With ShopEngine, you can easily create a “My Account” page from where the customers can view their dashboard, track their orders and downloads, edit their account addresses and details. From this very page, they can also login or register to their account on your website.
Usually, a “my account page” features an account dashboard, account order, account order details, account downloads, account addresses, account details, and account login/register page.
Let’s get to know how to create each of these pages to create a complete “my account page” for your users with a friendly WooCommerce my account page builder.
Quick Overview
Starting from my account dashboard to account login page, this guide will demonstrate creating any type of account pages with ShopEngine, a no-code WooCommerce my account page builder.
Tools Used: ShopEngine, Elementor, and WooCommerce.
After installing and activating these plugins, you need to create and customize the following My Account pages:
- My account dashboard
- My account order
- My account order details
- My account downloads
- My account address
- My account details
- My account register
1. Create My Account Dashboard Page #
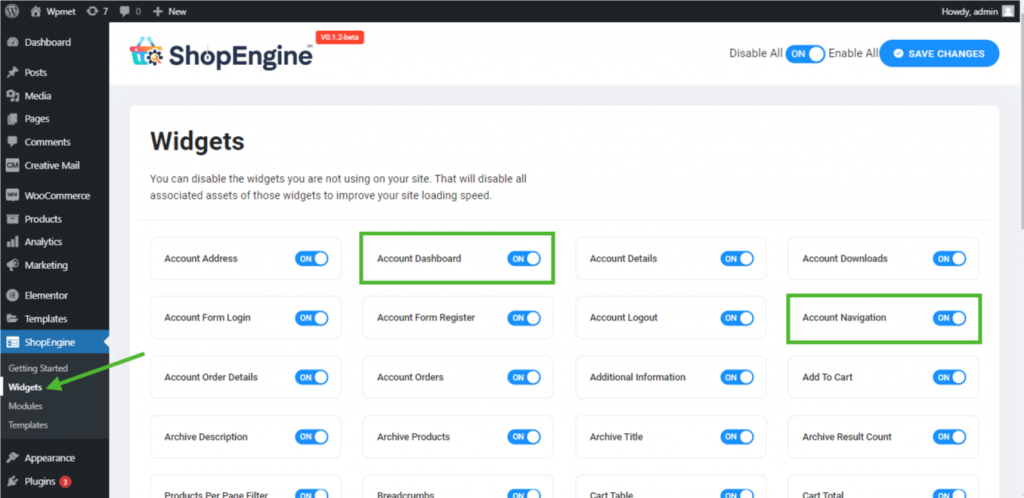
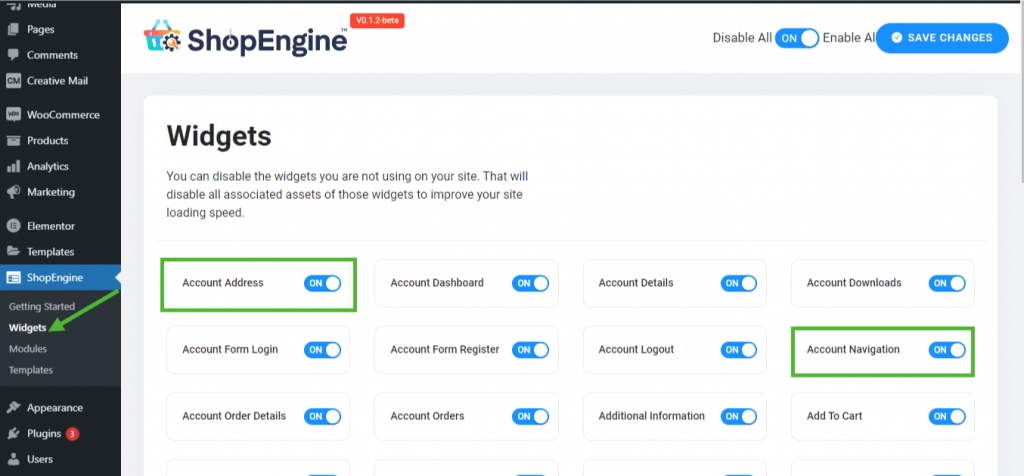
Step 1: Enable Required Widgets #
- Go to ShopEngine-> Widgets -> Make sure that the Account Dashboard and Account Navigation widgets are enabled.
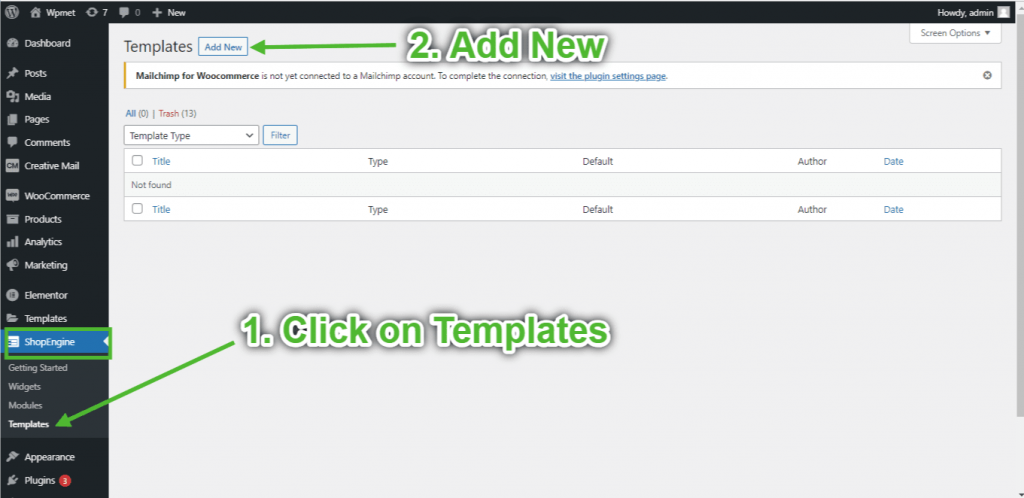
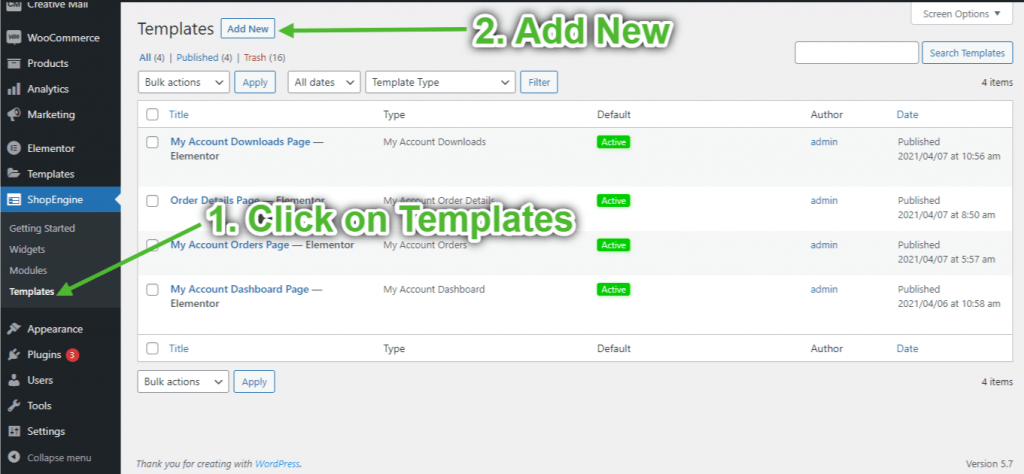
Step 2: Create Dashboard Template #
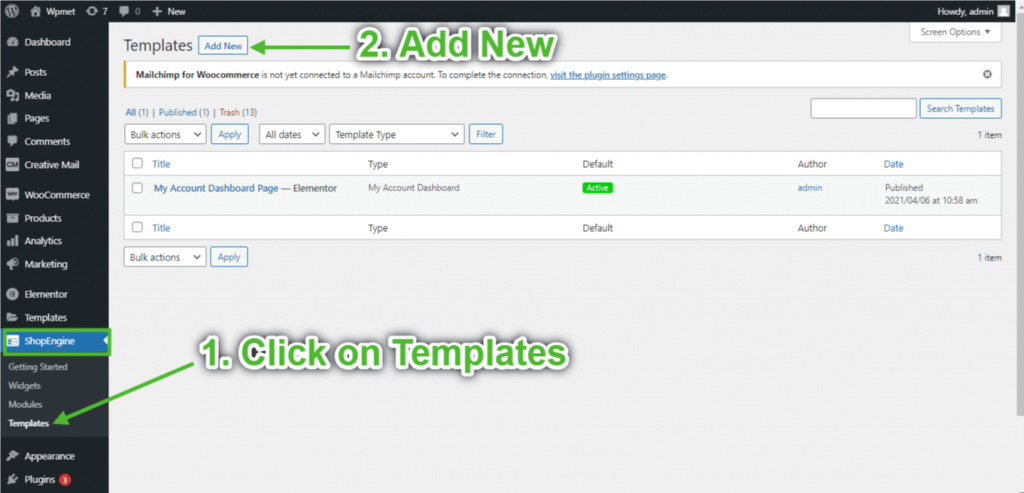
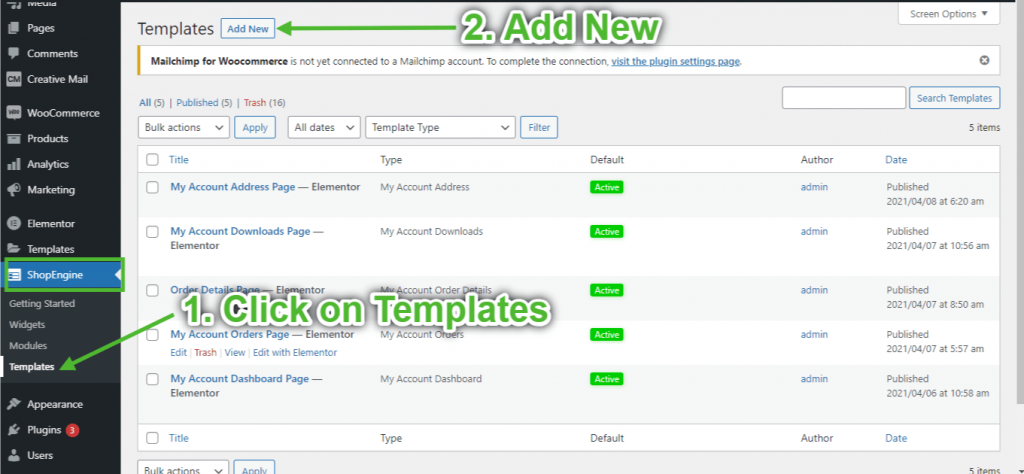
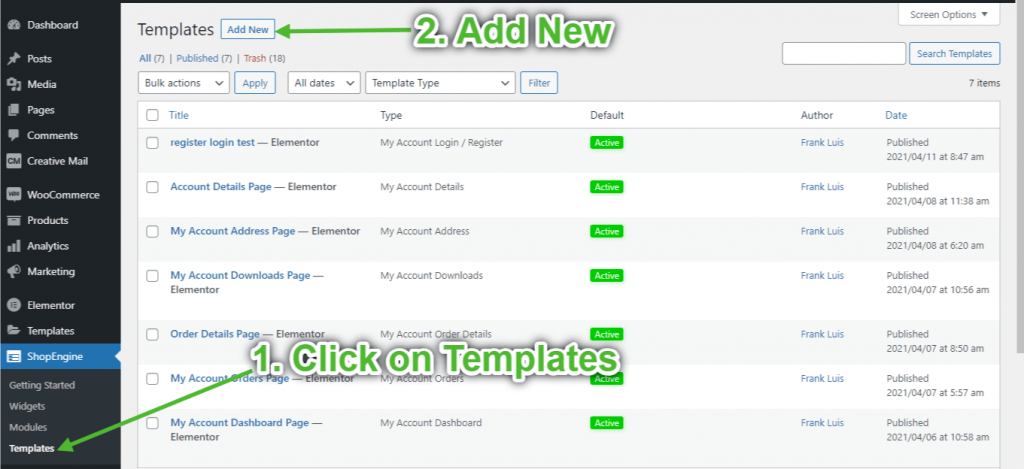
- Go to ShopEngine-> Templates -> Add New.
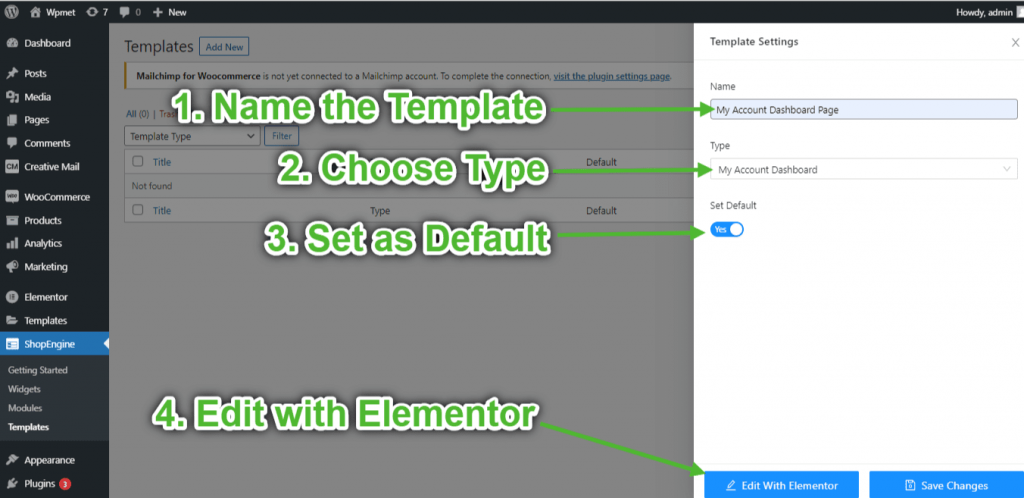
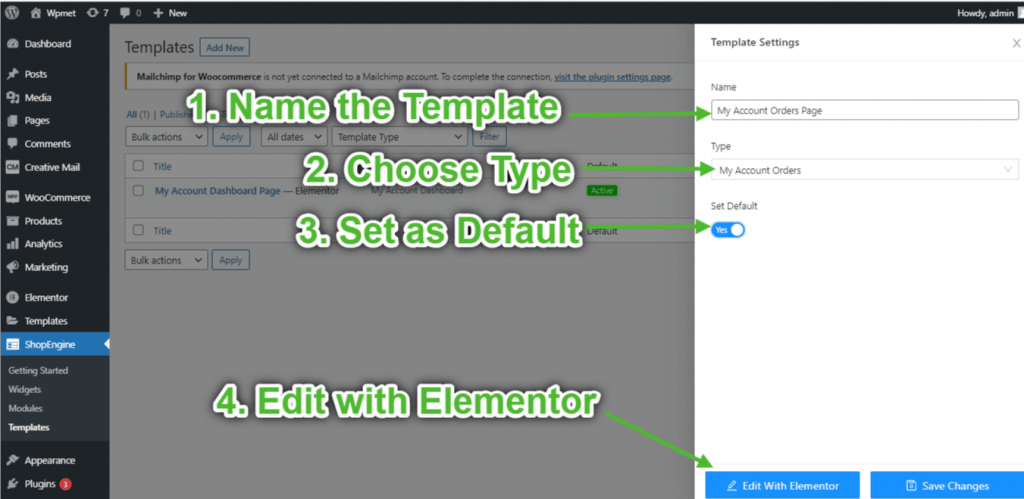
- Provide Template Name-> Select Page Type: My Account Dashboard
- Enable Default Template-> Set Default->Yes -> Click on Edit with Elementor (The template settings will first get inserted and then will be opened with Elementor Page Builder)
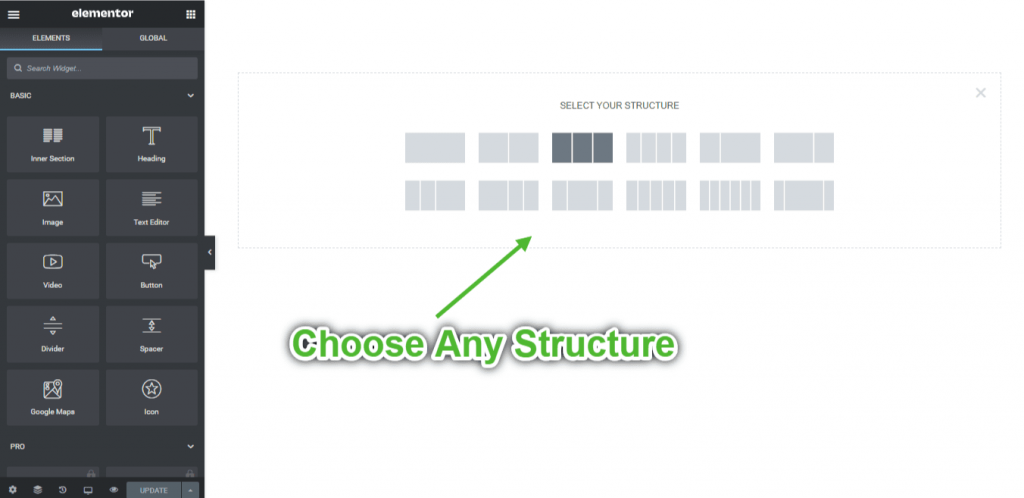
Step 3: Choose a Structure #
- Click on the “+” icon of Elementor and choose your preferred section layout.
Step 4: Build Dashboard Page #
To build the Account Dashboard page, you’ll need to leverage two widgets: Account Navigation and Account Dashboard widgets.
- Drag and drop the Account Navigation widget from ShopEngine My Account element block of Elementor. You can change the text and link color, text and link font weight, user font weight, typography, link hover color, etc. from the style settings tab if you want.
- Also, drag and drop the Account Dashboard widget from the same block and make any changes you like.
- Once you are done editing your Account Dashboard page, save it by clicking on -> Update.
Step 5: Preview Dashboard Page #
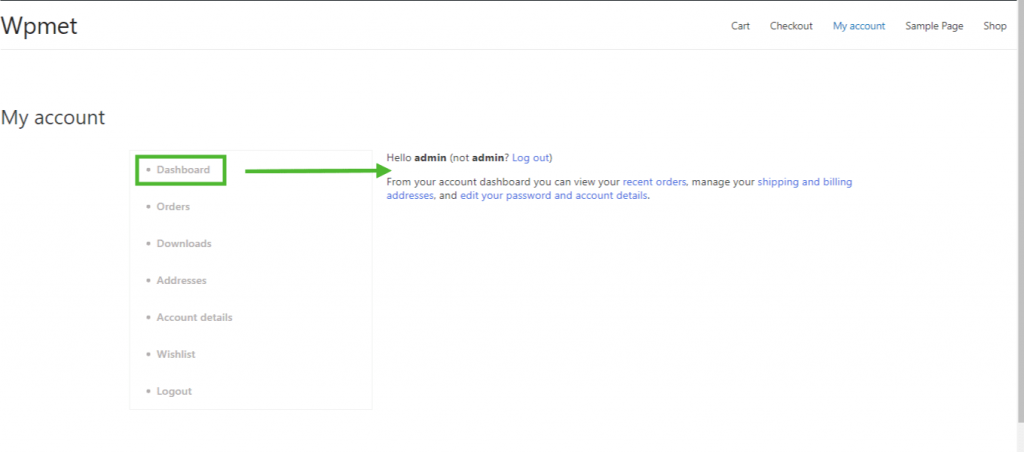
- Now, go to the My Account page of your website->Click on Dashboard. That’s a preview of how your customers will see the Account Dashboard from their devices.
2. Create My Account Order Page #
Step 1: Enable Required Widgets #
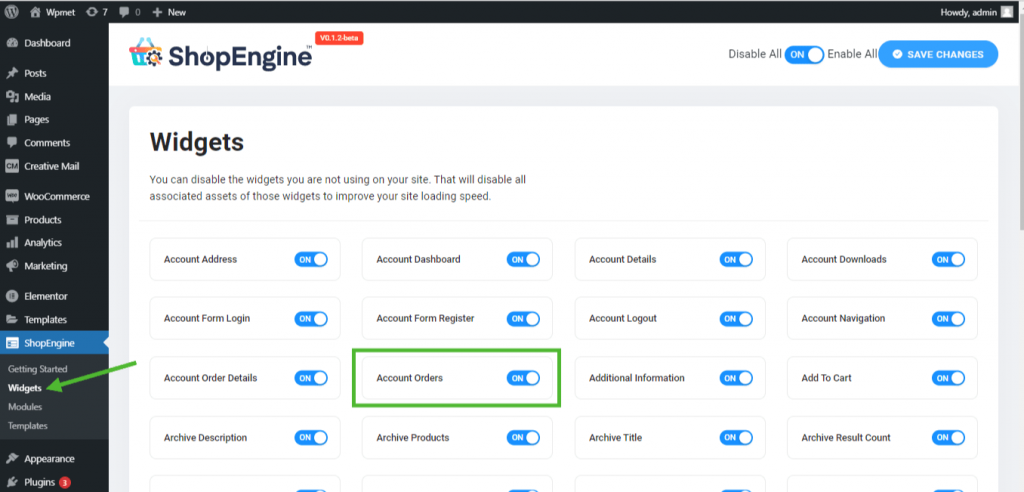
- Go to ShopEngine-> Widgets -> Make sure that the Account Orders widget Account Navigation widgets are enabled.
Step 2: Create WooCommerce My Account Order Page Template #
- Go to ShopEngine-> Templates -> Add New
- Provide Template Name-> Select Page Type: My Account Orders
- Enable Default Template-> Set Default->Yes -> Click on Edit with Elementor
Step 3: Choose a Structure #
- Click on the “+” icon of Elementor and choose your preferred section layout.

Step 4: Build Account Orders Page #
To build the Account Orders page, you’ll need to leverage two widgets: Account Navigation and My Account Orders widgets.
- Drag and drop the Account Navigation widget from ShopEngine My Account element block of Elementor. You can change the text and link color, text and link font weight, user font weight, typography, link hover color, etc. from the style settings tab if you want.
- Also, drag and drop the Account Orders widget from the same element block and make any changes you like.
- Once you are done editing your Account Orders page, save it by clicking on -> Update.
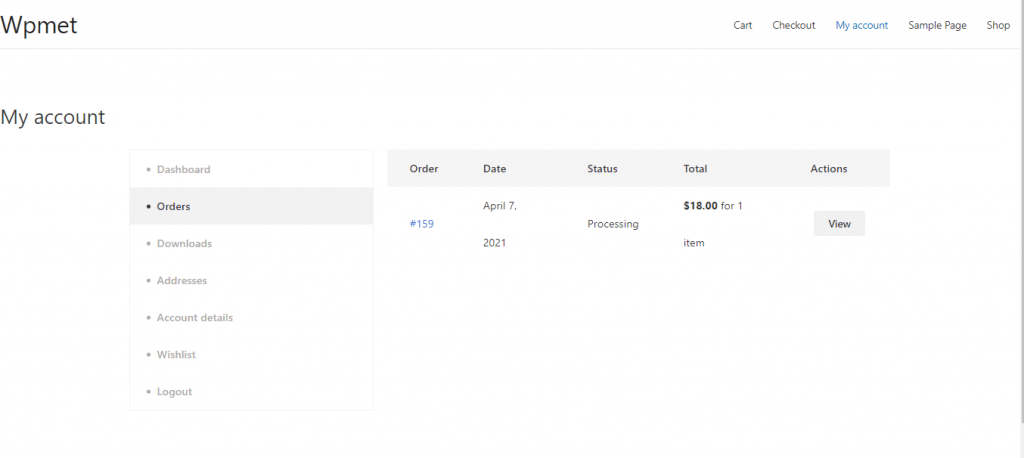
Step 5: Preview Account Orders Page #
Now, go to the My Account page of your website->Click on Orders. That’s a preview of how your customers will see the Order page from their devices.
3. Create My Account Order Details Page #
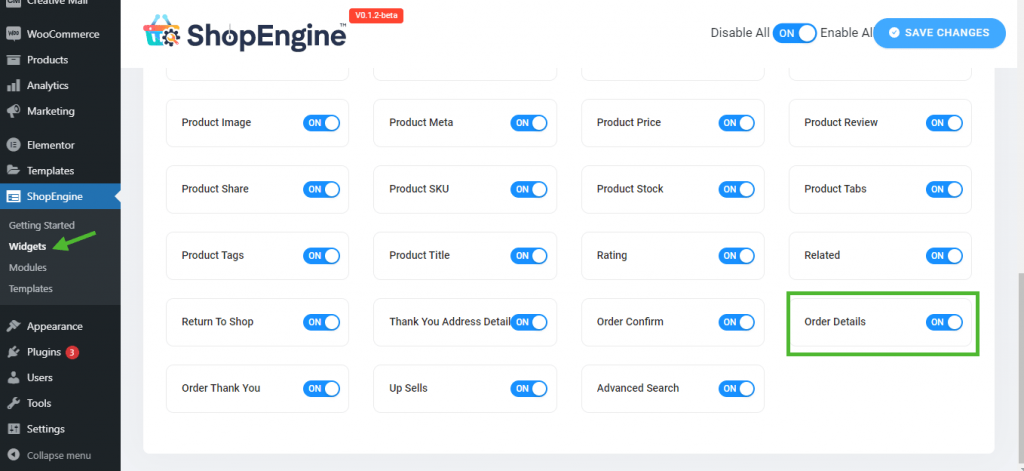
Step 1: Enable Required Widgets #
- Go to ShopEngine-> Widgets -> Make sure that the Order Details and Account Navigation widgets are enabled.
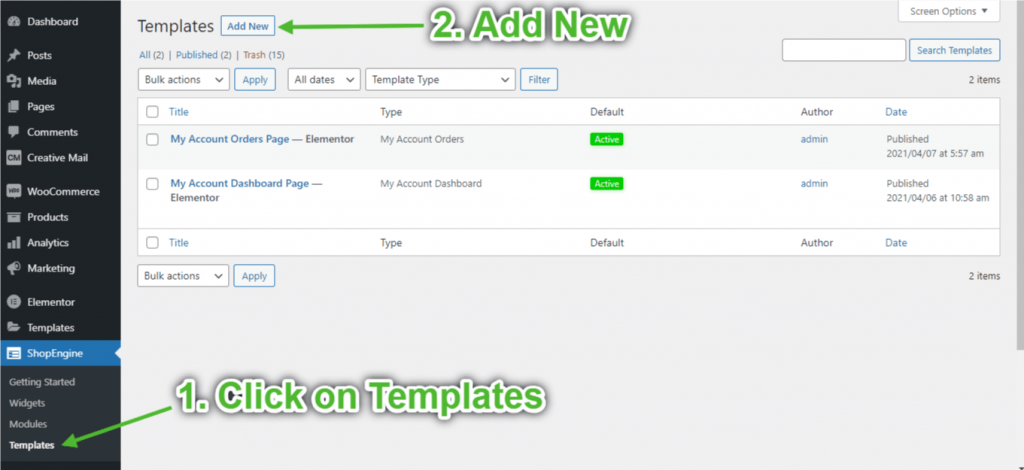
Step 2: Create Order Details Template #
- Go to ShopEngine-> Templates -> Add New
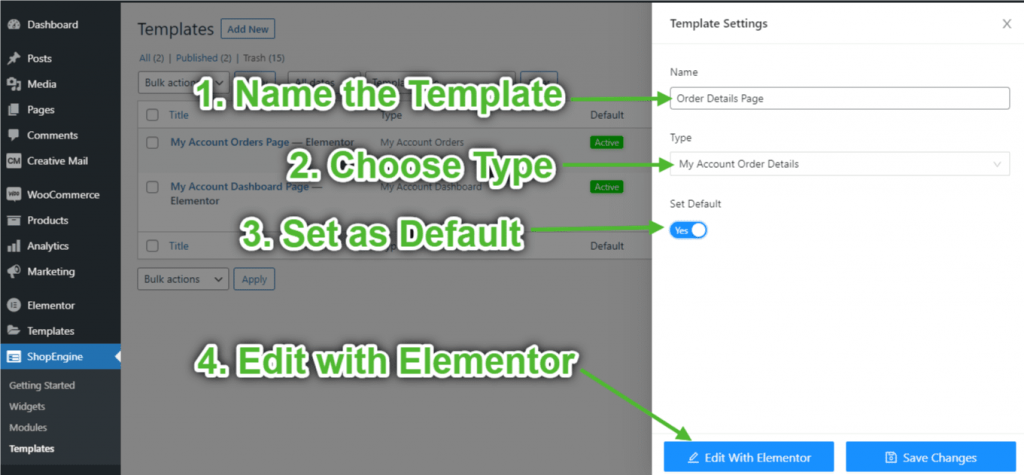
- Provide Template Name-> Select Page Type: My Account Order Details
- Enable Default Template-> Set Default->Yes -> Click on Edit with Elementor
Step 3: Choose a Structure #
- Click on the “+” icon of Elementor and choose your preferred section layout.
Step 4: Build Order Details Page #
To build the Order Details page, you’ll need to leverage two widgets: Account Navigation and Account Order Details widgets.
- Drag and drop the Account Navigation widget from ShopEngine My Account element block of Elementor. You can change the text and link color, text and link font weight, user font weight, typography, link hover color, etc. from the style settings tab if you want.
- Also, drag and drop the Account Order Details widget from the same element block and make any changes you like.
- Once you are done editing your Account Order Details page, save it by clicking on -> Update.
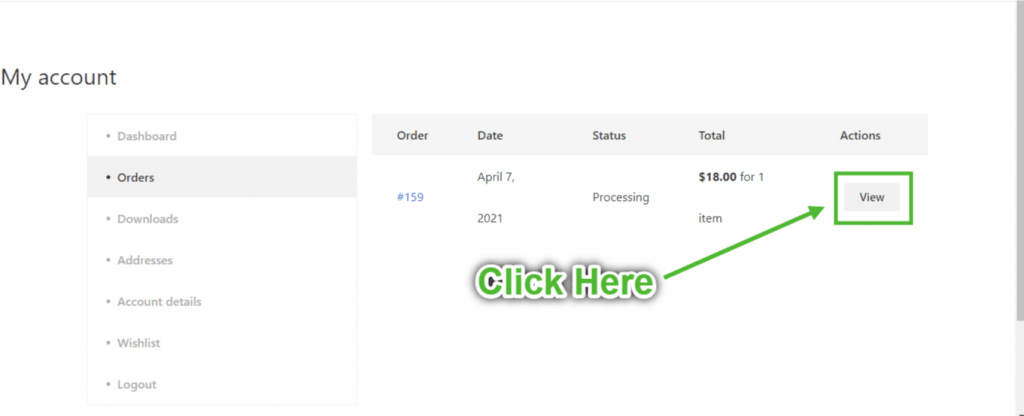
Step 5: Preview Order Details Page #
Now, go to the My Account page of your website->Click on Orders-> Click on View from the right-end side of any order. That’s a preview of how your customers will see the Order details page from their devices.
4. Create My Account Downloads Page #
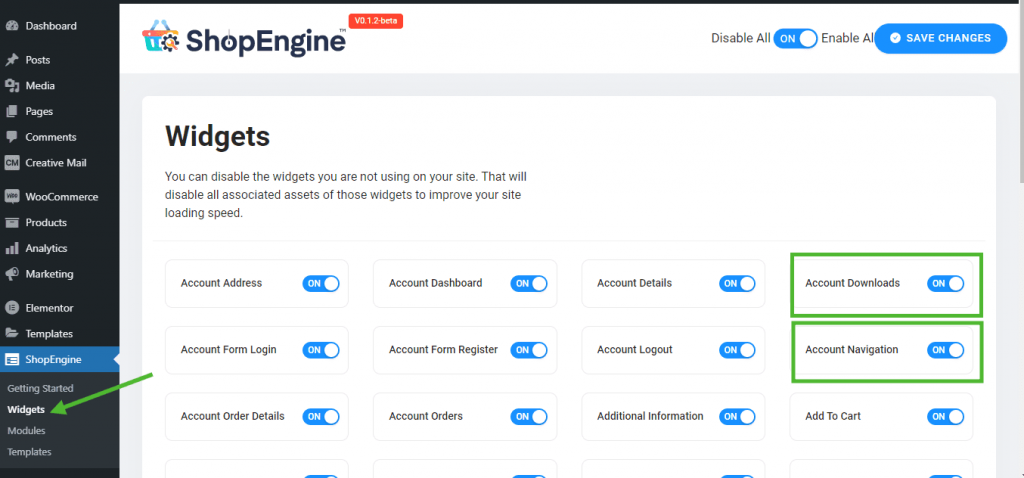
Step 1: Enable Required Widgets #
- Go to ShopEngine-> Widgets -> Make sure that the Account Navigation and Account Downloads widgets are enabled.
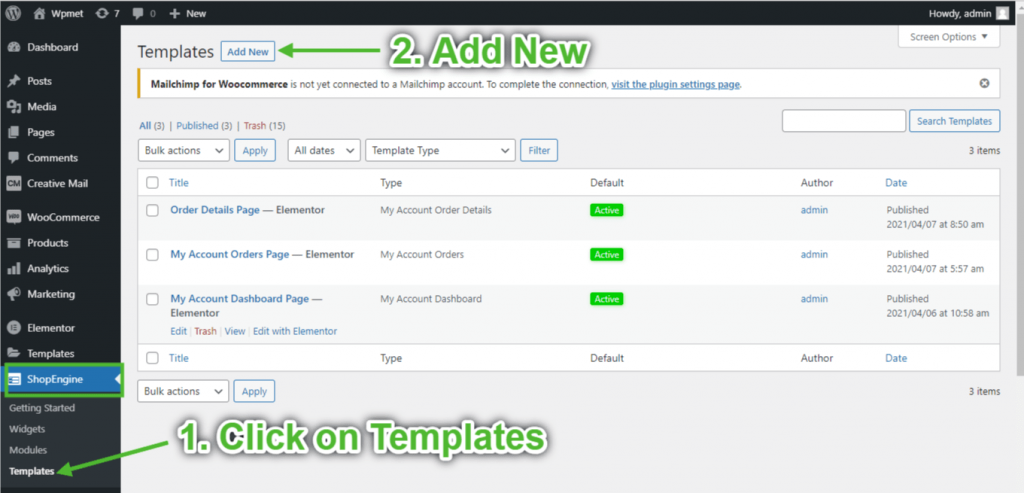
Step 2: Create My Account Downloads Template #
- Go to ShopEngine-> Templates -> Add New
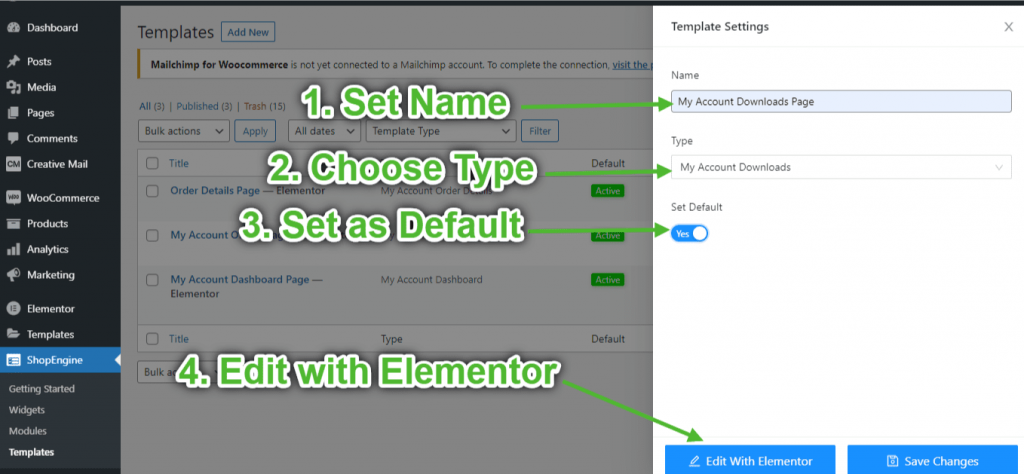
- Provide Template Name-> Select Page Type: My Account Downloads
- Enable Default Template-> Set Default->Yes -> Click on Edit with Elementor
Step 3: Choose a Structure #
- Click on the “+” icon of Elementor and choose your preferred section layout.
Step 4: Build Account Downloads Page #
To build the Account Downloads page, you’ll need to leverage two widgets: Account Navigation and Account Downloads widgets.
- Drag and drop the Account Navigation widget from ShopEngine My Account element block of Elementor. You can change the text and link color, text and link font weight, user font weight, typography, link hover color, etc. from the style settings tab if you want.
- Also, drag and drop the Account Downloads widget from the same element block and make any changes you like.
- Once you are done editing your Account Downloads page, save it by clicking on -> Update.
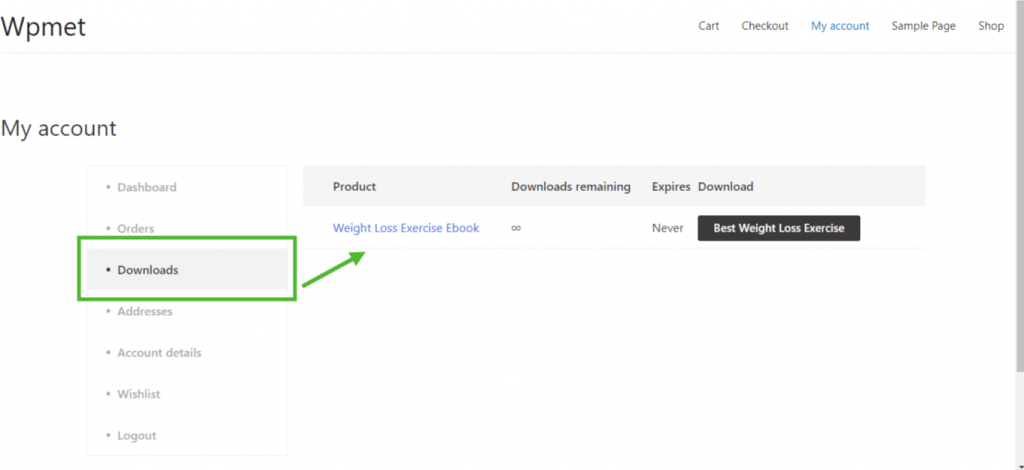
Step 5: Preview Account Downloads Page #
Now, go to the My Account page of your website->Click on Downloads. That’s a preview of how your customers will see the page from their devices.
5. Create My Account Address Page #
Step 1: Enable Required Widgets #
- Go to ShopEngine-> Widgets -> Make sure that the Account Navigation and Account Address widgets are enabled.
Step 2: Create My Account Address Template #
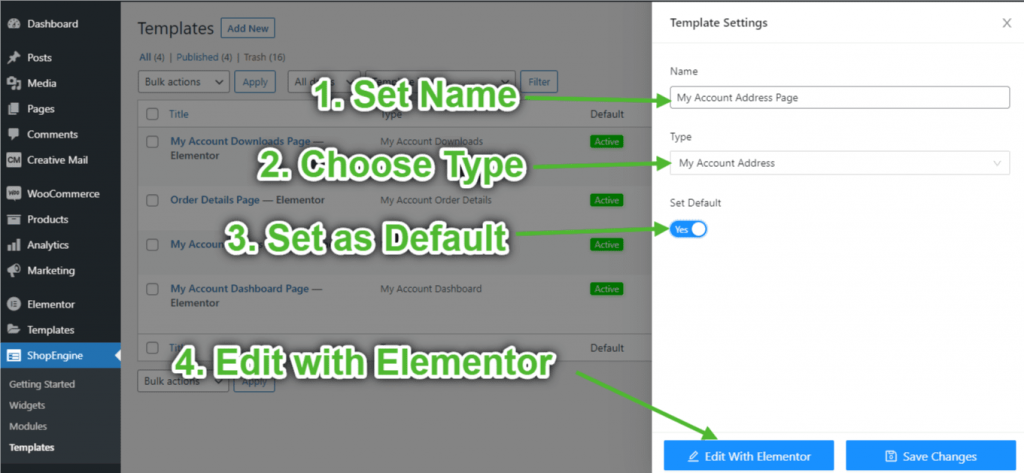
- Go to ShopEngine-> Templates -> Add New
- Provide Template Name-> Select Page Type: My Account Address
- Enable Default Template-> Set Default->Yes -> Click on Edit with Elementor
Step 3: Choose a Structure #
- Click on the “+” icon of Elementor and choose your preferred section layout.
Step 4: Build Account Address Page #
To build the Account Address page, you’ll need to leverage two widgets: Account Navigation and Account Address widget.
- Drag and drop the Account Navigation widget from ShopEngine My Account element block of Elementor. You can change the text and link color, text and link font weight, user font weight, typography, link hover color, etc. from the style settings tab if you want.
- Also, drag and drop the Account Address widget from the same element block and make any changes you like.
- Once you are done editing your Account Address page, save it by clicking on -> Update.

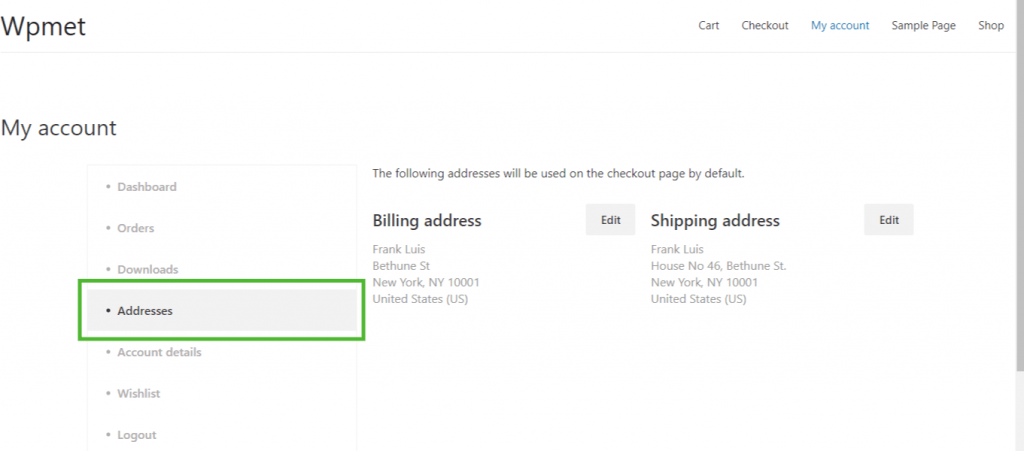
Step 5: Preview Account Address Page #
Now, go to the My Account page of your website->Click on Addresses. That’s a preview of how your customers will see the page from their devices.
6. Create My Account Details Page #
Step 1: Enable Required Widgets #
- Go to ShopEngine-> Widgets -> Make sure that the Account Navigation and Account Details widgets are enabled.

Step 2: Create My Account Details Template #
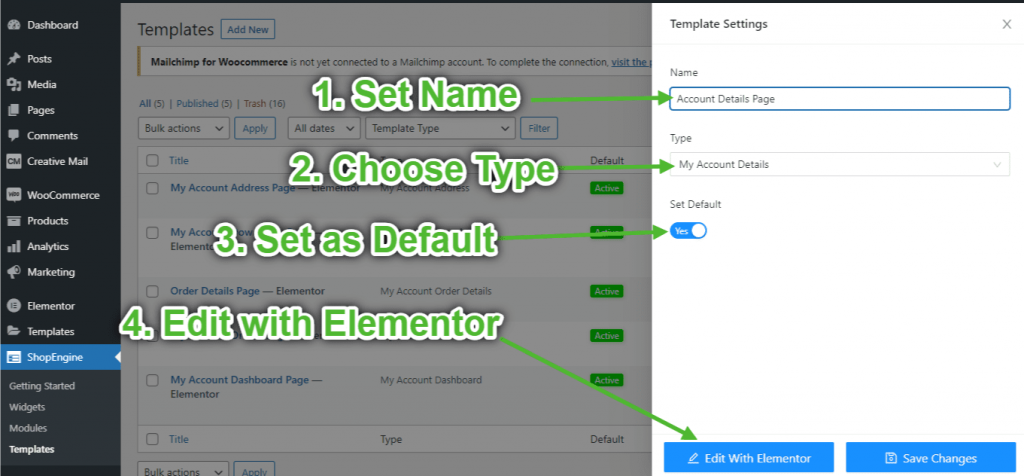
- Go to ShopEngine-> Templates -> Add New
- Provide Template Name-> Select Page Type: My Account Details
- Enable Default Template-> Set Default->Yes -> Click on Edit with Elementor
Step 3: Choose a Structure #
- Click on the “+” icon of Elementor and choose your preferred section layout.
Step 4: Build Account Details Page #
To build the Account Details page, you’ll need to leverage two widgets: Account Navigation and Account Details widget.
- Drag and drop the Account Navigation widget from ShopEngine My Account element block of Elementor. You can change the text and link color, text and link font weight, user font weight, typography, link hover color, etc. from the style settings tab if you want.
- Also, drag and drop the Account Details widget from the same element block and make any changes you like.
- Once you are done editing your Account Details page, save it by clicking on -> Update.
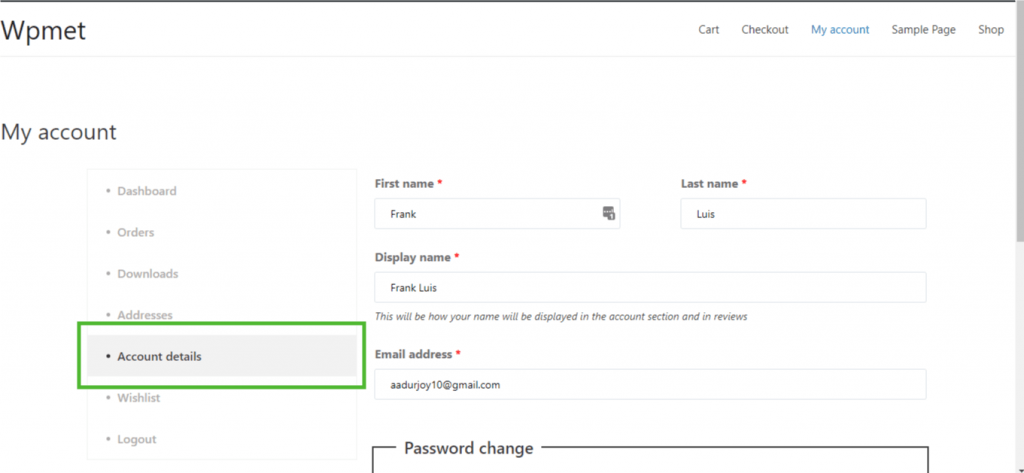
Step 5: Preview Account Details Page #
Now, go to the My Account page of your website->Click on Account Details. That’s a preview of how your customers will see the page from their devices.
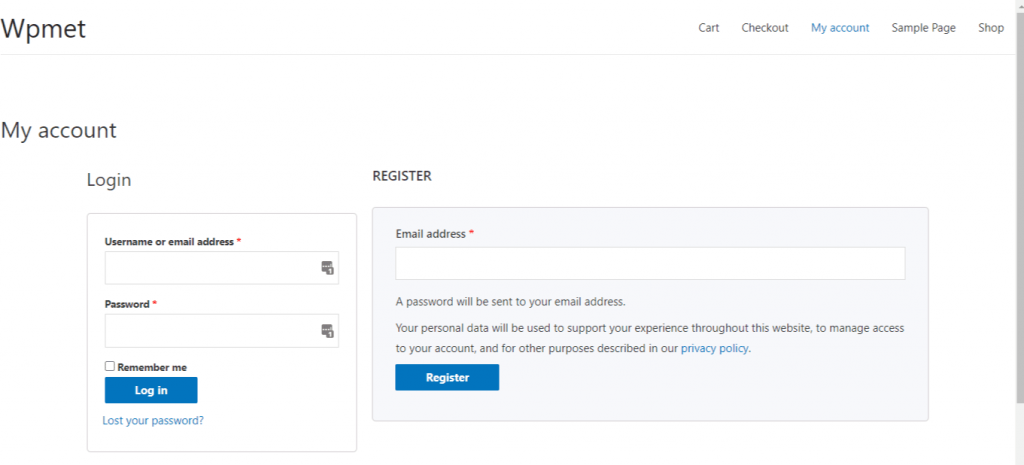
7. Create My Account Login/Register Page #
Step 1: Enable Required Widgets #
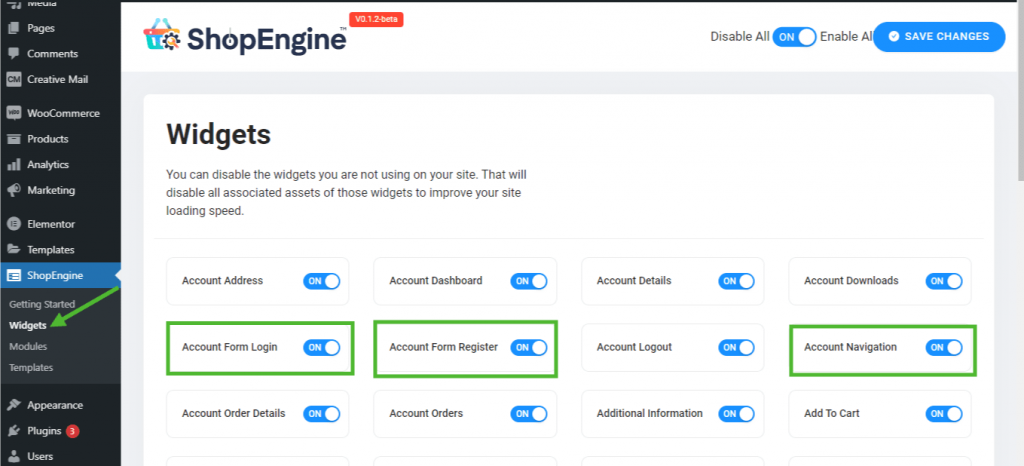
- Go to ShopEngine-> Widgets -> Make sure that the Account Navigation, Account Form Register, and Account Form Login widgets are enabled.
Step 2: Create My Account Login/Register Template #
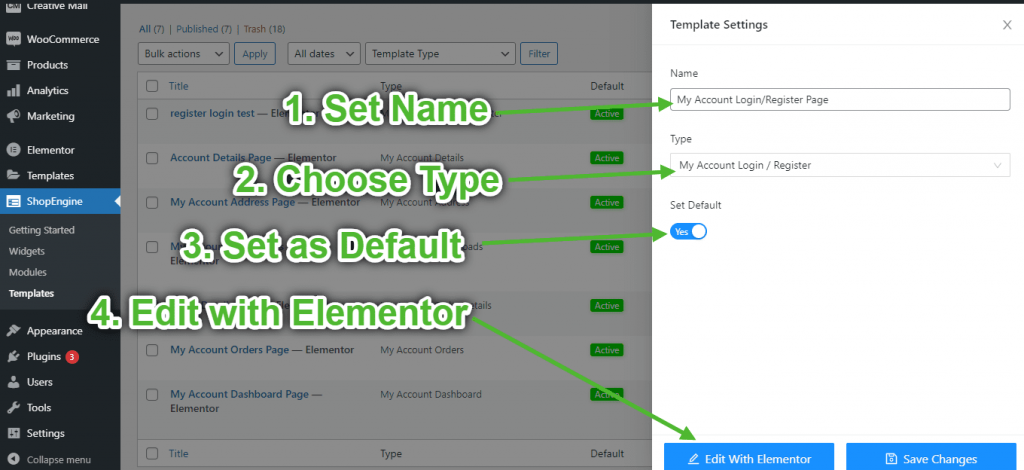
- Go to ShopEngine-> Templates -> Add New
- Provide Template Name-> Select Page Type: My Account Login/Register
- Enable Default Template-> Set Default->Yes -> Click on Edit with Elementor
Step 3: Choose a Structure #
- Click on the “+” icon of Elementor and choose your preferred section layout.
Step 4: Build Account Login/Register Page #
To build the Account Login/Register page, you’ll need to leverage two widgets: My Account Form Login, and Account Register Form widget.
- Drag and drop the My Account Form Login widget from ShopEngine My Account element block of Elementor. You can change the title, form container, label, input, and typography from the style settings tab if you want.
- Also, drag and drop the Account Register Form widget from the same element block and make any changes you like.
- Once you are done editing your page, save it by clicking on -> Update.
Step 5: Preview Account Login/Register Page #
Now, go to the My Account page of your website->Go to Dashboard -> Click on Logout. Now, you’ll be able to see a preview of how your customers will see the page from their devices.