French
  English
  German
  Spanish
  Italian
  Danish
  Portuguese
  Swedish
  Polish
  Korean
  Japanese
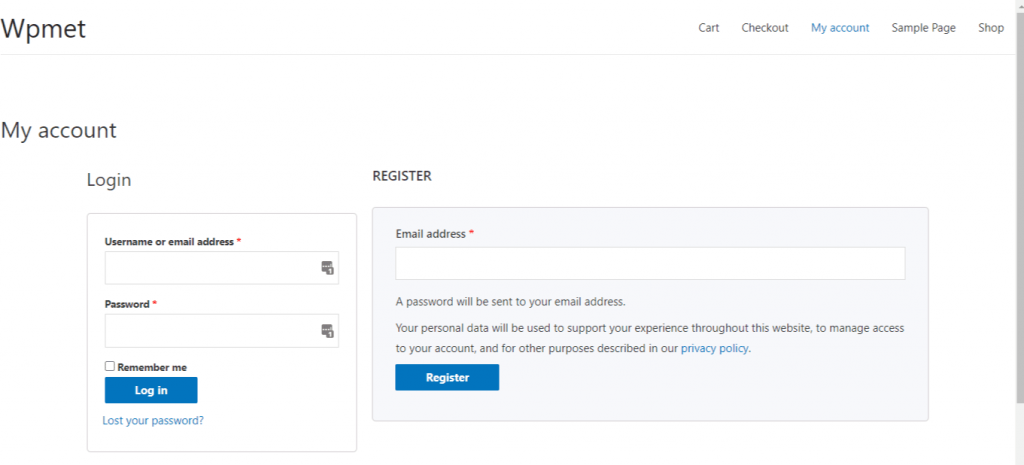
 Avec ShopEngine, vous pouvez facilement créer une page « Mon compte » à partir de laquelle les clients peuvent consulter leur tableau de bord, suivre leurs commandes et téléchargements, modifier les adresses et les détails de leur compte. À partir de cette même page, ils peuvent également se connecter ou s'inscrire à leur compte sur votre site Web.
Habituellement, une « page mon compte » comprend un tableau de bord du compte, une commande de compte, les détails de la commande de compte, les téléchargements de compte, les adresses de compte, les détails du compte et une page de connexion/inscription au compte.
Let’s get to know how to create each of these pages to create a complete “my account page” for your users with a friendly WooCommerce my account page builder.
Quick Overview
Starting from my account dashboard to account login page, this guide will demonstrate creating any type of account pages with ShopEngine, a no-code WooCommerce my account page builder.
Tools Used: ShopEngine, Elementor, and WooCommerce.
After installing and activating these plugins, you need to create and customize the following My Account pages:
- My account dashboard
- My account order
- My account order details
- My account downloads
- My account address
- My account details
- My account register
1. Créer une page de tableau de bord Mon compte #
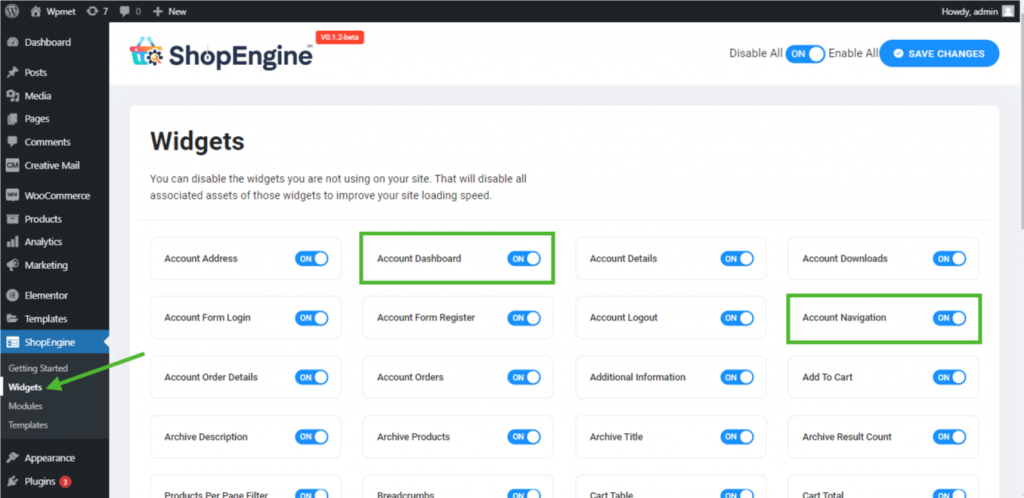
Étape 1 : Activer les widgets requis #
- Go to ShopEngine-> Widgets -> Make sure that the tableau de bord de compte et Navigation dans le compte les widgets sont activé.
Étape 2 : Créer un modèle de tableau de bord #
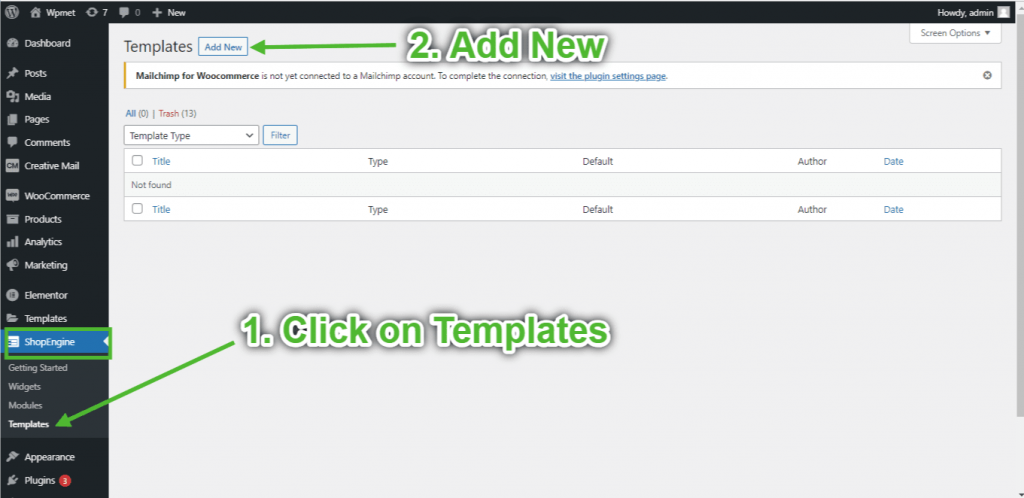
- Go to ShopEngine-> Modèles -> Ajouter un nouveau.
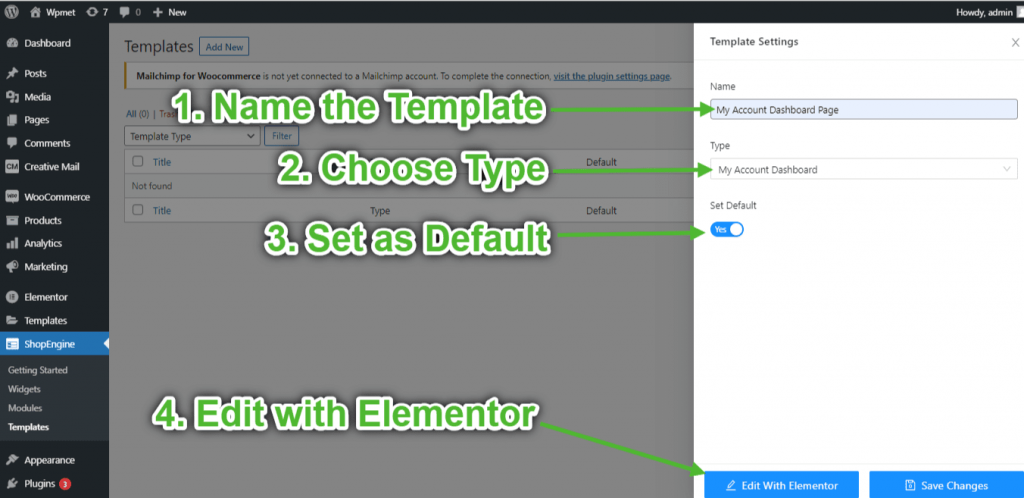
- Fournir un modèle Nom-> Select Page Type: Tableau de bord de mon compte
- Enable Default Template-> Set Default->Oui -> Click on Modifier avec Elementor (Les paramètres du modèle seront d'abord insérés, puis ouverts avec Elementor Page Builder)
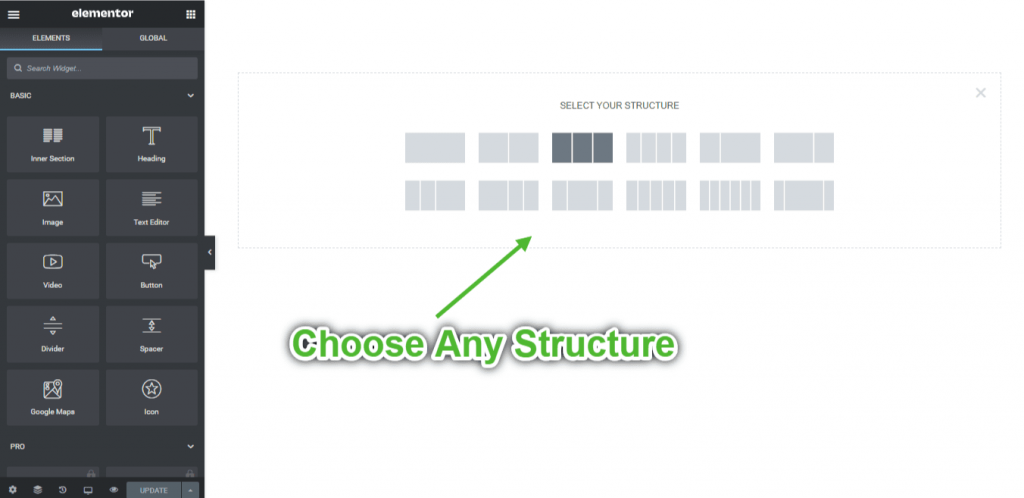
Étape 3 : Choisissez une structure #
- Clique sur le "+" icône d'Elementor et choisissez votre disposition de section préférée.
Étape 4 : Créer une page de tableau de bord #
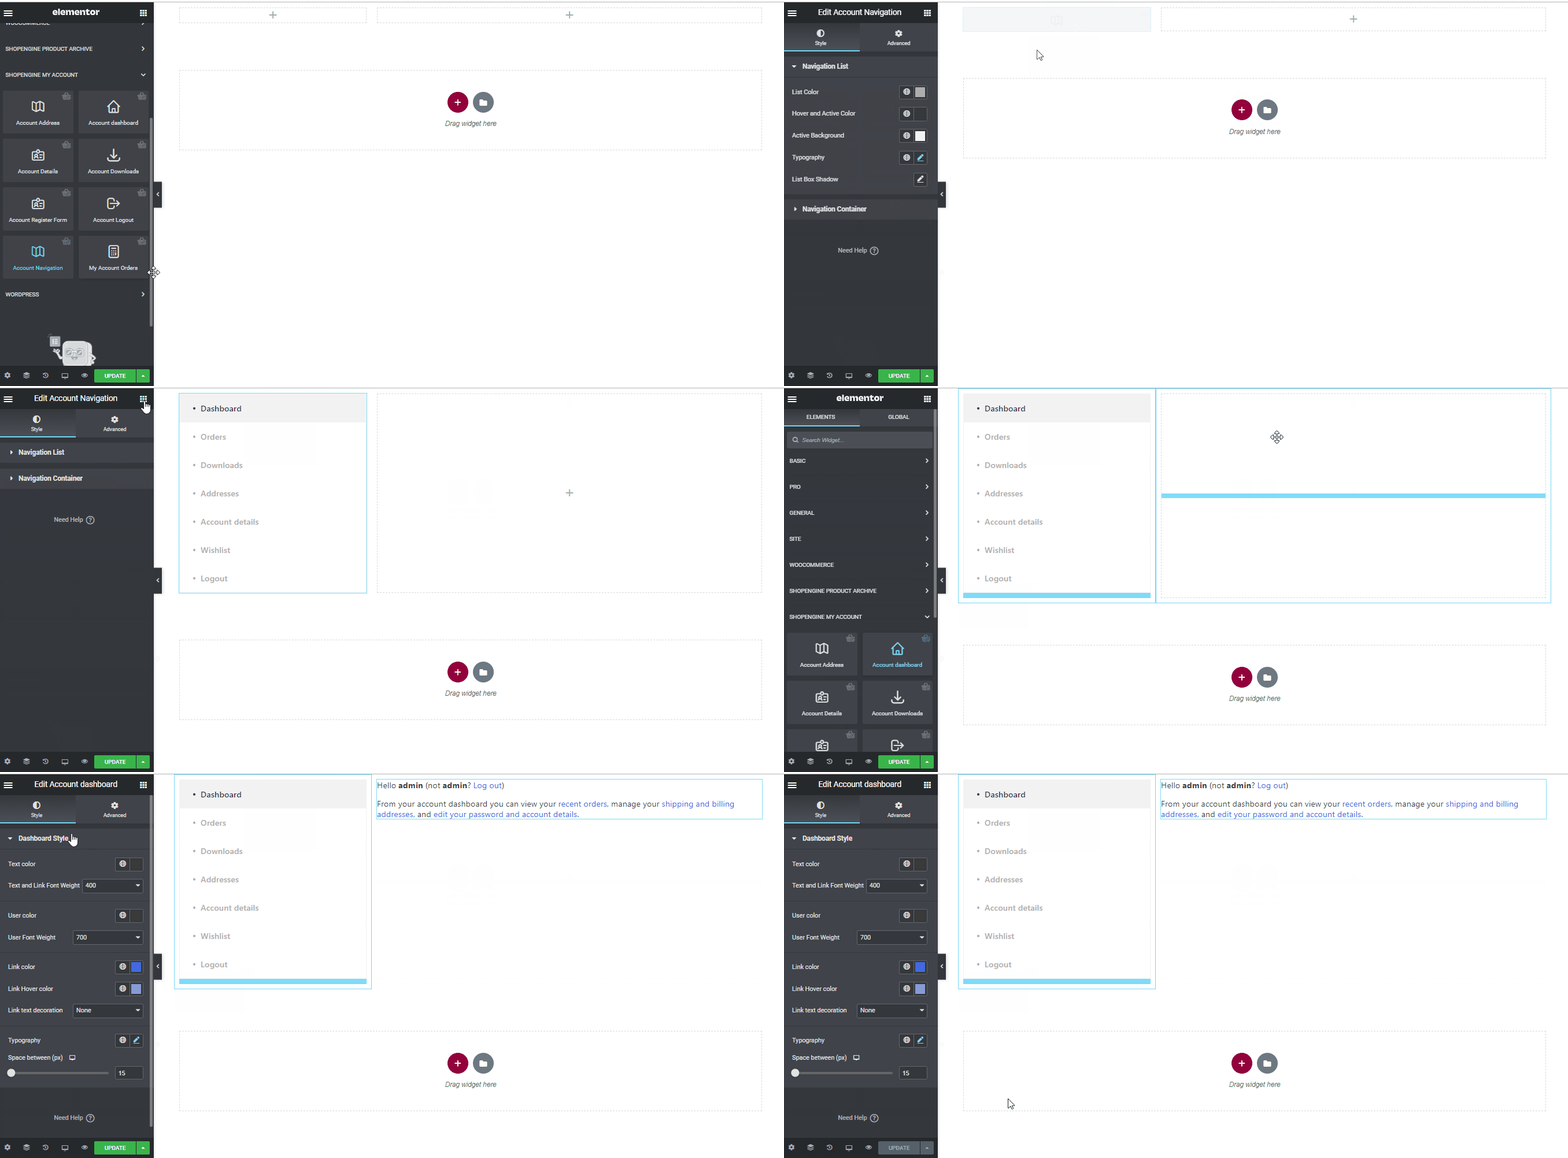
Pour créer la page Tableau de bord du compte, vous devrez utiliser deux widgets : Navigation dans le compte et tableau de bord de compte widgets.
- Faites glisser et déposez le widget de navigation de compte depuis le bloc d’éléments ShopEngine My Account d’Elementor. Vous pouvez modifier la couleur du texte et des liens, l'épaisseur de la police du texte et des liens, l'épaisseur de la police de l'utilisateur, la typographie, la couleur de survol du lien, etc. à partir de l'onglet Paramètres de style si vous le souhaitez.
- Faites également glisser et déposez le widget Tableau de bord du compte à partir du même bloc et apportez les modifications que vous souhaitez.
- Once you are done editing your Account Dashboard page, save it by clicking on -> Mise à jour.
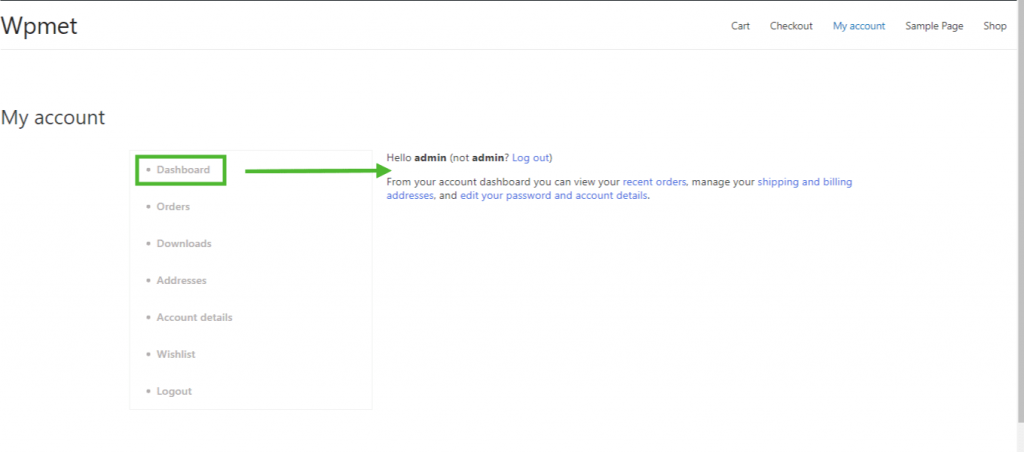
Étape 5 : Aperçu de la page du tableau de bord #
- Maintenant, allez au Page Mon compte of your website->Click on Tableau de bord. Il s'agit d'un aperçu de la façon dont vos clients verront le tableau de bord du compte depuis leurs appareils.
2. Créer une page de commande de mon compte #
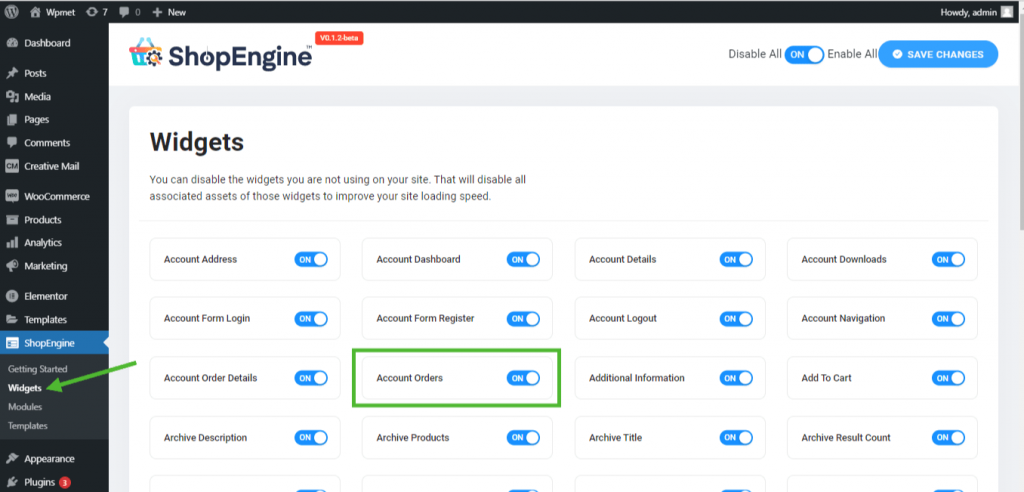
Étape 1 : Activer les widgets requis #
- Go to ShopEngine-> Widgets -> Make sure that the Ordres de compte widget Navigation dans le compte les widgets sont activé.
Step 2: Create WooCommerce My Account Order Page Template #
- Go to ShopEngine-> Templates -> Add New
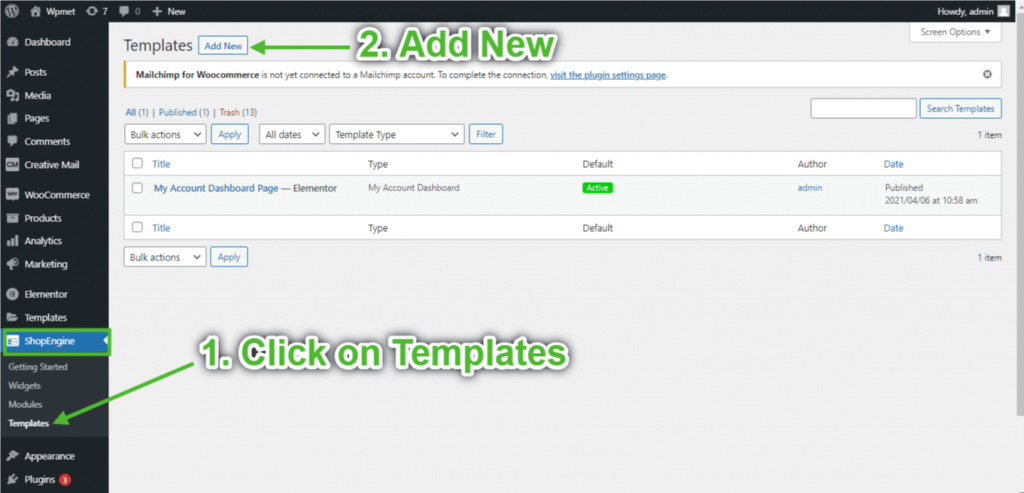
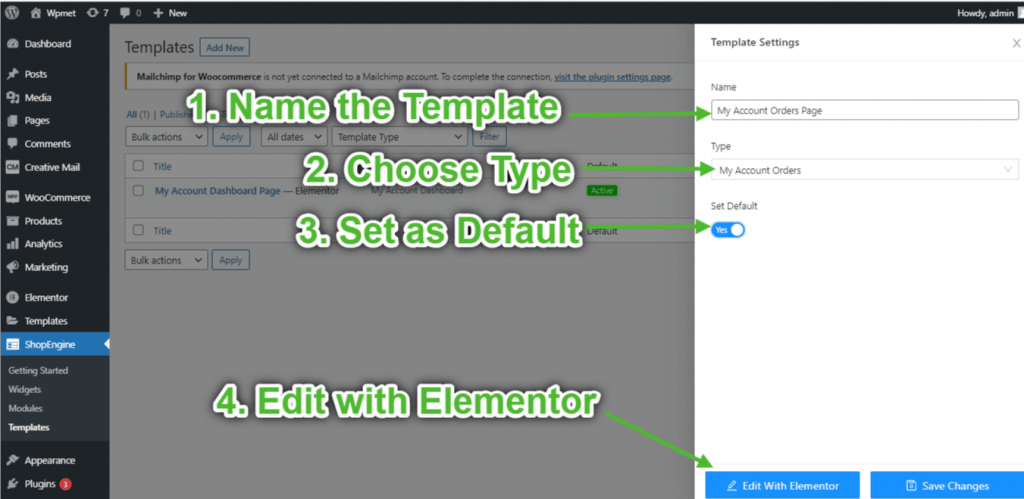
- Fournir un modèle Nom-> Select Page Taper: Mon compte Commandes
- Enable Default Template-> Set Default->Oui -> Click on Modifier avec Elementor
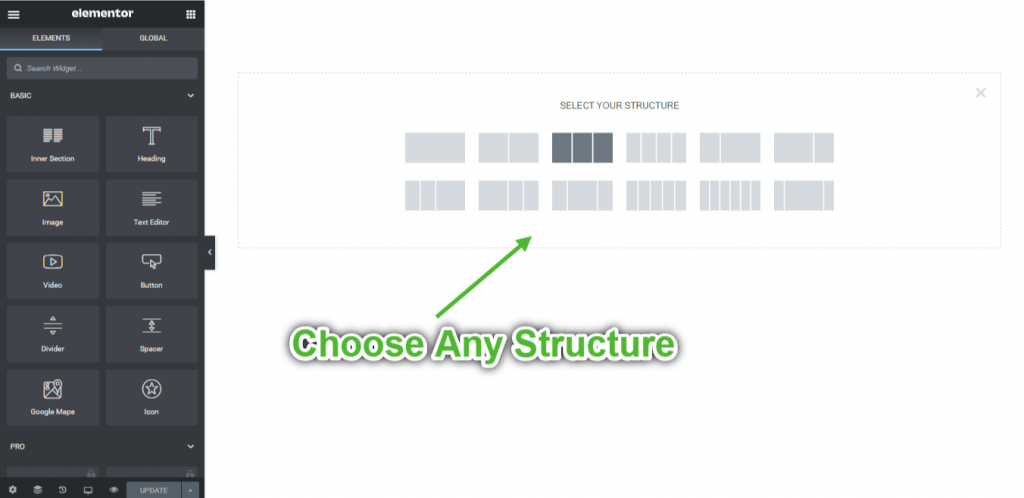
Étape 3 : Choisissez une structure #
- Clique sur le "+" icône d'Elementor et choisissez votre disposition de section préférée.
Étape 4 : Créer une page de commandes de compte #
Pour créer la page Ordres de compte, vous devrez utiliser deux widgets : Navigation dans le compte et Mon compte Commandes widgets.
- Faites glisser et déposez le widget de navigation de compte depuis le bloc d’éléments ShopEngine My Account d’Elementor. Vous pouvez modifier la couleur du texte et des liens, l'épaisseur de la police du texte et des liens, l'épaisseur de la police de l'utilisateur, la typographie, la couleur de survol du lien, etc. à partir de l'onglet Paramètres de style si vous le souhaitez.
- En outre, faites glisser et déposez le widget Ordres de compte à partir du même bloc d'éléments et apportez les modifications que vous souhaitez.
- Once you are done editing your Account Orders page, save it by clicking on -> Mise à jour.
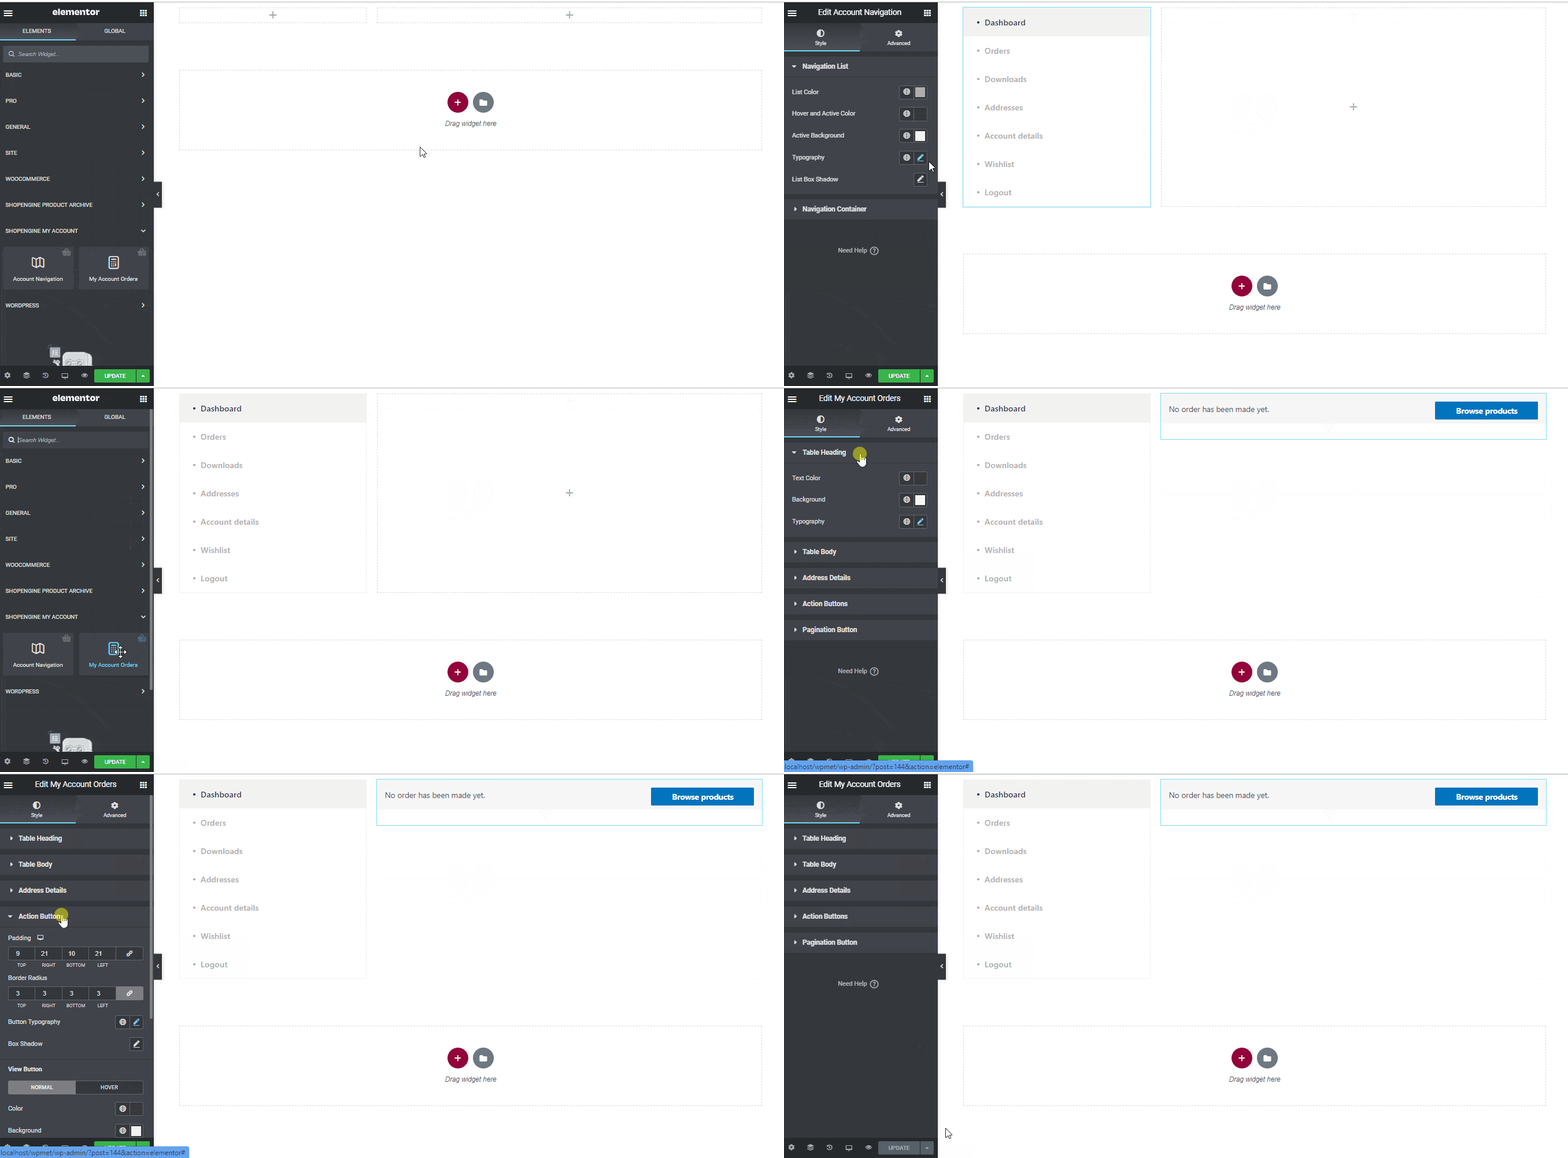
Étape 5 : Aperçu de la page des commandes de compte #
Maintenant, allez au Mon compte page de votre site internet->Cliquez sur Ordres. Il s'agit d'un aperçu de la façon dont vos clients verront la page de commande depuis leurs appareils.
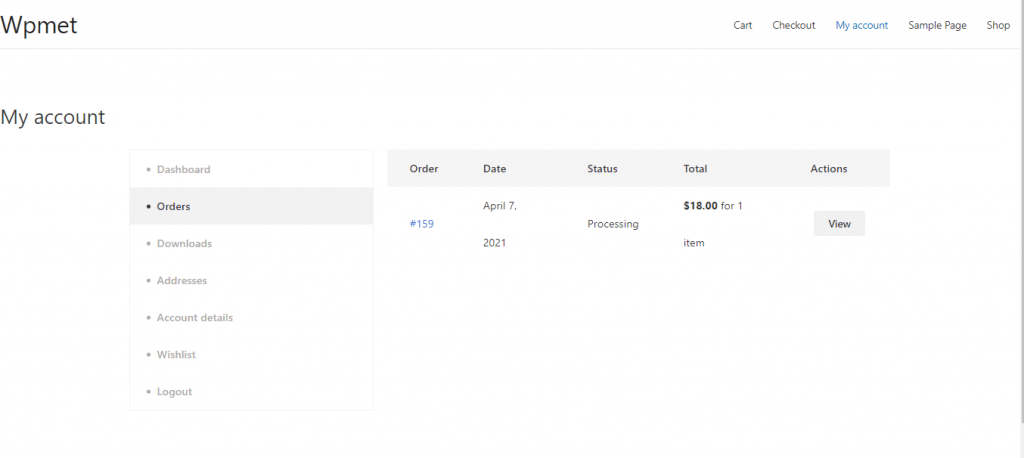
3. Créer la page de détails de la commande de mon compte #
Étape 1 : Activer les widgets requis #
- Go to ShopEngine-> Widgets -> Make sure that the détails de la commande et Navigation dans le compte les widgets sont activé.
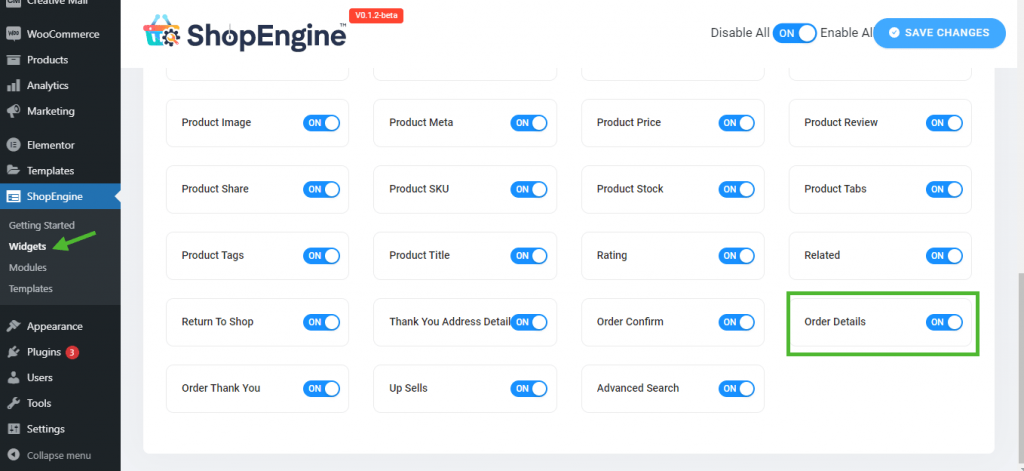
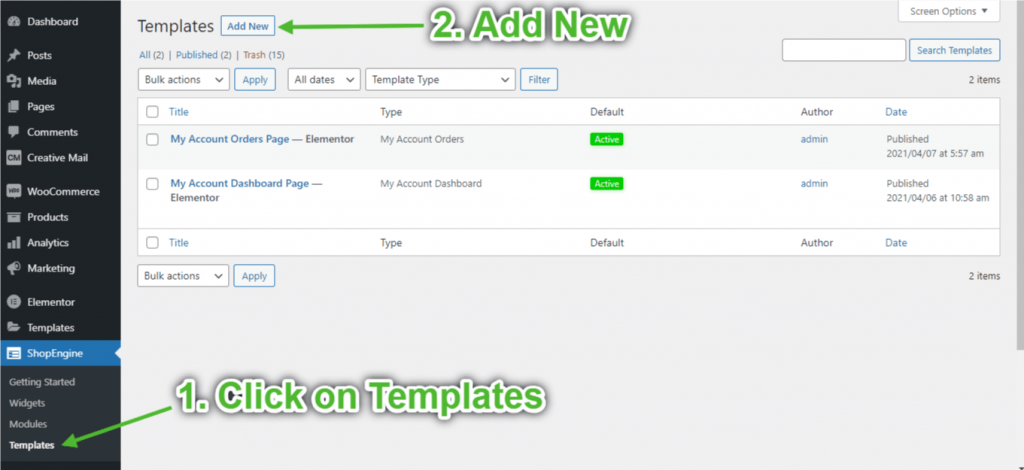
Étape 2 : Créer un modèle de détails de commande #
- Go to ShopEngine-> Modèles -> Ajouter un nouveau
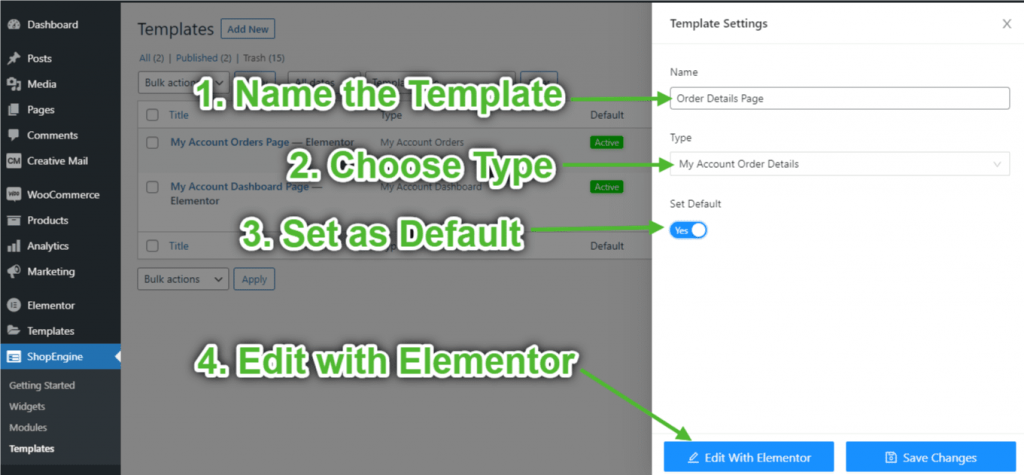
- Fournir un modèle Nom-> Select Page Taper: Mon compte Détails de la commande
- Enable Default Template-> Set Default->Oui -> Click on Modifier avec Elementor
Étape 3 : Choisissez une structure #
- Clique sur le "+" icône d'Elementor et choisissez votre disposition de section préférée.
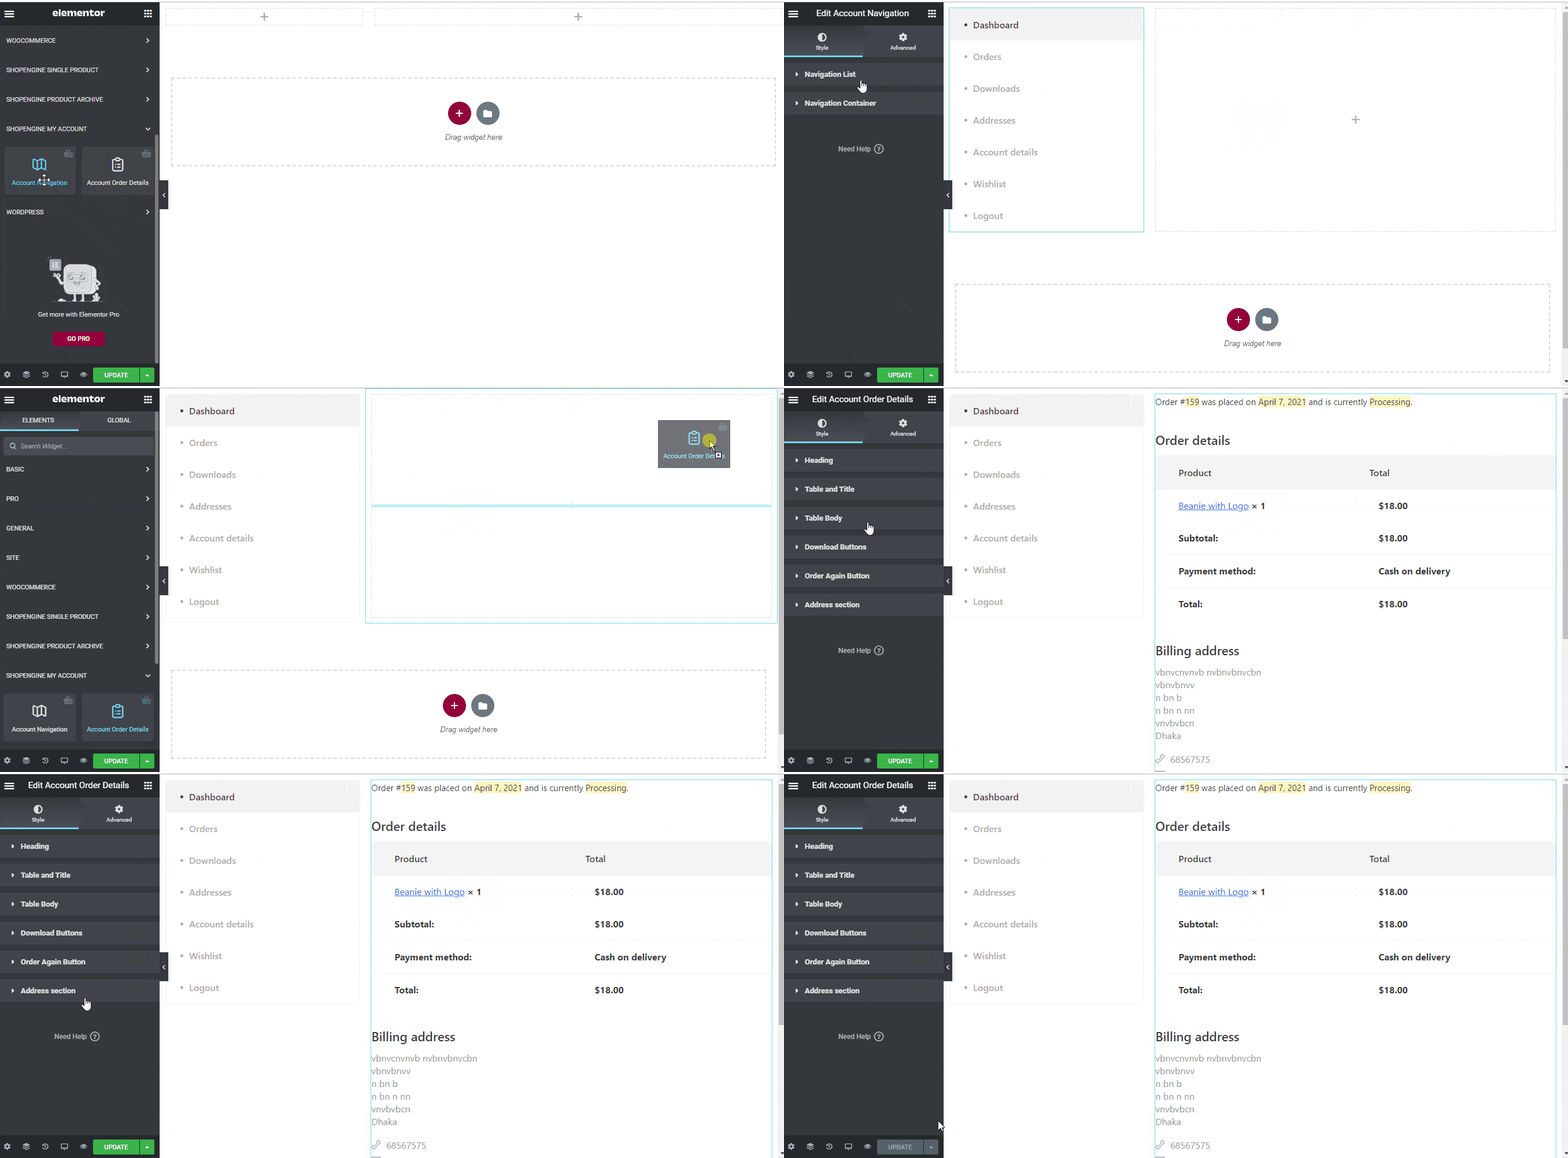
Étape 4 : Créer la page des détails de la commande #
Pour créer la page Détails de la commande, vous devrez utiliser deux widgets : Navigation dans le compte et Détails de la commande de compte widgets.
- Faites glisser et déposez le widget de navigation de compte depuis le bloc d’éléments ShopEngine My Account d’Elementor. Vous pouvez modifier la couleur du texte et des liens, l'épaisseur de la police du texte et des liens, l'épaisseur de la police de l'utilisateur, la typographie, la couleur de survol du lien, etc. à partir de l'onglet Paramètres de style si vous le souhaitez.
- Faites également glisser et déposez le widget Détails de la commande du compte à partir du même bloc d'éléments et apportez les modifications que vous souhaitez.
- Once you are done editing your Account Order Details page, save it by clicking on -> Mise à jour.
Étape 5 : Aperçu de la page des détails de la commande #
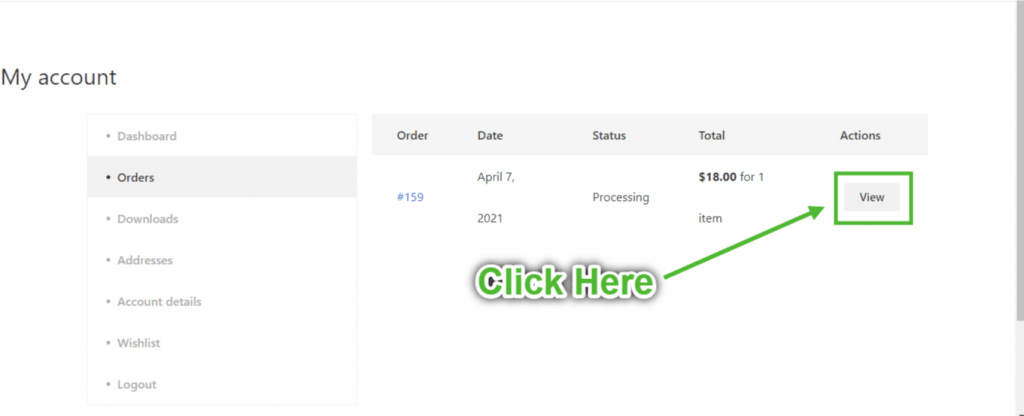
Maintenant, allez dans Mon Page de compte de votre site->Cliquez sur Ordres-> Cliquez sur Voir du côté droit de toute commande. Il s'agit d'un aperçu de la façon dont vos clients verront la page Détails de la commande depuis leurs appareils.
4. Créer une page de téléchargements de mon compte #
Étape 1 : Activer les widgets requis #
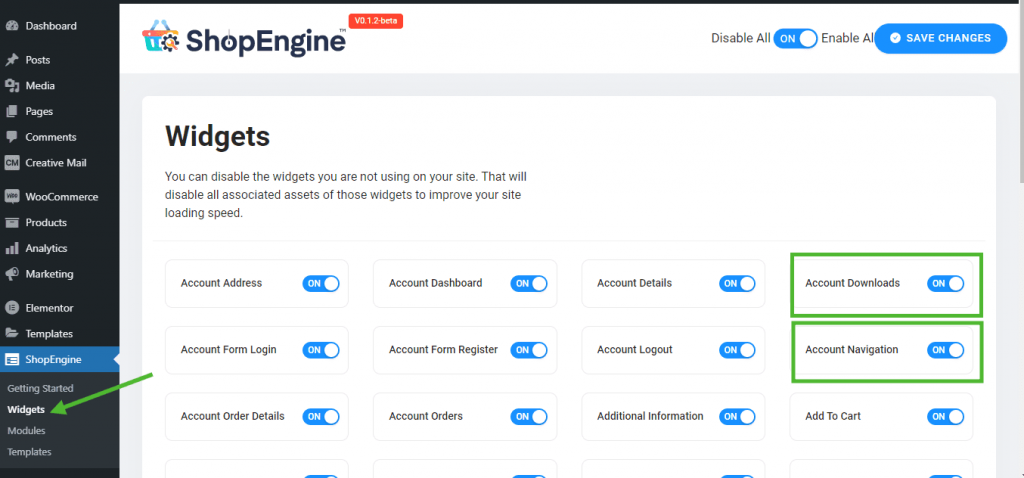
- Go to ShopEngine-> Widgets -> Make sure that the Compte La navigation et Téléchargements de compte les widgets sont activé.
Étape 2 : Créer un modèle de téléchargement de mon compte #
- Go to ShopEngine-> Modèles -> Ajouter un nouveau
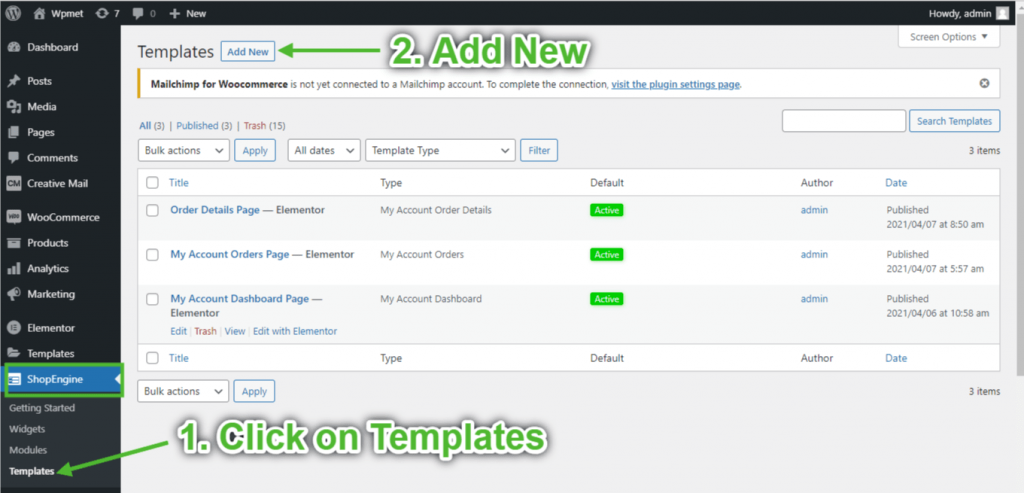
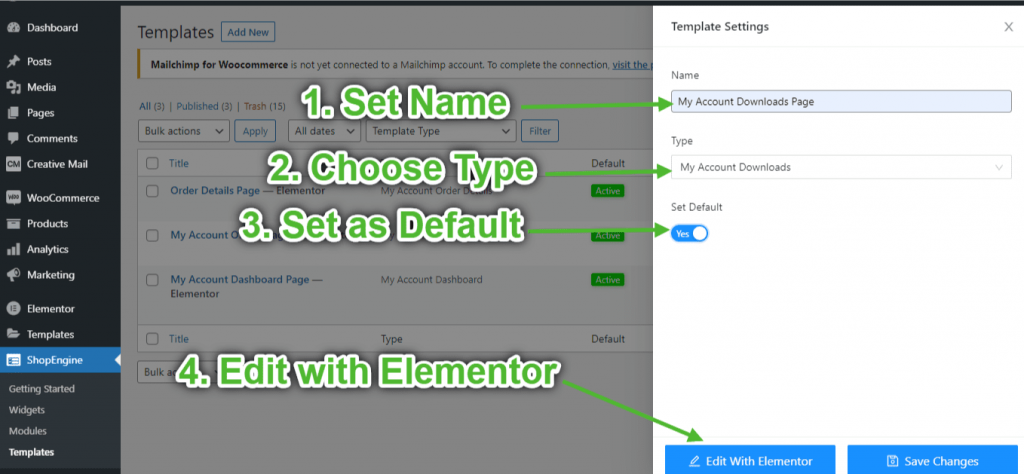
- Fournir un modèle Nom-> Select Page Taper: Téléchargements de mon compte
- Enable Default Template-> Set Default->Oui -> Click on Modifier avec Elementor
Étape 3 : Choisissez une structure #
- Clique sur le "+" icône d'Elementor et choisissez votre disposition de section préférée.
Étape 4 : Créer une page de téléchargement de compte #
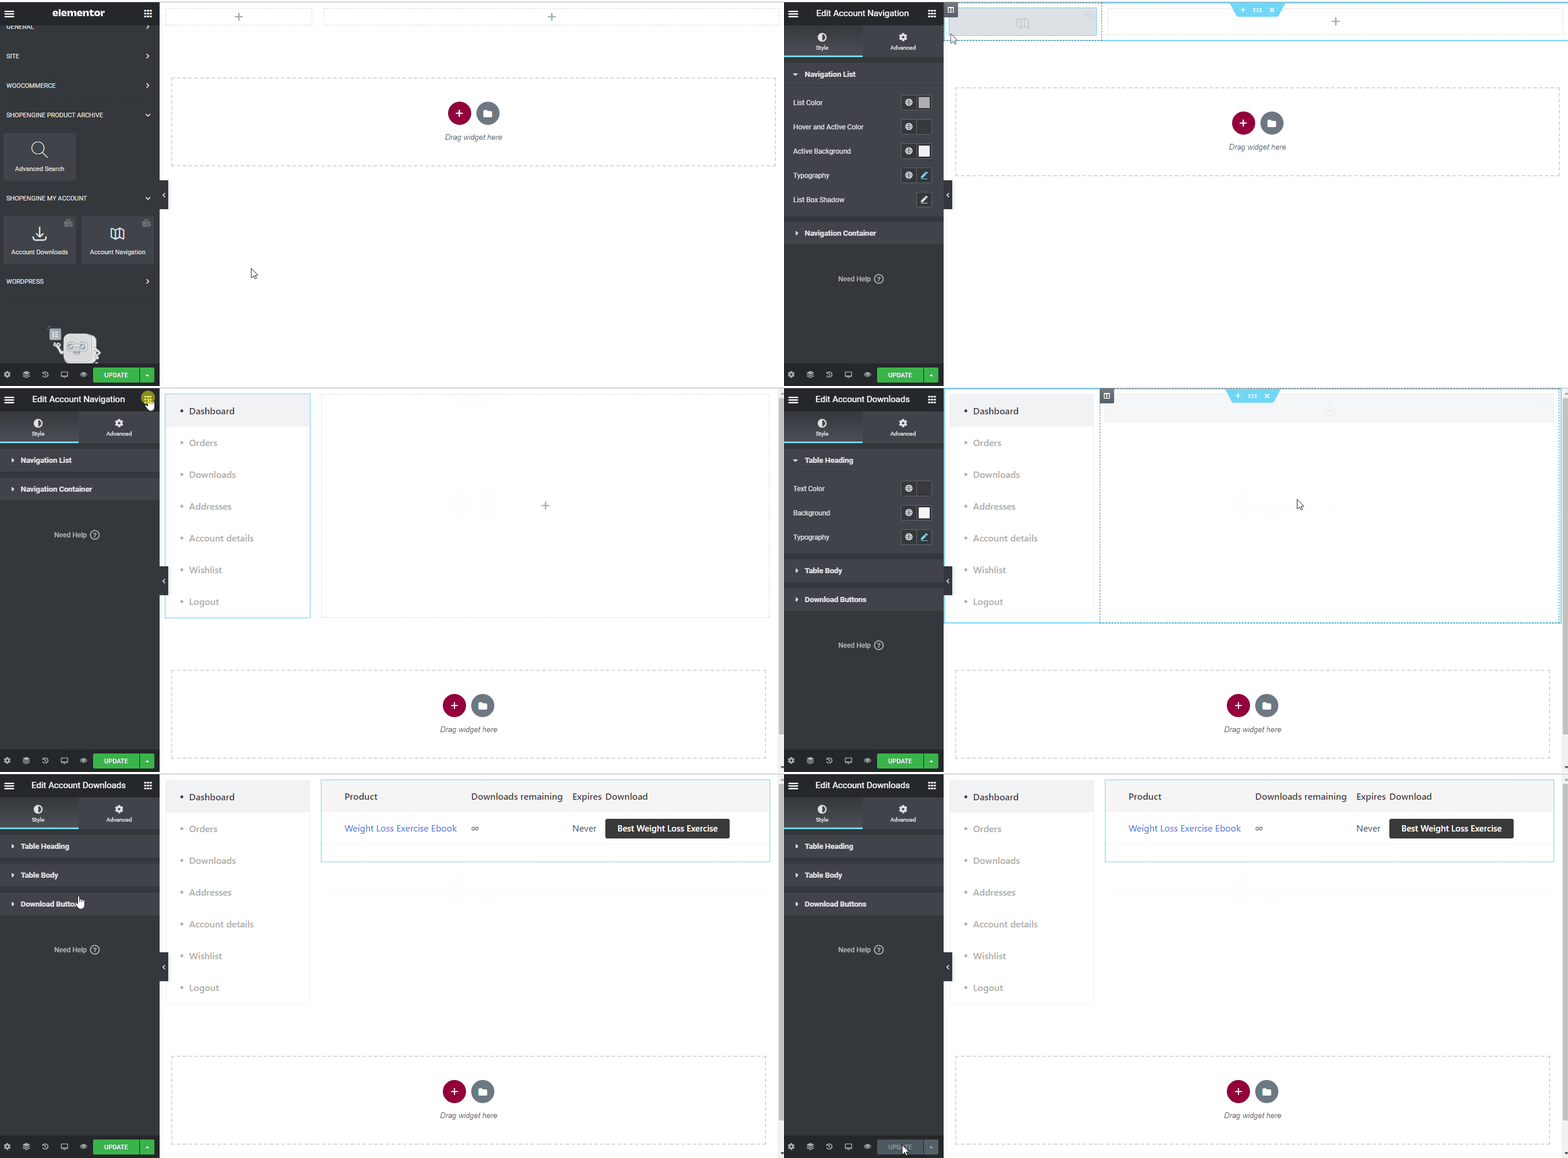
Pour créer la page Téléchargements de compte, vous devrez utiliser deux widgets : Navigation dans le compte et Téléchargements de compte widgets.
- Faites glisser et déposez le widget de navigation de compte depuis le bloc d’éléments ShopEngine My Account d’Elementor. Vous pouvez modifier la couleur du texte et des liens, l'épaisseur de la police du texte et des liens, l'épaisseur de la police de l'utilisateur, la typographie, la couleur de survol du lien, etc. à partir de l'onglet Paramètres de style si vous le souhaitez.
- Faites également glisser et déposez le widget Téléchargements de compte à partir du même bloc d'éléments et apportez les modifications que vous souhaitez.
- Once you are done editing your Account Downloads page, save it by clicking on -> Mise à jour.
Étape 5 : Aperçu de la page de téléchargement du compte #
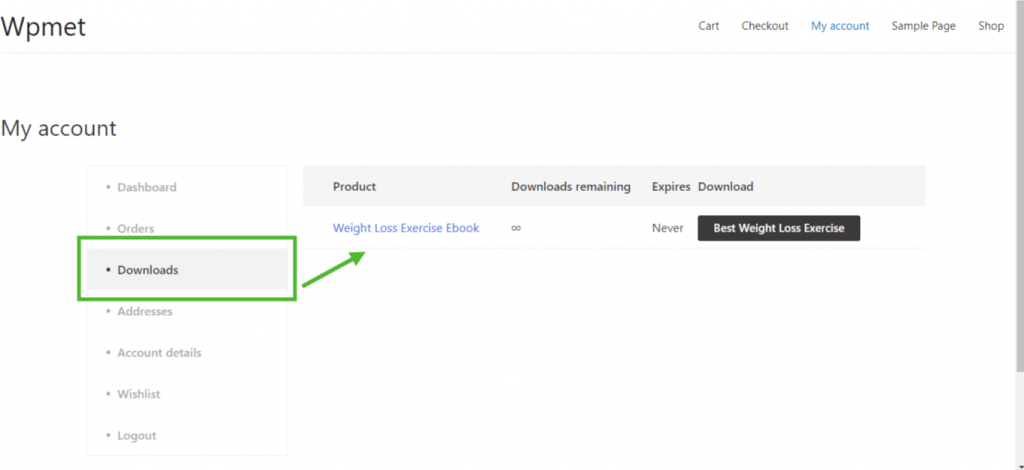
Maintenant, allez au Mon compte page de votre site internet->Cliquez sur Téléchargements. Il s'agit d'un aperçu de la façon dont vos clients verront la page depuis leurs appareils.
5. Créer une page d'adresse de mon compte #
Étape 1 : Activer les widgets requis #
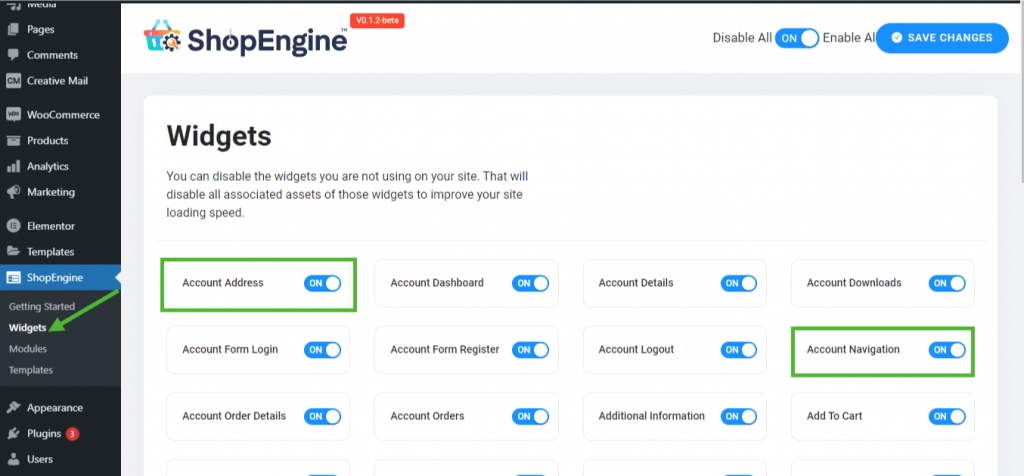
- Go to ShopEngine-> Widgets -> Make sure that the Compte La navigation et Adresse du compte les widgets sont activé.
Étape 2 : Créer un modèle d'adresse de mon compte #
- Go to ShopEngine-> Modèles -> Ajouter un nouveau
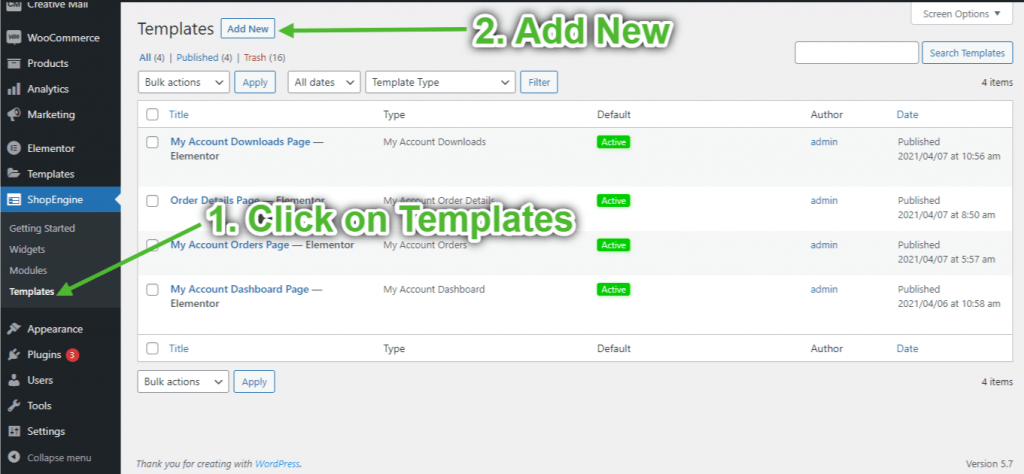
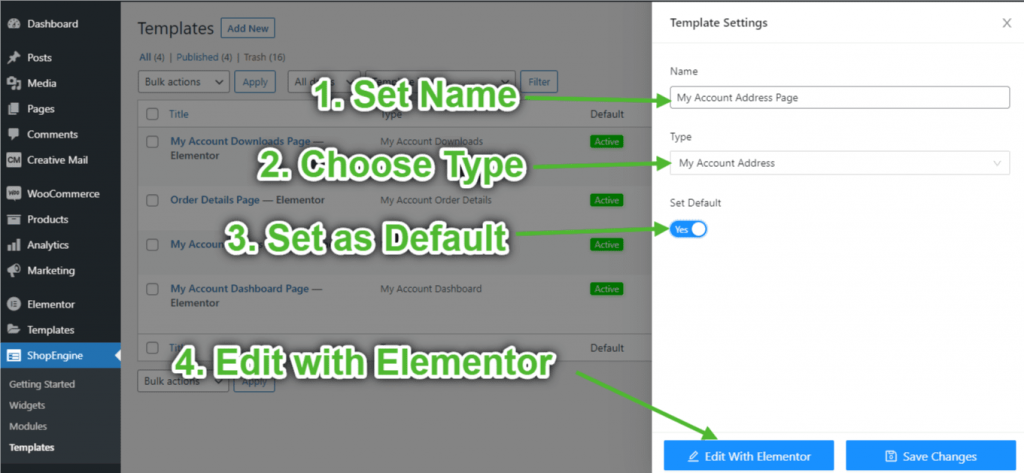
- Fournir un modèle Nom-> Select Page Taper: Adresse de mon compte
- Enable Default Template-> Set Default->Oui -> Click on Modifier avec Elementor
Étape 3 : Choisissez une structure #
- Clique sur le "+" icône d'Elementor et choisissez votre disposition de section préférée.
Étape 4 : Créer une page d'adresse de compte #
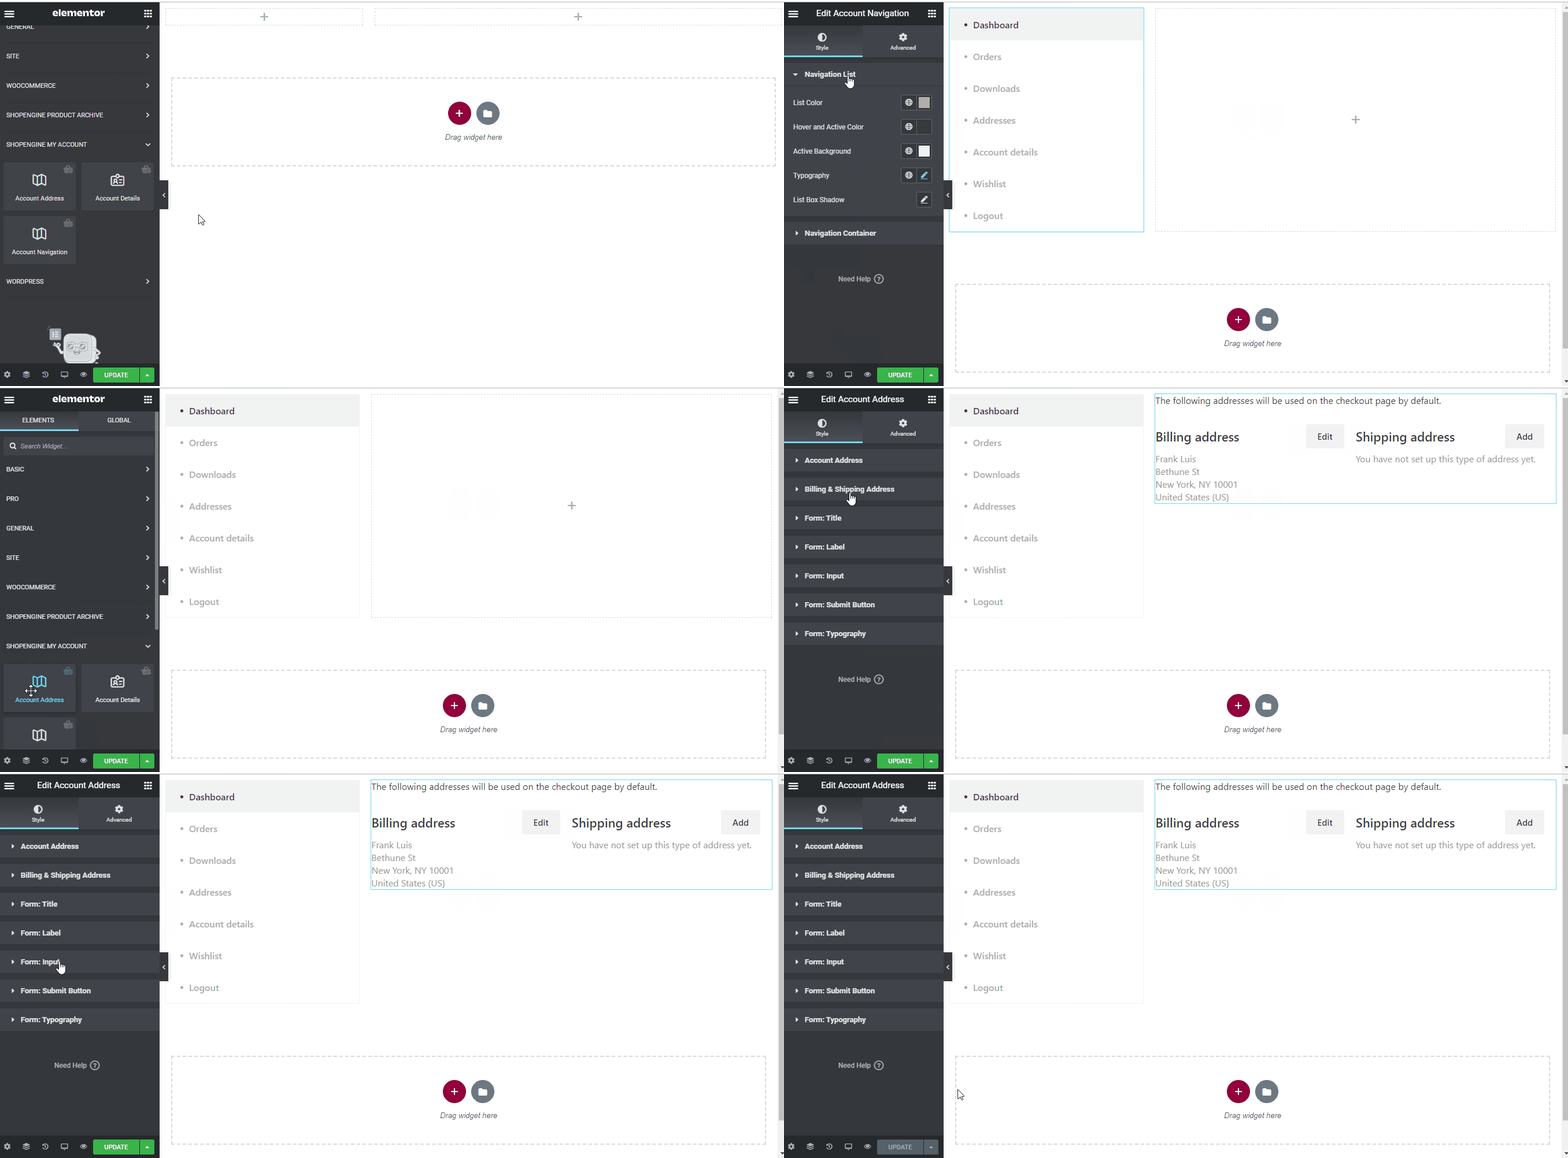
Pour créer la page Adresse du compte, vous devrez utiliser deux widgets : Navigation dans le compte et Adresse du compte widget.
- Faites glisser et déposez le widget de navigation de compte depuis le bloc d’éléments ShopEngine My Account d’Elementor. Vous pouvez modifier la couleur du texte et des liens, l'épaisseur de la police du texte et des liens, l'épaisseur de la police de l'utilisateur, la typographie, la couleur de survol du lien, etc. à partir de l'onglet Paramètres de style si vous le souhaitez.
- Faites également glisser et déposez le widget Adresse du compte à partir du même bloc d'éléments et apportez les modifications que vous souhaitez.
- Once you are done editing your Account Address page, save it by clicking on -> Mise à jour.
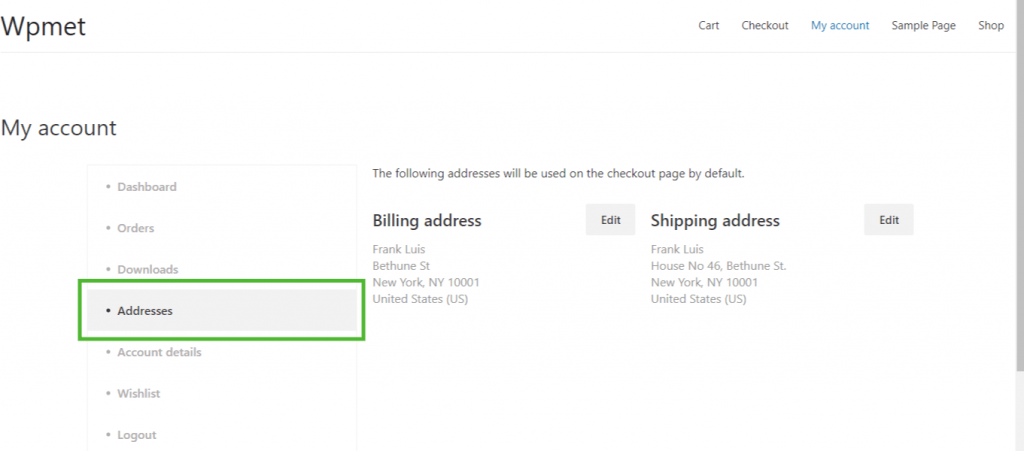
Étape 5 : Aperçu de la page d'adresse du compte #
Maintenant, allez au Mon compte page de votre site internet->Cliquez sur Adresses. Il s'agit d'un aperçu de la façon dont vos clients verront la page depuis leurs appareils.
6. Créer une page de détails sur mon compte #
Étape 1 : Activer les widgets requis #
- Go to ShopEngine-> Widgets -> Make sure that the Compte La navigation et Détails du compte les widgets sont activé.
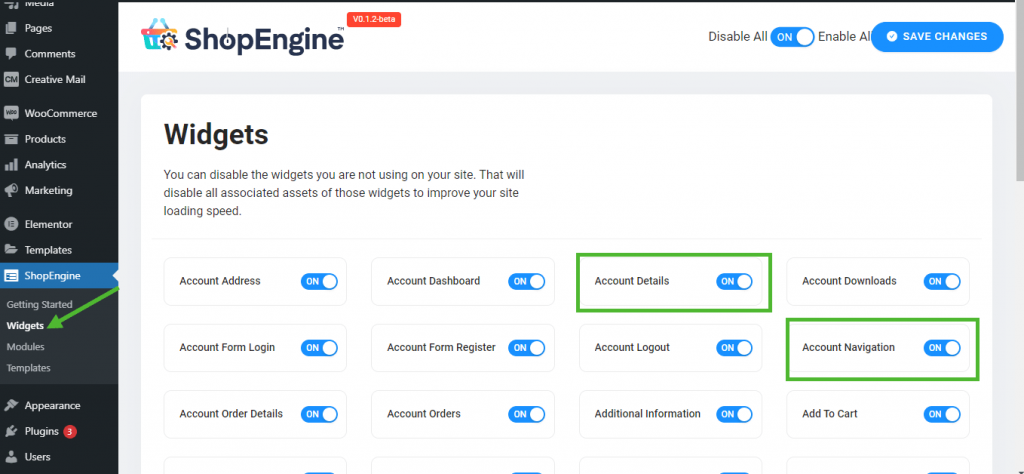
Étape 2 : Créer un modèle de détails de mon compte #
- Go to ShopEngine-> Modèles -> Ajouter un nouveau
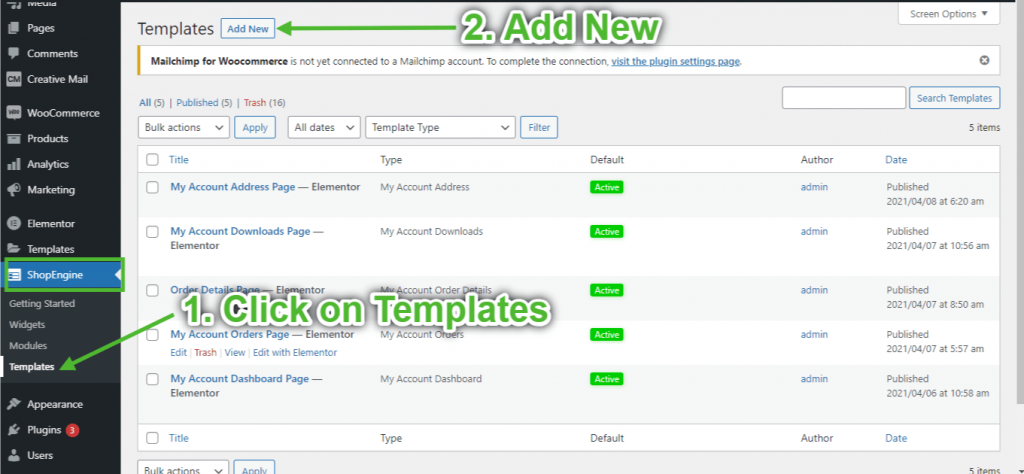
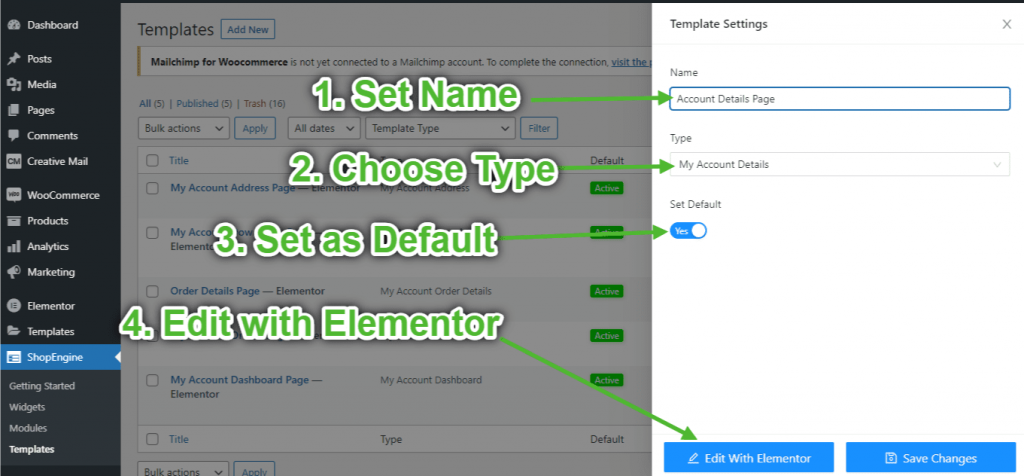
- Fournir un modèle Nom-> Select Page Taper: Détails de mon compte
- Enable Default Template-> Set Default->Oui -> Click on Modifier avec Elementor
Étape 3 : Choisissez une structure #
- Cliquez sur l'icône «+» d'Elementor et choisissez votre disposition de section préférée.
Étape 4 : Créer une page de détails du compte #
Pour créer la page Détails du compte, vous devrez utiliser deux widgets : Navigation dans le compte et Détails du compte widget.
- Faites glisser et déposez le widget de navigation de compte depuis le bloc d’éléments ShopEngine My Account d’Elementor. Vous pouvez modifier la couleur du texte et des liens, l'épaisseur de la police du texte et des liens, l'épaisseur de la police de l'utilisateur, la typographie, la couleur de survol du lien, etc. à partir de l'onglet Paramètres de style si vous le souhaitez.
- Faites également glisser et déposez le widget Détails du compte à partir du même bloc d'éléments et apportez les modifications que vous souhaitez.
- Once you are done editing your Account Details page, save it by clicking on -> Mise à jour.
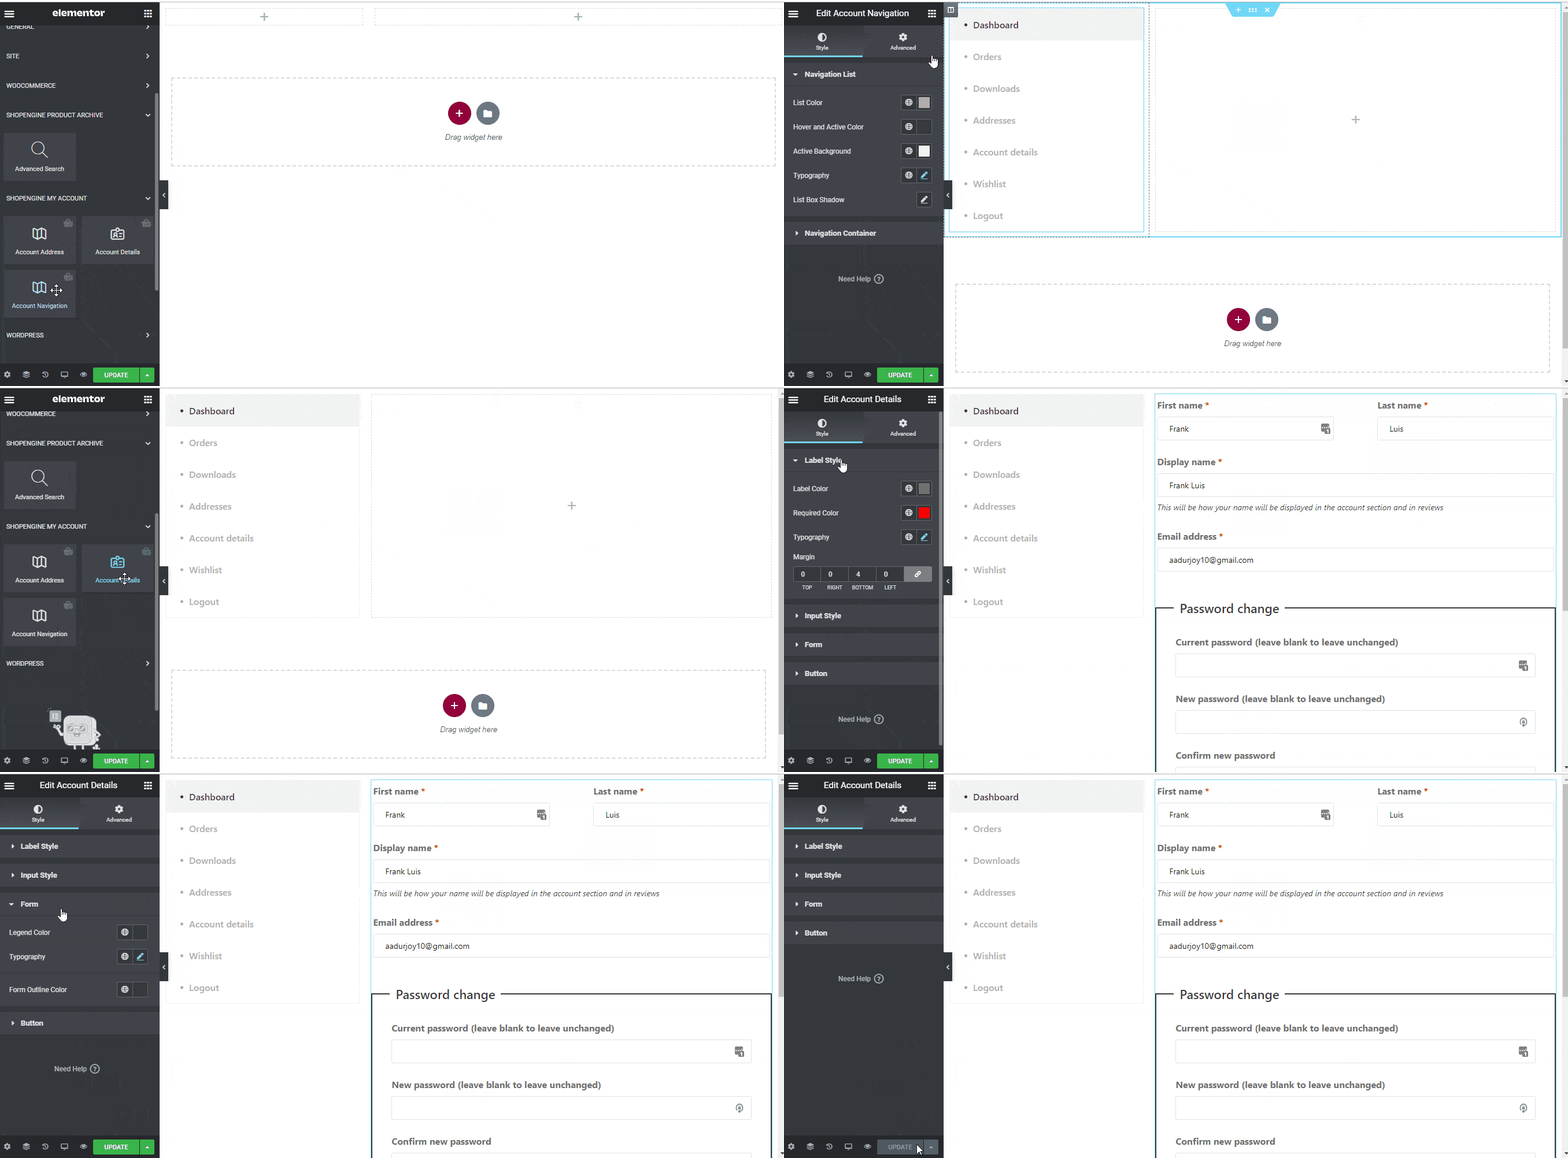
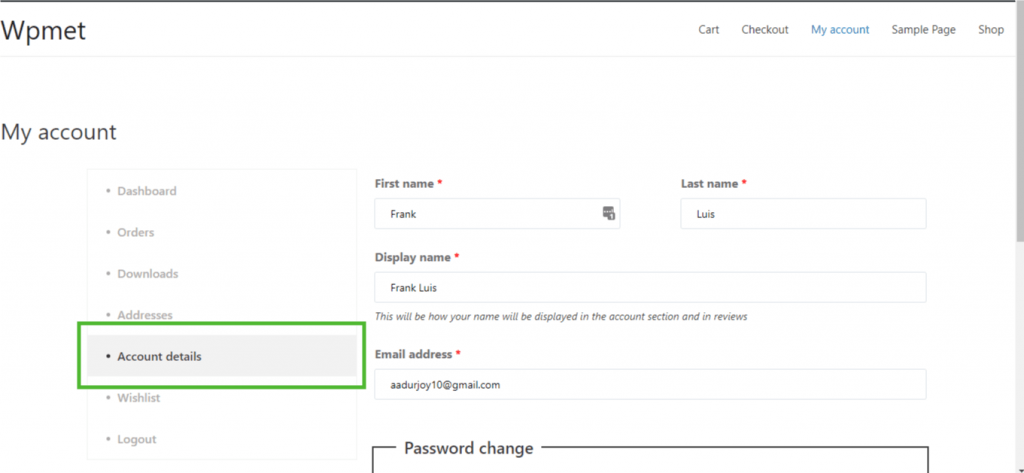
Étape 5 : Aperçu de la page des détails du compte #
Maintenant, allez au Mon compte page de votre site internet->Cliquez sur Détails du compte. Il s'agit d'un aperçu de la façon dont vos clients verront la page depuis leurs appareils.
7. Créer une page de connexion/inscription à mon compte #
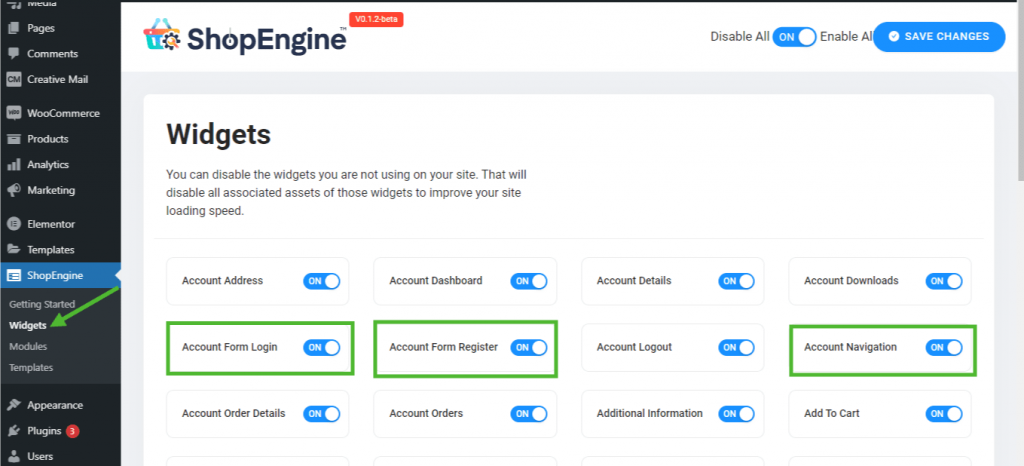
Étape 1 : Activer les widgets requis #
- Go to ShopEngine-> Widgets -> Make sure that the Compte La navigation, Registre du formulaire de compte, et Connexion au formulaire de compte les widgets sont activé.
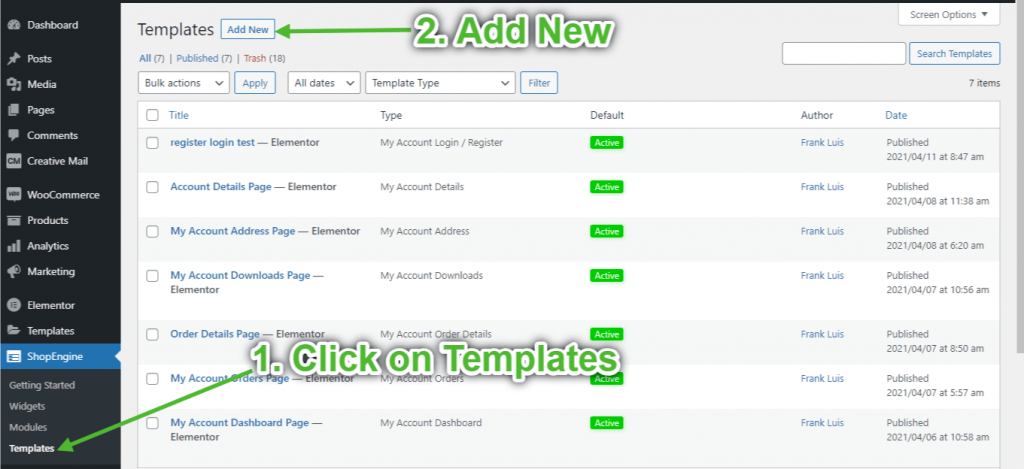
Étape 2 : Créer un modèle de connexion/inscription à mon compte #
- Go to ShopEngine-> Modèles -> Ajouter un nouveau
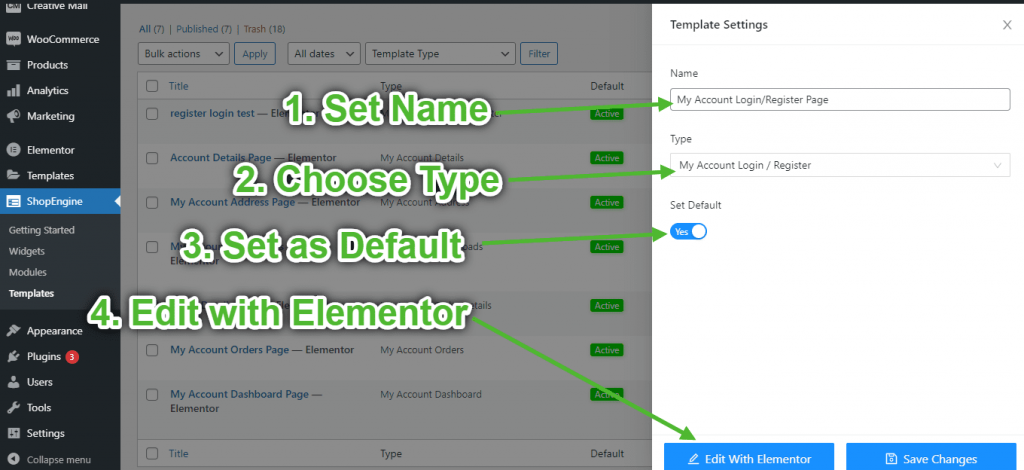
- Fournir un modèle Nom-> Select Page Taper: Mon compte Connexion/Inscription
- Enable Default Template-> Set Default->Oui -> Click on Modifier avec Elementor
Étape 3 : Choisissez une structure #
- Cliquez sur l'icône «+» d'Elementor et choisissez votre disposition de section préférée.
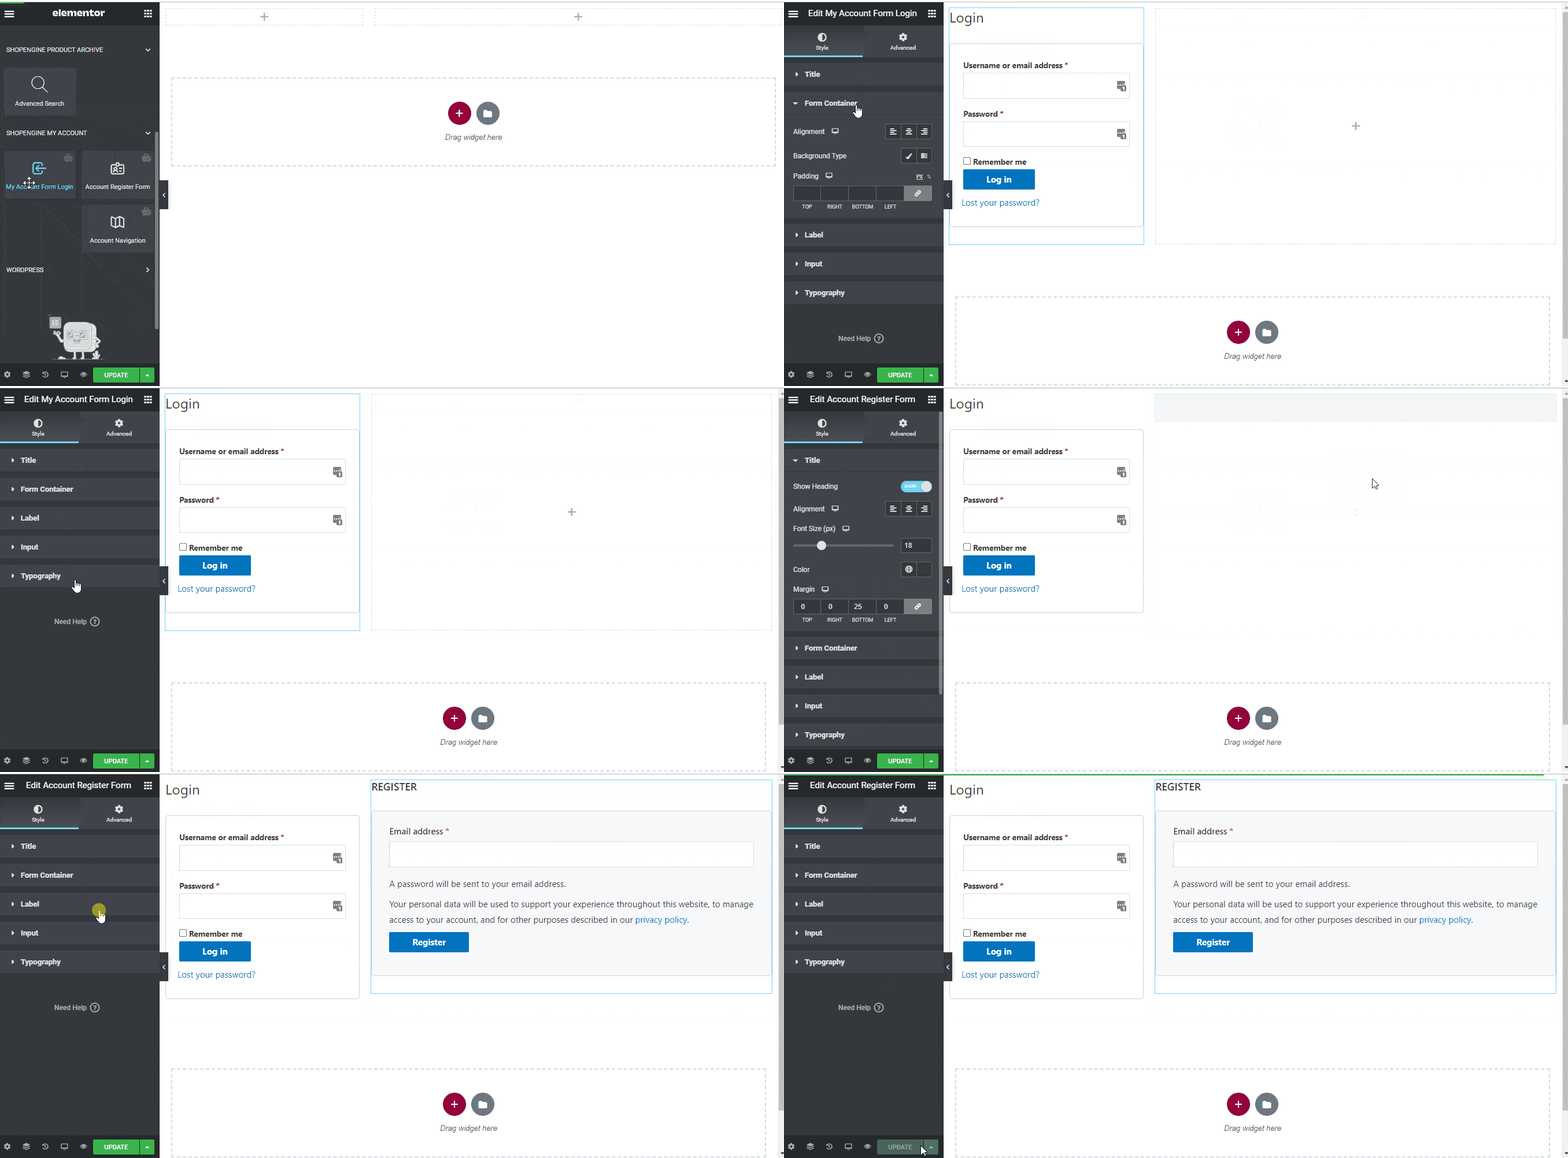
Étape 4 : Créer une page de connexion/inscription au compte #
Pour créer la page de connexion/inscription au compte, vous devrez utiliser deux widgets : Connexion au formulaire de mon compte, et Formulaire d'enregistrement de compte widget.
- Faites glisser et déposez le Connexion au formulaire de mon compte widget du bloc d’éléments ShopEngine My Account d’Elementor. Vous pouvez modifier le titre, le conteneur de formulaire, l'étiquette, la saisie et la typographie à partir de l'onglet Paramètres de style si vous le souhaitez.
- Faites également glisser et déposez le Formulaire d'enregistrement de compte widget du même bloc d’éléments et apportez les modifications que vous souhaitez.
- Once you are done editing your page, save it by clicking on -> Mise à jour.
Étape 5 : Aperçu de la page de connexion/inscription au compte #
Maintenant, allez au Mon compte page de votre site Web->Aller à Tableau de bord -> Cliquez sur Se déconnecter. Vous pourrez désormais voir un aperçu de la façon dont vos clients verront la page depuis leurs appareils.