

 Italian
  English
  German
  Spanish
  French
  Danish
  Portuguese
  Swedish
  Polish
  Korean
  Japanese
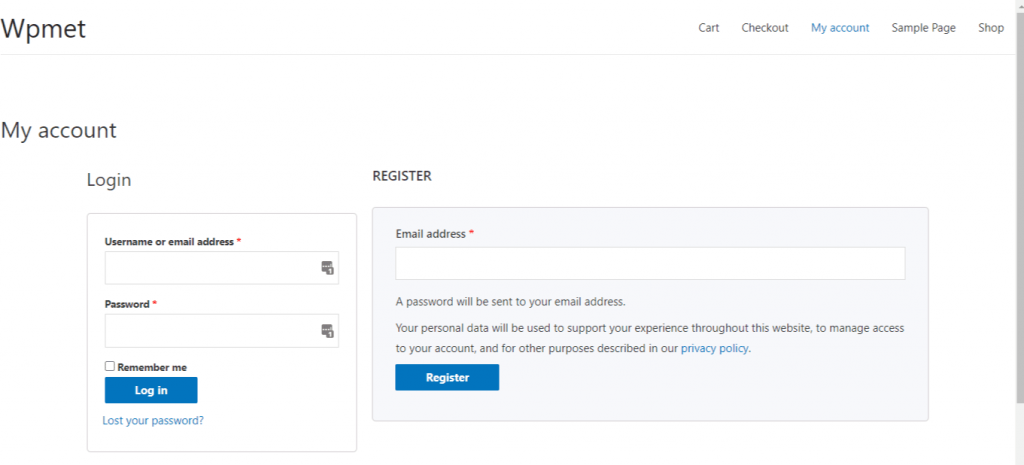
 Con ShopEngine, puoi creare facilmente una pagina "Il mio account" da cui i clienti possono visualizzare la propria dashboard, monitorare i propri ordini e download, modificare gli indirizzi e i dettagli del proprio account. Da questa stessa pagina possono anche accedere o registrarsi al proprio account sul tuo sito web.
Di solito, una "pagina del mio account" presenta una dashboard dell'account, un ordine dell'account, i dettagli dell'ordine dell'account, i download dell'account, gli indirizzi dell'account, i dettagli dell'account e la pagina di accesso/registrazione dell'account.
Let’s get to know how to create each of these pages to create a complete “my account page” for your users with a friendly WooCommerce my account page builder.
Quick Overview
Starting from my account dashboard to account login page, this guide will demonstrate creating any type of account pages with ShopEngine, a no-code WooCommerce my account page builder.
Tools Used: ShopEngine, Elementor, and WooCommerce.
After installing and activating these plugins, you need to create and customize the following My Account pages:
- My account dashboard
- My account order
- My account order details
- My account downloads
- My account address
- My account details
- My account register
1. Crea la pagina dashboard del mio account #
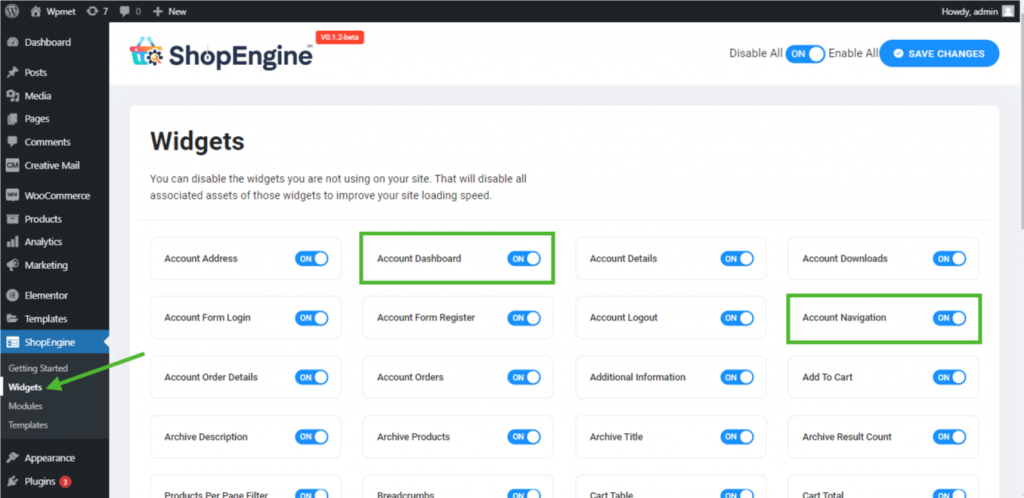
Passaggio 1: abilita i widget richiesti #
- Go to ShopEngine-> Widget -> Make sure that the Pannello di controllo dell'account E Navigazione dell'account i widget sono abilitato.
Passaggio 2: crea un modello di dashboard #
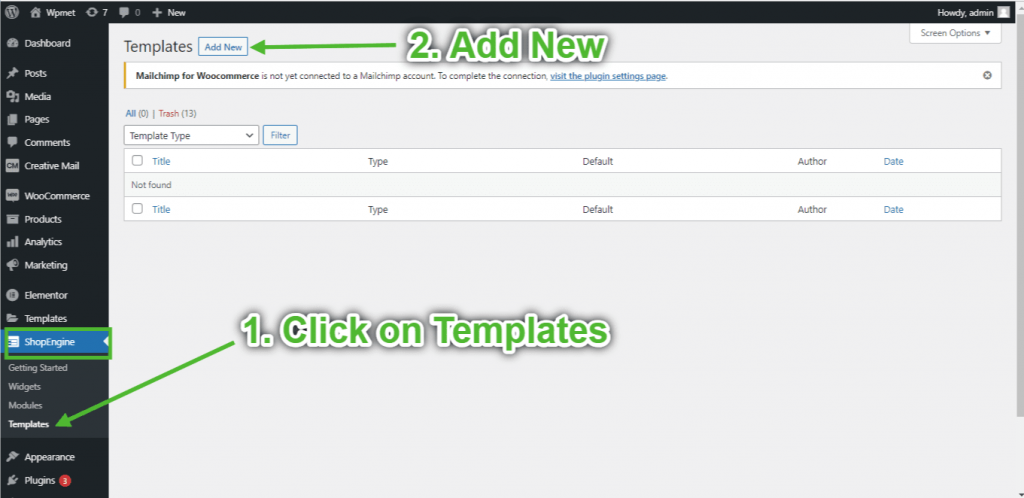
- Go to ShopEngine-> Modelli -> Aggiungere nuova.
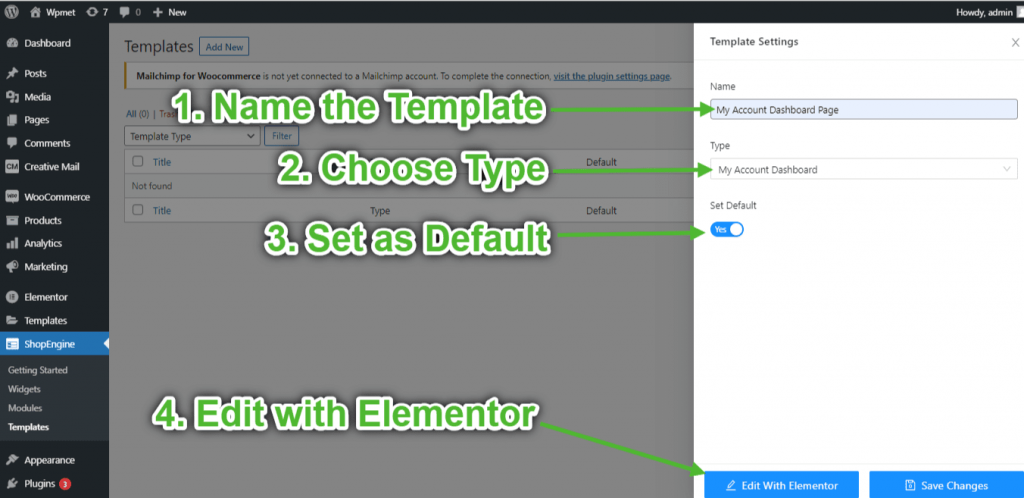
- Fornire modello Nome-> Select Page Type: La mia dashboard del conto
- Enable Default Template-> Set Default->SÌ -> Click on Modifica con Elementor (Le impostazioni del modello verranno prima inserite e poi verranno aperte con Elementor Page Builder)
Passaggio 3: scegli una struttura #
- Clicca sul "+" di Elementor e scegli il layout della sezione preferito.
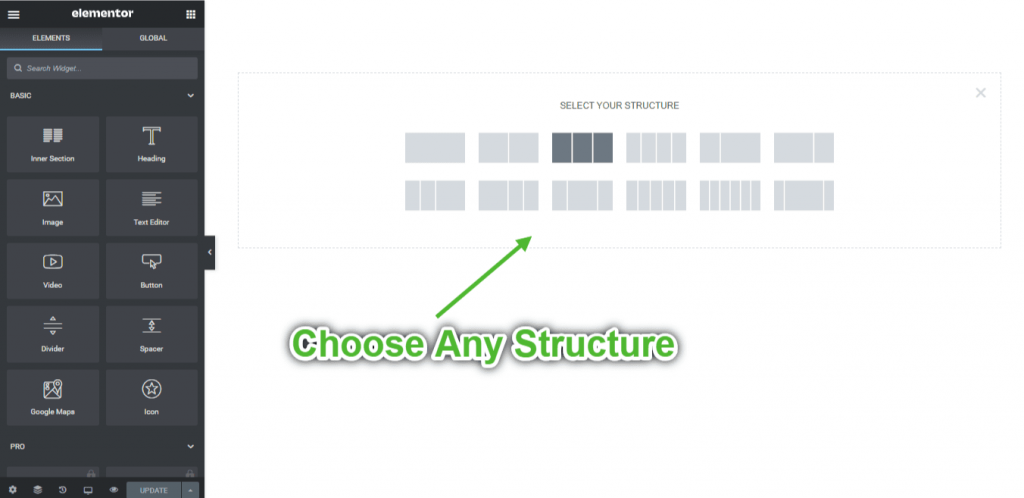
Passaggio 4: crea la pagina dashboard #
Per creare la pagina Dashboard account, dovrai sfruttare due widget: Navigazione dell'account E Pannello di controllo dell'account widget.
- Trascina e rilascia il widget Navigazione account dal blocco elemento ShopEngine Il mio account di Elementor. Se lo desideri, puoi modificare il colore del testo e del collegamento, il peso del carattere del testo e del collegamento, il peso del carattere dell'utente, la tipografia, il colore del collegamento al passaggio del mouse, ecc. dalla scheda delle impostazioni dello stile.
- Inoltre, trascina e rilascia il widget Dashboard dell'account dallo stesso blocco e apporta le modifiche che desideri.
- Once you are done editing your Account Dashboard page, save it by clicking on -> Aggiornamento.
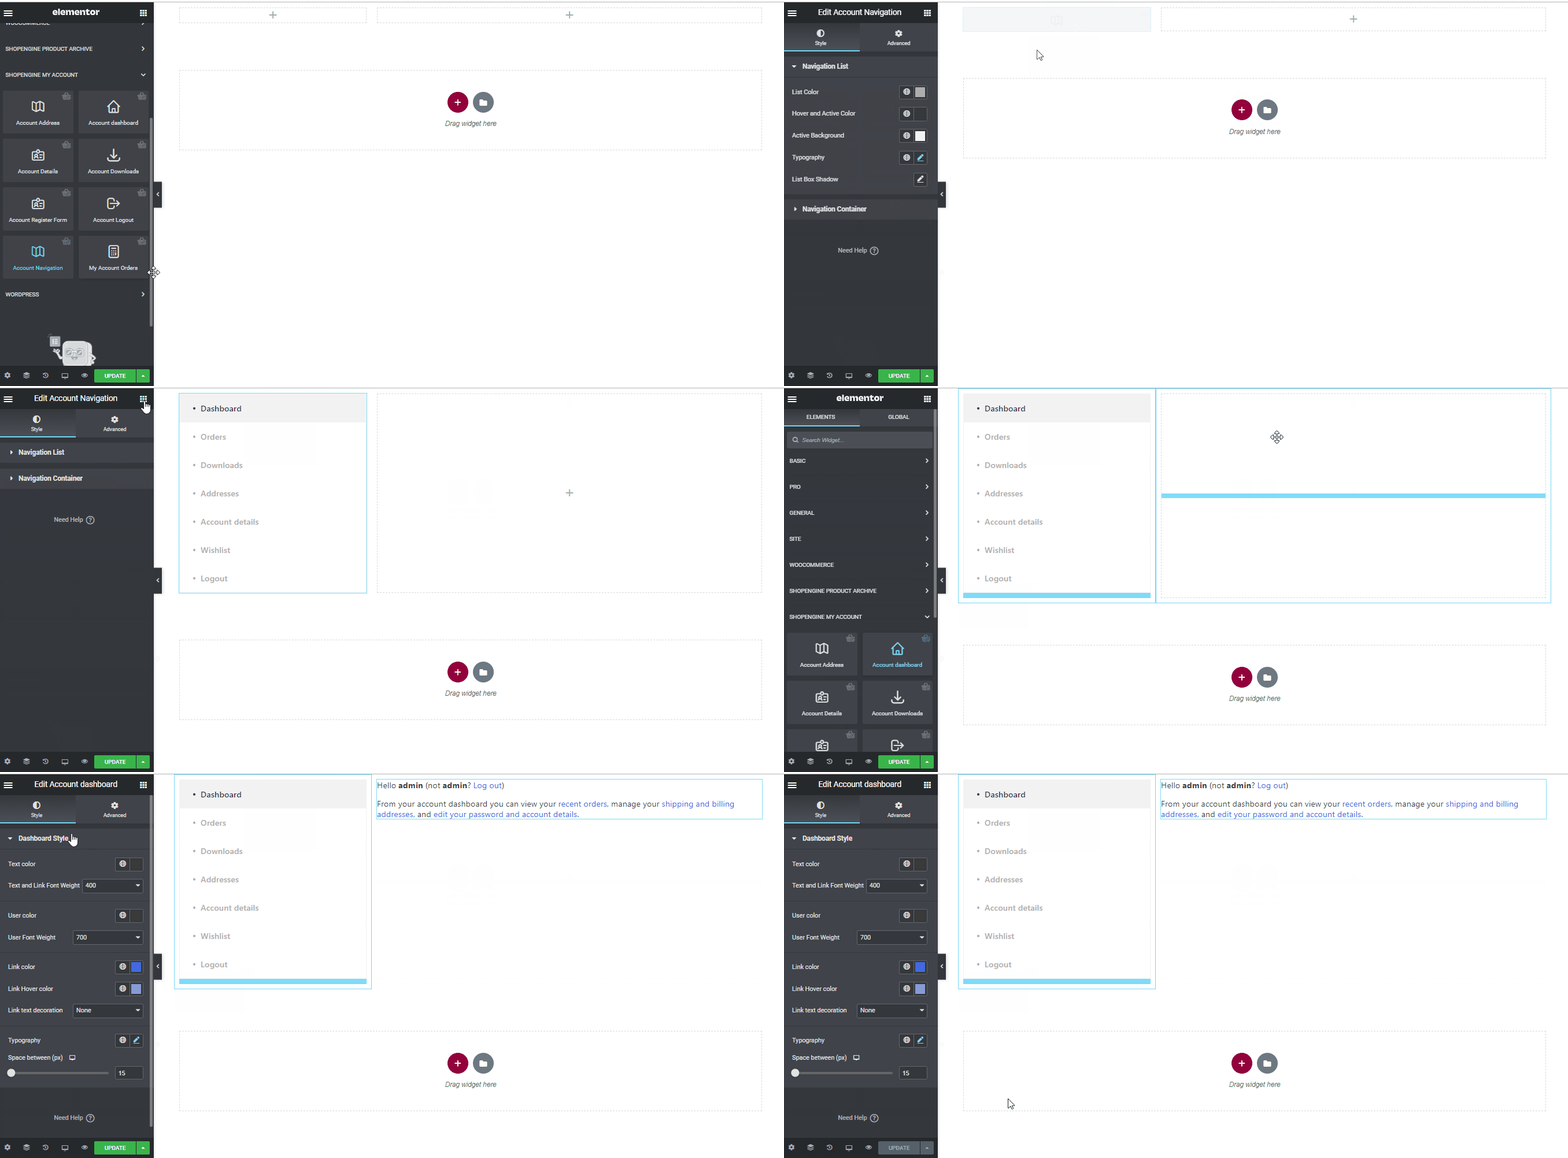
Passaggio 5: anteprima della pagina dashboard #
- Ora vai a Pagina Il mio account of your website->Click on Pannello di controllo. Questa è un'anteprima di come i tuoi clienti vedranno la dashboard dell'account dai loro dispositivi.
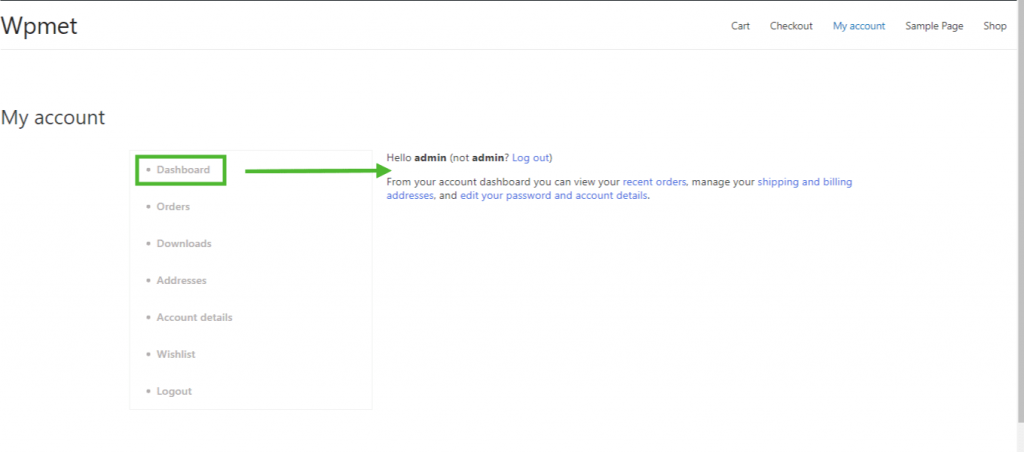
2. Crea la pagina dell'ordine del mio account #
Passaggio 1: abilita i widget richiesti #
- Go to ShopEngine-> Widget -> Make sure that the Ordini account aggeggio Navigazione dell'account i widget sono abilitato.
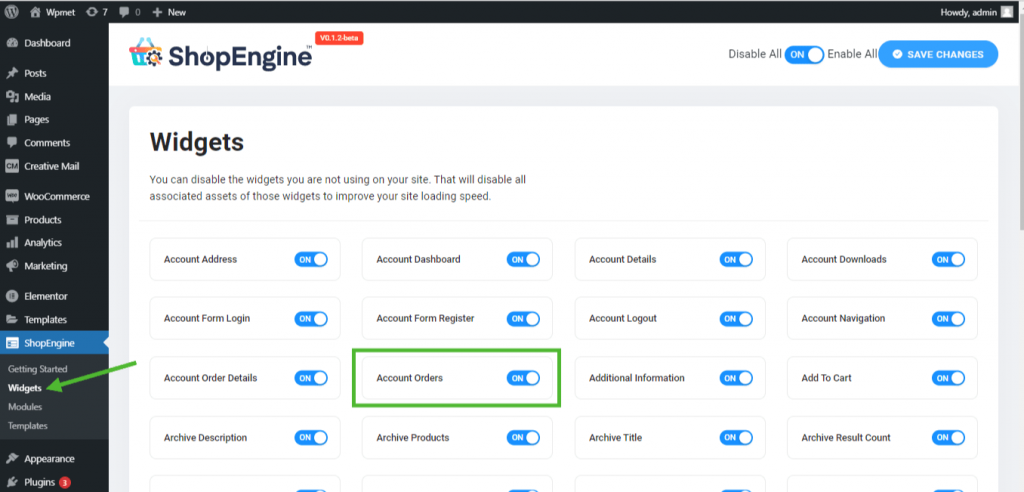
Step 2: Create WooCommerce My Account Order Page Template #
- Go to ShopEngine-> Templates -> Add New
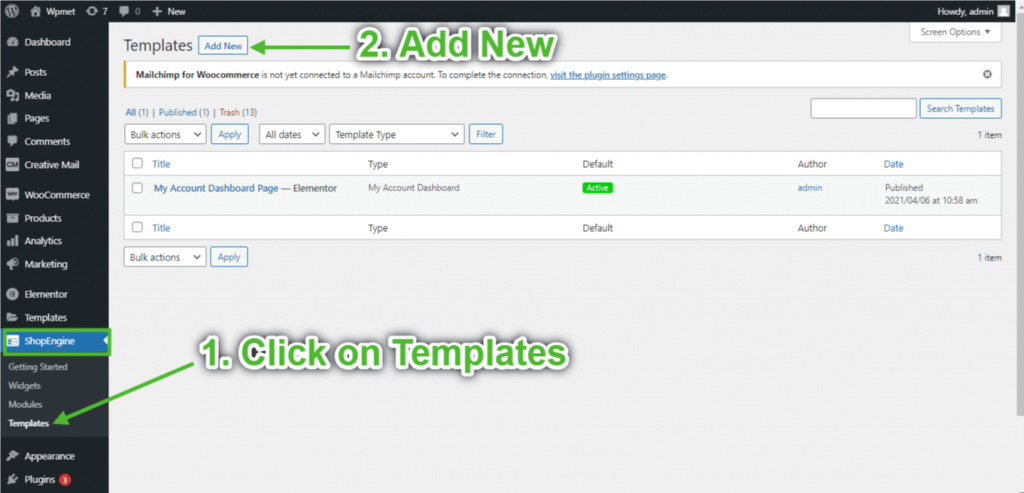
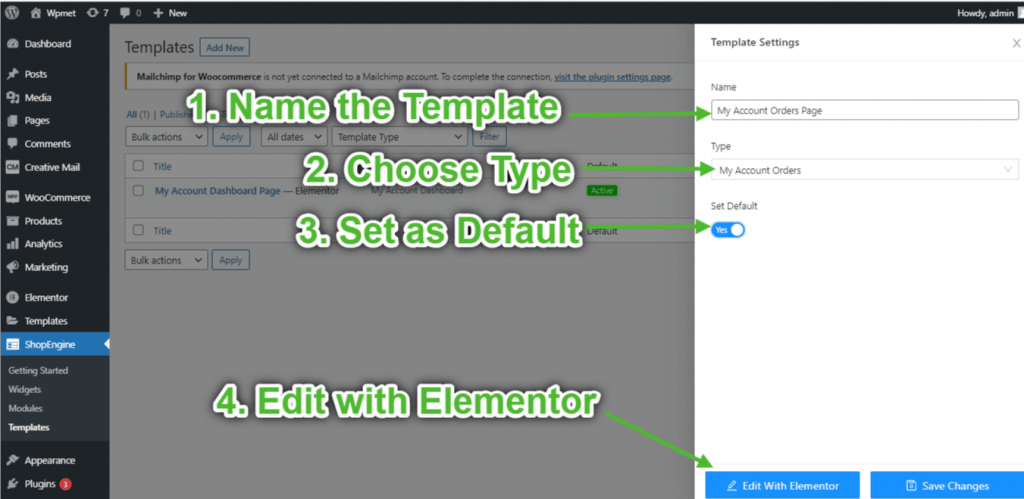
- Fornire modello Nome-> Select Page Tipo: Il mio account Ordini
- Enable Default Template-> Set Default->SÌ -> Click on Modifica con Elementor
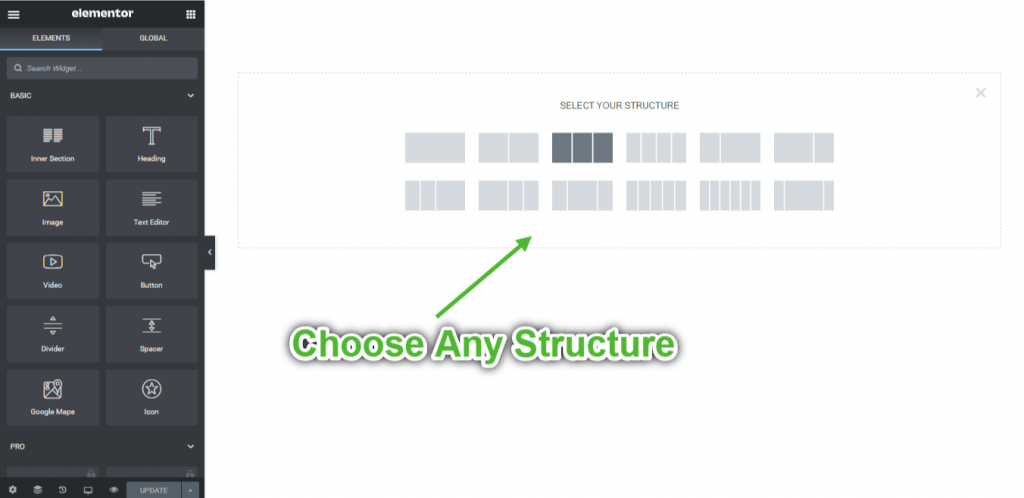
Passaggio 3: scegli una struttura #
- Clicca sul "+" di Elementor e scegli il layout della sezione preferito.
Passaggio 4: crea la pagina degli ordini dell'account #
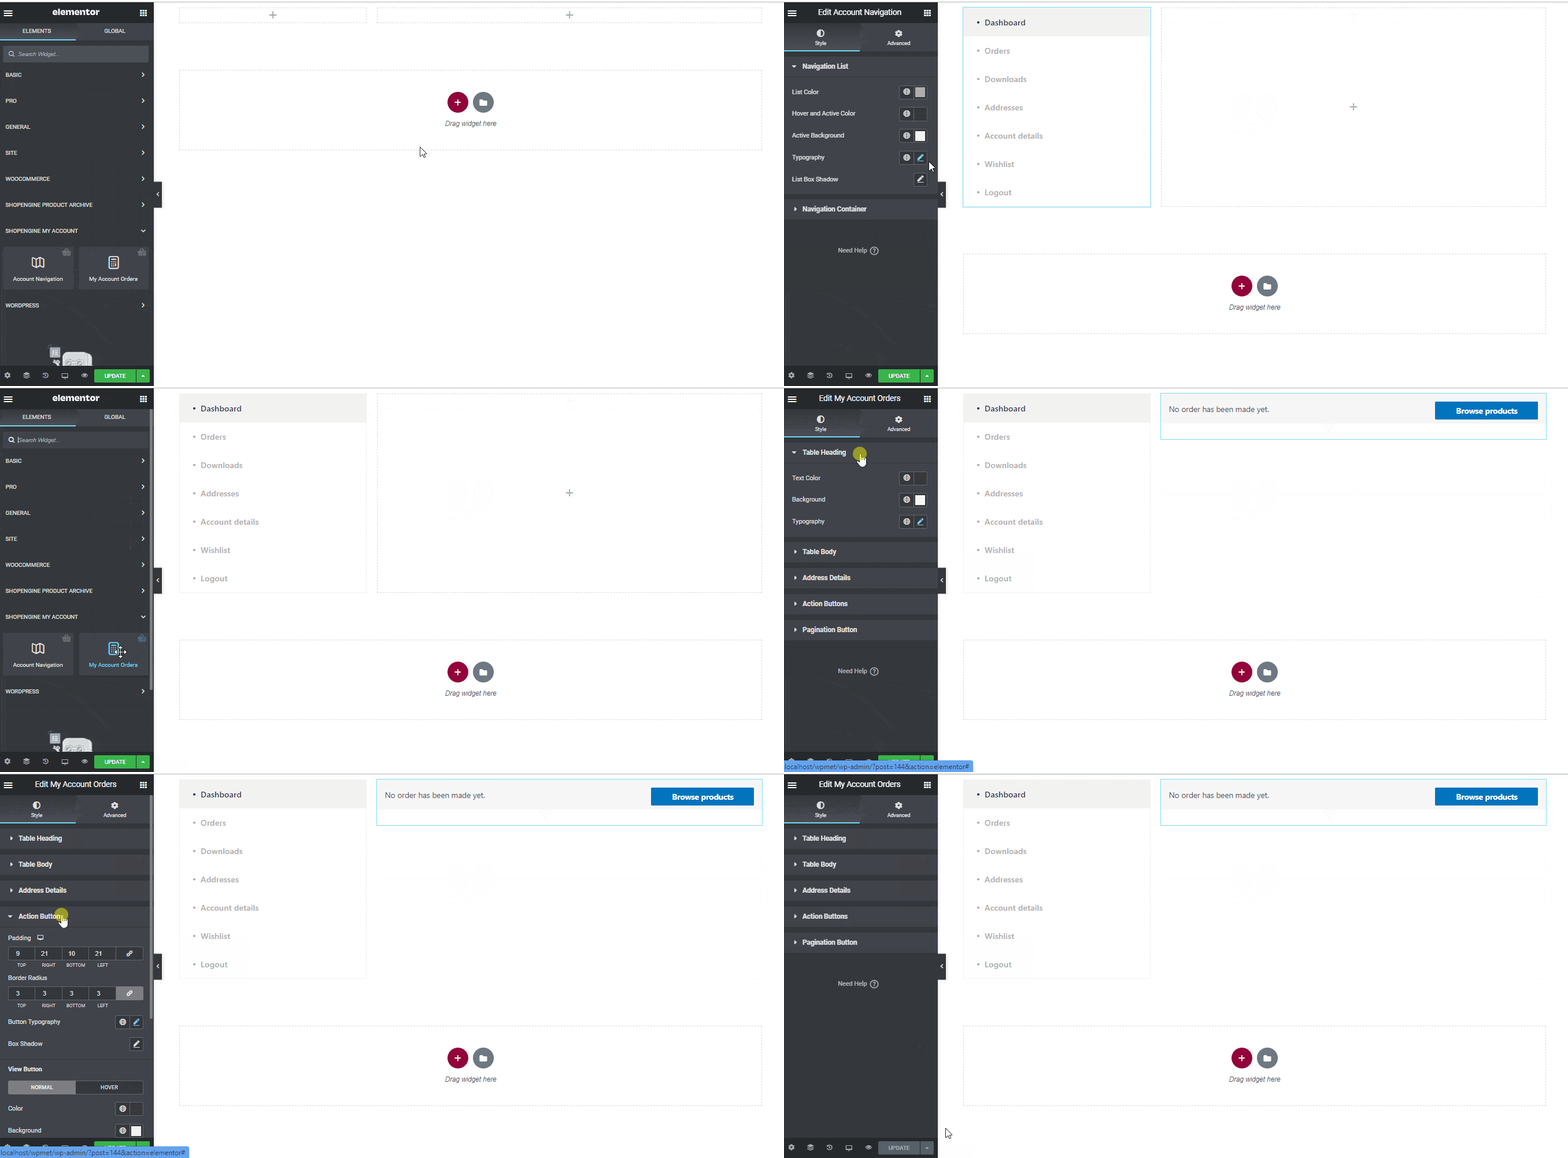
Per creare la pagina Ordini account, dovrai sfruttare due widget: Navigazione dell'account E Ordini del mio account widget.
- Trascina e rilascia il widget Navigazione account dal blocco elemento ShopEngine Il mio account di Elementor. Se lo desideri, puoi modificare il colore del testo e del collegamento, il peso del carattere del testo e del collegamento, il peso del carattere dell'utente, la tipografia, il colore del collegamento al passaggio del mouse, ecc. dalla scheda delle impostazioni dello stile.
- Inoltre, trascina e rilascia il widget Ordini account dallo stesso blocco di elementi e apporta le modifiche che desideri.
- Once you are done editing your Account Orders page, save it by clicking on -> Aggiornamento.
Passaggio 5: anteprima della pagina degli ordini dell'account #
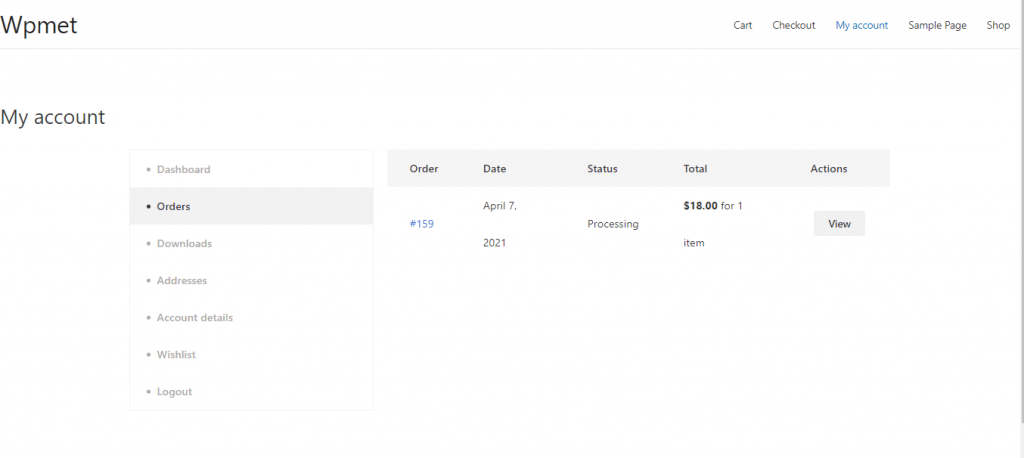
Ora vai a Il mio conto pagina del tuo sito web->Clicca su Ordini. Questa è un'anteprima di come i tuoi clienti vedranno la pagina Ordine dai loro dispositivi.
3. Crea la pagina dei dettagli dell'ordine del mio account #
Passaggio 1: abilita i widget richiesti #
- Go to ShopEngine-> Widget -> Make sure that the Dettagli dell'ordine E Navigazione dell'account i widget sono abilitato.
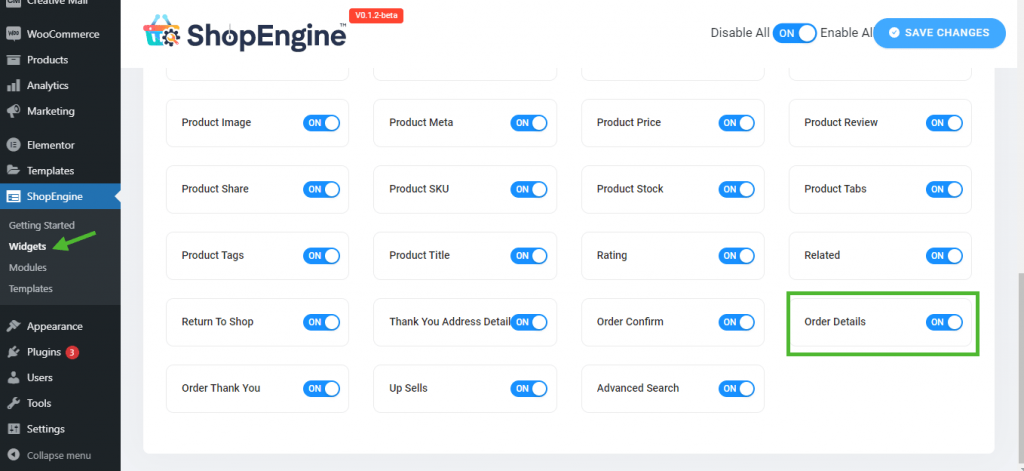
Passaggio 2: crea il modello dei dettagli dell'ordine #
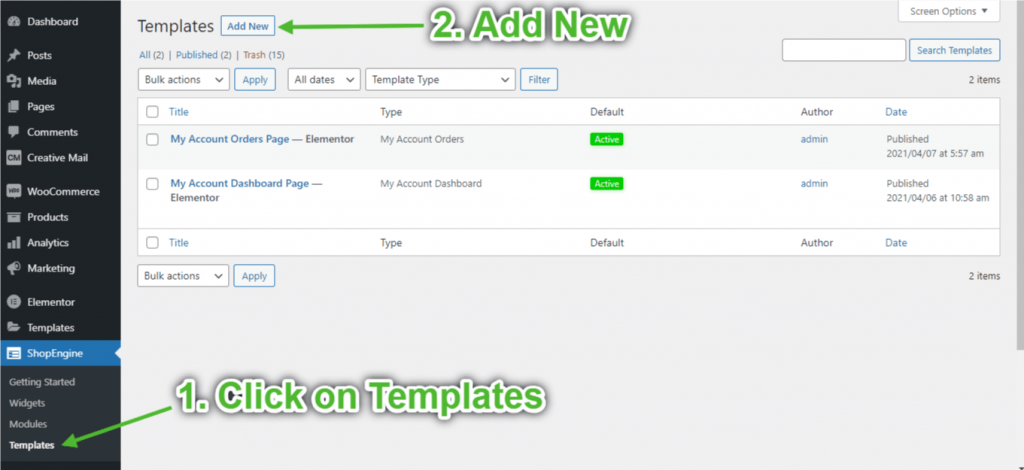
- Go to ShopEngine-> Modelli -> Aggiungere nuova
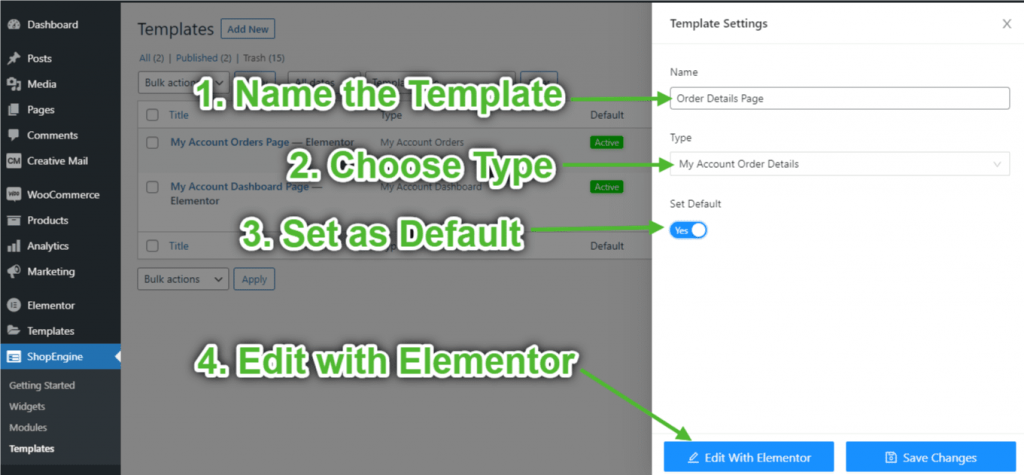
- Fornire modello Nome-> Select Page Tipo: Dettagli dell'ordine del mio account
- Enable Default Template-> Set Default->SÌ -> Click on Modifica con Elementor
Passaggio 3: scegli una struttura #
- Clicca sul "+" di Elementor e scegli il layout della sezione preferito.
Passaggio 4: crea la pagina dei dettagli dell'ordine #
Per creare la pagina Dettagli ordine, dovrai sfruttare due widget: Navigazione dell'account E Dettagli dell'ordine dell'account widget.
- Trascina e rilascia il widget Navigazione account dal blocco elemento ShopEngine Il mio account di Elementor. Se lo desideri, puoi modificare il colore del testo e del collegamento, il peso del carattere del testo e del collegamento, il peso del carattere dell'utente, la tipografia, il colore del collegamento al passaggio del mouse, ecc. dalla scheda delle impostazioni dello stile.
- Inoltre, trascina e rilascia il widget Dettagli ordine account dallo stesso blocco di elementi e apporta le modifiche che desideri.
- Once you are done editing your Account Order Details page, save it by clicking on -> Aggiornamento.
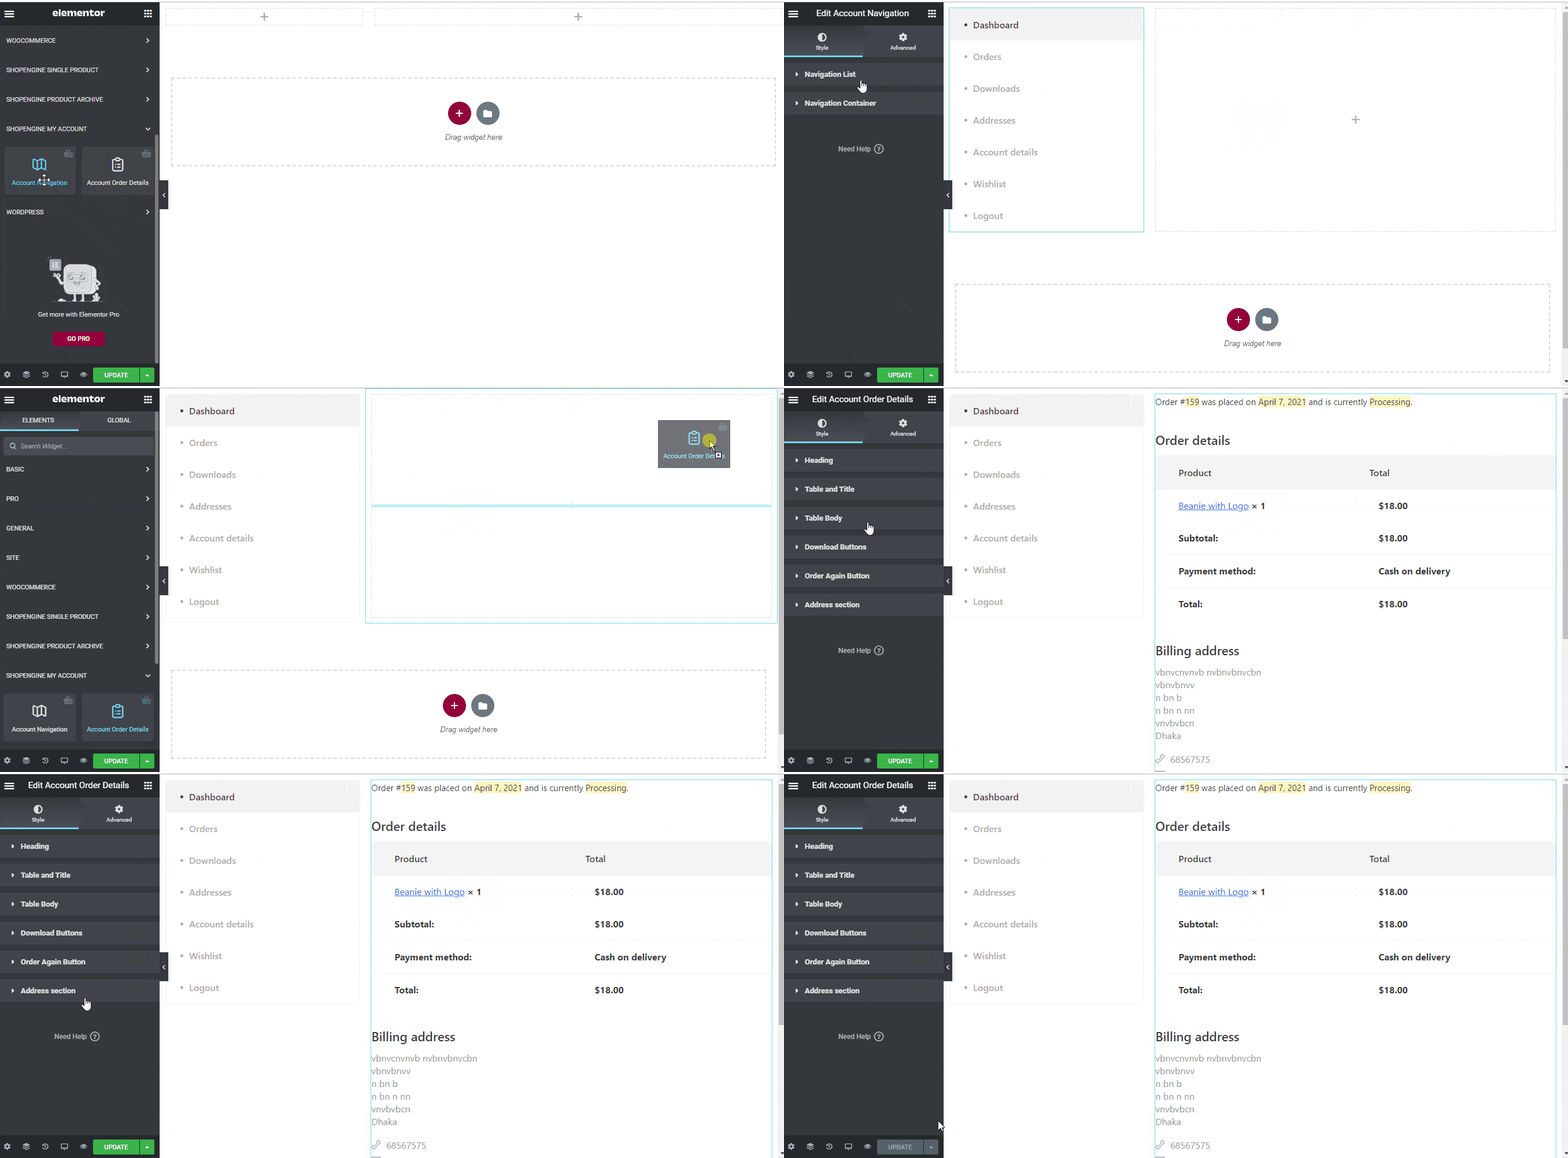
Passaggio 5: visualizzare l'anteprima della pagina dei dettagli dell'ordine #
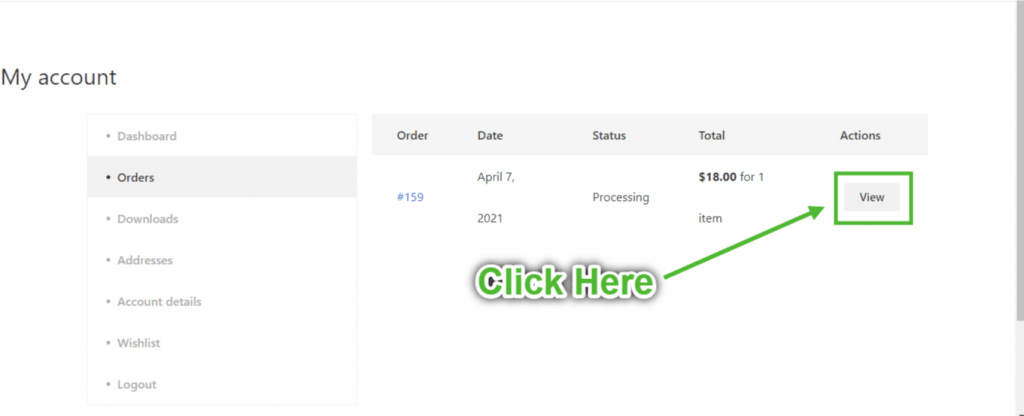
Ora vai su My Pagina del conto del tuo sito web->Clicca su Ordini-> Fare clic su Visualizzazione dal lato destro di qualsiasi ordine. Questa è un'anteprima di come i tuoi clienti vedranno la pagina Dettagli ordine dai loro dispositivi.
4. Crea la pagina di download del mio account #
Passaggio 1: abilita i widget richiesti #
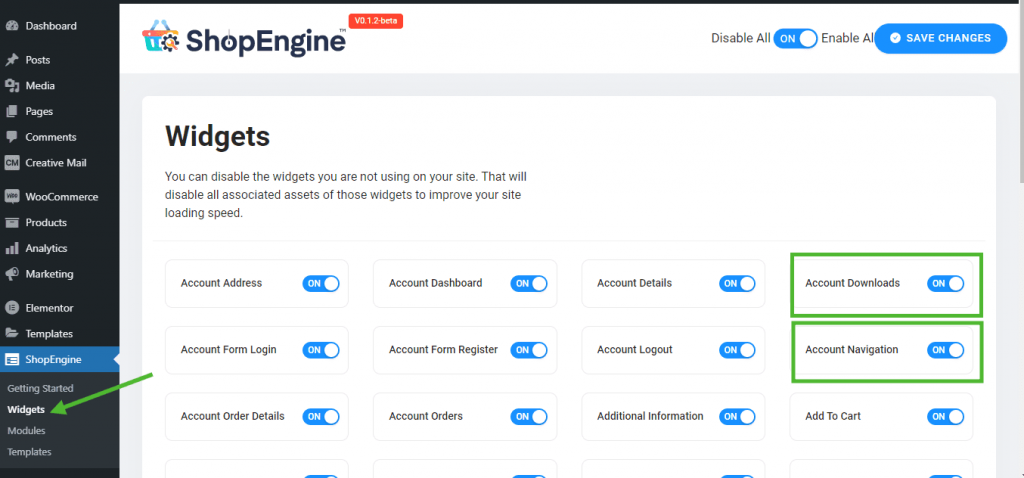
- Go to ShopEngine-> Widget -> Make sure that the Account Navigazione E Download dell'account i widget sono abilitato.
Passaggio 2: crea il modello di download del mio account #
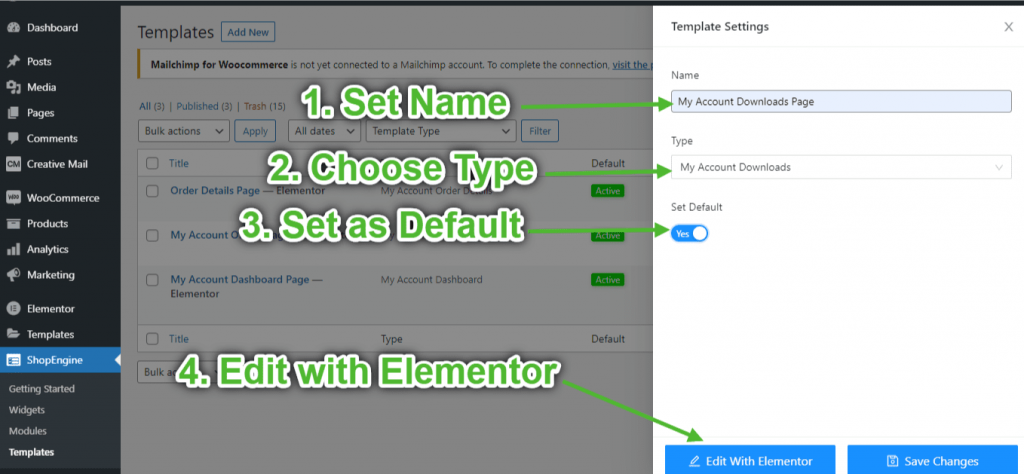
- Go to ShopEngine-> Modelli -> Aggiungere nuova
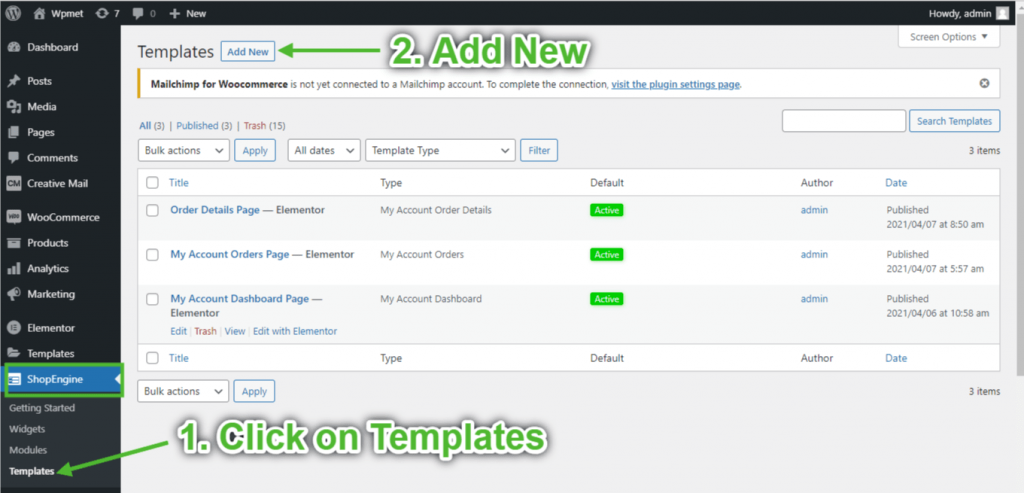
- Fornire modello Nome-> Select Page Tipo: Download del mio account
- Enable Default Template-> Set Default->SÌ -> Click on Modifica con Elementor
Passaggio 3: scegli una struttura #
- Clicca sul "+" di Elementor e scegli il layout della sezione preferito.
Passaggio 4: crea la pagina di download dell'account #
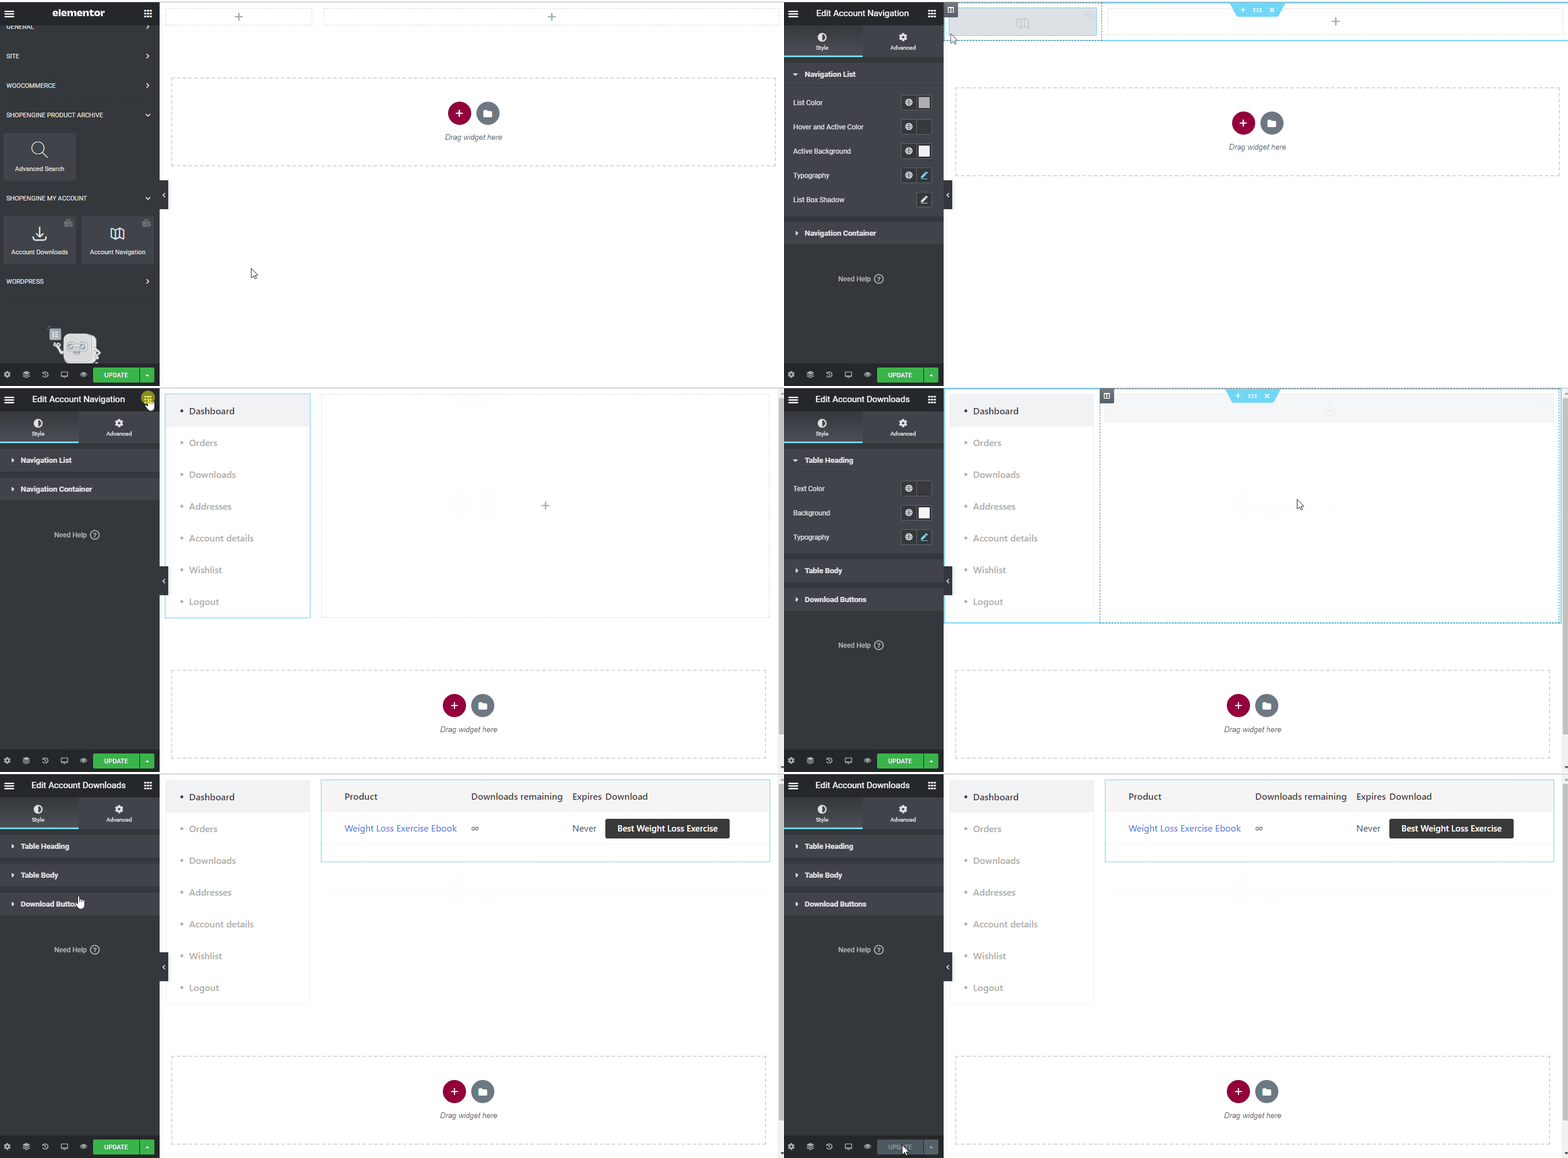
Per creare la pagina Download dell'account, dovrai sfruttare due widget: Navigazione dell'account E Download dell'account widget.
- Trascina e rilascia il widget Navigazione account dal blocco elemento ShopEngine Il mio account di Elementor. Se lo desideri, puoi modificare il colore del testo e del collegamento, il peso del carattere del testo e del collegamento, il peso del carattere dell'utente, la tipografia, il colore del collegamento al passaggio del mouse, ecc. dalla scheda delle impostazioni dello stile.
- Inoltre, trascina e rilascia il widget Download account dallo stesso blocco di elementi e apporta le modifiche che desideri.
- Once you are done editing your Account Downloads page, save it by clicking on -> Aggiornamento.
Passaggio 5: anteprima della pagina di download dell'account #
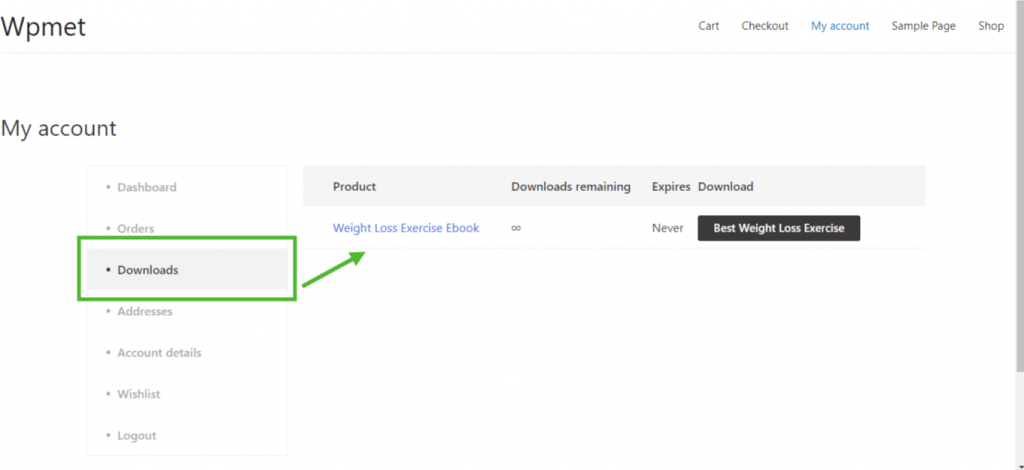
Ora vai a Il mio conto pagina del tuo sito web->Clicca su Download. Si tratta di un'anteprima di come i tuoi clienti vedranno la pagina dai loro dispositivi.
5. Crea la pagina dell'indirizzo del mio account #
Passaggio 1: abilita i widget richiesti #
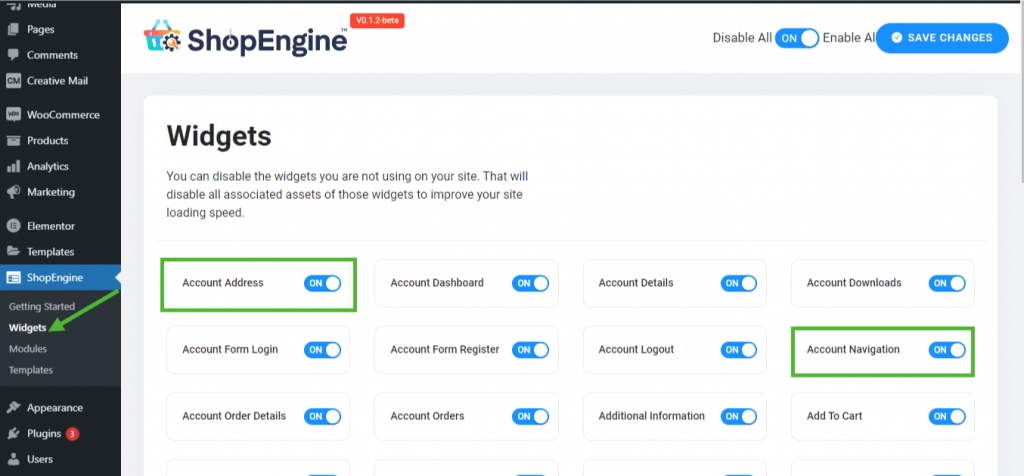
- Go to ShopEngine-> Widget -> Make sure that the Account Navigazione E Indirizzo dell'account i widget sono abilitato.
Passaggio 2: crea il modello di indirizzo del mio account #
- Go to ShopEngine-> Modelli -> Aggiungere nuova
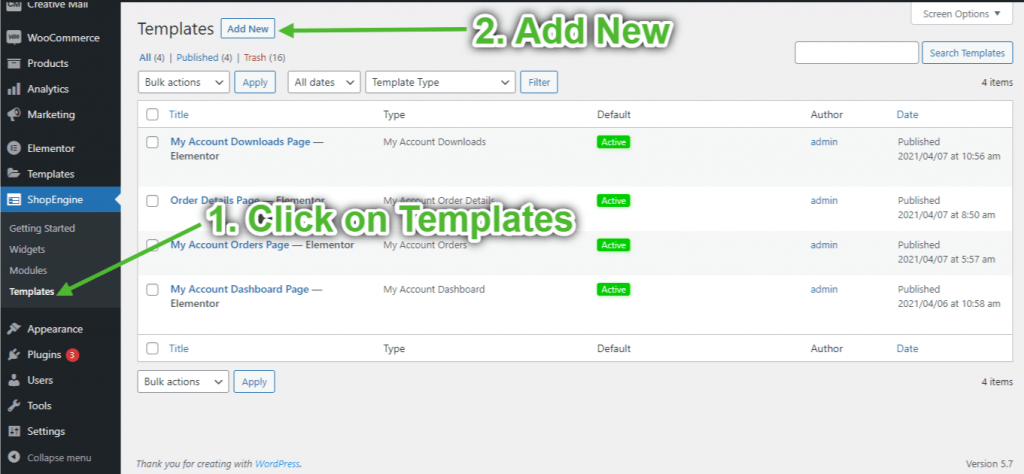
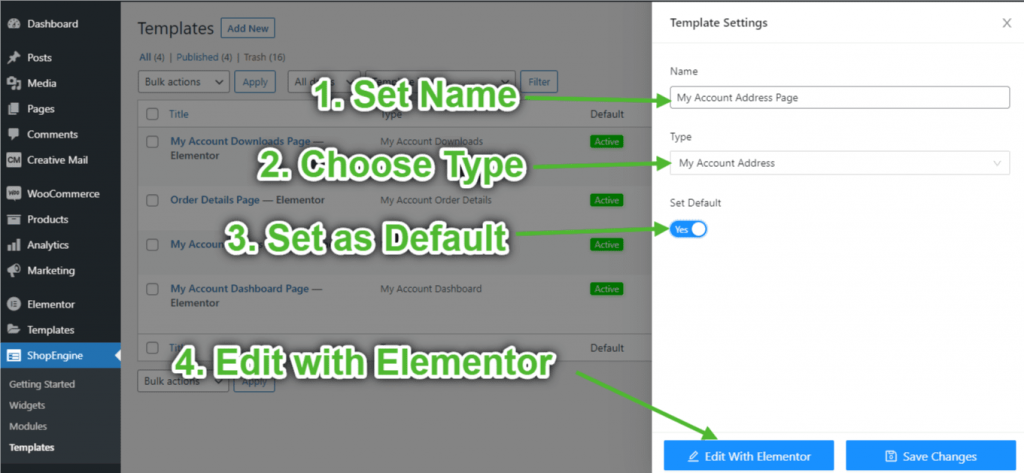
- Fornire modello Nome-> Select Page Tipo: Indirizzo del mio account
- Enable Default Template-> Set Default->SÌ -> Click on Modifica con Elementor
Passaggio 3: scegli una struttura #
- Clicca sul "+" di Elementor e scegli il layout della sezione preferito.
Passaggio 4: crea la pagina dell'indirizzo dell'account #
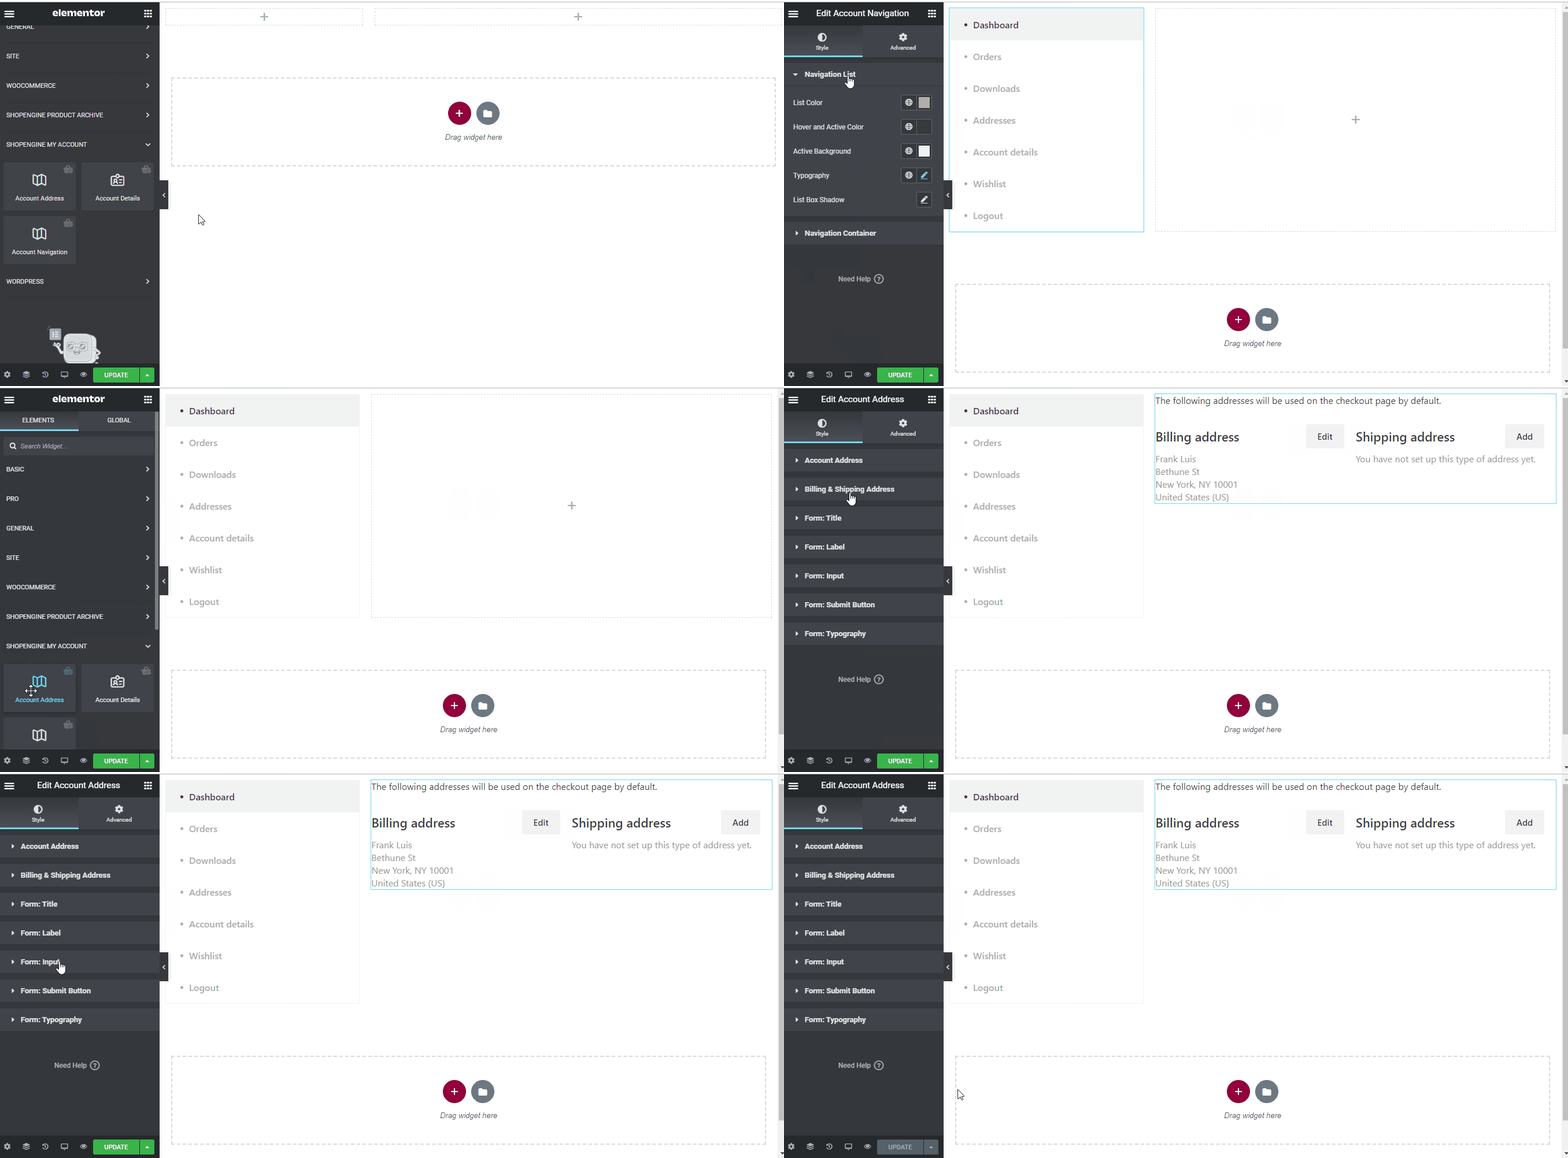
Per creare la pagina Indirizzo account, dovrai sfruttare due widget: Navigazione dell'account E Indirizzo dell'account aggeggio.
- Trascina e rilascia il widget Navigazione account dal blocco elemento ShopEngine Il mio account di Elementor. Se lo desideri, puoi modificare il colore del testo e del collegamento, il peso del carattere del testo e del collegamento, il peso del carattere dell'utente, la tipografia, il colore del collegamento al passaggio del mouse, ecc. dalla scheda delle impostazioni dello stile.
- Inoltre, trascina e rilascia il widget Indirizzo account dallo stesso blocco di elementi e apporta le modifiche che desideri.
- Once you are done editing your Account Address page, save it by clicking on -> Aggiornamento.
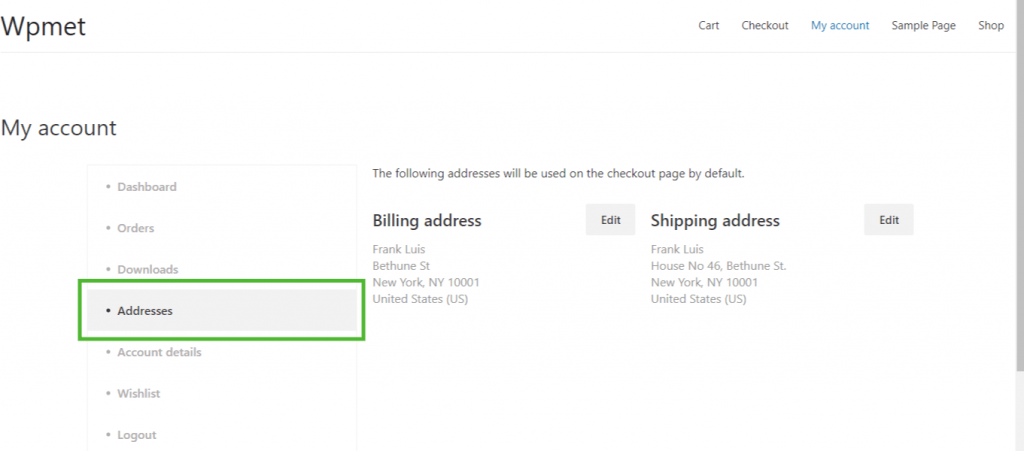
Passaggio 5: anteprima della pagina dell'indirizzo dell'account #
Ora vai a Il mio conto pagina del tuo sito web->Clicca su Indirizzi. Si tratta di un'anteprima di come i tuoi clienti vedranno la pagina dai loro dispositivi.
6. Crea la pagina dei dettagli del mio account #
Passaggio 1: abilita i widget richiesti #
- Go to ShopEngine-> Widget -> Make sure that the Account Navigazione E Dettagli account i widget sono abilitato.
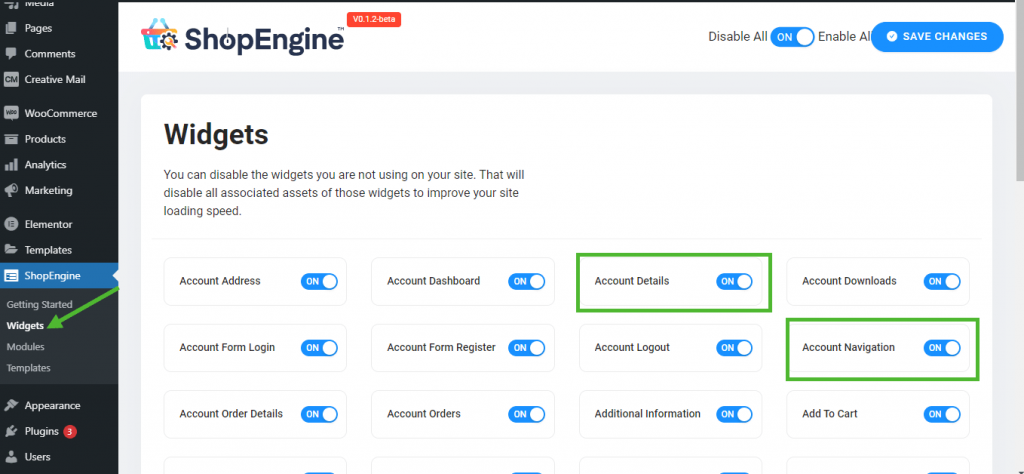
Passaggio 2: crea il modello dei dettagli del mio account #
- Go to ShopEngine-> Modelli -> Aggiungere nuova
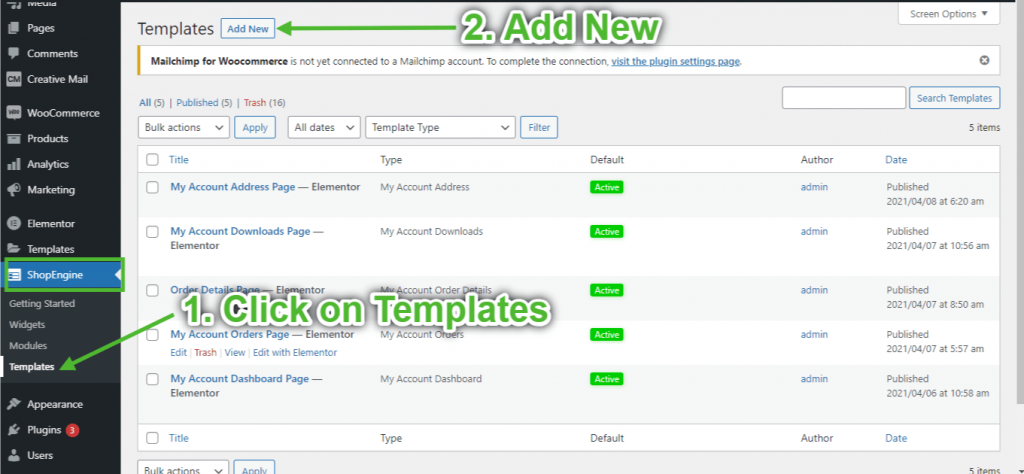
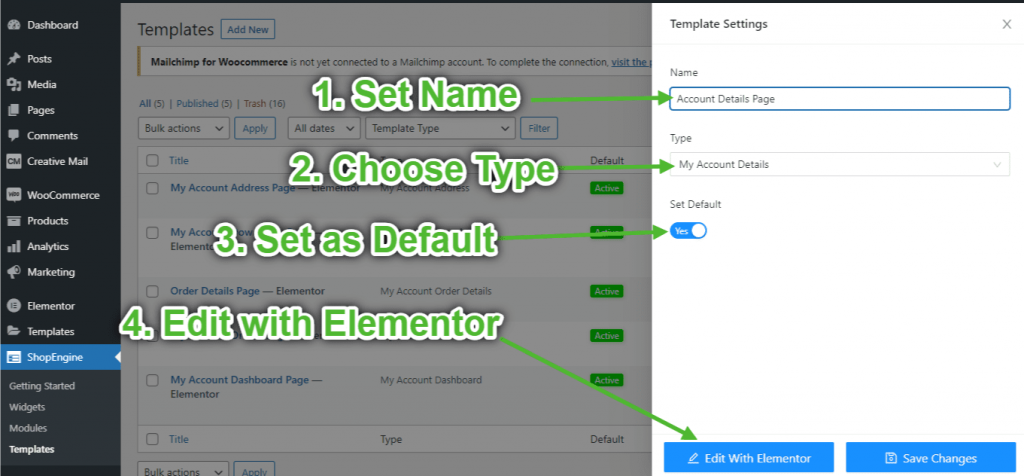
- Fornire modello Nome-> Select Page Tipo: Dettagli del mio account
- Enable Default Template-> Set Default->SÌ -> Click on Modifica con Elementor
Passaggio 3: scegli una struttura #
- Fai clic sull'icona "+" di Elementor e scegli il layout della sezione preferito.
Passaggio 4: crea la pagina dei dettagli dell'account #
Per creare la pagina Dettagli account, dovrai sfruttare due widget: Navigazione dell'account E Dettagli account aggeggio.
- Trascina e rilascia il widget Navigazione account dal blocco elemento ShopEngine Il mio account di Elementor. Se lo desideri, puoi modificare il colore del testo e del collegamento, il peso del carattere del testo e del collegamento, il peso del carattere dell'utente, la tipografia, il colore del collegamento al passaggio del mouse, ecc. dalla scheda delle impostazioni dello stile.
- Inoltre, trascina e rilascia il widget Dettagli account dallo stesso blocco di elementi e apporta le modifiche che desideri.
- Once you are done editing your Account Details page, save it by clicking on -> Aggiornamento.
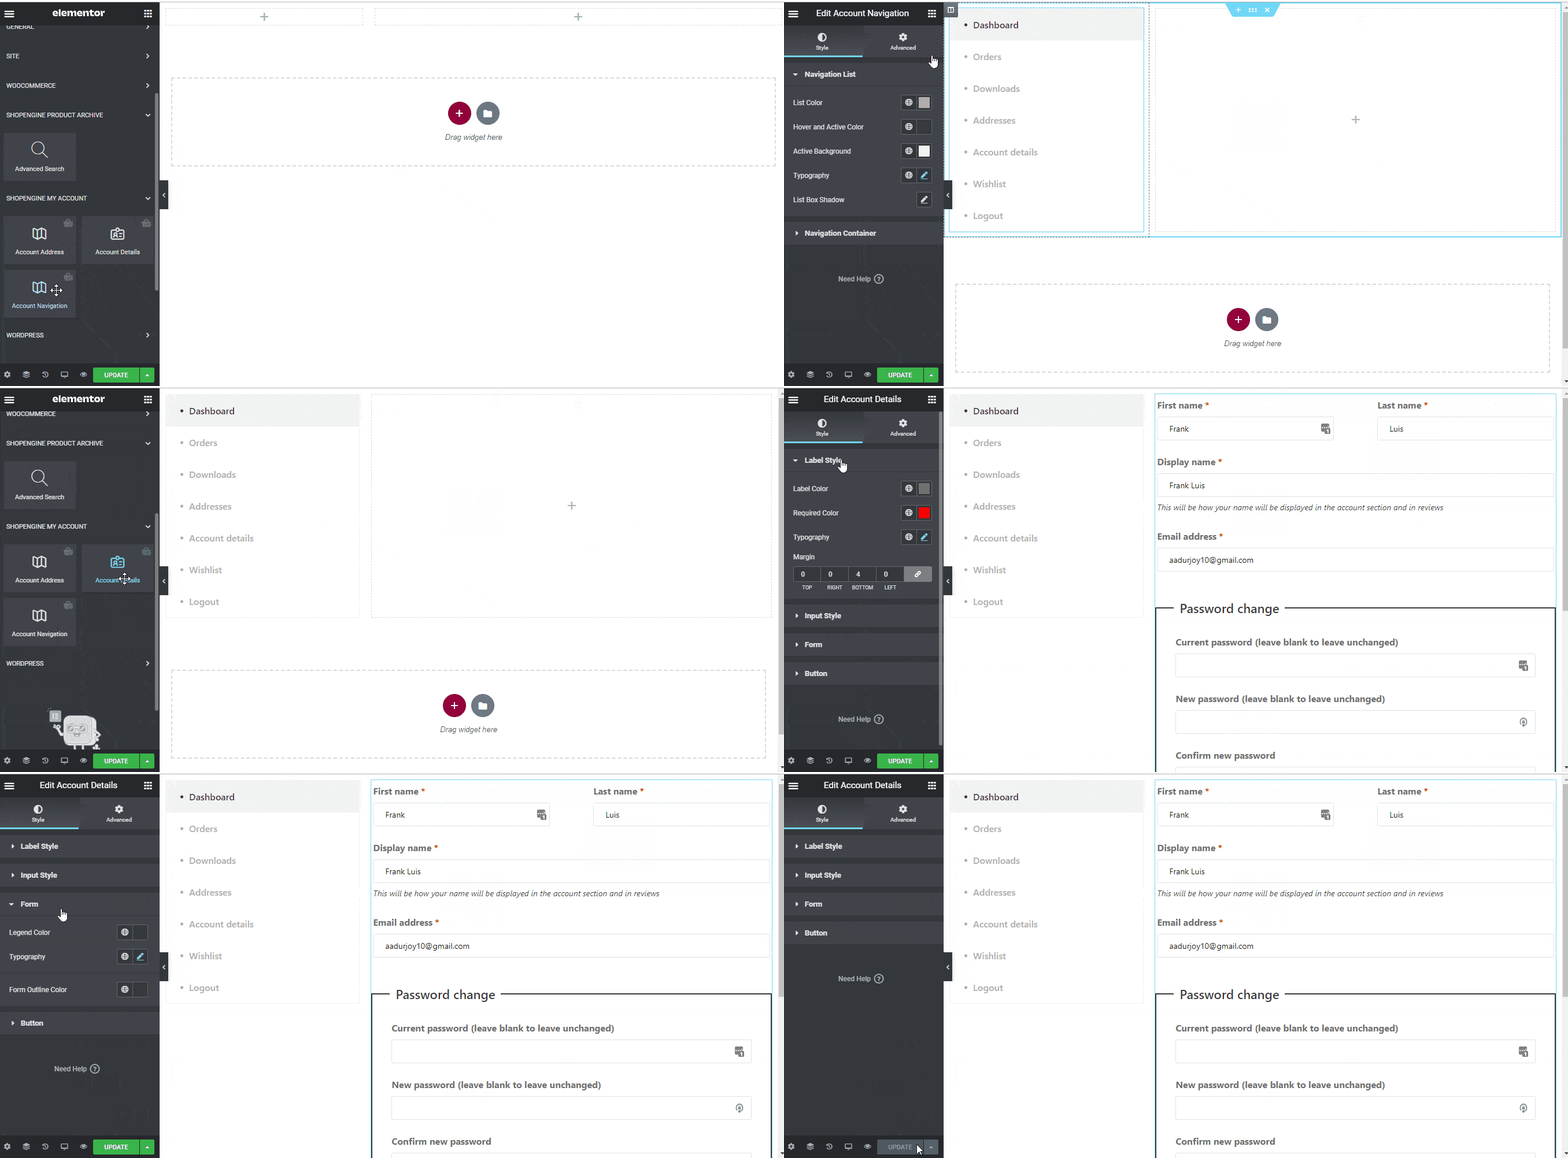
Passaggio 5: anteprima della pagina dei dettagli dell'account #
Ora vai a Il mio conto pagina del tuo sito web->Clicca su Dettagli account. Si tratta di un'anteprima di come i tuoi clienti vedranno la pagina dai loro dispositivi.
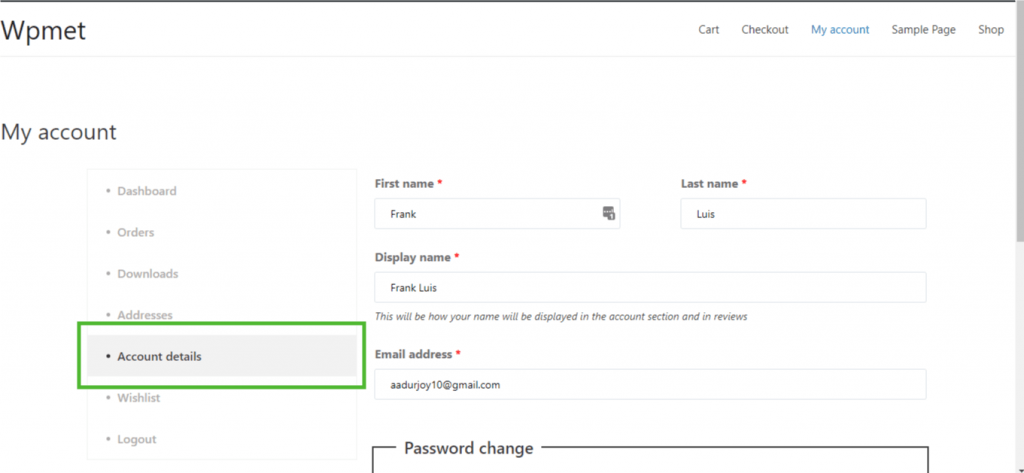
7. Crea la pagina di accesso/registrazione del mio account #
Passaggio 1: abilita i widget richiesti #
- Go to ShopEngine-> Widget -> Make sure that the Account Navigazione, Registro del modulo di conto, E Accesso al modulo account i widget sono abilitato.
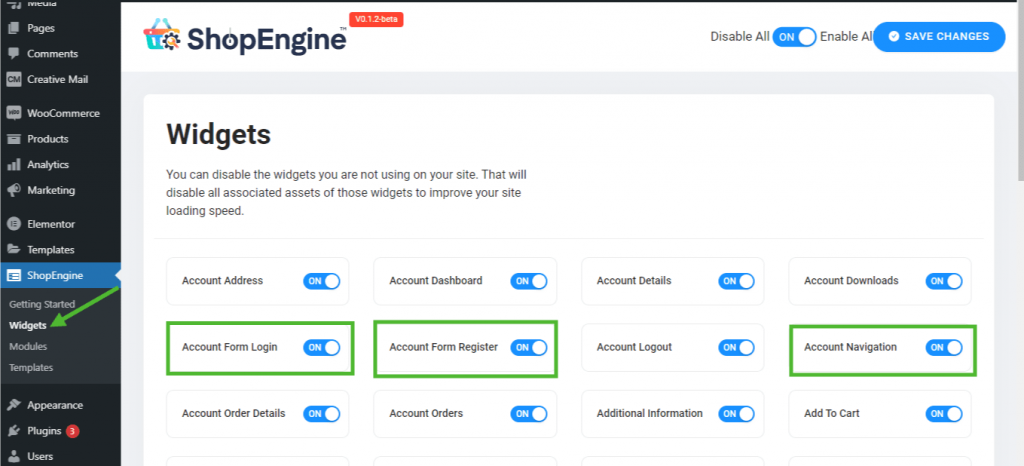
Passaggio 2: crea il modello di accesso/registrazione del mio account #
- Go to ShopEngine-> Modelli -> Aggiungere nuova
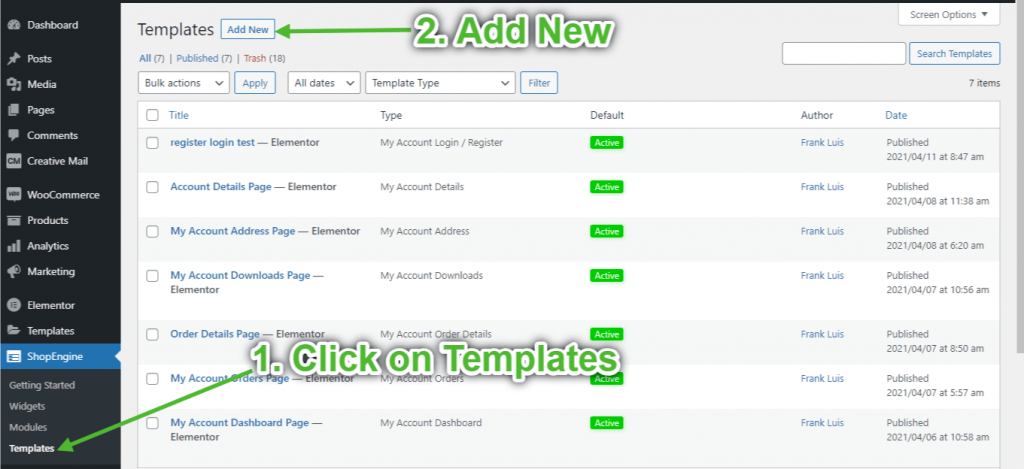
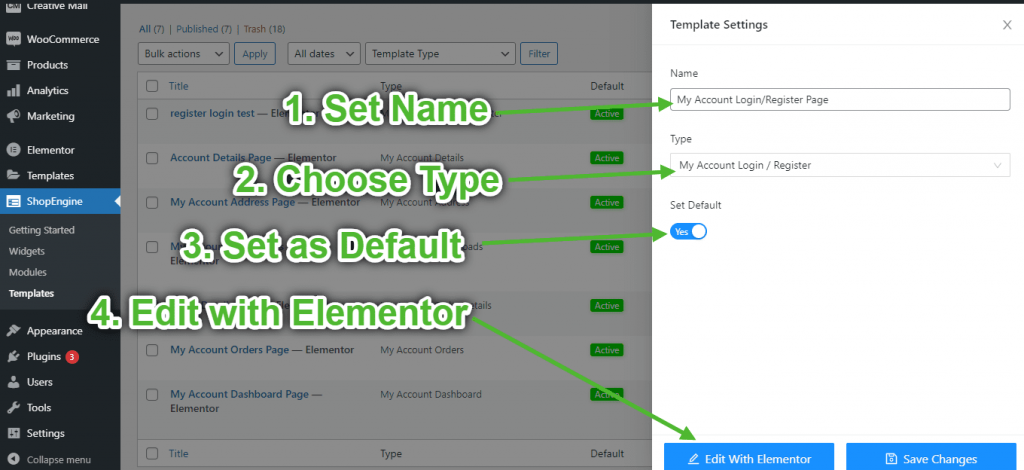
- Fornire modello Nome-> Select Page Tipo: Accedi/Registrati al mio account
- Enable Default Template-> Set Default->SÌ -> Click on Modifica con Elementor
Passaggio 3: scegli una struttura #
- Fai clic sull'icona "+" di Elementor e scegli il layout della sezione preferito.
Passaggio 4: crea la pagina di accesso/registrazione dell'account #
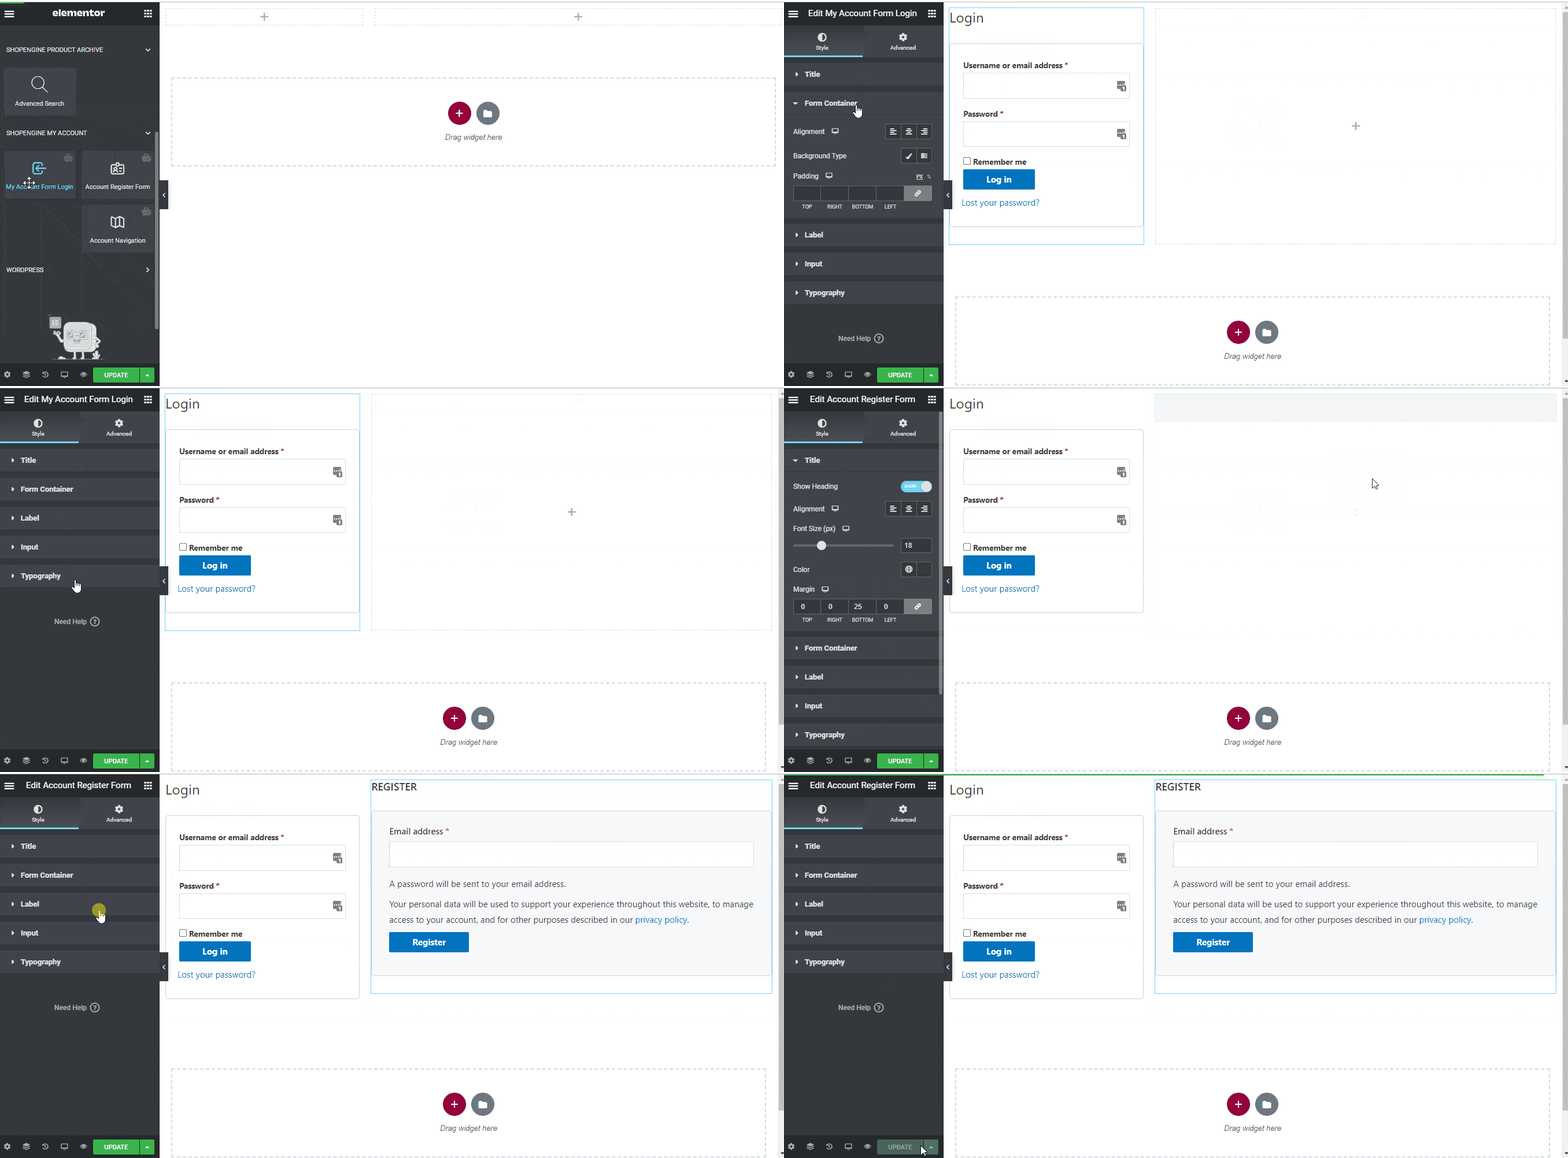
Per creare la pagina di accesso/registrazione dell'account, dovrai sfruttare due widget: Modulo di accesso al mio account, E Modulo di registrazione del conto aggeggio.
- Trascina e rilascia il file Modulo di accesso al mio account widget dal blocco elemento ShopEngine Il mio account di Elementor. Se lo desideri, puoi modificare il titolo, il contenitore del modulo, l'etichetta, l'input e la tipografia dalla scheda delle impostazioni di stile.
- Inoltre, trascina e rilascia il file Modulo di registrazione del conto widget dallo stesso blocco di elementi e apporta le modifiche che desideri.
- Once you are done editing your page, save it by clicking on -> Aggiornamento.
Passaggio 5: anteprima della pagina di accesso/registrazione dell'account #
Ora vai a Il mio conto pagina del tuo sito web->Vai a Pannello di controllo -> Fare clic su Disconnettersi. Ora potrai vedere un'anteprima di come i tuoi clienti vedranno la pagina dai loro dispositivi.