

Adding conditional logic to Elementor form can boost form submission rates.
How? Well, because the conditional logic Elementor form can make sure your customers don’t have to fill out unnecessary fields. As a result, it offers a better user experience.
Do you know what is the best part about these forms?
Well, the best part is that building Elementor conditional logic form is an easy task especially if you follow this article. In this blog, you will learn how to build an Elementor conditional logic form using MetForm, the best WordPress conditional form builder in just 5 steps.
Moreover, you will learn the advantages and use case of it.
So, keep reading….
Quick Overview
This tutorial includes lorem ipsum dolor sit amet.
Tools Used: Elementor, MetForm free, & MetForm pro.
Steps you need to follow while creating conditional form with MetForm:
1. Install required plugins.
2. Add MetForm widget.
3. Create form to a WordPress page.
4. Integrate conditional logic to form fields.
5. Customize other form settings such as confirmation, notification, etc.
What is Conditional Logic in Forms?
Conditional logic in forms is a way of controlling how a form acts based on the user input. You can make specific form fields or multiple fields hide and only have them visible after your user takes a certain action or chooses a certain value in your forms.
It’s a common practice in WordPress forms nowadays. Move to the next section to find out why conditional logic is popular and when people usually use this in their forms.
Why and When to use Conditional Logic in Elementor Form?
Conditional forms are very effective in ensuring your customers have the best experience while filling up your forms. Also, it ensures you get the exact amount of data you need.
Wondering how?
Well, customers don’t particularly enjoy filling out forms. Let’s face it, it’s not really anyone’s hobby!
On top of that, if you ask them to give out information that is not particularly helpful/relevant for them, then it’s obvious for your users to get annoyed.
And that’s exactly where conditional logic in forms comes in handy. With conditional logic, you can ensure that your forms will ask users only to fill out the relevant information and not all the fields in the form.
Basically, the conditional form in Elementor follows the “If condition” logic. For example, if condition A is true, then Action X will take place otherwise it won’t. You can also set up many conditions for a single action. For example, Action X will only take place if Condition A and Condition B both are true, or either of them is true.
Let’s talk about a real-life example, suppose in a form you want to know how many kids one will bring to an event.
Now you don’t need to ask everyone to fill out the number of children. You can ask them first if they plan to bring kids, and once they say yes, then you can show the option in the form to select how many kids they will bring.
This way, those people who are not going to bring any kid won’t have to fill the number of child fields. In fact, they will have a shorter form which will motivate them to finish filling out the form rather than abandon it midway.
To sum it up, here are the advantages of using conditional logic in Elementor form:
- It saves users time as users are only required to fill the fields that are meant for them.
- Improves user experience as conditional forms are more convenient.
- Encourages users to fill out the form as they are shorter than the ones without conditional logic.
- You get all the relevant information and an increased form submission rate.
Now that you know how useful conditional logic can be, let’s move on to the next section where you will learn how to add conditional logic to Elementor form.
How to build conditional logic Elementor form: Step-by-step guide
Follow all the steps properly to create your conditional logic Elementor form in a few moments.
Step 1: Install necessary plugins
To add Conditional Logic to an Elementor Form, along with the Elementor free version, you need to install an Elementor form builder MetForm. You will need both
- MetForm (Free)
- MetForm Pro
You can have a look at the documentation if you need help with the process of installing and activating MetForm.
Note: You don’t need the Elementor Pro version to add conditional logic form.
The good news is you can join the MetForm Community at 20% discount using the coupon code community20.
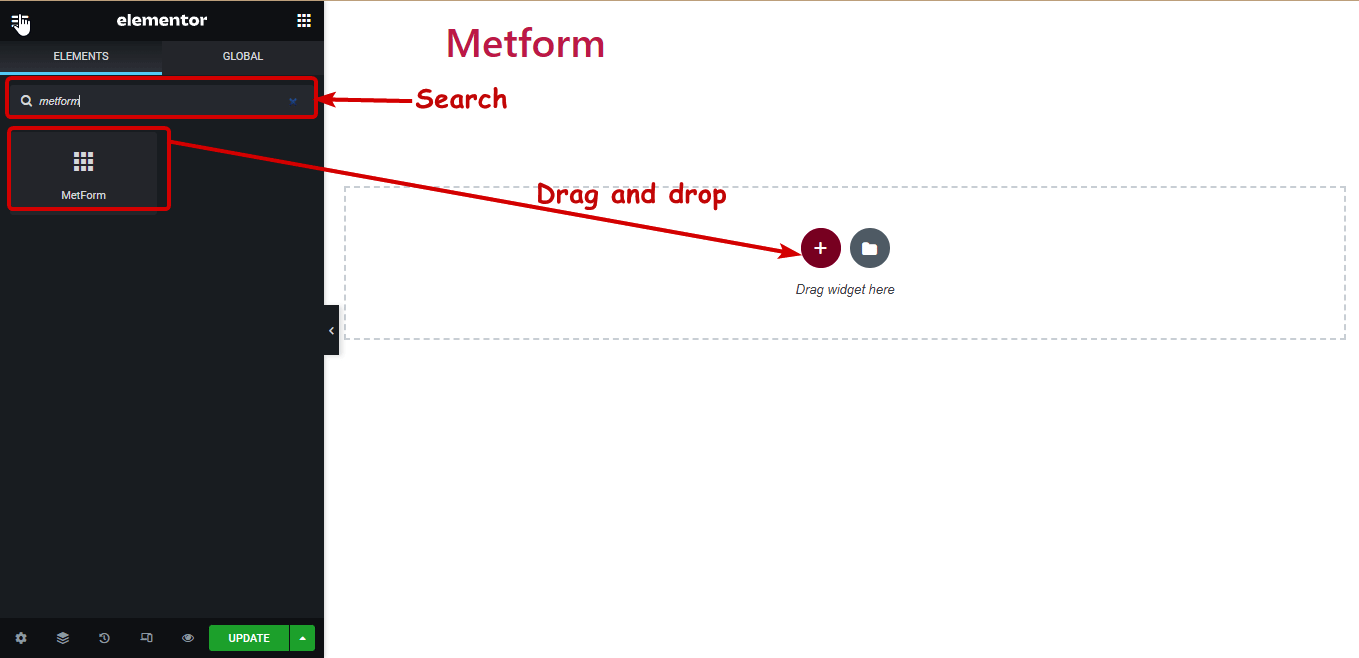
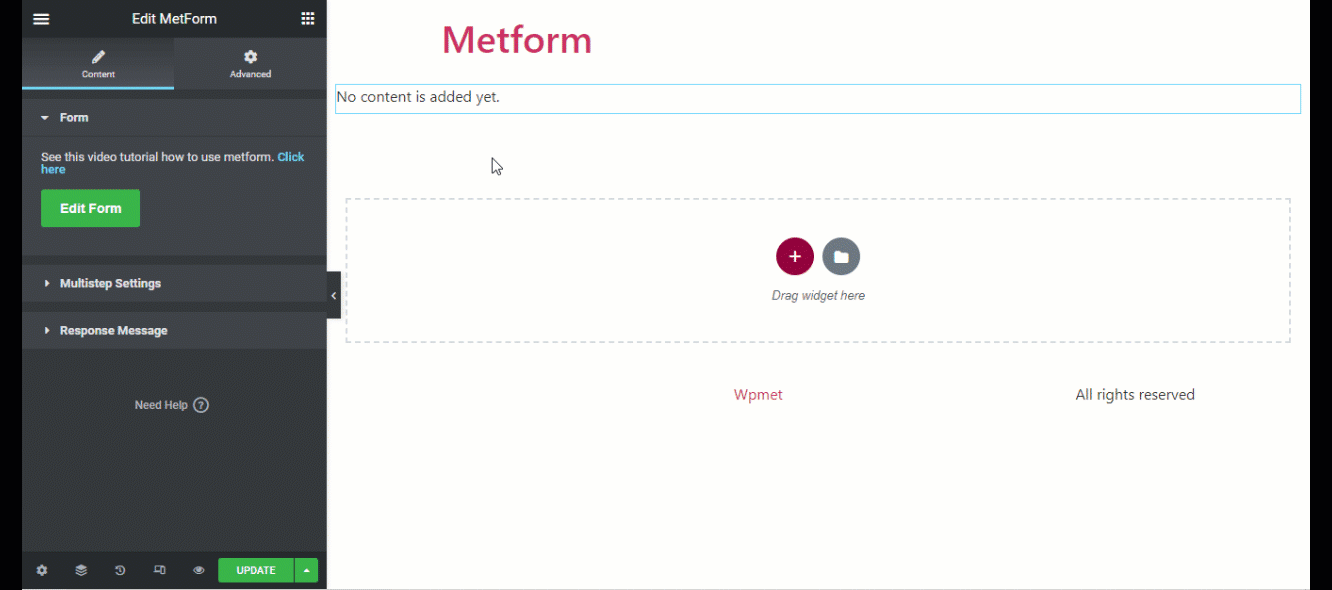
Step 2: Drag and drop MetForm widget to your Elementor Page
Now go to the page where you want to add your Elementor conditional logic form. You can add the conditional form to an existing page or create a new page. However, make sure you are on the Edit with Elementor mode.

Now search for MetForm, once you find the widget, drag and drop it on the page.
👉👉 You can also check our blog How to Create WordPress Survey Form in Elementor using MetForm
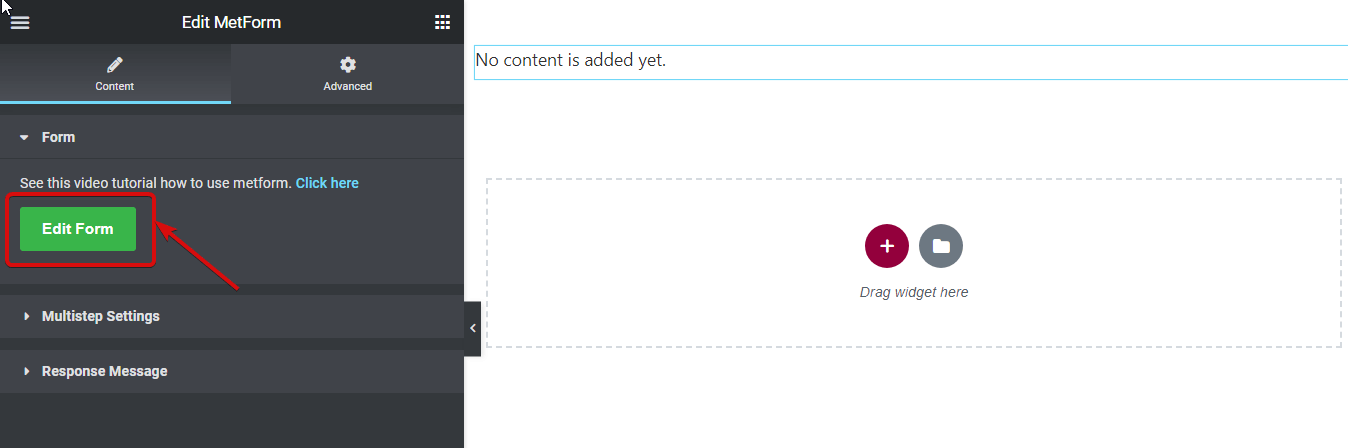
Step 3: Create/Add a form to your page
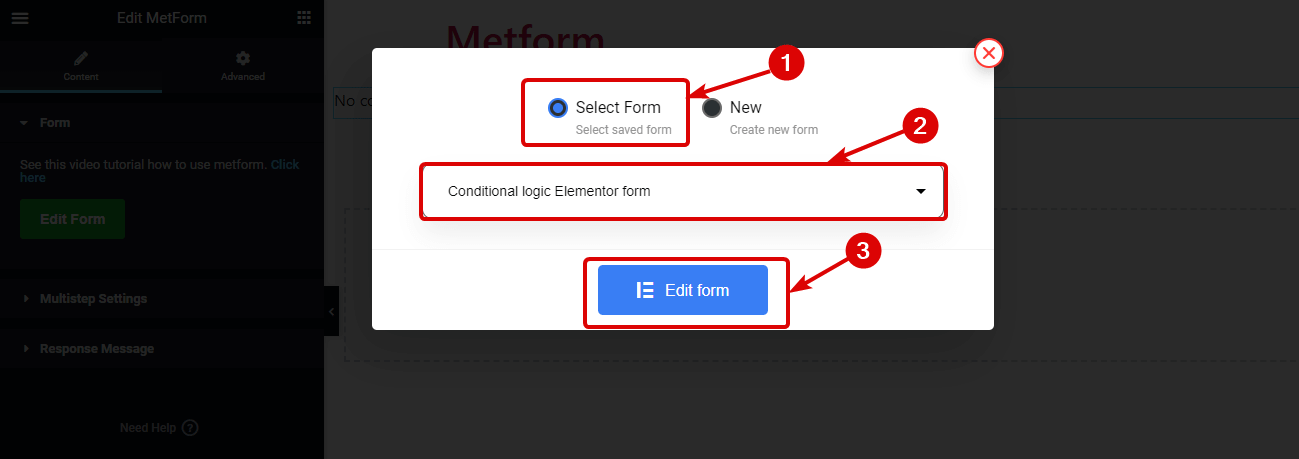
Now, you can either pick an existing MetForm conditional logic form or create a new one. To create a new form or add an already existing one with WordPress conditional form builder, click on the Edit Form button.
I have already created one demo booking form, so I am going to
- Choose “Select Form”.
- Select my existing form named “Conditional logic Elementor form” from the drop-down.
- then click on Edit Form.
🔔🔔 If you want to build your Form from scratch using MetForm, check out our blog on
👉👉 how to create multi-step contact form from scratch using MetForm.
Step 4: Add MetForm conditional logic to Elementor form fields
Using the MetForm conditional feature, you can make form field hide/show based on multiple conditions such as if the dependent field is empty, not empty, equals (matches some value), not equals, greater than, greater than equal, smaller than, etc. Moreover, you can customize whether all the conditions need to be true or any of them need to be true for the action to take place.
In this article, I am going to apply a few of these conditions, you can follow the same steps to apply all the conditions. To apply any condition, you need to follow the following steps:
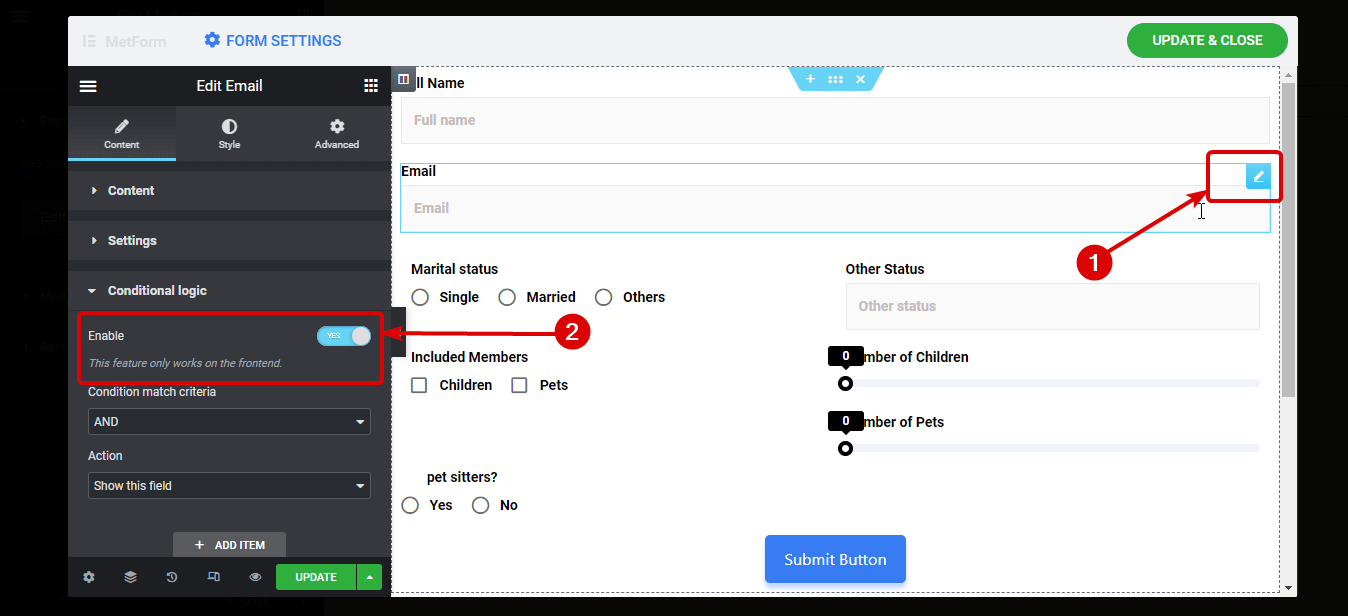
1️⃣ Edit the field and enable conditional logic
For this, on the form field, click on the edit icon on the top right corner, then on the left settings panel and scroll down a little bit, then expand the Condition Logic option and finally turn on the Enable button.
2️⃣ Set the criteria and Action
Now, choose the Condition match criteria as AND /OR and Action type as Show this field/hide this field from the drop-down.
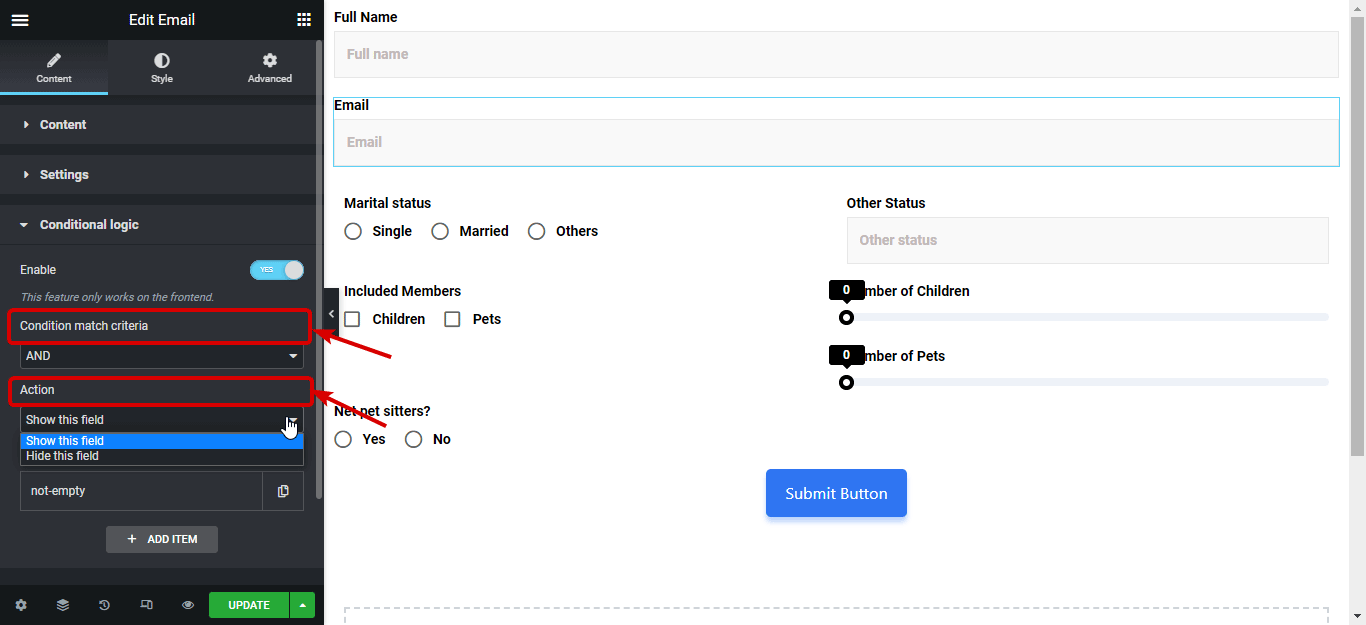
3️⃣ Set the condition
Now it’s time to set the condition, to set a condition
- Click on the + ADD NEW item
- On the If field, add the name of the field against which you want to add the condition
- From the Match (comparison) drop down choose the condition.
For example, I want to make the Email field only visible when the Full Name field is not empty. As a result, when someone fills up their name only then the Email field will appear visible. For that, I am going to
- Copy the name of the full name text field
- Come back to the email field conditional logic section and paste it on the “If field”
- Finally, choose not empty from the Match (comparison) drop-down.

Follow these exact steps to add conditional logic to all Elementor conditional form fields or a few ones depending on your requirements.
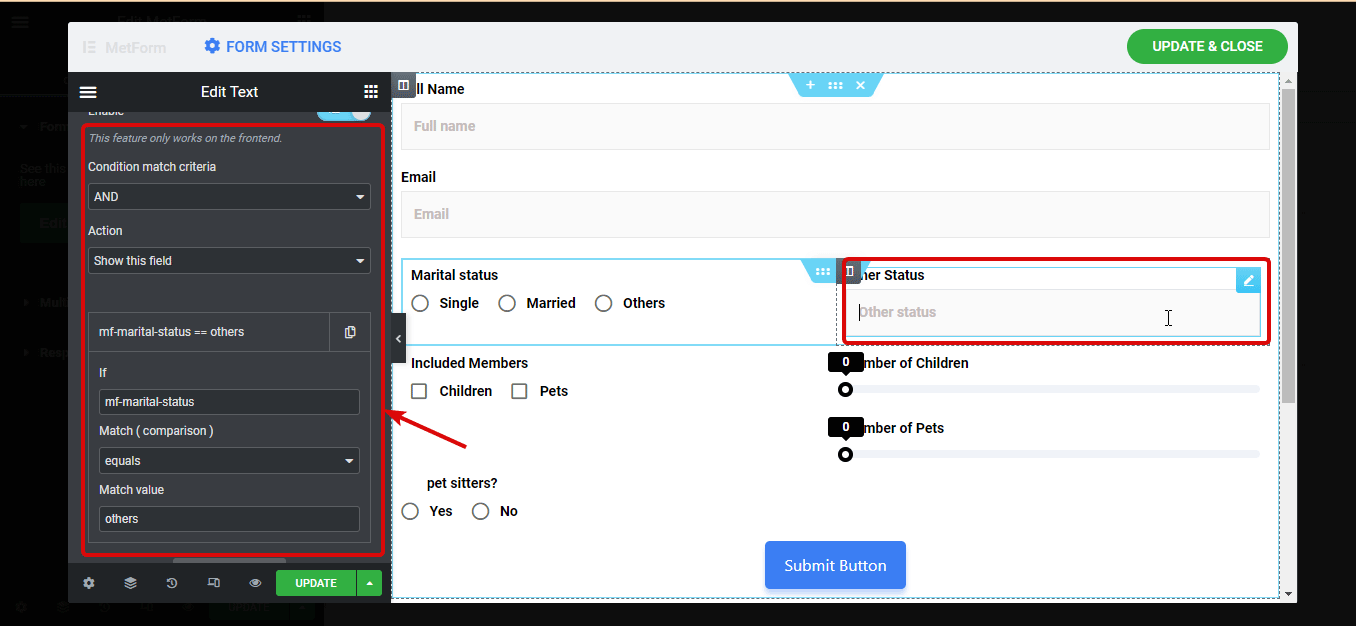
Note: If you want to set conditions for form fields like Radio or Checkbox where you have multiple options, you need to put the field name on the If field and set the value of the options in the radio/checkbox on the Match value field.
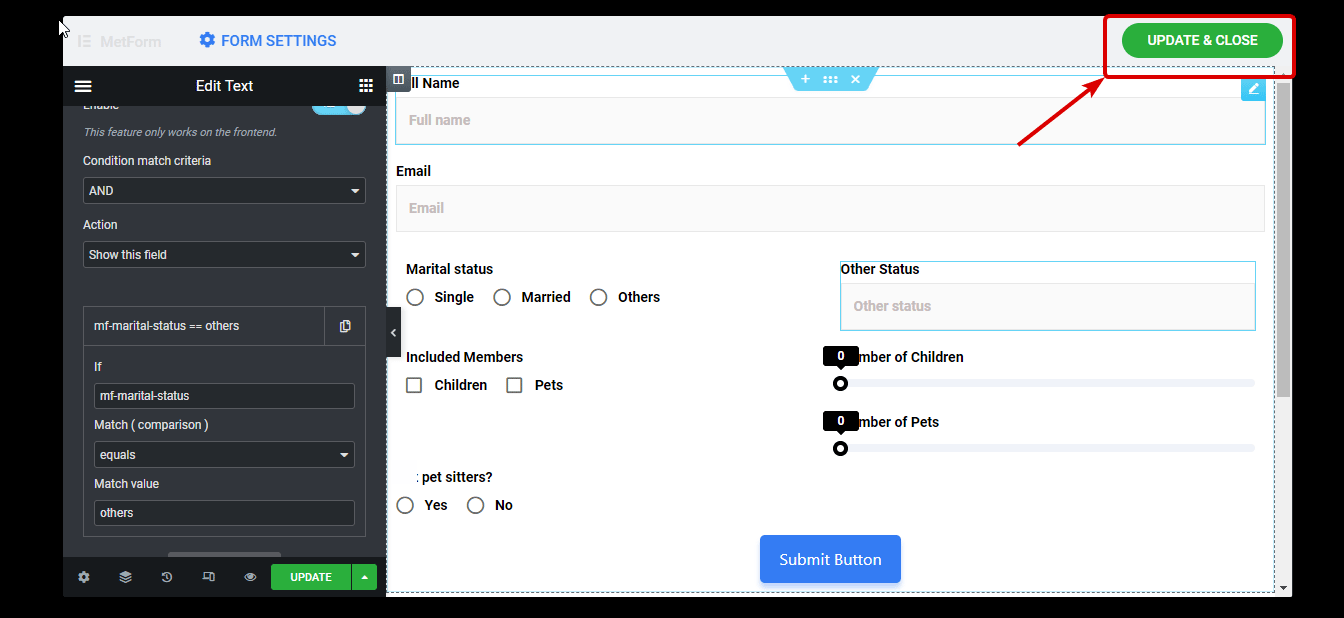
For example, to make the Other Status field appear only when someone chooses others as their material status, you need to
- Choose Match (comparison) as equals
- Copy the Marital status field name
- Paste it to the “If” option of Other Status’s conditional logic
- Copy the Others option’s value from the Marital Status ratio field
- then paste it to the “Match value” option of Other Status’s conditional logic
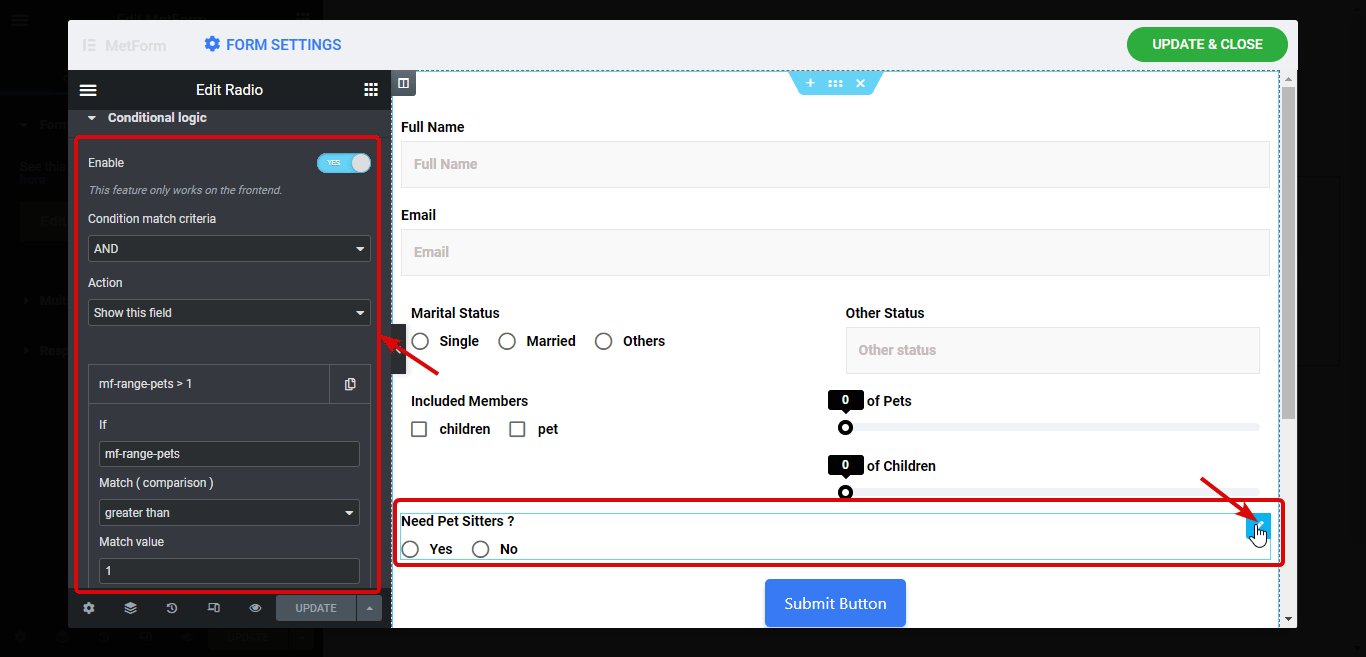
I have followed the same steps to make the Need Pet sitters form visible only when the Number of Pets is greater than 1.
✨✨ Adding forms in a popup is a proven lead magnet. Check how you can add forms in modal popup in just 3 steps.
Once you are done adding all the conditional logic to your Elementor form, click FORM SETTINGS to customize different settings. You can
- Customize Title, Success Message, Required Login, Count views, etc under general settings.
- You can customize options like turning on the confirmation, setting Email Subject, Email From, From email, and Thank you message, etc under Confirmation settings.
- Under Notification settings, you will get email notification options like Enable the Notification mail to the admin, Email Subject, Email To, Email From, Admin Note, etc.
You can also set the different Payment and CRM integrations if you want with this best WordPress conditional form builder. For more details on these topics, check out the documentation. After making all the changes scroll down and click on save changes.
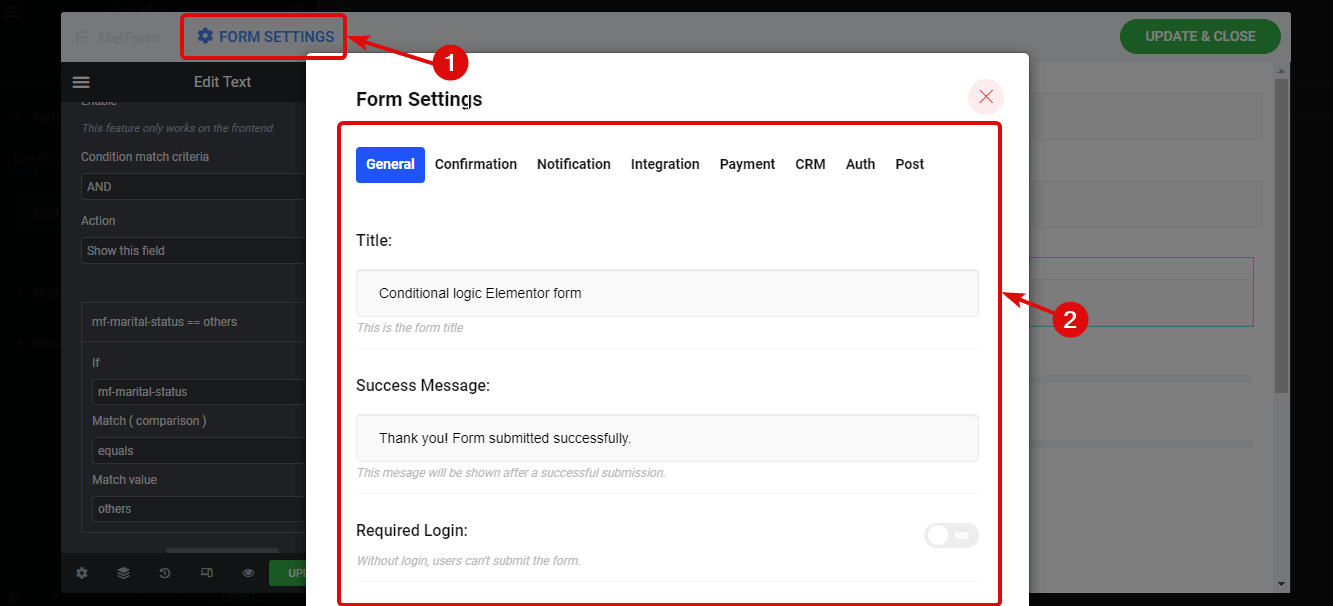
Click on UPDATE & CLOSE to save the conditional form you just created.
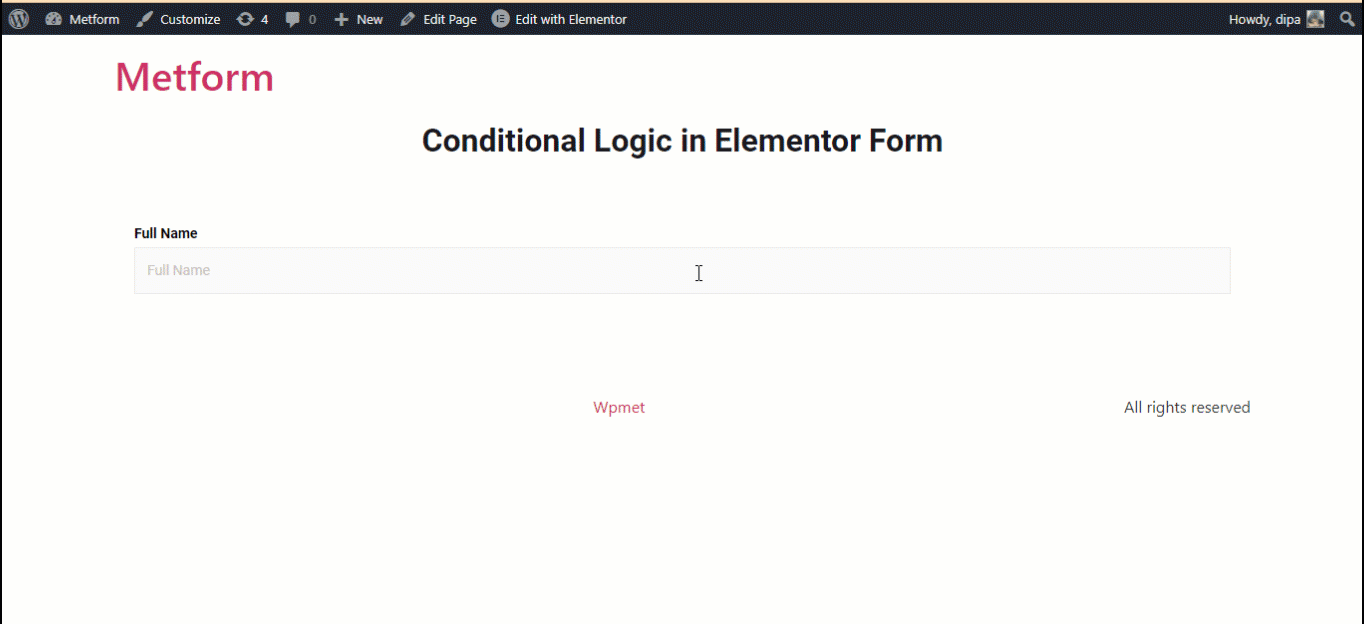
Now if you click on the preview button you should see your Elementor conditional form like the one shown below:
How to use MetForm’s Pre-Built template to add Conditional Form in Elementor
Now if you are looking for a premade template of Elementor conditional logic form, then you can not find a better option than MetForm. Because this WordPress form builder provides 6+ premade Elementor conditional logic form templates.
To use the prebuilt conditional forms of MetForm, when you reach the third step of the above-mentioned process, scroll down a little bit to find all the conditional forms. To choose the form you prefer, click on the form and then click on Edit Form.
When the form loads, click on UPDATE & CLOSE, and finally save your page. Here is a preview of the premade Elementor conditional logic form by MetForm:

🔔🔔 Related articles:
👉 MetForm vs Contact Form 7 vs Gravity Forms: Which Is the Best Form Builder?
👉 How to Create an Engaging Vacancy Application Form
👉 How to Create Booking Forms in WordPress?
Is Elementor SEO-friendly?
Yes, Elementor creates fast and SEO-friendly websites that Search Engines can easily crawl and index. Besides, it is compatible with most of the SEO plugins that ensure quality optimization for your site.
Are Elementor forms secure?
Elementor brings regular improvements and security fixes. It prevents unauthorized access by using SSL encryption. That’s why the data submitted through forms are protected.
Do Elementor forms have conditional logic?
By default, Elementor forms don’t have conditional logic fields. You need to add conditional logic fields by using MetForm like Elementor form builder.
Final Words
Congratulations! Now you know how to add conditional logic to Elementor form fields using MetForm. I hope now you will use this process to make a user-friendly Elementor conditional logic form in your WordPress website.
Keep in mind that your job is to make sure that users are required to make minimal effort to fill out your form. And that’s why MetForm’s conditional features work amazingly. Besides, MetForm, the WordPress conditional form builder also supports shortcodes.
Don’t forget about the prebuilt Elementor conditional logic form templates. Also, I would highly recommend you check out all the amazing features of MetForm. The advanced features of this WordPress plugin will help you build more optimized Elementor forms.
The good news is you can join the MetForm Community at 20% less price using the coupon code community20.
Leave a Reply