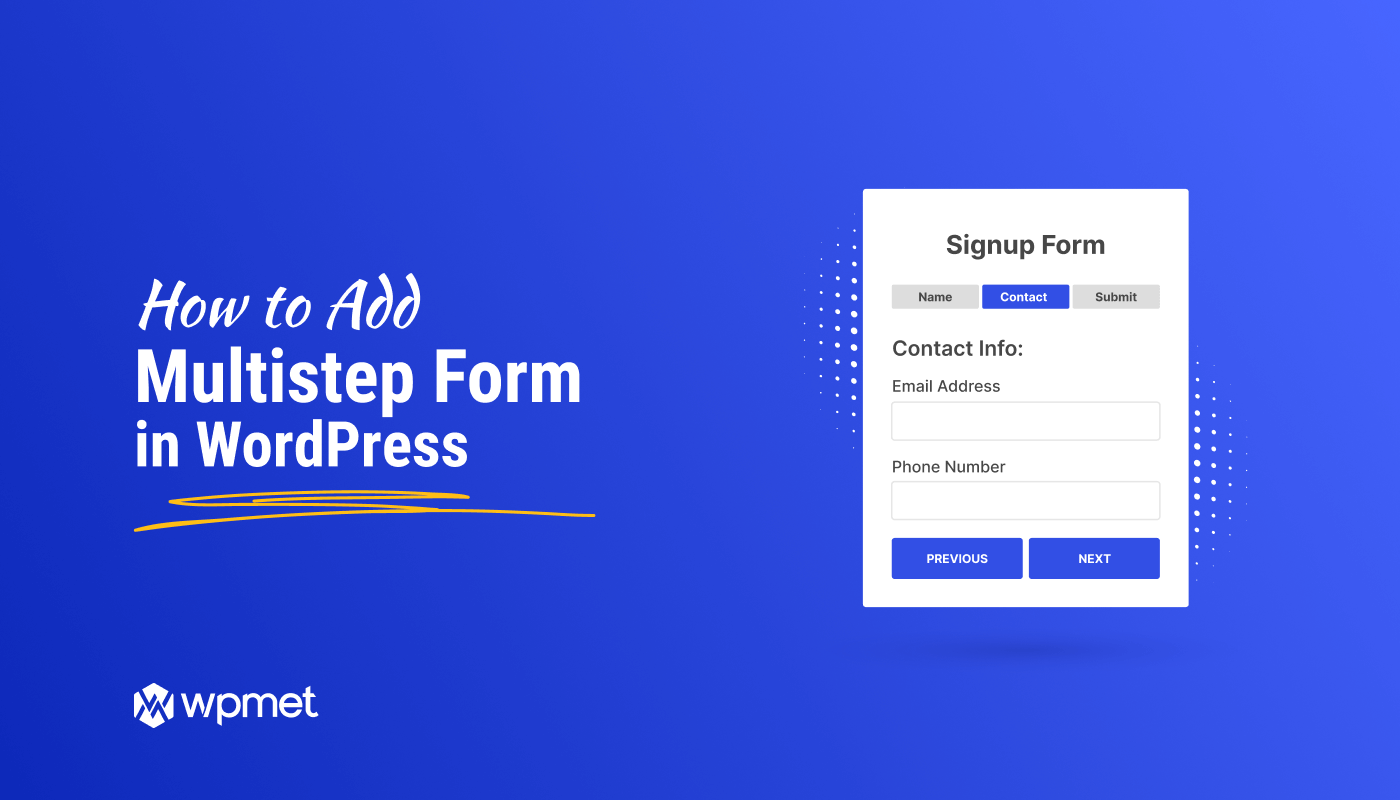
Did you know that converting your single step WordPress form into multi step form WordPress can increase your conversion by almost 60%? In fact, in some cases, the conversion rate can get as high as 300%.
Yes. Because nowadays, people are too busy and have a short span of attention. On top of that, if you ask them to fill up a one-step long-form, they are most likely to leave your website, leaving the form incomplete.
However, you can change this scenario by using a multi step form for your WordPress site. But the question is how?
Well, that’s why I am here to show you a step by step guide on how to add a multi step form in WordPress.
Keep reading to find out how you can easily create a multi step form in WordPress website with MetForm builder in just a few minutes ….
Quick Overview
In this guide, you will learn everything about a WordPress multistep form.
Here we’ll create multistep form using a blank template of WordPress form builder, MetForm.
Tools Used: Elementor, MetForm free, & MetForm pro.
After installing and activating these much needed tools, you need to follow the 5 steps friendly tutorial that requires zero coding skills.
What is a Multi Step Form?
Well, as the name suggests it’s a form with multiple steps where questions/input fields are divided into different steps rather than putting all in just one step. If you are looking for a definition, here is how HubSpot defines multi step form.
A multi-step form is a long-form that is broken into multiple pieces. They’re used to make long forms less intimidating and daunting.
– Hubspot
Multi-step forms are basically a substitute for long-form with too many input fields. If you have a comparatively smaller form, then you can stick to a one-step form.
Now that you know what a multi-step form is, let’s look at some of the reasons why you should consider adding a multi step form to your WordPress site.
Why Use Multi Step Form In WordPress?
Well, the simple answer is to skyrocket your conversion rate. Multi steps forms are nowadays becoming extremely popular on websites with usages like registration forms, booking forms, food order forms, etc. Some of the reasons why you should also consider using the multistep form in your website include:
- Multi-step forms work better when it comes to grabbing the user’s attention. As a result, people engage more and complete their form submission more often.
- Users find multistep to be more user-friendly and it provides better ease of use than a long one step form does not.
- Since there is a nav bar/ progress bar with a multi step form, users feel more encouraged to complete a multi step form.
- Conditional multi steps forms are great for collecting only relevant data that you need.
- As a result of all the positive sides mentioned above, multi-step forms increase the conversion rate.
Now that you know that you should use multi step forms in WordPress site, it’s time to create the perfect setup you need to build your multipart form.
Set up you need to build a WordPress Multi Step Form
Along with WordPress, you would need two more plugins to create multi-step forms in WordPress with ease. Those WordPress plugins are:
Elementor is the best WordPress page builder and MetForm is one of the fastest-growing free WordPress multi-step form plugins. If you need help installing MetForm, you can have a look at our documentation on how to install MetForm.
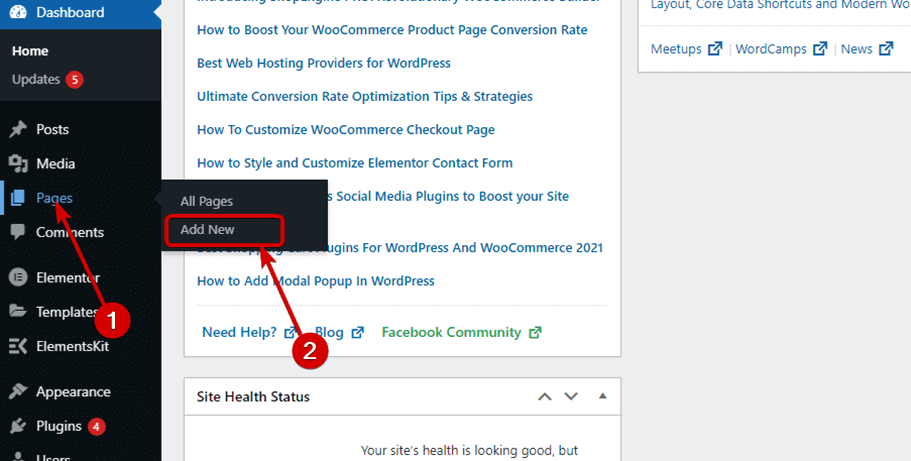
Once you are done installing, you need to create a page with the Elementor page builder before you can use the Metform. For that, go to Dashboard ⇒ Page ⇒ Add New.
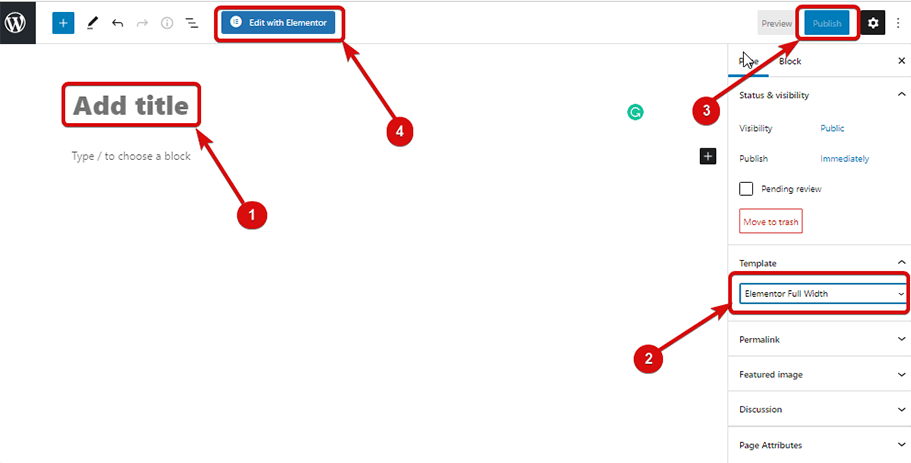
Now, provide a suitable Title, Select Elementor Full Width as Template, Click on Publish. After that, click on Edit with Elementor.
Finally, you are set to build your multi-step form. So, let’s move on to the main process.
Note: In this tutorial, I am going to show you how to add a multi-step form to a page. But you can also add forms built with MetForm in a modal popup easily.
How to Create a Multi Step Form In WordPress
In this blog, you will learn to create a modern-looking multi-step form from scratch in just 5 easy steps:
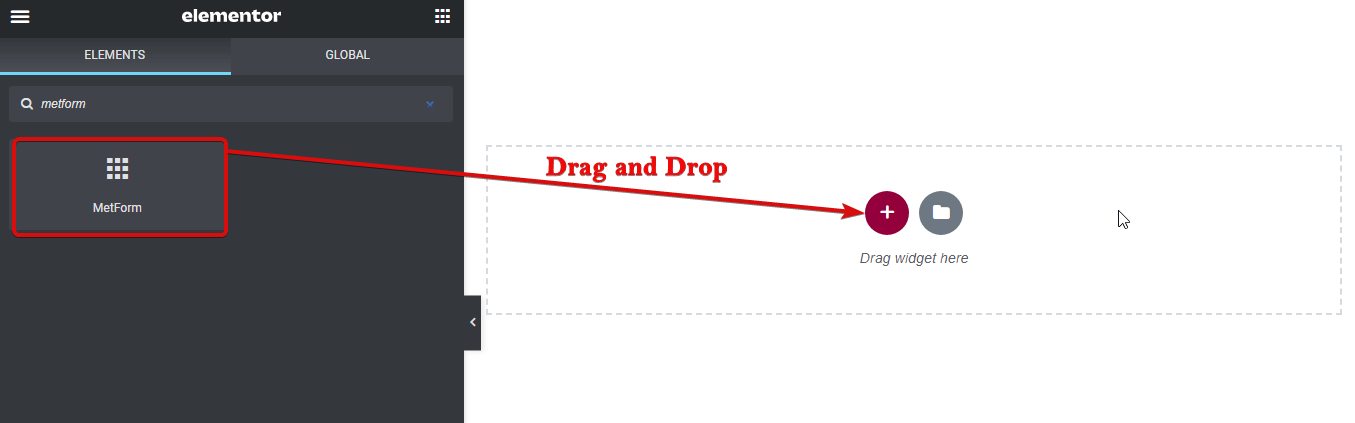
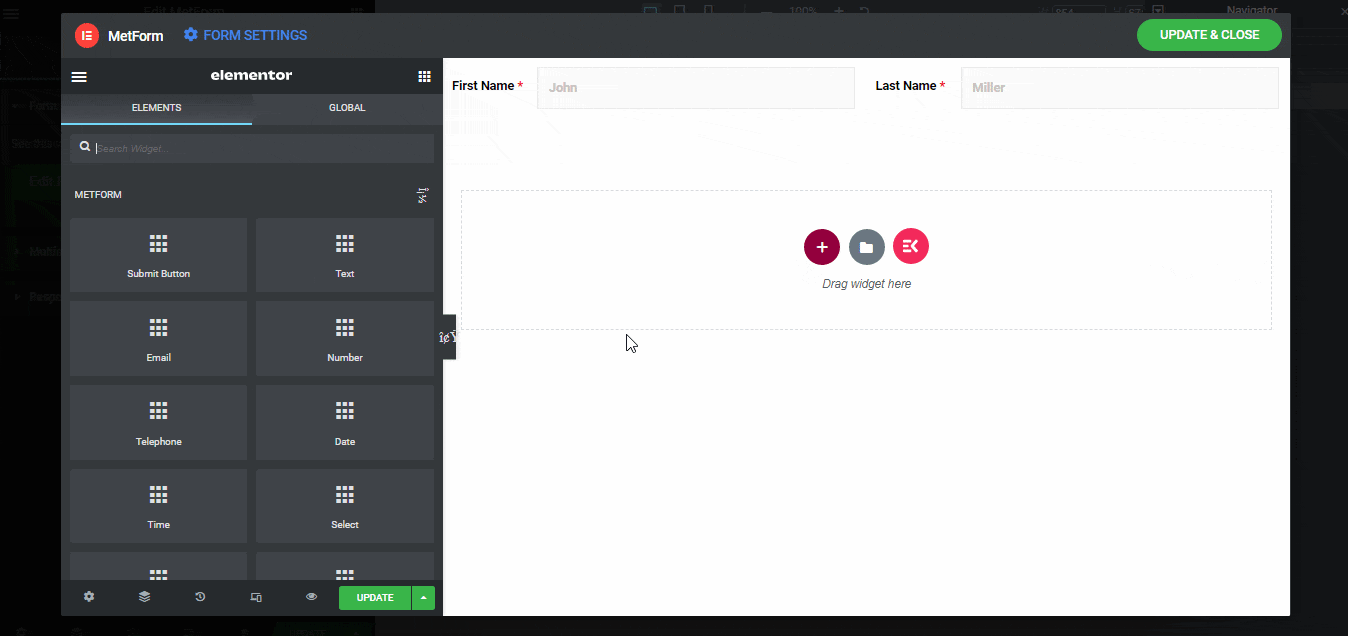
Step 1: Drag and Drop MetForm
Once you are in Edit with Elementor mode, search for MetForm and drag and drop on the place where you want the form to appear.
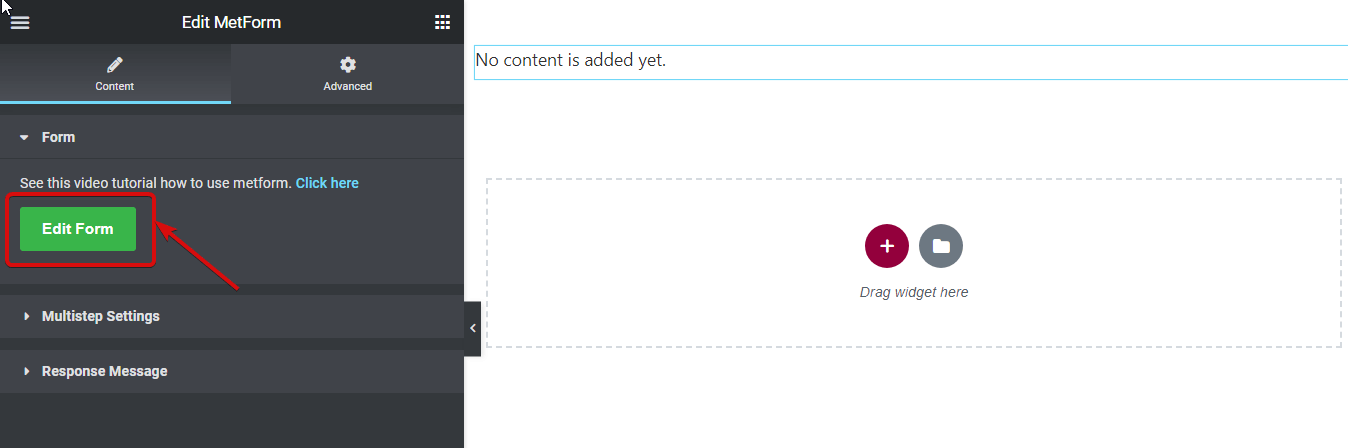
Step 2: Create a New Form
Click on the form section to go to the Edit MetForm options. Click on the Edit Form Button.
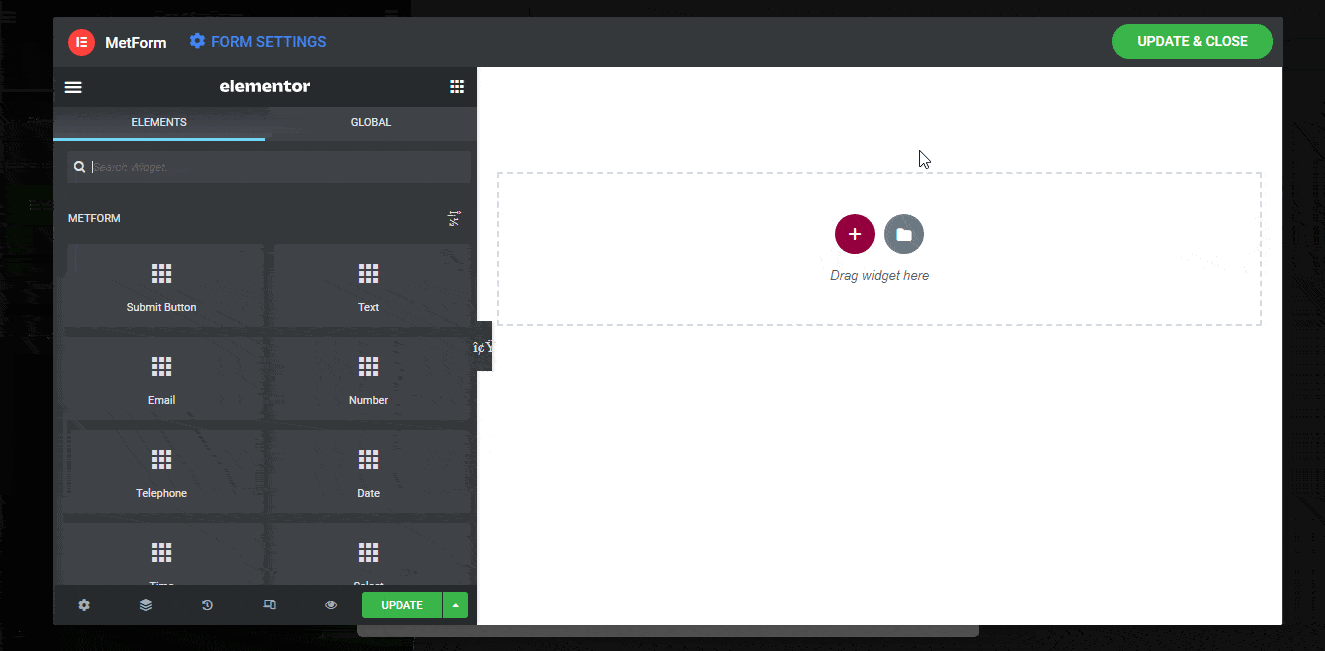
Once new window popups
- Select New (create new form)
- Provide a form name for the form
- Choose the blank template,
- and click on the Edit Form

😕😕 Not sure why you should go for MetForm and not Contact Form or Gravity Forms? Check our blog on 👉🏽👉🏽 Why MetFrom is the best form builder for WordPress.
Step 3: Build WordPress Multi Step Form From Scratch Using MetForm and Elementor Page builder
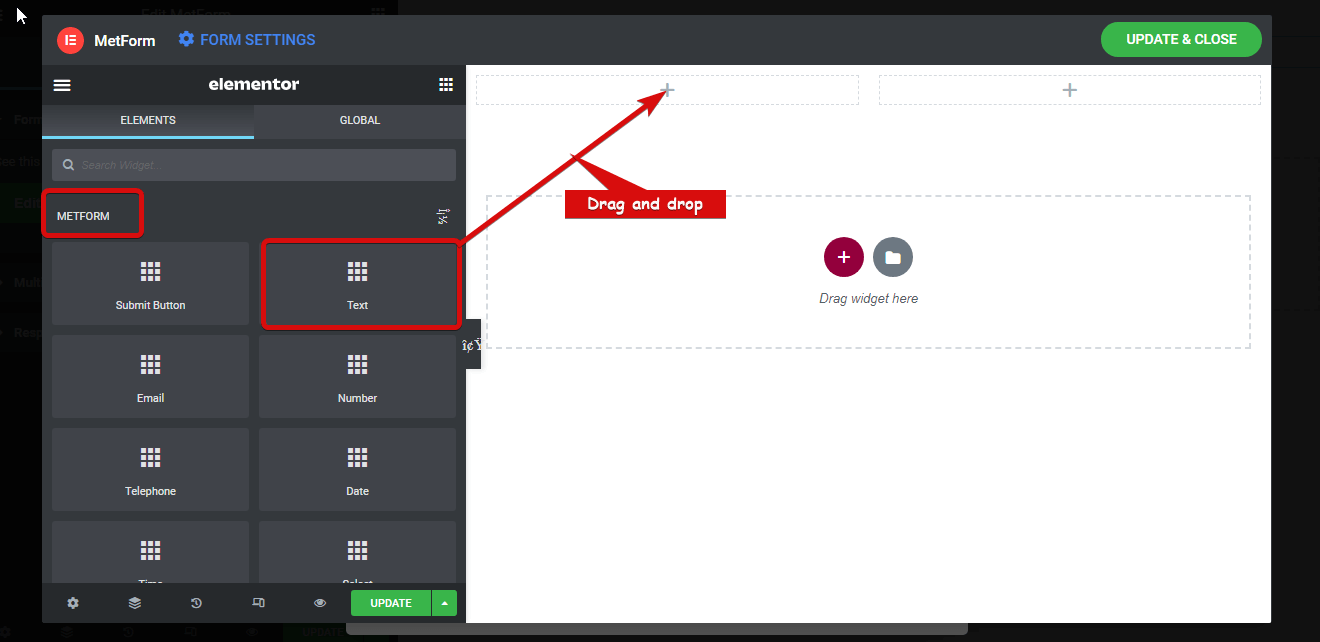
Once you click on Edit Form, you will get access to another new window with Elementor page builder to create your form from scratch. To build one single step of multi step form, you need to follow these four steps:
✅ Add a brand new section
✅ Drag and drop input fields according to requirements
✅ Drag and drop Prev/Next/Submit button depending on the phrase of the form
✅ Provide a proper name to the section
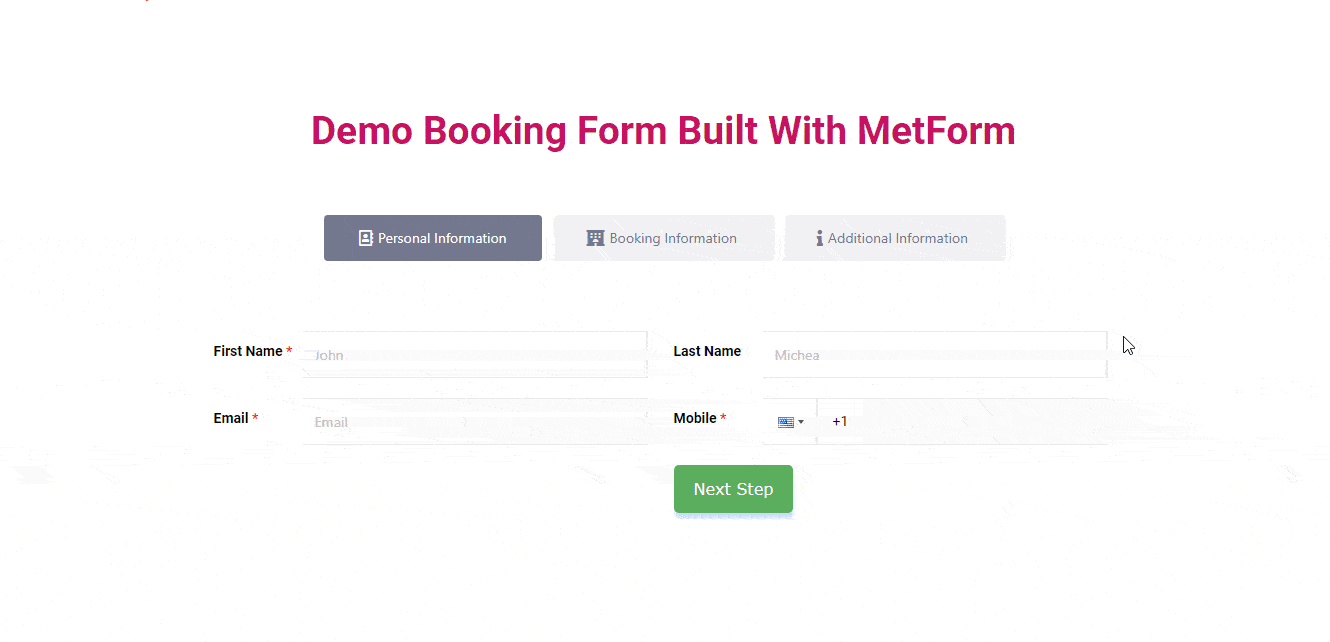
For this blog, I am going to create a demo of 3 steps Hotel Booking Multi-step form using the steps mentioned above. The three steps of the form will include Personal Information, Booking Information, and Additional Information
1️⃣ Booking Form Step One – Personal Information:
- For the Personal Information section, click on the Elementor + icon and choose a structure with two equal columns.
- Search for the Text input field and drag and drop the form field in the left column.
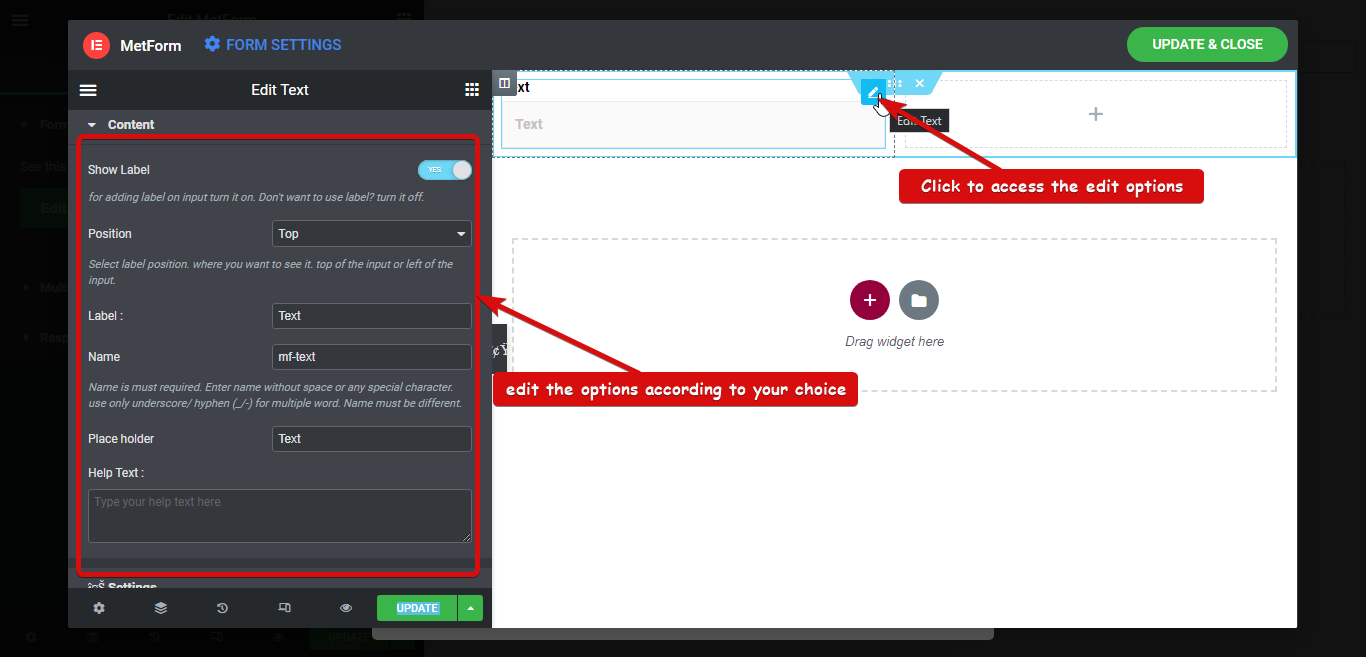
- Now to edit the attribute of this input field, click on the edit sign, go to Content ⇒ content and edit the following options:
- Show Label: Turn this option on to show the label of the input field.
- Position: You can choose to position the label on either top or left.
- Label: Give a name to your label. I am going to use “First name”.
- Name: Name field is required and must be unique. So, make sure to give a different name to each field and replace space with underscore/ hyphen.
- Placeholder: Provide a placeholder text.
- Help Text: In case you want to provide a help text for the users, you can do it here.
- Next, go to the Content ⇒ Settings to modify the following options:
- Required: To make this form field required turn this option on.
- Validation type: You can set different types of validation for the text field based on character length, word length, and expression.
- Warning message: Here you can set the warning message that will show up if the requirement is not fulfilled.

Note: I will use the conditional logic feature on the second step of this form.
Just like the First Name, add another Text input field for the last name. As part of the personal information step, here I am going to add two more fields; Email and Mobile number.
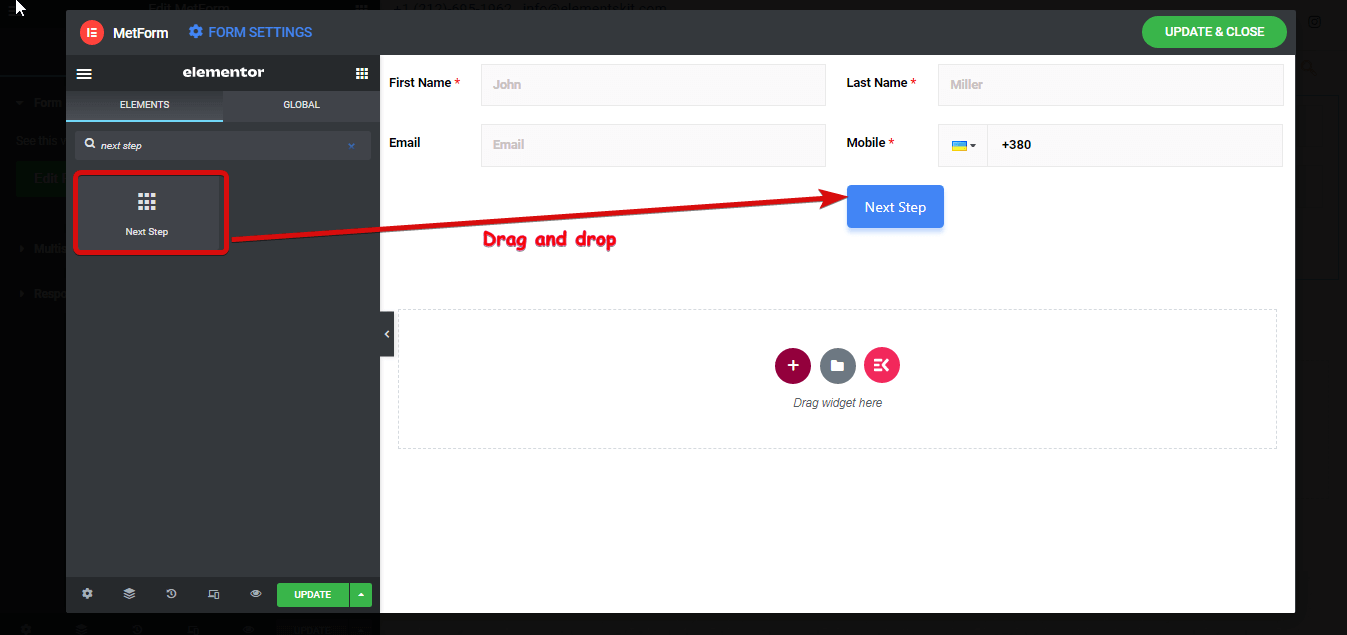
Once you are done modifying the settings of the Email and Mobile Number field. Search and drag and drop the Next Step button. You can change different button settings such as Label, Button alignment, icon, icon position, etc.
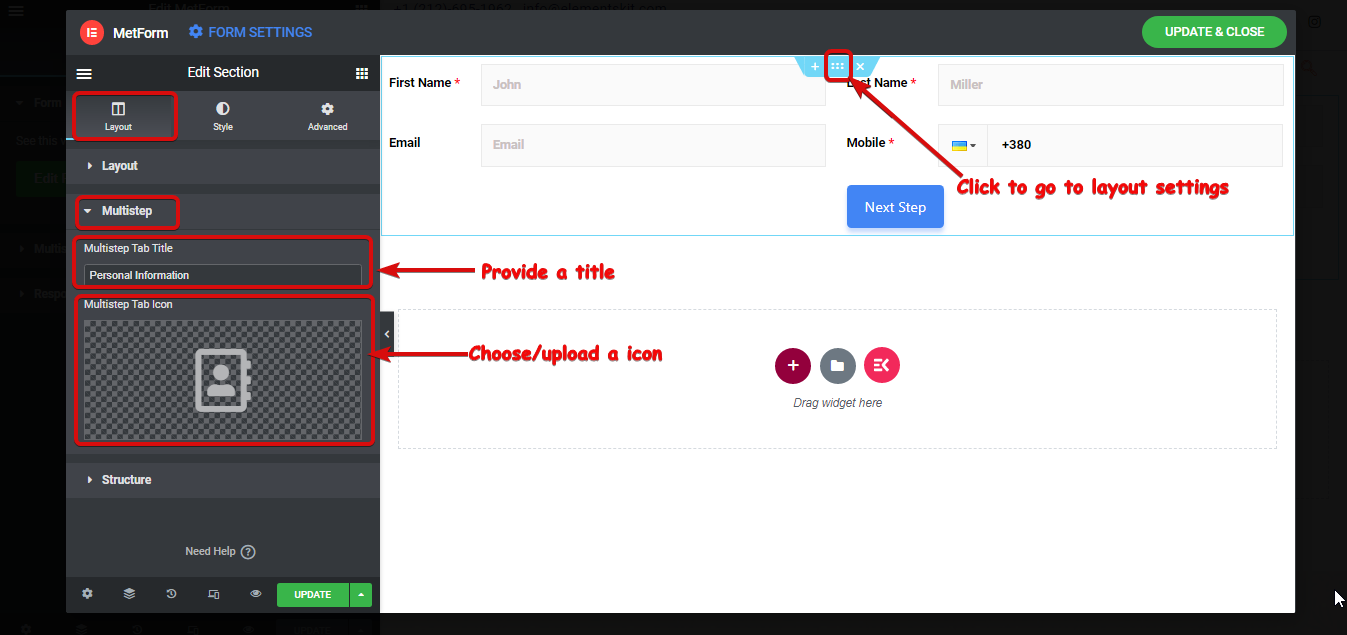
- Now section for the first step is ready, to give a proper name to the first step
- Click on the six dot icon to open the settings option and go to layout ⇒ multistep.
- Provide a name on the Multistep Tab Title option
- Choose an icon from the library or upload an SVG.
- Click on update to save.
Now that the first section is ready, let’s build the Second Step.
2️⃣ Booking Form Step Two – Booking Information:
- For the second step you need to choose a new section. I am going to choose a new section with a single column and then add a new inner section with two equal columns.
- After choosing the column drag and drop the 2 date input field for the check-in and check-out options.
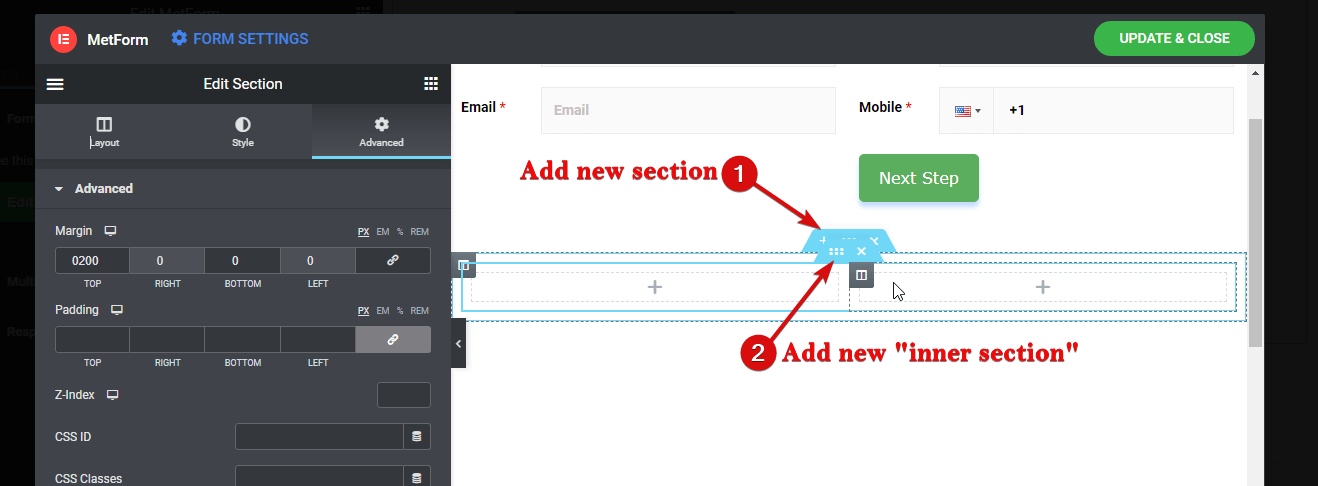
Must-Follow Rule: You must choose a new section to start the new step, otherwise, any input field you add will get added to the previous step. So, always remember, new steps require a new section even if it has the same layout.
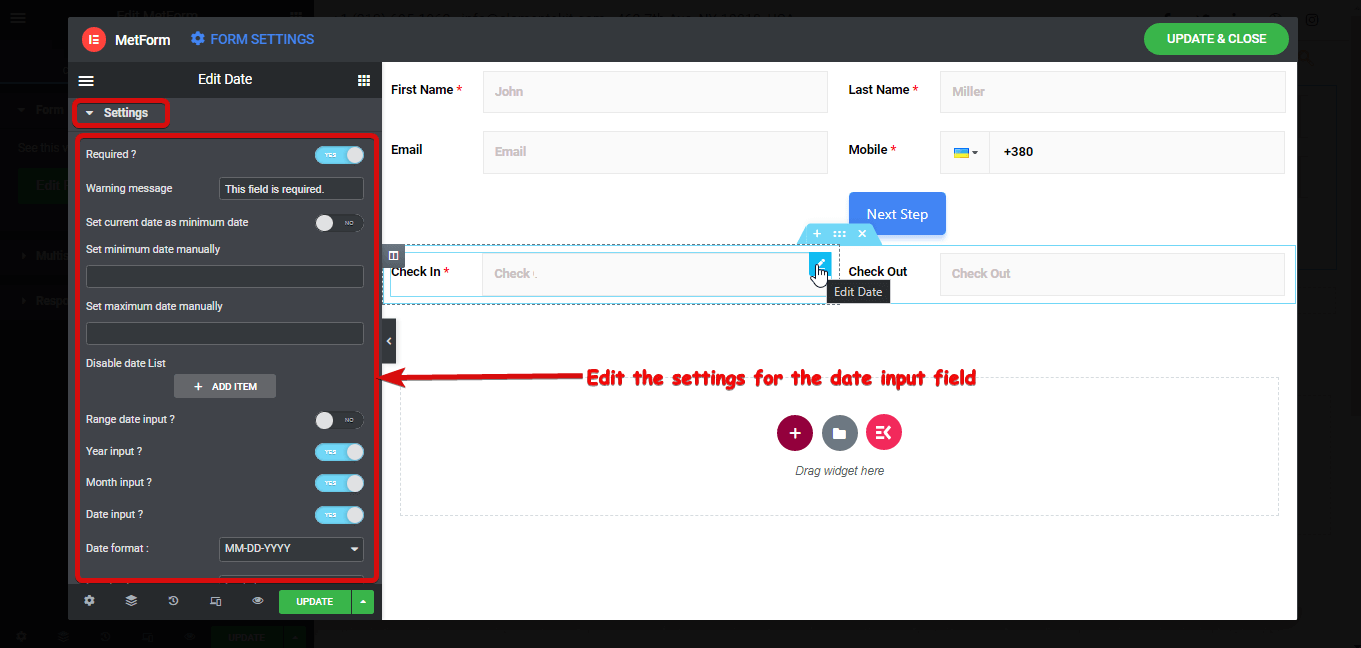
- Along with the mentioned settings option for the text field, you get the following settings for the Date input field under Content ⇒ Settings
- Set current date as minimum date: Turn this option on to set the current date as a minimum date.
- Set minimum date manually: If you don’t want to set the current date as the minimum date, you can set the minimum date manually as well.
- Set maximum date manually: Here you can set the maximum date.
- Disable date List: You can use this option to disable some dates. To disable any date click on the +ADD ITEM button and select the date.
- Range date input: By turning this option on you can enable users the option to select a range of dates. But for this form, I will leave this option turned off.
- Year input: Turn this option on to take a year as part of the date input.
- Month input: To enable month as part of the date input turn this option on.
- Date input: Turn this option on to take a date (day) as part of the date input
- Date format: Set the format of the date input here.
- Localization: Choose the location from the dropdown based on your preference.
- Want to input time with it: Turn this option on to take time along with data as input. If you turn this option, you will get another option that is Enable time 24hr. Using this option you can enable the 24hr format.
Now, finally, we are going to use the conditional form feature for the Check Out field. To make the check out field visible only when the check in field is empty,
- Copy the value of the Name field of the Check-In input field.
- Then go to the Content ⇒ Conditional, turn on the enable option
- Choose AND from the Condition match criteria dropdown.
- From the Action drop-down options, choose Show This Field.
- Click on + ADD ITEM, on the if input field, paste the check-in field name value you copied.
- Choose “not empty” from the drop-down of Match ( comparison ).
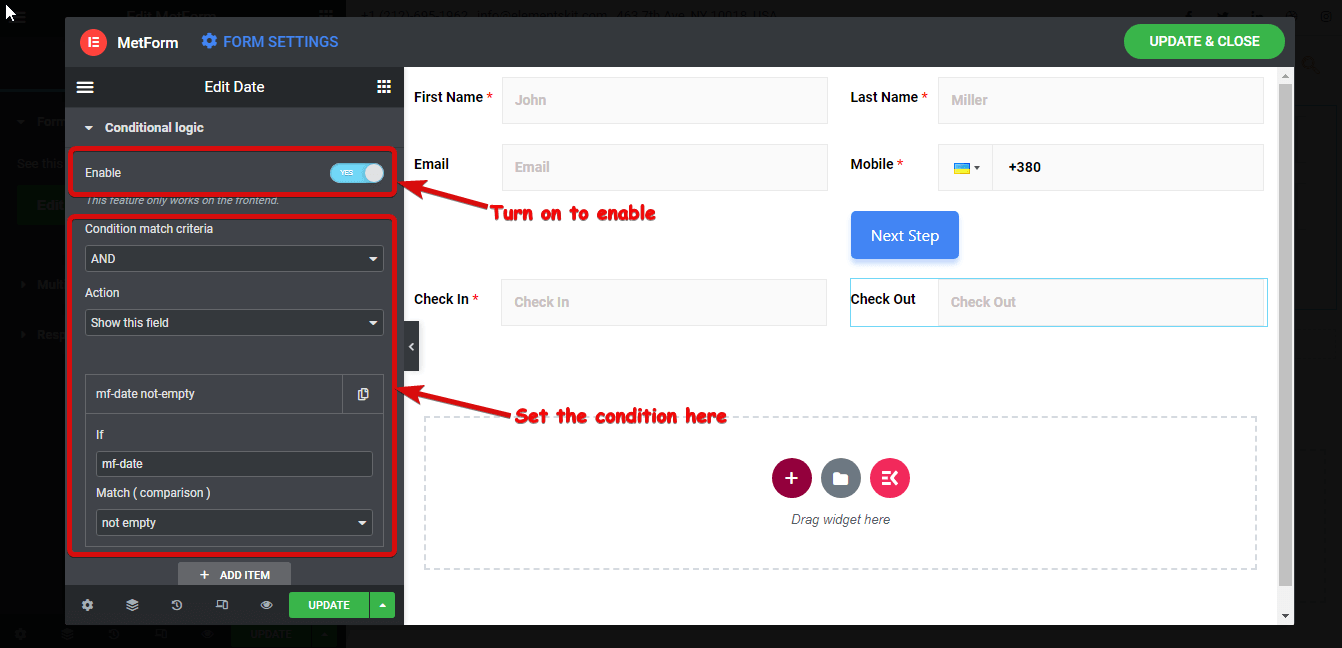
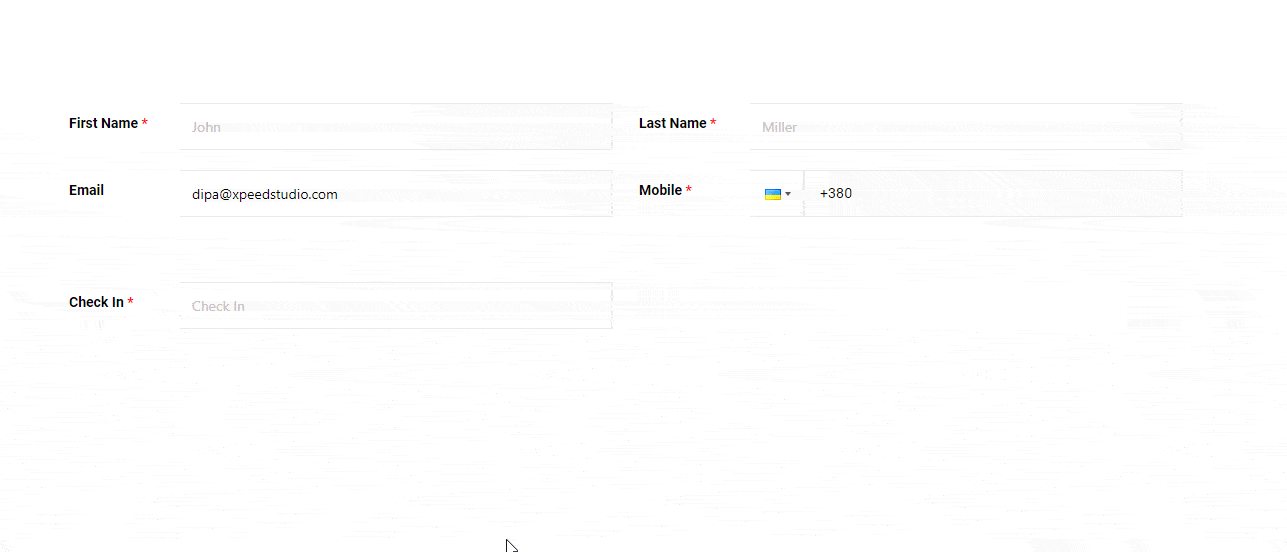
Now click on the preview button to see. Check out field should only be visible once you choose a Check-in date.
Add a new inner section so the form does not look bad when the conditional option hides check out initially. Drag and drop the Number form field twice to create two more fields for the number of rooms and number of People.
And since it’s the middle step, we need to include both Prev and Next Buttons.
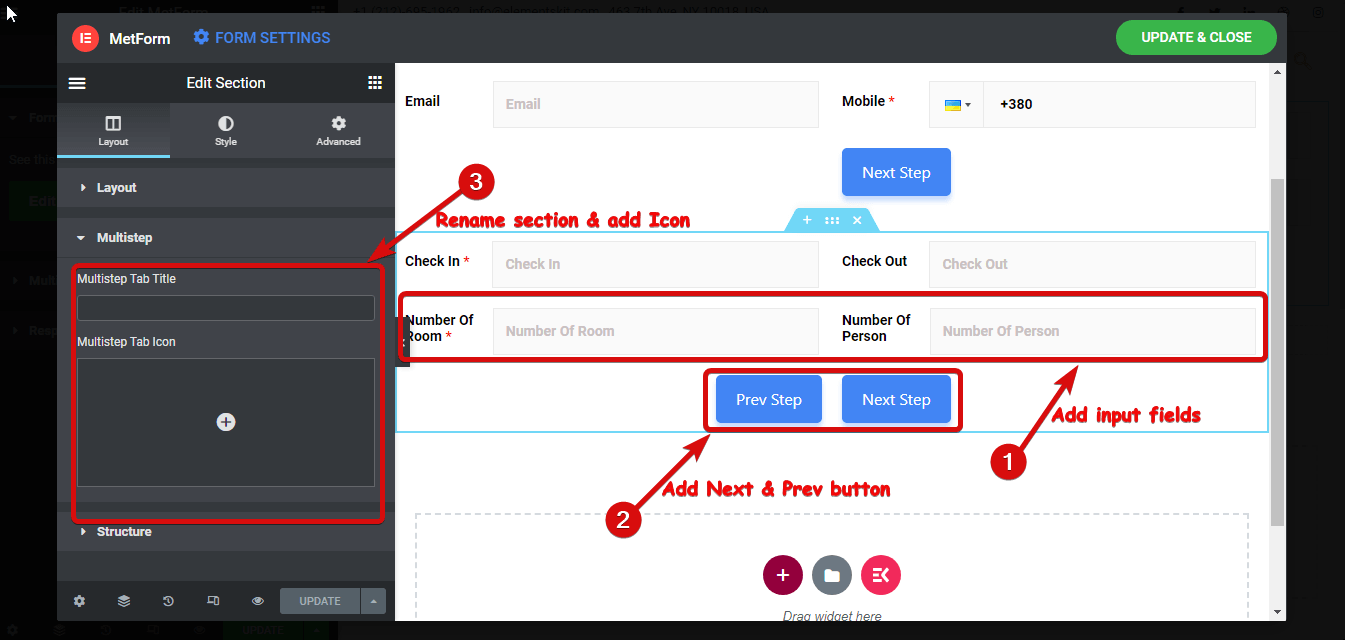
Once you are done with editing the settings for all the added fields for this section, change the section/step name from layout ⇒ multistep just like you did with the first section. I am naming it Booking Information.
👉🏽👉🏽 To learn more details about conditional form feature of MetForm click here.
Now the second step is ready, let’s move on to the third step
3️⃣ Booking Form Step Three – Additional Information
For the third step, let’s add a new section with a single column. And add a text field and name it Additional Information.
Next, add an inner section of two-column within the section. After that, drag and drop a prev button and then a submit button for form submission.

Note: You can add as many inner sections as you want. But to create a new step, you must add a new section.
To give a name to the third section, go to layout ⇒ multistep and add the title “Additional Information” and add an icon.
At last, we are done building our WordPress multi step form with 3 steps. Now click on update to save and close the window to move on to the multi-step settings.
👉👉 You can also checkout our blog How to Create WordPress Survey Form in Elementor using MetForm
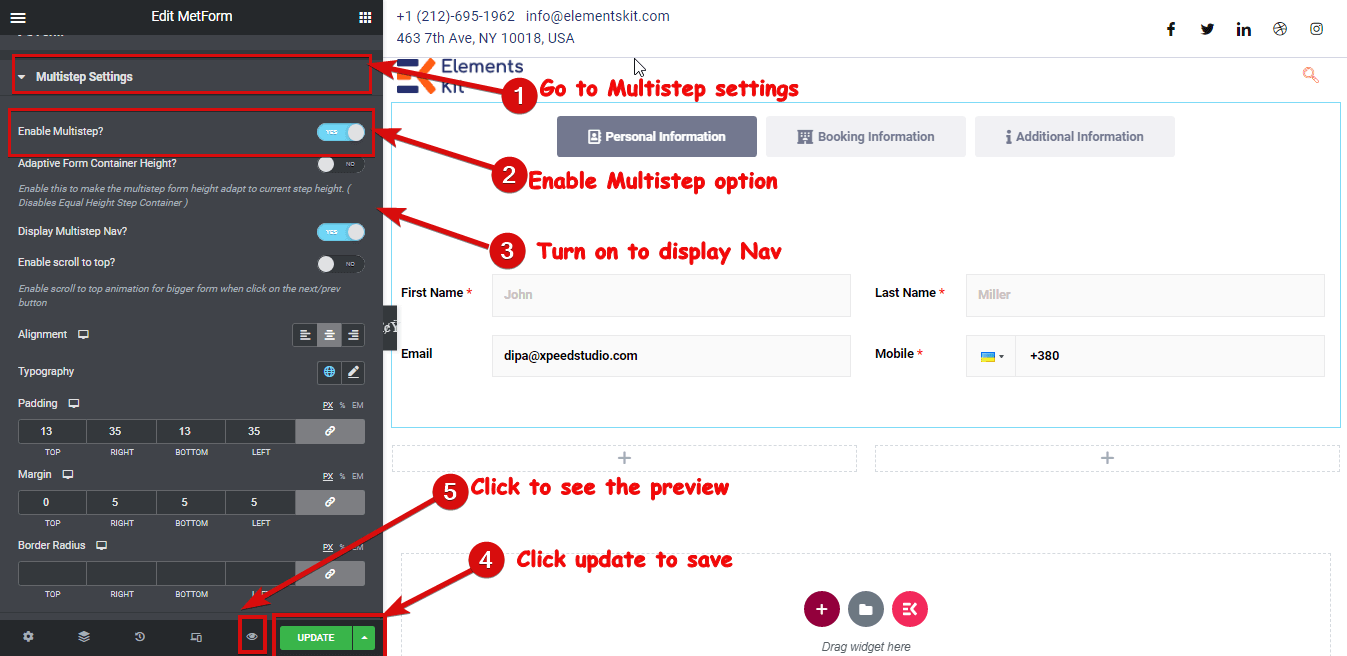
Step 4: Enable Multi Step Form Option of MetForm
Now that we have our form, it’s time to convert it to a working multi-step form. To do so
- Go to Content ⇒ Multistep Settings
- Turn on the enable Multi step option to make the multi-step options active
- Enable the Display Multistep Nav so the Section menu shows up on top. You can also edit the different settings like Adaptive Form Container Height, Enable scroll to the top, etc.
- After making all the changes, click on update to save
Step 5: Configure Confirmation, Notification, and Other Settings to Complete
Now that you have designed your multistep form. Let’s configure all the form settings MetForm has to offer. To modify the MetForm settings from the WordPress dashboard, go to MetForm ⇒ Forms ⇒ Click on the Edit option of the form you have just created.
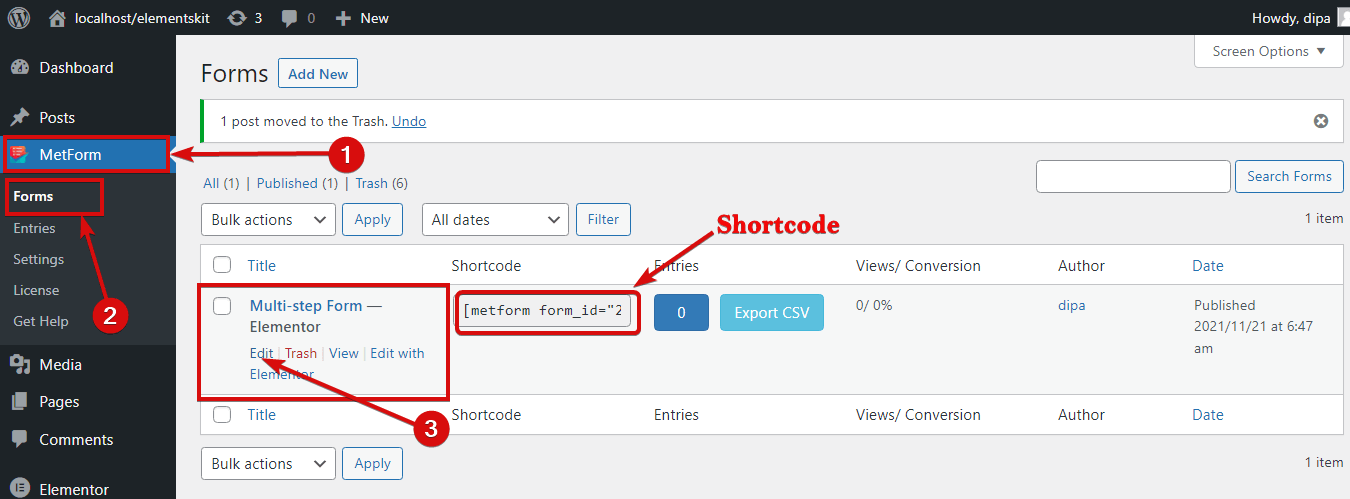
Note: Here you will also find the shortcode of the form you created which you just copy and paste to add your form anywhere on the website. You can access the Form settings from the Edit Form option as well.
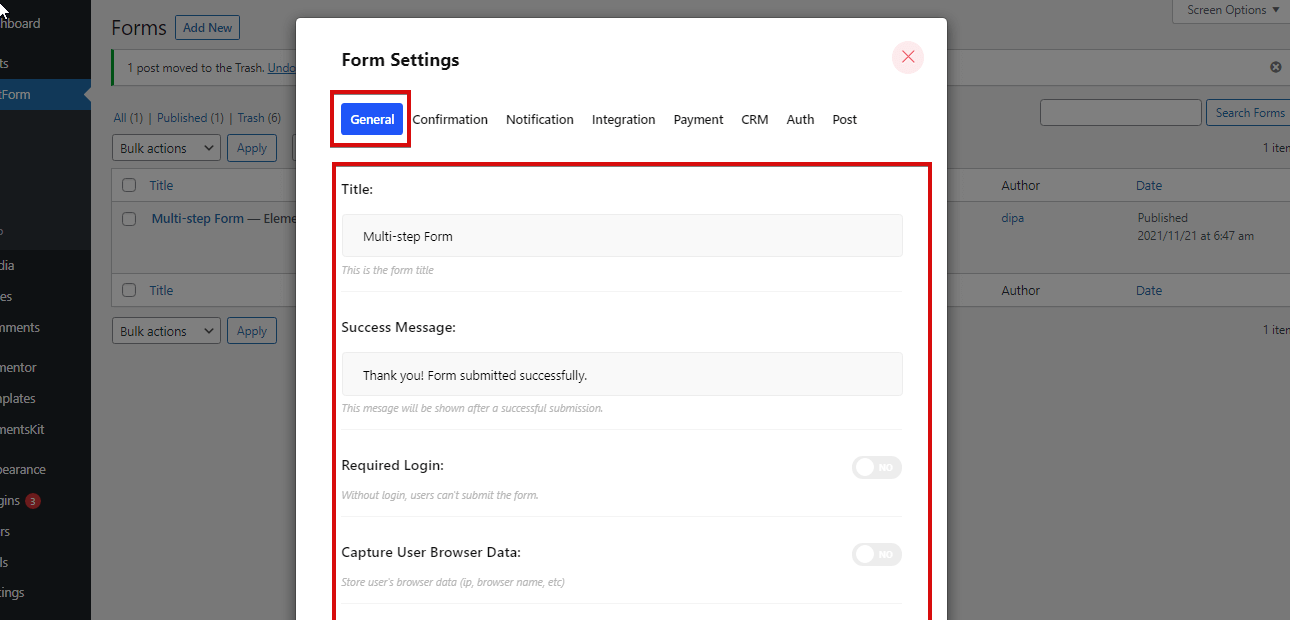
Here you will find the following settings:
General:
As part of the general settings, you can modify Title, Success Message, Required Login, Count views, etc. You can also set any custom URL you want users to land on after submitting the form.
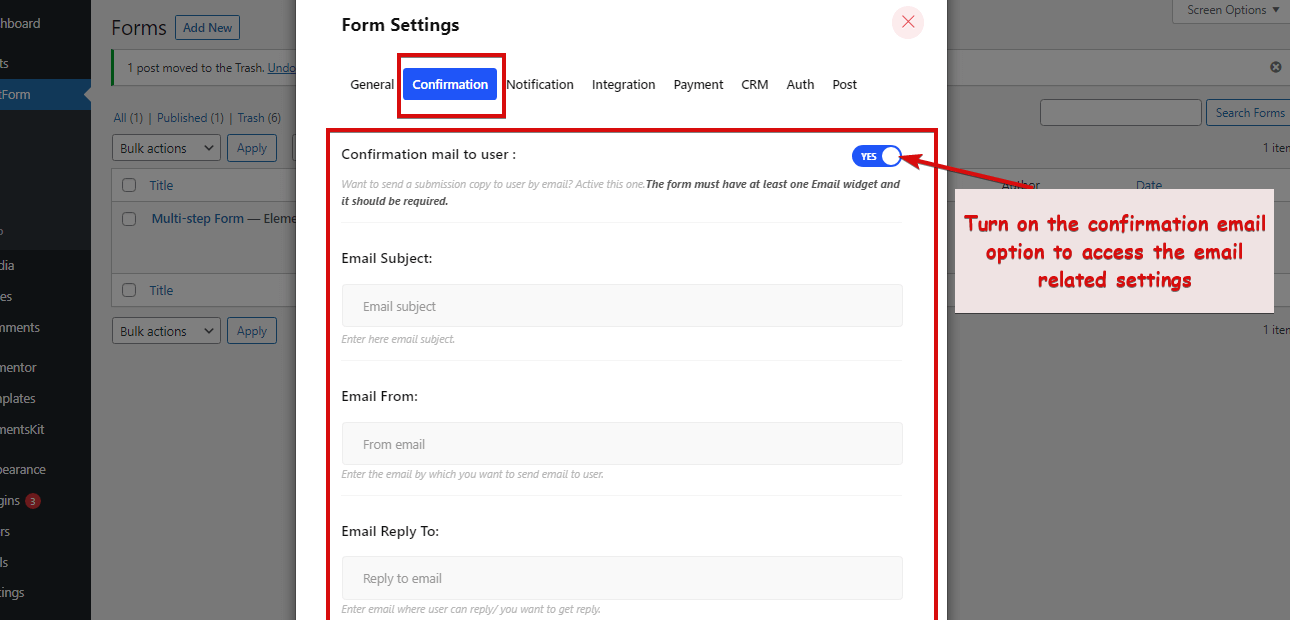
Confirmation:
You can send a confirmation email to your users with a copy of their submitted form with this form builder plugin. Turn on the confirmation option and then you can set Email Subject, Email From, From email, Email Reply To, and Thank you message.
Notification Settings:
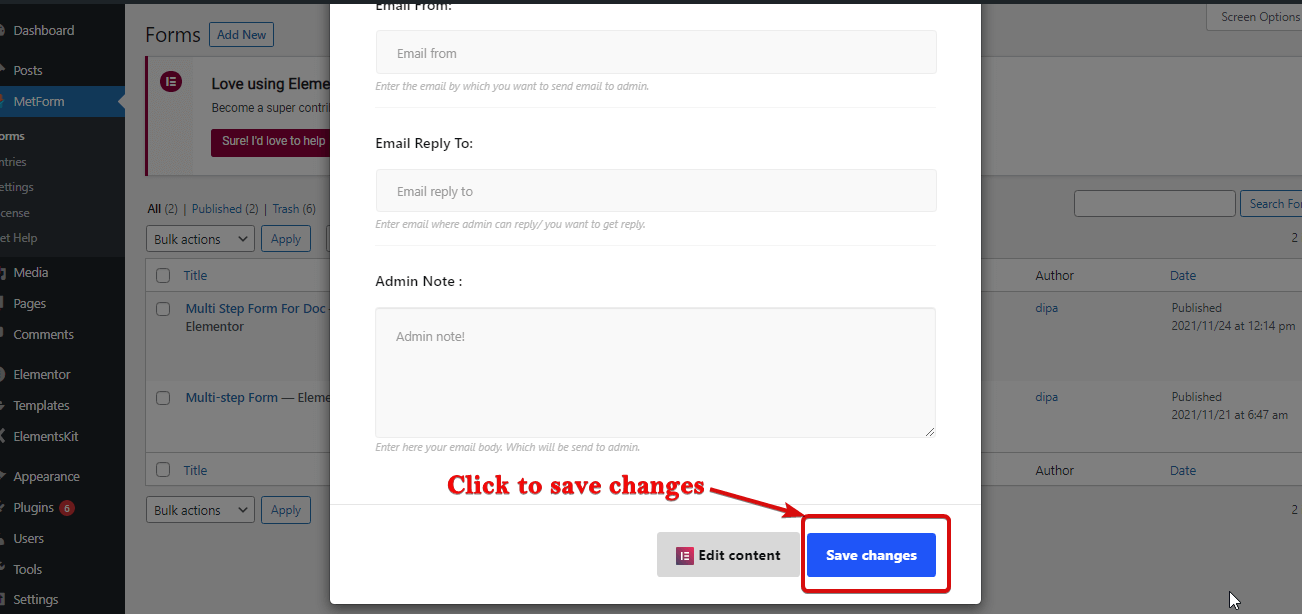
You can send form notification emails to the admin as well with MetForm. Enable the Notification mail to the admin option. Then set the Email Subject, Email To, Email From, Admin Note, etc.
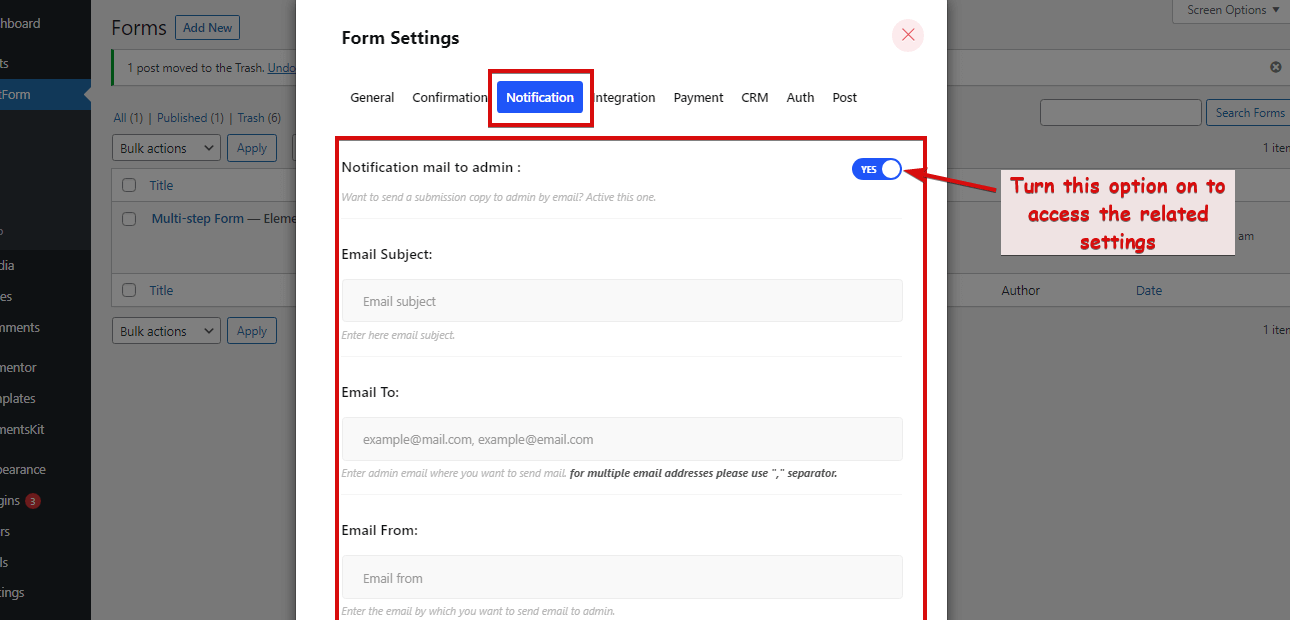
After making all the edits, scroll down and click on save changes to update the settings.
Apart from the settings, I have covered in this blog, you also get Integration like REST API, Mail Chimp, Google Sheet, etc. Also, payment gateway integration like PayPal, Stripe. CRM integration which includes HubSpot, Zoho, etc. You also get auth options like login and registration. For more details on these settings, check out our documentation of MetForm.
If you have followed the steps mentioned properly you should get a multi-step booking form like the one below:
👉🏽👉🏽 Creating a Job Vacancy form is also super easy using premade Job application form template. To check out the full blog 👉🏽click here.
Wrap Up
There, you have just created your WordPress multistep form in a few minutes. If you think this form is simple then don’t worry. The main purpose of this blog was to show how you can create a multi-step form in WordPress using MetForm.
Now that you know how to create a WordPress multi-step form, you can create your custom form and logic. I hope you utilize MetForm features to create wonderful multi-step forms. In case you face any problems along the way, share with us, our team will reply ASAP.
Don’t forget to check all the amazing features MetForm has to offer.
The good news is you can join the MetForm Community at a 20% less price using the coupon code community20
Leave a Reply