

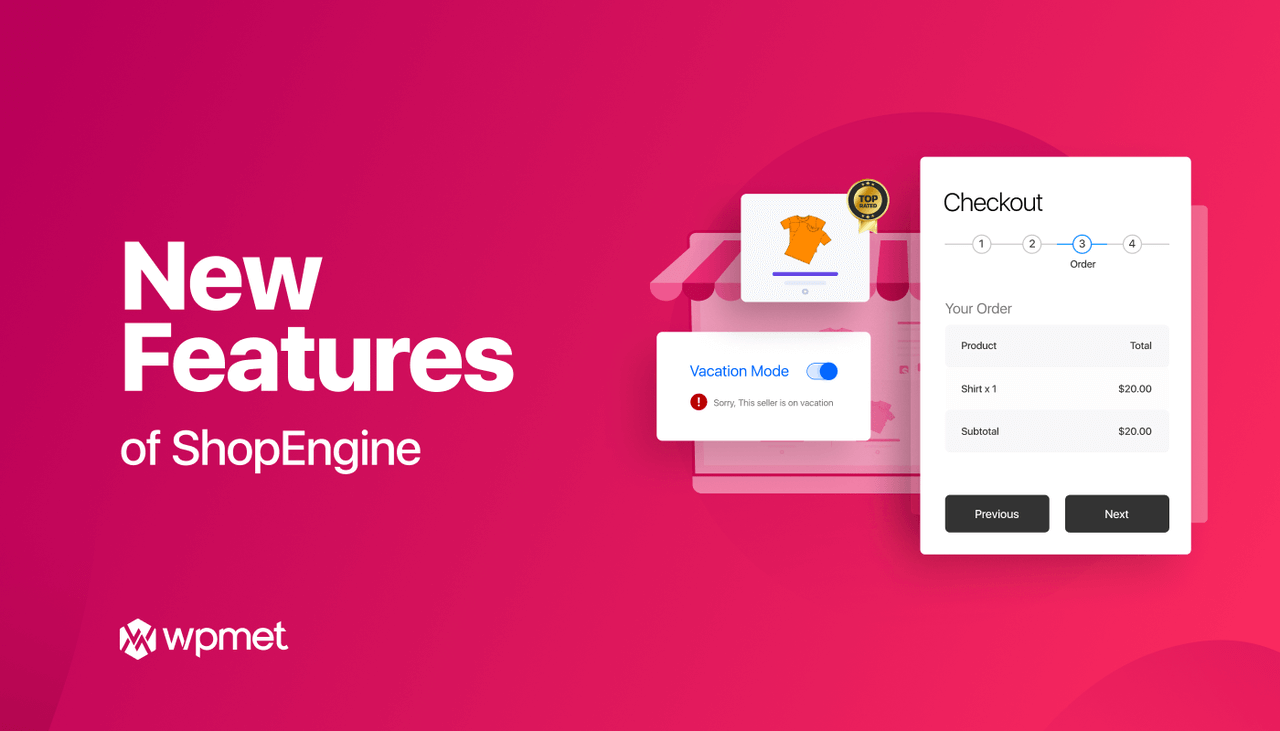
Good News! 🎉🎉
ShopEngine has added two new modules to the already rich list of WooCommerce features with its latest version. New features of ShopEngine are the Vacation module and Multi-step Checkout module.
Not just that! New features have been added to the Image Badge Module.
Are you excited just to hear about the new modules?
Then, get ready to be thrilled with joy because the functionalities/features that these modules have to offer are really amazing!
Moreover, these modules will make WooCommerce building more productive and the Shopping experience on your website more convenient and easy.
To know exactly how to move on to the main part where you get to know what these modules do and how you can use them…
Get to know the New ShopEngine Modules:
Like the previous modules, the new addition of modules also provides you with options to extend your eCommerce website’s functionality so you can achieve greater success. Let’s learn in little more detail about what these modules do:
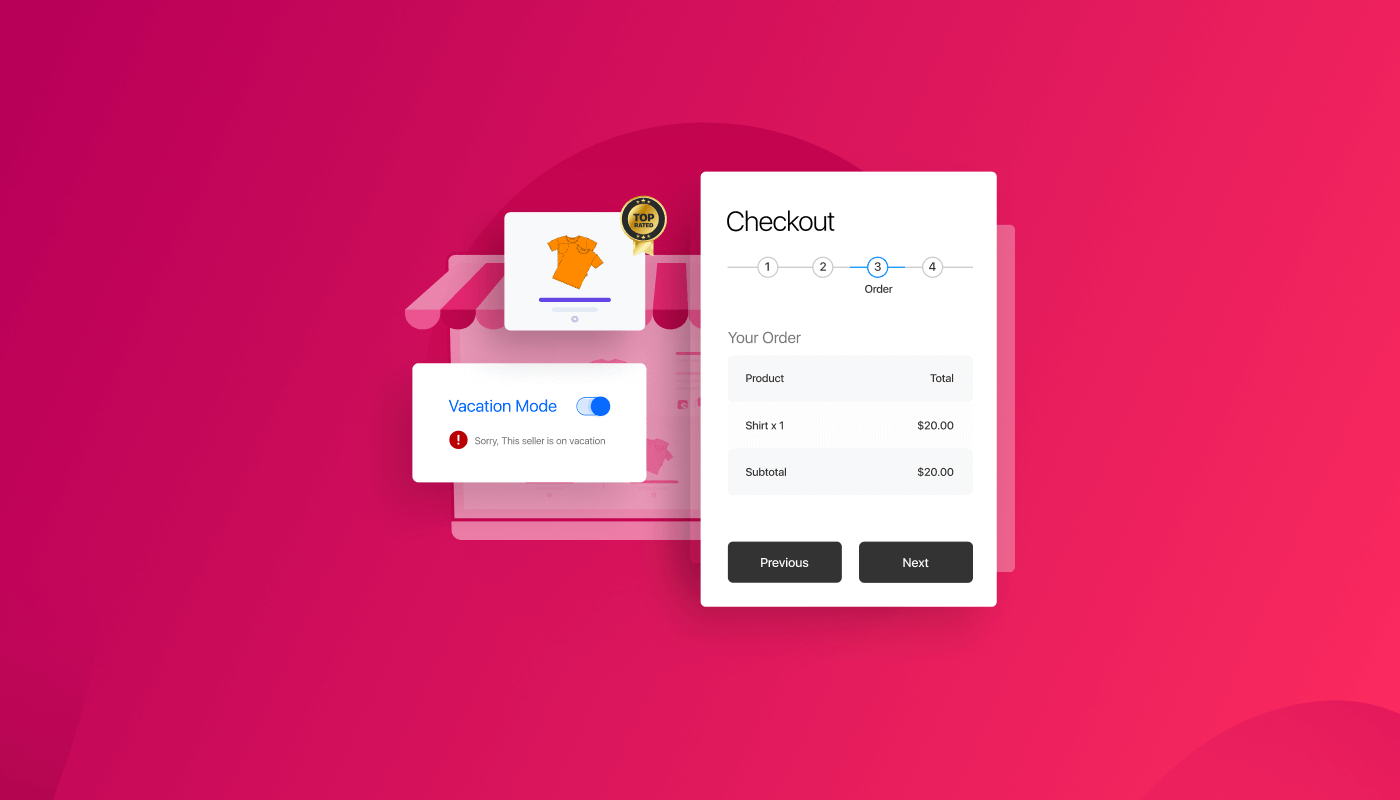
✨Vacation Mode:
Holidays are for everyone! And that includes store owners and everything involved with the process too.
But you can end up working on holidays if you do not put up a notice that says you are closed. Same is the case when you allow your customers to place orders during that period.
Now, you don’t have to worry about that thanks to the Vacation module of ShopEngine.
With this module, you can temporarily disable the shopping option (add to cart button) on your WooCommerce website. This Vacation module has two options to add off days:
- Weekly Offdays: You can set up weekly holidays during which shopping will be unavailable to your website visitors. You can also choose to display the weekly holiday message on the notice box. The weekly off days will be activated every week until you turn this option off.
- Off Days: Here you can set up specific off days like the traditional festivities or any personal reason for which you want to turn off the shopping experience on your website.
💡 Did you check out what Elementor 3.6 has to offer? Check out our review of Elementor 3.6
✨Multi-Step Checkout
This is one of our much-demanded modules. With this multi-step checkout form module, you can now replace your default WooCommerce one-page checkout form with a multi-step checkout form in a few steps.
Multi-Step Checkout will help you create a more user-friendly checkout page where the form is divided into smaller form steps such as Login, Billing, Order Overview, Shipping Methods, and Payment Methods.
Besides, you will also get all the input fields and widgets to create your own custom multi-step checkout form. And of course, the additional options to customize the styles will be there too.
If you were facing cart abandonment because your checkout form was too lengthy or too boring, you can easily solve that using ShopEngine’s multi-step checkout template.
👉👉 You can also checkout How to Add Currency Switcher to WooCommerce Website in 5 Steps
✨Badge (Updated new features)
Now Badge module is not just limited to a sales badge! It has also become an image badge.
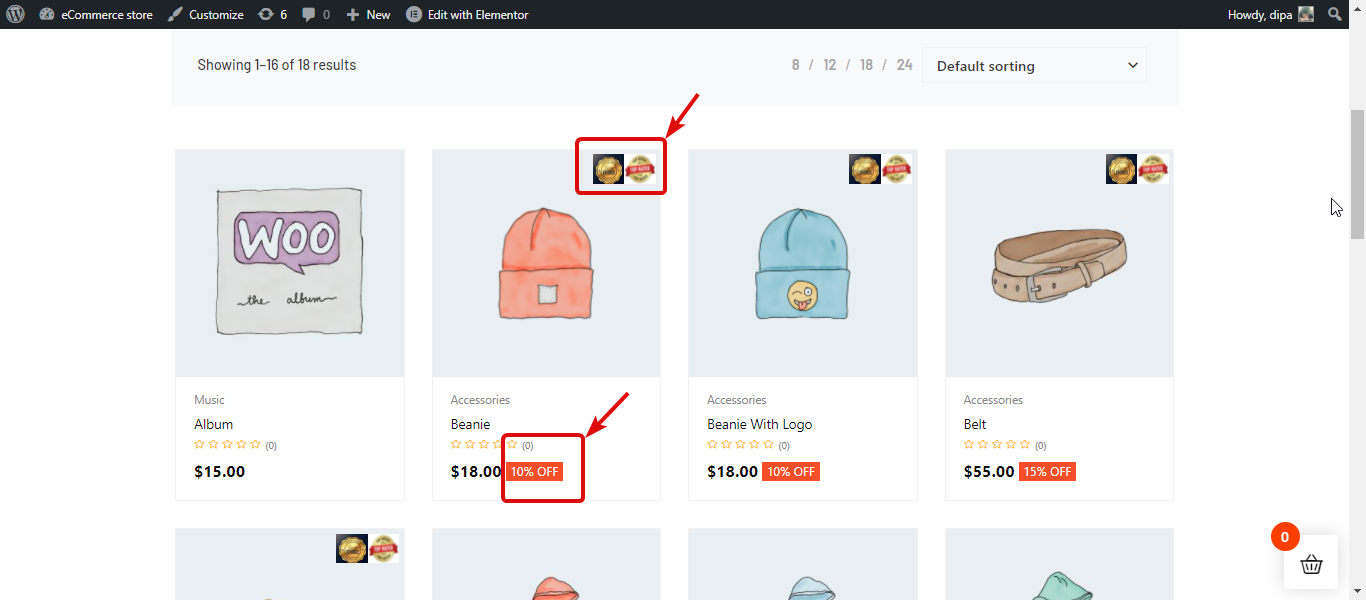
With the new improved Badge module, now you can display multiple image badges along with the product’s sales percentage on your product image. The badge feature will be applicable on the Archive, Shop, and Single Product page/template.
The new features of Badge Modules are:
- You can add multiple customizable Image badges (E.g. Most popular, top-rated, etc) to your products.
- Options to add badges to categories and individual products.
- You can also choose the alignment of the image badges.
Sounds cool, right? Because the image badge option will bring focus to your products. Also, it will have a positive psychological impact on your visitors that will encourage them to purchase those products.
How to use ShopEngine Vacation Module
Now, let’s go through the process of how you can leverage the vacation module facilities on your WooCommerce website.
Step 1: Enable ShopEngine Vacation Module and Vacation Widget
You need to enable both the Vacation module and Vacation widget to leverage this feature.
To enable the module go to ShopEngine ⇒ Modules ⇒ Vacation and click on the Settings Icon. Once the settings popup opens, turn on the toggle button of the Enable the module option.
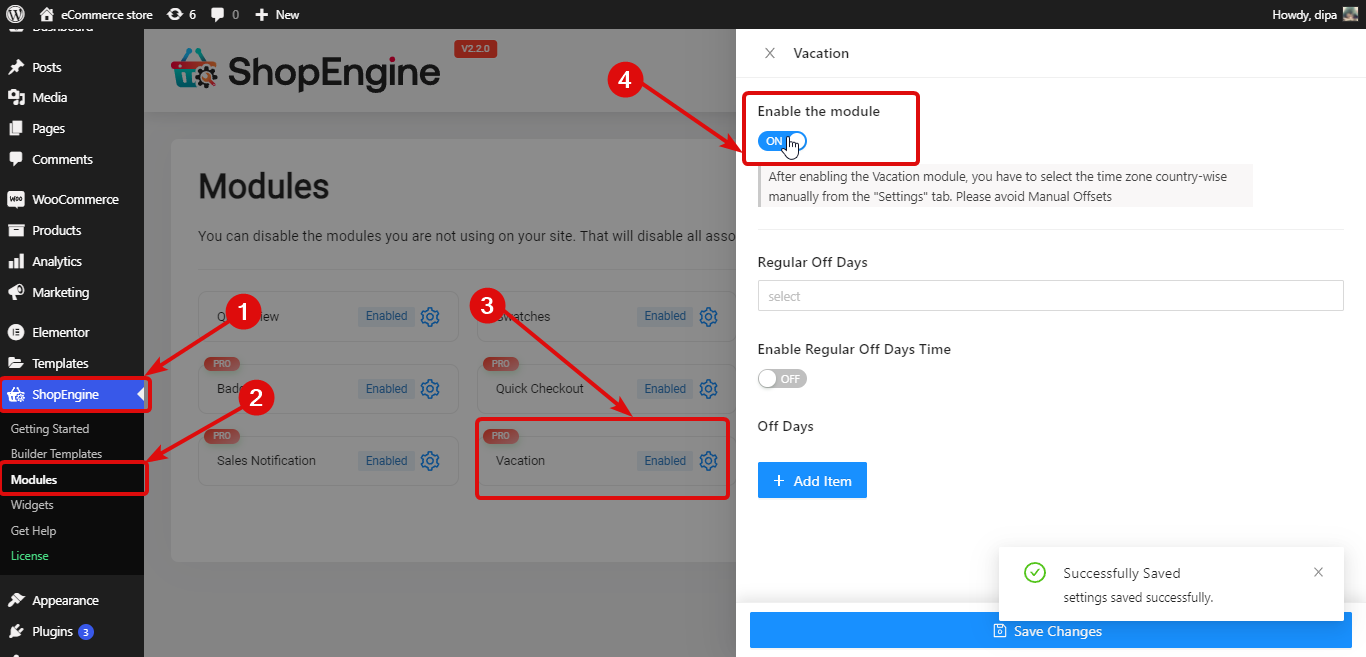
🔔 Note: You need to select the time zone country-wise manually from the “Settings” tab. Avoid Manual Offsets as the vacation module will work with the Manual Offset options.
To turn on the vacation badge, navigate to the ShopEngine ⇒ widget. Find the vacation widget and turn on the toggle button of Enable.

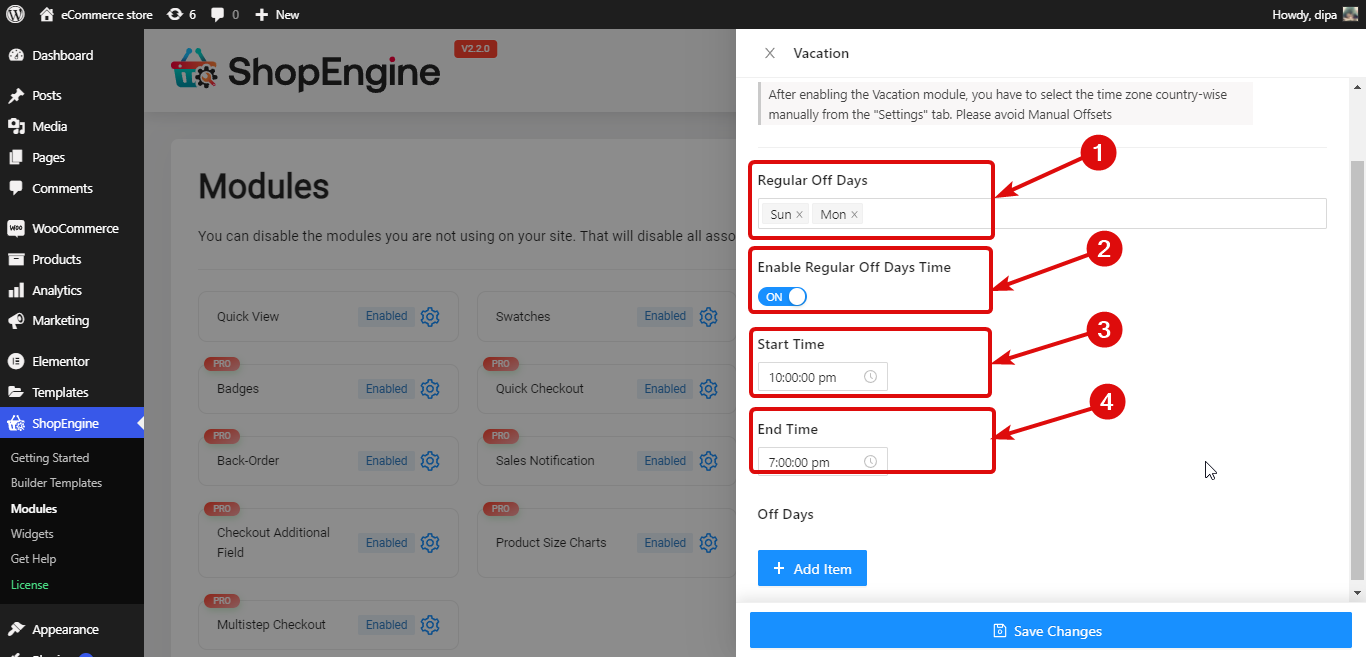
Step 2: Set up Regular Off Days
To set up weekly Regular Off Days. you need to provide the following settings:
- Regular Off Days: Choose the days from the Regular Off Days dropdown. You can select multiple off days.
- Enable Regular Off Days Time: Turn on this the option to activate the regular weekdays. Once you turn on this option, you will see the following two options.
- Start Time: Set the start time for regular weekdays.
- End Time: Set the end time for regular weekdays.
Step 3: Set up Casual Off Days
Along with weekly off days, you can add vocational off days as well. For that, click on the + Add New button. Then give a title, and choose the Start and End Date.
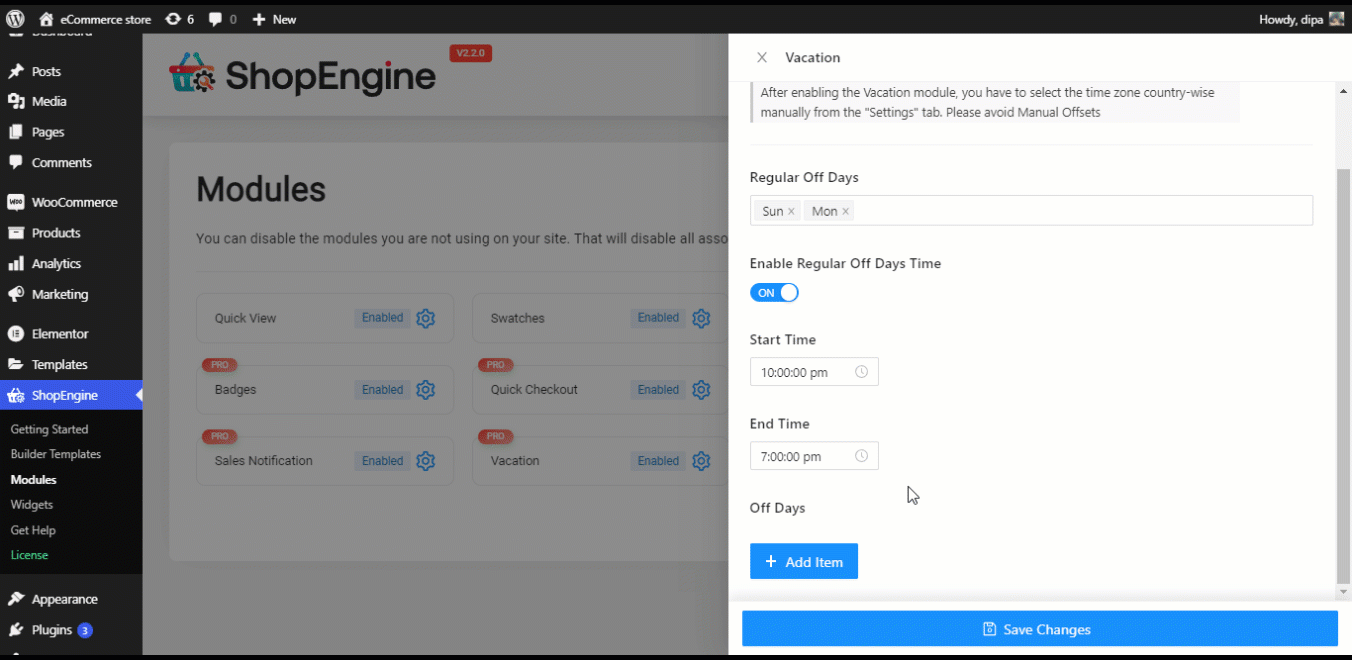
Finally, click on Save changes to update.
Checkout the features that released with last version of ShopEngine
👉👉 New Features of ShopEngine: Product Size Charts & Sticky Fly Cart
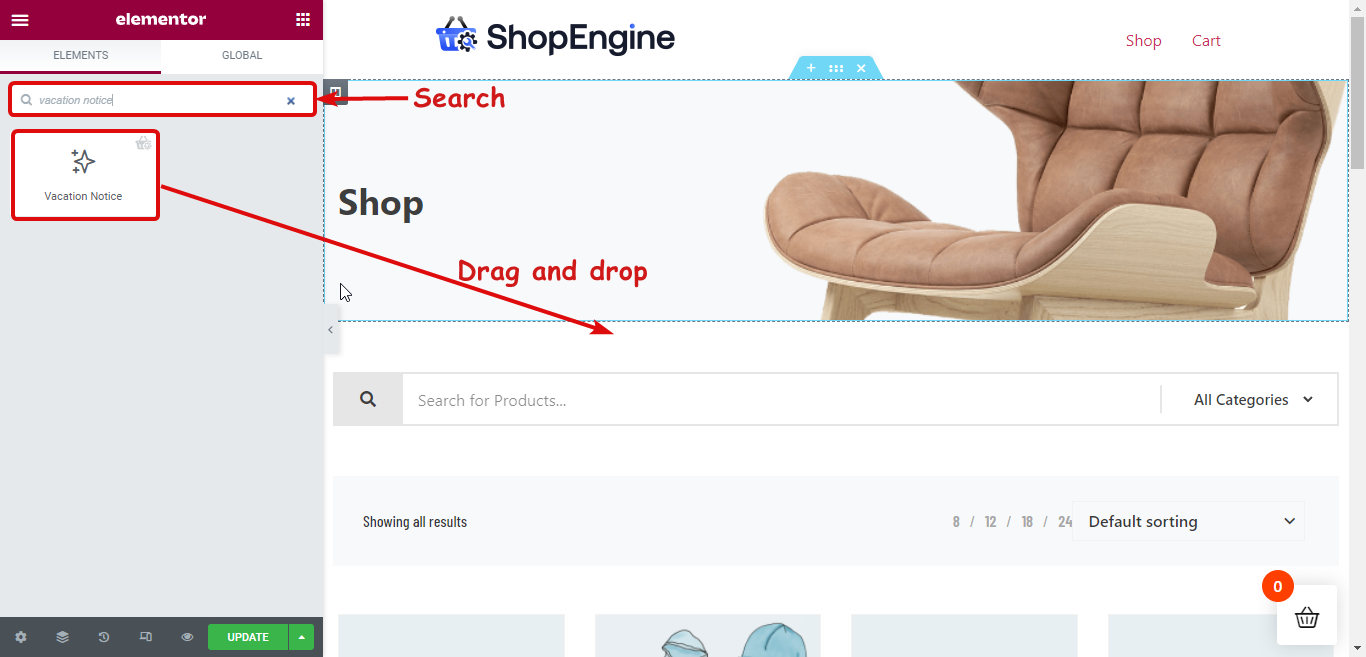
Step 4: Add Vacation widget to ShopEngine template
To make the vacation notice visible on the front end, you need to add it to the Shop Template.
For this, edit ShopEngine Shop Template with Edit with Elementor option. Once you are in the editor mode, search for Vacation Notice. Then drag and drop the widget on the template.
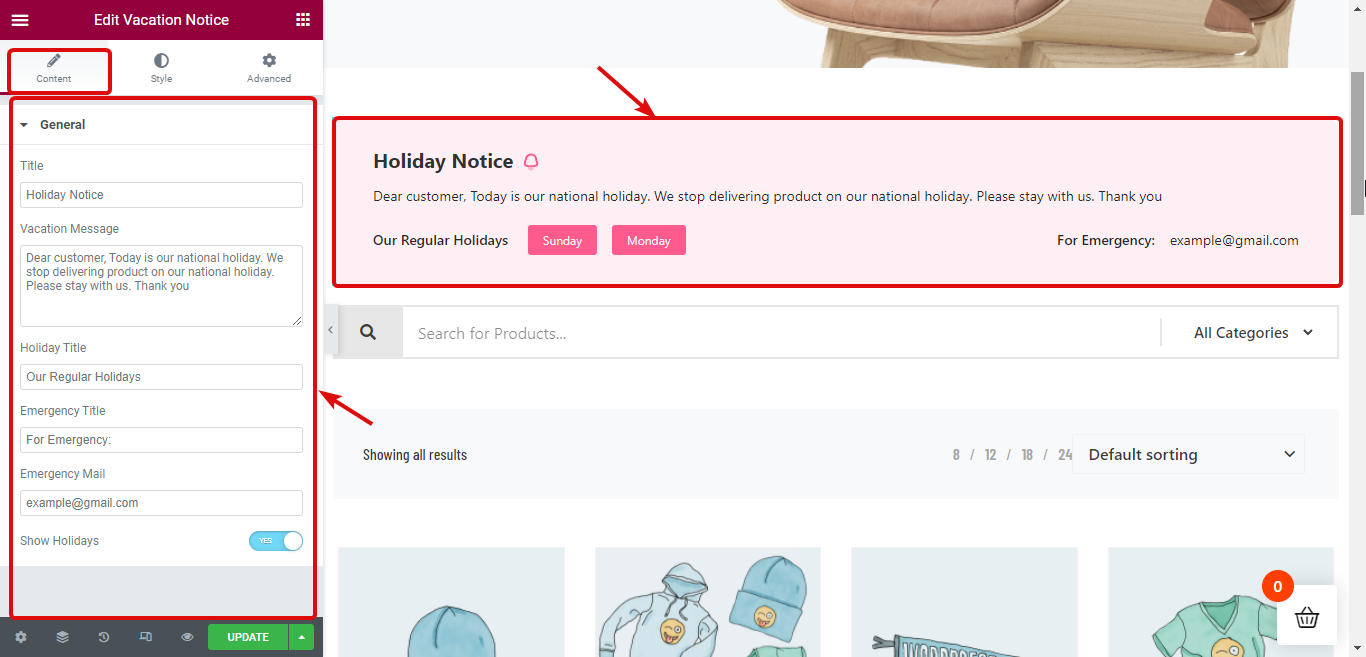
Step 5: Customize the content settings of the Vacation Notice widget
You can customize the following options of vacation notice that will be visible to your website visitors.
- Title: Provide a title for the vacation notice.
- Vacation Message: Here you can customize the message you want your visitors to know.
- Holiday Title: Here you can customize the title that will indicate the regular weekly off days.
- Emergency Title: You can customize emergency titles as well.
- Emergency Mail: The emergency email your customers can use to contact you.
- Show Holidays: You can turn on/off this option to display/hide the regular weekly off-days details.
Want to add custom field to your WooCommerce checkout page? Check our blog
👉👉 How to Add WooCommerce Custom Checkout Field in Just 3 Steps (Without Coding)
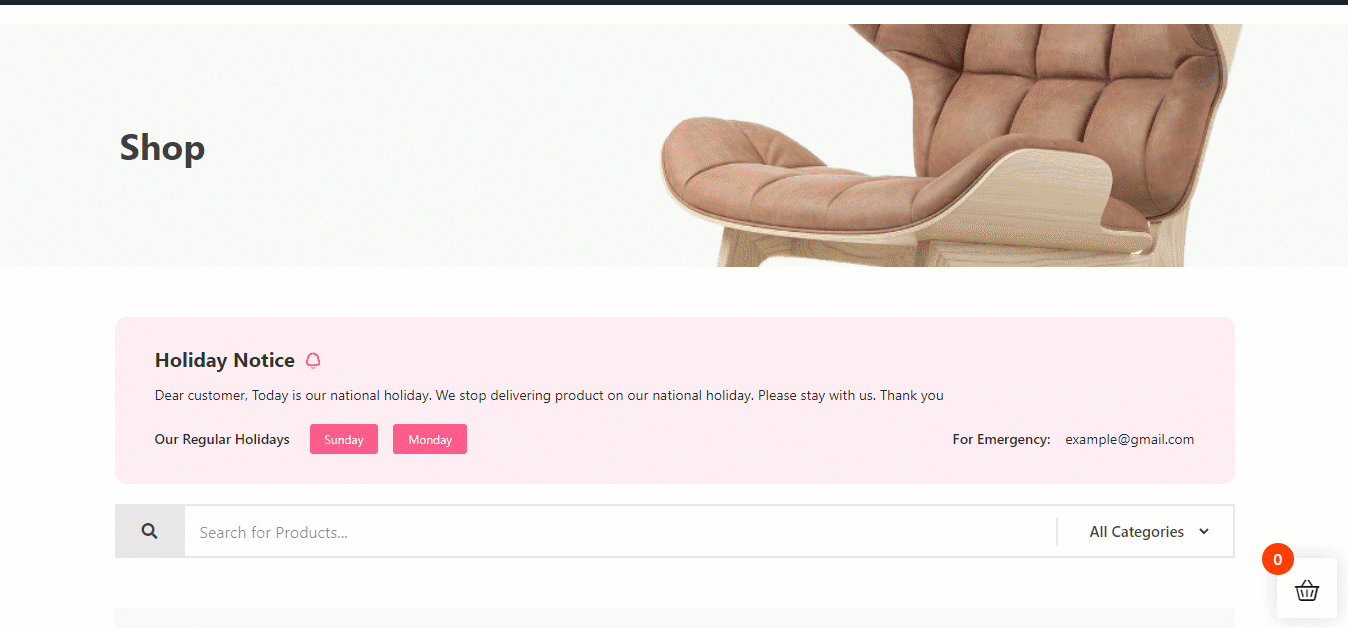
Step 6: Update and See the preview
Now click on Update to save. Now vacation notice should be visible on the front end like the preview below:
Besides, you can also customize both the content and outlook of the notice that will be displayed during the off days. For more details, check our documentation.
Useful, right? Now you can enjoy your vacation without having to worry that someone will accidentally ignore your vacation notice and place an order. Because, along with the proper off-day notice, the shopping option will also be unavailable.

How to use Multistep Checkout
Integrating multi-step checkout in WooCommerce is also super easy with ShopEngine. Check how you can do this:
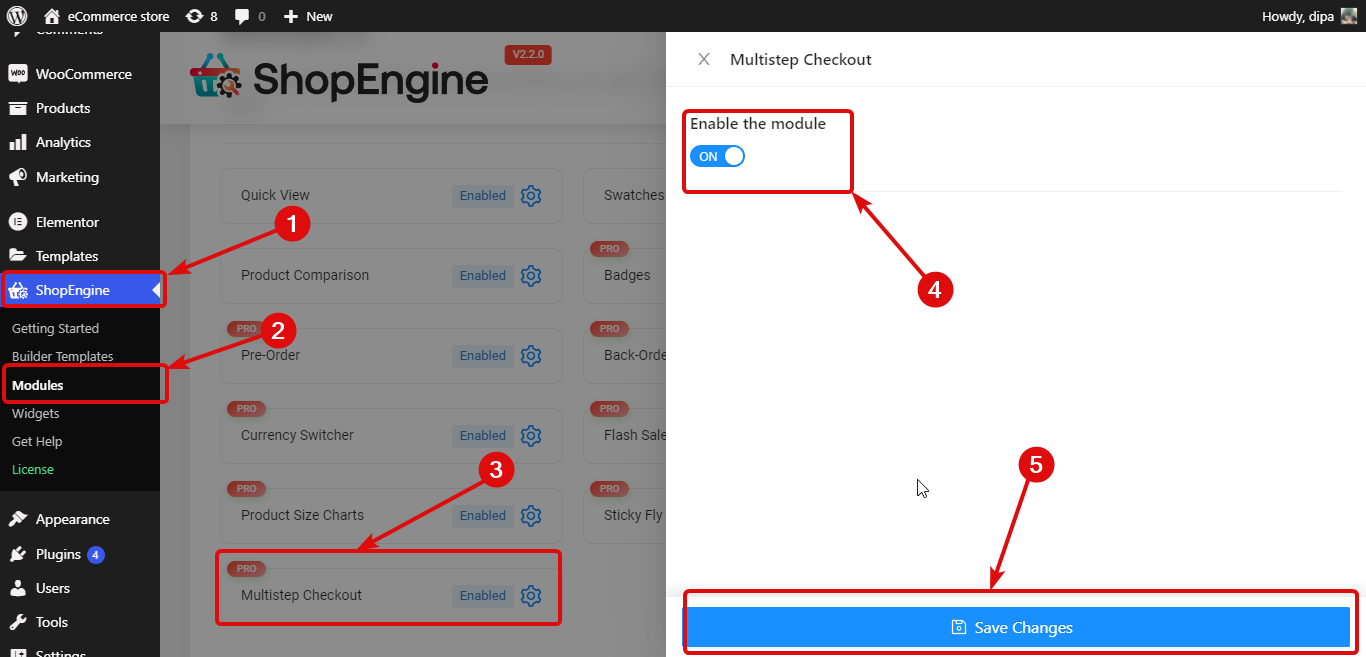
Step 1: Enable the Multistep Checkout module
To enable this module, go to ShopEngine ⇒ Modules ⇒ Badges Module and click on the Settings Icon. Then turn on the toggle button to enable the module. And, finally, click on save changes.
Step 2: Create a Multi-step Checkout Template
Now you can create a multi-step checkout, go to ShopEngine ⇒ builders Template. Then click on Add New.
Provide the following options to create a multi-step checkout template:
- Title: Give a suitable title
- Type: Choose type as checkout from the drop-down.
- Set Default: You must turn this option on so the multi-step checkout template becomes your default checkout template.
- Sample Designs: Scroll and choose the multi-step checkout template .
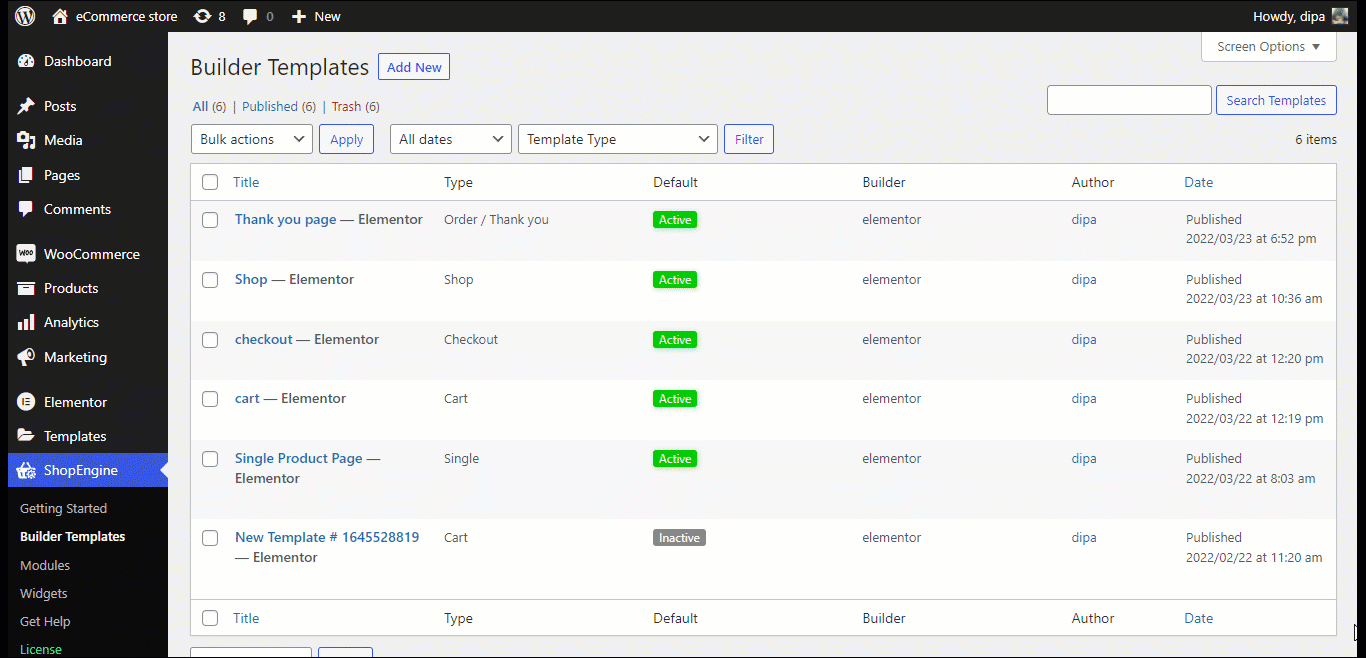
Now click on Save changes to update.
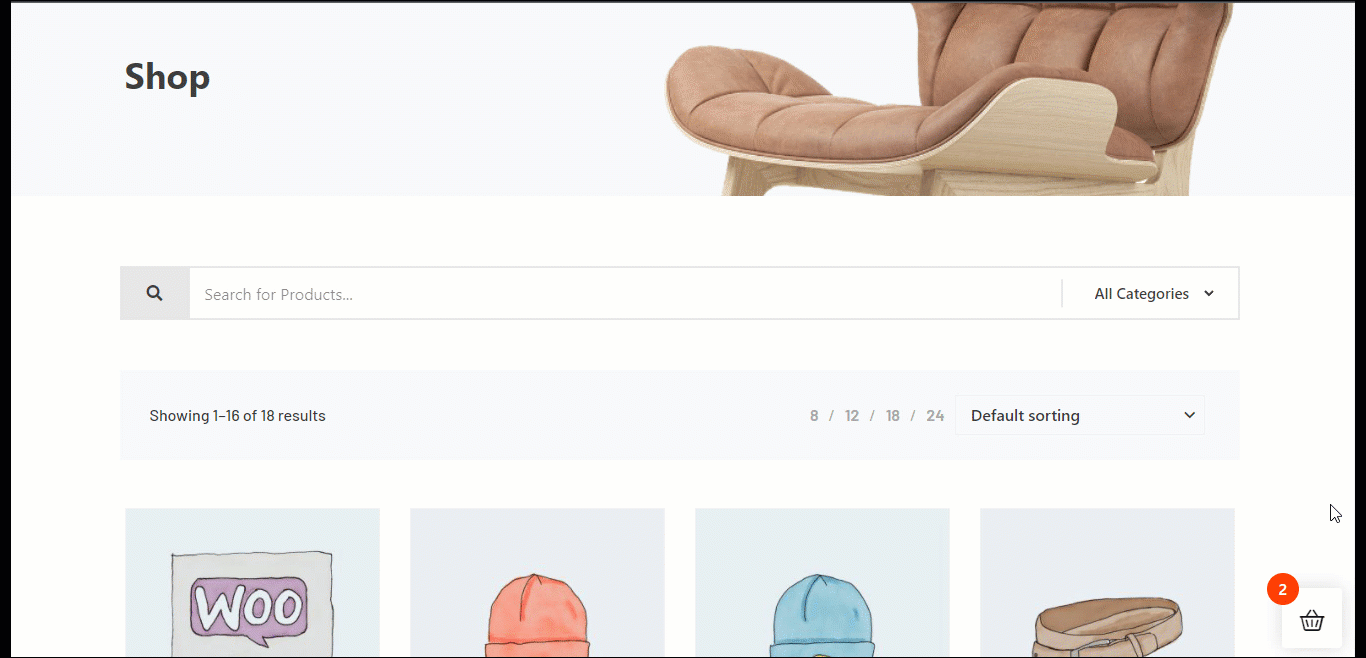
Here is a preview of the ShopEngine’s Multi-Step Checkout template.
🔔 Note: You can edit the prebuilt template and also create a multi-step checkout form from scratch. To learn more details, check out our documentation.
How to use the ShopEngine Badge Module
Learn how to add a sales badge with an image on the Elementor website using the ShopEngine badge module.
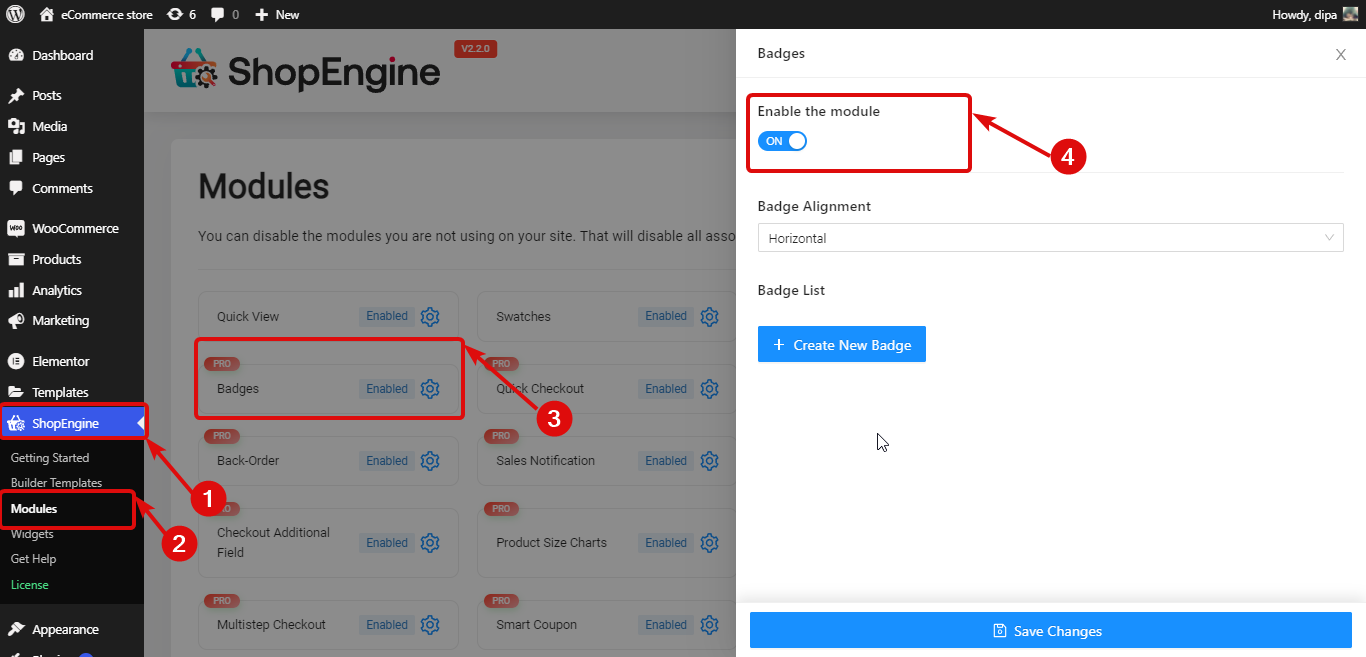
Step 1: Enable the Badge module
The first step is to enable the module. For that, go to ShopEngine ⇒ Modules ⇒ Badges Module and click on the Settings Icon. Then turn on the toggle button to enable the module.
Step 2: Create a new badge
Click on the + Create New Badge icon, then provide the following options:
- Title: Provide a title.
- Badge: Upload and choose an image for the badge.
- Position: Choose a position from the dropdown. The options are Top Right, Top Left, Bottom Right, and Bottom Left.
- Assign By: Here you can choose whether you want to assign the badges by categories or products.
- Applicable Categories/products: Here you can type the initial of the category/product and choose from the suggestions.
Once you provide all the information, click on Save changes to save the product badge.
Step 3: Customize Badge Settings
You can follow step 2 to make multiple badges. And once you add the widgets, you can set the Badge Alignment as horizontal or vertical.
Now click on Save changes and that’s it. Now badges should be visible on the front end of your WooCommerce website.
Here is a preview of what the ShopEngine Badge module looks like on the Shop page:
🔔 Note: For more details on this module, check out our documentation.
Are you using ShopEngine Nulled for any reason? Then you must read our blog on Why you should stop using a WordPress nulled plugin immediately.
🔔 Here are the issues that have been fixed with the release of ShopEngine (version 2.2.1) and ShopEngine Pro ( version 1.7.0)
Changelog:
✔️Fixed: Sticky fly cart icon not showing for non-logged-in users
✔️Fixed: Best selling product widget issues (alignment, gaping, control).
✔️Fixed: RTL & flying cart double image shown issue.
✔️Fixed: Cart text translation issue
Wrap Up
All the new additions and improvements of ShopEngine are highly useful in maintaining and growing your eCommerce business.
The vacation module will ensure you can enjoy your off-days while shutting off your eStore totally as you can browse your website.
The new and improved Badge module will provide social proof in the form of a badge which will highly motivate your users to buy your products. On the other hand, once your customers try to order, a multi-step checkout form will make sure they complete the full form and end up placing an order.
You can enjoy these features with ShopEngine Free(version 2.2.1) and ShopEngine Pro ( version 1.7.0).
Our team dedicatedly works hard to provide you with new useful modules with each new release. And this release is no different. Besides, a lot of issues have also been fixed.
Do update your ShopEngine version to the latest one, try out these amazing modules and features to make your WooCommerce more shopper-friendly.
Leave a Reply