Did you know that a recent study on 2 billion modal popups had a 9.28% conversion rate among the top 10%?(1)
Yes. Popups make website visits user-friendly and help you gain more newsletter signups quickly. Popups have changed drastically in how they look and function. As a result, they are becoming more popular on modern websites now than ever.
Do you also want to add WP modals to your website and leverage the benefits it has to offer?
Then this blog is exactly what you need. This is the only guide you will need to learn about popup modals and how to easily add them to your WordPress website.
Source: (1) Pop-up Statistics: Findings From Analyzing 2 Billion Pop-up Examples
What is a Modal Popup?
Modal popups are very common and it’s highly unlikely that you haven’t come across one. But do you know the definitions of the modal popup? Let’s have a look.
A modal (also called a modal window or lightbox) is a web page element that displays in front of and deactivates all other page content. To return to the main content, the user must engage with the modal by completing an action or by closing it.
– Hubspot
Modal windows are different from old model dialog boxes. In modeless pop-ups, users have access to the whole window even when the popup is on. So, they can ignore the popup and continue to do their work.
On the other hand, the new modal popup creates a new “mode” in the form of a child window and disables the parent window. As a result, the user can not work on the original window until he takes some action or closes the modal popup.
What’s the benefit? The benefit is you have your website’s visitor’s attention even if it is for a second or two. And getting the user’s focus on your message is what you need, right?
Because if they see what you have to offer, they will stick around for more than a second, which will ensure you a lead.
Why Use Popup Modal In Your WordPress Website
Most people think popups are annoying. Of course, I am not blaming them. You go to a site to do your work and suddenly a popup arises and interrupts, it is surely annoying.
But being a business owner, you need to look at a popup differently. Because believe it or not these annoying popups work like wonder. Popup modals are proven to be extremely successful especially in the lead collection.
According to Sumo, they collected about 23,645,948 email addresses in less than two years using a popup modal. In many cases, the conversion rate went up to as high as 50.2%!
So, if you are looking to boost your email list and accelerate your conversion rate, modal pop is your thing as these are proven lead magnets.
Moreover, modals are simple and flexible and you do not need to send users to another page to complete an action. More leads with better user experience. So, never think modals are useless or dead and start using them today.
Common Uses of a Modal Window In Modern Web Design
Modals are highly effective whenever you need website visitors to take some action or notice some important message. Some of the common uses of a modal window in web design include:
- Show Welcome Message
- Collect email and lead for newsletter subscription
- Login form
- Show a warning message before taking action
- Display cookie policy
- Display media like image gallery(product) or video etc.
- For multi-step forms for a better user experience.
I have listed only a few of the many ways of using modal in web design. Once you know how to create custom popups in WordPress, you will find various ways to use them on your website for optimal results.
So, let’s get started.
Setup You Need To Get Started
I am assuming you have WordPress installed on your website. Besides that, you will need a page builder and a WordPress popup plugin to make modal in your website:
- Elementor (free version)
- ElementsKit (both free and pro version)
Elementor is a free page builder and ElementsKit is one of the best WordPress modal popup plugins.
Done installing? now you are all set to create a WordPress custom popup on click in WordPress! Let’s start the main process now.
How To Add Modal Popup In WordPress In 3 Steps In Elementor Using ElementsKit
If you think adding a popup to your WordPress site is hard, ready to get surprised. Follow the steps below and easily create an Elementor modal popup in wp easily. This is the easiest tutorial on how to add popup in WordPress.
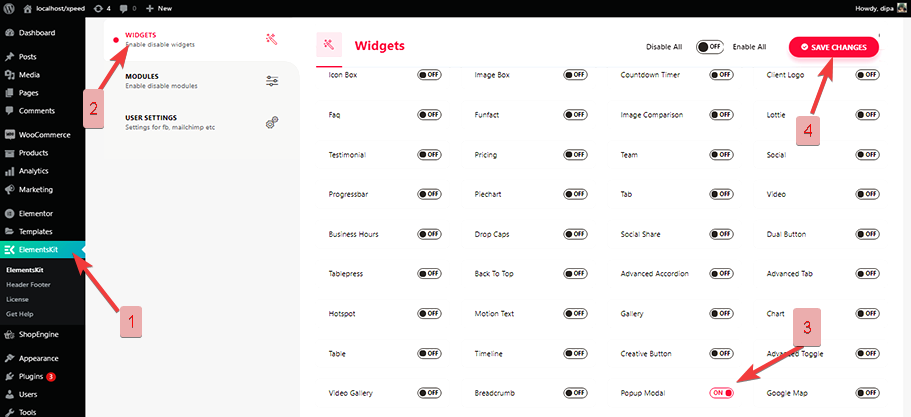
Step 1: Enable Modal Popup Widget
Once you have installed ElementsKit plugins, you can enable the Elementor Modal Popup widget from the WordPress dashboard
- Go to ElementsKit > Widgets > Turn on Popup Modal > Click Save Changes
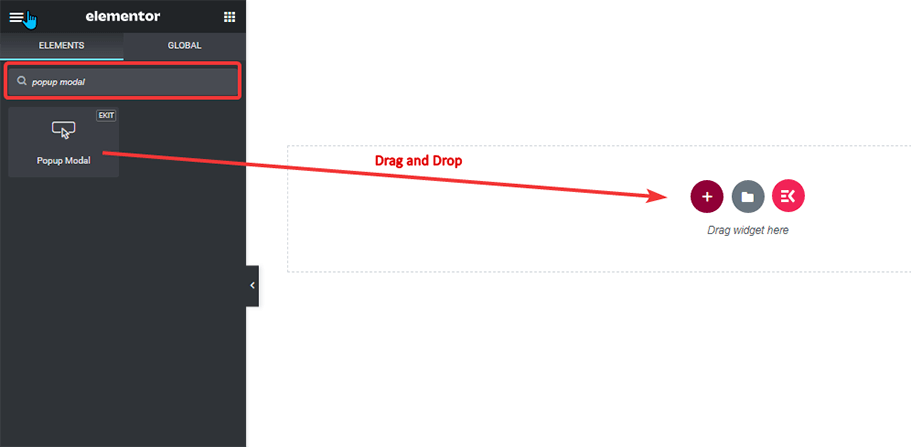
Step 2: Add WP Modal Popup Widget
- Search for a popup modal, drag and drop the widget on the section you want your Modal to appear.
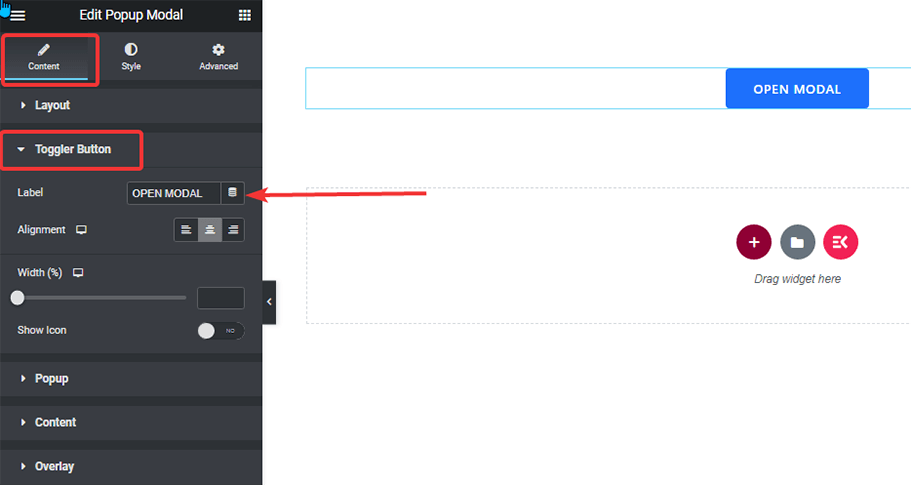
Step 3: Configure Settings To Complete
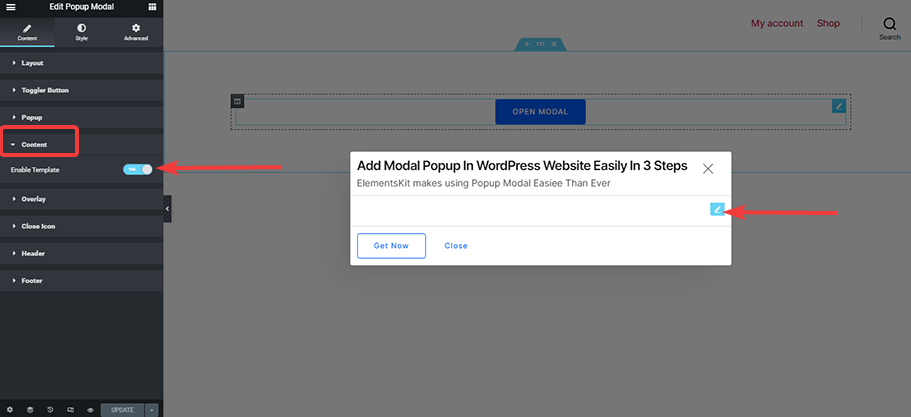
Click on the Edit icon on the popup section to go to the edit options.
- To change the button text go to Content > Toggle Button > Label and edit
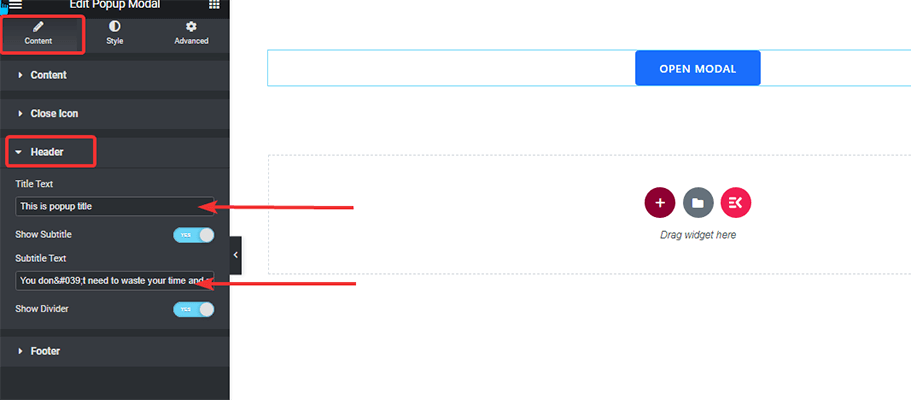
- To change the title and subtitle go to Content > Header and change the options with your custom text.
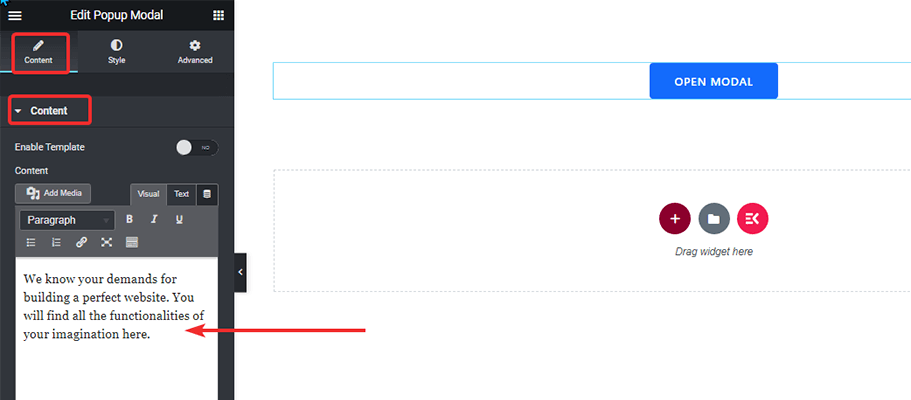
- To change the content of the body, expand the content section and edit the text to create WordPress popup message.
- Go to Content > Footer > Button > CTA and change the CTA label and URL with ElementsKit, a custom popup builder.

- Finally, click on Update to save.
Done. Now click on the preview button to see the results and check how your WordPress popup window looks:
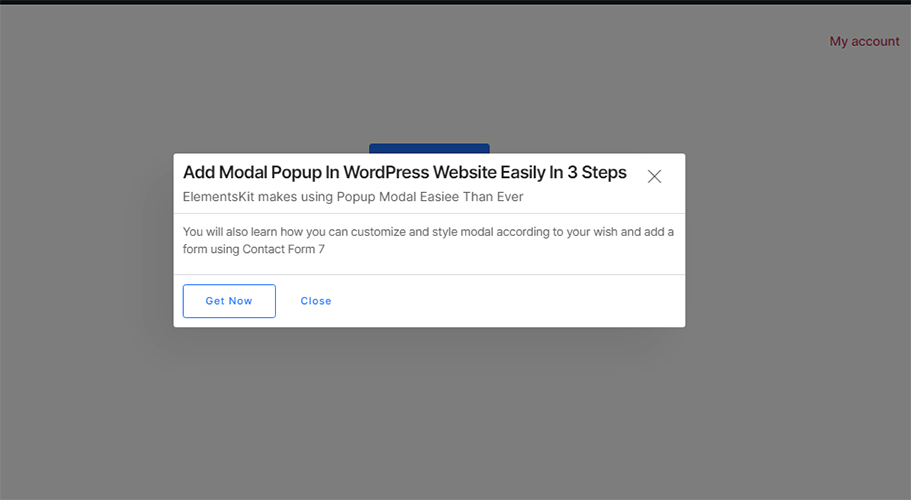
Well Done! You have created your Elementor modal popup.
Additional Settings For Modal
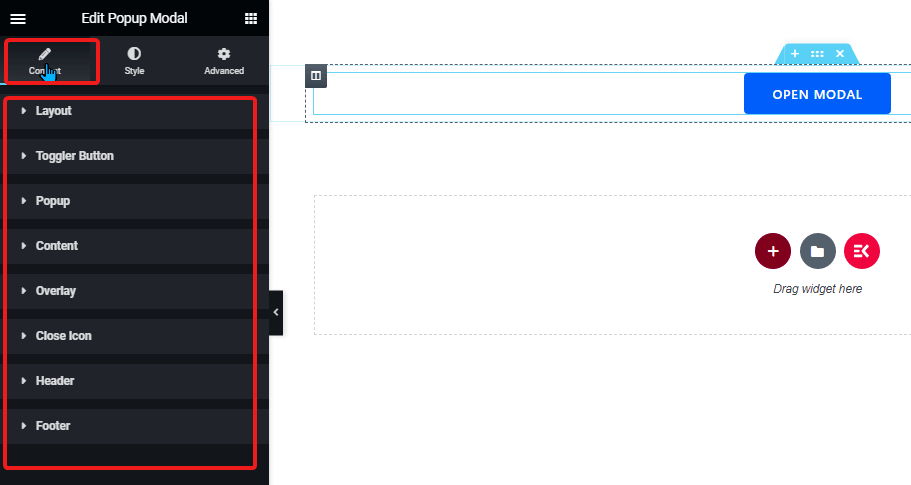
Now let’s have a look at the additional modal settings you can customize:
Layout:
Expand the layout option to change toggler type, popup position and popup show up option.
Toggler Type:
You don’t necessarily have to have a modal that triggers when someone clicks a button. ElementsKit offer you 2 more options to choose from besides button
Image: You can choose any custom image of any size instead of a button as a toggler for your modal. To choose a custom image
- Go to Content > Toggler Type > Choose Image
- Go to Toggler Image > Choose an image, image size, and alignment
Time: You can also set the modal to trigger after a specific time without any action from the user. For example to set your modal to appear after 3 sec
- Go to Content > Toggler Type > Time
- Add time in Toggle After (in Seconds)
Popup Show Type:
You have two options for popup show type: Modal and Slide.
Popup Position:
You can choose to place your popup anywhere in the window. The available position options to choose from are:
- Top Left
- Top Center
- Top Right
- Center Left
- Center
- Center Right
- Bottom Left
- Bottom Center
- Bottom Right
Popup:
Expand the popup option to choose the width and minimum height. Here you also get the option to show or hide the close icon, header, and footer. You can also adjust the horizontal and vertical position and add animation according to your wish.
Overlay:
In case you don’t want to force the user to click on your modal to close it, turn on the Close Popup OnClick Overlay option. This way, the user can click anywhere on the window to dismiss the modal.
Close Icon:
Here you can change the position of the close icon. You can set popup top right, popup top left, window top right, window top left. You can also change the vertical and horizontal positions. Moreover, you can choose any icon from the library or use an SVG image as an icon.
Header:
Apart from changing the title and subtitle, you can also show or hide the divider from here.
Expand the footer option to change the Label, Variant, and Alignment of the footer buttons. You can also choose to hide them if you want from here.
There you have it! You can now use the modern looking engagging popups on your website.
For more details, read the documentation of ElementsKit Popup Modal widget for Elementor.
How To Add Custom Design In Elementor Modal with ElementsKit Popup builder
Now, you know how to change text, position, animate, and do much more to customize your modal window in WordPress. But it still looks a little boring, right? Just like any other WordPress Elementor modal popup.
If you can add a custom image or a video or any other widget in your modal window just like a page, it would be so awesome. You can add any custom design to your model with ElementsKit.
Follow the steps to easily create your desired custom design on modal:
- Go to Content > Content > Turn on Enable Template
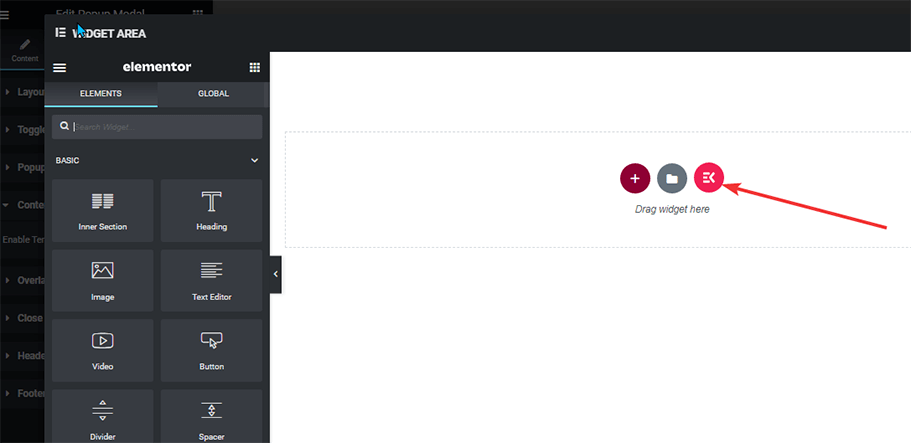
- Click on modal button and once the modal opens, click on the edit option to open the widget area
- Once the widget area is open, you can search for any widget > drag and drop > update to save.
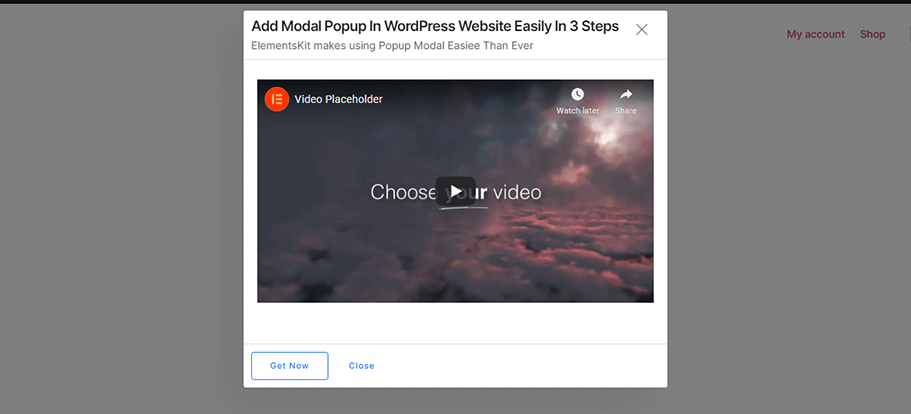
For example, if you want to add a video, then search for the video in the widget area and drag and drop to add in your model and update. Now, the video should appear in the modal window.

Use Premade ElementsKit Sections For Beautiful Modal
Don’t have the time to create a modal popup design from scratch? No worries. ElementsKit popup builder provides many built-in sections that you can choose to create engaging modals to highlight your message to the viewer.
To use built-in widgets from ElementsKit, follow the below steps:
- Click on the edit option on the modal to open the widget area
- Click on the EK Button to open another widget window with the premade sections.
- Go to > Sections > Choose the section you like > Insert
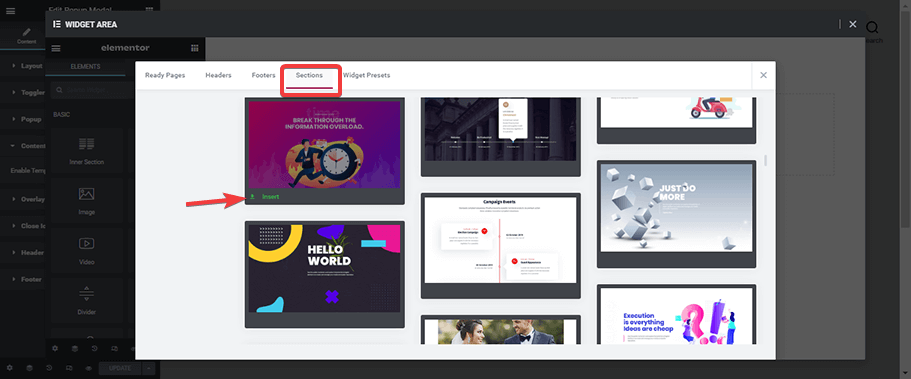
- After the insertion, you can change the image, text, or background color according to your preference and update.
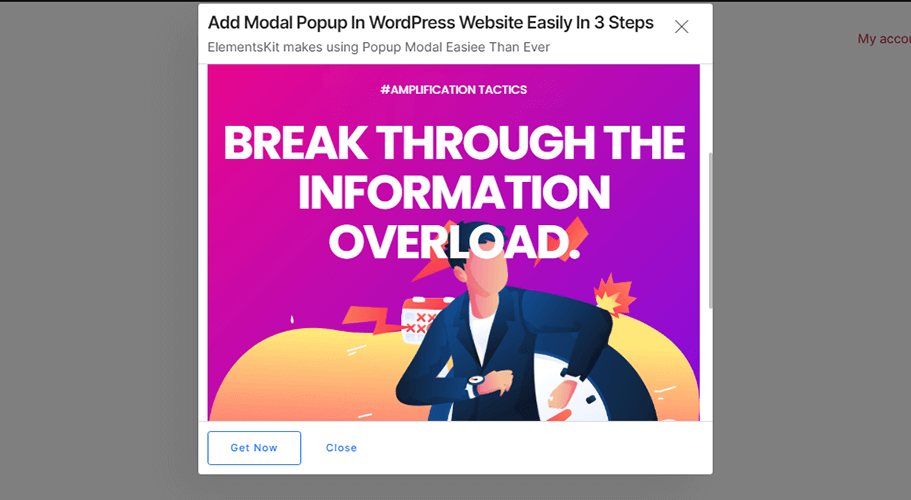
And here is the final result!
ElementsKit offers 60+ Widgets and 500+ Ready Sections. Learn more about ElementsKit and how to use them to enhance your website.
Add Contact Form 7 in Modal with ElementsKit
Like I said before, modals are effective in getting more newsletter subscriptions and collecting user data. But for that, you need to add a contact form in your modal, right?
Don’t panic, you will not need another WordPress popup plugin to add a contact form in your pop window. ElementsKit WordPress plugin is an all-in-one popup maker plugin.
Follow the instruction below to add popular Contact Form 7 in your modal with the ElementsKit popup maker plugin.
Before you follow these steps, make sure you have created a contact form on your website using Contact Form 7, Elementor Page Builder, and ElementsKit.
You can also have a look at the video tutorial below to create a contact form.
Let’s get started.
- Go to Content > Content > Turn on Enable Template
- Click on the edit option to open the widget area
- Search Contact Form, drag and drop on the section you want to add it.
- Expand the style option under contact form 7
- Choose from the premade form and update.
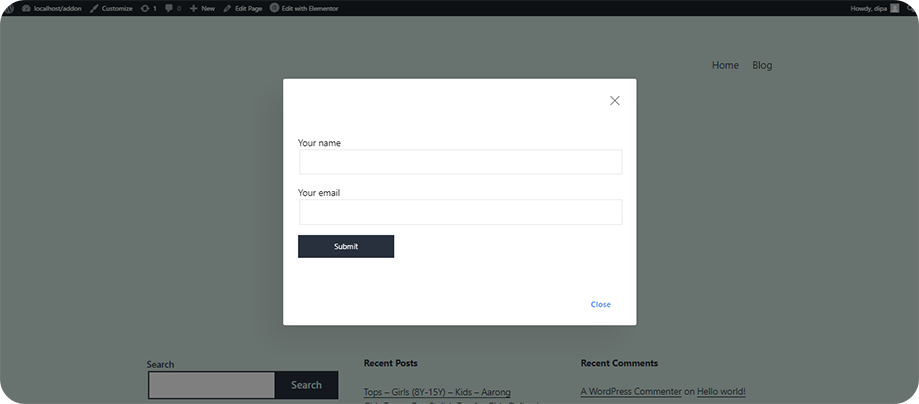
Here you have a modal popup with a contact form to boost your email list.
Did you know that you can create a custom widget without having any deep coding knowledge? Check how to build a custom widget easily without any code using ElementsKit.
Effective Tips for Adding WordPress Elementor Modal Popup
WordPress modal popups can significantly enhance user engagement, convey important messages, and drive specific actions from your visitors. Here are the 7 effective tips for implementing impactful modal popups on your WordPress site.
1️⃣ Choose a Reliable Plugin
Select a well-maintained WordPress modal plugin such as Elementor” or “ElementsKit” to create the modal window in your website.
2️⃣ Define Clear Goals
Clearly outline the purpose of your WordPress modal popup, whether it’s collecting emails, promoting offers, or conveying important information.
3️⃣ Timing is Key
Use triggers like time delay, scroll depth, or exit intent to display the popup at the right moment. That will help in avoiding immediate page load interruptions.
4️⃣ Mobile Responsiveness
Ensure your WordPress modal popup is mobile-friendly to provide a positive experience across various devices.
5️⃣Design for User Experience
Design concise, visually appealing WordPress modal popups with high-quality content. Include an easily accessible option to close the popup for users uninterested in the content.
6️⃣ A/B Testing for Optimization
Implement A/B testing to refine your modal in WordPress by creating variations and identifying the most effective elements for your audience.
7️⃣ Compliance with Privacy Regulations
Ensure your WordPress modal popup complies with privacy regulations, including transparent communication of your privacy policy and obtaining explicit consent for data collection.
FAQs
You can create a WordPress modal popup without a plugin by using custom code or themes that support modal functionality. However, using a modal popup WordPress plugin e.g. ElementsKit simplifies the process and provides additional features.
You should avoid using modal popups in situations where they may disrupt the user experience, such as on mobile devices with small screens or during critical user interactions like checkout processes.
Modal popups themselves don’t directly impact SEO, but their implementation can affect user experience and search rankings. So, you should ensure that popups are not intrusive, and designed following Google’s guidelines for interstitials to avoid negative SEO implications.
ElementsKit is recommended as a powerful and feature-rich WordPress modal popup plugin. It provides a range of customization options, templates, and compatibility with various page builders, making it a popular choice among WordPress users.
Wrap up
Congratulations! Now you know how to create Elementor popup modals in WordPress using an Elementor Addon. Create contact form popups, and do any customization in the WordPress site effortlessly using the easy popup maker plugin, ElementsKit Pro and Elementor Page builder.
Don’t just stop here. Keep experimenting on how many ways you can use the WordPress popup modal on your website. And if you need any help with building WordPress pop-ups using ElementsKit, leave a comment below.
Leave a Reply