Storeleads reports over 4.6 million WooCommerce live websites in 2024. As a WooCommerce user, you wouldn’t like your online store to look like other WooCommerce users, right? If you are using the WooCommerce default templates, your site will look similar to thousands of others. So, how will you set your WooCommerce store apart from others?
Customization is the answer! Yeah, you can customize your WooCommerce pages to stand out from the crowd. In this write-up, I will specifically deal with customizing your WooCommerce product page. Yeah, your unique product deserves a unique customized WooCommerce product page.
Luckily for you, this does not require any complex code or process. You can perform simple tweaks to optimize your page design and complement your product by editing your WooCommerce single-product page.
In this article, I’m going to explain how to customize a single WooCommerce product page even if you have no coding knowledge.
Customize WooCommerce Product Page– Important Tools to Have
You must be wondering about what you need to customize a WooCommerce single product page for online business. Well, the process I’m going to show for your WooCommerce product customization will not need you to buy dozens of paid plugins or extensions.
Apart from having WooCommerce installed and activated, you’ll need to activate the following two plugins on your WordPress website to edit your WooCommerce product page beautifully:
Both of the plugins work smoothly with the WooCommerce plugin and help you start designing and customizing your single product pages for all new products and old ones. Changing the WooCommerce product page or single product page layout will be easier with ShopEngine.

How to Customize Single WooCommerce Product Pages Step-by-step
There is no end to customization and tweaks for a default product page. Different kinds of products need different types of customization.
However, in this step-by-step guide, I’m going to explain the key customizations you can make to your WooCommerce product page so that you get more sales from all product pages. So, let’s jump to the process of how to customize or edit single product pages in WooCommerce.
Install Elementor and ShopEngine

As we’re going to customize the default WooCommerce product page with Elementor and ShopEngine, the first step is to install the plugins from WordPress. Here see how to install Elementor and ShopEngine to edit WooCommerce product page or change the list layout.
| Elementor Installation Process | ShopEngine Installation Process |
|---|---|
| 1. Go to your WordPress Dashboard. Click on Plugins ➜ Add New 2. In the search box, enter Elementor, and choose the Elementor Website Builder plugin to install. 3. After installation, click on Activate. | 1. Go to your WordPress Dashboard. Click on Plugins ➜ Add New 2. In the search box, enter ShopEngine, and choose the ShopEngine plugin to install. 3. After installation, click on Activate. |
Create a WooCommerce Single Product Page Template
- Go to ShopEngine ➜ Templates➜ Add New
- Give the template a Name
- Choose type: Single
- Set the template as default (Yes)
- Click on Edit with Elementor

In this product customization WooCommerce tutorial, I will show how you can build a WooCommerce product page from scratch. That is why I chose the blank WooCommerce single product page template. However, ShopEngine provides 9+ professional looking prebuilt single product templates that you can import and use.
Select a Structure to change your WooCommerce single product page layout
Choose your preferred structure from Elementor to start making a customized single Elementor WooCommerce product page for your store.
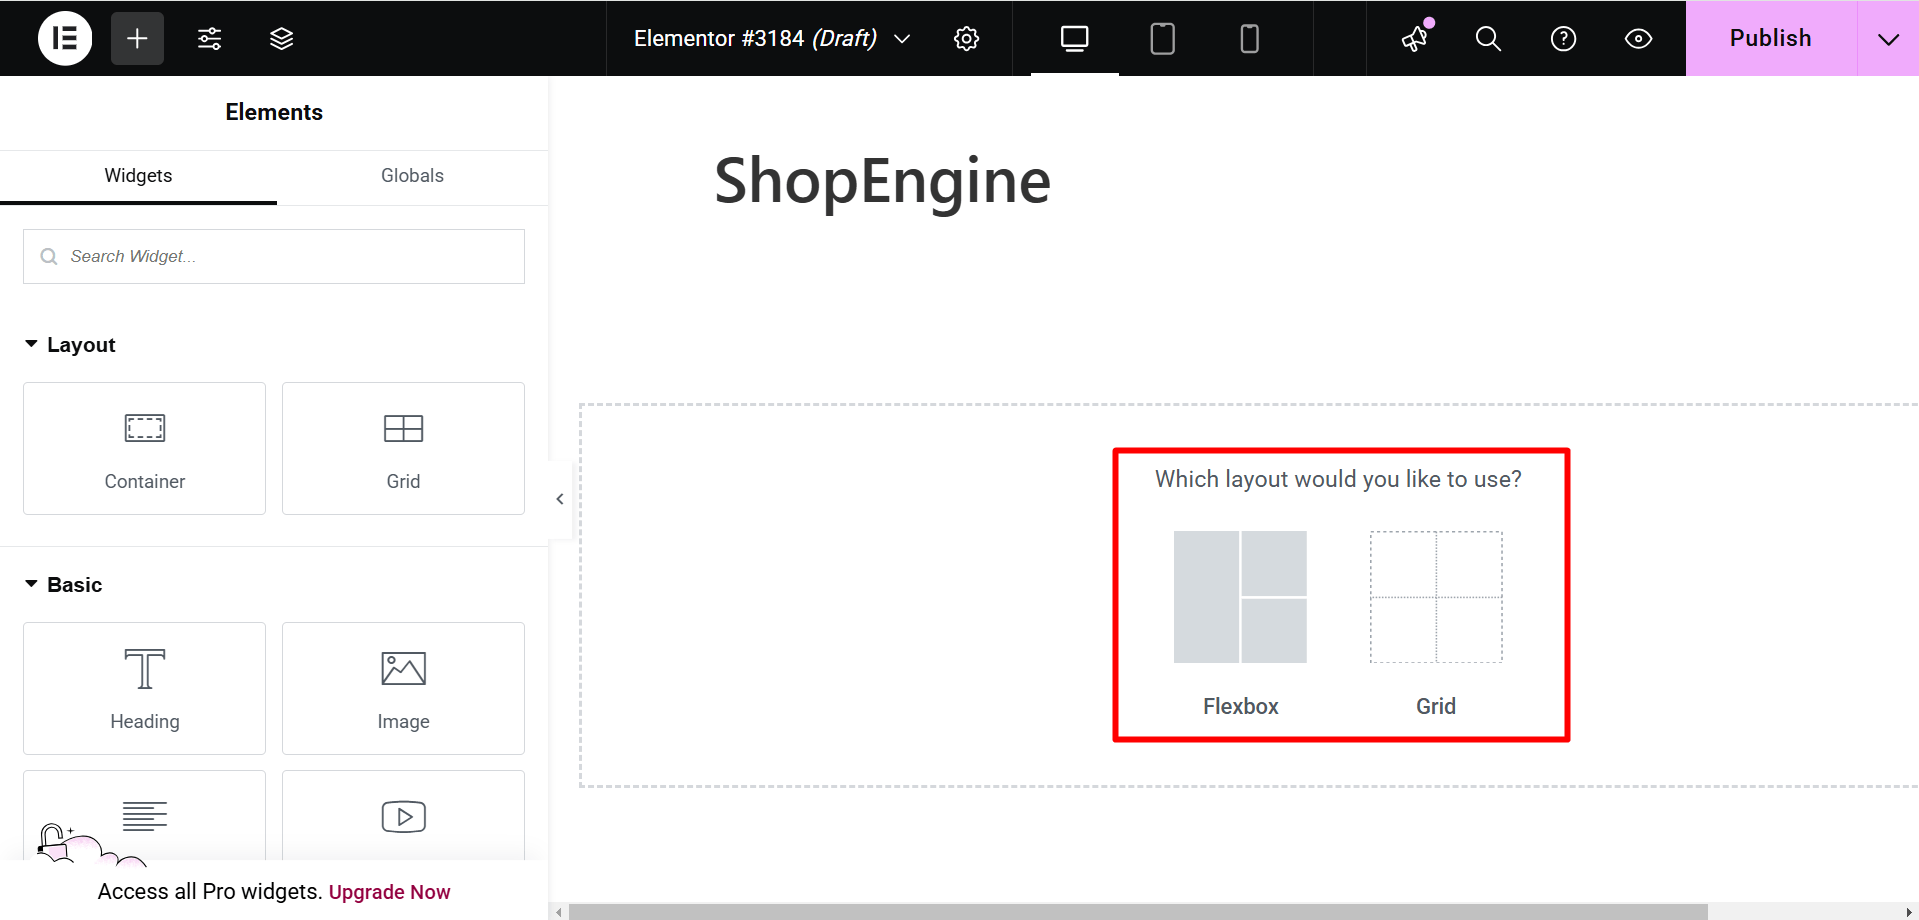
After you select a structure, you can drag and drop any widgets in any order according to your preferences. To create a custom WooCommerce Product page, ShopEngine provides 43+ widgets which include product image, product title, product price, product stock, product tabs, etc.
Note: Before you start building your product page, make sure the widgets you are going to use are enabled. You can do that from ShopEngine ⇒ Widgets ⇒ Single, turn on the widgets you need and click on save changes.

Here, I am going to show you how to use some of the single product widgets. You can use the same widgets or a different set of widgets following the same steps.
Customize Product Price
Search for the ‘Product Price’ widget on Elementor. Drag and drop the product price widget from the ‘ShopEngine Single Product’ block to make a WooCommerce custom product page.

This price block widget will help you to:
- Set the product price alignment to left, center, and right
- Change the primary, secondary, text, accent color
- Use the color picker option to design the product tag with your favorite color
- Change the typography family, typography size and weight, decoration, line height, letter spacing, and other typography-related settings.
Customize WooCommerce Product Title
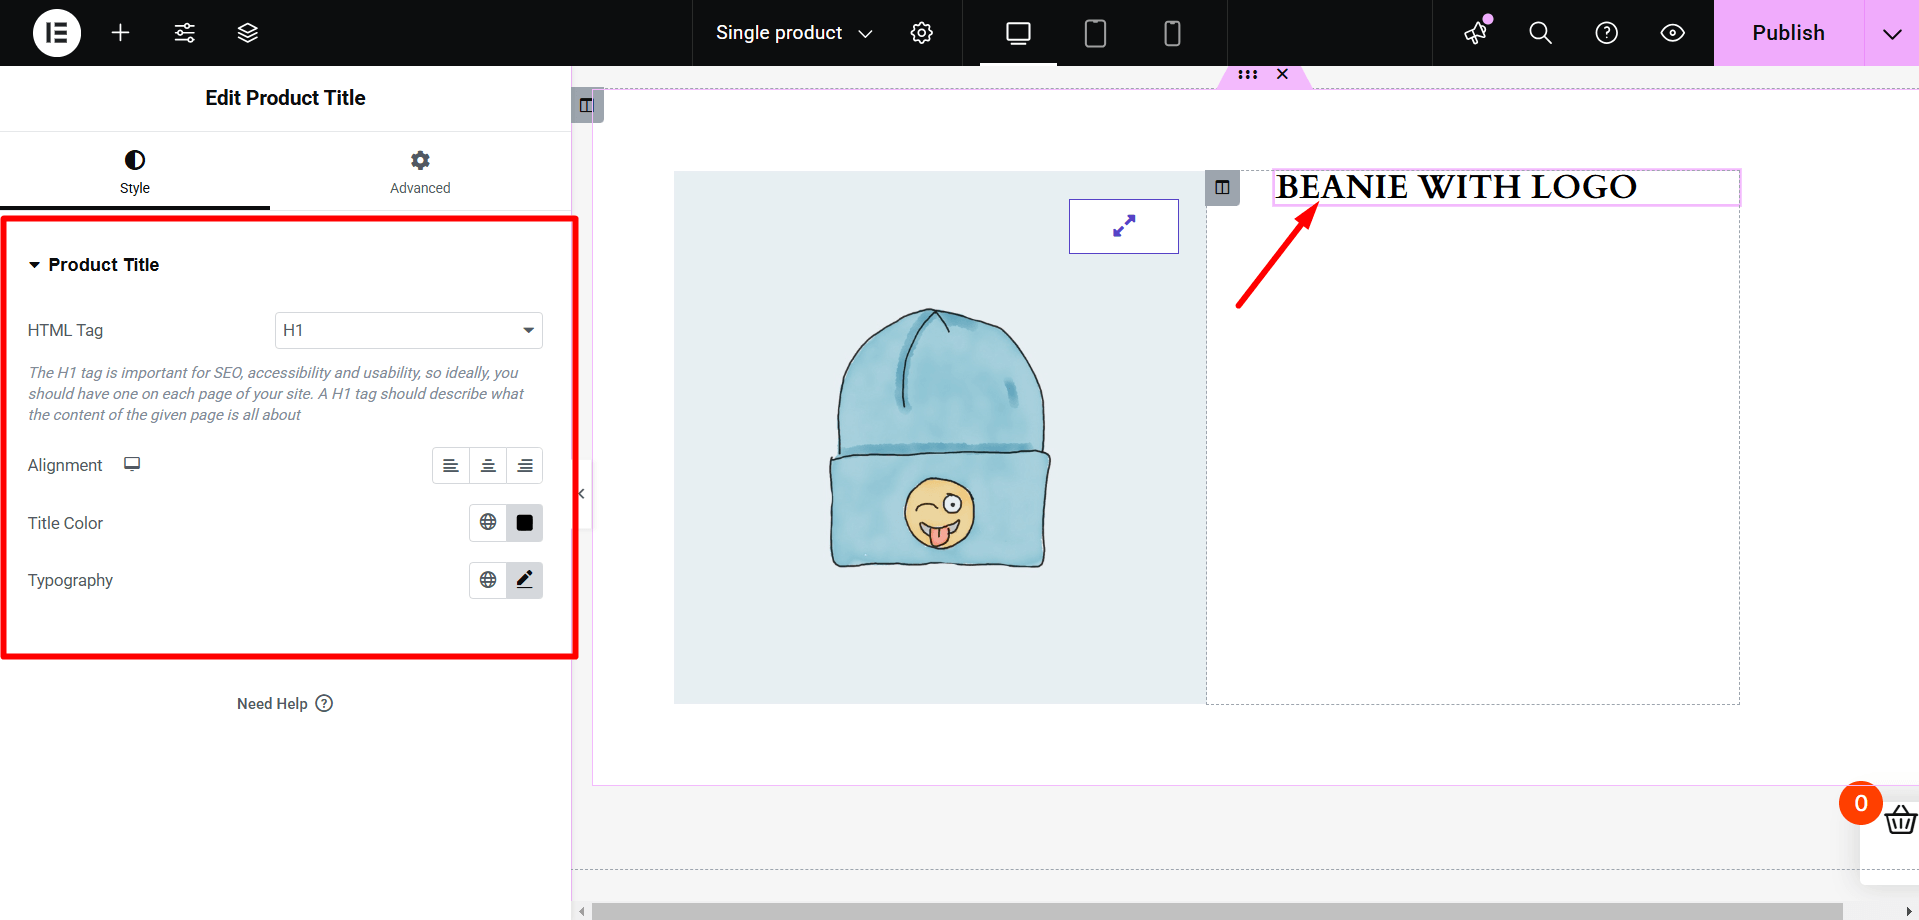
Search for the ‘Product Title’ widget on Elementor. Drag and drop the product title widget from the ‘ShopEngine Single Product’ block to make and customize your WooCommerce product page. These simple edits to your WooCommerce single product page can make a huge conversion by providing better UX.
From the style settings of the product title block, you can make the following customizations:
- Set your product title HTML tag from H1 to H6.
- Set product title alignment to right, left, or center.
- Change the product title color
- Set all aspects of typography
Add Breadcrumbs

A breadcrumb will let the shoppers know where they are on your website. It is a wise decision to add a breadcrumb to your product page. Here’s how to add breadcrumbs:
Search for the ‘Breadcrumbs’ widget on Elementor. Drag and drop the breadcrumbs widget from the ‘ShopEngine Single Product’ block to the Elementor content area.
From the style settings tab, you can:
- Set the text color, link color, and link hover color of the breadcrumbs
- Choose typography, alignment, icon, icon size, and space between values for the breadcrumbs that allow you to change WooCommerce product or category page layout.
Customize Product Additional Information

A short description might be inadequate for your product. And when a short description is not enough, the additional product information will increase the likelihood of more sales.
Search for the ‘Product Additional Information’ widget on Elementor to edit WooCommerce product page. Drag and drop the widget from the ‘ShopEngine Single Product’ block to the content area for changing WooCommerce product page layout.
Here is a list of what you can control by leveraging the widget:
- Change the alignment, color, typography, and margin of the title
- Change the color, typography, background, and width of the label
- Change the color, background, and typography of the value
- Reset the table alignment and padding
- Set your preferred typography family
Leverage Product Upsells

The product Upsells widget will help you to suggest more products to your buyers. Upselling products will inspire your buyers to buy more products from your shop and thus contribute to increased profit.
Search for the ‘Product Upsells’ widget on Elementor. Drag and drop the widget from the ‘ShopEngine Single Product’ block. This edited WooCommerce product page layout will drastically boost your conversion rate.
From the content and style tab, you can:
- Set the number of WooCommerce products per page to show
- Enable/disable slider, loop, and autoplay
- Show/hide the heading, sale flash, regular price, arrows, dots, and cart button
- Set slider columns, speed, and arrow size
- Define the dots size or active dots size
- Set order by option
- Set column gap
- Change background color, text alignment, etc.
These all customizations will make your product page more appealing to your customers by changing your WooCommerce product or category page layout.
Customize Product Rating

Showing product ratings on your product pages will help your visitors find the best products based on the user ratings.
Leverage the Show Product Rating widget from ShopEngine and make any of the following changes:
- Choose the rating star color and empty star color
- Set the star size and gap
- Review the link color, link hover color, and typography
- Define the left spacing and alignment
Customize Product Meta

Just drag and drop the product meta widget to the Elementor content area to start customizing your product meta settings.
Using the product meta widget, you can show or hide product SKU, category, and tags. On top of that, you can also change the layout, alignment, padding, typography, link hover color, and content color within minutes.
Update Product Description Styles

Drag and drop the product description widget of ShopEngine and bring any changes you like to the color, typography, and alignment of the description.
Customize Add to Cart Button
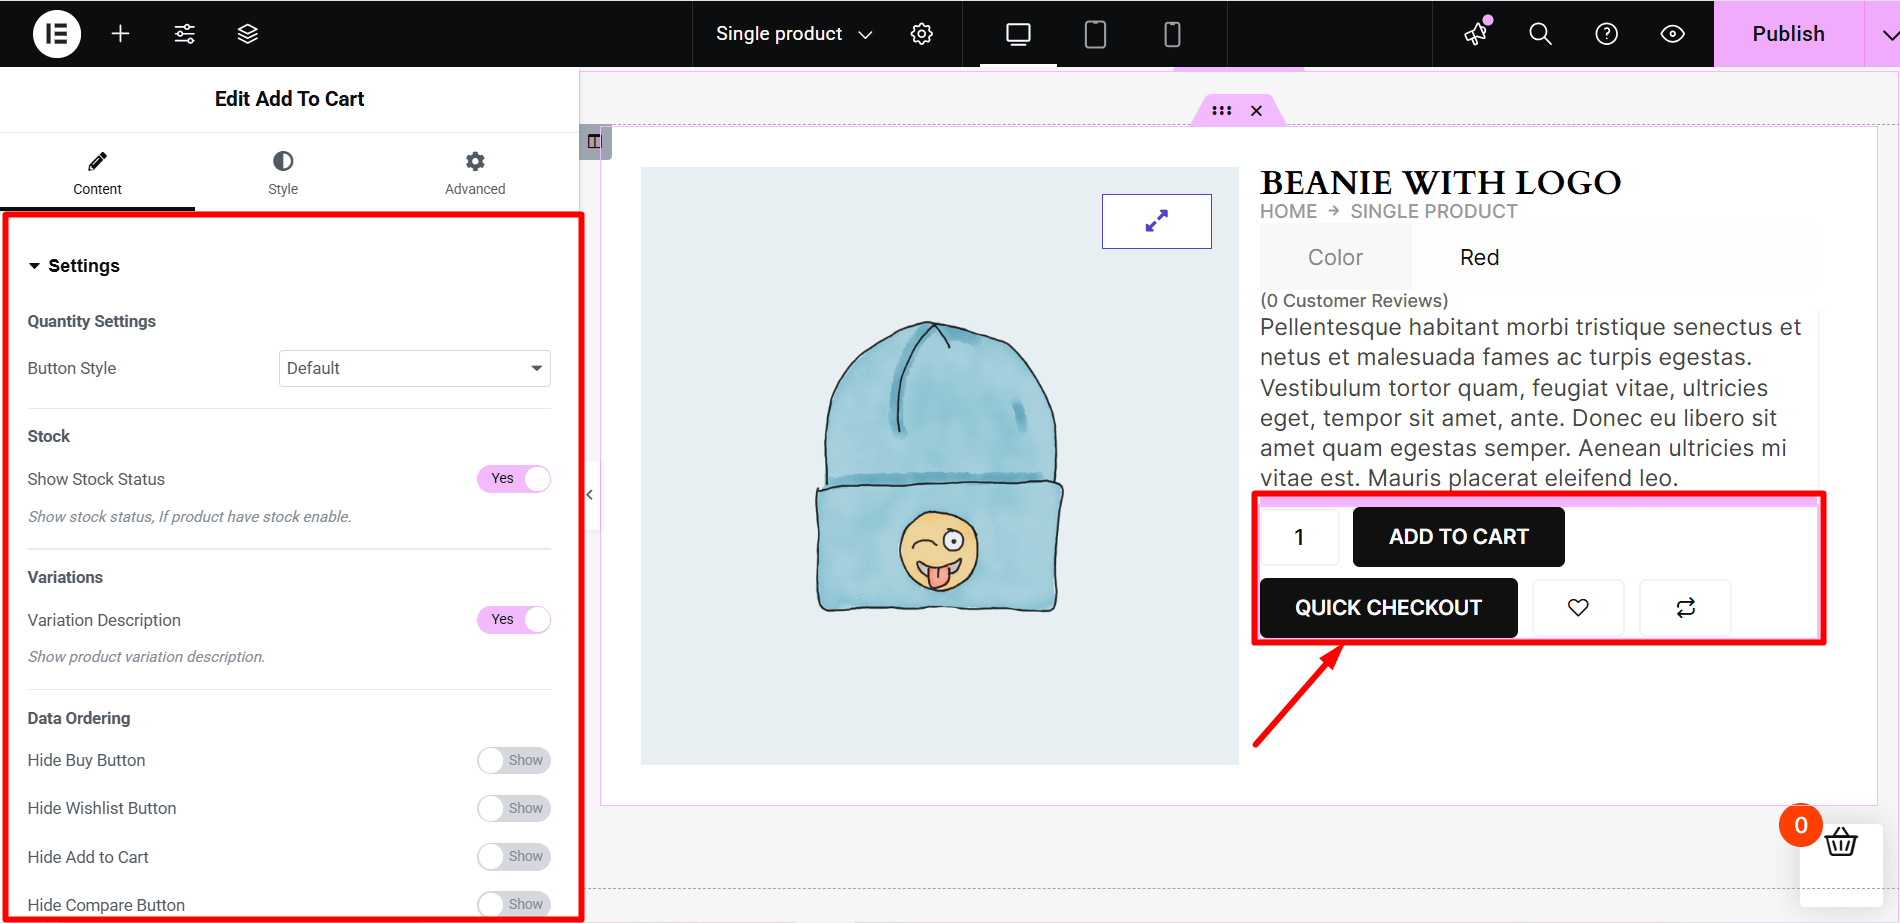
Make sure that your product pages have an excellent add-to-cart button. This will surely increase the conversion to a great extent.
With the add-to-cart widget from ShopEngine on Elementor, you can change the quantity icons, button positions, etc.
Moreover, you can execute A/B tests with the style settings to find out what works best for your changed WooCommerce product page layout.

Adding product-sharing buttons on your WooCommerce product pages is a great idea you can implement right now. When the shoppers share the product data with their near and dear ones, you’re going to have more sales from new users without any paid advertising.
Leverage the product share widget from ShopEngine to add a customizable product share option to your WooCommerce product pages. However, you have to use a social sharing plugin like WP Social to enjoy this option.
Customize the Product Review Widget

Place the product review widget at the right place on your product page so that the product users can leave their ratings and reviews. It also promotes your brand perfectly.
Using the ShopEngine ‘Product Review’ widget from the Elementor block, you can make the following changes to the product review section:
- Change the color and typography of the product review heading
- Set the single review border type, width, color, and padding
- Set author avatar width, author name color, and typography, review date color, and typography
- Review content color along with the typography
- Change the default star color and empty star color
- Customize the comment form
- Choose your preferred font size and font family, etc.
Customize Product Stock Status

With ShopEngine’s “Product Stock” widget, you can customize the in-stock or existing product text and icon along with the color, typography, and alignment of your WooCommerce product pages.
On top of that you are at full liberty to set the icon, alignment, color, and typography for ‘out of stock’ and ‘available on backorder status.
Add and Customize Product Tabs

Adding product tabs allows you to let your customers give more information regarding the products you are selling on your WooCommerce store. With ShopEngine, you can add custom tabs and customize them to suit your needs.
Just drag and drop the ‘Product Tabs’ widget from the ShopEngine Single Product block on Elementor and your edited WooCommerce product page is ready to go.
You can control the following aspects of your product tabs with the widget:
Navigation Style: Typography, menu color, active menu color, nav indicator color and border, menu spacing, box shadow, border type, line width, color, and padding.
Tab Content: Show or hide the tab content title, change the tab content title color and typography, and set tab content wrap padding.
Information List: Customize the attribute color, value color, and table data typography.
Average Rating: Experiment with the rating title, rating total, and rating count typography and color.
Review Style: Customize the rating color, empty rating color, date, authority and description color, date typography, and description typography.
Review Form: Change the form label color, label typography, input border color, input focus border color, input typography, message color, and required color.
Submit Button: Set the padding, border radius, button typography, box shadow, color, and background.
Show Related Products

Showing Related Products for your customers to buy is an amazing idea you can implement on your eCommerce website. ShopEngine ‘Related Product’ widget for the WooCommerce product page will help you show related products with the following settings:
- Set the number of products to show
- Enable/disable slider
- Show/hide heading, sale flash, regular price, and cart button.
- Set the number of slider columns
- Change background-color
- Set slider speed, etc.
Preview Settings or Changes on Responsive Mode

As most of the customers nowadays use mobile devices to buy from online stores, make sure the product pages of your shop work seamlessly for mobile and tablet viewers.
Leverage the button labeled responsive mode of the Elementor to see how the changes of your full-width product page look on mobile and desktop devices.
If you find that there are some inconsistencies or issues for mobile and tablet views, fix those up for mobile viewing.
When you are done adding and customizing the required widgets for your WooCommerce product pages and previewing the product page layout for devices, click on the ‘update’ button of Elementor.
That’s it! Follow the steps I have shared in this product customization WooCommerce tutorial.
Bingo! Your edited WooCommerce product pages are now mobile-optimized and ready to go live.
Bonus: 5 Ways to Optimize the Product Page to Increase the Conversion Rate
Once you customize the WooCommerce product page, it is time to optimize the page. A well-optimized product page can boost sales instantly.
To get a good conversion rate, it is important to optimize your product page by changing your WooCommerce product page layout. Below are 5 ways you can follow to maximize the conversion rate and revenue out of your online store.
Maintain Information Hierarchy

Make sure that you design the WooCommerce single product page maintaining the information hierarchy.
For example, it is a common practice to keep the breadcrumbs atop all the information. The breadcrumbs are usually followed by the product title and other product-related information like a review or description. In most of the online stores, you’ll see the images on the left of the page with an icon to see the enlarged view.
Also, make sure that the information you are providing on the new edited WooCommerce product page gives the shoppers a complete idea about the product you are offering to sell.
Use High-Quality Images

Only having a good product can’t bring more money into your pocket unless you present it smartly to your customers. A product image is an excellent way to showcase your products to the target audience both on the product page and shop page.
However, If your pictures are mediocre, obscure, or with a wrong angle, you can’t expect much out of them.
When you post the product images, make sure that they are clear, product-focused, and captured from the right angle.
Adding contextual product images can show your products in the appropriate environments. For example, capture a picture of kitchen appliances in the kitchen to show your customers how perfectly the appliances will suit their kitchen.
Hire a professional photographer to capture the detailed product image for the product gallery. In the case of a physical product, it is best to capture the same product from all angles. It will help customers see the product’s design and parts more clearly.
Take professional product photo retouching services to enhance your product images. On top of that, it makes the customers feel confident about making the purchase.
Last but not least, I recommend using high-resolution product gallery images. Though images can slow down your WooCommerce product page a little bit, you can minimize the effect with any free plugin for image optimization like Smush.

Write a Killer Product Description
Convincing and appropriate product details or descriptions play an important role in online sales. Make sure that the product description mentions the key product information. By the way, that’s not enough. The information should also be easy to read and to the point. You can use bullet-point format to display the information one by one.
Remember, you don’t need to be formal all the way. If it suits the product category, you can use a funny, approachable, and delightfully off-beat voice to edit the product page WooCommerce.
Here’s an appealing description of the Breakfast Hot Dog Bundle from Picky Bars:

The final suggestion, while you write a product description, note various usage options of the products. It will help the potential customers know whether the product will fulfill their needs or they need something else.
Place Pricing the Right Way
No matter what types of products you are selling, price is always a big factor for your customers. The pricing and how you place it on your custom WooCommerce product page affect their buying decision.
To make your pricing easily visible, you can use a large font. Making the pricing text bold or using a contrasting color might also work well for you.
Highlight discounts along with showing the regular price followed by the new one. This customized and changed WooCommerce product page layout will offer an easy-to-view user experience.
Here’s an example of how Picky Bars has done it:

If your customers can’t see the price clearly, you should rethink the design customization that you have done to edit your WooCommerce product page.
Optimize the WooCommerce Product Page with On-page SEO
To gain more organic traffic to your WooCommerce product pages, it is important to use on-page SEO techniques. Use the right title tags, meta description, alt tag for product image, keywords, description, and other on-page SEO factors to gain more customers and thus a higher conversion rate.

More guides:
Need more WooCommerce page customization guides? Read the following blogs to customize and change your WooCommerce shop and other pages:
How to Customize WooCommerce Category Page Without Coding
How to customize WooCommerce Cart Page For Free
How to edit and customize WooCommerce shop page
How to customize WooCommerce my account page
How to customize WooCommerce checkout page
How to Solve WooCommerce Empty Cart Error
Through these blogs, you will learn how to set up and change WooCommerce custom shop, cart, my account, and checkout pages.
Final Words
No matter how you customize WooCommerce product page of your online store. Whether it is an Elementor WooCommerce product page or the default one, make sure that the changes you make are user-friendly and intuitive. While you customize and edit a single product page in WooCommerce, make sure that you follow consistency, relevance, and context. However, your edited and changed WooCommerce product page layout needs to be highly optimized for devices.
Customizing your WooCommerce single product page might seem to be a daunting task at the beginning. However, if you have Elementor page builder and ShopEngine, you should stay free of stress.
That’s all for now. If you have any questions or confusion, feel free to let us know via the comment box.
Leave a Reply