

WooCommerce cart page customization serves several benefits, including cart page abandonment, but doing it smoothly isn’t a cakewalk.
The cart page leads to making the final decision whether to check out or abandon the cart. You wouldn’t want buyers to abandon the cart, right? That’s where you need to customize Your WooCommerce cart page.
In this blog, you will find a step-by-step guide on how to customize WooCommerce cart pages that too without any coding.
Let’s get started…
Quick Overview:
This tutorial explains the process and importance of customizing WooCommerce Cart Page design.
Tools Used: WooCommerce, Elementor, and ShopEngine.
In this standard Cart Page, we have included:
✅ Product Cart Table.
✅ Total order amount.
✅ Shipping Method.
✅ Coupon Code filed.
✅ “Return To Shop” button.
✅ Upgrade Cart option.
✅ Cross-sell products.
✅ Deal Product promotion.
✅ “Proceed To Checkout” button
In this process, first step is to install the plugins, then create the cart page, and final step is to customize page design.
How does a default WooCommerce Cart Page look
WooCommerce provides a very basic layout of a Cart page. Although different themes add styles to the WooCommerce cart page, it still kinda looks the same.
Here are common elements of a WooCommerce cart page design (included but not limited to):
| 🔹Product thumbnails or images 🔹Product names 🔹Product prices 🔹Quantity selector or input field 🔹Remove item button 🔹Subtotal for each item 🔹Total order subtotal 🔹Coupon code field (if applicable) 🔹Cart totals summary (taxes, shipping, discounts, etc.) | 🔹Estimated shipping costs and options 🔹Cross-sell or upsell product suggestions 🔹Cart item subtotal 🔹Cart item total (including taxes and shipping) 🔹Quantity update buttons or links 🔹Product attributes (size, color, etc., if applicable) 🔹Shipping address and method selection 🔹Proceed to the checkout button |
You can edit the WooCommerce cart page and customize the elements as per your needs. Before that, let’s have a look at how the default WooCommerce cart page looks on different themes.
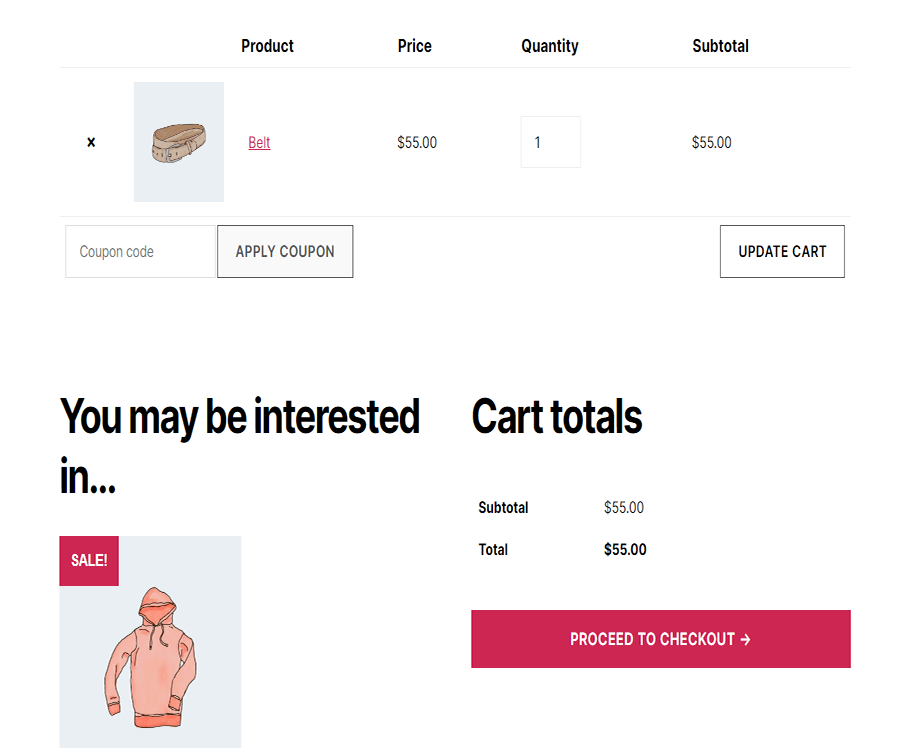
Here is how the WooCommerce cart page design looks on the WordPress Twenty Twenty theme:
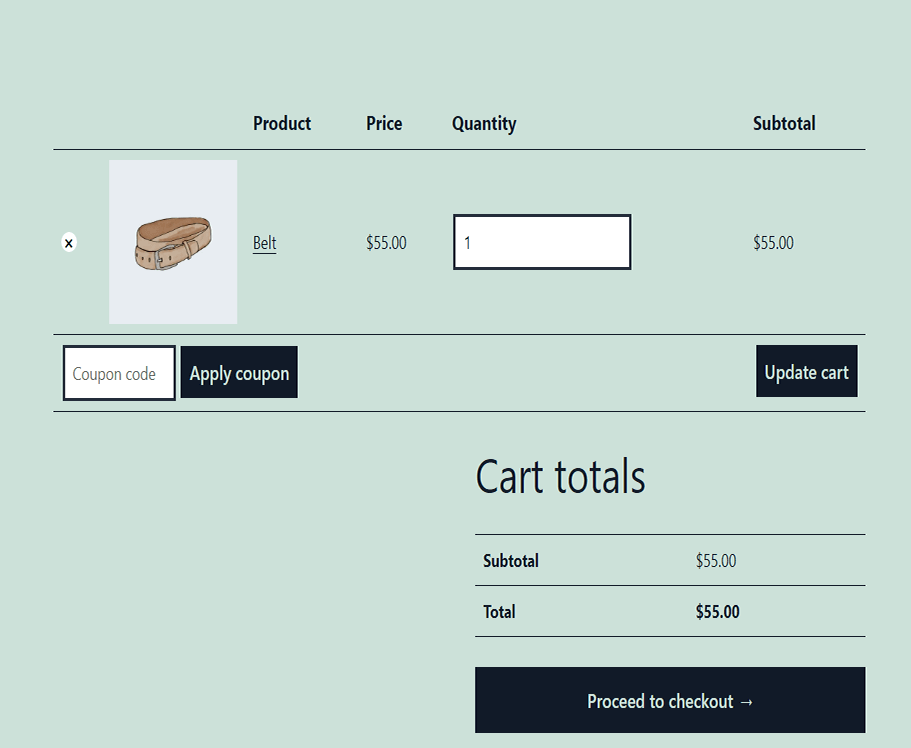
Here is how the cart page design looks on the Twenty Twenty One theme of WordPress:
Even a popular Elementor theme like Hello Elementor will give you a very basic-looking WooCommerce cart page design with the same old layout.
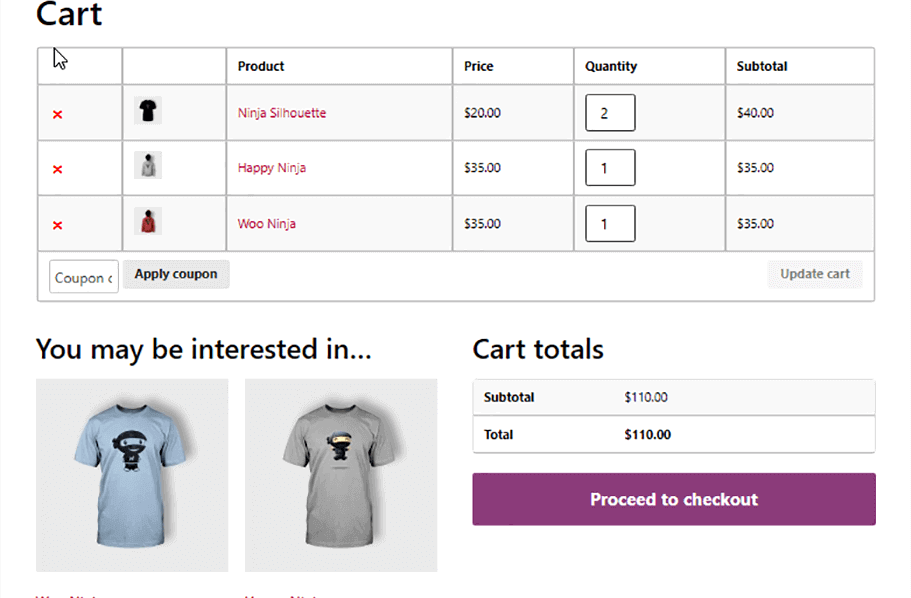
I think you will agree that all of the cart pages above have the same layout and offer nothing fancy or extraordinary
Why Customize WooCommerce Cart Page
As per the November 2023 report of BuiltWith, 6.6 million+ live websites use WoCommerce.
WooCommerce lets you build a ready-to-use fully functional eCommerce website with its templates, including a cart page in no time. Many of these websites use the default templates of WooCommerce for the cart and other pages.
But you wouldn’t want your website cart page to look similar to others as this is likely to turn off your buyers. To stand out from the crowd, WooCommerce cart page edits or WooCommerce cart customization can come to the rescue.
It’s also a fact that around 70% of people abandon their shopping cart and never proceed to check out. This shows how important it is to customize the WooCommerce cart page.
Use WooCommerce abandoned cart plugins to recover lost sales by automatically reminding customers to complete their purchases.
And it’s a known fact that people are attracted to things that are different and stand out in the crowd.
So, don’t let your cart page get lost in the crowd, rather customize it so it stands out and helps you get more orders.
Now the question is how can you get a cart page that stands out? Well, there are two ways you can create a Woocommerce cart page design.
- Editing the WooCommerce files (requires you to know to code)
- Use a drag-and-drop plugin
Why Editing Code to get a custom WooCommerce Cart page is not a good idea
While editing code to get your desired cart page is an option, it’s not recommended for noncoders. Since you chose a ready-to-use platform like WooCommerce to build your website, I guess you aren’t looking to hand-code anything.
Here are some of the reasons why newbie programmers or noncoders should avoid editing default code for WooCommerce cart page design purposes.
- It requires you to be an expert programmer and know HTML, CSS, Javascript, and PHP like a pro.
- If code is not edited and optimized efficiently it may slow down your website.
- You will need to change the code every time you want to change your WooCommerce theme
- When WooCommerce comes up with a new update, you will be required to make new changes to make the code compatible with a new version of WooCommerce
- You can also lose all your code when WooCommerce updates if you don’t create a child theme.
Besides, if you are using platforms like WordPress and WooCommerce to avoid coding in the first place, then why learn to code just to edit a cart page, right?
No worries. I have another process that you can use to custom design your Cart page smoothly without having to code. Not even a single line. Promise!
Let’s see how to edit the WooCommerce cart page without coding knowledge!
How to Customize WooCommerce Cart Page Using a Drag and Drop Plugin
Now you can design a cart page with easy drag-and-drop technology. Thanks to the WooCommerce PageBuilder plugin ShopEngine.
There are many top WordPress shopping cart plugins for WooCommerce, ShopEngine is the ultimate WooCommerce builder with premade templates, and widgets to custom build your WooCommerce pages and modules with useful eCommerce functionalities. With this plugin, you get complete control over the design of your WooCommerce pages including the Cart page.
While ShopEngine gives you a premade Cart Template, you can create your Cart page from scratch as well as you can do WooCommerce cart customization. In this blog, I will walk you through the process of how to edit a WooCommerce Cart Page to create a brand new one from scratch.
We recommend to create a custom shop page to showcase your products in the best style.
Step #1: Install Elementor and ShopEngine
To get started for the process of how to customize cart page in WooCommerce, you will need two plugins
Since ShopEngine is a WooCommerce Page builder for Elementor and requires Elementor, make sure you install Elementor first.
Step #2: Create a Cart Page Template
Once you have installed both the plugins, create a Cart Template. To create a cart page template :
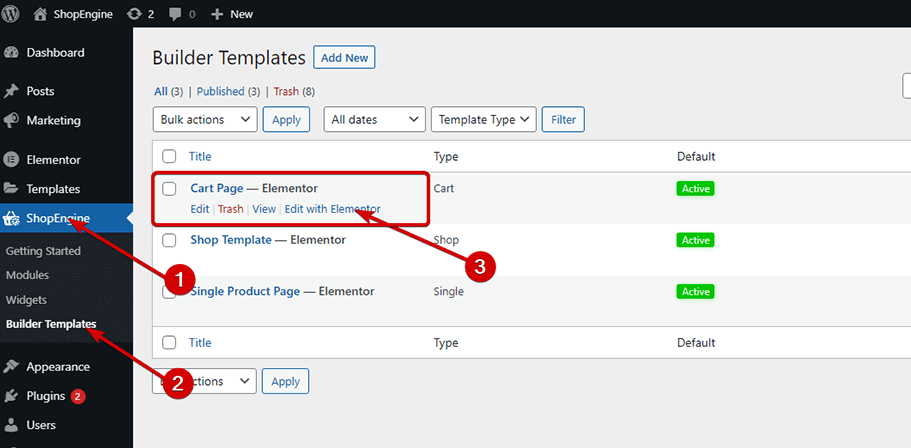
- Go to: Dashboard => ShopEngine => Builders Template
- Click on Add New to open the Template Settings Window
- Give a Template name of your preference
- Choose Type as Cart from the dropdown
- Turn on the Set Default option to override any existing Cart Page
- Choose the blank option under Sample Design
- Click on Save Changes to update
Note: To get a ready-to-use Cart Template, choose the “Sample Design 1” option while creating the template. You can edit every element of that premade template too. I chose blank as I am going to create one from scratch
Step #3: Choose a Layout/Structure
Now it’s time to choose a layout. To get started
- Go to ShopEngine => Builders Module
- Hover on the Cart Template from the list
- Click on Edit With Elementor
- Once the Elementor Editor opens Click on the Add New Section (+) icon
- Now choose the structure/layout you like
Step #4: Design Cart Page using ShopEngine Widgets
ShopEngine provides five widgets exclusively to design a WooCommerce Cart Template. Along with Cart Template widgets, you can also use the Coupon Form widget and five+ general widgets to build your cart page.
For this blog, I am going to use the following widgets:
- Cart Table: The cart widget displays all the products in the cart in a table format with price, quantity, and subtotal. Customers can update product quantity and also clear the cart with one click.
- Cart Total: This widget shows all the available shipping methods and total order total.
- Return to Shop: This widget provides a button with a link that takes you back to the shop page.
- Checkout Coupon form: Customers can use their discount coupon using this widget.
- Deal Product: This widget lets you showcase your sale products on the cart page that too with a countdown timer that displays the sale schedule period. This is a general widget of ShopEngine.
- Cross-Sell: Cross-sell displays all the cross-sell products attractively on the cart page.
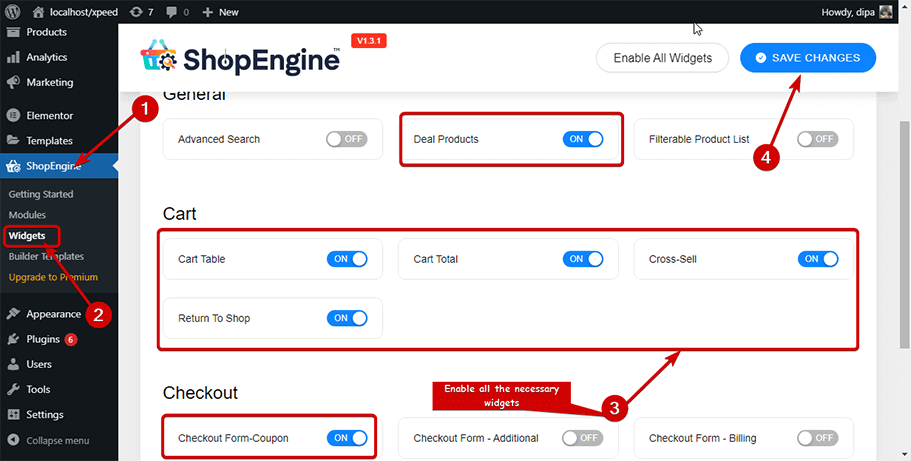
First, You need to turn on the widgets you want to use on your cart page. To turn on
- Go to Admin Dashboard => ShopEngine => Widgets.
- Scroll and search the widget you want to use
- Enable the widgets you want to use
- Click on Save Changes at the top of the page
Now it’s time to drag and drop the WooCommerce cart widgets into your layout. Go back to the Cart page editor mode:
- Search for the widget
- Drag and drop the WooCommerce cart widgets (one by one)
Note: You can hide the Continue Shopping Button and Hide All button.
As ShopEngine is totally compatible with Elementor, you can use multiple layouts on the same page. For the next part, let’s use a different layout. To do so, I am going to add a new section with a different structure and drag and drop Cross-sell and Deal products widgets.
Note: You need to add cross-sell products and set products on sale with schedules from the admin dashboard under product settings for Cross-sell and Deal products to show up on the front end.
Both Cross-Sell and Deal products give you different settings you can customize. So, after you drag and drop the widget, customize the settings according to your preference.
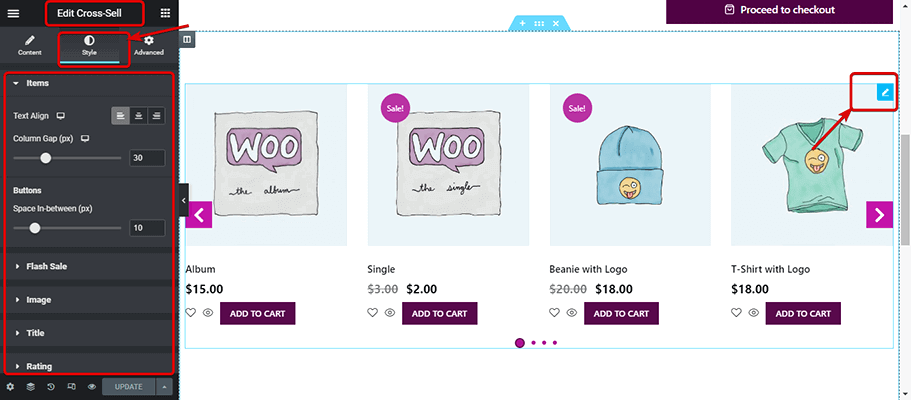
With the cross-sell widget, you get options like turn on/off Enable Slider, show/hide Flash Sale, Sale Price, Cart Button, and the number of products to show under content settings. For sliders, you get options like Slides Per View, Loop, and Autoplay. Slide Speed etc. In addition, you also get the Order By and Order option under the advanced tab.
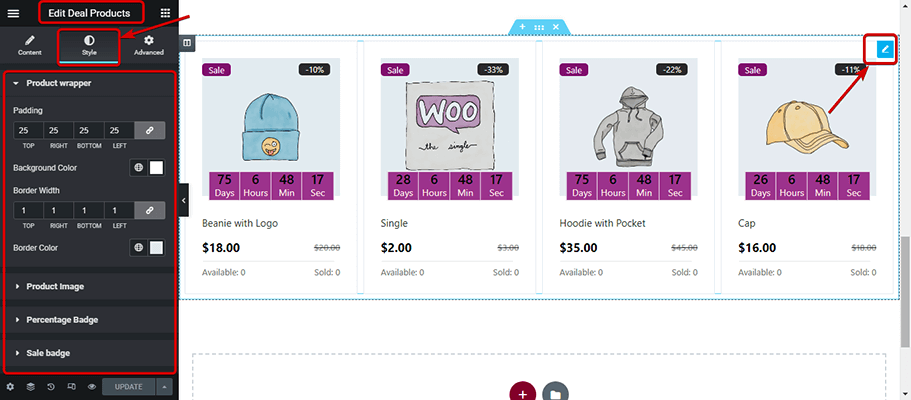
Deal products provide you with content settings like Order, Order By, Date, Show Product, Column, Column Gap, and Row Gap. You also get other settings which include Enable Sale, Badge, Sale badge, Sale, Title Word Limit, Percentage Badge, Countdown Clock, and Days.
Step #5: Customize Woocommerce Cart page’s Style Parameters
Not just structure, with ShopEngine you get complete control over the styling of your cart page too.
To change the style parameters of ShopEngine Widgets, hover over the widget you want to edit to find an Edit option in the top right corner. Click on that option to find all the Woocommerce cart settings for content and styles on the Elementor panel placed on the left side.
Let’s have a look at the style settings you can customize for each of the widgets used in this blog:
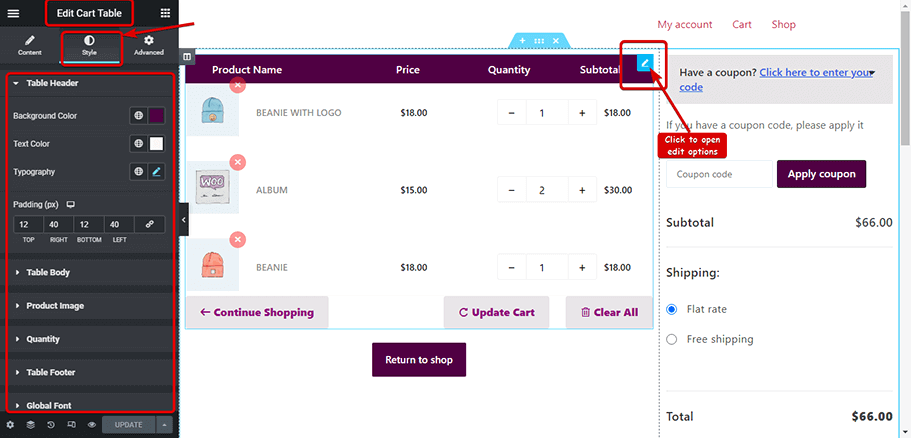
Cart Table:
You can change the style settings of the Table header, table Body, Product Image, and Quantity. Table Footer and Global Font. For more details, you can check out our documentation on the Cart table.
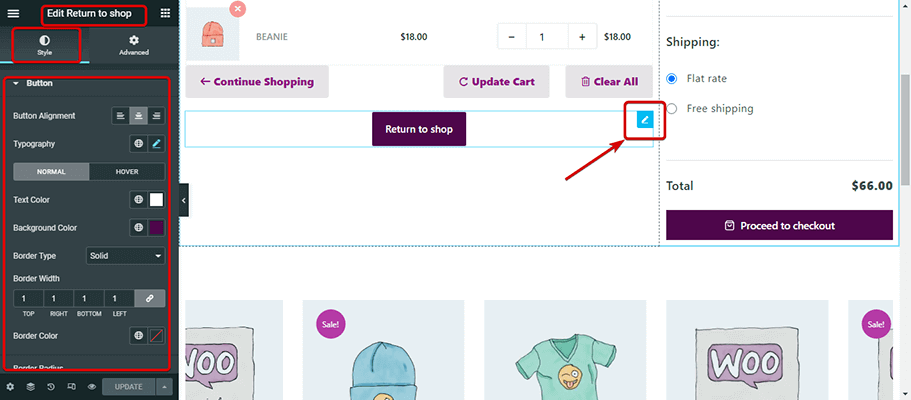
Return to Shop:
You change Button Alignment, Typography, Border Color, Border Radius, and Box Shadow. For that, you can check out Return To Shop Widget.
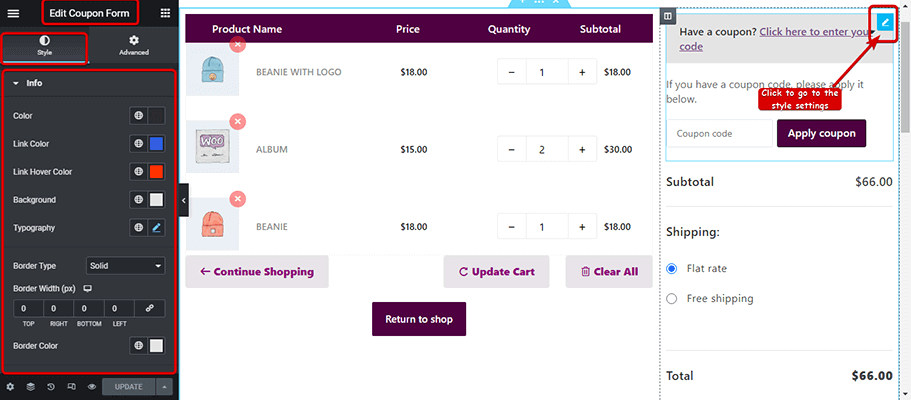
Coupon Form:
For the coupon form, you will get a style setting for info, description, coupon form, apply button, and global font. You can easily do that with the Coupon form.
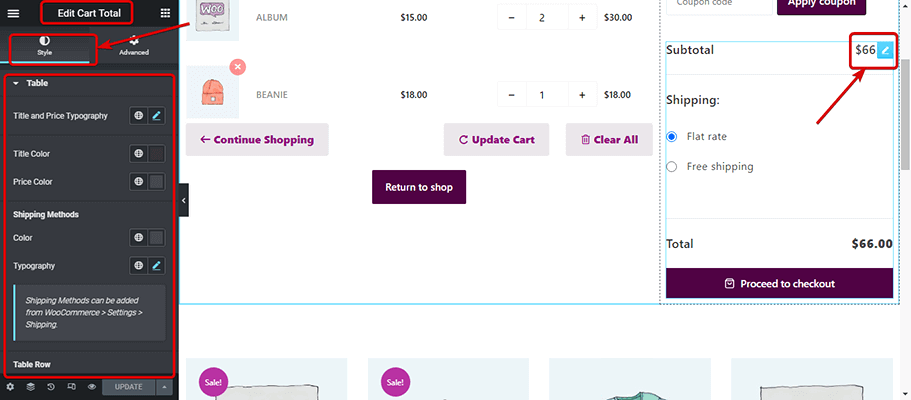
Cart Total:
For Cart total widget you get many style options to change the styling of Table, Input, checkout update button, and global font. For more detailed WooCommerce cart style settings you can check out our documentation on Cart total.
Cross-sell:
For the Cross-sell widget, you get various style options which include styles for items, flash sales, image, Title racing, price, Add to cart, Slider style, and global font. For more details about Cross, Sale style check out the documentation.
Deal Products:
You get different style options for Product Wrapper, Product Image, Product Badge, Countdown Clock, Content Style, Stock and Progress bar, and Global font. To know more details about the style options check out our documentation on the Deal Product widget.
Step #6: Update and Preview custom WooCommerce cart page design
After you change the styles click on Update to save changes and click on Preview to see the changes.

If you have followed the layout and settings mentioned in this blog, you should design a custom cart page in WooCommerce using ShopEngine like the one below:
After optimizing the cart page and customizing it, make sure to customize the WooCommerce checkout page to get more conversions. Also, you can offer WooCommerce floating cart to increase the number of add to carts.
Bonus: Tips to Boost your eCommerce store sale using ShopEngine Modules
Now you know how to build and customize a cart page in woocommerce. ShopEngine, in addition to WooCommerce cart page template builder, provides you with useful modules with important eCommerce functionality that can boost your online shop’s sales. ShopEngine Modules include:
- Quick View
- Category page
- Customize the WooCommerce product page
- Variation Swatches
- Wishlist
- Product Comparison
I’m sure Being a WooCommerce store owner, you know how important these functionalities are to make the online buying experience a good one. If we talk about the Cart Template, using the Quick View button and the Wishlist button on the cross-sell will give your customers a better shopping experience. And this increases the chance of your customers buying more products.
With Quick View, customers can easily check out any product’s complete information with just one click. Similarly, with just one click users can add the product to their wishlist using the wishlist module button to checkout later. Both these functions can play a significant role in increasing product sales.
If the cart page is not showing properly, there could be an empty cart error. Here is how to solve empty cart error issue.
So, don’t just customize your cart page, use ShopEngine modules to give your customers a great buying experience and boost your shop’s sales.
Why Upgrade to ShopEngine Pro?
Well, honestly ShopeEngine does provide you with enough features to make your online store a good one. But why should you settle for good when you can get the best, right?
ShopEngine Pro provides you with a vast amount of features that will make online shopping on your eCommerce store the best buying experience for your customers. Along with customizing the woocommerce cart pages, you can access 20+ modules which include Flash sale countdown, badges, Sales Notification, Quick checkout, Parietal payment, Currency Switcher, and many more.
Not just customer satisfaction, ShopEngine features are designed to make online store management super duper easy too with modules like Preorder, Backorder, Additional Checkout Field, and many more.
Not to forget 16+ premade templates with full WooCommerce customization control and 70+ advanced widgets to create every WooCommerce template from scratch if you want to.
When it comes to the cart page, ShopEngine allows you to build a WooCommerce custom cart page for your online store too.
A plugin with so many features, premade templates, and modules that too at a very reasonable price is sure to try, right?
Get your version of ShopEngine today and never worry about how to customize WooCommerce again!
Final Words
Congratulations! You have successfully redesigned your WooCommerce custom cart page. Wasn’t that easy?
Well, that’s what ShopEngine does, now you know how to customize a WooCommerce cart page without coding.
So, Don’t just limit your online store to default styles, redesign your entire WooCommerce website and use the modules to make your online business more successful than ever.
So, Which WooCommerce page are you going to customize next? Don’t forget to share your experience of using ShopEngine.

Leave a Reply