Ecommerce business is now more competitive than ever. The competition is growing because new site is coming regularly. A lot of eCommerce entrepreneur is struggling with sales. So do you?
A recent study says, 60% of cart abandonment is normal nowadays. So, you bring the potential customer to your WordPress site, let them choose the product, add a cart page, and then got the bounce.
Not getting sales after someone takes the step of adding products to their cart is really disheartening. However, you can fix this issue if you customize the WooCommerce checkout page.
So, the question is how to customize or edit the WooCommerce checkout page. Here you are going to learn how to do WooCommerce checkout page customization with the WooCommerce checkout template.
Quick Overview
This WooCommerce checkout page customization will walk you through the easiest way to create a customizable checkout page, both in Elementor and Gutenberg. To create a custom checkout page in Elementor, you need to install the following tools and then use a template and widgets to design your checkout page.
Required solutions: Elementor, WooCommerce, & ShopEngine.
On the other hand, you will get ShopEngine blocks in Gutenberg that allow you to craft a checkout page by dragging and dropping checkout blocks. Also, you will get to know tips and tricks to improve the checkout page.
Why Customize WooCommerce Checkout Page?
WooCommerce checkout page does an adequate job of providing a smooth checkout process for customers. However, if you want to give your user a more enriching shopping experience and thus increase your conversion rate then you should consider customizing the WooCommerce checkout page.
Depending on your business type, you should edit the WooCommerce checkout page to ensure a smooth buying experience for your customers. For example, if you sell only digital goods, then there is no need for collecting addresses.
Speaking of collecting addresses, the checkout page is the best place for you to collect user data which you can use to make your customer’s experience better and also use in your future marketing strategy to increase sales.
Apart from adding, removing, or editing checkout page form fields, you can also add a new section to highlight your special offer or USP (unique selling proposition) of your business or testimonial, etc. All of these can help you to gain customers’ trust and get more customers to complete their orders.
I hope now you realize the importance of a custom checkout page for your WordPress website and why you should customize the WooCommerce Checkout Page.
If you are wondering how to do the WooCommerce checkout page customization, move to the next section for answers.
How to Customize WooCommerce Checkout Page in Elementor
When all the other companies offer the external plugin/addon for the checkout page, Wpmet brings an in-built drag-and-drop WooCommerce checkout page builder. With ShopEngine, you can create your own checkout page with 3 simple steps. And you can edit your WooCommerce checkout page too.
Besides doing the creation and customization of WooCommerce checkout page, you can create and customize many other WooCommerce pages, including WooCommerce single product page, cart page, and archive page.
Don’t worry! You won’t have to write any code. Here I am going to show the process of WooCommerce checkout page template customization.
Before starting the WooCommerce checkout page design, It’s better if you do a sketch about your upcoming checkout page. It will save your time and remove confusion while designing the page.
Install Elementor and ShopEngine
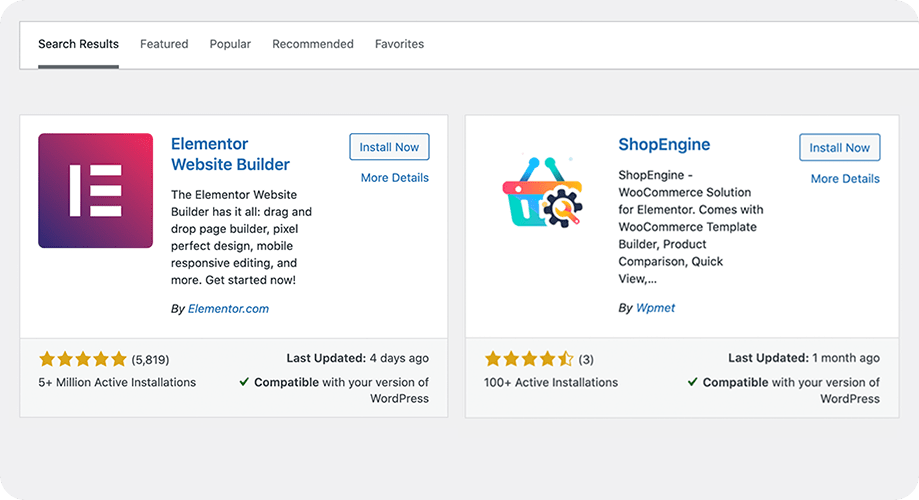
The first step is to install Elementor and ShopEngine on your WordPress WooCommerce site. Both plugins are free and available in the WordPress directory. After installing the plugin, please finish the basic setup.
Installation key: wp-admin -> Plugins -> Add New -> ShopEngine/Elementor -> Install Now -> Activate
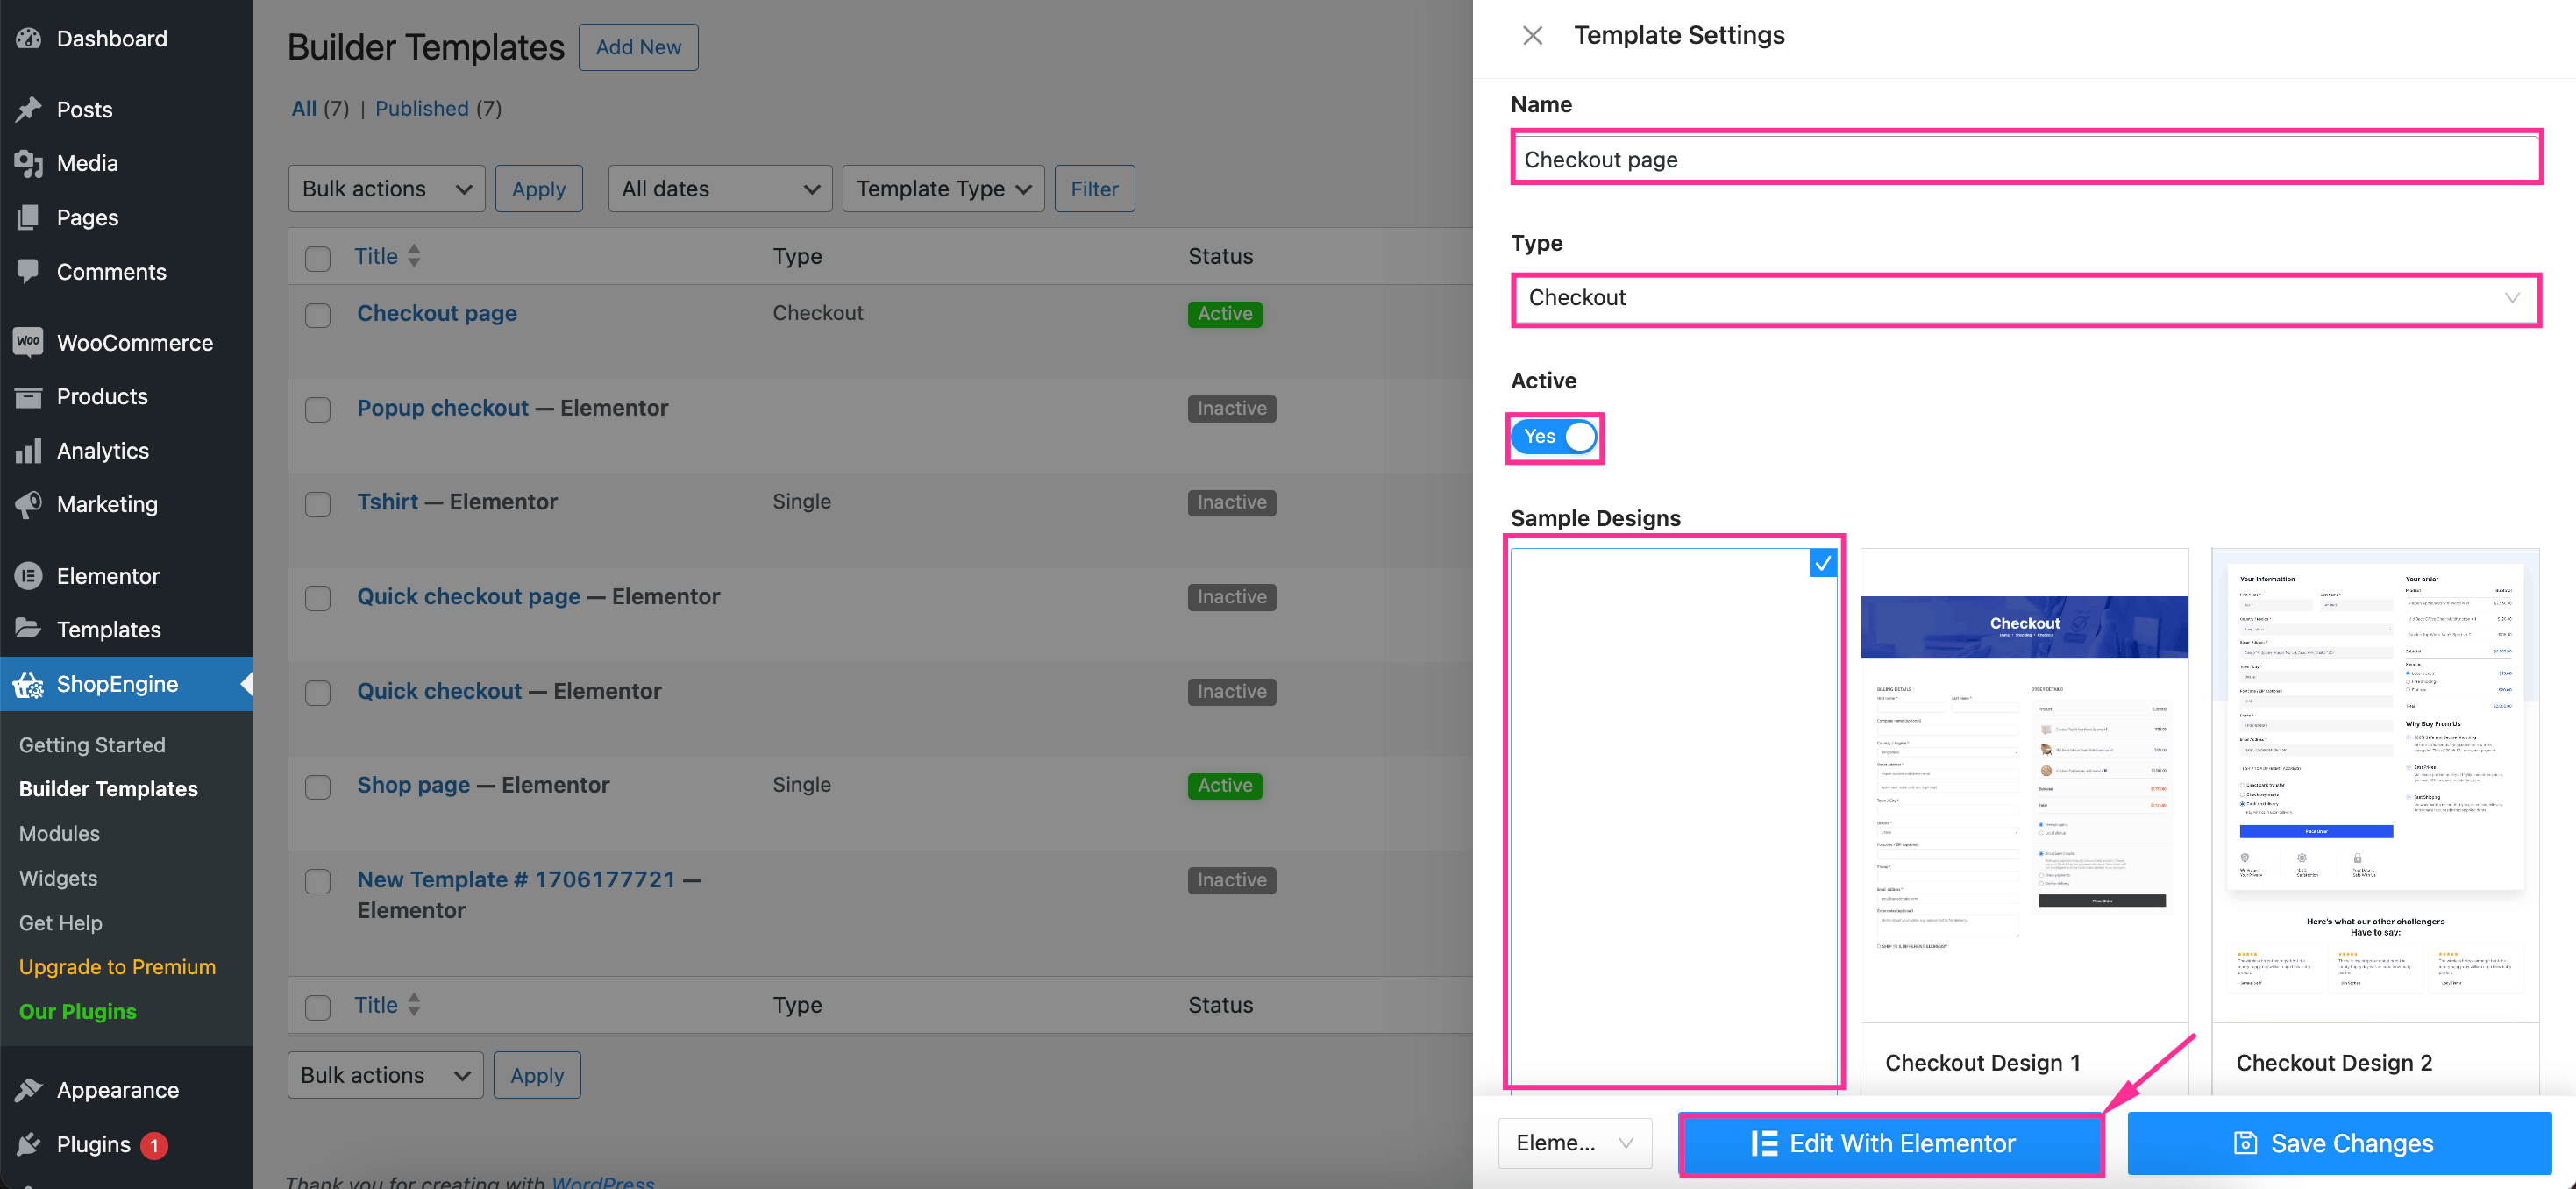
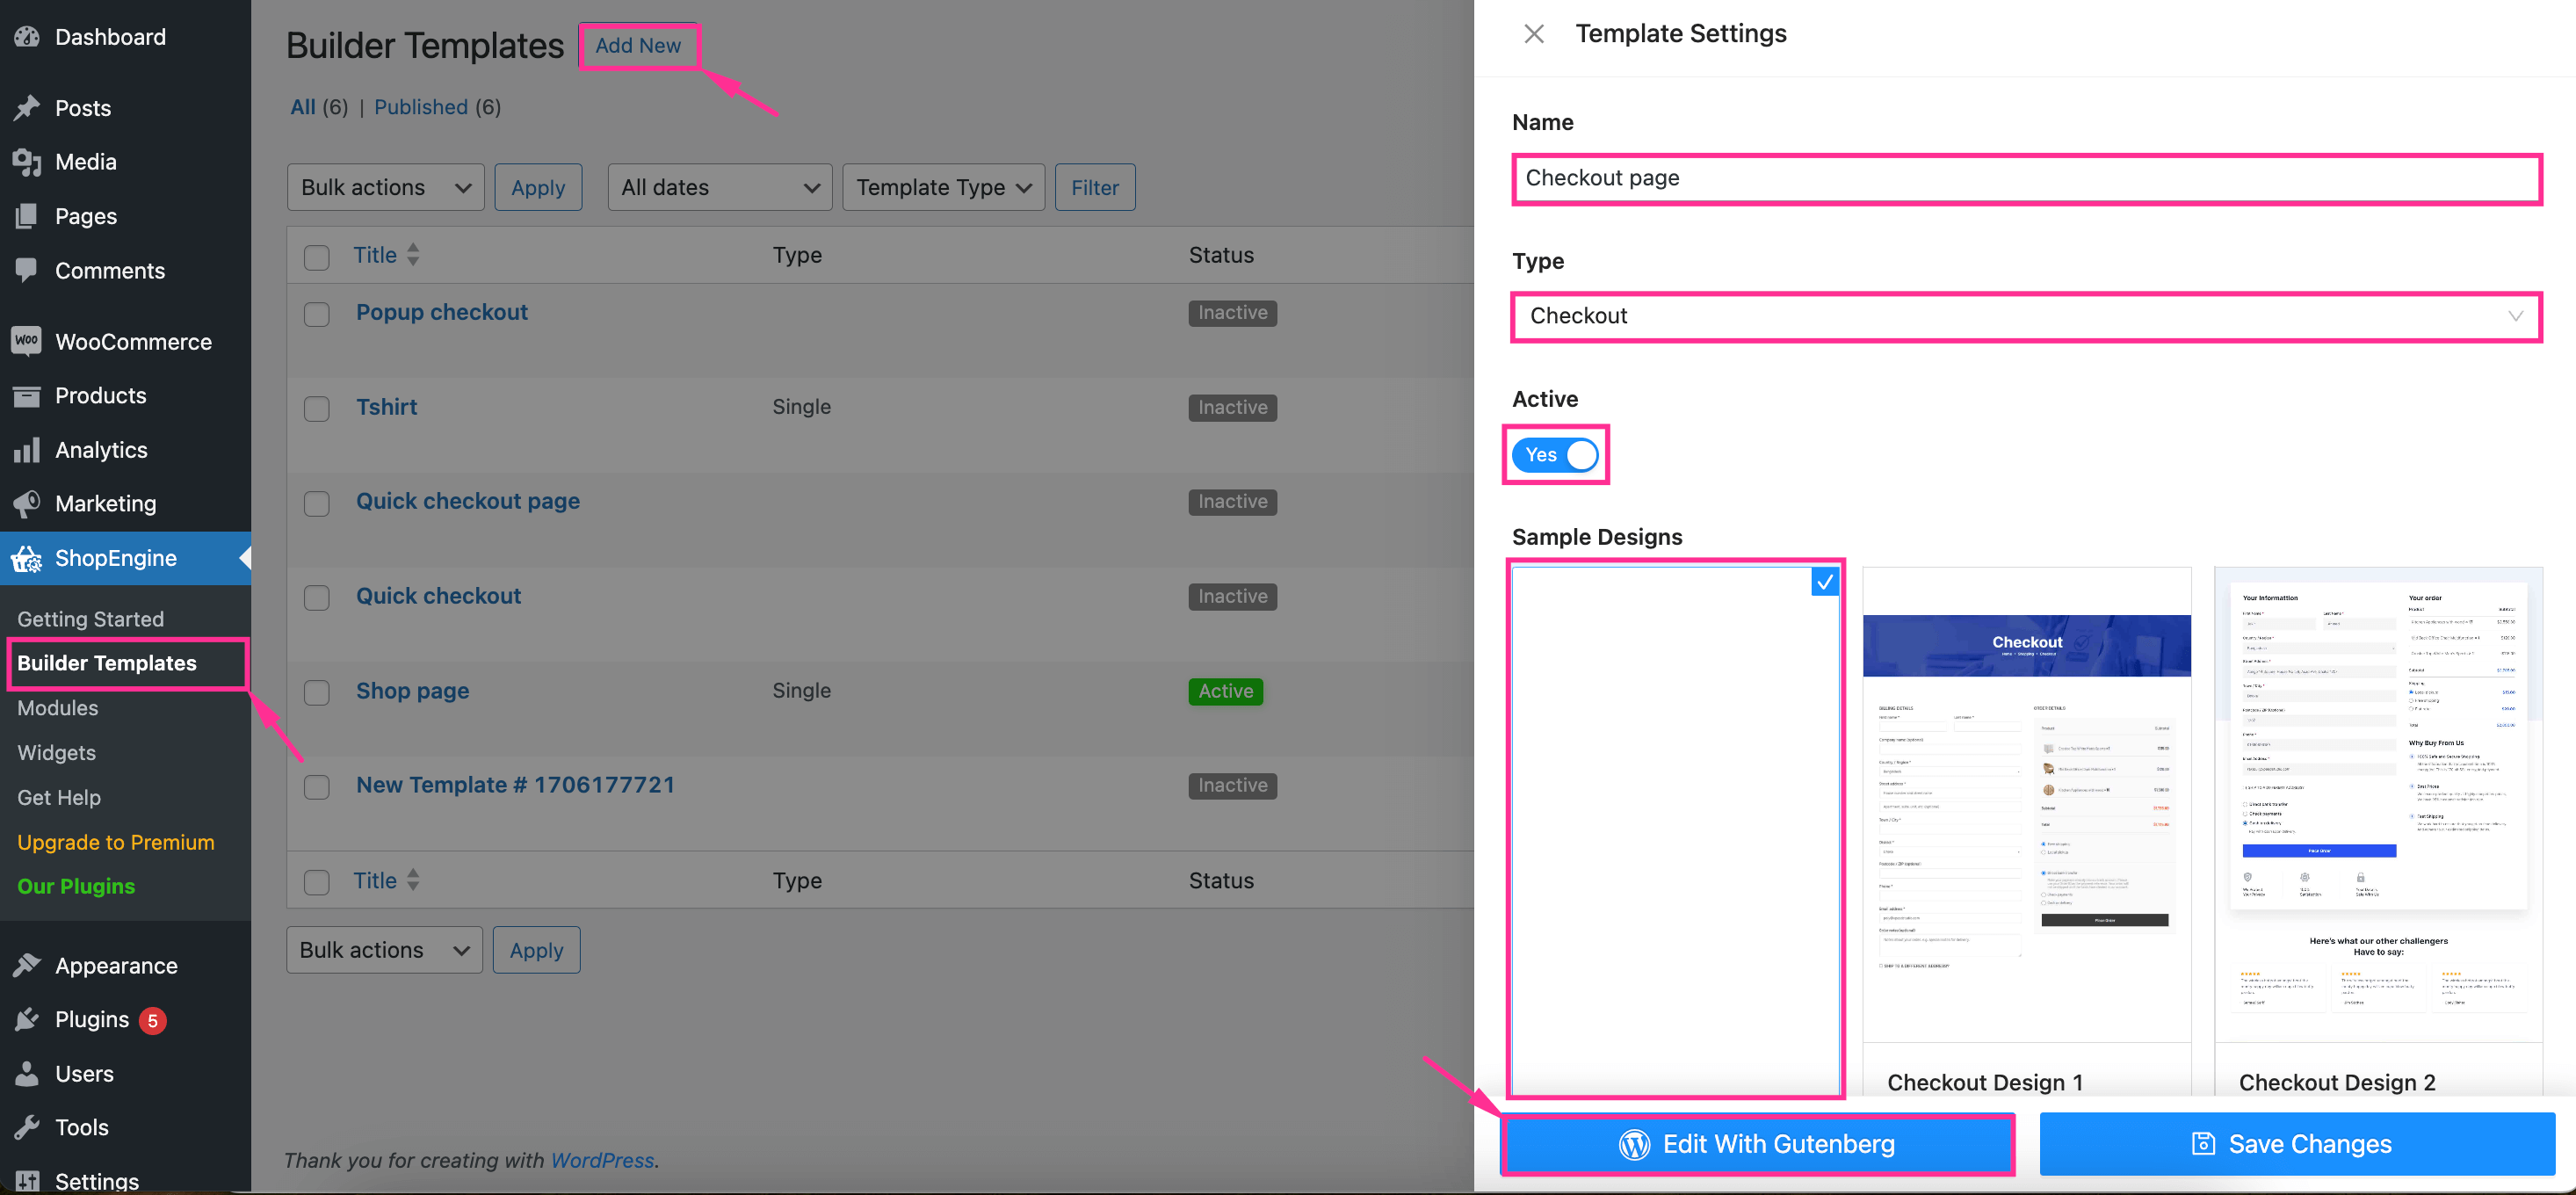
Create a Checkout Page Template
- Click on Template from the ShopEngine sidebar menu.
- Click on “Add New” and a pop-up will be displayed in your dashboard.
- Set the name and “Checkout” from the “Type” drop-down.
- Set the default as “YES” and save the page.
Settings Key- Go to ShopEngine -> Templates -> Add New

A new checkout page will be added to the page list. Edit the page with Elementor. Check the documentation for more details about how to create a checkout page template with ShopEngine.
You can create custom fields and make a standard WooCommerce checkout page for your website. No custom code or custom CSS is required for the WooCommerce checkout page template. With ShopEngine, you can modify the WooCommerce checkout page with simple “drag and drop”.
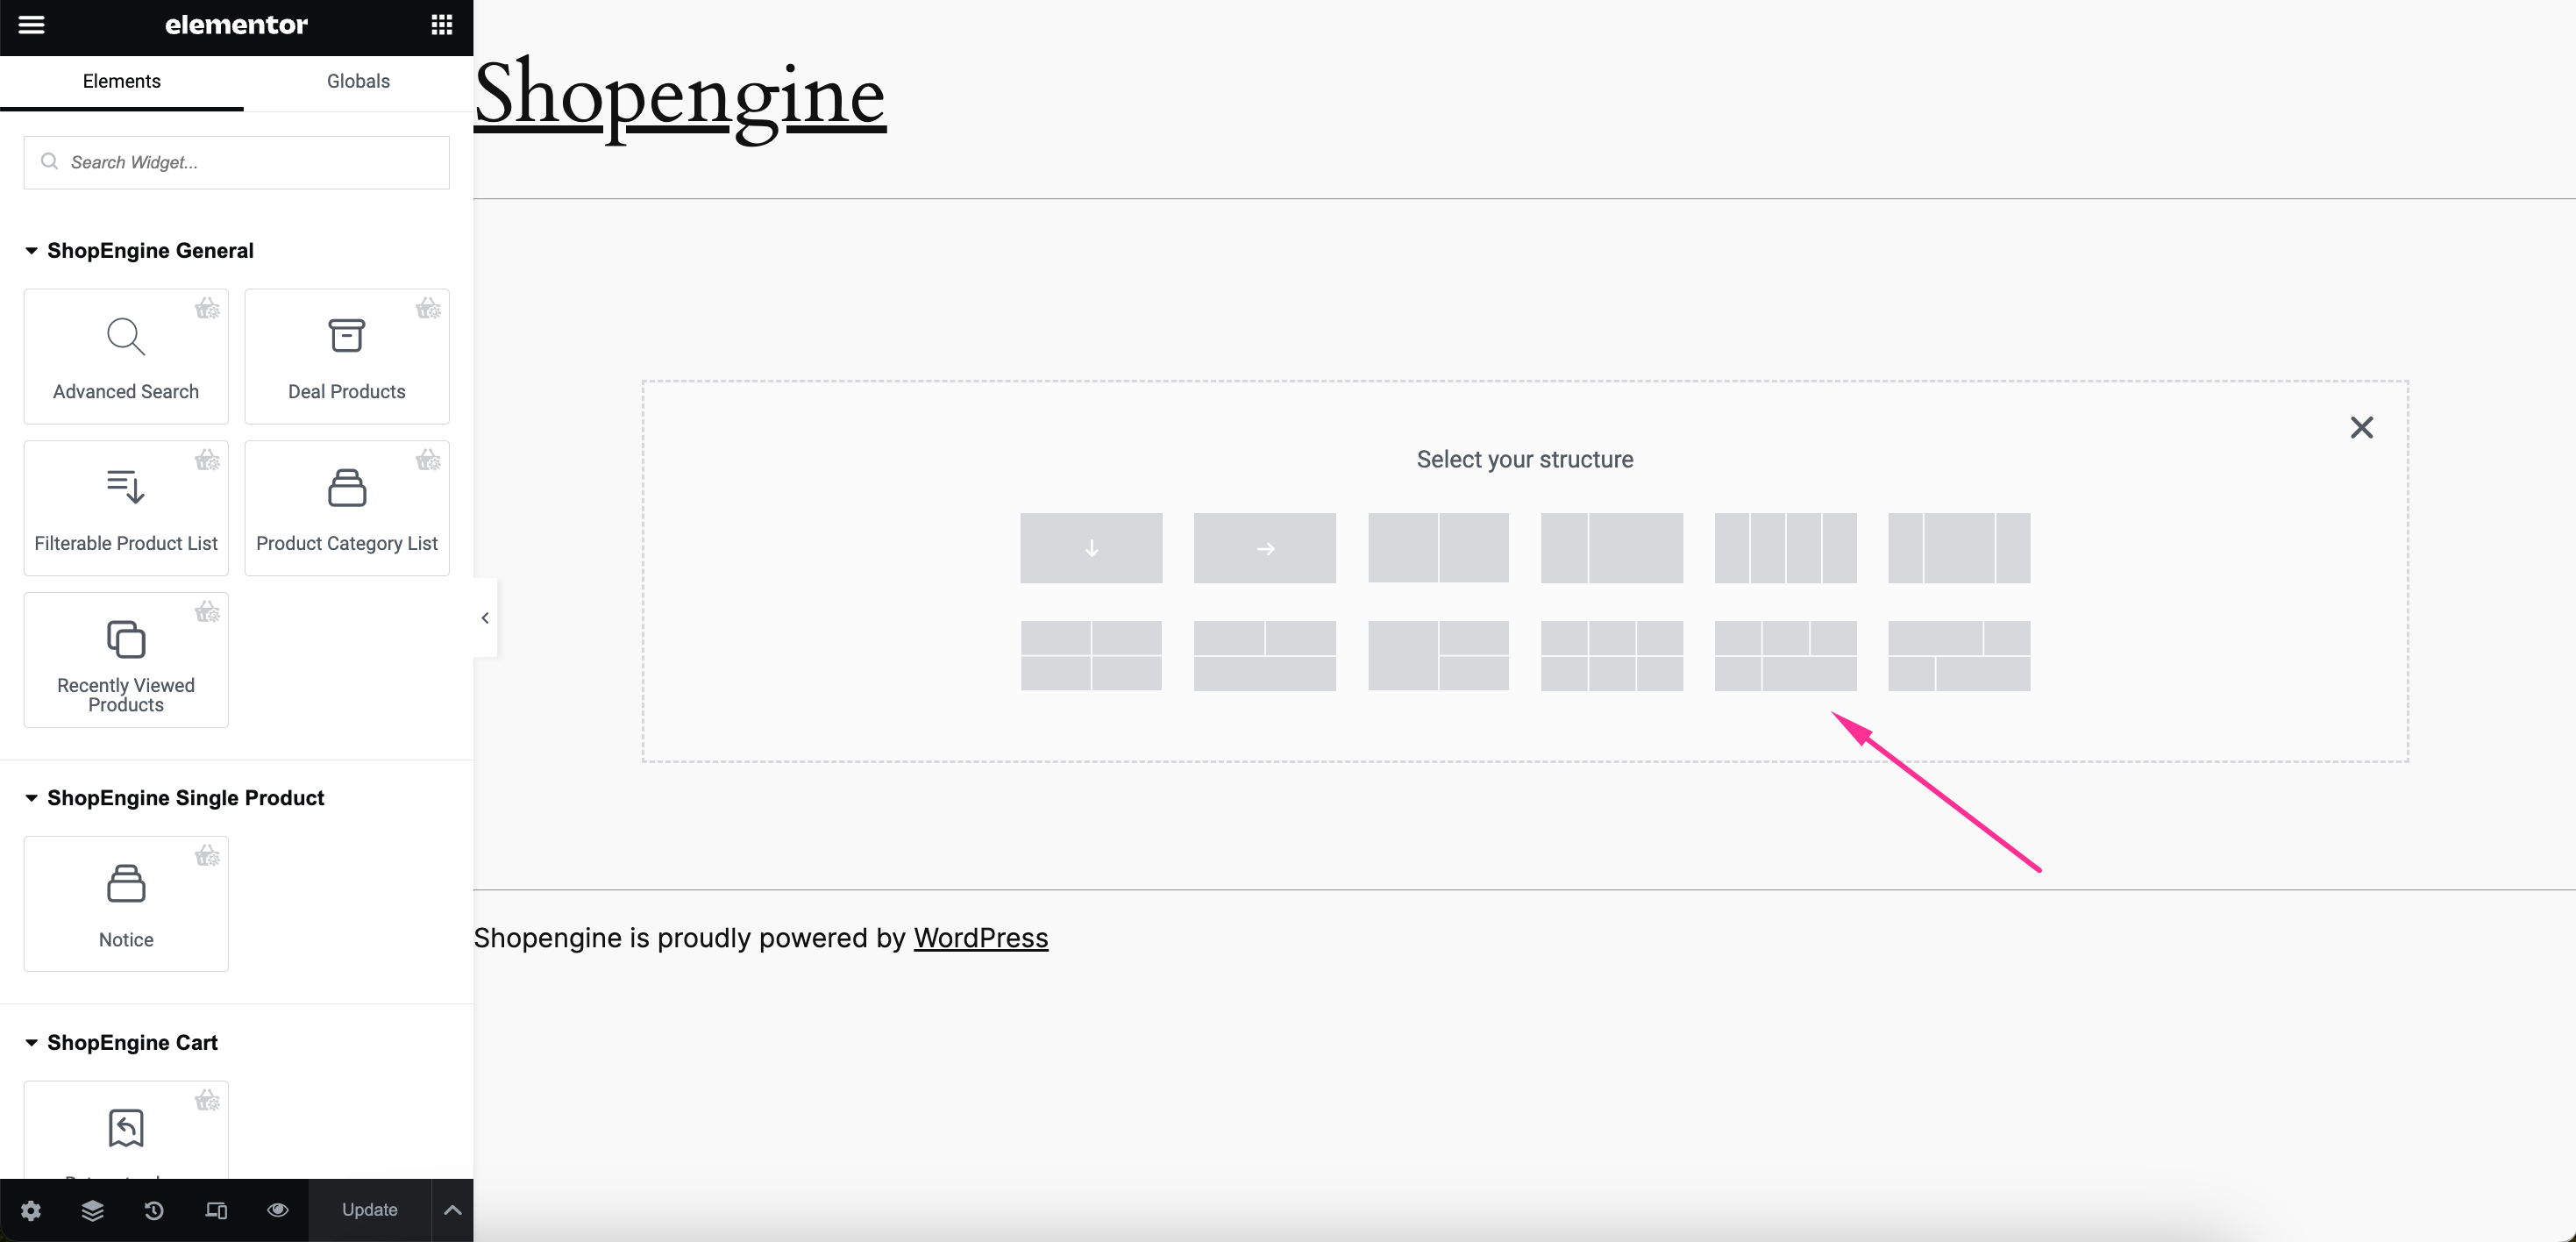
You can search for the element and drop it on the page for WooCommerce checkout page customization. Then save it. Also, you can browse them manually. You can choose any Elementor layout according to your choice, add widgets and save it.
Checkout Elements for Custom Checkout Page
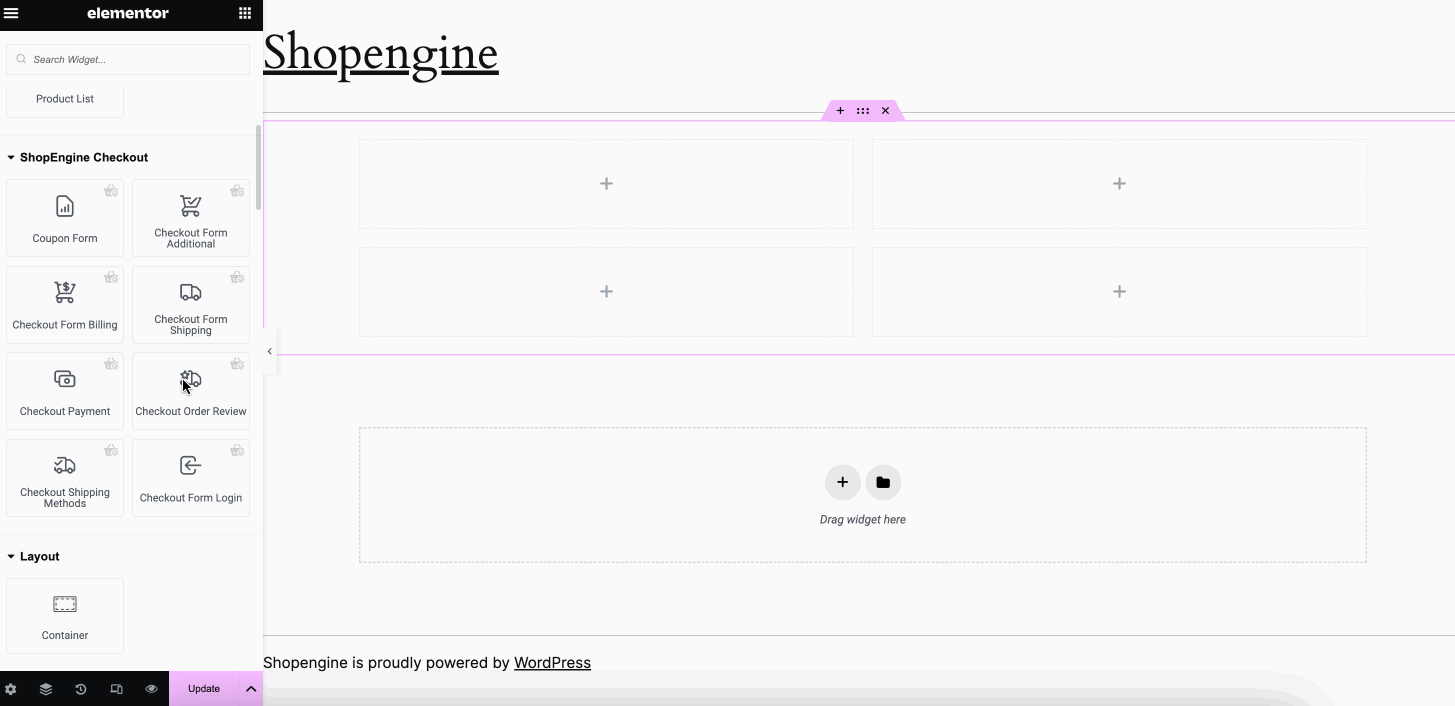
- Coupon Form- It’s a form for offering your coupon.
- Checkout Payment- The form is to set the checkout payment method. This form contains billing details to customize the checkout page.
- Checkout Review Order- With this form, it’s possible to take customer reviews.
- Checkout Form Additional- It (customize checkout fields) is for taking extra information like different billing addresses or external information.
- Checkout Form Billing- It’s a form for taking the billing information of the customer.
- Checkout Form Login- The form is for customer login during order time.
- Checkout Form Shipping- It’s a form for getting the shipping address from the customer.
- Shipping Method- The shipping method is to know which shipping method will be applied.
- Form Additional- These custom fields are for taking extra information like different billing addresses or external information.
- Form Shipping- Form shipping is for catching the shipping information from the customer.
So, now you know which element is for what! And you also have the sketch of your checkout page with ShopEngine, the WooCommerce checkout page builder. So, design your custom WooCommerce checkout page with ShopEngine drag-and-drop features.
Note: In case you don’t want to build your checkout page from scratch, you can use the prebuilt checkout page templates of ShopEngine and edit different sections to personalize it. For a clearer understanding of the process, watch the video below:
With ShopEngine you can also create a multi-step checkout page in WooCommerce.
Check the whole process
👉👉 How to Add WooCommerce Multi-Step Checkout in 5 Steps
How to Customize WooCommerce Checkout Page in Gutenberg
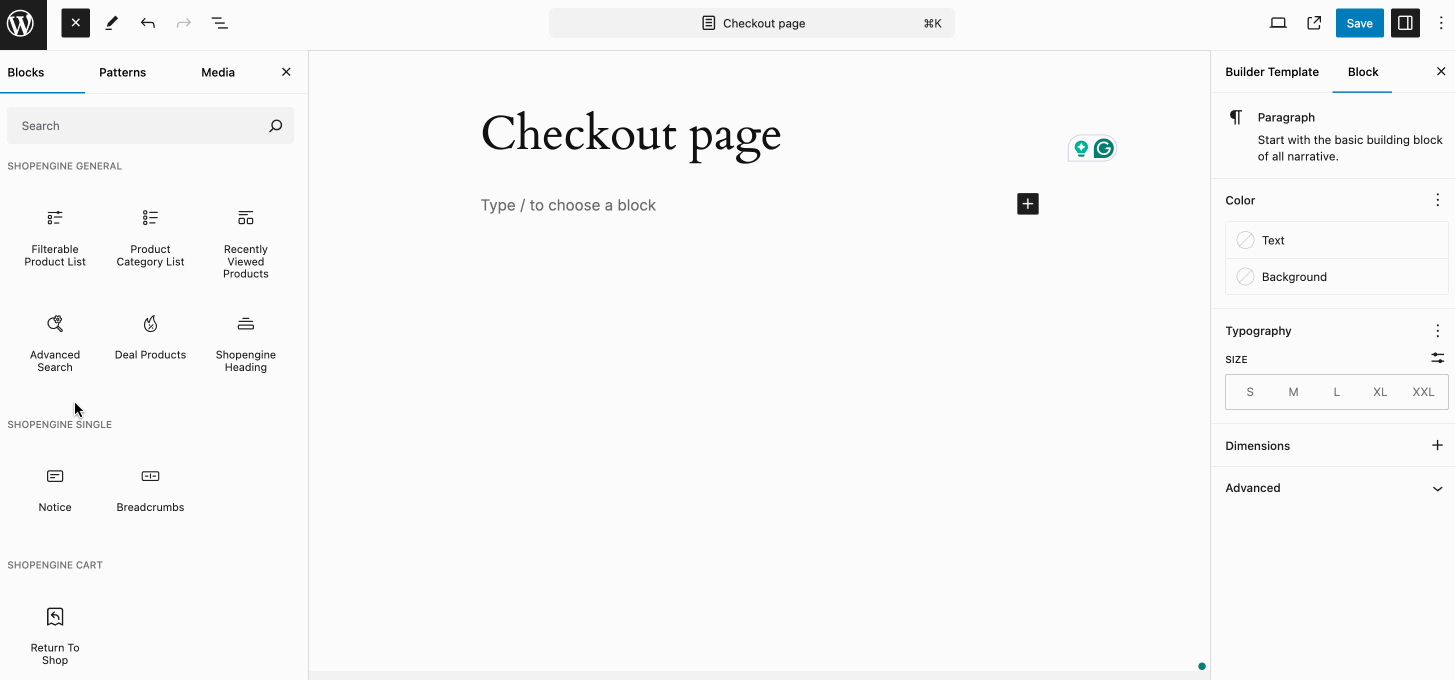
The process of adding and customizing WooCommerce checkout page is quite similar in Gutenberg. First, you have to add a checkout page template then, Edit it accordingly with Gutenberg. For that, navigate to ShopEngine >> Builder Templates and hit the “Add New” button.
This will slide open a template from the right side. There you need to fill out the Name and Type fields. Also, enable the Active toggle and select a sample design. After that, hit the “Edit with Gutenberg” button.
Now, you will be taken to the Gutenberg editor where you can create and customize checkout page by leveraging the ShopEngine checkout blocks. To access those blocks, press the “+” icon and scroll down until you come across the checkout blocks.
After finding the checkout blocks, add required blocks such as checkout form billing, coupon form, checkout review order, checkout payment, etc. according to your needs. Besides, you can find the option of customizing all these blocks on the right side after selecting each block.
Finally, press the “Save” button to live your checkout page on your WooCommerce store.

Bonus Tips To Improve WooCommerce Checkout Page
There are always some secret things that boost sales. We bring all the secret tips here in public. Applying the following tips after customizing the checkout page template could grow your sales a lot more than your expectation.
Simplify the Checkout Process
A recent study shows, 28% of top eCommerce sites have 5 steps on the checkout page. You can keep it the same or have fewer steps on your eCommerce site.
Keep your checkout page simple and obvious. Add a visual indicator so your customers can see the total steps. Too many steps can damage your progress rate.
Offer Multiple Payment Options
There was a time when an eCommerce site contained a single payment method. It caused a high abandonment rate. Especially when a site sticks with a local payment gateway.
In order to solve the high abandonment problem, brands are now offering multiple payment getaways. E-wallets and e-payment getaways make it easier than ever it was. In this era, if you do not offer multiple payment options, you will lose a lot of customers.
Show Checkout Progress
As mentioned already, the checkout page should have around 5 steps, Now, It’s better to show the steps as progress or step completion. Your customer should know how many steps are left to finish the checkout.
It’s better to add the progress steps with the title. It will help users to understand the upcoming information.
This is a great idea to grow your sales. Show the total savings to your customer. Let’s say, they are saving x% from the order. Who doesn’t want to save? So, It will keep their attention.
You also can show the upcoming saving point. For example, you can ping or display a notice with “Spend 100 and save x% more.” This will surely help to get more sales.
Keep the Customer on the Same Page During the Payment
If you drive your customer to another page for taking payment, your customer will often exit from the site. They will not get back for extra shopping. It will be hard to do upsell and downsell to the customer.
So, keep your customer on the same page while creating a payment. You can integrate a payment gateway nowadays. It improves customer experience and decreases abandoned problems.
Display Testimonial
Adding a few eye-catching testimonials to the checkout page grow customers’ trust. But make sure, you are not adding generic and too many testimonials on the page.
Implement Points and Rewards
Another great way to reduce the abandoned problem is to introduce points and rewards. If you allow your customers to redeem points for making purchases or for added discounts, it will motivate them to checkout.
Customers can only earn points on checkout if they fulfill the requirement of the mentioned order total.
Try Upsells and Cross-sells
According to Amazon, cross-selling and upselling contributed about 35% of their revenue. Product recommendations are responsible for an average of 10-30% of eCommerce site revenues according to Forrester Research analyst.
Checkout page upsells and cross-sells are some of the best options for any eCommerce site. Show your customer-related product with a discount and reward points.
Use Mobile-Friendly Design
When it comes to SEO, Google and all other search engines care for mobile-friendly design. It has a high impact on search ranking. Well, if your checkout page is less mobile-friendly, you have a high chance to lose a lot of customers.
Design a mobile-friendly and responsive checkout page for your eCommerce site. You can use ShopEngine, a WooCommerce checkout page customization plugin for designing the mobile-friendly checkout page.
Enable Cart Content Saving
The site should have clean and simple “cart content” saving options. It should not ask for any future registration, login, or data input from the users.

What else ShopEngine has to Offer?
Along with the widgets, ShopEngine also provides many useful modules to add preorder, vacation mode, flash sale, etc. You can always check out all these modules in details later. Besides, for each module, you will get ready layouts like the WooCommerce checkout page template.
But the module that I want to put light on is the Additional checkout fields. Using this module you can easily add custom fields to any of the forms of your WooCommerce checkout page and customize the WooCommerce checkout page depending on your business and requirements.
Related: How to add advanced WooCommerce custom checkout field
You can also check out how easy it is to add a custom field in the video below:
Bonus blogs:
✅ How to Customize WooCommerce Category Page Without Coding
✅ How to Customize WooCommerce Cart Page Without Coding (Free)
✅ How to customize WooCommerce My Account page using ShopEngine
✅ How to customize WooCommerce Shop Page using ShopEngine
✅ How to Customize the WooCommerce Product Page using ShopEngine
✅ Best Shopping Cart Plugins For WordPress & WooCommerce
Final Call
Checkout is the final step for a potential customer to buy something. So, the checkout page is the place where you need to take extra care. And ShopEngine is the best WooCommerce checkout page customization plugin you will find to customize or modify WooCommerce checkout page and make it extra special.
Also, now you know how to customize or edit WooCommerce checkout page for free. So, are you ready to customize or edit WooCommerce checkout page with ShopEngine?
Leave a Reply