

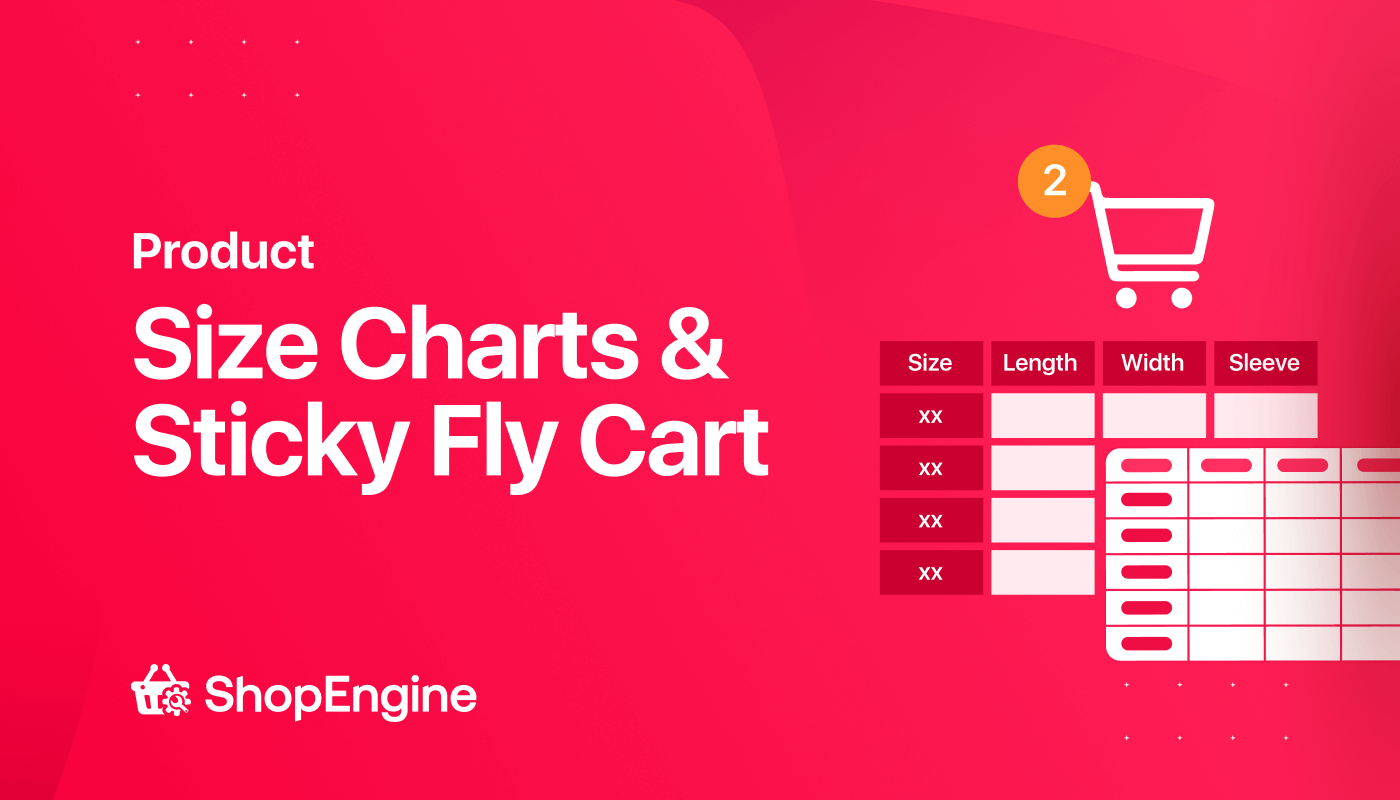
Do you know product size chart and sticky fly carts can bring a tremendous improvement to the conversion rate of your eCommerce business?
Now your favorite WooCommerce page builder ShopEngine has brought these amazing features to properly fulfill your business goals. Because of these sales driving modules, adding variations to your products and easy checkout from the shop page is possible. Moreover, you can implement these modules on your eCommerce site through an easy drag and drop feature that won’t take more than 5 minutes.
How about getting an in-depth description of these modules? If you are interested then, go through the complete blog. Here you will get to know everything about these two new features of ShopEngine.
Quick overview of the new modules of ShopEngine
ShopEngine has added two new exclusive features after thinking about the ongoing requirement of your eCommerce store. With the help of these two new features, your customers can choose products and place orders instantly. Now let’s take a quick overview of these features along with their benefits:
Product size charts module:
This is one of the most demanded modules that you have suggested adding with ShopEngine again and again. Now, you can enjoy this module and add a WooCommerce size chart in a few seconds with the template. Besides, you can customize it to make it more visible and attractive for your customers.
This new feature plays a significant role in fulfilling business goals. Because it extends shoppers’ experience by offering lots of benefits. Take a look at why you need to utilize this feature badly on your WooCommerce store:
- Customers can choose the right products in less time.
- The product size charts module will increase customers’ satisfaction.
- Higher customer satisfaction brings a greater conversion rate.
- It will help you stand out from other eCommerce sites through Word of mouth marketing.
Sticky fly cart module:
It’s another new feature of ShopEngine through which you can add a sticky fly cart. This is a blessing for customers who want to shop in less time. Because they don’t need to visit their cart page to view their “add to cart” products. They can directly add products to their cart and check out without visiting another page. Moreover, it offers other facilities too and here are those:
- It’s possible to see “add to cart” products and delete products anytime without visiting the cart page.
- Increasing conversion rate because customers can directly check out from the shop page.
- This will enhance your customer’s satisfaction by letting them easily check out.
These are the two features that you will get from the updated version of ShopEngine. Finally, after the quick checkout of these modules now it’s time to see how you can utilize these new features of ShopEngine on your eCommerce site.
How to create a size chart with ShopEngine’s product size chart module
ShopEngine is a perfect WooCommerce page builder that is continuously updating according to your customers’ requirements. Now it has added your favorite size chart module to its features. Adding and editing product size charts with this module can be done within a few minutes. Eager to know the process of adding it?
Go through the following steps to add a Product size chart to your WooCommerce store:
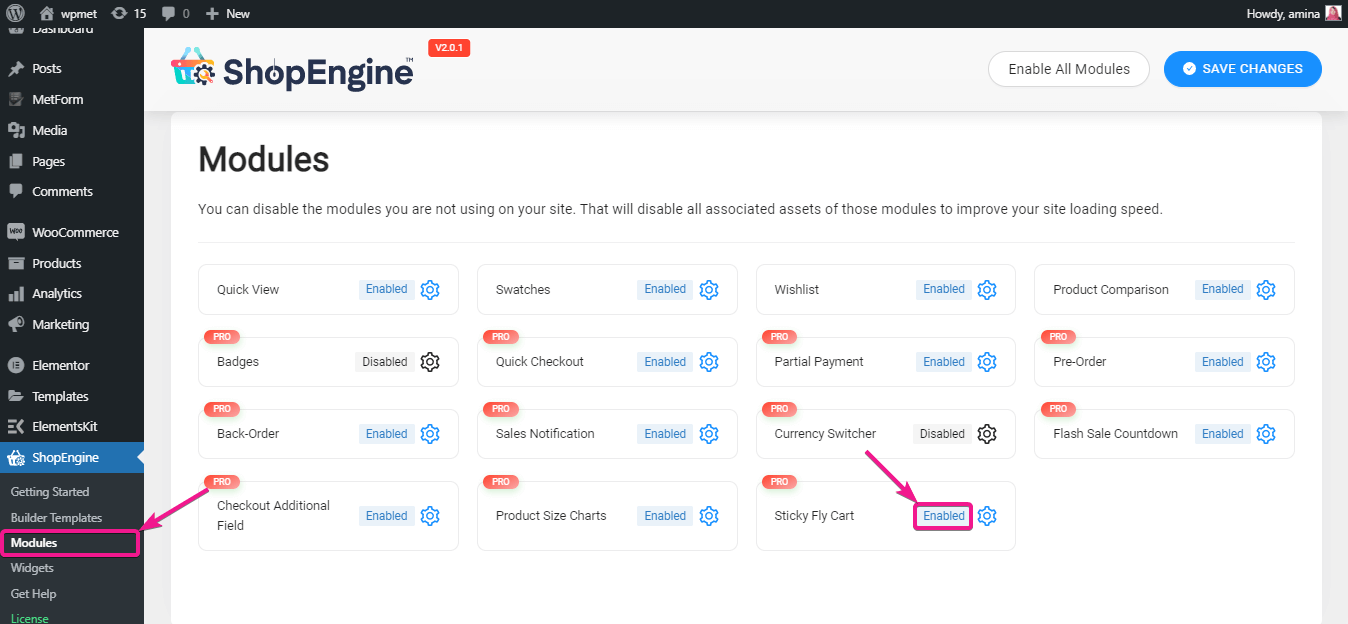
Step 1: Enable product size charts module.
First, you need to enable the product size chart module. To do it, go to your admin dashboard and visit ShopEngine>> Modules. Now click on the product size charts like the image.
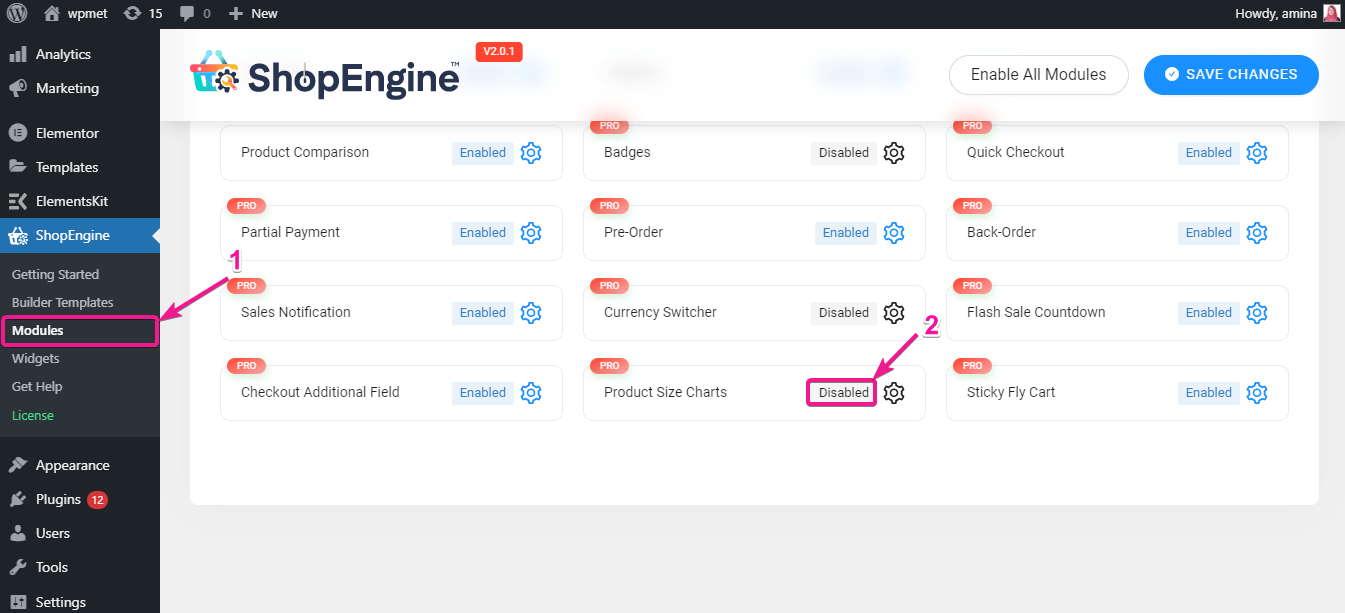
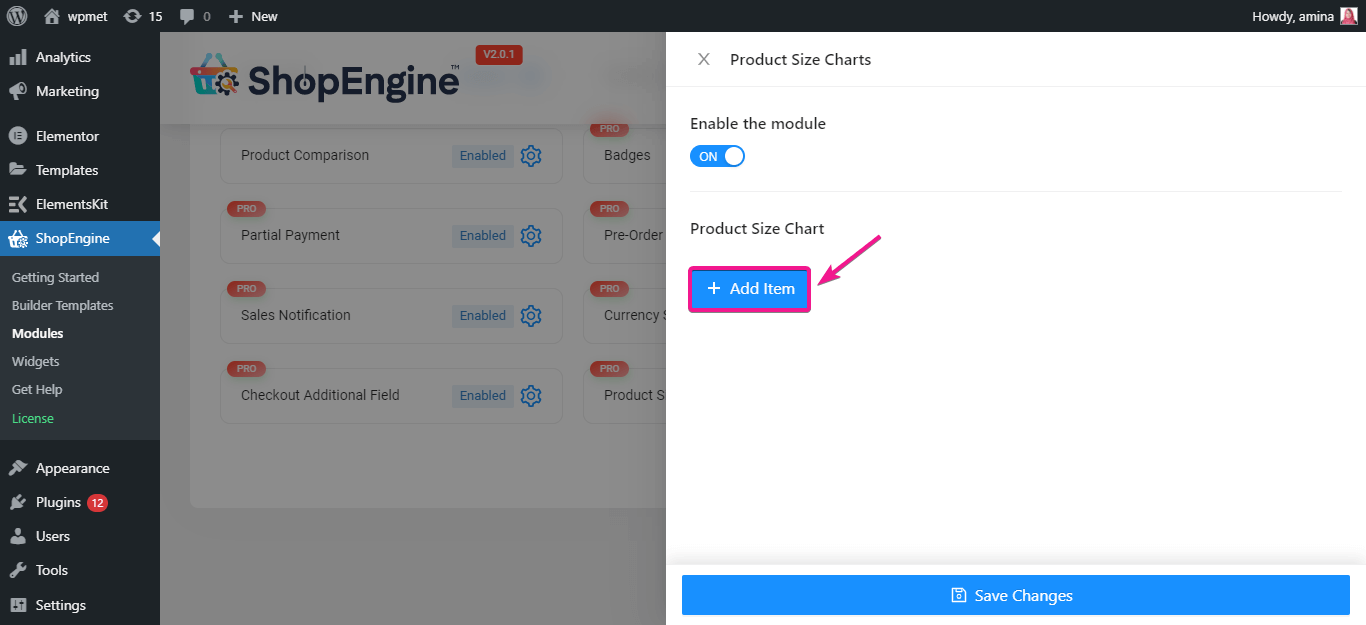
After that, enable the module.
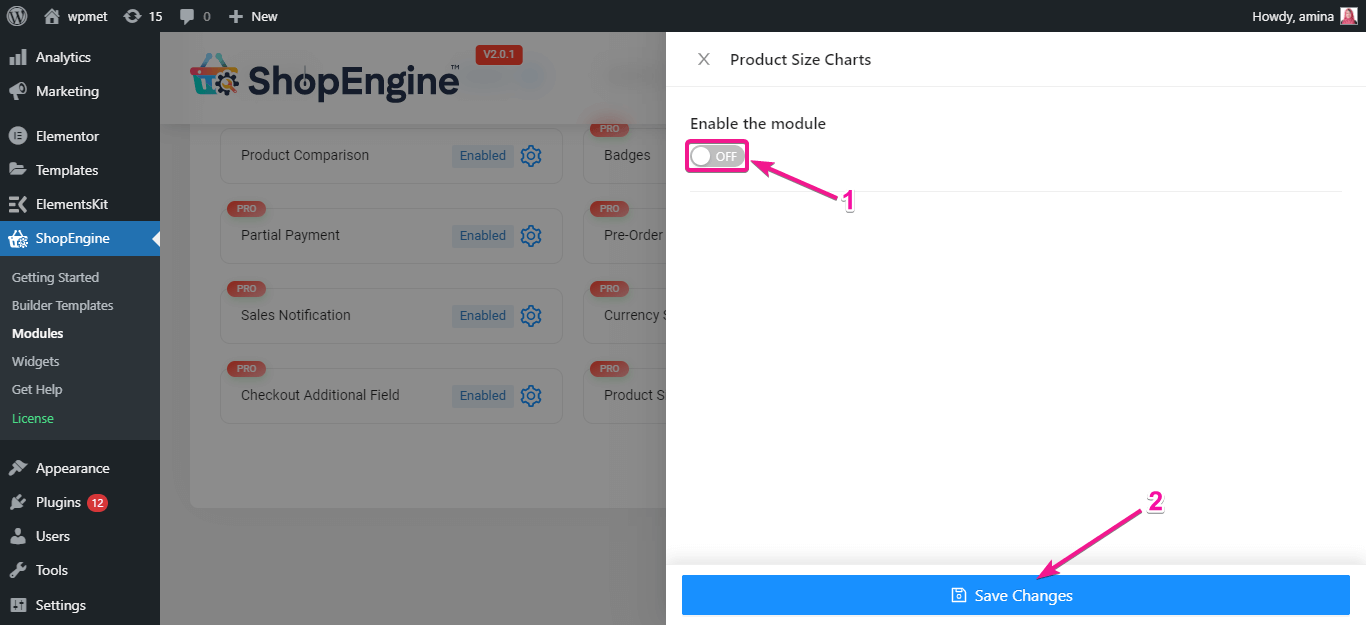
Here you need to add the chart that you want to show with your products. For doing it, click on the “add item” icon.
Then, enter the chart title and chart image like the below gif.

Step 2: Create a single product page for adding size chart.
After enabling the product size charts widget, you need to create a single page template. Do remember you can only use this module on the single product page template.
Now you have to visit ShopEngine>> Builder templates. Then, press the add new button to create a new template.
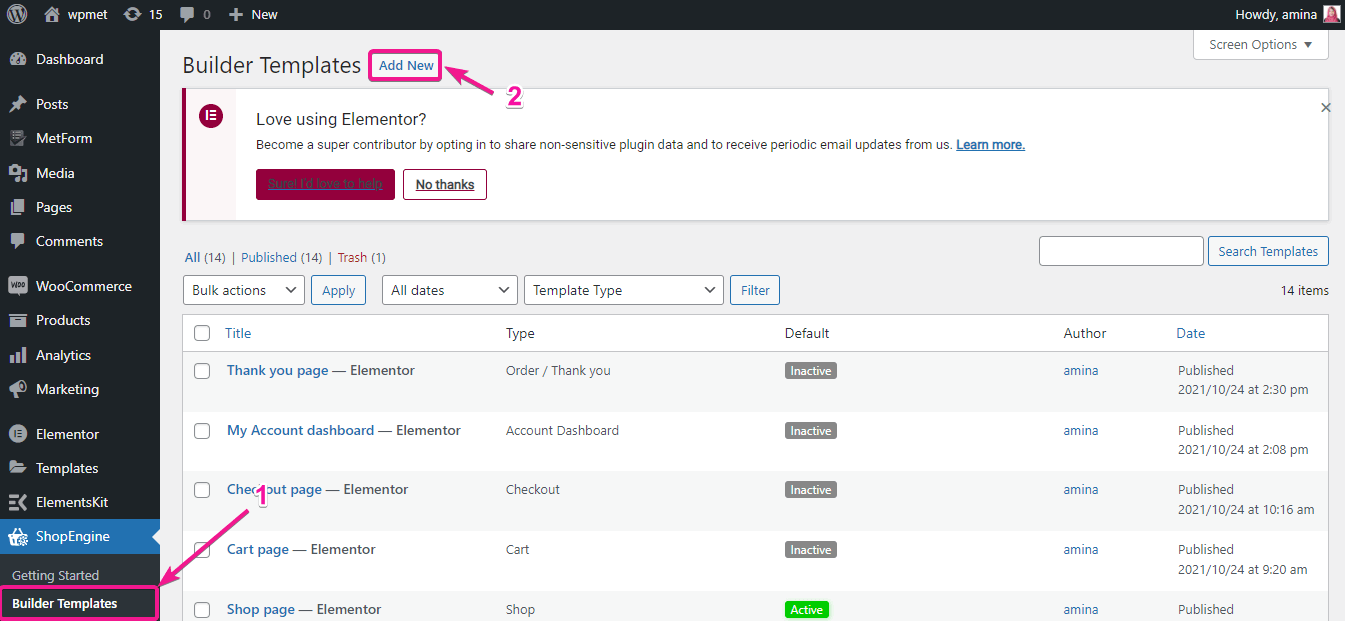
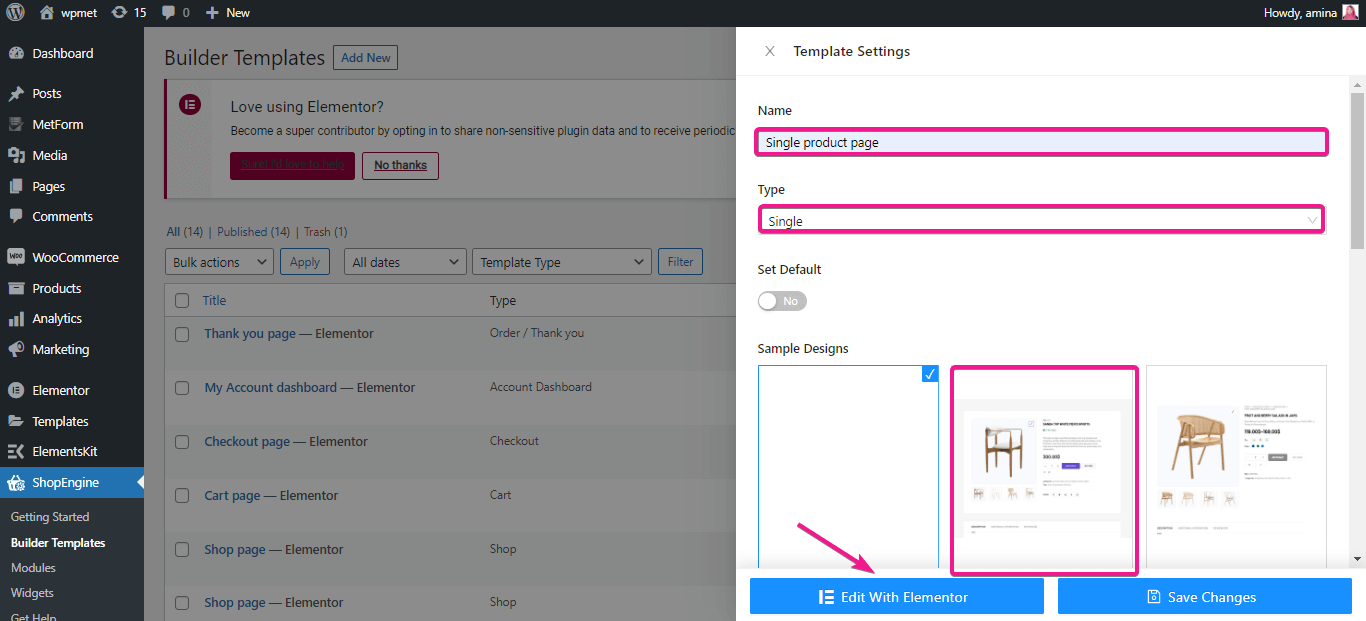
After creating a new template, you have to enter the template name, type, and select template design. Finally, press edit with the Elementor button to set all the added template settings.
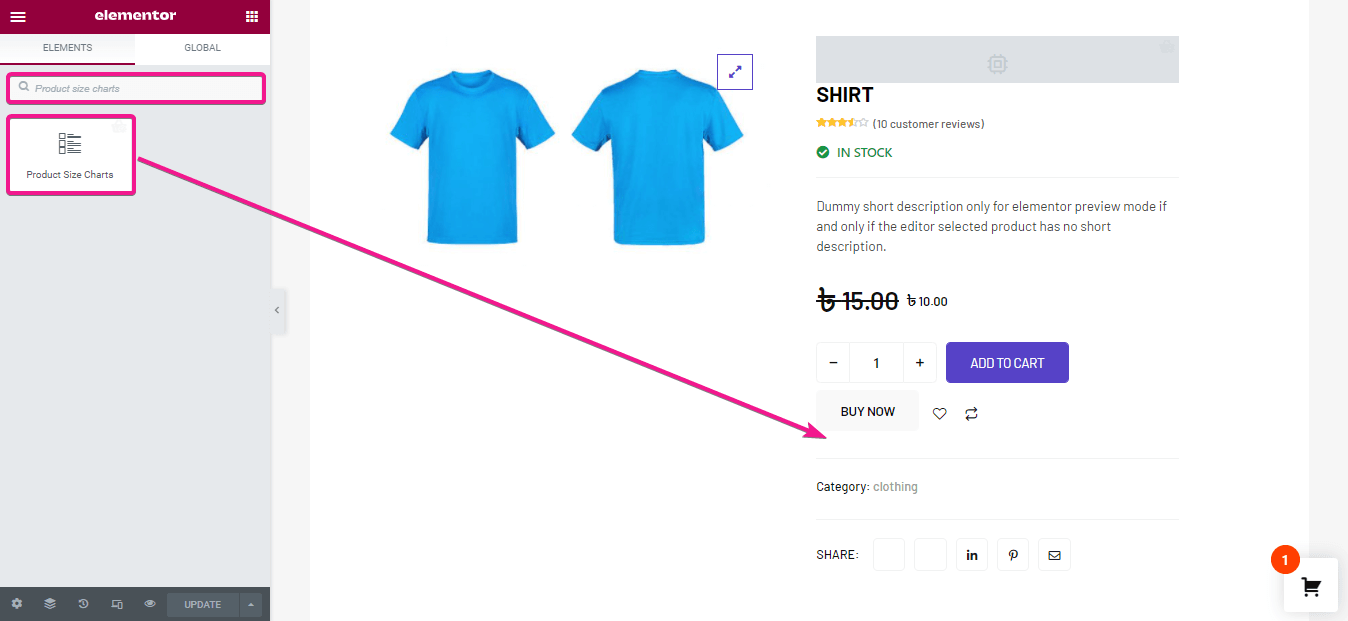
It will redirect you to another page. Here search for product size charts module and drag and drop the widget to your preferred section.
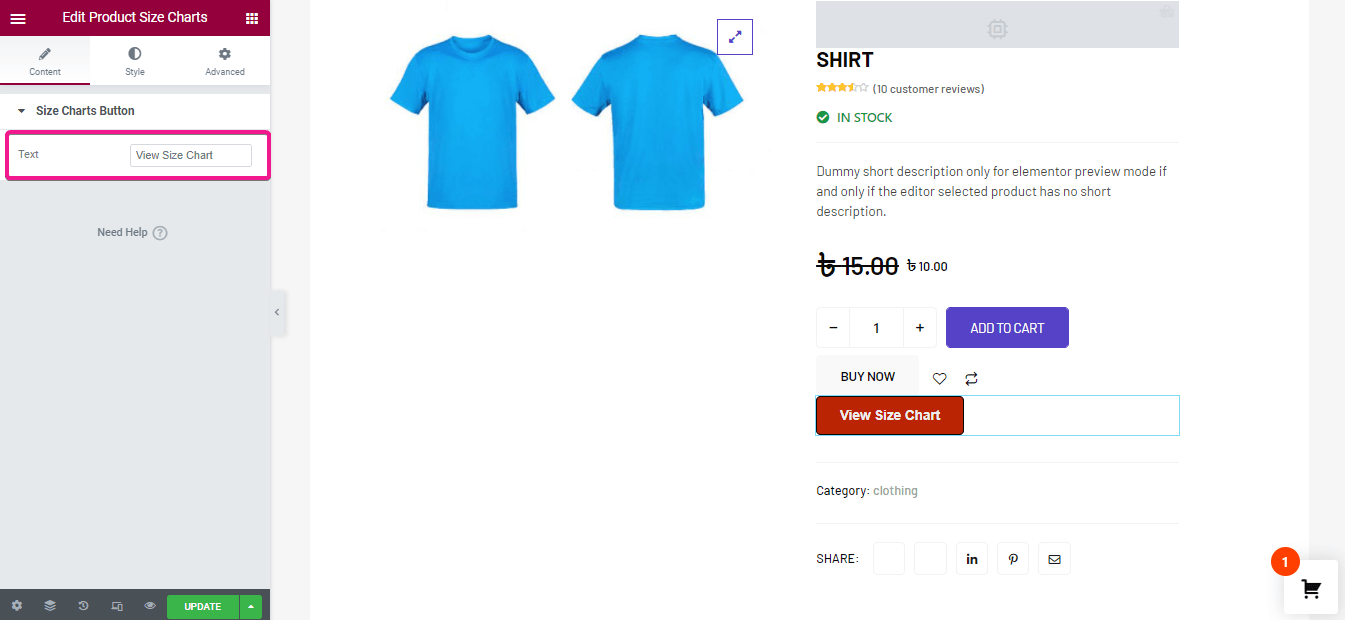
Step 3: Editing product size charts.
Now it’s time to edit the size chart viewing button. First, you need to enter text for your size chart button. A default text will be added if you don’t add any text for the button.
After that, edit the style of the size chart button. Here you will get the following style editing options:
- Typography.
- Color.
- Background color.
- Border type.
- Width.
- Border color.
- Border radius.
- Padding.
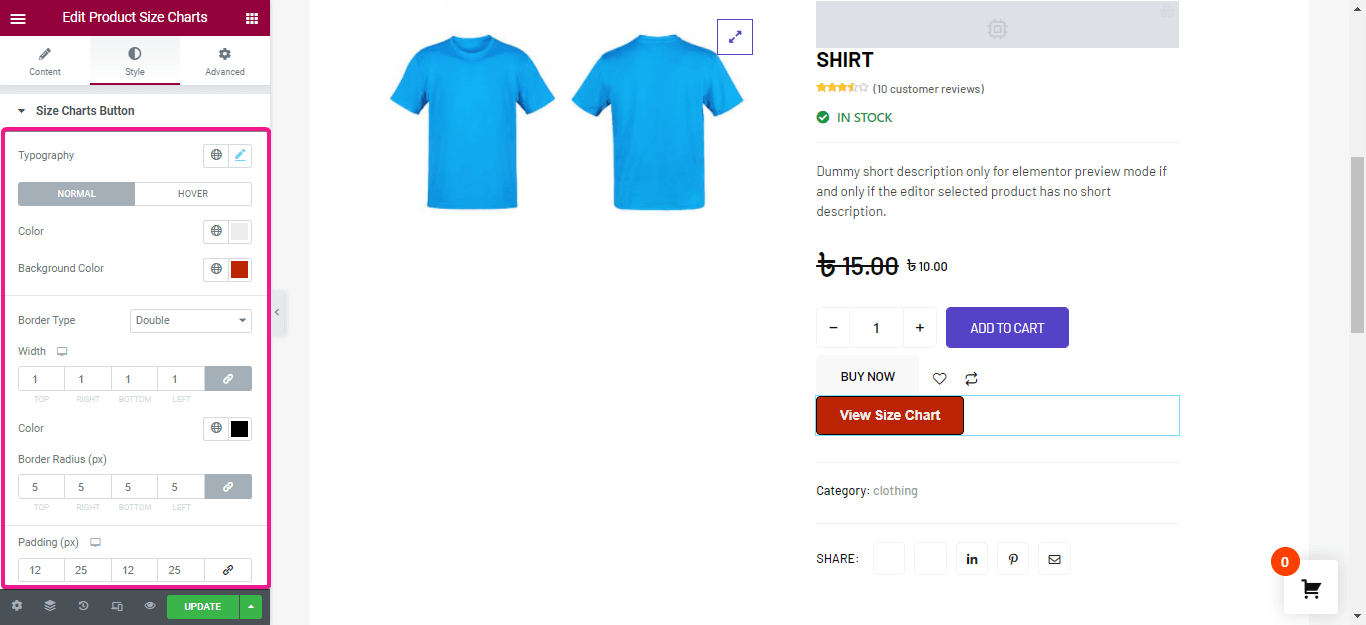
Finally, Change how you want to show your popup size chart. Here, adjust the width, height, border radius, padding, background color for the popup. Then click on the update button.

Step 4: Add size chart with products.
In the forth step, you need to add a size chart with an individual product. Go to the products>> all products and select the product to which you want to add a size chart. After choosing, click on the edit option. Then, go to size charts and select the name of the chart after enabling the product chart.
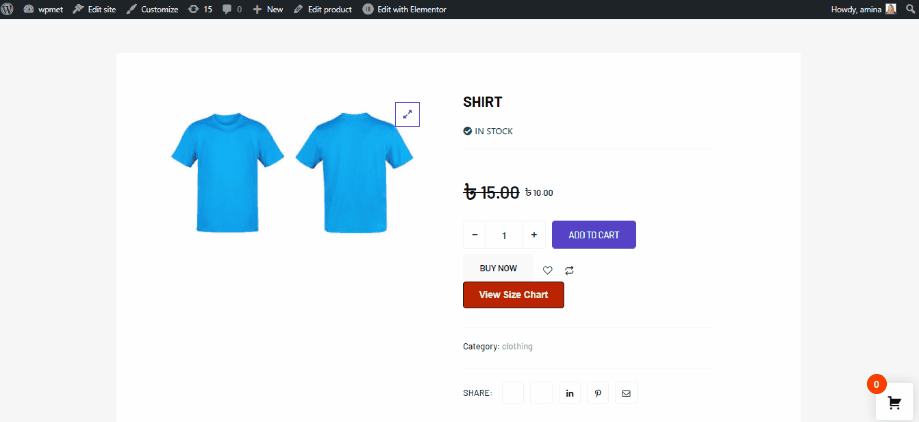
After updating, your added product size chart will look like this:
How to add sticky fly cart with ShopEngine
Another new feature of ShopEngine is its sticky fly cart module. Just enabling and setting this module is enough to add a sticky fly cart to your eCommerce site. Adopt the following 2 steps to add a sticky fly cart:
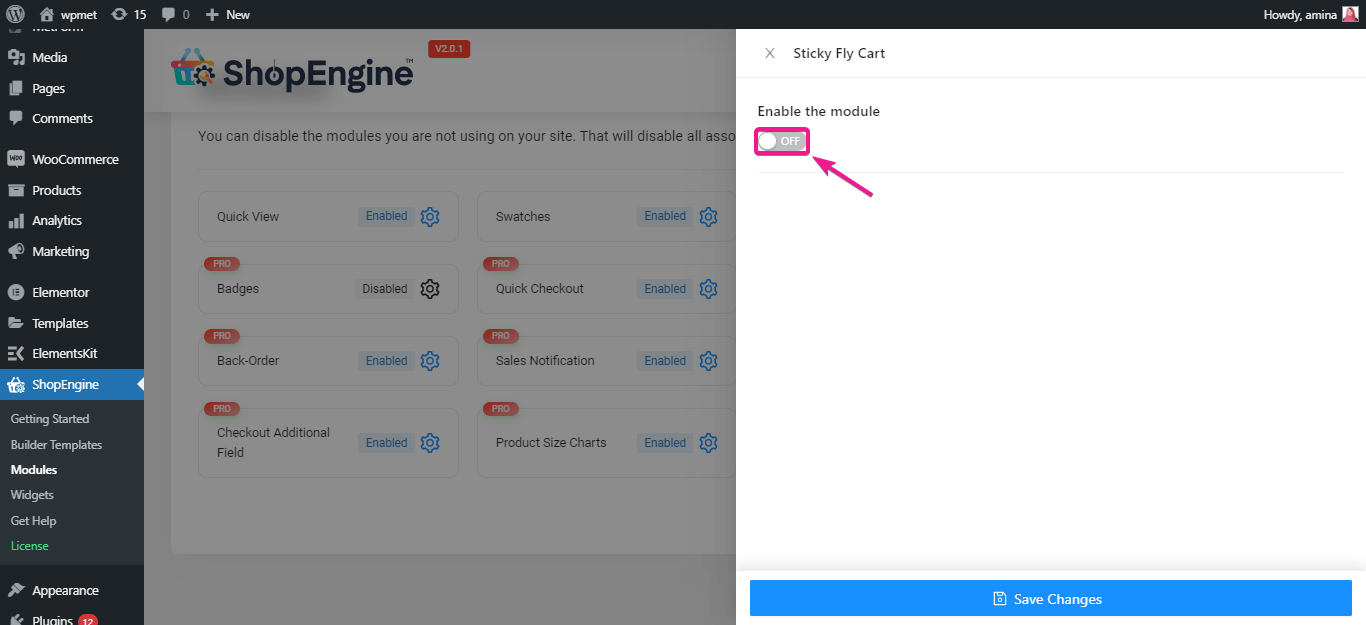
Step 1: Enable the sticky fly cart module.
In the first step, Enable the sticky fly cart module. For it, hover your mouse on ShopEngine and go to modules. Then, click the enable button.
You need to turn on the module.
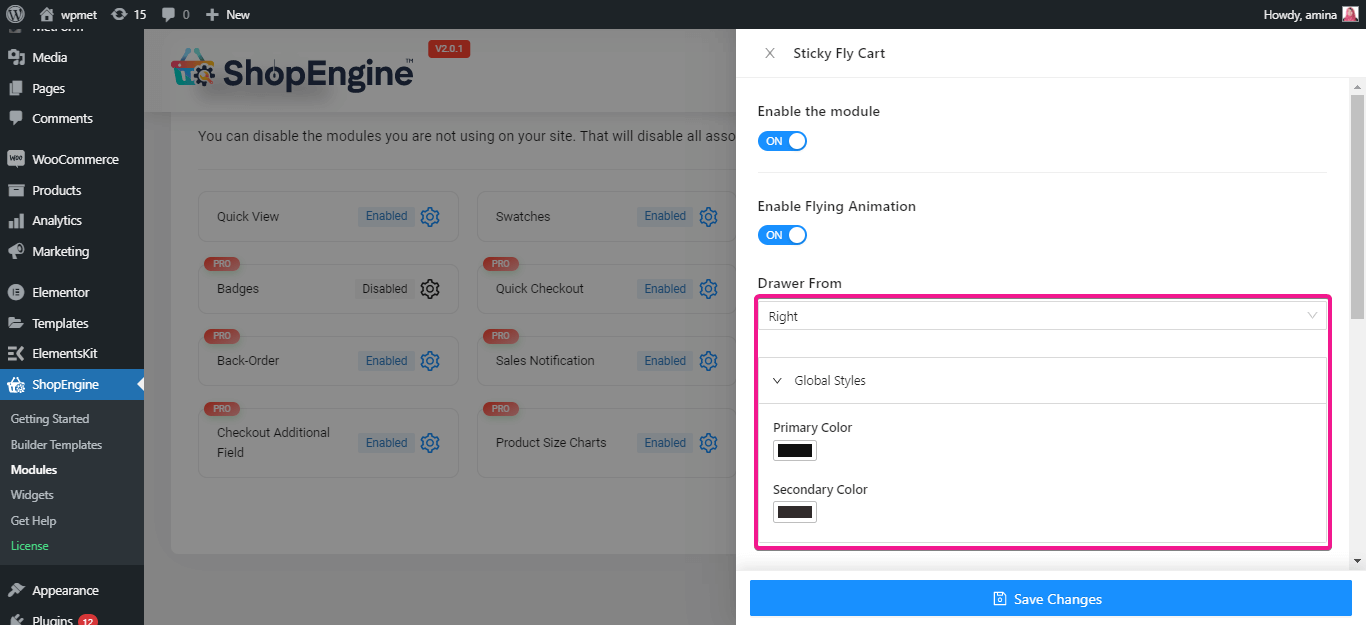
Step 2: Set up sticky fly cart module.
After turning on the fly cart module, set up the sticky fly cart. For setting it up, choose right or left where you want to show the fly cart. Then, select primary and secondary colors for your global styles.
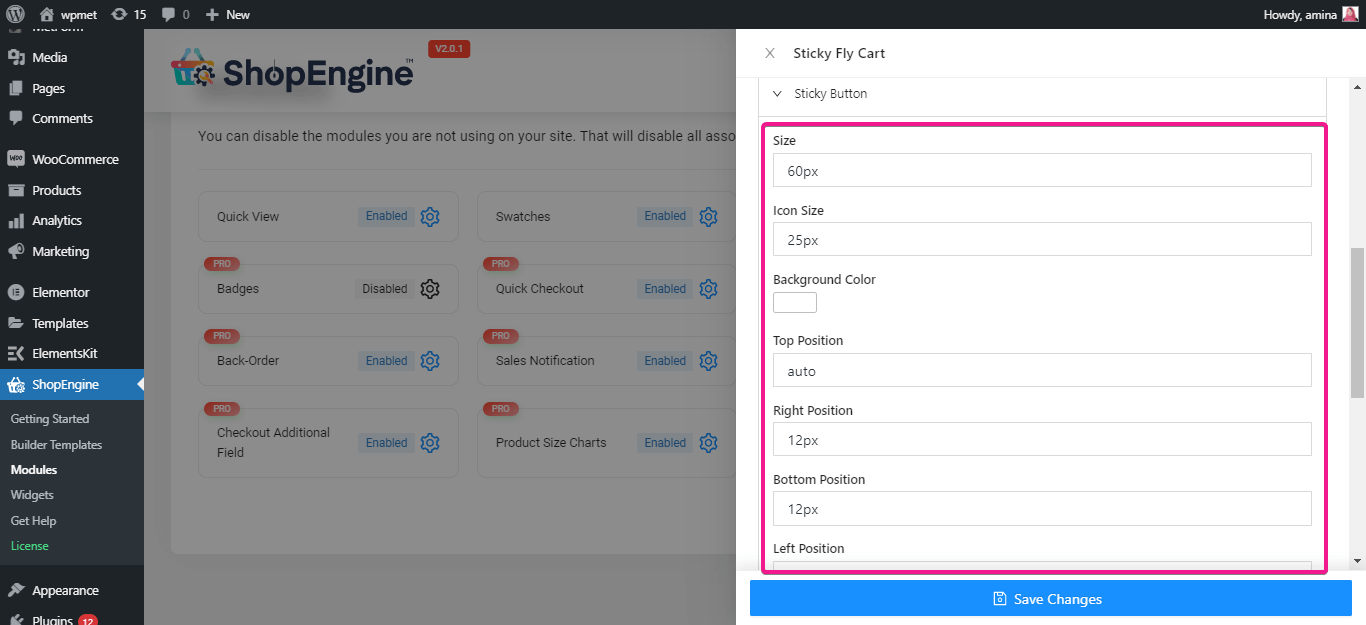
After that, edit the sticky button of your fly cart. Here you will get the following sticky button edit options:
- Size.
- Icon size.
- Background color.
- Top position.
- Right position.
- Bottom position.
- left position.
Now do the same for the sticky button counter, cart body, header, items and subtotal. Finally, Save the changes that you have done to your sticky fly cart.
Visit your product page and your added sticky fly cart will look like this:

Get started with ShopEngine’s product size charts and sticky fly cart module:
Adding a product size chart will minimize the confusion of your customers and let them choose the exact size of their products. Whereas a sticky fly cart will let them easily pick their products and see the added items from time to time. These two features are very important for any eCommerce website.
Luckily, now you will get both of these features in the updated version of ShopEngine. Besides, you have already known how easily you can add product size chart and sticky fly cart to your WooCommerce store. Use these features to boost your WooCommerce conversion rate and increase revenue like other well-established eCommerce websites.

Leave a Reply