

Thinking of adding a WooCommerce currency switcher to your website?
Well, if your plan is to expand your business overseas then you should add a multi currency switcher plugin and you must leverage a WordPress currency switcher plugin for that. Because it is the most convenient way to add this feature to your WordPress site and provide your customers the option to change the currency in WooCommerce.
But which WooCommerce currency converter plugin should you use? And how to use the right WordPress currency converter to add multiple currency features with ease?
You will get answers to all such questions in this detailed tutorial on how to add a currency switcher to the WooCommerce site. So, without further ado, let’s get started…
What is WooCommerce Currency Switcher?

WooCommerce currency switcher is an eCommerce website feature that enables users to check product prices in various currencies. On top of that, they can also checkout to place an order in their preferred currency. Customers can switch between different currencies on all the WooCommerce pages such as the shop page, cart page, checkout page, etc.
🤷Want to add a custom checkout field to your WooCommerce site? Check out our blog on 👇👇
How to Add WooCommerce Custom Checkout Field in Just 3 Steps (No Coding)
Benefits of Using Currency Switcher in a WordPress site
Globalization has made it rather essential to add options to change the currency in WooCommerce. The perks of having a WooCommerce multi-currency switcher on your site include:
- It can help you to expand your business. Because with the currency switcher option, you can target a broader audience. And the bigger your targeted audience is, the better chance you have to successfully expand your business.
- Having a currency switcher option on your WooCommerce store will also ensure a better user experience for your customers. As users will have the option to see prices in their own local currency, they won’t have to convert prices into other currencies which can be annoying and time-consuming.
- Besides, having an advanced feature like a currency switcher can help you stay ahead of your competitors. As I have mentioned before, now it’s the time of globalization, and having a currency switcher will help your brand to beat your competitors.
Required Plugins to add WooCommerce Multi Currency Switcher to WordPress
You will need to install a one-page builder and another WordPress currency switcher plugin to follow the tutorial shown in this blog. The required plugins are:
The currency switcher feature is available with only ShopEngine Pro. So, make sure you have installed and activated the ShopEngine Pro.

How to Add WooCommerce Currency Switcher to WordPress Website in 5 steps
Follow each step carefully to add an Elementor WooCommerce currency converter to your WordPress site without any hassle. Here are the steps:
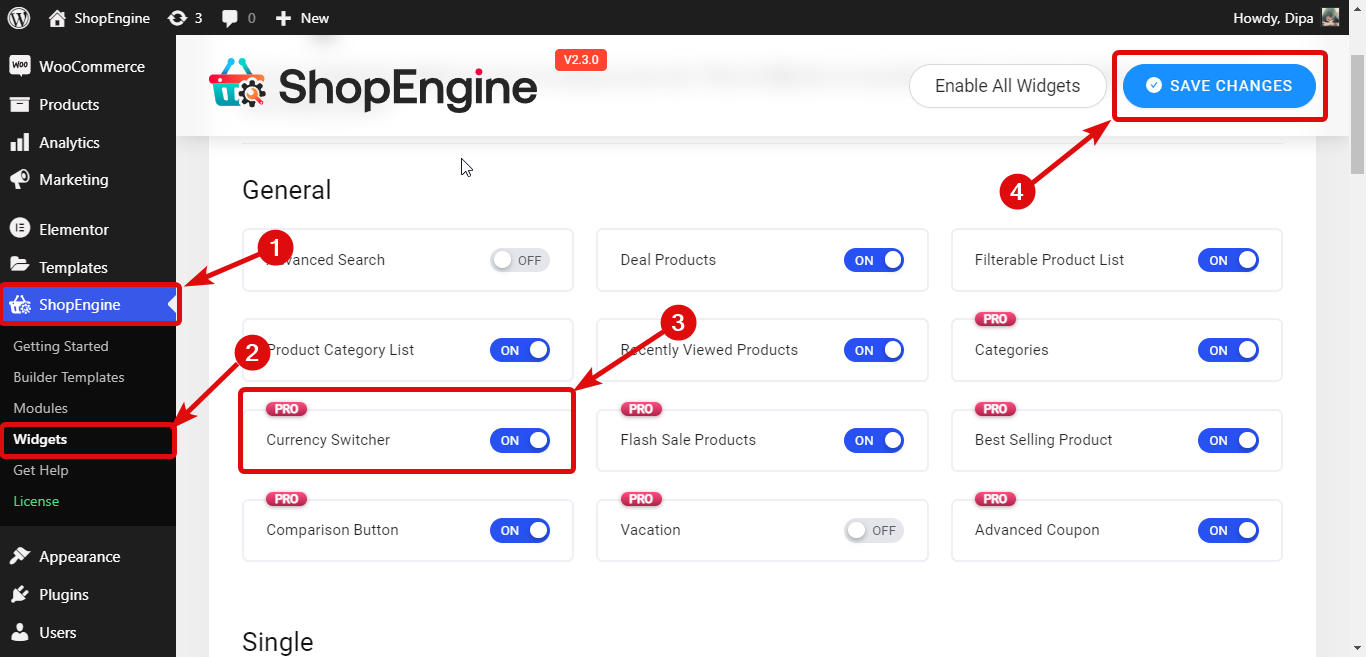
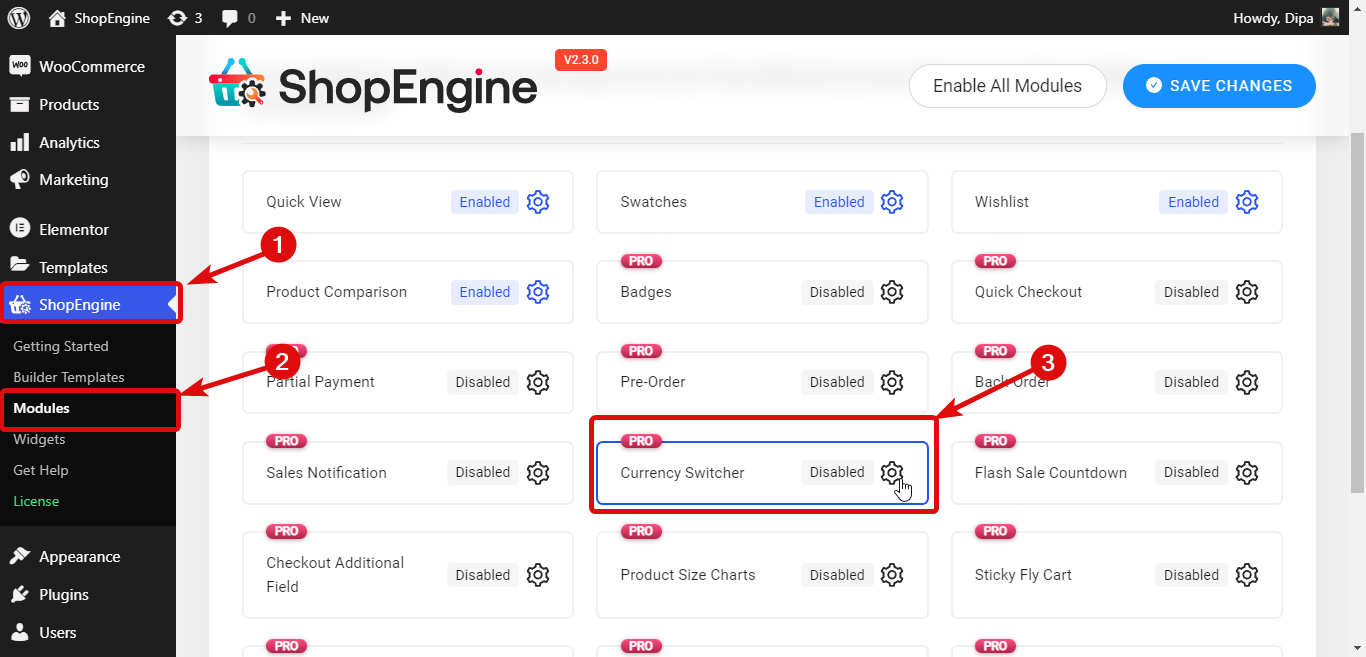
Step 1: Enable Both Currency Switcher Module & Widget
You will need both currency switcher module and widget to add a fully functional currency switcher to your WooCommerce site. Before you can use these, you need to enable them.
To enable the currency switcher widget, from the WordPress Dashboard go to 1. ShopEngine ⇒ 2. Widgets ⇒ 3. Turn on the toggle button under the General section ⇒ 4. Click on Save Changes.
To enable the currency switcher widget, from the WordPress Dashboard go to 1. ShopEngine ⇒ 2. Modules ⇒ 3. Currency Switcher and click on the Settings Icon. After enabling the Currency Switcher module option click on Save Changes.
Also, read 👉👉 Best Shopping Cart Plugins for WooCommerce
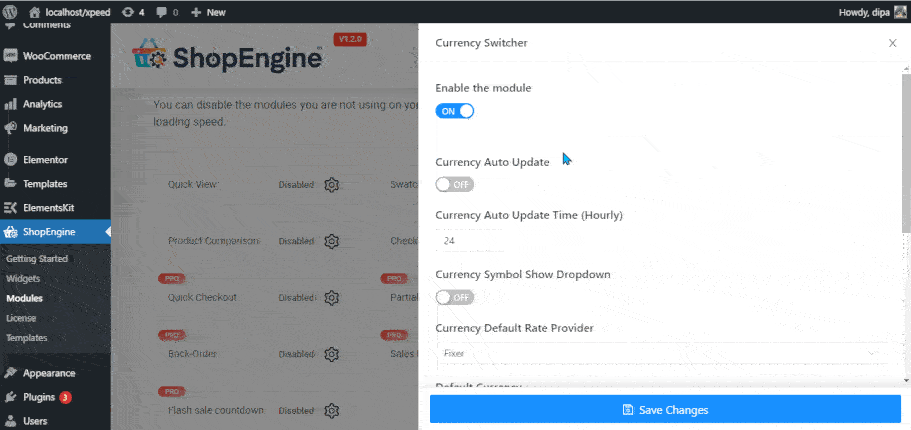
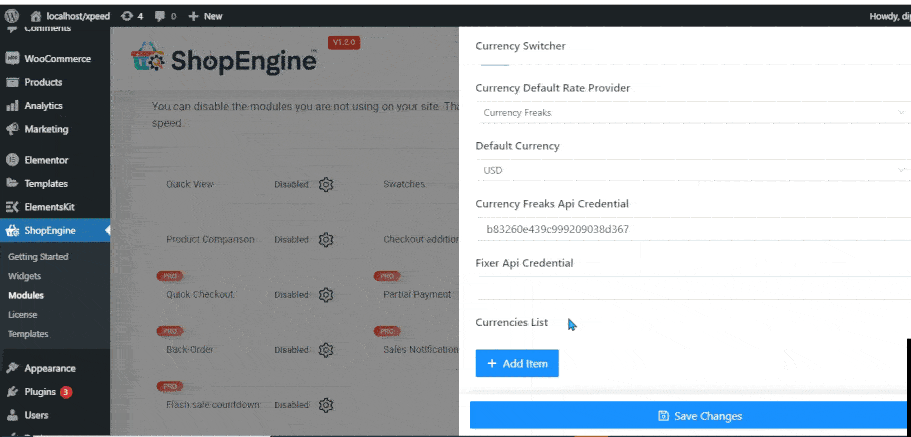
Step 2: Customize the Currency Switcher Module’s Settings
After you enable the WooCommerce currency converter widget and module, you will get the following options to customize:
- Currency Auto Update: Turn this option on to update different currency values automatically.
- Currency Auto Update Time (Hourly): Set how frequently you want the currency to update. You must give the numbers in hours only.
- Currency Symbol Show Dropdown: Turn this option to show the currency list (symbol) in the dropdown menu at the front end.
- Currency Default Rate Provider: ShopEngine leverages 2 API providers to update the currency rate; Fixer API and Currency Freaks API. You can choose either of these two.
- Default Currency: Select the default currency that will appear when someone first lands on your website.
- Currency Freaks API Credential: Once you sign up for any of the Currency Freaks packages, you will get an API credential, use that value here.
Step 3: Add Multiple Currencies
To add a new currency, click on the + Add New button and provide the following information.
- Currency Activate: Turn on/off Currency Activate to activate/deactivate the currency.
- Currency Name: Put the name of the currency name in the Currency Name field.
- Currency Code: Make sure to use a standard code for the Currency Code. For example Currency code for the United States Dollar is USD.
- Currency Rate: Put the currency rate in terms of exchange rate or USD.
- Currency Symbol: Use a standard currency symbol.
- Currency Symbol Position: You can position the currency symbol on left, right, left space, or right space depending on the currency you are trying to add.
- Currency Decimal: Select the number of decimal places you want your currency to show.
- Disable Payment Gateways For This Currency: Choose the payments gateways you want to disable for the currency.
After inserting all the data, click Save Changes to set WooCommerce multiple currency.
Note: Repeat the same process to add as many currencies as you want.
Also read: how to customize WooCommerce Category page without coding using ShopEngine
Step 4: Drag and drop Currency Switcher Widget to your WooCommerce site
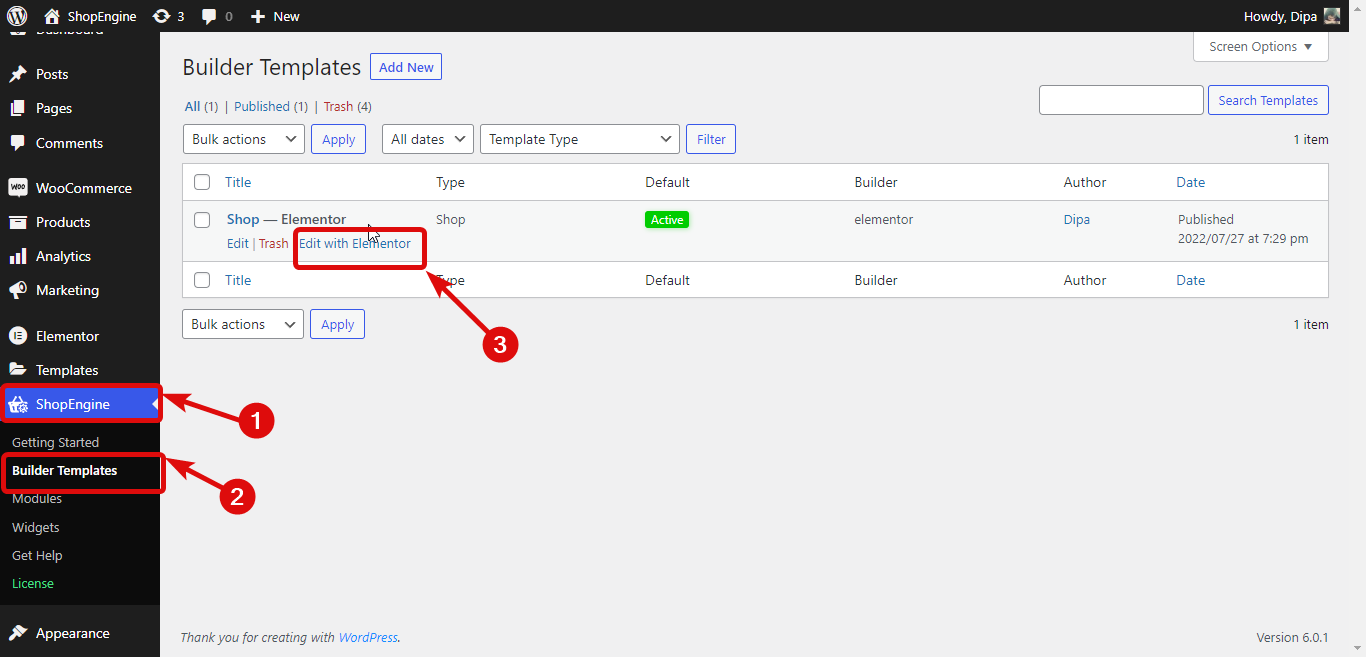
To add Currency Switcher, navigate to 1. ShopEngine ⇒ 2. Builder Templates ⇒ 3. Shop Page Template, and click on Edit with Elementor.
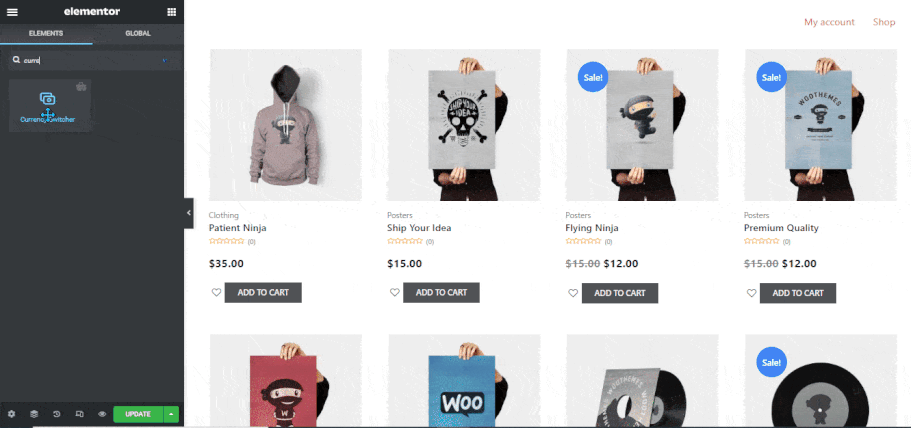
Once the editor shows up, Search for Currency Switcher on the Elements Search option, when found the widget, drag and drop it.
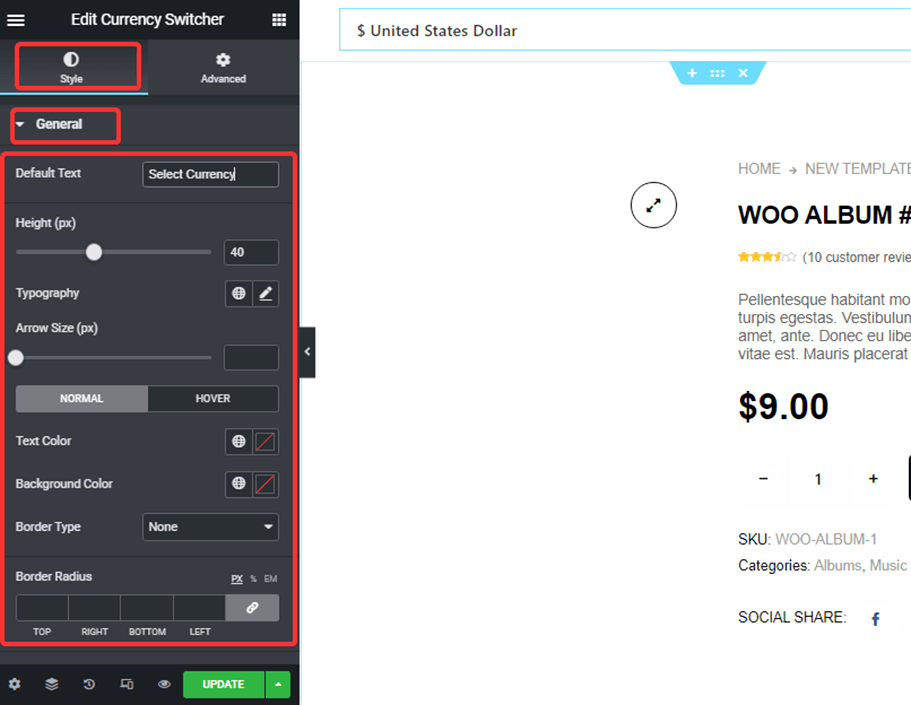
You can also change different styles of currency switcher widget such as
- Default Text
- Height (px)
- Typography
- Arrow Size (px)
- Normal/ Hover
- Border Radius
- Padding
For more details about the style settings, check out the documentation.
Note: If any Payment Gateways are disabled for some Currency, then that gateway will not show up on the checkout page for that currency.
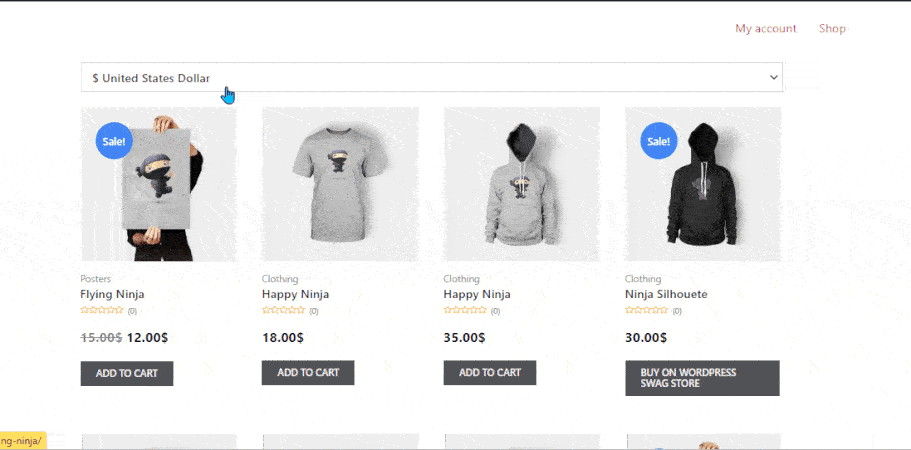
Step 5: Update & Preview Elementor Currency Switcher
Once you are done with the style customization, click on update to change WooCommerce currency at checkout. Here is a preview of your added WooCommerce Elementor currency switcher:
👉👉 Check out how to custom build your WooCommerce cart page using ShopEngine
What to Consider When Choosing a Currency Switcher Plugin
Now, we will outline some important tips for getting a flexible plugin option for your customers to complete international transactions effortlessly.
- Easy-to-set-up: Your selected WooCommerce plugin should have a flexible builder interface to set real-time currency rates. Avoid plugins that present users with coding challenges. And, choose one that lets you easily give necessary inputs or select currency from a list.
- Multi-Currency Checkout Support: Another thing you should consider when choosing a currency switcher plugin is its multi-currency checkout support. It should empower you to change the online store’s default currency in WordPress.
- Control Over Payment Gateway: This is an obvious feature for a currency-switcher plugin that integrates different payment gateways. Also, you need to have control over the display of your payment gateway. For example, ShopEngine allows you to disable specific payment gateways for a specific currency type.
- Customize Currency Switcher Display: Some modern WooCommerce plugins allow you to define the currency symbol and its positions. You can even customize the currency switcher design to match your brand. So, you must look for these options to get your suitable currency switcher plugin.
- Easily Configure Tax & Shipping Rules: The plugin should automatically adjust taxes, shopping fees, and other discount offers based on the customer-selected currency. An incorrect calculation of your discounted and taxed product prices can increase cart abandonment rates.
- Support Other WooCommerce Features: Go for an inclusive e-commerce plugin that incorporates other WooCommerce features to run your online business seamlessly. Having an all-in-all WooCommerce plugin saves you from using multiple Woo plugins.
- Performance & Speed: Whatever plugin you’re using it should always be lightweight and optimized for page speed. Therefore, the currency switcher plugin shouldn’t any extra bloaty to your website.
- Regular Updates & Support: Make sure that there is an active team to regularly improve the plugin and answer your questions.
FAQ
Integrating currency exchange in WordPress takes a few minutes with WooCommerce solution like ShopEngine. Its Currency Switcher module allows you to add currency exchange in a drag-and-drop interface and lets your customers shop in their local currencies.
WooCommerce plugins such as ShopEngine lets you add multiple currency without using a single line of code. All you need to do is enable both currency switcher widget and module. Then add it to your WooCommerce store.
Final Words on WordPress Currency Switcher
I hope you have successfully added the WooCommerce currency switcher to your WordPress site. As mentioned before, using a WooCommerce plugin makes it super easy and when you use the best currency switcher for WooCommerce like ShopEngine it becomes even more tranquil.
Choosing ShopEngine as your WordPress currency switcher plugin is an excellent decision because it’s a multipurpose plugin that along with a currency switching feature also offers popular eCommerce features such as preorder, backorder, partial payment, etc. Besides, you can build all your WooCommerce pages from scratch using this plugin.
So, do try this marvelous award-winning currency switcher plugin.
Leave a Reply