Offering your customers a simple, easy, and hassle-free checkout process can boost the number of customers who complete orders on your site.
Customers like the idea of buying any product but not necessarily the lengthy process that is required to complete an online order nowadays.
Result?
Well, many people leave their checkout process in the middle.
The good news is you can change the scene and ensure people complete the order by replacing the default checkout page with a WooCommerce multistep checkout.
No! You don’t need to code to do this. Instead, you can just pick a good WooCommerce multistep checkout plugin to do that with just drag and drop. How?
For this, read the whole blog where I will show how to add multistep checkout to WooCommerce sites with ease which will result in an easy checkout process for your customers.
What is a Woocommerce multi step checkout plugin?
A WooCommerce multistep checkout plugin helps you build a checkout page that is divided into multiple steps or sections in order to simplify the process. In a multi-step checkout page for WooCommerce, a single page design is replaced with a multi-step page where different functions such as billing, shipping, payment, etc are split into different steps. This type of checkout page also gives users the option to go back and forth between stages.
Wondering why anyone would want to go for a multi-step checkout page for WooCommerce instead of the default one page.
To get an answer, move to the next section.

Why add multistep checkout to the WooCommerce site?
The perks of using a multi-step checkout for WooCommerce are too many to ignore. Here are some of the reasons to add a multistep checkout to WooCommerce:
- A long list of forms can be confusing and annoying for users. The introduction of multi-step checkout can solve this issue by giving them a more structured form where there is no need to scroll for long.
- Since multi-step checkout asks users to fill in the information in parts, it makes the user’s life easy. Besides, having the option to check your previous inputs without scrolling up or down ensures a good user experience.
- By providing a simpler form and good user experience, multi-step checkout can encourage users to complete more orders and thus increase the revenue of your business.
- With multi-step checkout, you can collect partially filled data of users and use those later for email campaigns to convince users to complete the order.
👉 👉 You can also read Best Shopping Cart Plugins for WooCoomerce
Things to look for in a WooCommerce multi step checkout plugin
You can’t just pick any plugin for your WordPress site and expect to enjoy the benefit. Here are some things you must look for in a WooCommerce multistep checkout plugin:
- Easy customization option so you can easily incorporate a multistep checkout to your site
- The plugin should be lightweight, otherwise, it will slow down your website and increase the bounce rate.
- The plugin should be device responsive as many people shop using mobile devices nowadays
- Last but not least, make sure the plugin is compatible with your theme and others plugins that you already are using on your website so there is no conflict.
👉 👉 You can also read How to build WordPress single page website with one page navigation
What plugins are needed to add WooCommerce multi step checkout for WooCommerce?
You will need a page builder and a WooCommerce multistep checkout plugin to follow along with the tutorial shown in this blog. The plugins are
Want to learn about ShopEngine a little more? Checkout the video below 👇👇
🔔 Note: If you need help activating ShopEngine pro, check out the installation guide.
You can use the coupon community20 to get 20% OFF on ShopEngine Pro.
How to add WooCommerce multi step checkout to WordPress using Elementor and ShopEngine in 5 steps
This is an extremely easy-to-follow step-by-step guide. All you have to do is follow the the 5 steps described below to add multi step checkout to WooCommerce without any hassle:
Not in the mood to read? No worries, you can check the video below 👇👇
Step 1: Activate Multi Step Checkout Module of ShopEngine
The first step is to activate the multi-step checkout module of ShopEngine. This module is only available in the pro version. To activate
- Navigate to: ShopEngine ⇒ Modules
- Click on the Multi-Step Checkout Module
- Turn on the module
- Finally, click on Save Changes to update
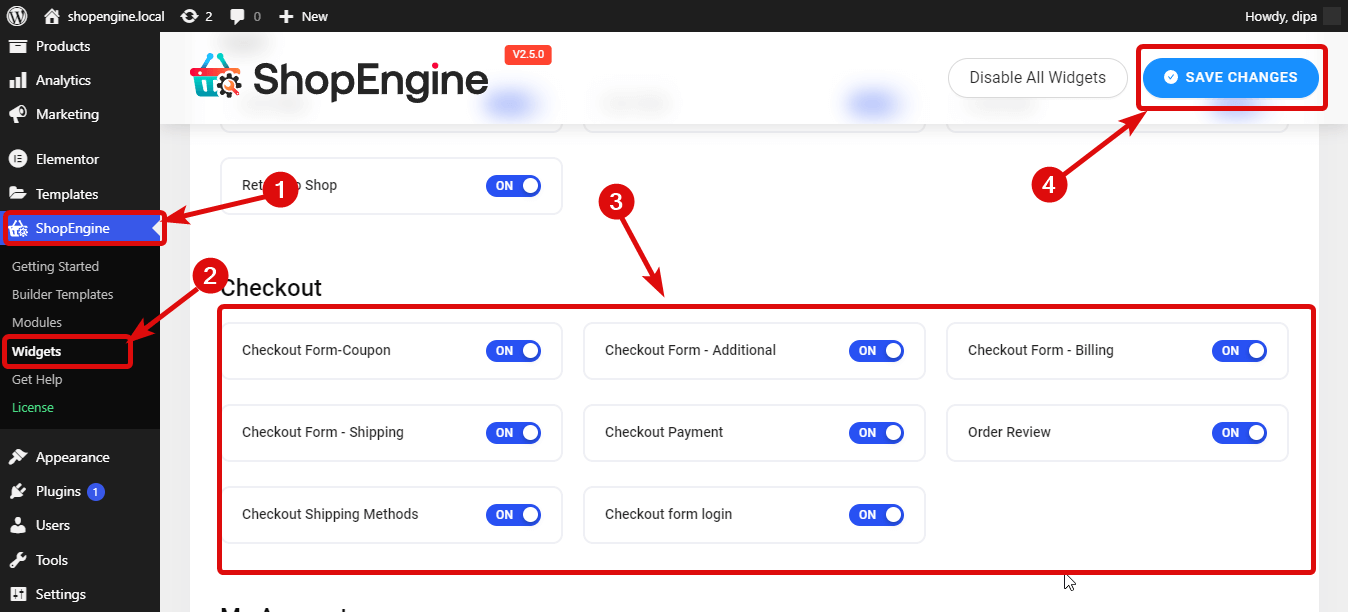
Step 2: Activate the Checkout widgets of ShopEngine
Now it’s time to activate all the widgets you will need to build the checkout page. For this:
- Navigate to: ShopEngine ⇒ Widgets
- Turn on all the modules under Checkout section
- Finally, click on Save Changes to update
👉👉 You can also read How to Add Currency Switcher to WooCommerce Website in 5 Steps
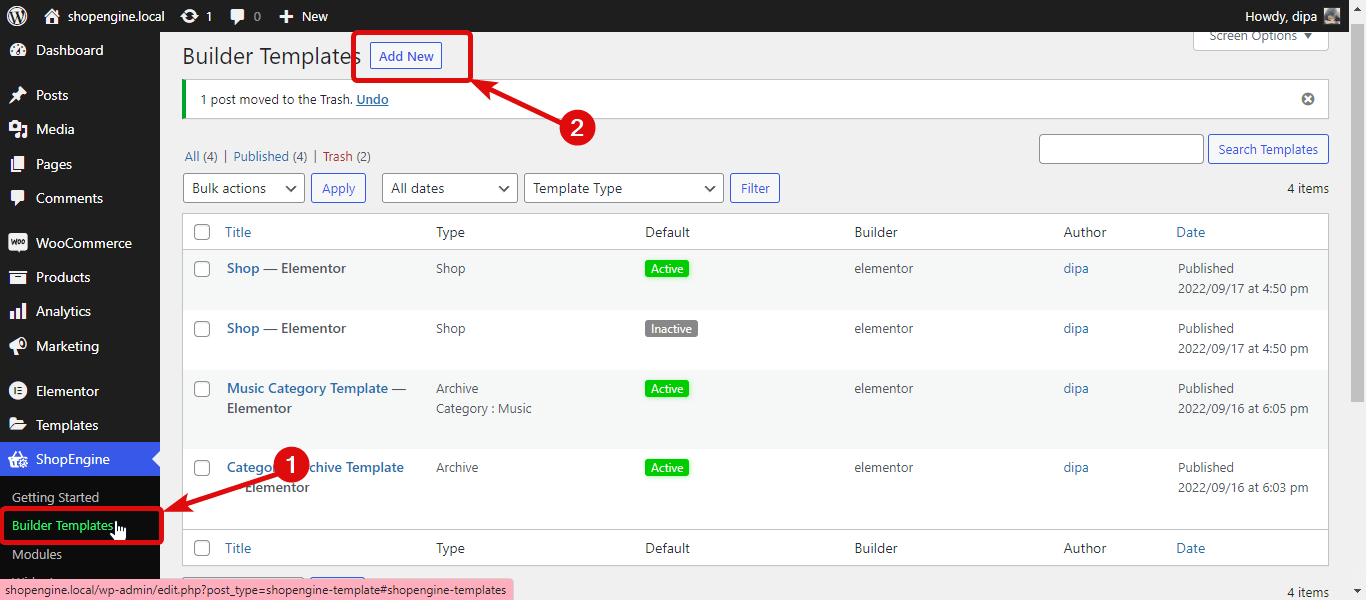
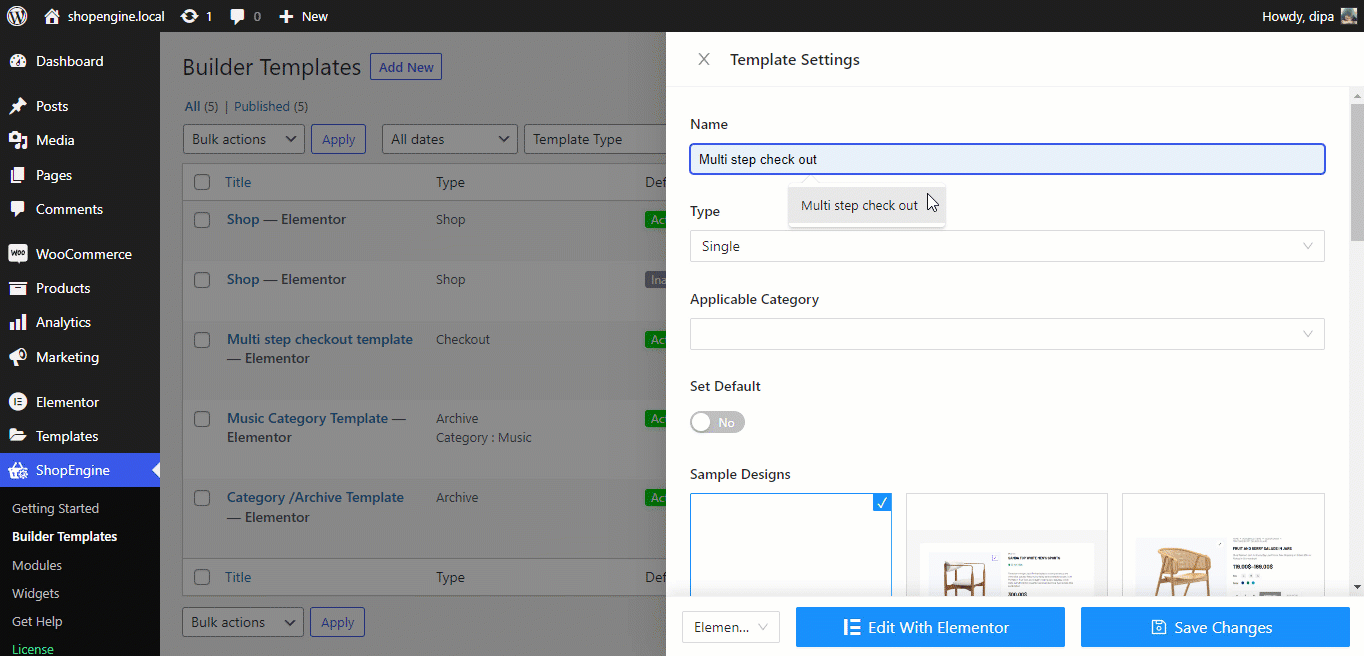
Step 3: Create Multi Step Checkout template
You are set to build your WooCommerce multi-step checkout page. To create the template
- Go to ShopEngine ⇒ Builders Template
- Click on Add New
Once the new window opens, provide the following options:
- Name: Provide a suitable name
- Type: Choose Checkout from the dropdown
- Set Default: Must turn this option to override any existing checkout page
- Sample Designs: Choose the multi-step pre-built template from the list
Now click on Edit with Elementor option to customize the checkout page.
👉👉 You can also read How to Customize WooCommerce Cart Page
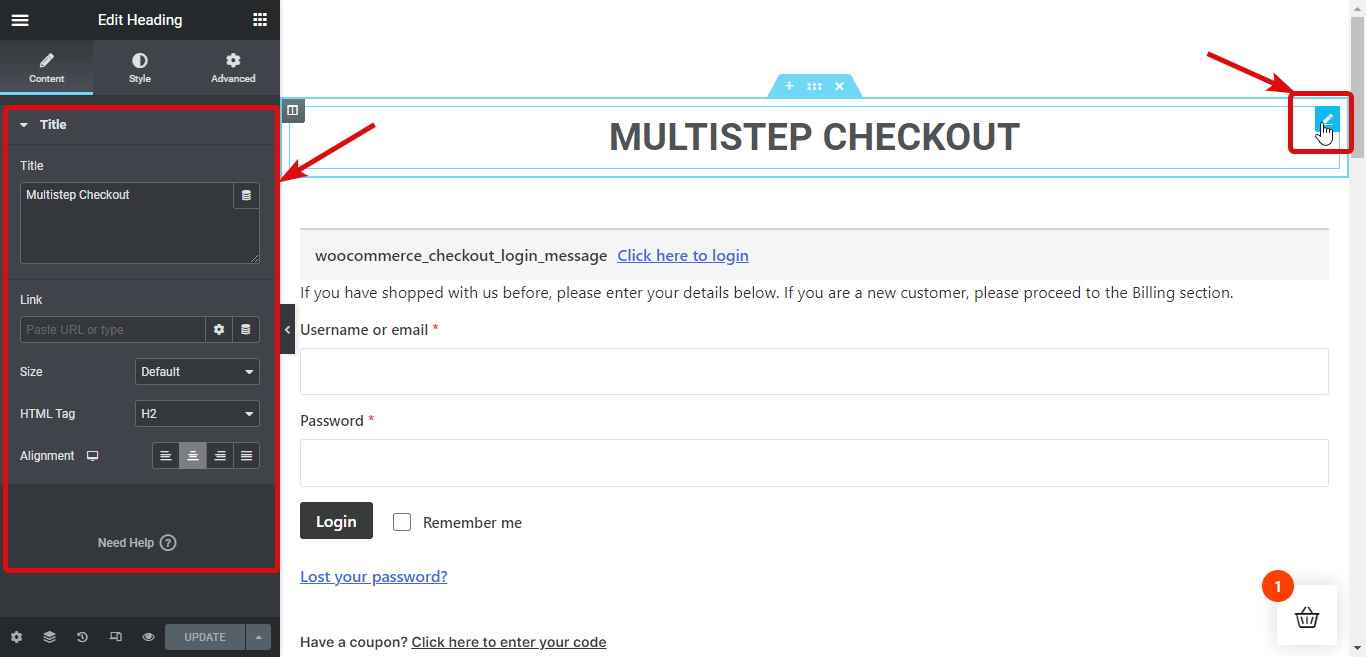
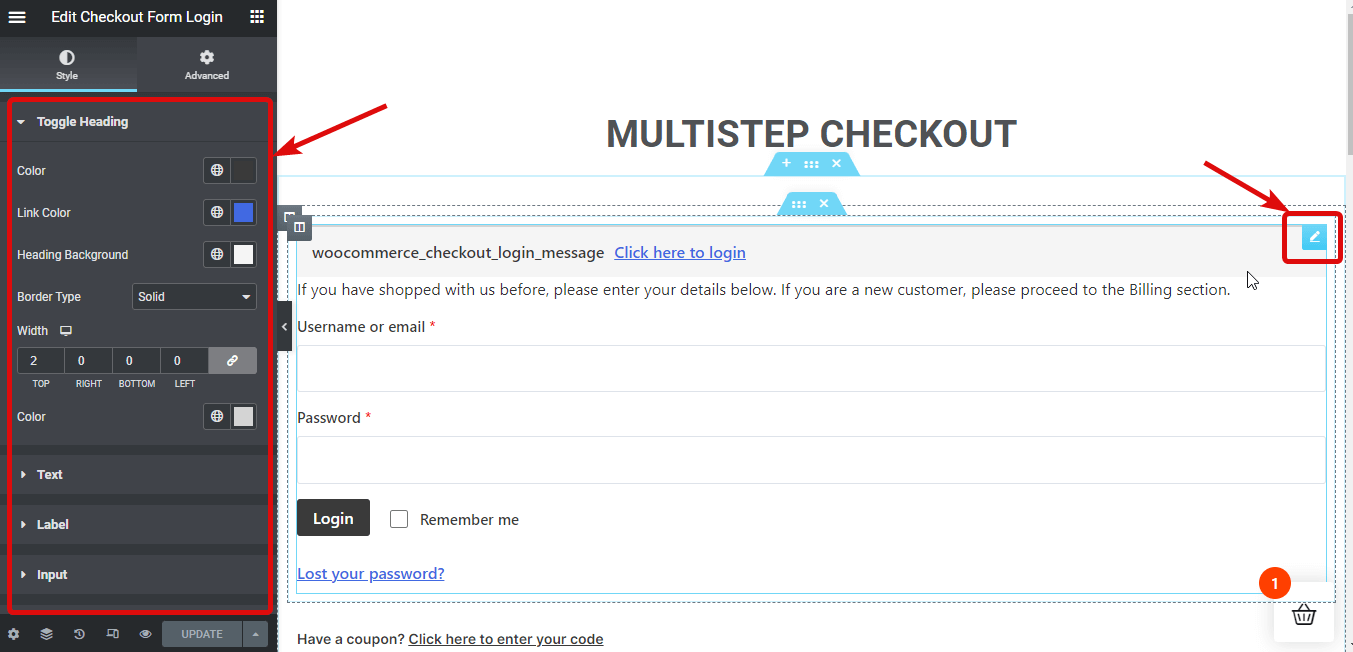
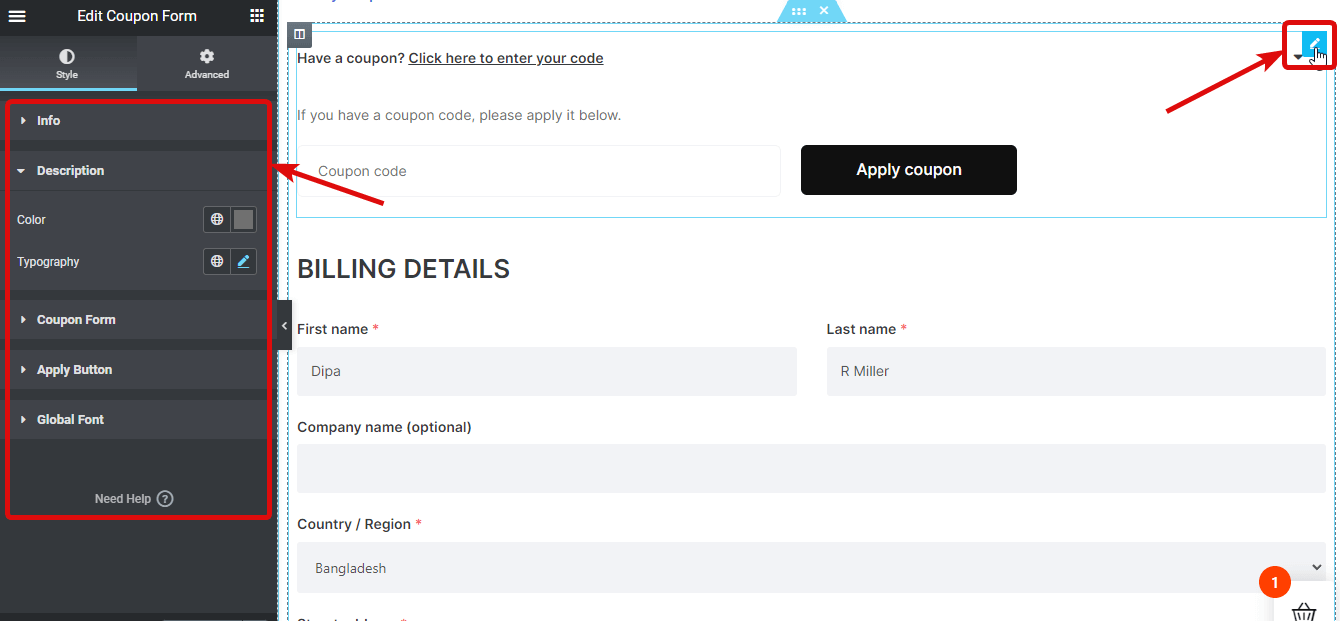
Step 4: Customize different settings of the checkout page
You can customize different settings of different widgets to personalize them according to your needs. To customize the setting of any widget click on the Edit icon on the right-top corner of any widget.
✅ Heading: This widget as the name suggests displays the title of the template. You can customize the Title, Link, Size, HTML tag, and alignment option.
✅ Checkout Form Login: This widget contains a login form which you need to expand by clicking on the “Click here to login” option. You can customize different options of Toggle Heading, Text, Label, Input, Button, and Typography.
✅ Coupon Form: This has a form option to apply a coupon which you need to expand by clicking on the “Click here to enter your code” option. You can customize various options Info, Description, Coupon Form, Apply Button, and Global Font.
✅ Checkout Form Billing: It has a form where customers can provide all the billing-related information. You can customize different styles of Form Titles, Field Visibility, Form Container, Label, Input, and Global Font.

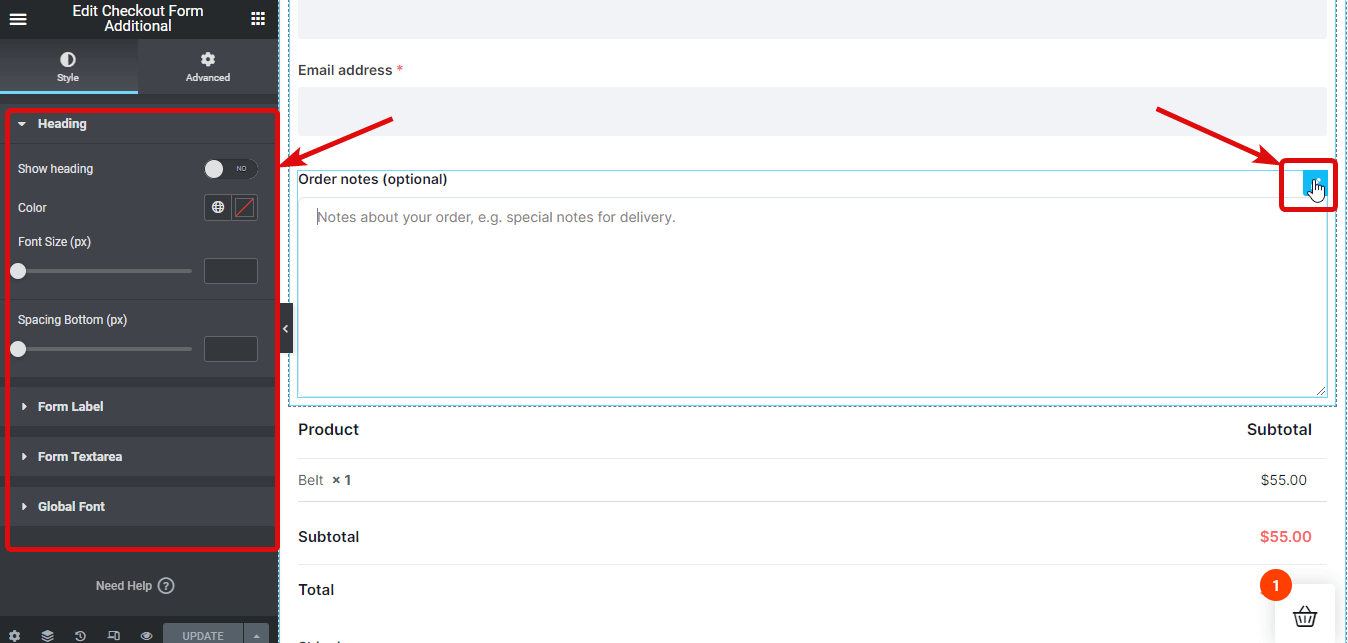
✅ Checkout Form Additional: Here customers can add additional comments regarding the order they are placing. You can make changes to Heading, Form Label, Form Textarea, and Global Font settings to customize the look of the widget.
👉👉 You can also read How to add advanced WooCommerce custom checkout field
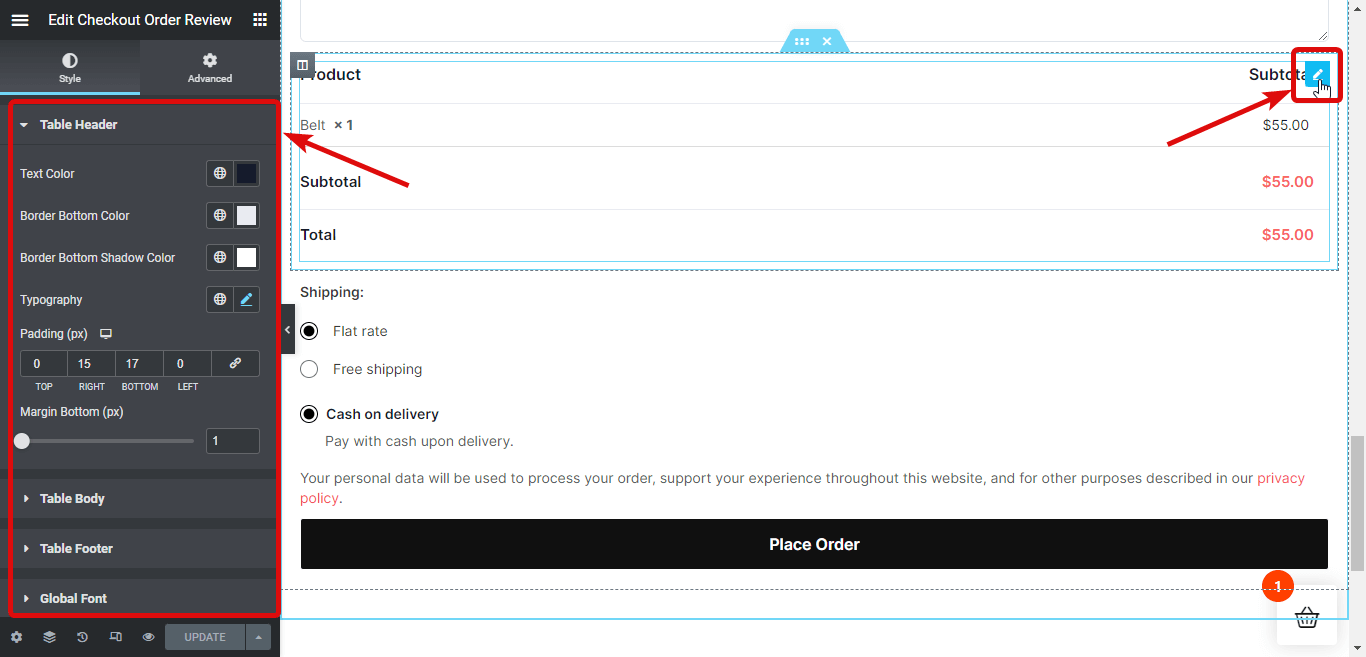
✅ Checkout Order Review: This widget shows all the products of the order with individual prices and total prices. You can alter different style options under Table Header, Table Body, Table Footer, and Global Font.
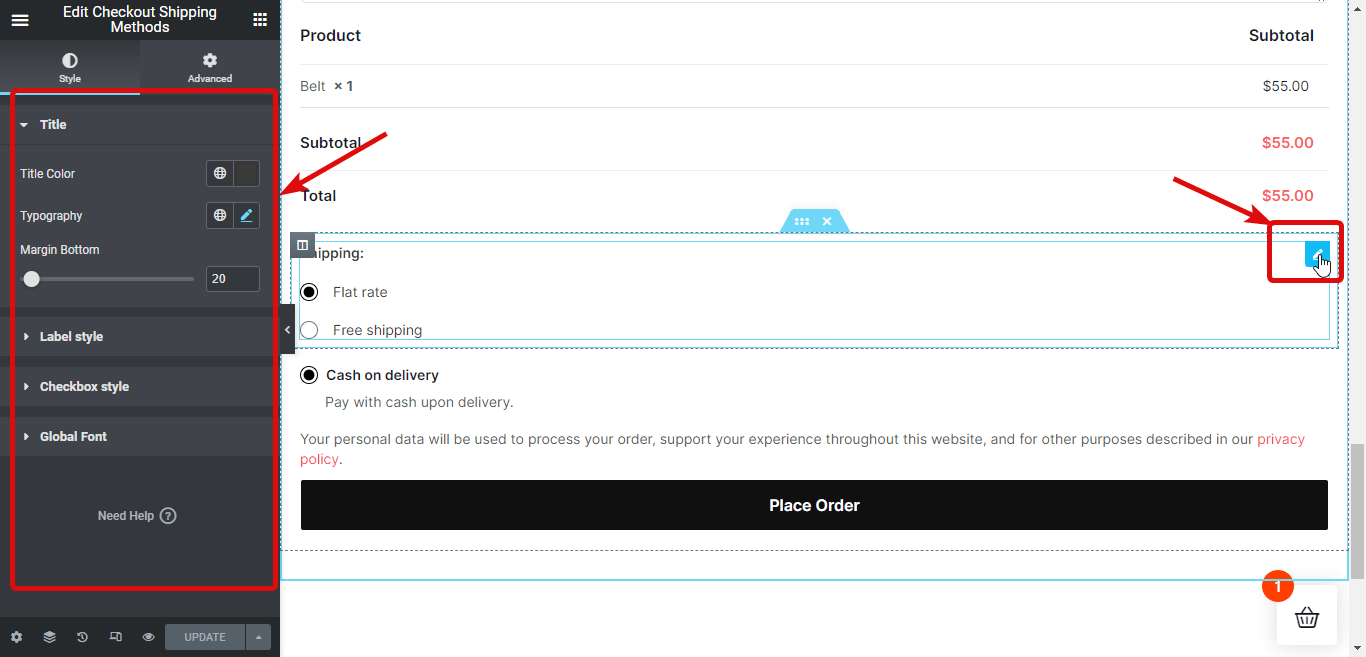
✅ Checkout Shipping Methods: Here customers can choose their preferred shipping method based on the available ones. You can customize many options of Title, Label style, Checkbox style, and Global Font.
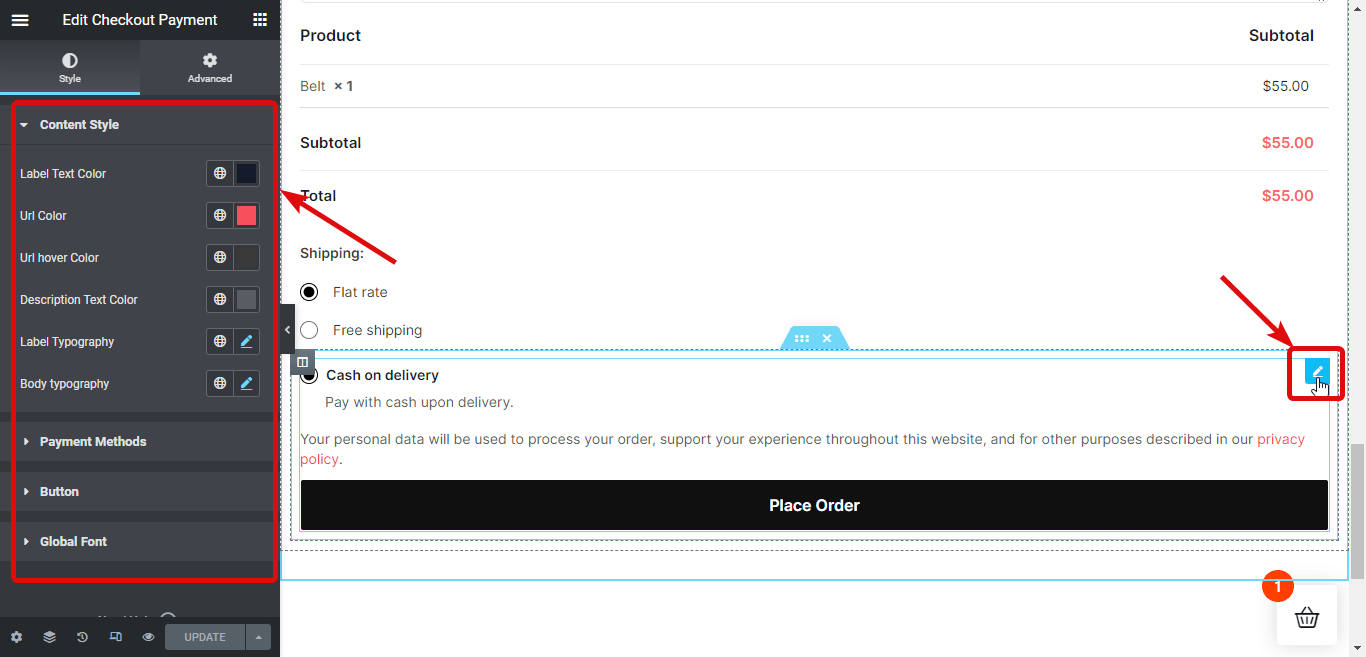
✅ Checkout Payment: This widget showcases all the available payment options along with a button to place an order. The options you get to customize include Content Style, Payment Methods, Buttons, and Global Font.
Step 5: Publish and preview WooCommerce multi-step checkout
Once you are done making changes to all the checkout widgets, click on Update to save your WooCommerce multi-step checkout template. Here is a preview :
Why choose ShopEngine as your WooCommerce multi step checkout plugin?
Two main reasons why you should choose ShopEngine as your WooCommerce multi-step checkout plugin are :
☑️ It’s the best plugin you will find to add multi-step checkout to your site.
☑️ ShopEngine is not just a multistep checkout plugin but rather an all-in-one solution for your WooCommerce site.
Yes! ShopEngine is the only plugin you will need to customize all the pages of your WooCommerce sites such as the shop page, cart page, my account page, category page, etc.
Not just template customization, with this single plugin, you can also add currency switcher, preorder, partial payment, backorder, wishlist, variation swatches, sales notification, quick checkout, product comparison, and many more modules
You will be surprised to know that ShopEngine offers 20+ modules and 70+ widgets in just one single plugin.
Now, you must be thinking if it offers so much, then it must slow down your site.
Well, you have nothing to worry about because it’s extremely lightweight! In fact, it’s lighter than many popular WooCommerce template builders available.
Frequently asked questions
How do I create a multi step checkout page in WordPress?
If you have a WooCommerce-based WordPress site, you can easily create a multi step checkout page in WooCommerce using ShopEngine in just 5 steps. You can see the whole process in the blog.
Can you create a multi-step checkout page in WooCommerce using ShopEngine for free?
You will need both ShopEngine free and pro versions to add multi step checkout to your WooCommerce site. However, ShopEngine pro is highly affordable.
Final Words
I hope you were able to add a multi-step checkout page to your WooCommerce site with ease because it was the goal of this step-by-step WooCommercecheckout tutorial. Proving an efficient checkout process is something you must focus on in order to thrive in this competitive world of online business. A WooCommerce multistep checkout is a good way to do the mentioned.
If you use ShopEngine to add multistep checkout to your WooCommerce site, then you won’t have to worry about spending a huge amount of money on multiple plugins. Besides, the team offers 24×7 support which comes in handy in the long run.
So, do try this impeccable WordPress plugin.
Leave a Reply