Are you worried about how to set up WooCommerce plugin on the WordPress website to set up an eCommerce store?
And are you looking for an easy-to-follow tutorial for installing the WooCommerce for WordPress plugin?
If so, then you are just at the right place, because it is going to be a barebones WooCommerce installation process.
Firstly, I would like to inform you that, it is an excellent decision to pick WooCommerce plugin for your WordPress website. Do you know that the WooCommerce store is one of the most successful and best platforms for an online store?
It is also quite helpful in creating, customizing, and setting up WooCommerce automatically generates it.
Here in this WooCommerce for WordPress tutorial, we will guide you on how to set up a WooCommerce online store on a WordPress site:
Let’s begin to set up WooCommerce! 😄
Quick Overview
The WooCommerce store setup process majorly includes two key phases.
Pre-Setup:
✅ Get domain & hosting
✅ Install WooCommerce plugin
Store Configuration:
✅ Add your store’s basic details
✅ Select up payment gateways
✅ Set up shipping methods.
✅Add products to WooCommerce.
Afterwards, choose WooCommerce templates and themes and start customizing your store.
What is set up WooCommerce Store?
WooCommerce is software for a WordPress site that helps sell goods and services online. Setting up WooCommerce for a WordPress store has become one of the world’s most popular plugins for online store developers. It is also used by millions of small and large companies in WordPress.
In other words, WooCommerce is a WordPress plugin that is regarded as the market’s most common online shop creator. Anyone can create an eCommerce by using WooCommerce, with any WordPress theme.
🔔 Quick info
If you’re looking to start your successful online store, WooCommerce for WordPress shop is a fantastic platform to use. Check out our latest blog on 👉 10 Tips for Running a Successful WooCommerce Shop in 2025
Step: 1. Get an Official Domain for Your WordPress WooCommerce Site
To start a website, an official domain is what you need first. Which you must buy, and several online hosting providers are available online, or you can even use an existing domain ID (if you have any).
Spending time on the right domain name for your company is very important. Please keep on searching unless and until you get the correct domain name for your online store.
After that, you will be asked to provide information about your account and finalize the specifications of the hosting plan you wanted to get for your domain.
After providing all the info and payment, your domain provider will give you the login information to your web hosting dashboard through email. The dashboard where your respective website will be handled.
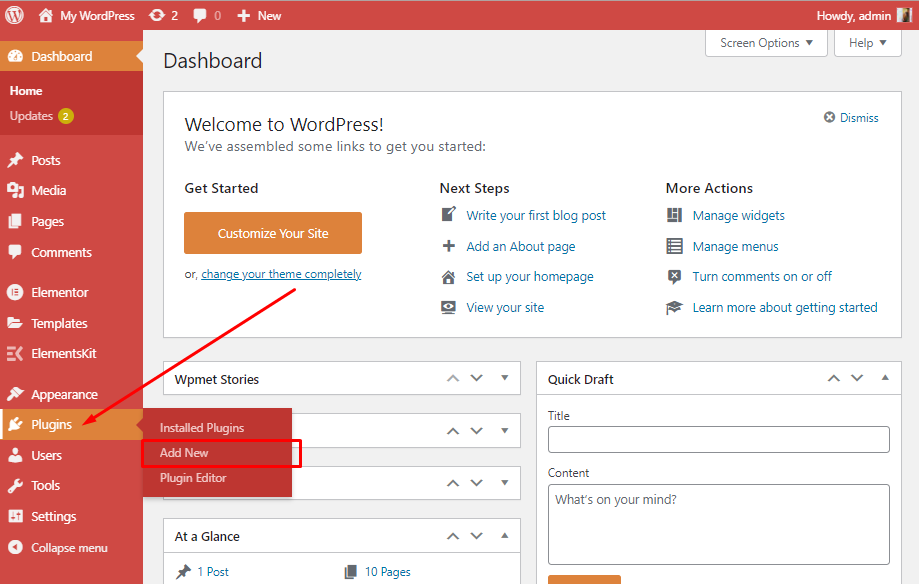
Step: 2. How to Add WooCommerce Plugin to WordPress
The second step is to set up WooCommerce for WordPress website. You may get it from the WordPress plugin library for free and then install it on your site. You may even install it directly from your WordPress dashboard.
Now to install WooCommerce from your dashboard you just need to click on the Plugins > Add New.
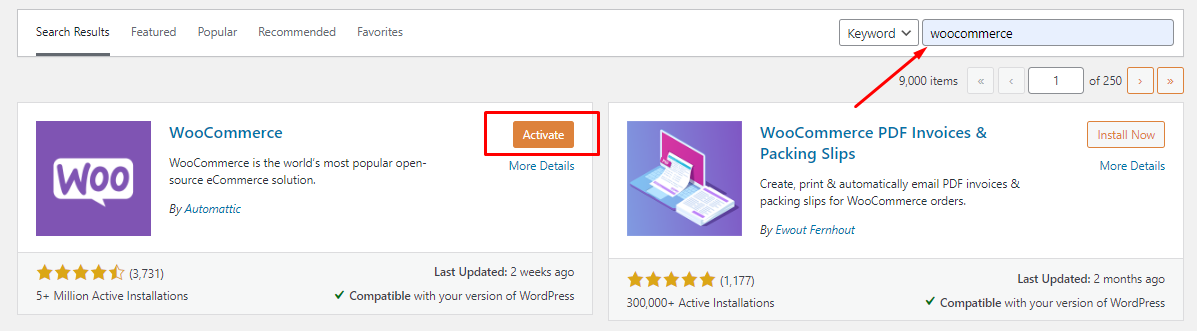
Now at the right above corner, you’ll see ‘Search Plugins’, then on the search bar type WooCommerce, and after that click Install Now. The plugin authority should be listed by Automattic:

After installing the plugin click on Activate button.
Finally, you have your WooCommerce extension added. Now it’s time to add the pieces.
🤔 Is it possible to use WooCommerce for WordPress free?
WooCommerce is an open-source e-commerce plugin for WordPress that is free to download and use. However, running an online store, isn’t free, as there will be costs for hosting and domain registration. Along with adaptations, design, branding, marketing, and advertising.
Step: 3. Access the WooCommerce Store Setup Wizard
Let WooCommerce be your ultimate setup wizard. Just right after activating WooCommerce for the first time, you will surely be prompt to use the setup wizard.
Some important settings include how you will get paid, shipping orders, recommendations, and more through the procedure. If you don’t prefer to use those setups, just click on Not Right Now at the bottom of the page.
Now let’s dive in! 🏊🏼♀️
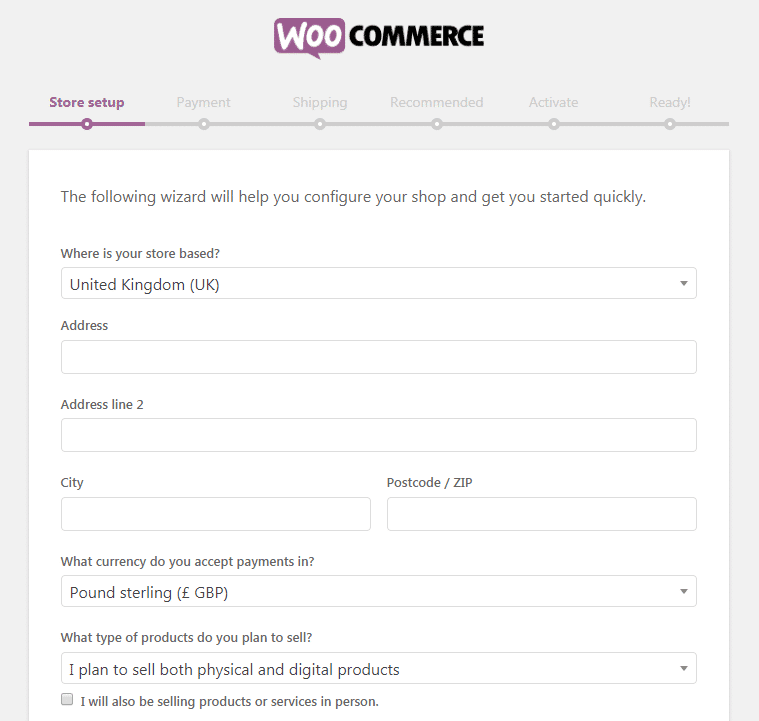
The first section in this WooCommerce setup wizard is – Store Setup. The following wizard will help you to configure where your store is placed, what currency you prefer, and what type of product you prefer to sell. It can be either physical, digital, or both.
Keep in mind that whatever you select here (or anywhere else in the setup wizard) can be updated later if necessary in your WooCommerce settings. For the time being, select Let’s Go.
Step: 4. Choosing Payment Gateway for WooCommerce Store Setup
On the next page, you can choose which types of payments your online store will accept. You can utilize Stripe and/or PayPal by default, as well as offline payments like checks and cash:
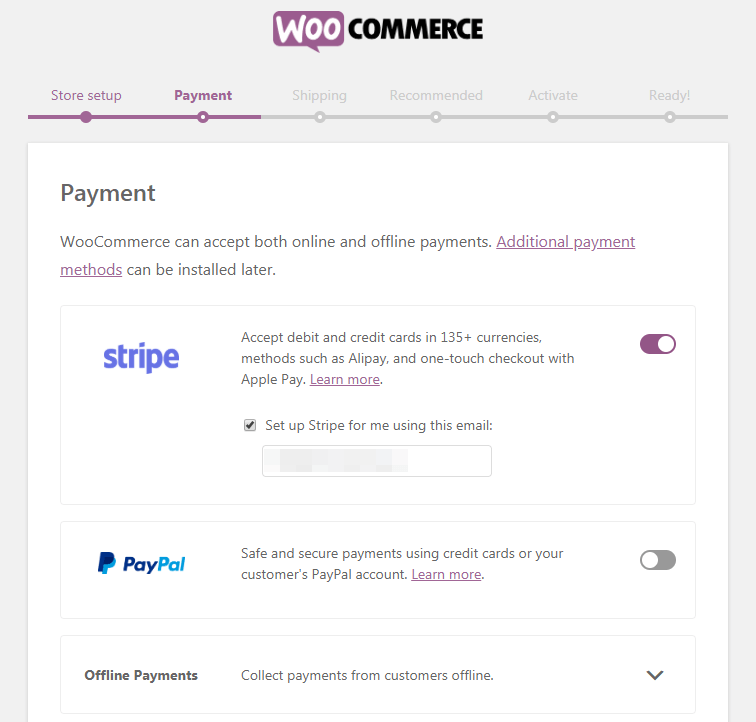
It will also ask you to add services that are appropriate to your country, as well as choose a payment processor. Simply choose the setup payments option you want to utilize, and WooCommerce will configure them for you.
- Stripe: You can even create an account right from this section. All you need to do is click on the check box and add your email address, WooCommerce will set up a stripe in the background.
- PayPal: You just need to enable PayPal standard and it will ask for your PayPal email address. And you’re good to go!
- Offline Payments: WooCommerce also has Offline payment options too in which you will get check payments, bank transfer payments, and cash on delivery.
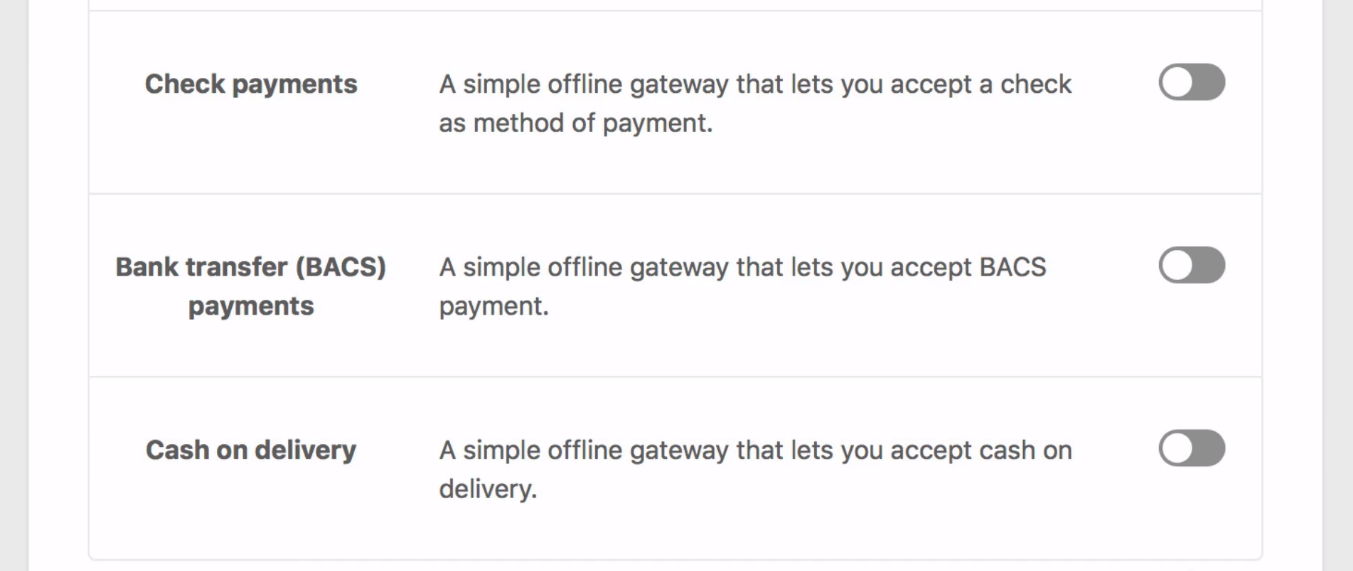
You can go for any of the three options you prefer. This setup is quite smart, isn’t it?
Step: 5. Configure Your Shipping Options for WooCommerce Store
Now the next section you’ll be seeing after configuring your payment gateways is Shipping.
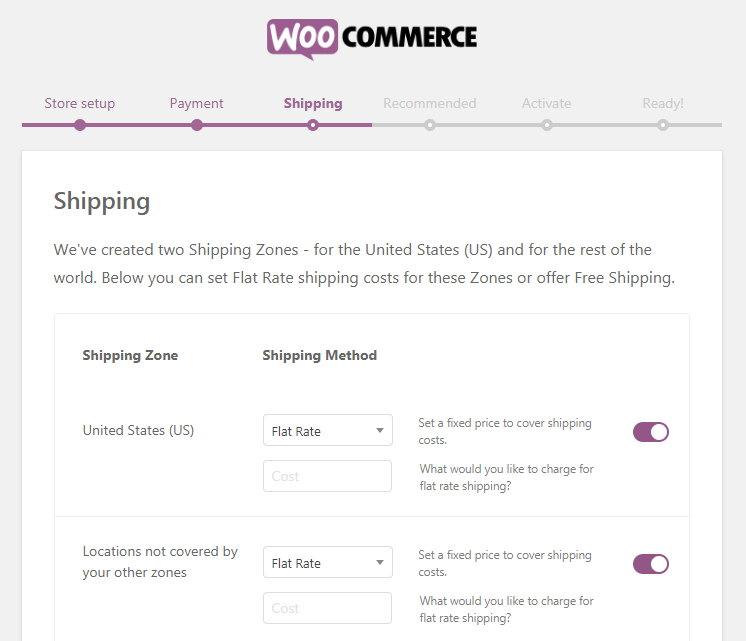
You can set the amount your clients will be charged (or free) for shipping here. After enabling your preferred shipping option, you may now click on Continue.
WooCommerce Shipping is a free service that offers flat-rate shipping, free live rates, and at-home label printing for customers in the United States and Canada.
Step: 6. Install Recommended Add-Ons(Optional)
You’ve set up the foundations for your online store at this point. The WooCommerce store setup wizard presents you with a few optional add-ons on the next section:
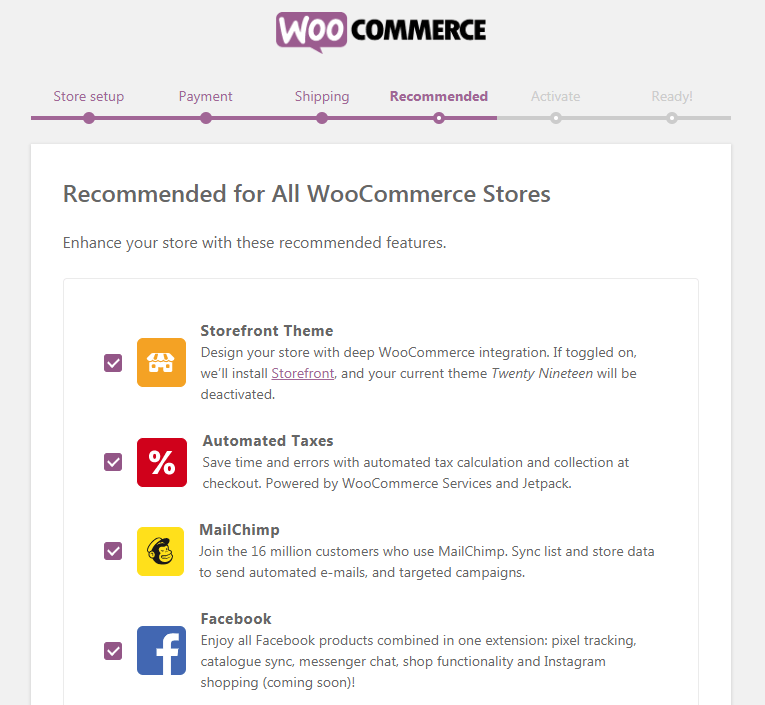
Although none of these tools are essential to managing your online store, they might be very useful. We recommend that you at least take a look at Storefront. This is a WooCommerce-specific WordPress theme that can help you set up your store more quickly and easily.
Step: 7. Complete the WooCommerce Store Setup
Your WooCommerce store is now live and ready to sell. A lot of important links can be found in this last section. You can now import products into your store, go back to your WordPress dashboard, or make changes to the settings you just set up.
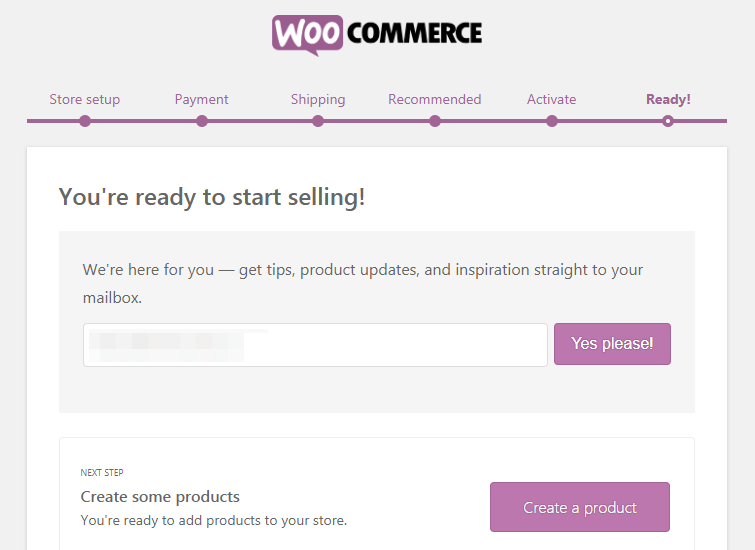
Most likely, however, you’ll want to start adding things right away. Select Create a Product now to continue following our WordPress WooCommerce tutorial.
You’ll be taken to your freshly eCommerce-ready WordPress site once you’ve completed the setup wizard. To review your details, go to the WooCommerce > Settings tab:
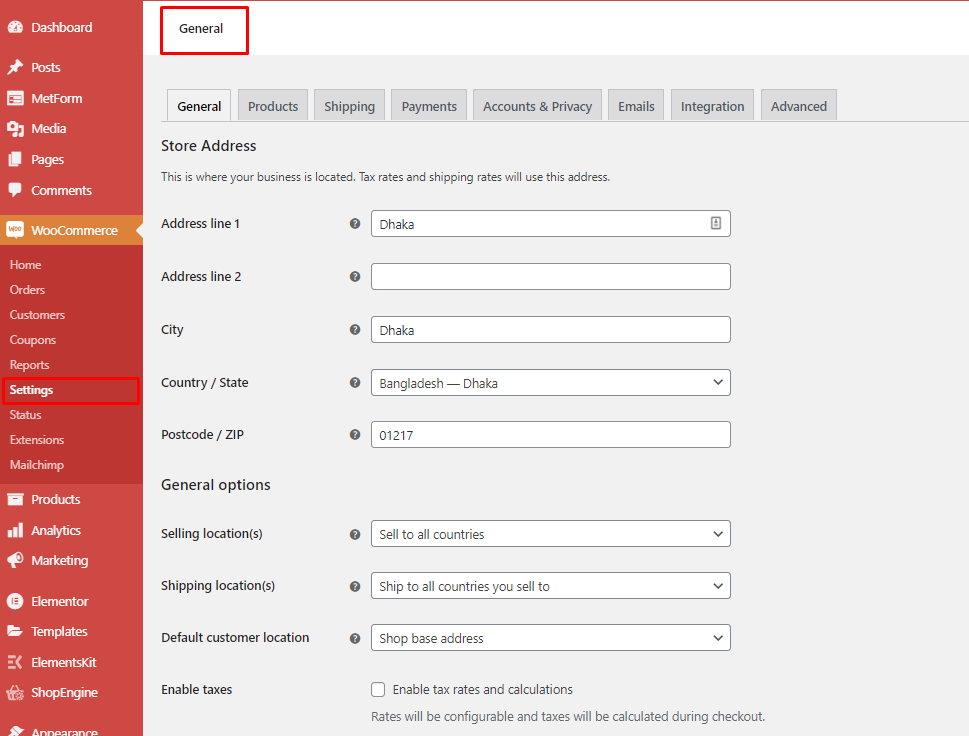
You can review or change any of the following settings from here. Attributes are useful for concisely presenting important qualities, regardless of the type of goods you’re selling.
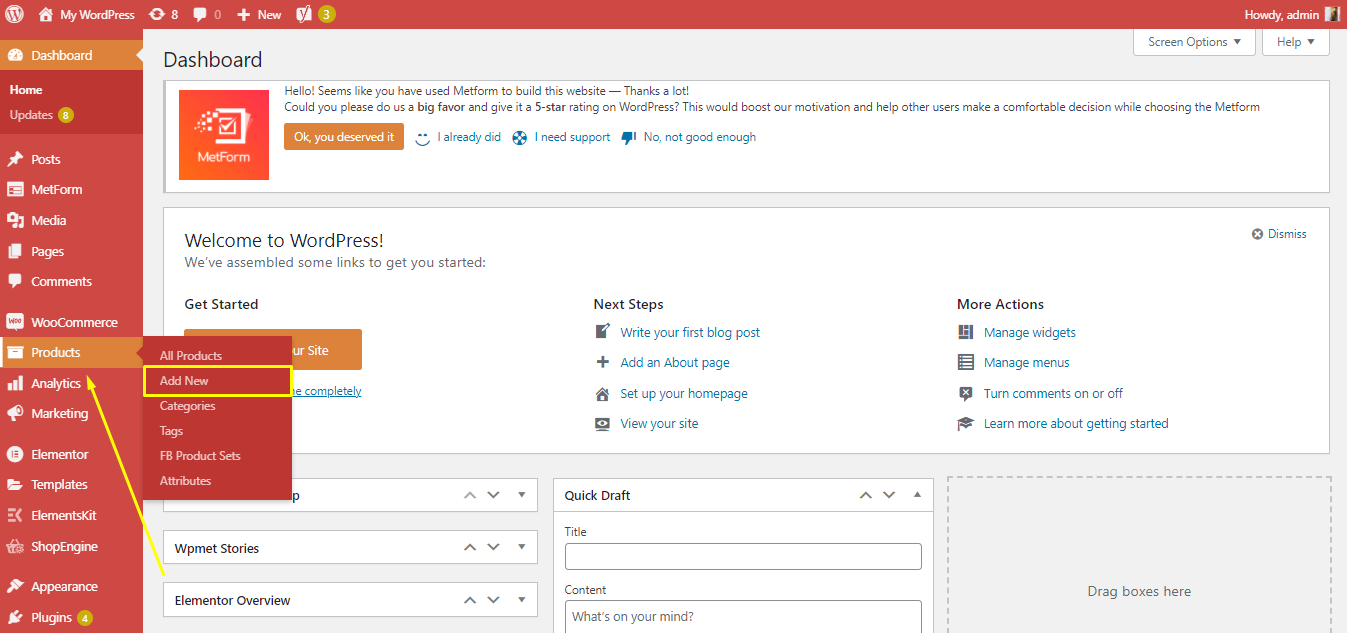
Step: 8. Adding up Products in WooCommerce Store
Now it’s time to set up products. After installing wooCommerce, WooCommerce settings allow you to sell products online through your online store in just a few store setups. To add your products, just simply go to the Products > Add New Tab.
First of all, you need to give your product a title, then add an image of your product and give a comprehensive caption.
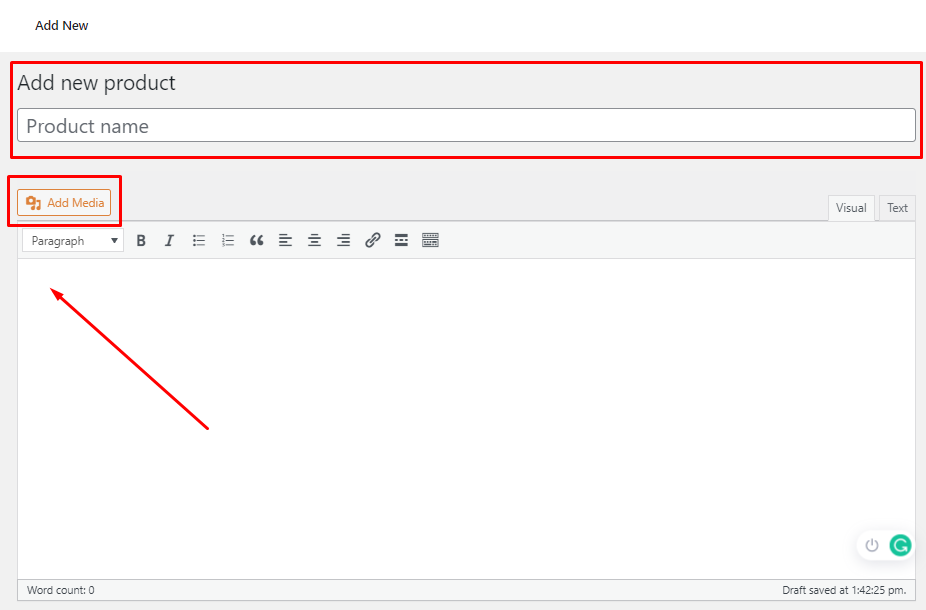
Nothing makes eCommerce stores more appealing and useful than pictures of the product. WooCommerce powered online store adding product images and even product image galleries to go along with each item super simple.
You need to add pictures of the product first. It will be the key element of the product that will be used in the store pages.
You can also add product categories in WooCommerce settings by simply clicking on the right column on the ‘Add new category’ page. For the product you are adding, you may simply create a new category.
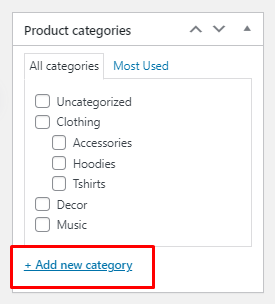
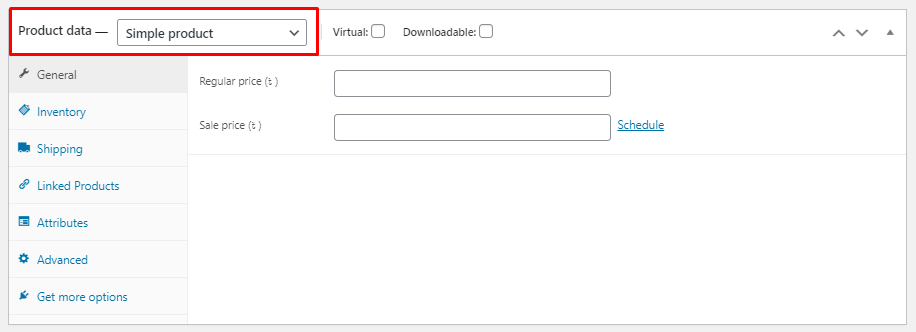
Categorizing your items would allow your consumers and make it much easier to browse products on your WooCommerce website. You need to scroll down to the ‘Product Data’ box a bit, then.
This is where you can pick your product types, add price, set up shipping details, shipping options, and other store key settings.
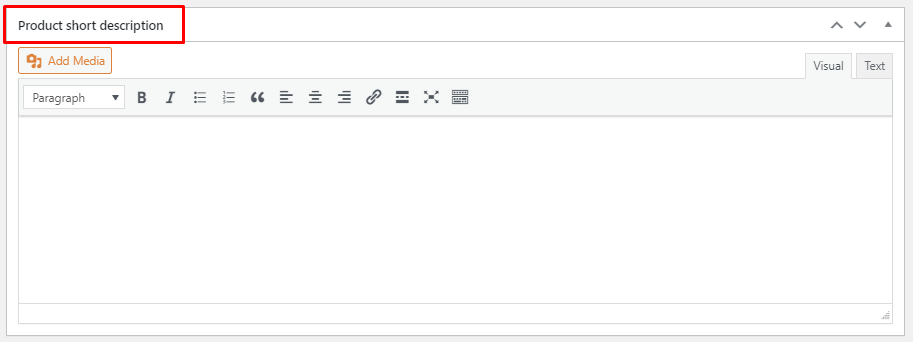
Next, by scrolling down a little, you can see a Product short description box. Essentially, through the WooCommerce folder, this definition can be included on the variable products page on your website.
A very catchy and insightful short summary that will help you get more clicks needs to be added to the description.
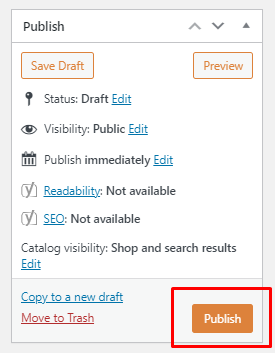
Finally, now check all the WooCommerce product details you have added so far. If it all looks great, you’re ready to make this item live in your shop.
To publish your product, click on the ‘Publish’ button in the top-right column box on the screen.
To add more items to your eCommerce store website, simply repeat the procedure.
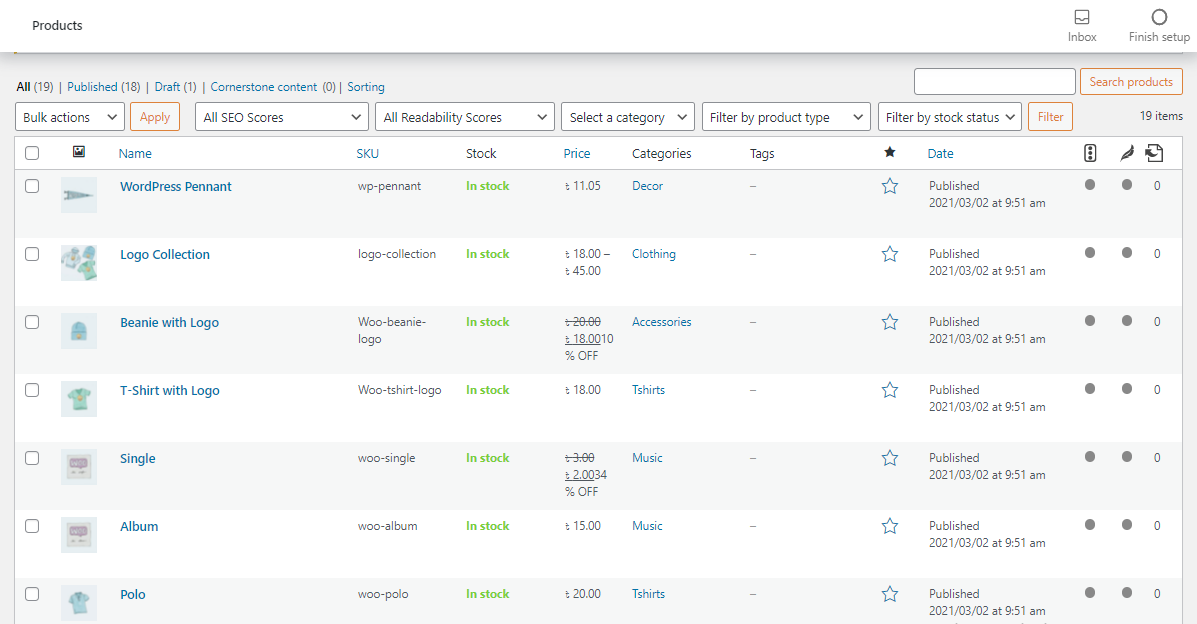
You can also check your saved products in the “All Products” section. And will be able to customize any of the products anytime!
Step: 9. How to choose a WooCommerce template and theme in WordPress
Going for a professional design for your online store has a major influence on how your brand is viewed by consumers. Hundreds of WordPress themes and models for WooCommerce templates are available in online stores.
Although you can use any WordPress WooCommerce extension store free or premium, it depends entirely on your taste.
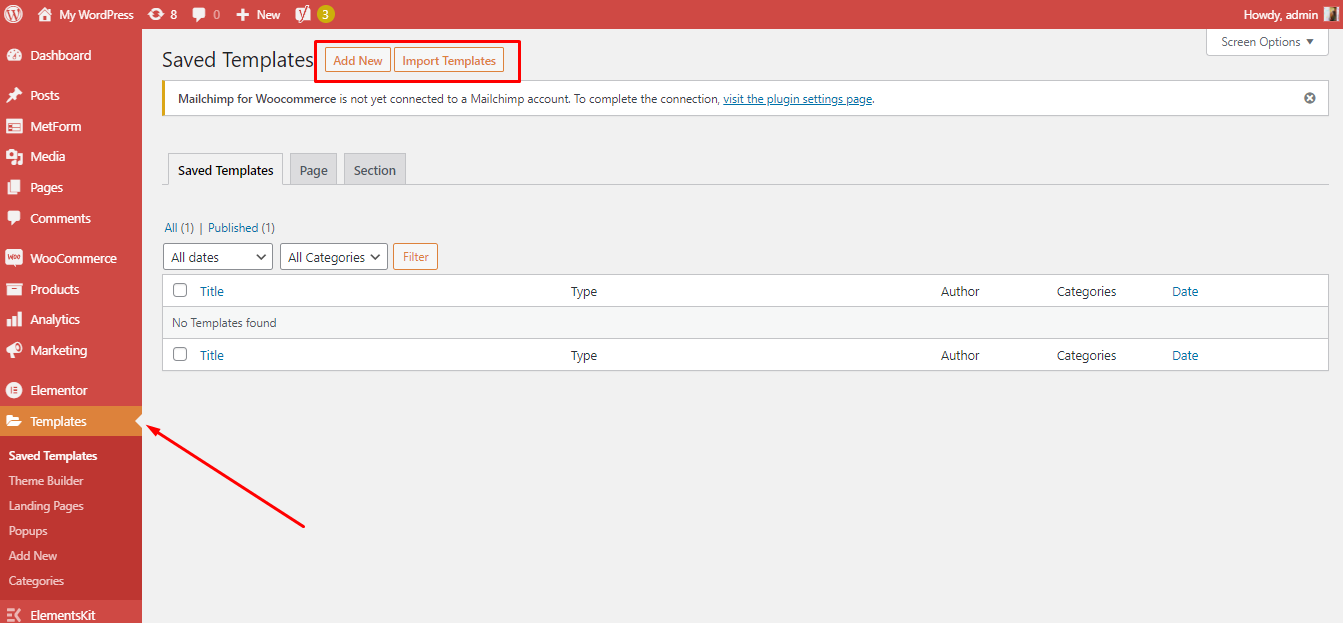
You just need to go back to the WooCommerce dashboard to get one of the WordPress templates, and then you can see the templates in the left corner of your dashboard feature column. Simply click Templates > Add New.
You can also import your desired templates online, too.
Now, if you want to make it more personalized and search for WooCommerce themes that are professionally designed, can you think about how to select the perfect theme for your website?
Here are our top suggestions for WooCommerce themes that every eCommerce store should have:
- ElegantThemes: This is a modern WooCommerce WordPress theme with a modular design. It allows you to simply construct any page layout by dragging and dropping modules.
- Astra: This is a simple and free WordPress theme that comes with complete WooCommerce integration and a variety of customization possibilities. It offers a modern homepage layout with various widget-ready spaces where content widgets may be easily dragged and dropped.
- Neve: This is a classic WooCommerce multipurpose theme. It’s easy to set up an eCommerce site or online store because it’s quick to load, robust, and packed with features.
- Hestia: This is a well-known free WordPress theme for WooCommerce stores and online commerce. Many of the features found in premium WordPress themes are included and a plethora of customization choices.
In case of any confusion at getting the best high resolution, exclusive and handcrafted theme for your eCommerce site your can clearly rely on the list of WooCommerce themes we have mentioned above.
Step: 10. Install WordPress WooCommerce plugins and extensions
WooCommerce’s real catch is that it comes with versatile WooCommerce extensions and add-ons for your online business.
All WooCommerce plugins and extension, store add-ons, and their functionalities are connected. If you install WooCommerce, you would also like to install WordPress WooCoommerce extensions/plugins.
Usually, both WooCommerce, as well as WordPress, have all kinds of plugins available online.
However, ShopEngine is your one-stop WooCommerce Builder for Elementor, in which you will get all types of WooCommerce template-making solutions for the eCommerce business.
In other words, ShopEngine is an ‘all in one’ package that will make your e-commerce store lighter as well as save a lot of your money.
Because it’s an absolutely FREE plugin!
🔔 What’s so special about ShopEngine?
With ShopEngine, you will get 50+ Fully Customizable Widgets, 5+ Useful Modules, 10+ Premium Features, and many more.
ShopEngine will give you a complete package to set up WooCommerce WordPress websites. You can create checkout pages, shop pages, payment gateways, checkout processes, shop pages, admin panels, and whatnot.
WooCommerce also has multiple free and paid extensions, which you will get online and also can be purchased through online payments.
Step: 11. Learn about other WooCommerce resources to flourish your online store
It’s time to start promoting your WooCommerce store and expand your company even faster now that your WooCommerce store has begun. Here are some tips for you:
- Holding an eye on users of WooCommerce.
- It will really help to improve your website traffic if you learn how to use SEO (Search Engine Optimization).
- Start creating a track for the email list and keep producing more leads.
- Try to keep an eye on and fix abandoned cart sales.
⚡ Check this blog to export orders from WooCommerce.
WooCommerce Frequently Asked Questions (FAQ)
WooCommerce is a very effective platform, and many business owners have a lot of questions about it before they get started. Here are a few frequently asked questions:
- What type of products should I sell on WooCommerce?
You can sell any type of product with WooCommerce. WooCommerce offers extensions that let you use it as a booking system, auction site, multi-vendor marketplace, dropshipping, and much more. - Is there an alternative to WoooCommerce available?
WooCommerce is adaptable and simple to use, but it isn’t always the best option. Depending on your requirements, you may discover that other options are more appropriate. - Can I add a blog section to my WooCommerce?
Yes, you certainly can. Your WooCommerce store is built on top of WordPress, the world’s most popular blogging platform. All you have to do now is set up a separate blog section and begin producing articles. - Will I be able to change my WooCommerce store name anytime?
In the WordPress admin area, go to Settings > General and modify the name of your store. Simply adjust the title to anything you’d like your store to be called.
Note: If you wish to modify the domain name of your WooCommerce store, though, you’ll need to follow a slightly different procedure. - How can I get WooCommerce support?
As WooCommerce is a free plugin, only limited help is accessible through the WordPress community forums and the official WooCommerce website.
Last words…
I hope the whole WooCommerce tutorial was helpful enough to guide you on how to set up WooCommerce your own eCommerce websites.
If yes! Then congratulations on your brand new eCommerce store. 👏🏼
And for more helpful WooCommerce tutorials, tips and blogs please join our WPmet community on Facebook/Twitter. Please don’t forget to subscribe to our channel on YouTube for more useful tutorials.
So, what are you waiting for, start creating your eCommerce website now! 😃
Leave a Reply