


Want to smoothen your customers’ shopping experience and increase the conversion rate? You may wonder, but adding a floating cart 🛒 to your WooCommerce website will do these jobs effectively!
A floating cart is a small widget that appears on the screen when a customer adds a product to the cart. It displays a compact but detailed view of the contents of their cart and proceeds to checkout without reloading the whole webpage. 🤩
Now the question is, “How to Add WooCommerce Floating Cart to WordPress?” You can add a floating cart using ShopEngine’s sticky fly cart widget just following 3 simple steps. 🙌
Let’s see how you can add a convenient and visually appealing WooCommerce floating cart using ShopEngine to create a more engaging and user-friendly shopping experience for your customers.
How to Add WooCommerce Floating Cart to WordPress – Step-by-Step Guide
Now, it’s time to depict the steps of adding the WooCommerce floating cart to WordPress. And the easiest way to add a floating cart to your WooCommerce store is by using the sticky fly cart widget of ShopEngine.
ShopEngine is a complete WooCommerce page builder to enhance your online store’s functionality. You can design and build your entire store with all the necessary features and functionalities using templates and modules of ShopEngien.
Among them, the sticky fly cart widget will allow you to add a floating cart to your websites. Plus, it will make the checkout process smoother for your customers.
In addition, it’s super easy to integrate with your WordPress website within 3 steps.
Let’s get started-
Step 1: Install and activate the Necessary plugins
To add the floating cart to your WordPress website, the prerequisites are installing the following 3 plugins.
✅ WooCommerce: Download WooCommerce
✅ ShopEngine (Free): Download ShopEngine
✅ ShopEngine Pro: Get ShopEngine Pro
Login to your WordPress dashboard, then navigate to Plugins -> Add New. After that, search for WooCommerce and activate it. WooCommerce is an open-source eCommerce platform for creating stores in WordPress. It’s free and fully customizable.
Next, search for the ShopEngine plugin and install it. After that, activate the license.
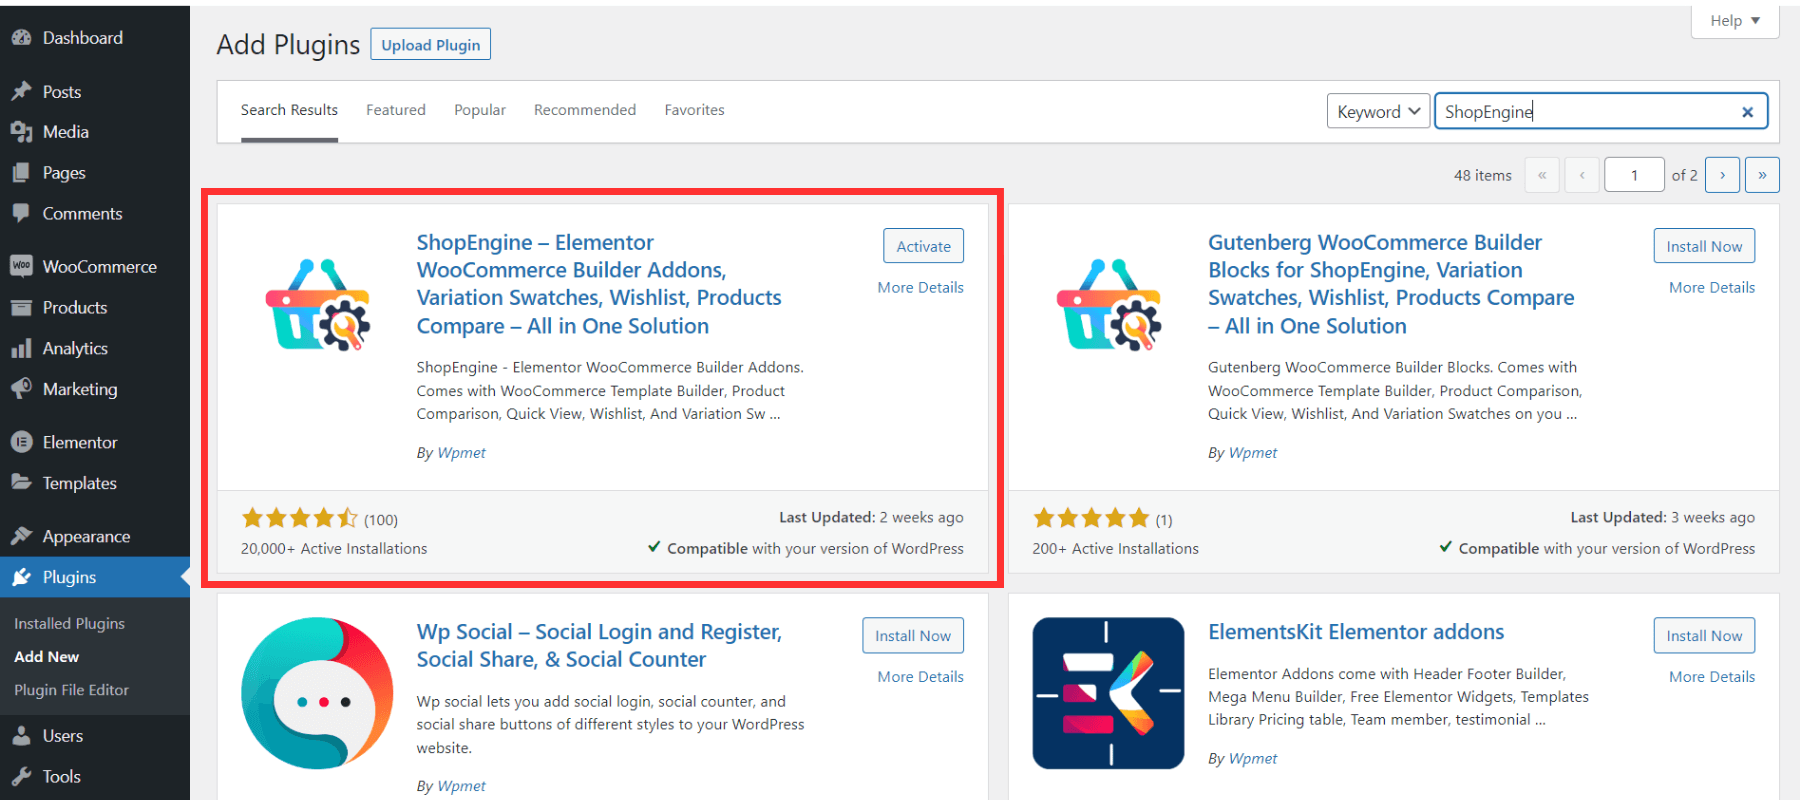
📢📢 See this documentation to install and activate ShopEngine
Once you are done with the activation, you can avail the most exciting features and molecules to design a beautiful and functional WooCommerce website including the floating cart options.
Step 2: Enable the Sticky Fly Cart Widget of ShopEngine
By default, the sticky fly cart widget is turned off. So, now, you have to enable the sticky Fly Cart widget of ShopEngine.
- Hover over the ShopEngine -> Modules.
- You can see the “Sticky Fly Cart” widget
- Click on the gear icon (setting) and a sidebar will pop up
- Turn on the “Enable the Module”
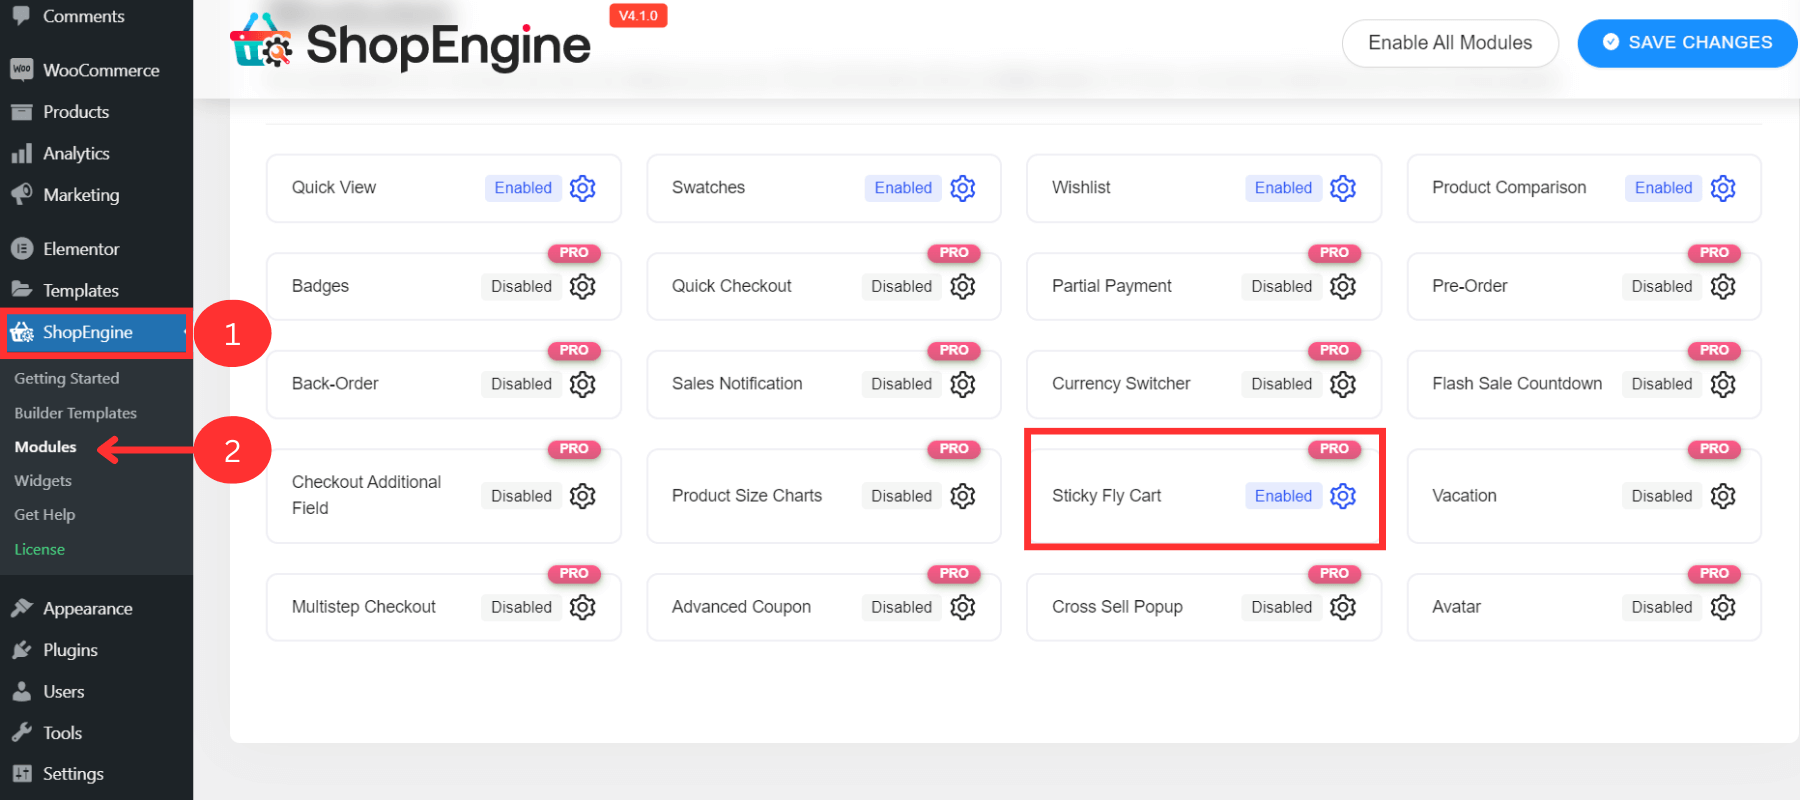
Key Features of Sticky Fly Cart
✅ Display the cart details with every item
✅ Show the subtotal amount
✅ Can add or delete items
✅ Navigate the cart page
✅ Perform check-out operation
Step 3: Customize the Sticky Fly Cart Settings
The best part of this sticky fly cart is its tons of customization options. After enabling the widget, you can change the properties of the woo-commerce floating cart button, position, animation, and cart items or keep the default values.
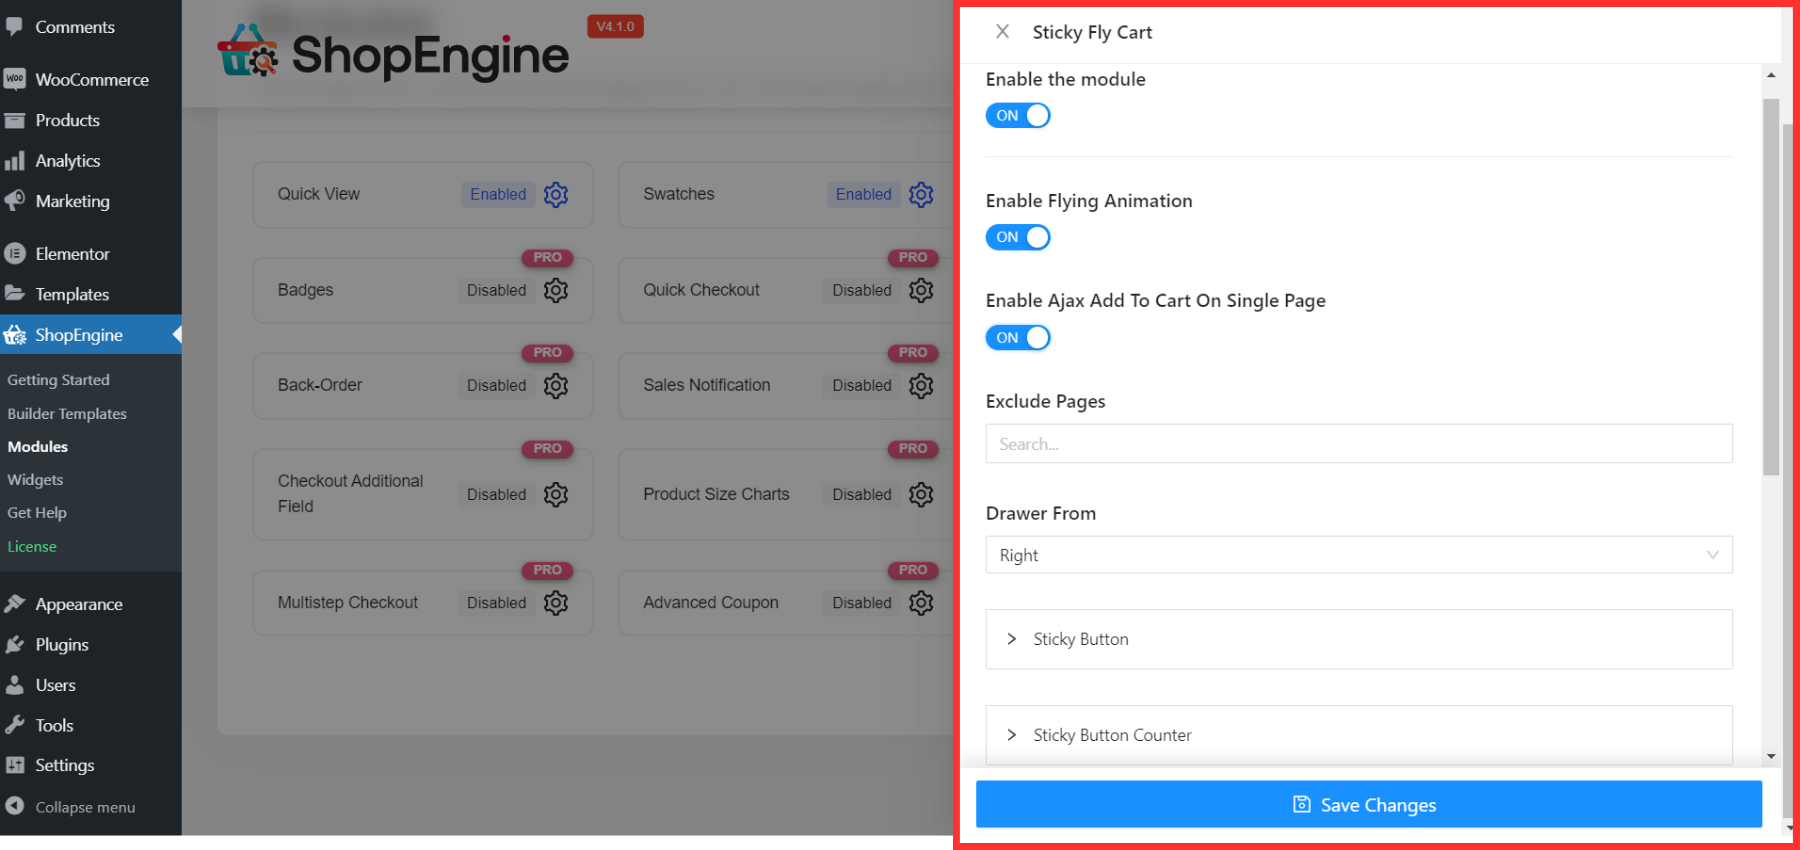
Here are the major customization options:
✨ Enable/disable Flying Animation
Turn on this option to set the animation to this sticky fly cart or disable it if you don’t prefer animation.
✨ Enable/Disable Ajax Add to Cart on Single Page
Enabling this option will allow the customer to add products (single or variable) without reloading the entire site.
See also – How to Add WooCommerce Variable Product to your Website
✨ Exclude Pages
If you want to exclude any page from this feature, you can add the pages in this field.
✨ Drawer From
Set the fly cart position on the left or right side. As a result, the floating cart icon will appear on this side.
✨ Sticky Button and Sticky Button Counter
Next, you can see these 2 options for customizing the properties of the sticky button and the sticky button counter. You can customize the following:
- Button and icon size
- Text and background color
- Top, left, right, and bottom position
✨ Cart Body
- Customize the color and link the hover color
- Change the background color
- Set custom cart body width and padding
✨ Cart Header
- Adjust the padding value
✨ Cart Items
- Modify the padding (left, right, top, bottom) values
- Customize the width, type, and color of the border-bottom
- Set custom font size
✨ Cart Buttons
- Adjust the wrap padding values
- Set button padding
- Customize buttons color, background
- Set custom hover background color
After all the customization, click on Save Changes. All the properties will appear in the new floating cart of your WordPress website.
How to Test the New floating cart in Your WooCommerce Website
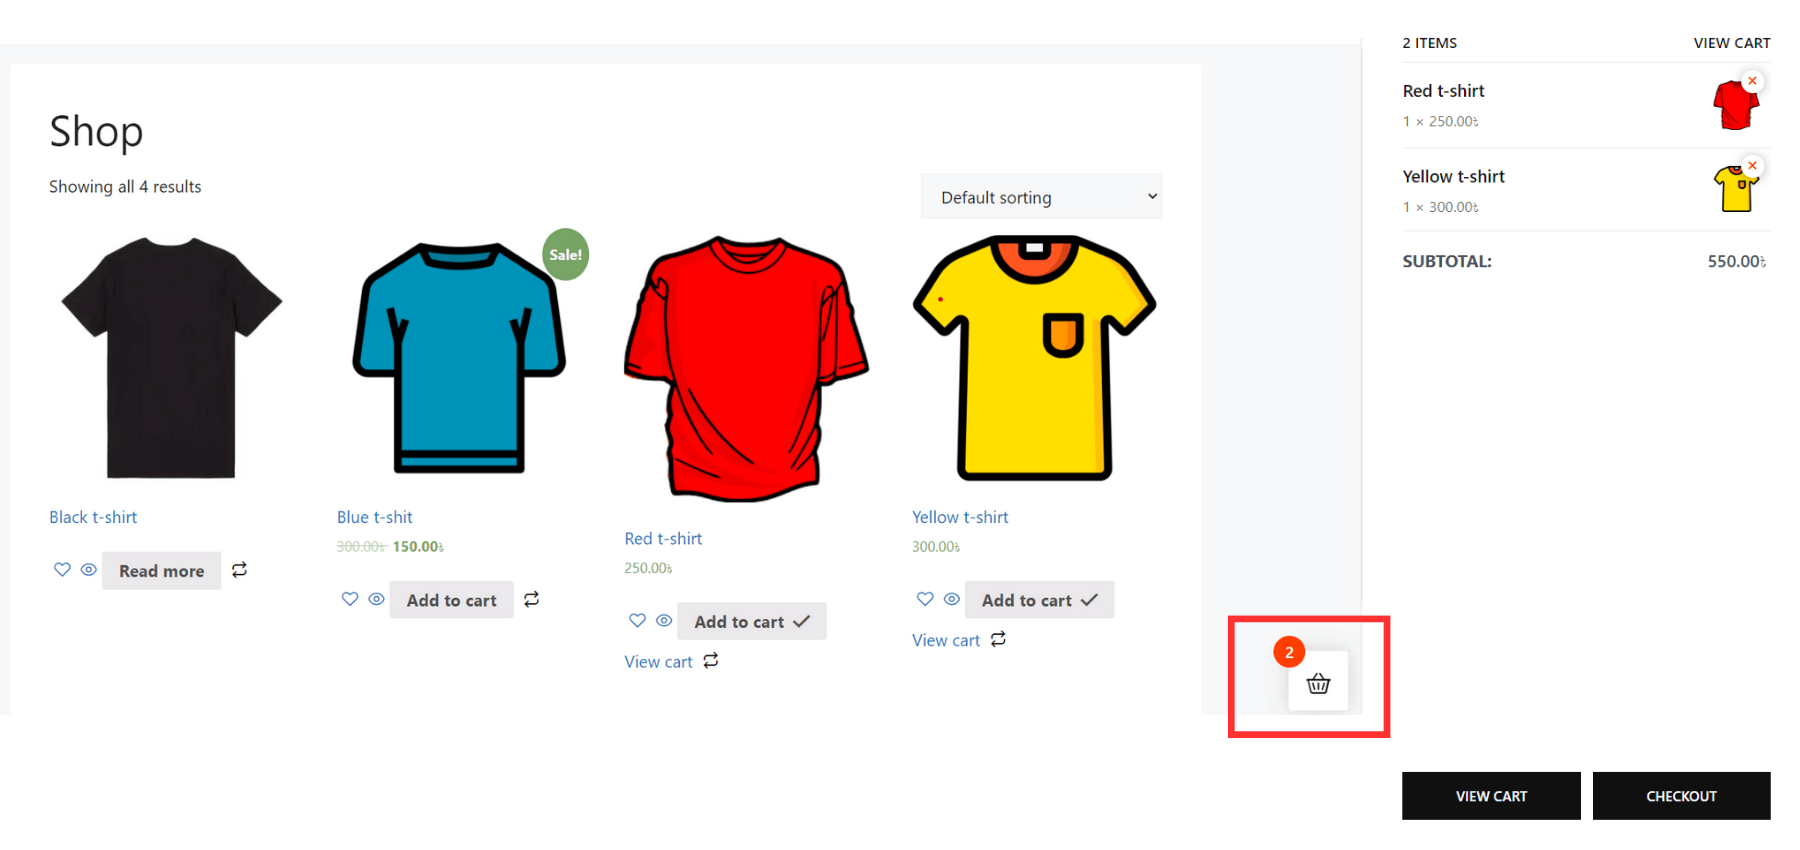
To make sure, you add the sticky fly cart to your website and it works perfectly,
- Go to the shop page of your WooCommerce website
- The floating cart will appear at the selected position
- Select single or multiple products and add them to the cart
- Then, test all the features. Add, delete, navigate the cart page, and check out to make sure all of these features work perfectly.
✨✨Want to add a multi-step checkout system to your WooCommerce store?
👉👉See this blog – How to Add WooCommerce Multi-Step Checkout in 5 Steps
5 Key Benefits of Adding ShopEngine’s Sticky Fly Cart to WordPress
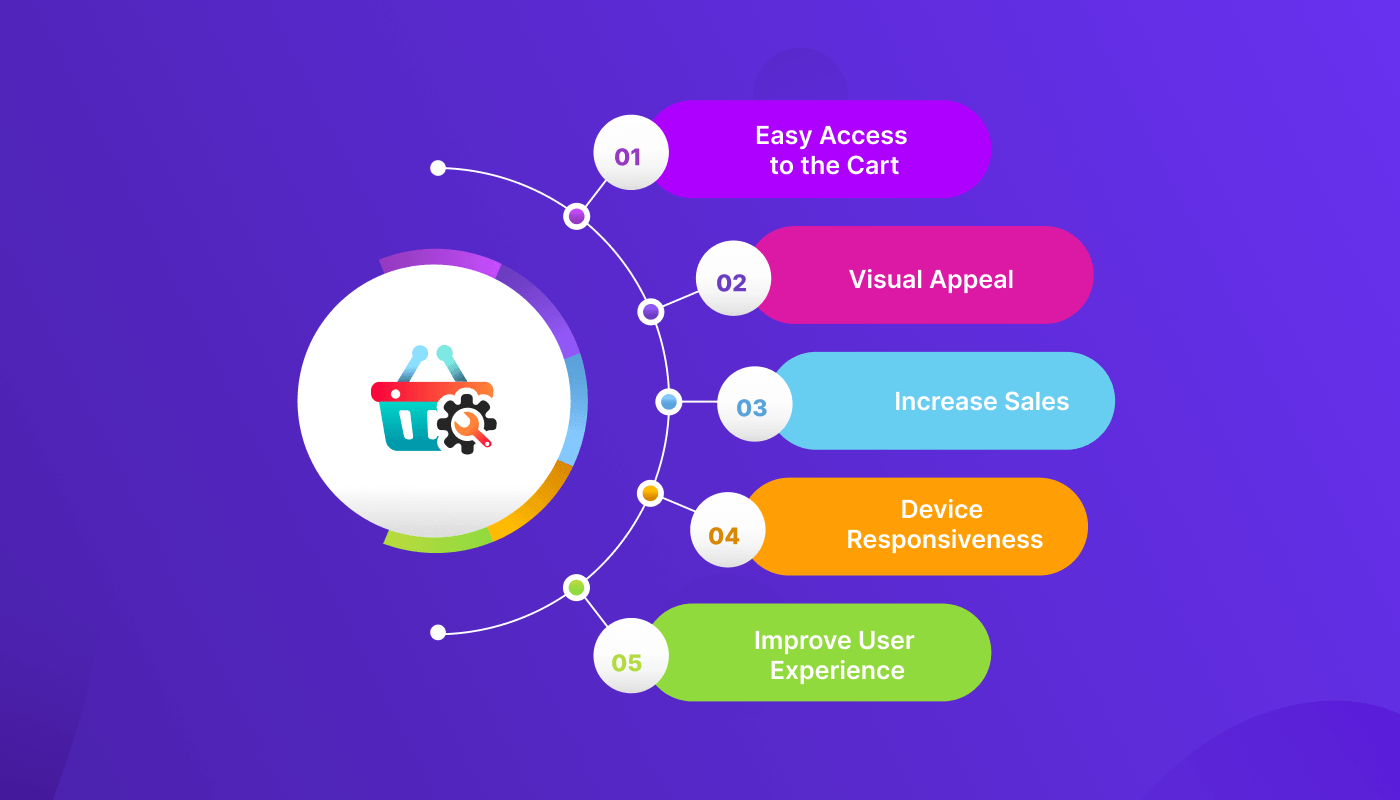
The floating cart feature may look like a small change to your WordPress website. But adding the sticky fly cart widget of ShopEngine to your WooCommerce store will help you in multiple ways.
Here are the 5 significant benefits:
🛒 Easy Access to the Cart
With the sticky fly cart of ShopEngine, customers can easily see all details of their cart content. For convenient and fast access, they can add, remove, or check out products more easily.
Also, they can keep track of the cart page without navigating the whole website. As a result, it will reduce the chance of abandoning their cart due to the complexity of navigating the WooCommerce site.
✔ Visual Appeal
This sticky fly cart adds an elegant as well as professional look to your website. You can also customize each and every element and its features to create the most cohesive look.
For the user-friendly visual appeal, the cart process will be more engaging and attractive to the customers.
💰 Increase Sales
When your customer gets a nice appearance with easy access to the cart content, it will increase the conversion rate and sales.
Also, the sticky fly cart icon of ShopEngine is placed in a prominent location on the webpage. As a result, it reminds your customers of the products they already add and enhances the chance of potential sales.
📲 Device Responsiveness
Next, this sticky fly cart widget is entirely device responsive including the pc, tab, or smartphone. So, your customer will get a seamless shopping experience on whatever device they use.
🤝 Improve User Experience
In terms of easy access, appealing design, device responsiveness, and less loading time, adding this sticky fly cart to your WooCommerce website will improve the overall user experience of your customers.
FAQs
Is It Necessary to Add a Floating Cart to My E-Commerce Website?
Adding a floating cart to your WooCommerce store is necessary to improve user experience and increase conversion rate. Users can track their cart items and take other actions without loading the entire website.
Can I Add WooCommerce Floating Cart to Specific Web Pages?
Yes, you can add a floating cart to specific pages of your website. ShopEngine offers flexible options for customizing the placement of the floating cart on any page. You can also exclude the pages from the “Exclude pages” options.
Is It Free to Use the Sticky Fly Cart Widget of ShopEngine?
ShopEngine offers various free features to design your WooCommerce store, but the sticky fly cart widget is a premium feature of ShopEngine. You can add this widget to make the cart and purchase process smoother. And, we can ensure, you won’t regret spending on this widget for the super easy integration, excellent features, and various customization options.
Bottom Line
Time to wrap up!
See how easy it is to add the floating cart to your WordPress website using ShopEngine’s sticky fly cart widget. Just follow the simple 3 steps and you are ready to go!
It offers a convenient way to view and update your customers’ cart contents. Also, it will help to encourage them to complete their purchase.
So, why are you waiting? Add the ShopEngine’s sticky fly cart to your website and make it more flexible and user-friendly!

Leave a Reply