


Adding a Google Map in your website not only makes it easy for visitors to find your business location but also adds a touch of professionalism and functionality.
But how to add Google Maps in WordPress site? 🤔
Don’t worry! We’ll show the easiest method:
- Using a WordPress plugin (ElementsKit)
You may ask, why ElementsKit?
Well, it offers a Google Map widget that you can insert by just drag-and-drop. Also, you’ll get huge customization options to customize your Google Map so that it looks exactly the way you want it to. So, you don’t need to be a coding whiz to make it happen!
Let’s dive in! 🥳
What is Google Maps?
Google Maps is a web mapping service developed by Google to display accurate locations and directions for any address. 🗺️
Google Maps is a web mapping service developed by Google to display accurate locations and directions for any address. You can see satellite imagery, street maps, and 360° panoramic views of streets. Besides, Google Maps also offers real-time traffic conditions and the best route planning for traveling by foot, car, bicycle, or public transportation. 🛣️🚦
Then how does Google Maps work? Well, Google Maps mainly works using a complete combination of satellite and terrestrial imagery. At the same time, it collects user feedback continuously to proceed with a validation process and stays updated with the constant change in real-time conditions. ⏳
How to Add Google Maps in WordPress Site in 5 Steps
The easiest way to integrate Google Maps in WordPress is by using a WordPress Plugin. Manually integration is also possible, but it’s difficult to get all facilities and customization options without a plugin.
To add Google Maps to your WordPress site, the ElemenetKit WordPress plugin is the best choice. It’s an ultimate all-in-one Elementor add-on for the WordPress website which already reached the 1M+ active installation milestone.
You will get 85+ custom Elementor widgets along with the Google Map. With multiple types of Map styles, you will find numerous customization options that will definitely suit your preferences, website type, as well as the users’ needs.
Let’s explore the simple 5 steps on how to add Google Maps in WordPress site using the ElementsKit plugin! 🙌
✨✨ Requirements
✅ Elementor – Download Elementor
✅ ElementsKit Lite – Download ElementsKit Lite
✅ ElementsKit Pro – Get ElementsKit Pro
✅ Google Map API – Get Google Map API
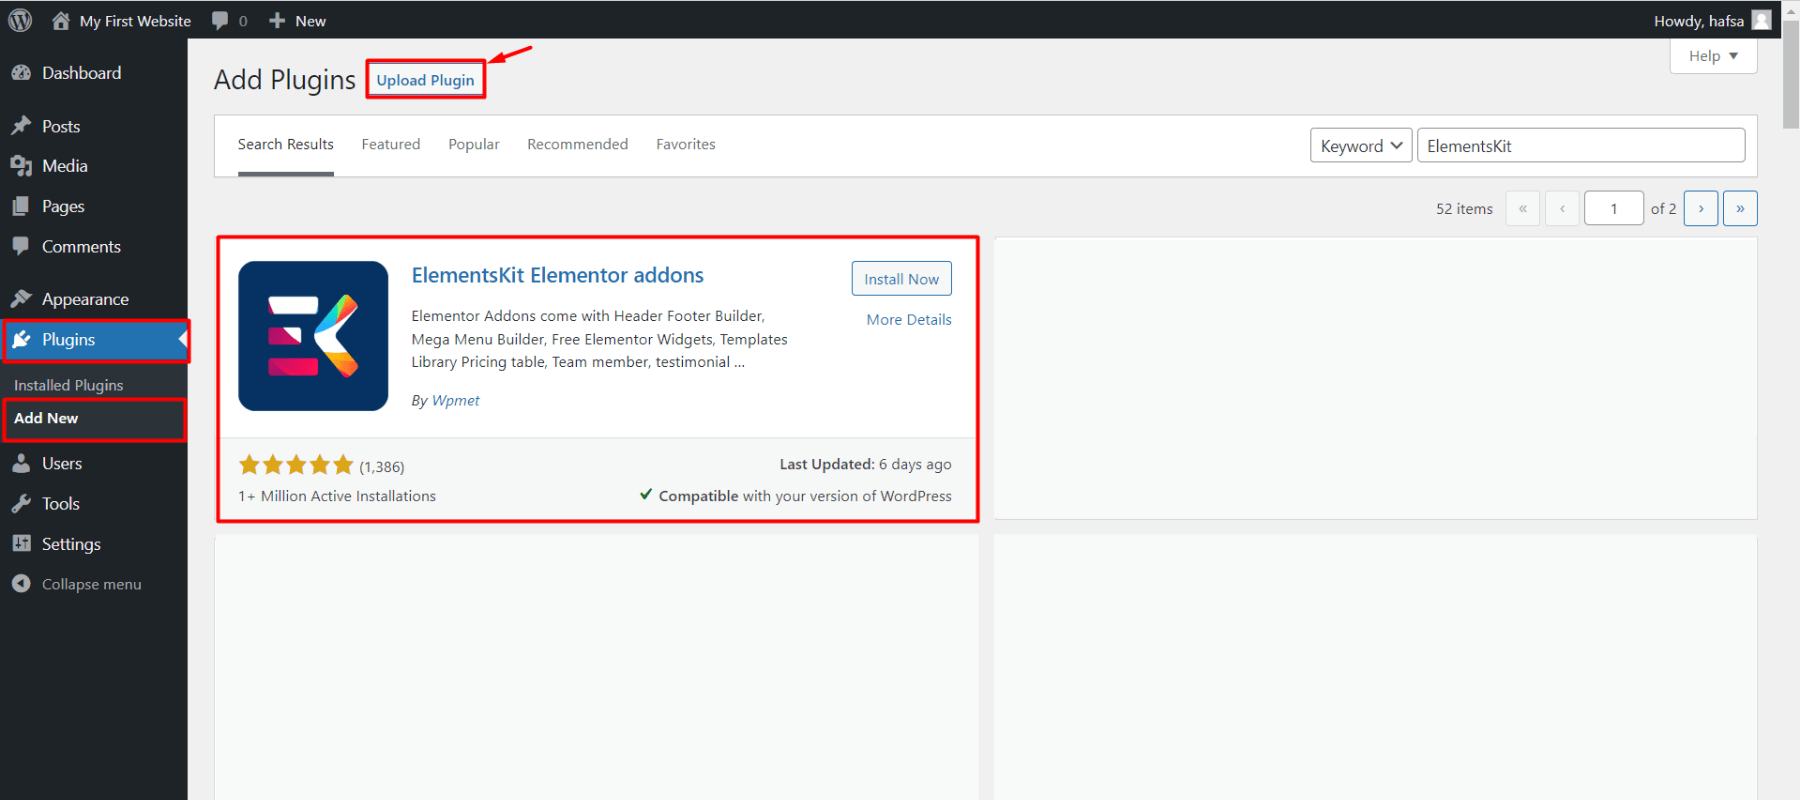
Step 1: Install ElementsKit Plugin
The installation process of ElementsKit is similar to any other plugin installation in WordPress. You can directly install and activate it or upload the zip file of the plugin, then install and activate the license. To install ElementsKit,
- Go to your WordPress dashboard
- Click on Plugins ➔ “Add New”
- Download the ElementsKit WordPress Plugin Zip file and upload the file
- Or, search for ElemenetsKit Add-on in the search box
- Then click on “Install”
- Once installed, click on “Activate”
🎯 As the Google Map feature is a pro widget of ElementsKit, you need to purchase a premium package and activate the license.
👉 Here is the documentation guide on how to purchase and activate the ElementsKit Pro license.
Step 2: Generate a Google Map API Key
Now, you need to generate the Google Map API key to connect with your WordPress site. The Google Maps API (Application Programming Interface) is a unique code given by Google to integrate and utilize Google Maps functionality in your own websites or other applications.
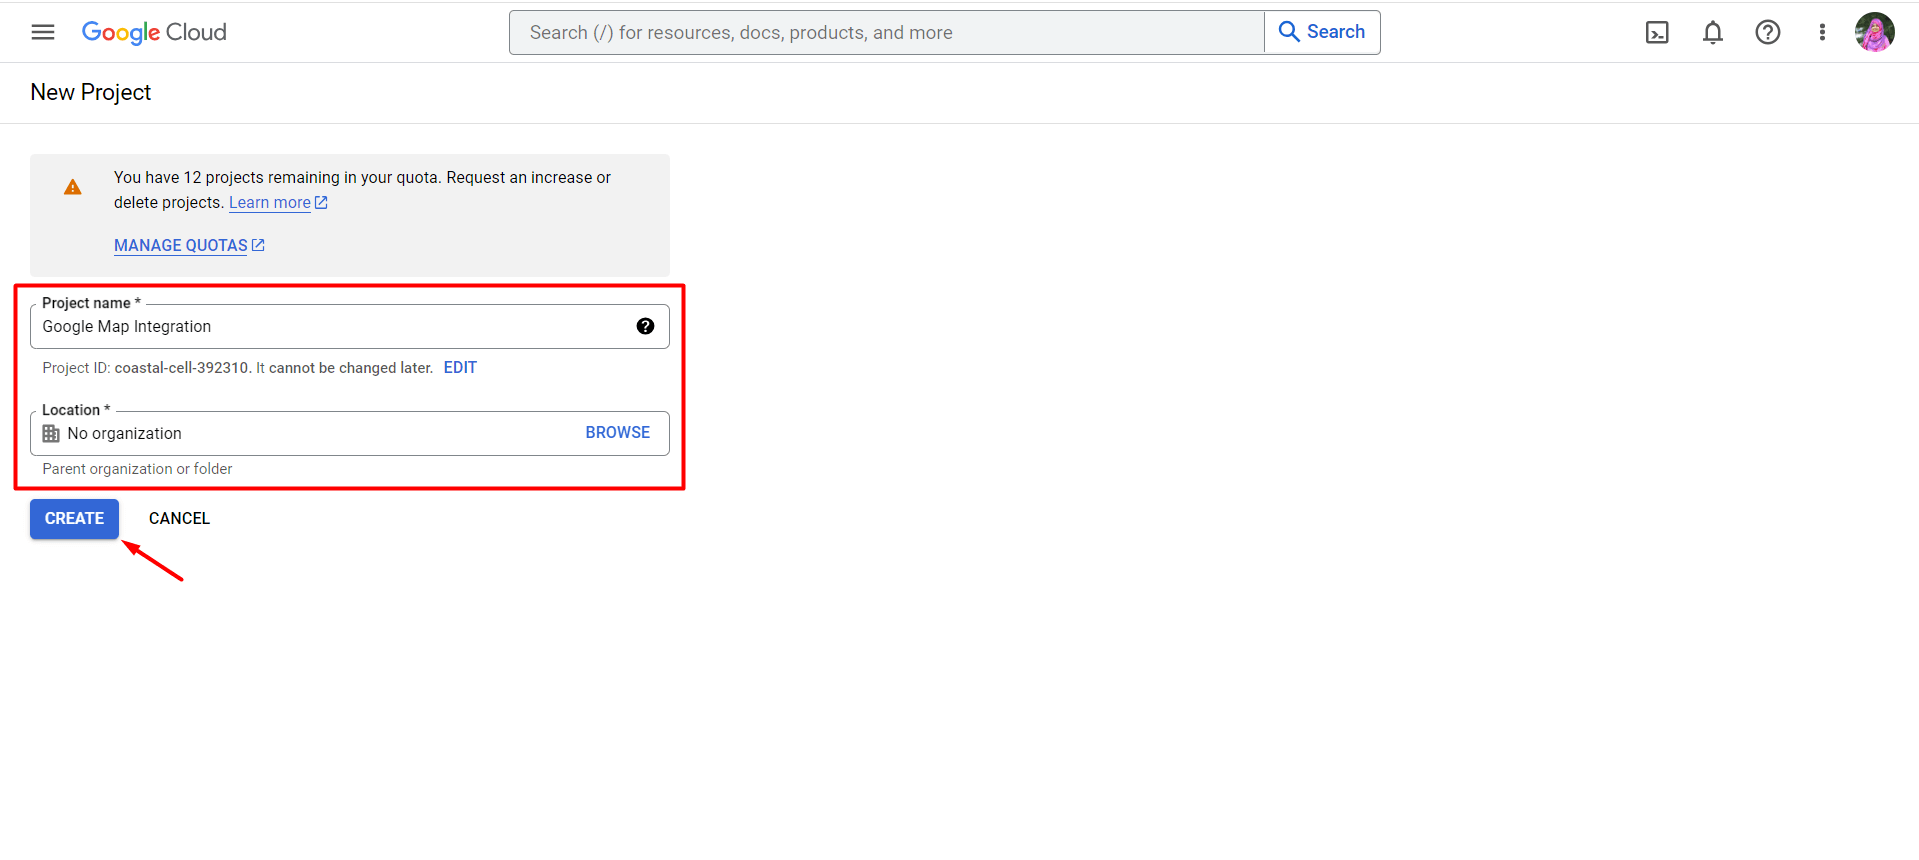
- Navigate to Set up in Cloud Console
- Click on “Create New Project”
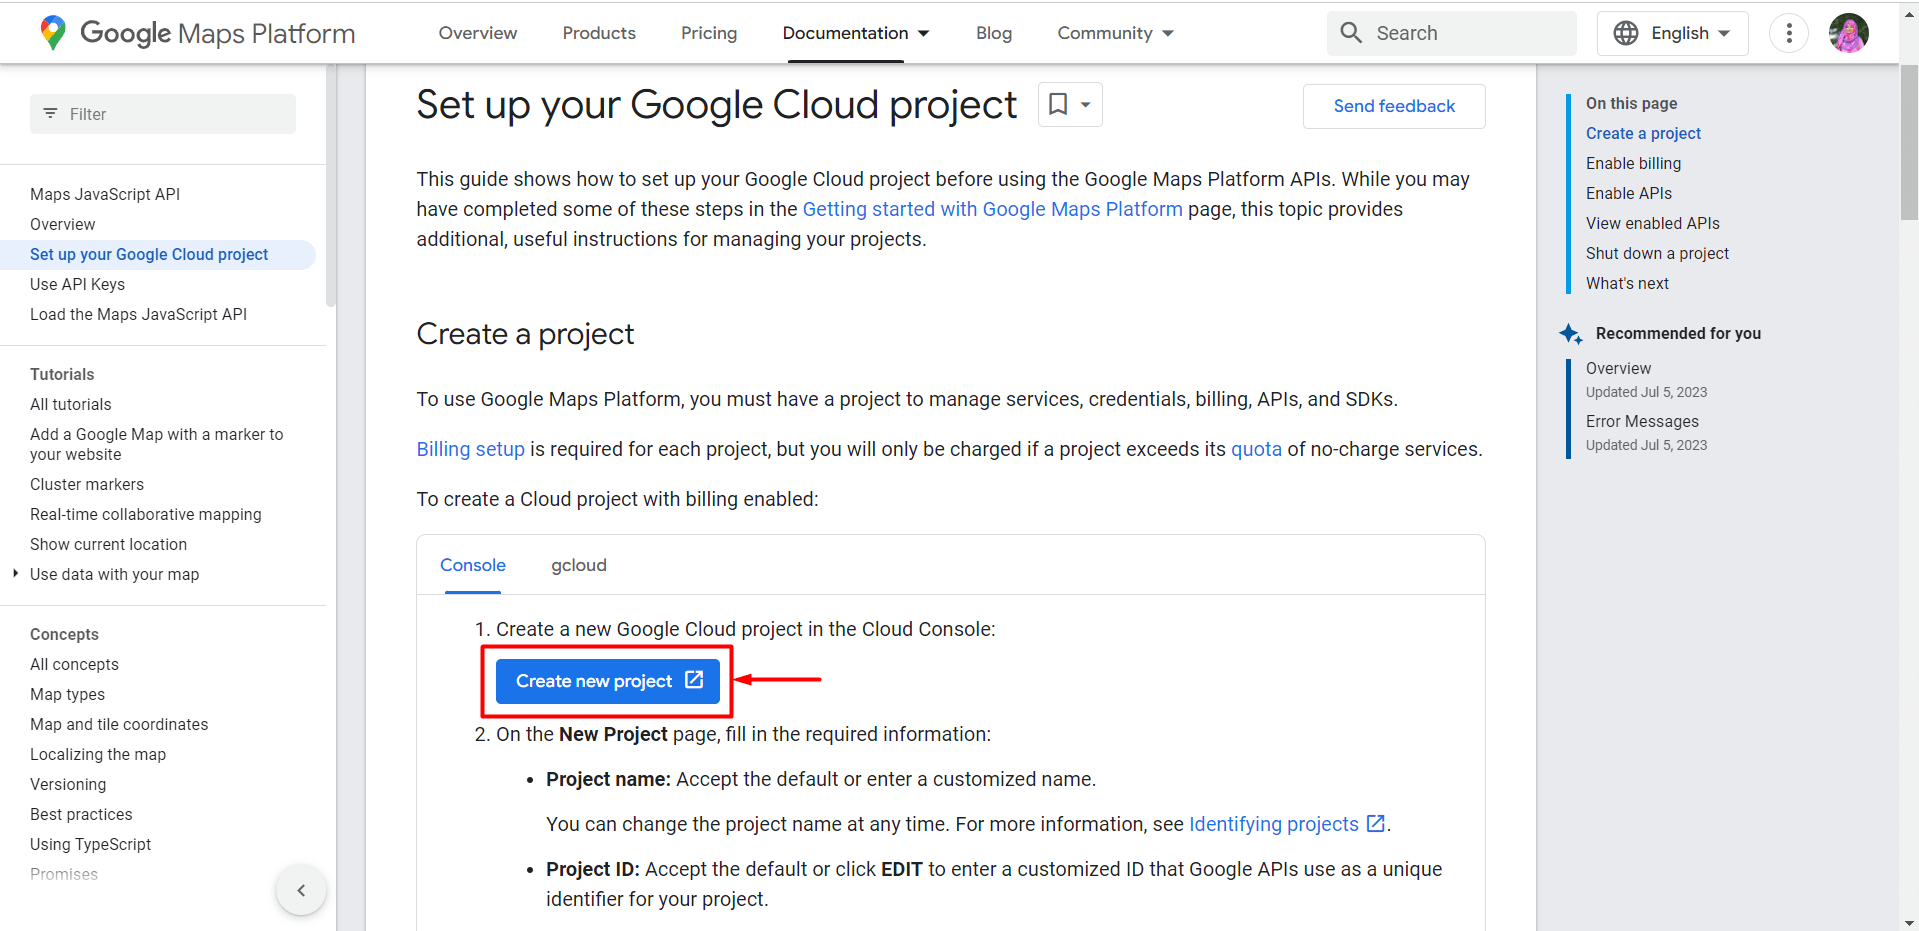
- Write your project name and location
- Click on “CREATE”
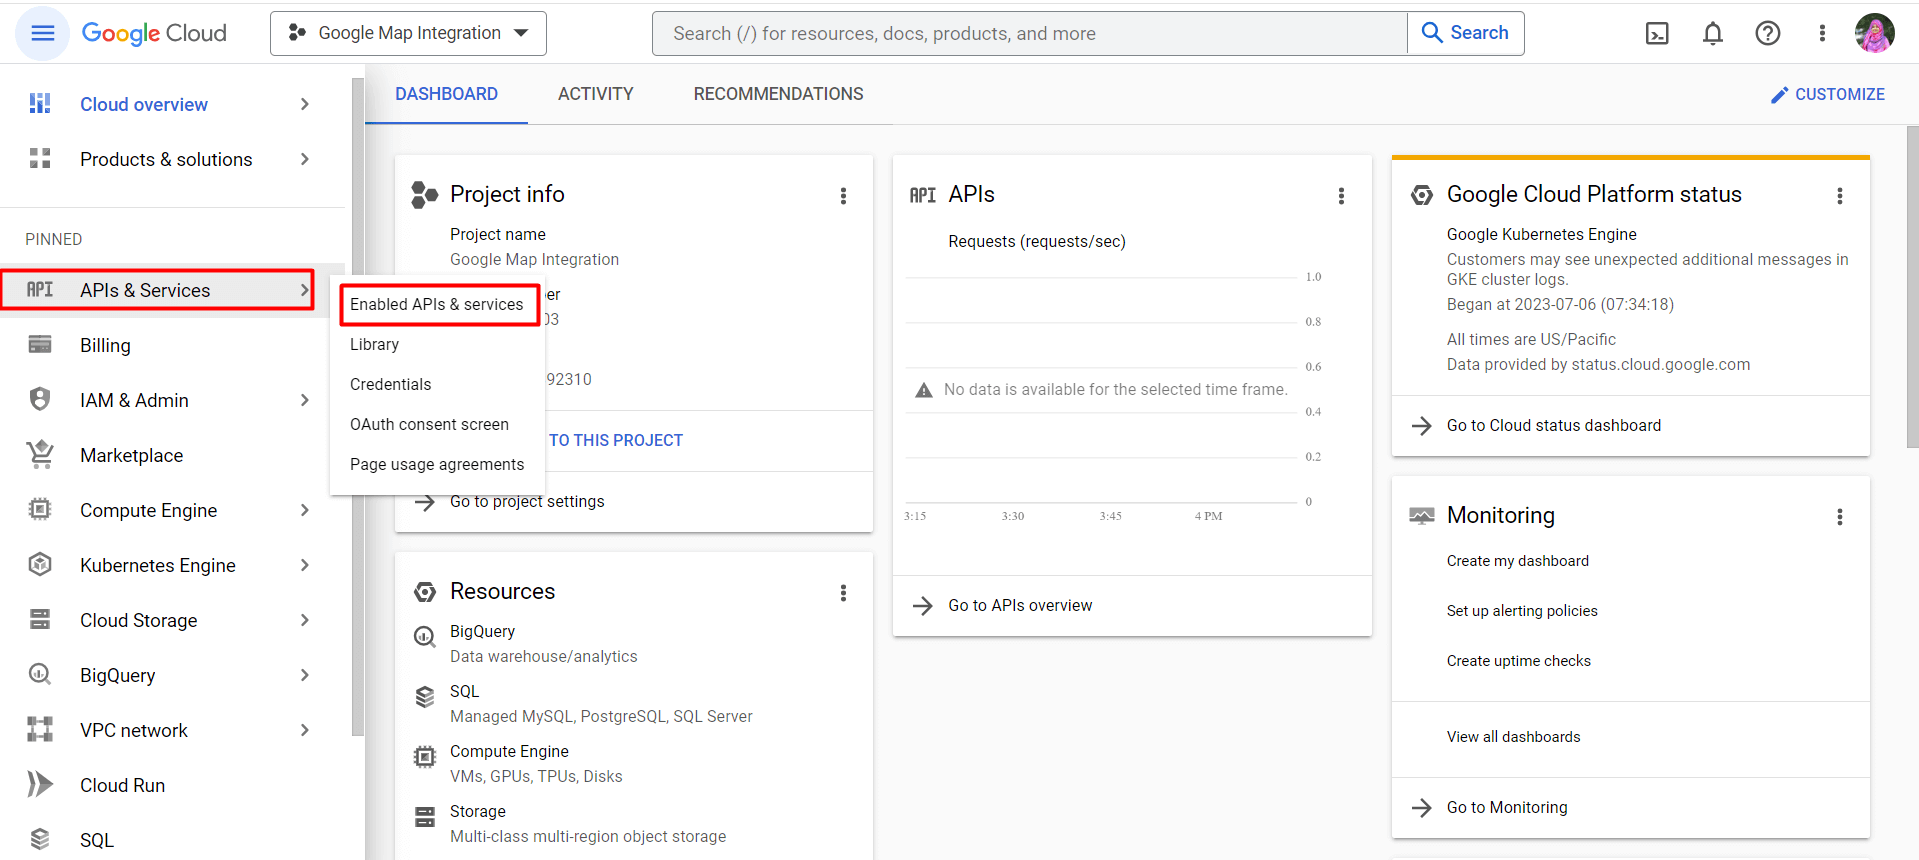
- It will redirect to the hamburger menu
- Select the “APIs & Services” option
- Click on “ENABLE APIS AND SERVICES”
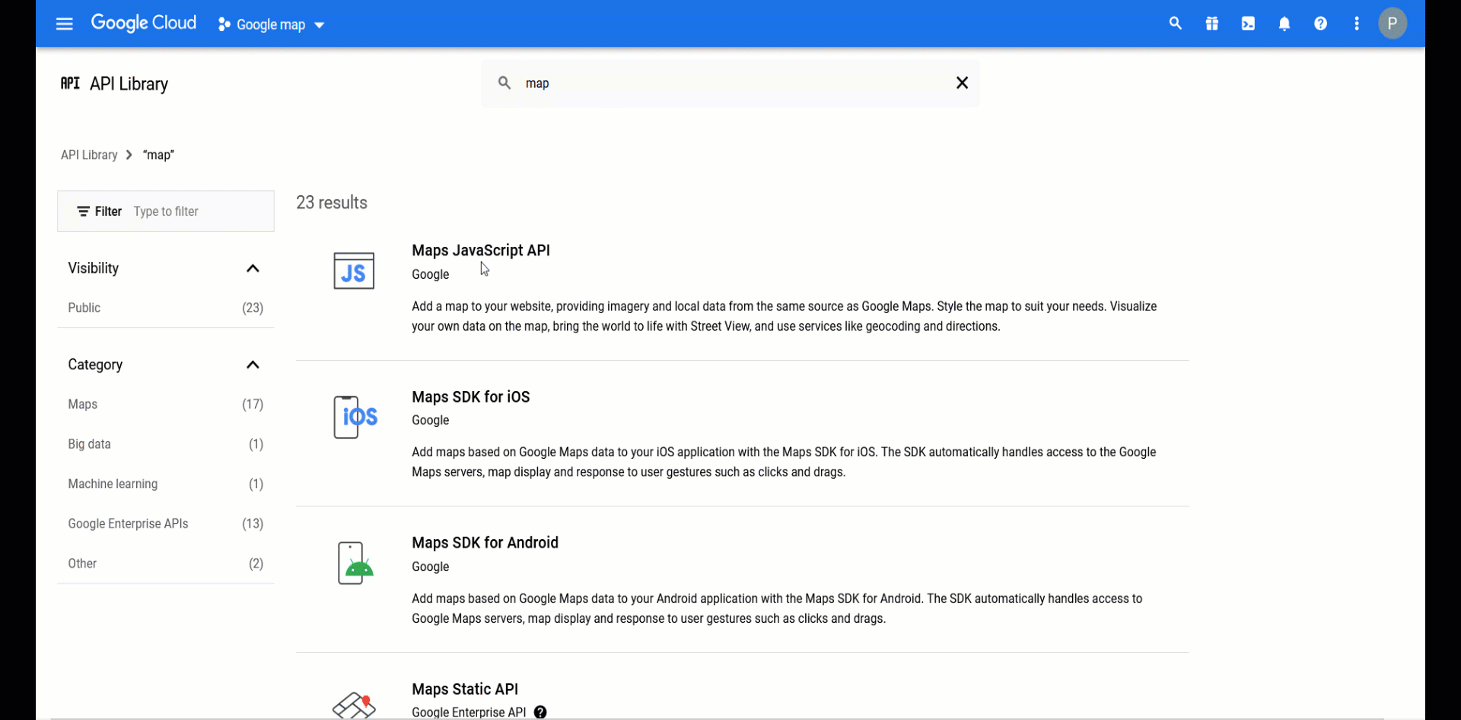
- Search Map in the search box
- Or, click on the “Maps JavaScript API”
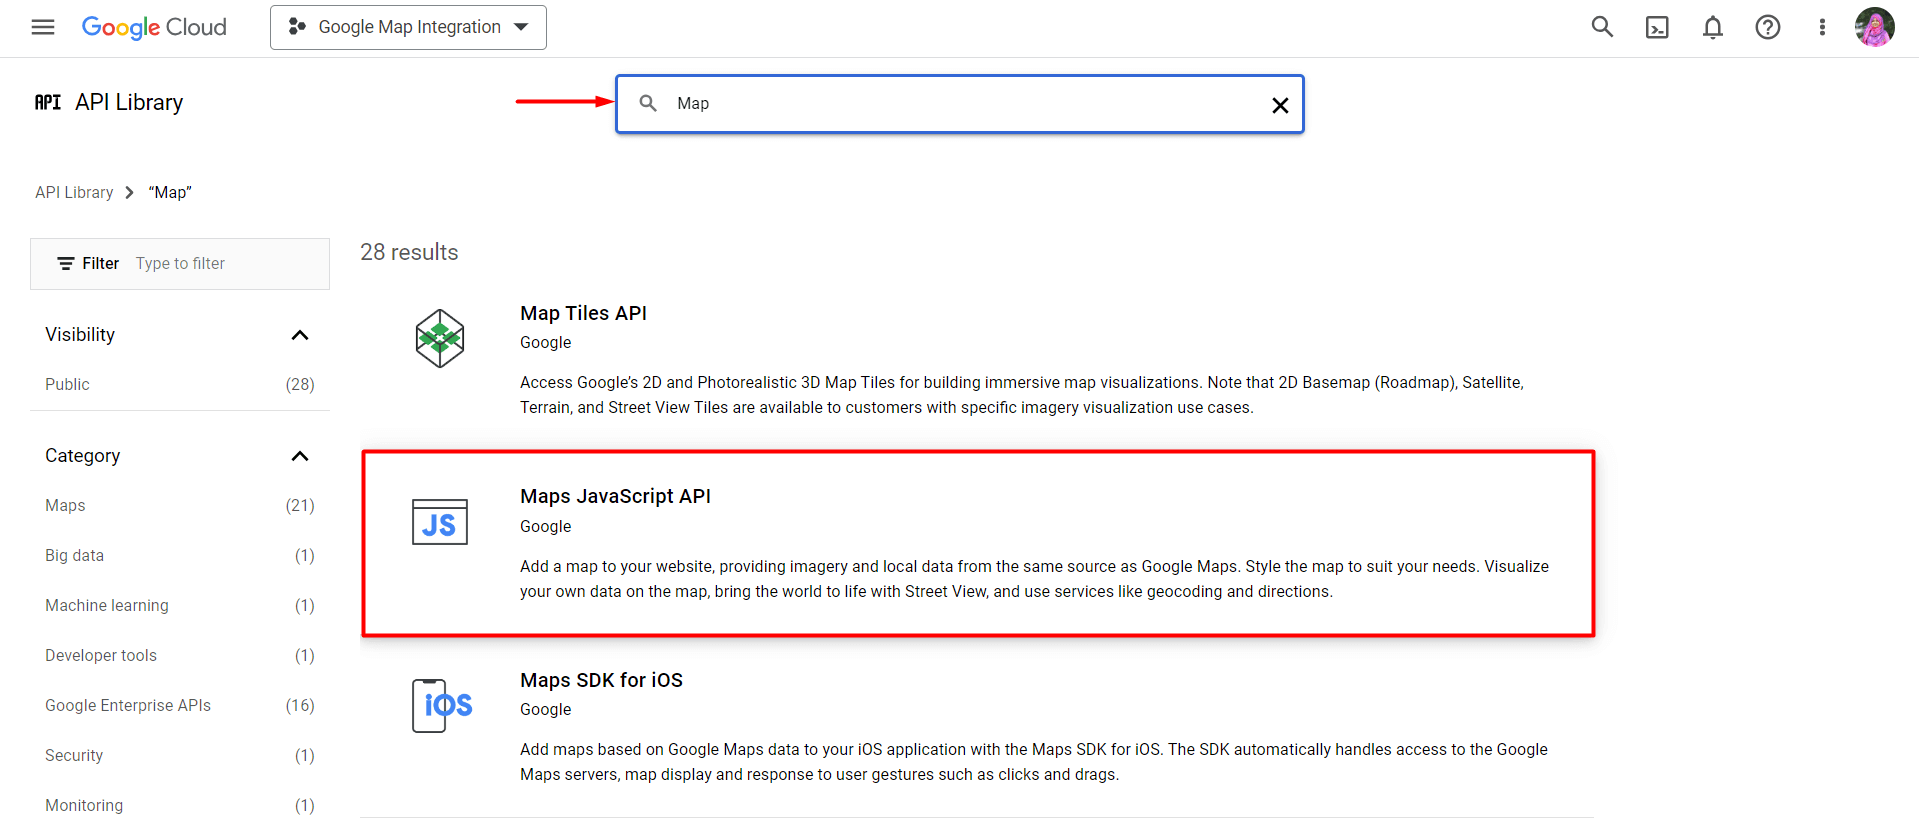
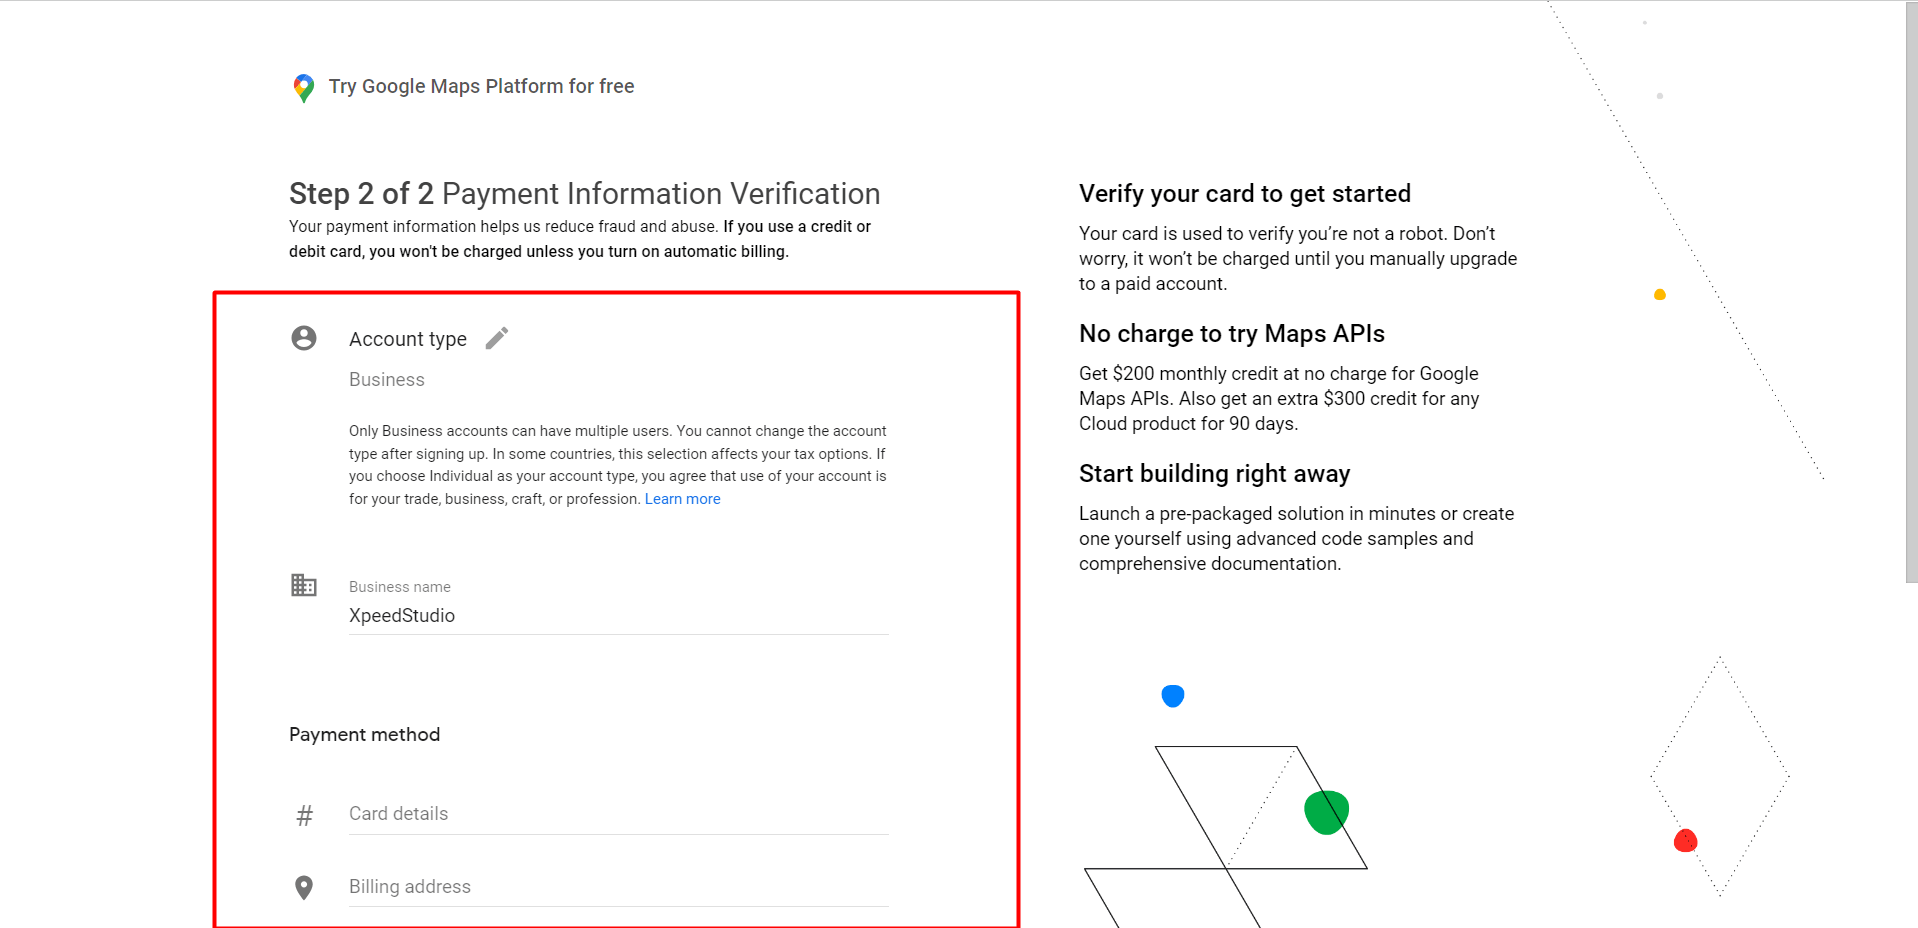
- If you don’t have the premium plans, you need to set up your account with the necessary information (country, card details, billing address, etc)
- Next, enable the Maps JavaScript API
- Now, go to the Google Maps Platform ➔ Credentials page
- Select a project or you can also create a new project from here
- Click on “Create Credentials”, and it will generate a new API key for you
- Next, click Create credentials ➔ API key
- You can see the newly created API key for Google Maps listed on the Credentials page under API keys
- Copy the API Key from here
- Click on Close
❗❗Remember to restrict the API key before using it on your WordPress website❗❗
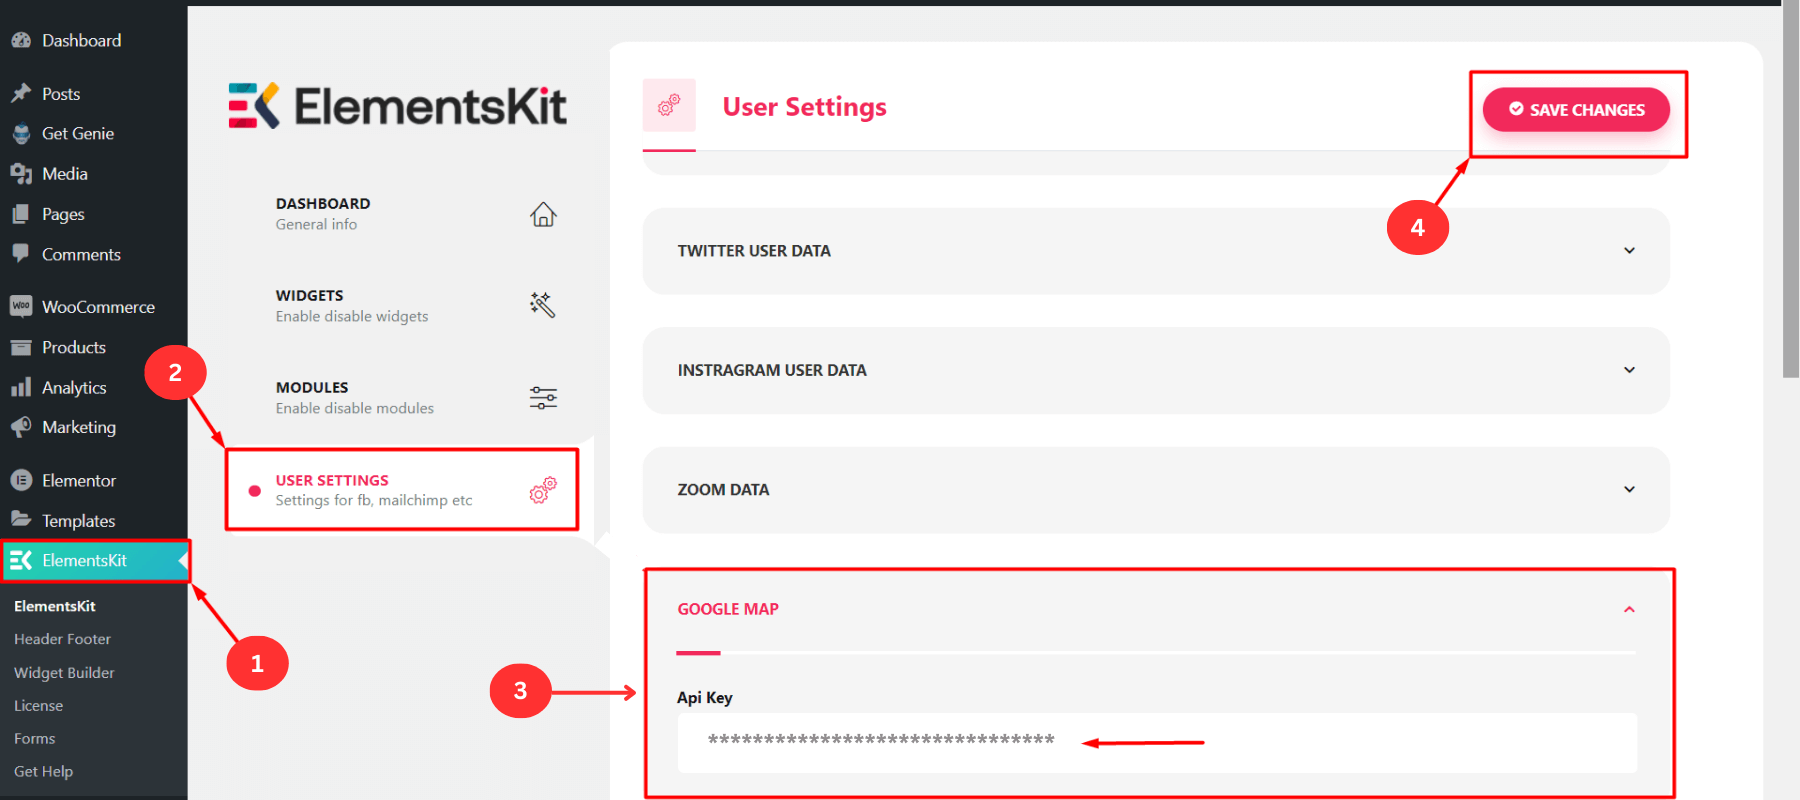
Step 3: Connect Google Map API Key with ElementsKit
Now, you need to connect the newly created Google Map API key to your WordPress website. To do so, you have to paste the API key in the Google Map section of ElementsKit.
- Go to your WordPress dashboard
- Click on “ElementsKit”
- Go to the “WIDGETS” option
- Scroll down, you can see the Google Map widget
- Turn on the “Google Map” widget
- Click on “Save Changes”

- Navigate “ElementsKit” ➔ “User Settings”
- Scroll down and click on the “Google Map” option
- Paste the API key on the input field
- Click on “Save Changes”
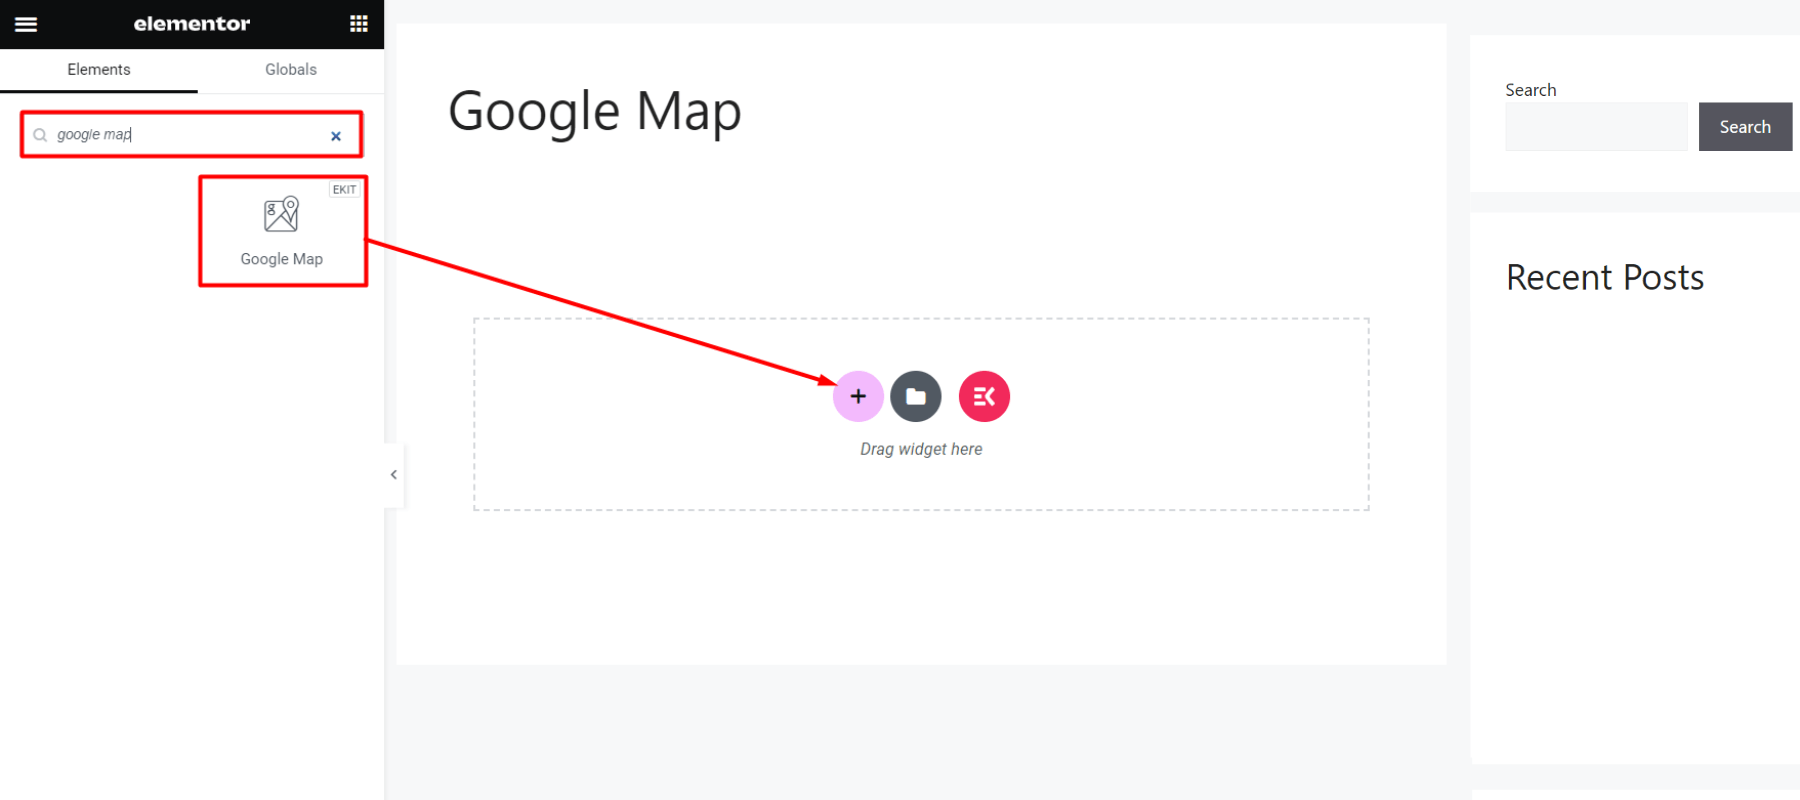
Step 4: Drag-and-drop the Google Map Widget Inside the Page/Post
Now, it’s time to see how to add Google Maps in WordPress site by just drag-and-drop:
- Create a new page/post or open an existing page/post
- Click on “Edit with Elemetor”
- Search for the “Google Map” widget of Elemenetkit
- Drag and drop the widget inside the block where you want to display the map
🟢 Note: You can add multiple maps and customize them individually using the same widget. All you need to do is select an Elementor block and then drag and drop the Google Map widget. 🟢
Step 5: Customize the Google Map Settings
Now, the final step is to customize Google Maps as per your preferences. ElementsKit offers tons of customization options including content, style, and advanced settings for layout, motion effects, responsiveness, custom CSS, etc.
Let’s see how you can customize Google Maps using the customization options of ElementsKit on your WordPress website.
Content Customization
In this section, you can select the map type, and address type, and set custom latitude and longitude to add the address you want to display on your website. Also, there are customization options for map markers, controls, and themes.
🌎 Map Type
ElementsKit offers versatile mapping platforms from this one widget. You can select map type from the drop-down section.
- Click on Settings ➔ Select map type
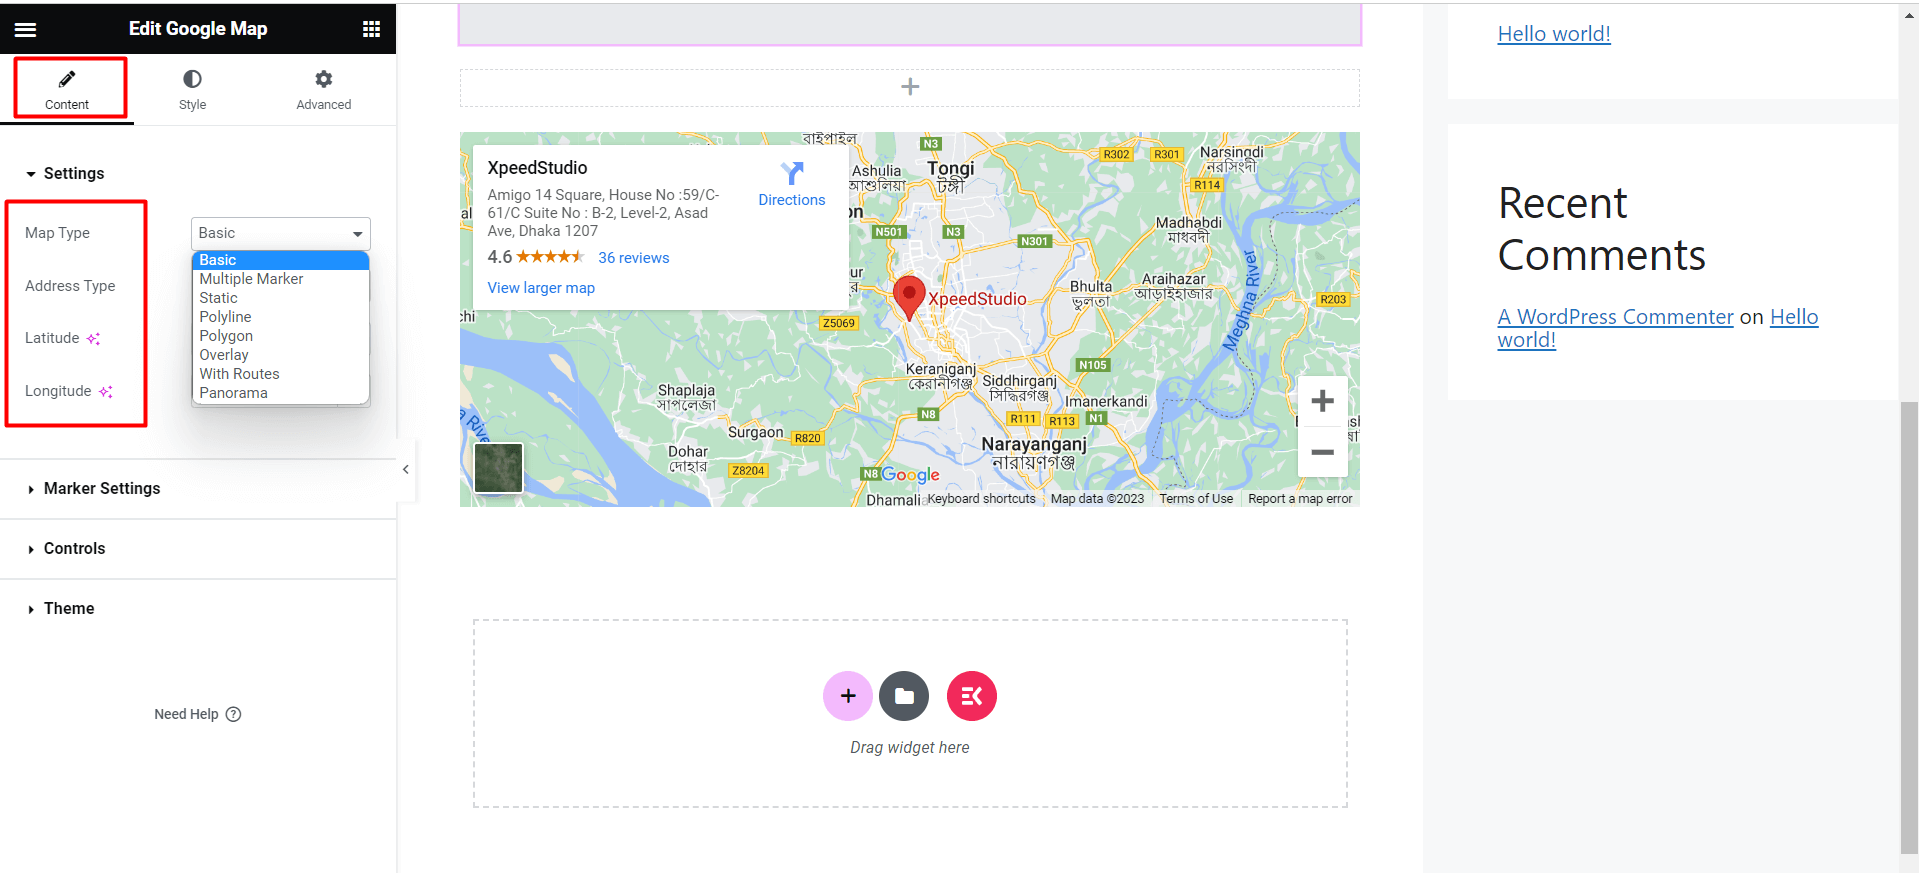
Here you can get 7 types of Google maps, such as:
1️⃣ Basic: With the basic Google Map functionality, your website users can search for locations, view maps, and get directions to various destinations.
If you are a beginner and want to add a simple Google Map to your WordPress website with a marker, then go for the basic map type.
2️⃣ Multiple Marker: Using Multiple Google Maps is ideal for you if you are planning trips or highlighting different locations. Your website visitors can mark and label multiple points of interest on a single map.
3️⃣ Static: Using the static maps feature of ElementsKit, you can provide your users to generate a static image of a map. This type of map can be embedded in your WordPress websites if you want to share offline viewing.
4️⃣ Polyline: you use Polyline-type Google Maps in your WordPress site to allow users to create and display lines on the map to see the routes, boundaries, or specific areas of interest.
5️⃣ Overly: ElementsKit’s Google Maps widget also supports the overlay integration feature. Using this type of map, you can display the overlay additional data such as weather information, traffic conditions, or custom layers onto the map for enhanced visualization.
6️⃣ With Routes: When you use the with routes map of ElementsKit, Your website visitors can input their starting and destination points to get detailed turn-by-turn directions. Plus, they can see the estimated travel time and real-time traffic updates.
It will help to find out their distance from your location, or more suitable when you have to add multiple office/branch addresses to your website.
7️⃣ Panorama: You can also display the panorama view using the Google Map widget of ElementsKit. Panoramic views, also known as Street View will provide users with a 360-degree virtual tour of various locations. It’ll allow the website visitors to explore places as if they were physically present.
👉👉 For each type of map customization in detail, you can check out this documentation – Google map in the WordPress site.
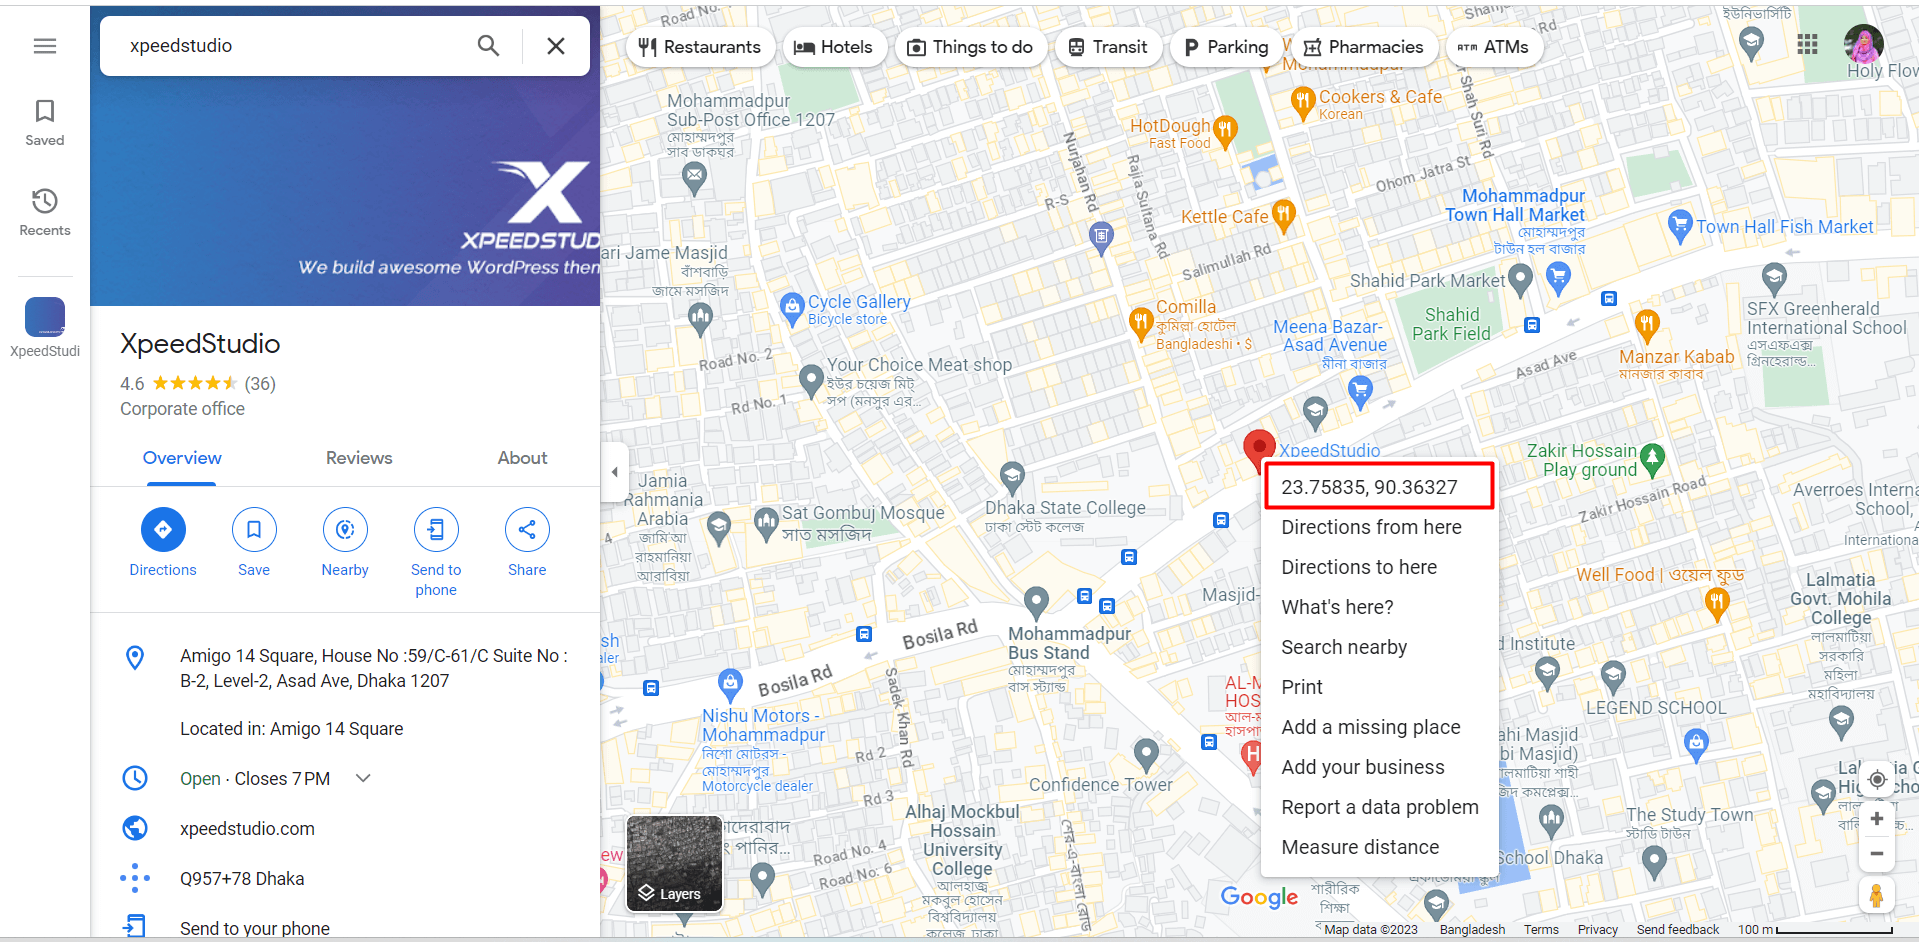
📌 Address Type
For each type, you can select Address type as an address by writing the location name directly or setting the latitude and longitude of the respective address.
However, latitude and longitude are the geographical coordinates to represent a specific location on the Earth’s surface.
Latitude is the measurement of a point’s distance north or south of the Equator. On the other hand, longitude defines the measurement of a point’s distance east or west of the Prime Meridian.
Get Latitude and Longitude:
- Go to https://www.google.com/maps/
- Search the name of your location
- Right-click on the pinpoint in the Map
- You can see the values of Latitude (left) and Longitude(right)
- Now copy the Latitude and Longitude
- Next, paste them into their input fields
🔖 Marker Settings
Here you can customize the options for marking the location using title, content, icon, etc.
- Add a Google map title to display the name while someone searching your location
- Write content with 1-2 lines to describe the address when hovering over the map
- Enable the toggle to add a custom marker icon
- Upload marker icon, you can use your company logo or other icons to describe your identity
- Set custom width and height for the marker icon
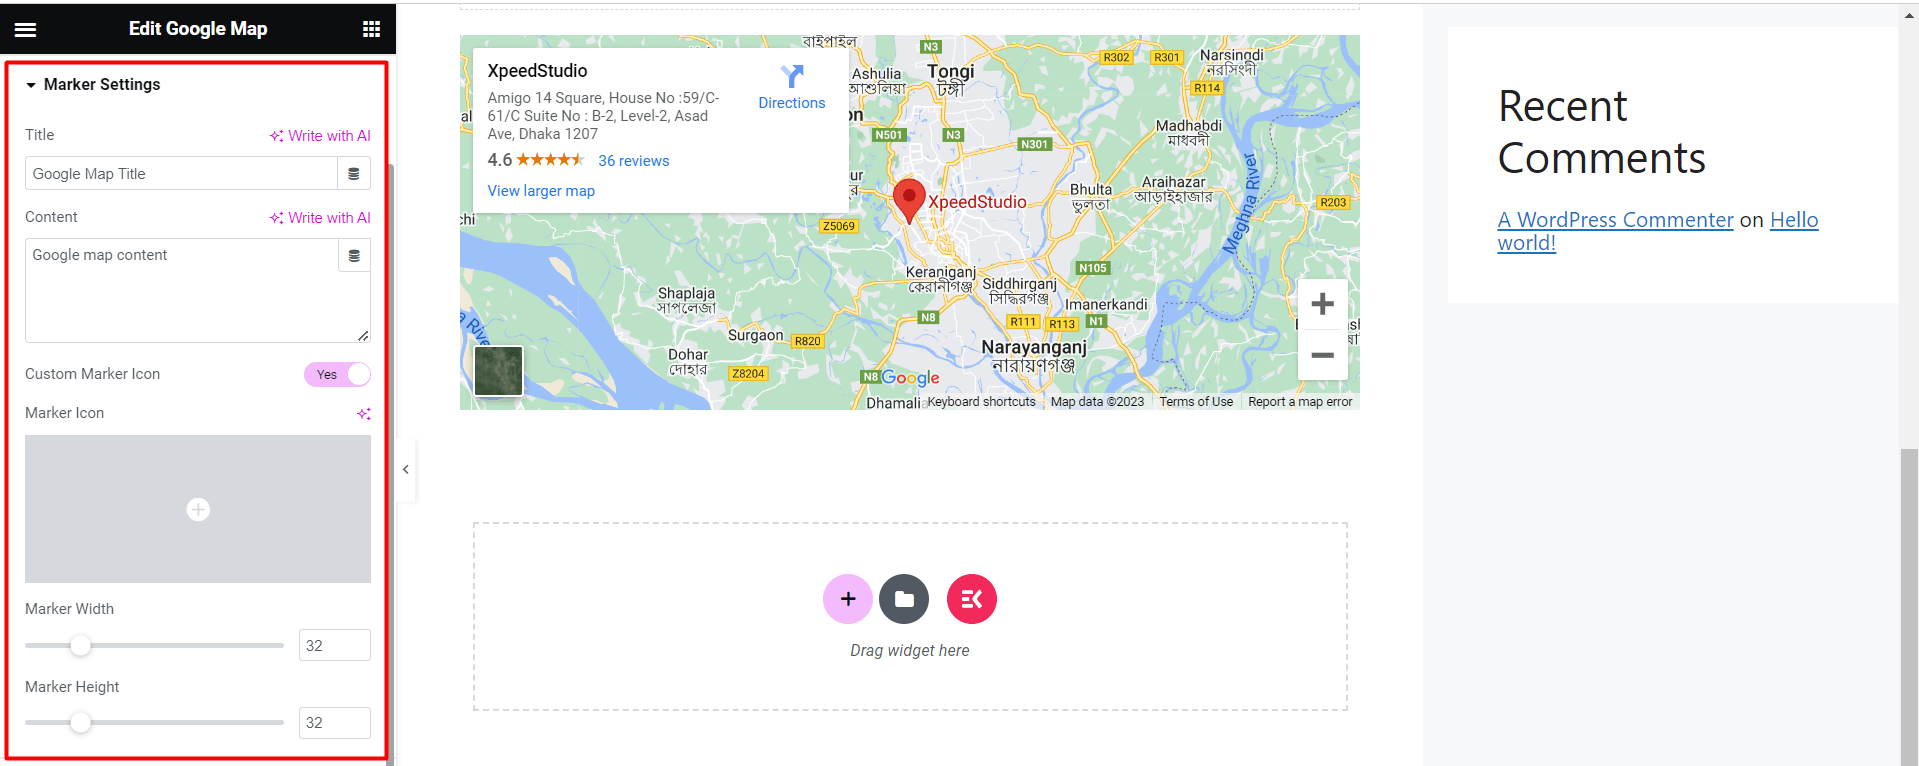
🟢 For multiple marker type Google Map, you can upload and customize multiple icons for each location. 🟢
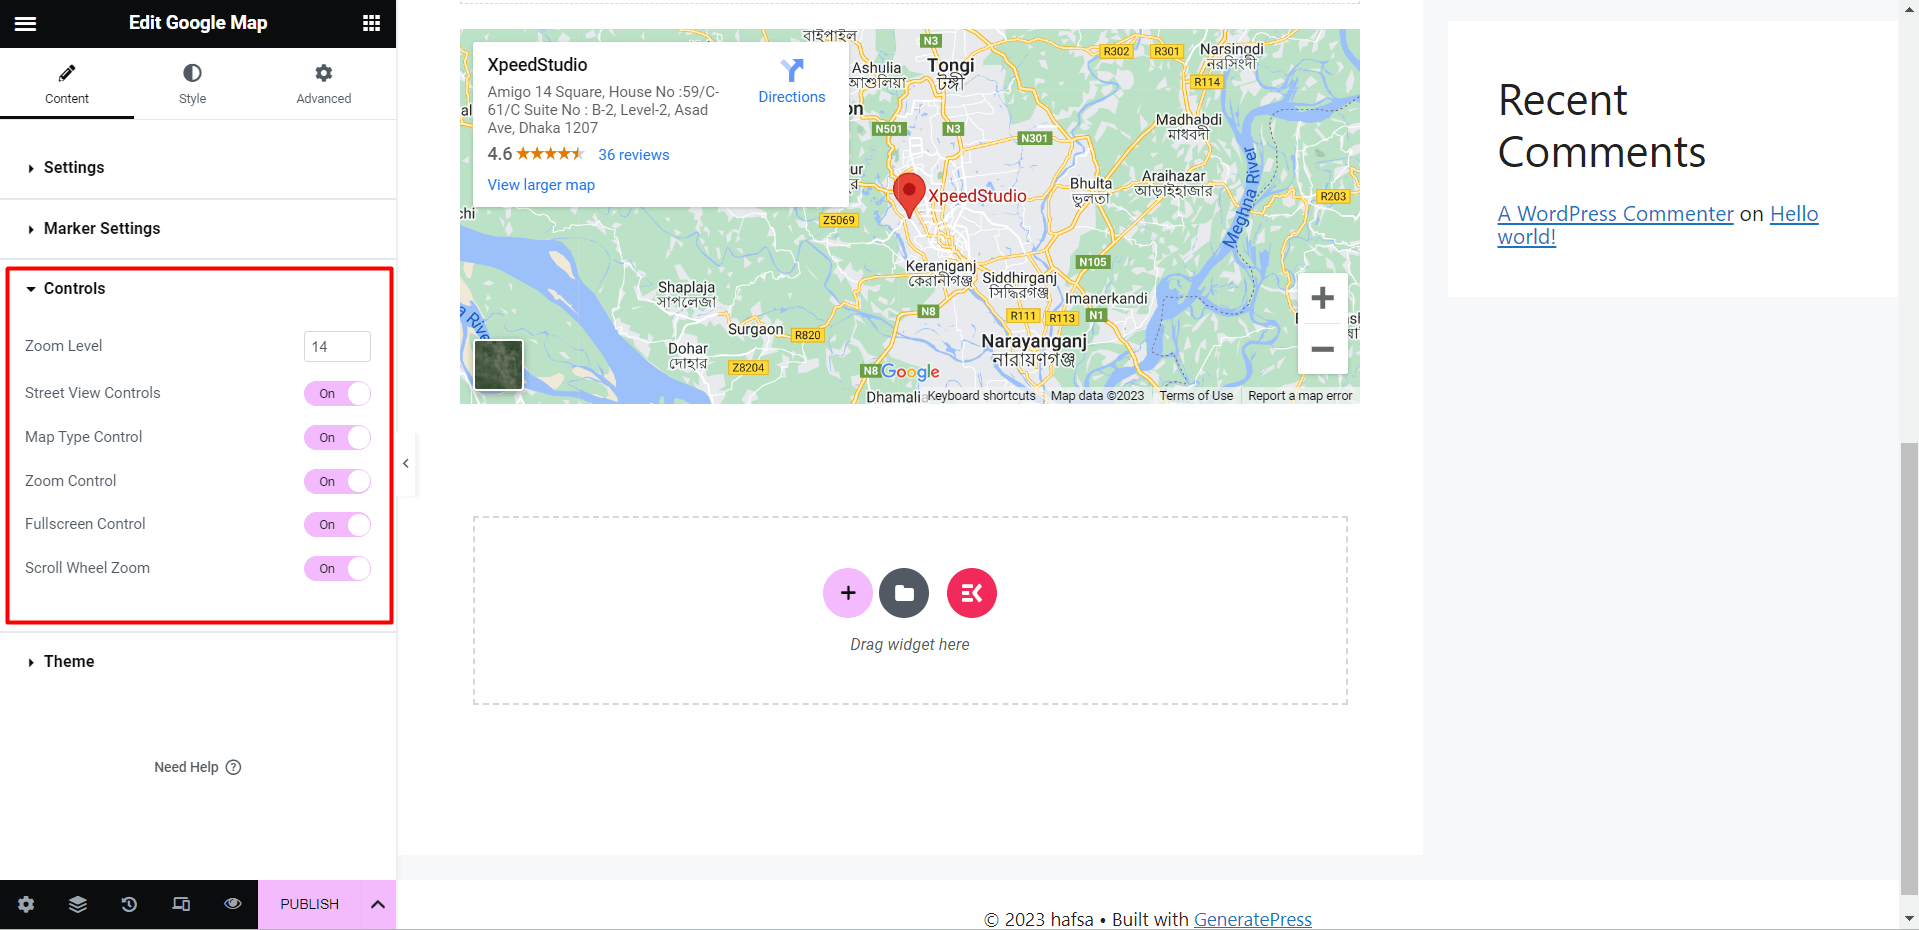
🎛️ Controls
You can control the zoom level, street view, map type, map scrolling, etc from this setting.
- Control Zoom Level: Provide any number to define the zooming level.
- Enable Street View Control: Enable to show the map with Street View.
- Turn on Map Type Control: Turn on to allow the user to control map type e.g. roadmap, satellite, etc.
- Enable Zoom Control: Turn on to add a zoom control icon for zoom in (+) and zoom out (-) the map.
- Enable Fullscreen Control: Turn on this option will allow the user to see the map in fullscreen mode.
- Enable Scroll Wheel Zoom: Enabling the scroll control wheel will increase or decrease the zoom factor by 10%for each click, up or down.
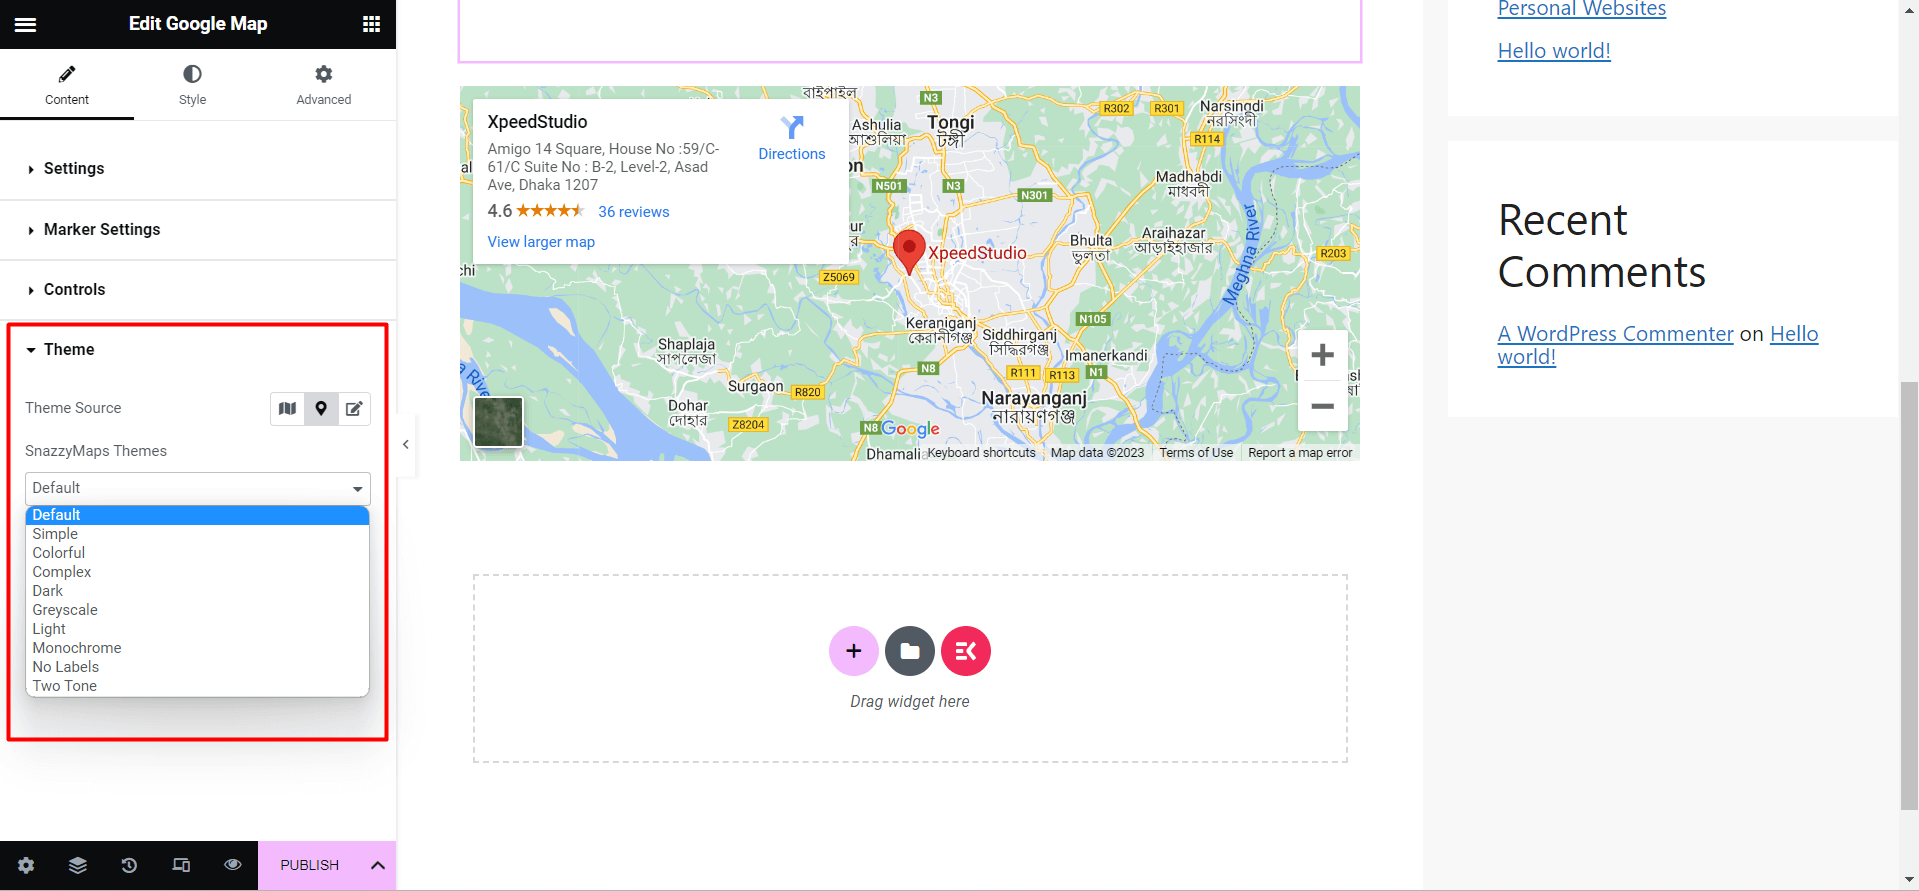
🎨 Themes
You can customize the Google Map theme source and styles. Also, if you can add a custom theme, that is possible in the ElementsKit Google Map widget.
✨ Google Standard Theme Source
- Click on theme ➔ Select the source type: Google Standard
- Select standard theme styles from the drop-down section:
- Standard, Sliver, Retro, Dark, Night, and Aubergine
✨ Snazzy Maps Theme Source
- If you want to add various color schemes, then Snazzy Map is for your site.
- Click on theme ➔ Select the source type: Snazzy Maps
- Select the styles from the drop-down section:
- Default, Simple, Colorful, Complex, Dark, Grayscale, Monochrome, No Labels, and Two Tone
✨ Custom Theme
- You can also add a custom theme as per your preferences and needs.
- Choose the theme source ➔ Custom
- Add a custom theme style on the given field
- Click on “Click here” to get the JSON style code of your selected style
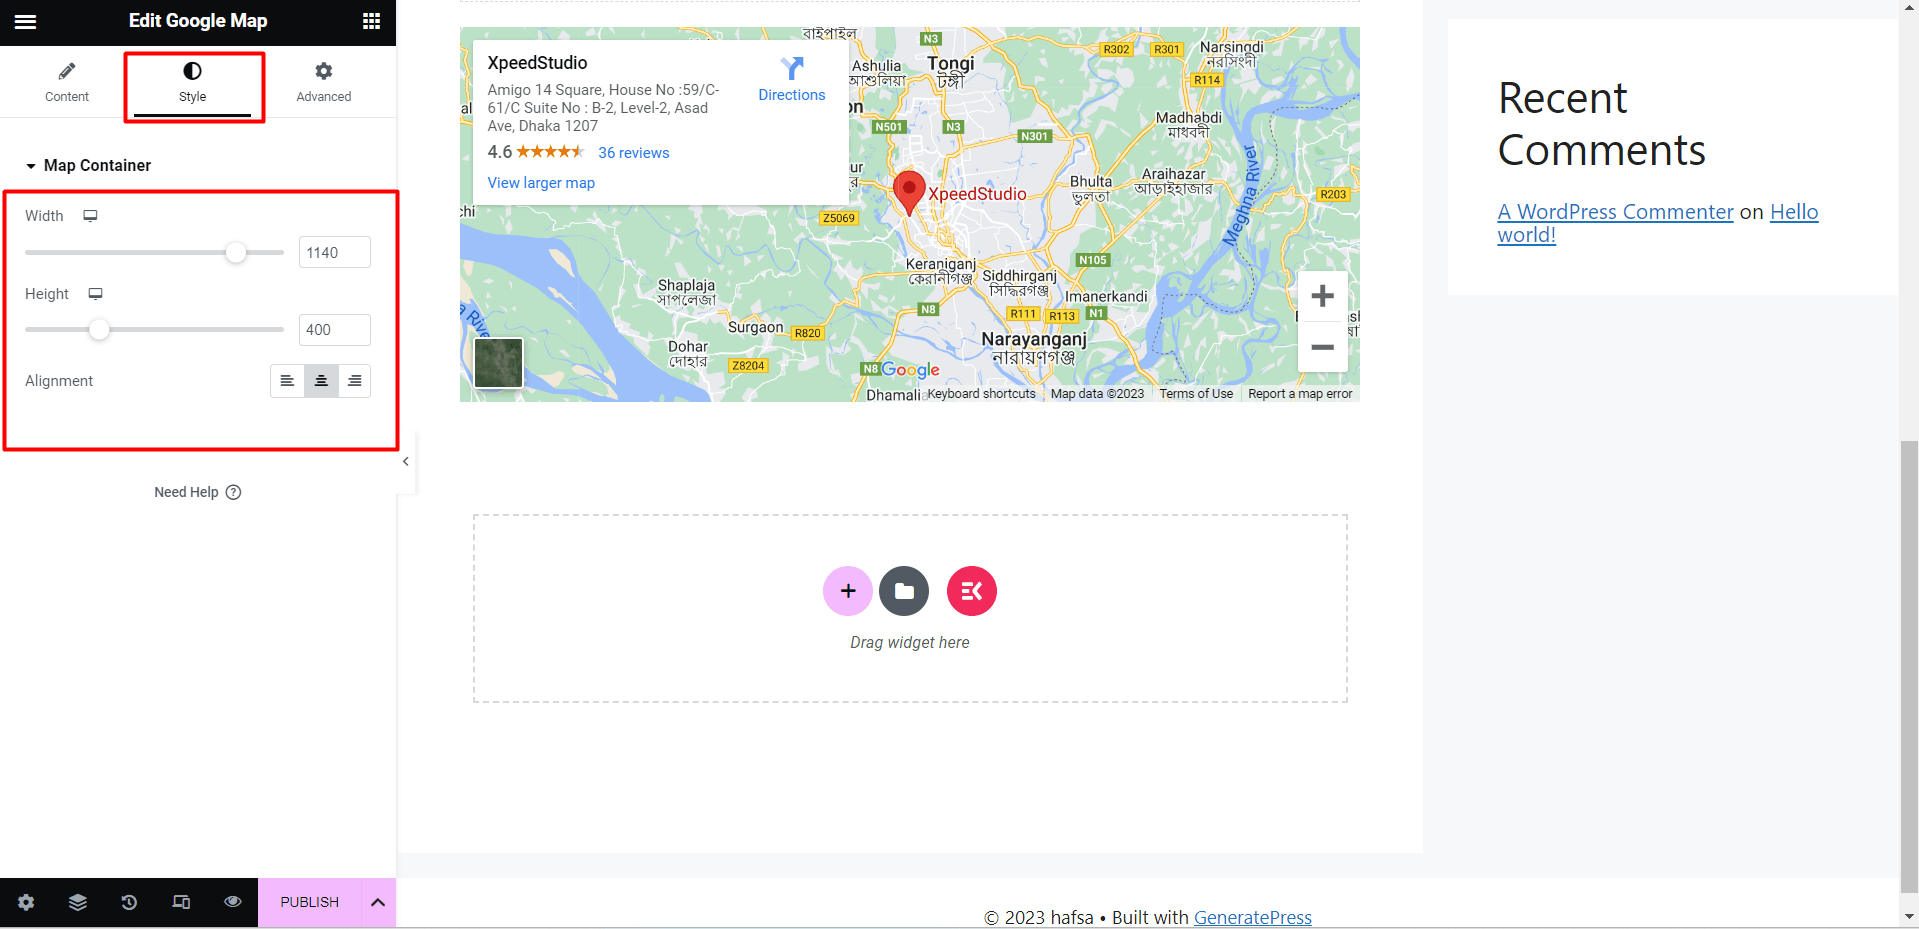
Style Customization
You will get full flexibility to set custom height, width, and map alignment based on the web page design.
➡️ Height: Set custom height for the map
➡️ Width: Adjust the width as per your preference
➡️ Alignment: Set the alignment of the Google map at left, right, or center
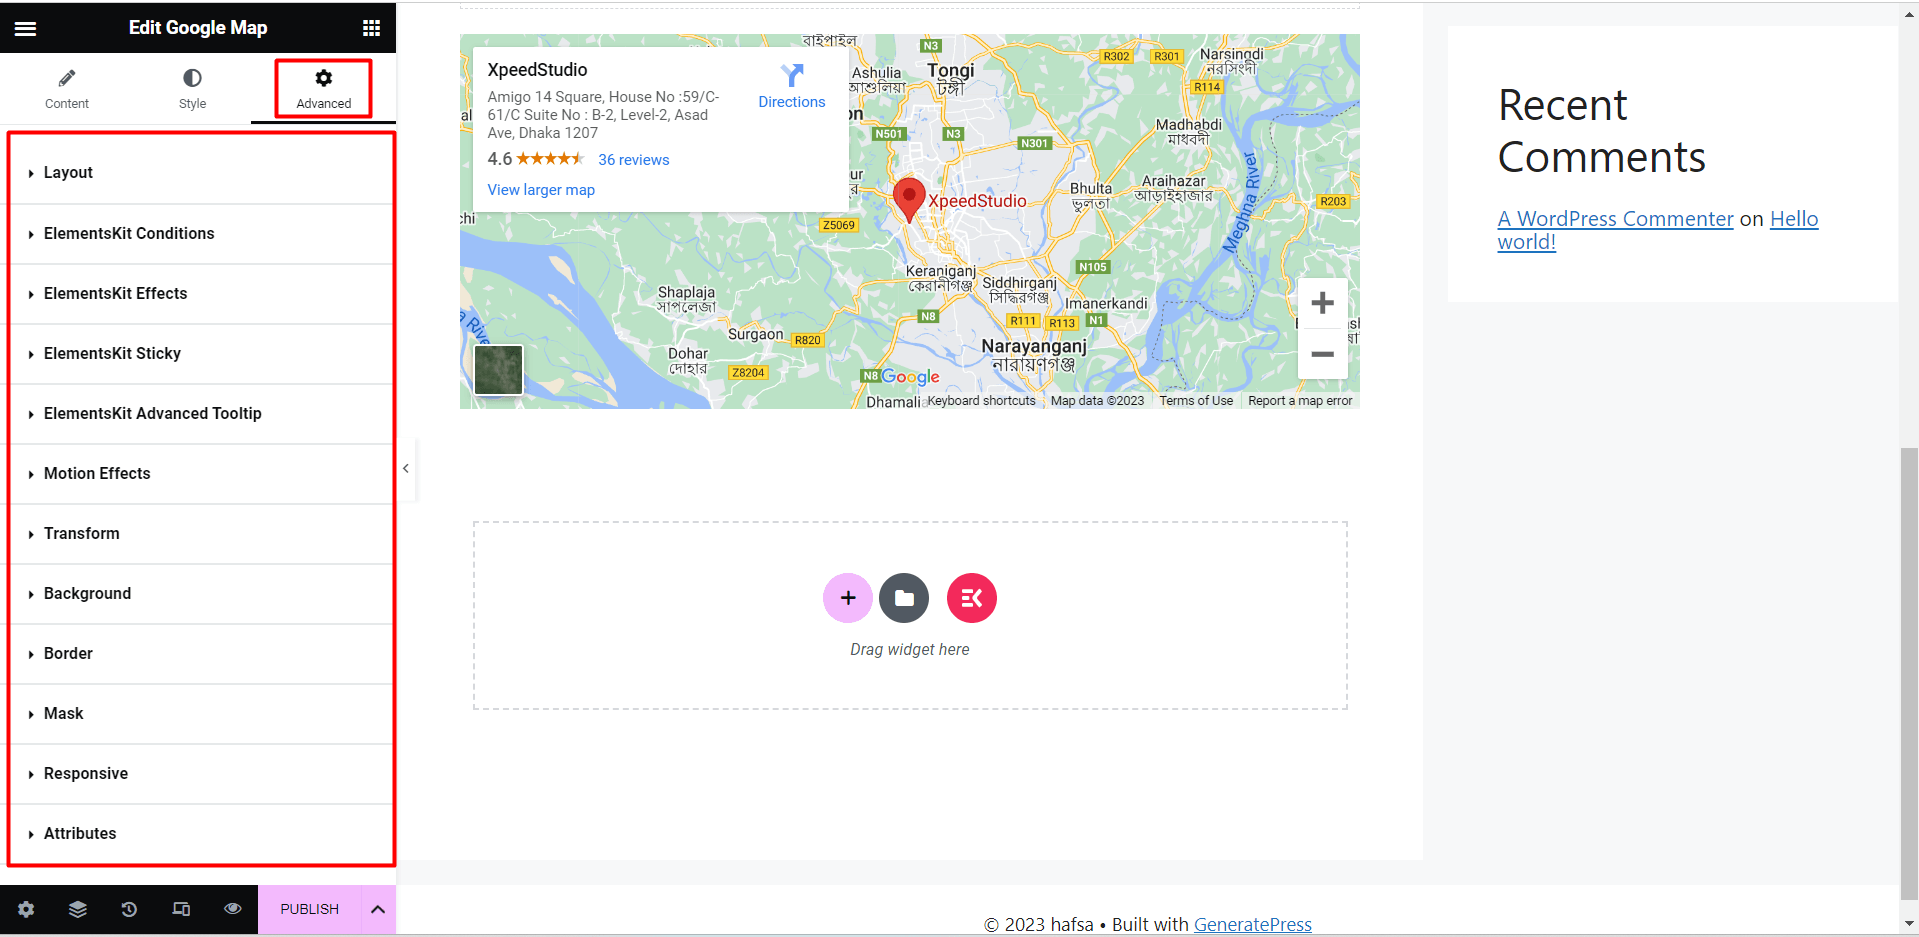
Advanced Customization
You can control all the styles of Map layout and other functionalities and customize them from the advanced settings of the ElementsKit Google Map widget.
⏺️ Set custom values for the entire layout width, margin, padding, position, and z-index
⏺️ Set motion effects for the input fields (e.g. zoom in, zoom out, fade in, fade out, etc)
⏺️ Choose the layout background type and color
⏺️ Customize the border type, radius, mask, and device responsiveness (pc, tab, mobile)
⏺️ Insert attributes and custom CSS for additional functionalities

5 Benefits of Inserting Google Maps in WordPress Website
Adding Google Maps to your website offers numerous advantages. Here are the 5 major benefits of integrating Google Maps on your WordPress website:
1. Increases Business Visibility
When any visitors land on your website, Google Maps will help them to view your location and provide a clear idea of where your business is situated.
As this feature is particularly useful for businesses with physical storefronts or offices. So, if you have multiple branches, you can showcase them on a single map.
That will help your customers to find out new and nearby branches. They can simply click on the markers to get the address and directions to each location.
As a result, you can increase your business’s visibility to potential customers on your WordPress site.
2. Provides Accurate Directions
One of the primary advantages of incorporating Google Maps into your WordPress website is to provide accurate directions to your business. Visitors can input their current location and receive step-by-step directions to your location.
This feature is highly convenient for customers who are unfamiliar with the area or rely on public transportation. Accurate directions help ensure that potential customers can easily reach your business without any hassle or confusion.
3. Showcases Local SEO
Local search engine optimization (SEO) is crucial for businesses targeting a specific geographic area. By integrating Google Maps into your WordPress website, you can showcase your business’s location in search results.
According to recent studies, approximately 46% of all searches have local intent. That indicates internet users are looking for their most nearby businesses, services, or products.
So, adding a Google Map will increase your chances of appearing in the local pack or map pack. It’s the section of search results that displays a map with local businesses related to the search query.
As a result, you can tap into this vast local search audience and improve your chances of attracting local customers.

4. Facilitates Event Planning
Integrating Google Maps into your WordPress site can simplify the event planning process for both you and your attendees for any business events or gatherings. You can embed a map on your event page to provide the precise location and directions to the venue.
This will save your visitors time and effort in searching for the venue separately. Additionally, you can include markers for nearby public transportation stops, parking areas, or accommodations, to make it even easier for attendees to plan their visit.
5. Enhance Trust, Credibility, and User Experience
Last but not least, when you have an address on Google Maps, it helps to build trust among visitors. It shows transparency and provides customers with visual proof of your existence.
Besides, when visitors can see your location easily, they are more likely to trust your business, especially if they can find positive reviews and ratings associated with your location.
Also, adding a Google Map to your WordPress site can help to increase the brand creditably as well as smoothen the user experience by accurate direction of your business place. It’ll reduce the need for users to switch between platforms to find directions or search for your business on external mapping services.
By keeping visitors on your website, you can provide a seamless experience, increasing the chances of conversions and customer satisfaction.
🔔 People also read – Creating a News Ticker in WordPress: 3 Easy Steps
5 Best Practices for Using Google Maps in WordPress
Here are the 5 best practices for using Google Maps in WordPress sites to enhance user experience as well as stay ahead of SEO games.

✔️ Ensure the Right Placement of the Map
Appropriate Map placement is crucial for both usability and search engine optimization (SEO). For instance, you can display your location map on the contact page or the footer.
There are no strict rules for map placement on your website, just you should place your map in a location where it is easy for visitors to find and use.
✔️ Optimize the Map’s Loading Time and Performance
Make sure you have optimized the loading time of the map. Because A slow-loading map can be frustrating for visitors and can also hurt your SEO.
You can use a lightweight Google Maps plugin with all customization options like ElementsKit. If you use an alternative method instead of a plugin, minify and compress JavaScript and CSS files before publishing the Google Map on your website.
✔️ Ensure Responsive Design for Mobile Devices
Device responsiveness is a must. Make sure, the map automatically adjusts its size and layout to fit any screen size e.g. pc, tab, or mobile phone.
This is important for ensuring that visitors have a good experience viewing your map not only on pc or large screens but also on mobile devices.
✔️ Ensure Compliance with Google Maps API Terms and Conditions
Google Maps has a set of terms and conditions that you must agree to and follow them.
These terms and conditions are on how you can use Google Maps and their other rules. So it is important to read them carefully before using the API.
✔️ Maintain the Updated Version of the Google Maps Plugin
Google Maps regularly releases new versions of its API. These releases include new features and bug fixes.
So, it’s important to keep your Google Maps plugin up to date to ensure that you are using the latest version of the API and that you are not missing out on any new features.
📢 See also – What’s New in WordPress 6.2: 11 Major Features and Beyond!
FAQs
Why is It Important to Add to WordPress Website?
Adding Google Maps to your WordPress website can improve your website’s Local SEO, build visitor trust, increase website traffic, and provide a better user experience for your visitors.
How to Create Google Map Shortcode in WordPress?
To create a Google map shortcode in WordPress,
- Navigate to Google Map
- Search your desired location
- Navigate to “Share” ➔ “Embed a map”
- Copy the Embedded HTML code
- Now, create or open an existing page/post
- Add a new custom HTML block
- Paste the Embedded code in this block
- This embedded iFrame code will be converted into a shortcode when you edit the page or post
How to Add Google Maps in WordPress Site without any Plugins?
You can use Google My Maps and create a new map to add basic Map functionalities to your WordPress website without installing any plugins. Besides, you can use the default iFrame/shortcode method to embed the HTML code of your preferred location Google Map into the webpage.
Why is Google Maps Not Working on My WordPress Site?
Google Maps may not work on your WordPress site for incorrect API key configuration, authentication issues, or conflicts with other plugins or themes. So, it is recommended to check the API key settings and use updated version plugins and ensure compatibility with other plugins/themes.
Wrap it Up
To increase your business visibility, build visitors’ trust, boost local SEO, and drive more traffic to your website, adding Google Maps to the WordPress site is an effective solution.
And, now you know “how to add Google Maps in WordPress site” is not rocket science. By following the above 5 steps using ElementsKit and Google Map API, you can easily integrate a single or multiple locations map into your website. Just make sure, you are also following the best practices while integrating Google Maps into your site.
If you have any queries or suggestions, let us know, and we’ll be glad to hear from you. Thanks for reading!
Leave a Reply