According to ContentSqaure, the average bounce rate for websites in all industries is 45%. If your website’s bounce rate is above this range, it is at risk of getting penalized from the search result as bounce rate is a crucial ranking factor. Trying the parallax effect WordPress could save you.
The parallax effect is most suitable for the homepage or a landing page for a better user experience. It makes a web page dynamic. So, how can you add a parallax effect as there are no such features in the default WordPress dashboard?
Well, it is pretty straightforward if you know the process. Don’t be worried. In this article, I am sharing a detailed guide with the complete process to create parallax effects in 3 easy methods. Stay tuned and go through the article to be a pro in parallax effect.
Quick Overview
Parallax effect in WordPress is a design that loads the background page at a slower rate than the foreground. Here are the ways to add parallax effect in WordPress:
- Method 1 (Recommended and Easiest): Using a WordPress Plugin
- Install and activate Elementor and ElementsKit.
- Enable Parallax effects module.
- Create a page.
- Add parallax effect to background image.
- Method 2: With custom CSS.
- Upload the background image to the WordPress Media Library.
- Copy the image URL for later use in CSS.
- Create a new post or page from the WordPress dashboard.
- Add a Custom HTML block to the editor.
- Insert HTML structure to define the parallax section.
- Go to Appearance → Customize → Additional CSS.
- Paste the CSS code to create the parallax scrolling effect.
- Replace the placeholder image URL with your actual media file link.
- Save the CSS changes and preview the page.
- Fine-tune spacing, height, or responsiveness manually using additional CSS if required.
- Method 3: With WordPress theme.
- Install a WordPress theme with built-in parallax sections.
- Import a demo template that includes parallax backgrounds.
- Replace demo images and content with your own.
- Preview and publish the page
Why Use Parallax in WordPress?
- Improves visual appeal and page interactivity
- Enhances user experience and engagement
- Helps reduce bounce rate on key pages
- Supports storytelling and content focus
What is Parallax Effect WordPress?
Parallax effect in WordPress is a design that loads the background page at a slower rate than the foreground. It is a kind of illusion that feels like 3D but actually is on a 2D surface. As a result, on mouse scrolling, the page gives a visual effect. It feels deep and immersive.
Parallax WordPress scrolling is a web design technique in which the website background moves at a slower pace than the foreground.
– Wix
Why Should You Use Parallax Effect WordPress?
There is no doubt that the parallax effect looks great when added in the right way. So, is it essential to add parallax effects for any website? The answer is no. But there are certain benefits of it –
Reduces Bounce Rate
Bounce rate has a significant impact on the Search Engine Ranking Position (SERP). A higher bounce rate gives a signal that users are not interested in the page. Adding parallax effects reduces bounce rate by providing an immersive vibe to the visitor at the first impression.
Better User Experience
Why do webmasters spend hours on website design? To give a good user experience to the visitor, right? The parallax WordPress effect does this job perfectly with a classic user interface on the page.
More User Engagement
Do you want to encourage users to take any action on the page? It is not possible unless you can convince them. This requires a positive feel on the web page, and you can do it perfectly with the parallax effect.
Pro Tip
Improve the User Interface (UI) to grab audience attraction. It boosts user engagement as well as ranking on search results.
Types of Parallax Effects in WordPress
Though the basic parallax scrolling in WordPress is the same, there are some variations for it. Reflecting the styles for scrolling effects, there are four different types of popular parallax effects for websites.
On Scroll Effect
The most common and attractive type of parallax effect is the scroll effect. Here, the background image gives a visual illusion by loading slower than the foreground. However, it requires advanced WordPress backgrounds to show the effect.
Simple Animation
It could be simple animation like fading in, fading out, zoom in, zoom out, and more. Usually, it is ideal for simple images.
Tilting Effect
It is the parallax WordPress effect that tilts the selected image right or left. Depending on the CSS code you are using, or the page builder plugin, it may vary.
On Mouse Move
As the name suggests, the effect works based on the mouse move. When the visitor is moving the mouse, the selected image will move accordingly and show various effects.
How to Add a Parallax Effect to Any WordPress Theme?
You can use three different ways to add parallax effect in WordPress –
- ✅ With a WordPress parallax scrolling plugin
- ✅ Adding custom CSS
- ✅ Using a WordPress theme with parallax effect
Obviously, each way won’t suit everyone. Particularly, if you are not a coder, you must be looking for the simplest way. To be honest, the best way to show advanced parallax effects is: using the ElementsKit Plugin. The updated version of ElementsKit is offering tons of features besides the advanced parallax effect.
Wondering how? Check the next part of this article.
Why ElementsKit?
ElementsKit addon with Elementor page builder makes it possible to design any Website without coding knowledge.
Method 1: Add Parallax Effect Using WordPress Parallax Plugin ElementsKit
Performing the task requires Elementor and ElementsKit. So, before you start, install these plugins as per the following instructions.
Step 1: Install the Elementor Page Builder
Add and install the Elementor page builder before you install the ElementsKit plugin. If you already have installed Elementor, skip this step and go for the next.
Go to your WordPress Dashboard. Keep the mouse cursor on Plugins, and it will show ‘Add New’ option.
From the options, click add new=>> Search Elementor.
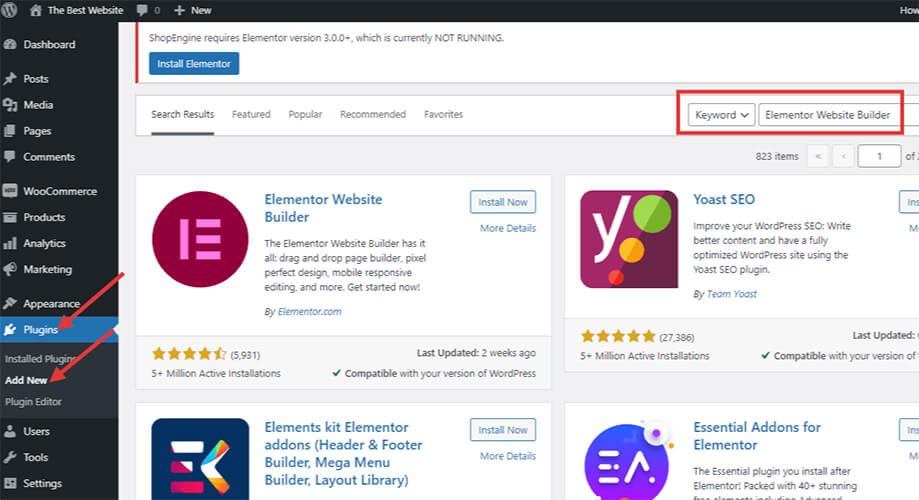
In the search list, you will see Elementor as shown in the image. Click the install button and then activate the plugin.
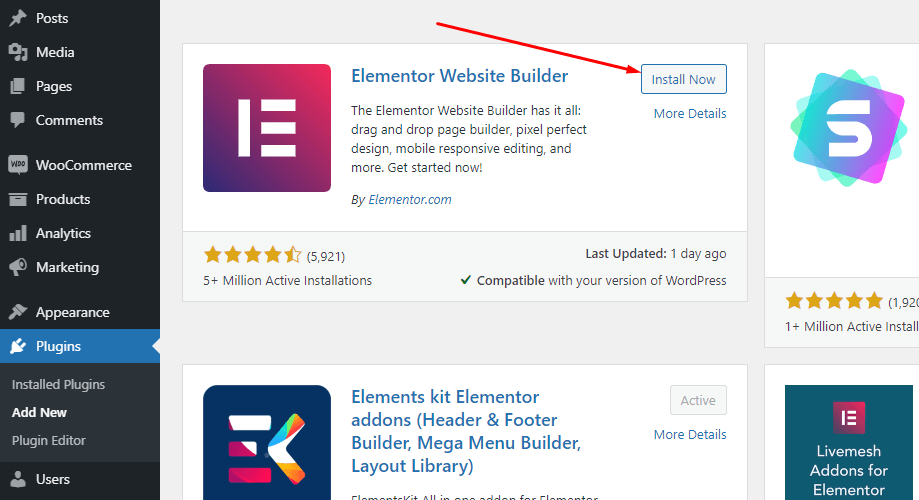
Step 2: Install ElementsKit Plugin
Like the previous step, go to Plugins > Add New > Search for ElementsKit. You will see the plugin in the list. Hit the ‘Install Now’ button and then activate the plugin. It is a WordPress plugin for parallax effect and most advanced features.
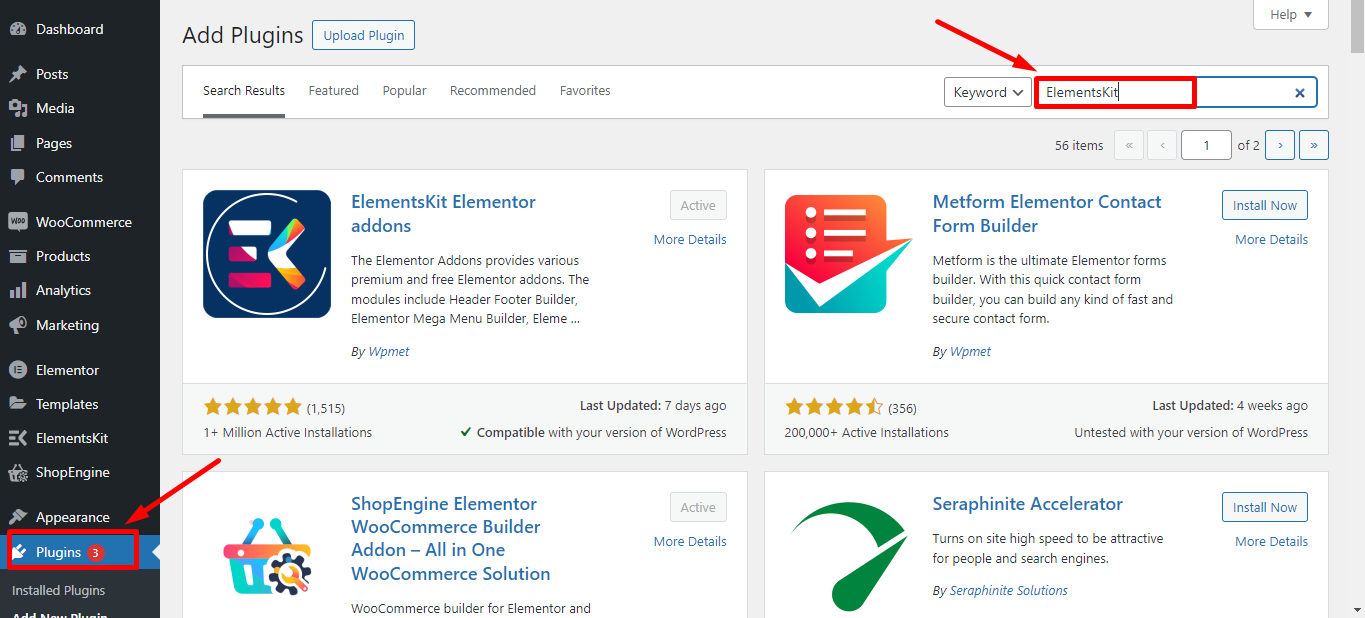
Step 3: Enable the Advanced Parallax Feature in ElementsKit
Loading the background slower than the foreground requires enabling the ElementsKit Parallax Effect module for Elementor. From the WordPress dashboard, in the right bar, find ElementsKit and click on it. In the options panel, click modules.
From the list of modules, enable ‘Parallax Effect’. Then save the changes.
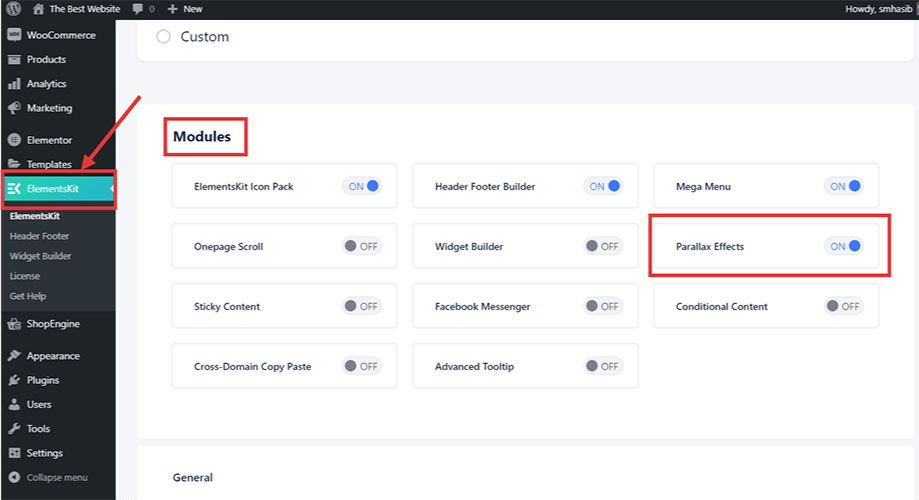
Step 4: Create a New Page to Add Parallax Effect
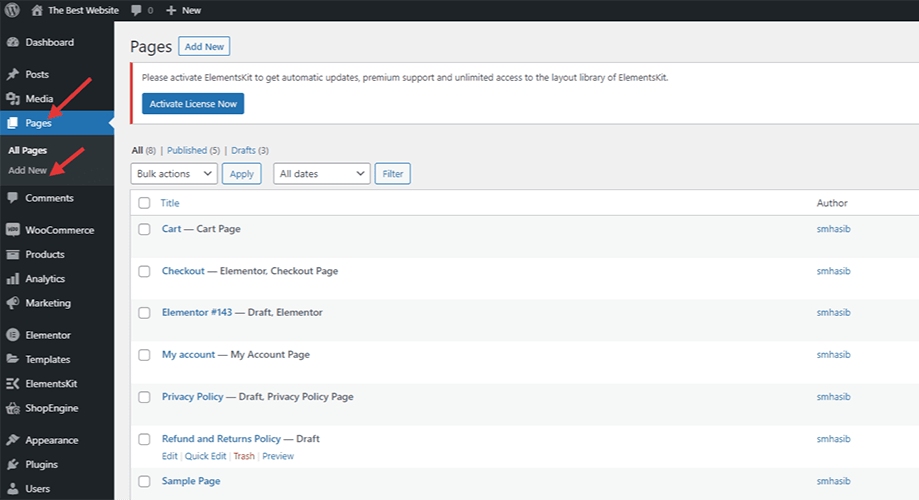
From the WordPress dashboard, go to appearance > Pages > Add New. Click the add new button, and a new page will be created.
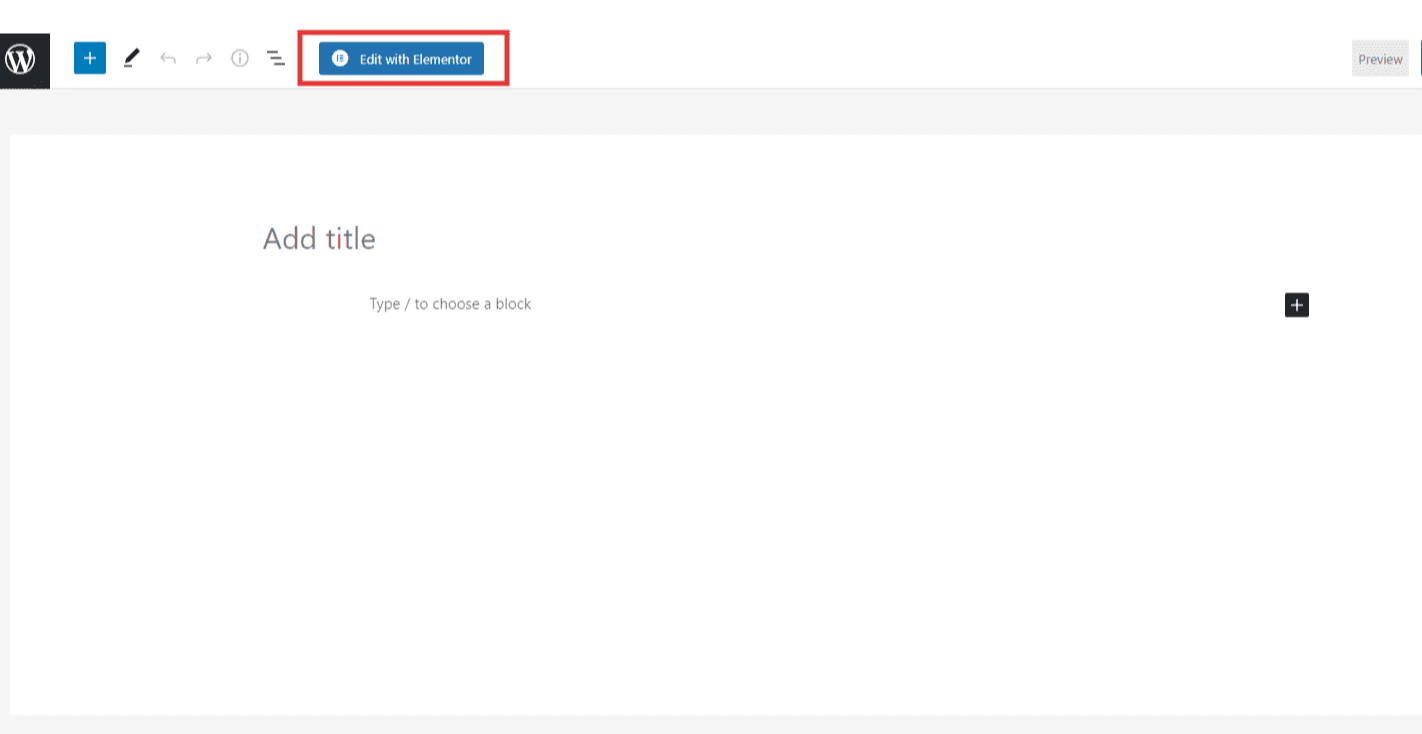
Select ‘Edit with Elementor’ from the top.
Step 5: Add the Parallax Effect WordPress Background Image
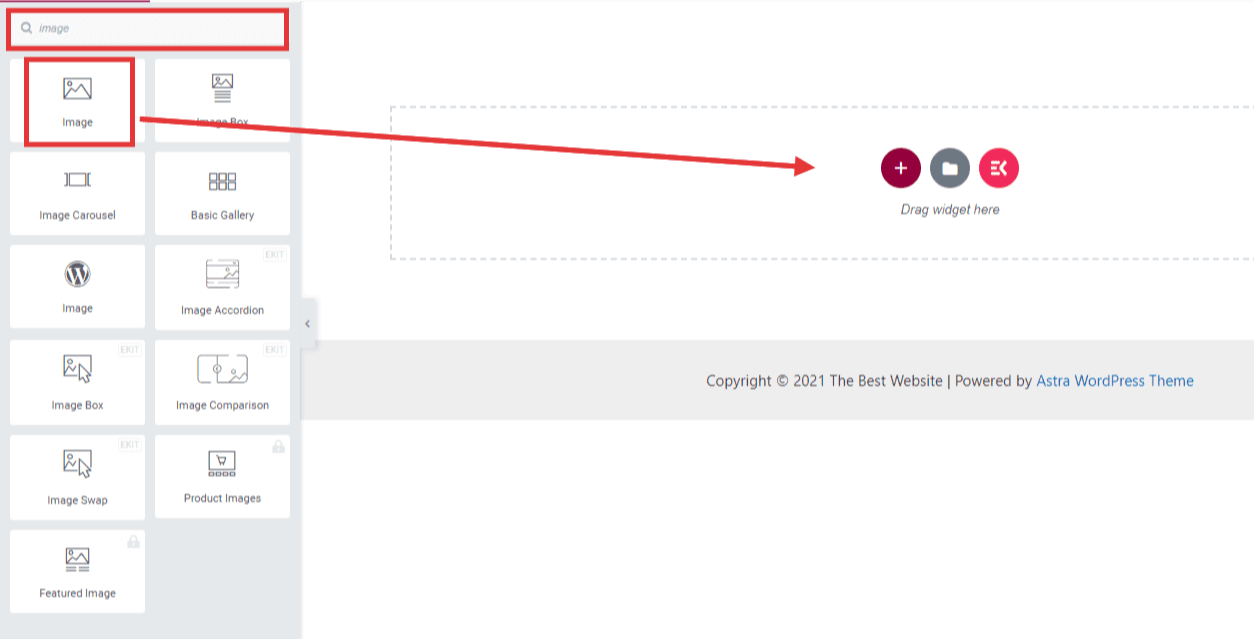
In page editing, you can use advanced WordPress backgrounds for the parallax effect. To add the background image, select the image widget from the left bar. Drag and drop the widget to the page editor.
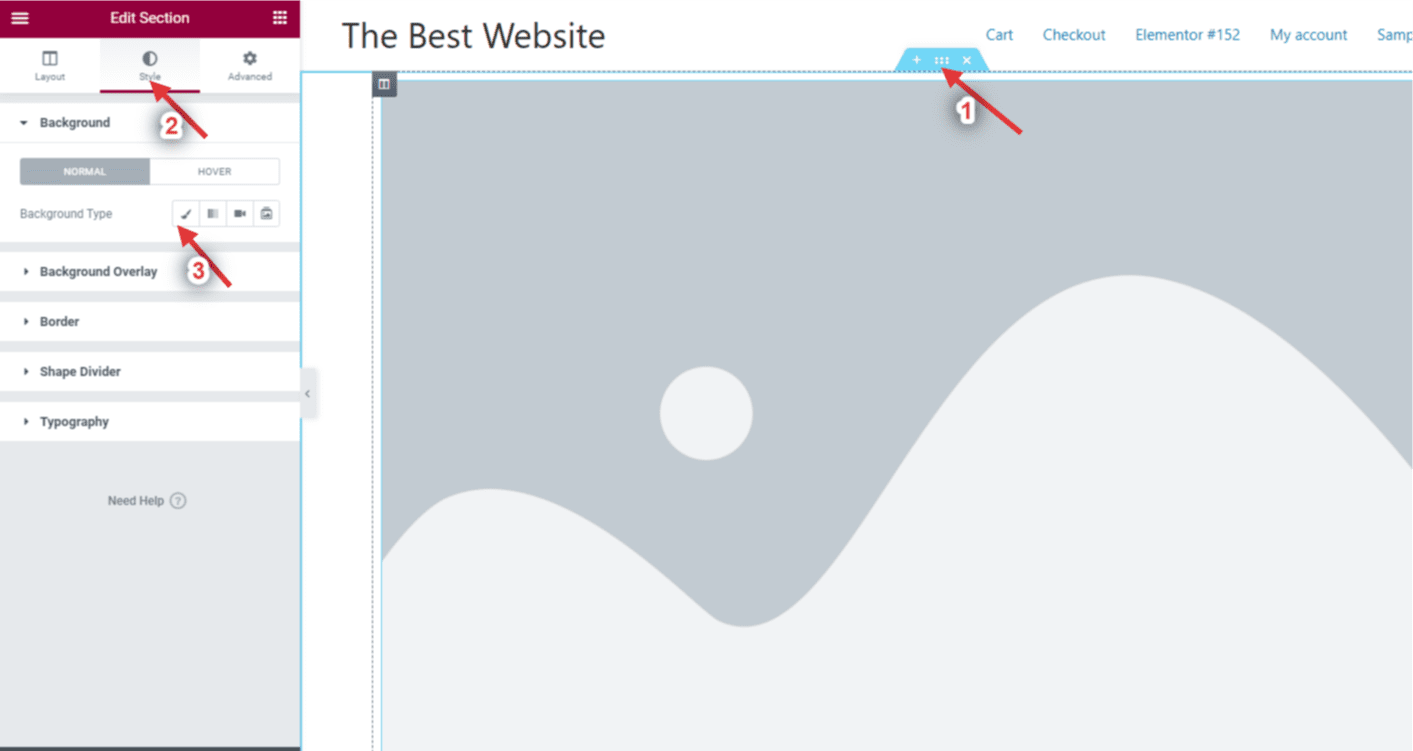
On the top of the image widget, you will find dots as shown in the image. Click it and then go to the Style tab. Choose a background, and then choose the background type. Select an image as the background so that you can add a background image.
Choose the image from the WordPress media library that you want to show in the back.
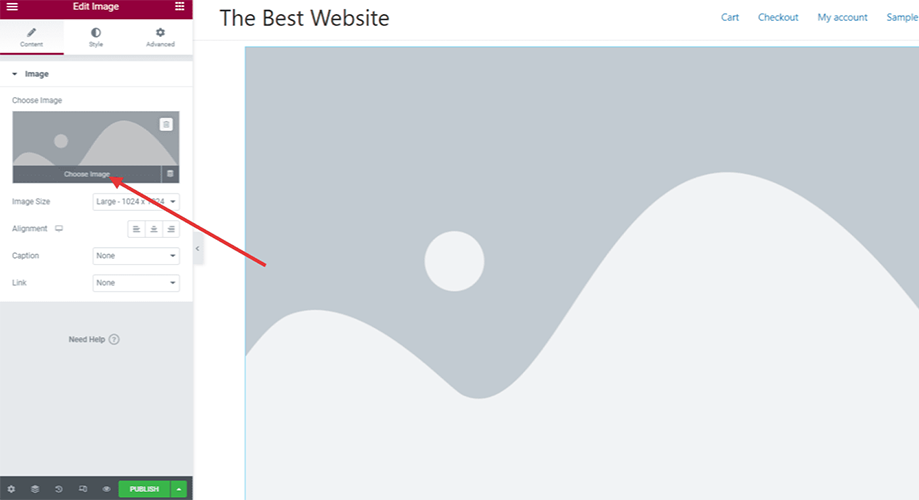
Step 6: Add New Image On the Page
Add an additional image on the screen with ElementsKit effects. To perform the task, click on the image icon. Choose the image that you want to show with animation.
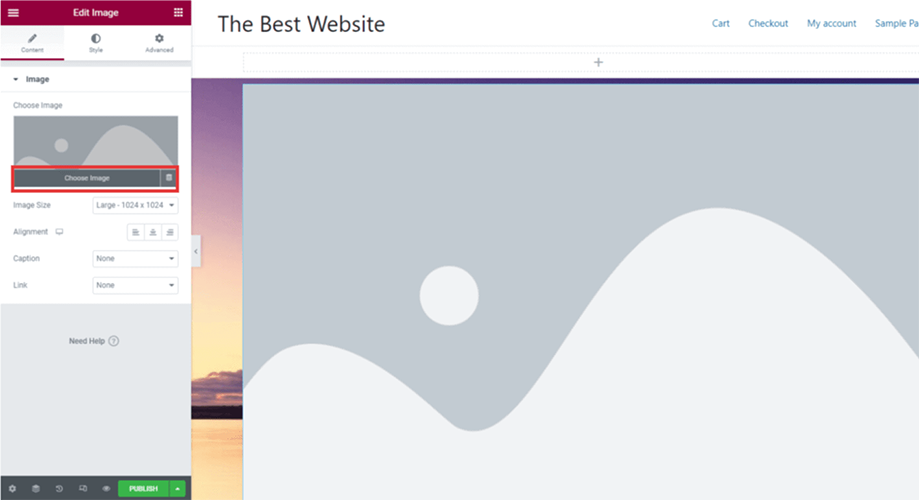
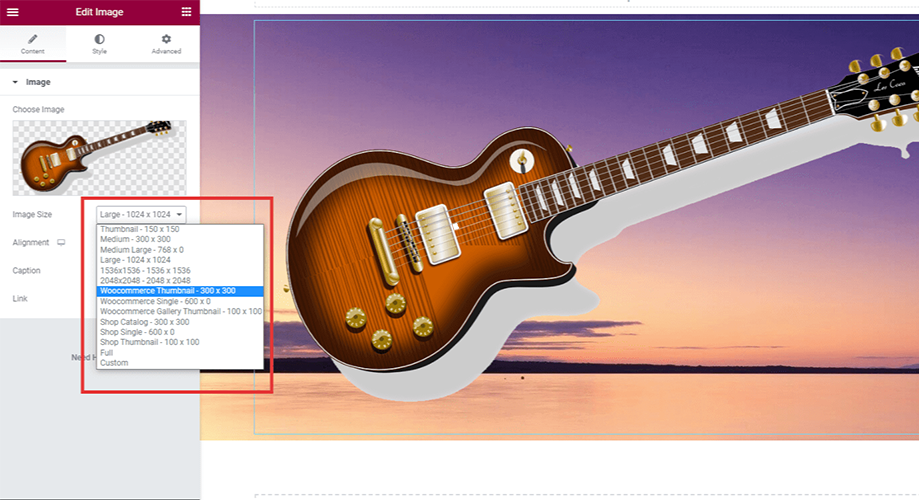
After adding the new image, you can add the image thumbnail size from the left bar as shown in the following picture.
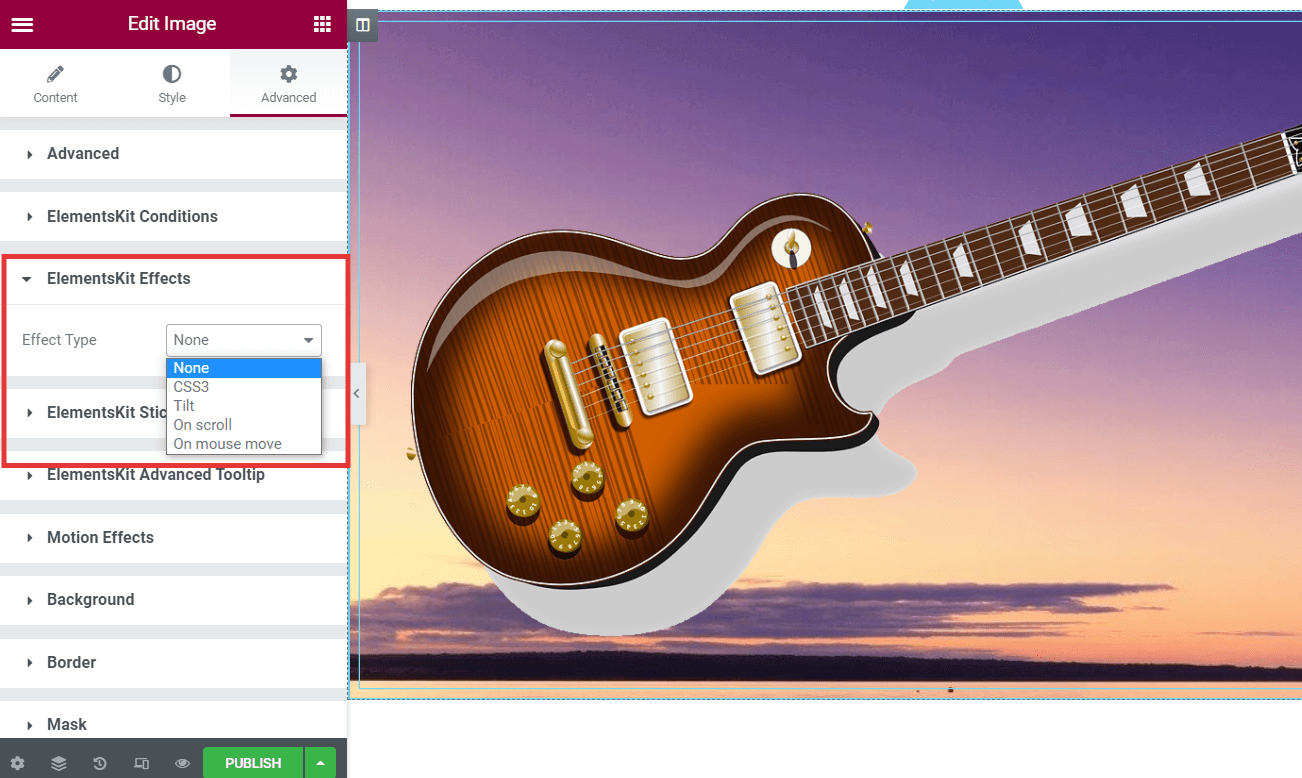
To add animation for the new image, go to the advanced tab in the options panel and click ElemenetsKit Effects. Choose the effect type from the drop-down menu.
You will find four different options. Choose one that you want.
There are tons of customization options in the options panel. Go through one by one and preview the effects.
To learn more details, read the documentation of ElementsKit Parallax Effect module for Elementor.
Finally, in the bottom left, there is a preview button. Hit the button and preview the background parallax effect.

You can also check the preview for mobile devices. ElementsKit optimizes the pages to be responsive so that the mobile users and tab users experience the same.
If everything goes well and the added effects are working as you want, publish the page on your WordPress website.
Method 2: Add Parallax Effect Using Custom CSS
If you can code and want to add the scroll effect manually, adding custom CSS is enough. But the whole process needs a manual operation.
First, go to the WordPress media library and add the image for the parallax effect. There you will get an URL for the parallax image. Copy the URL for the next step.
In the post area of WordPress dashboard, click add new. A new post will appear. Click the ‘+’ icon on the right side and then click browse all.
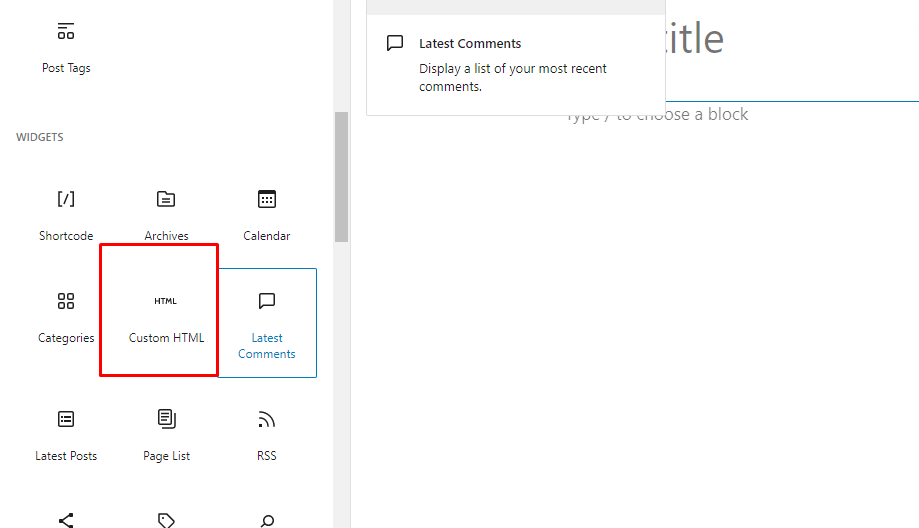
There, post the following code –
<div class="parallax">
<div class="parallax-content">

Your Main Content

</div>
</div>
Now you need to add the custom CSS. For this, go to Appearance from WordPress Dashboard. Select Customize.
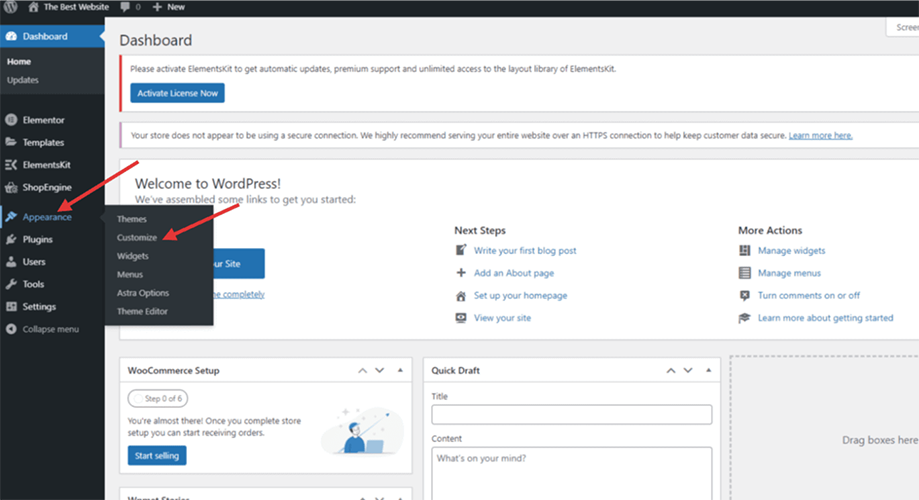
Then choose additional CSS.
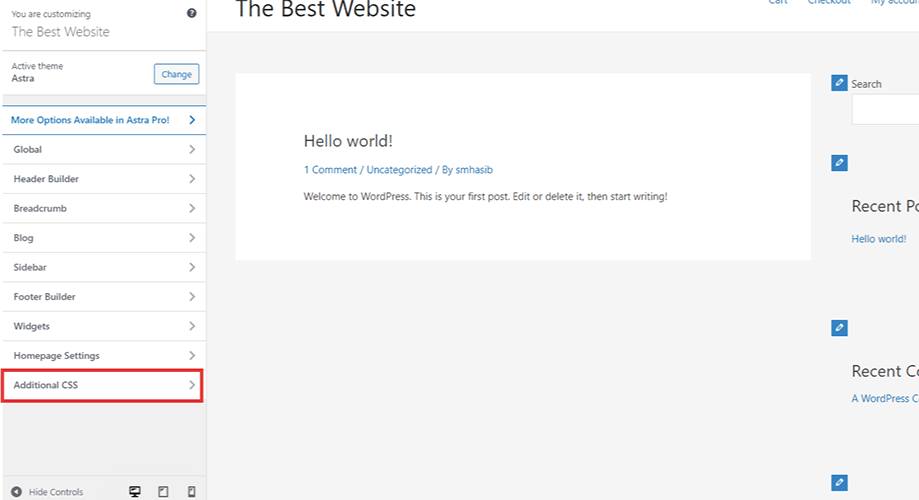
Now there will be a section for the custom CSS code.
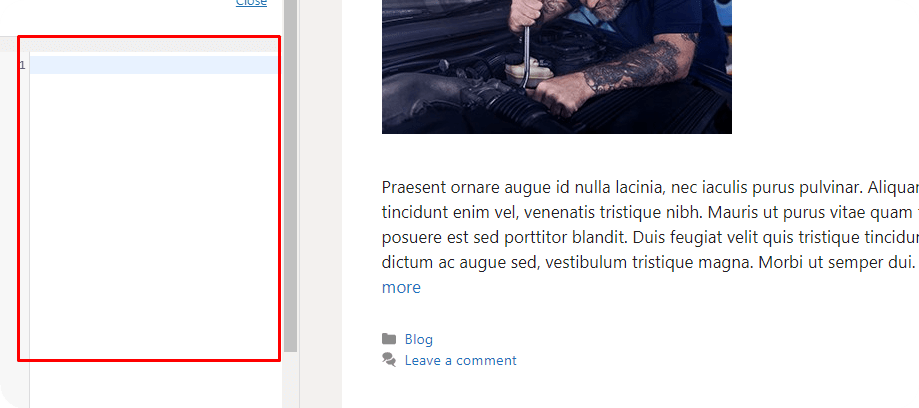
Paste the following Code to add parallax effect –
.parallax {
background-image: url("https://your_background_image_url_for_parallax_effect");
height: 100%;
background-attachment: fixed;
background-position: center;
background-repeat: no-repeat;
background-size: cover;
margin-left:-410px;
margin-right:-410px;
}

.parallax-content {
width:50%;
margin:0 auto;
color:#FFF;
padding-top:50px;
}
Replace the link with the image link and save. Now check the preview, and you will see the effect. However, any customization requires advanced-level coding. We suggest watching some WordPress video tutorials before adding any custom code.
Method 3: Add Parallax Effect in Background Image Using Parallax WordPress Themes
You can create parallax effects using some WordPress themes too. The process actually works with the templates. Different WordPress themes offer to import the demo content directly into the WordPress website. So, if you are just beginning a WordPress website and thinking of adding the parallax effect, check for the demo pages. If you find a template with the feature, import it.
After importing the template, remove the demo background image and other sections. Replace other contents with yours and then hit the preview button. You will have the option to check the effect.
Remember, options with built-in features are limited, and you can’t do much customization. Also, you will hardly find a free WordPress theme that offer the parallax effect.
Frequently Asked Questions
Can You Add Parallax Effect Using Only Elementor?
Yes, if you have the Elementor Pro version. Otherwise, either you need a custom CSS or WordPress parallax plugin to add the effect. However, with the built-in templates available in the free version, you can show some basic effects.
Why ElementsKit While There Are Other Plugins?
Well, there are tons of plugins out there that might have the parallax effect as a built-in feature. But ElementsKit will allow you to go a few extra miles. Besides loading the background slower than the foreground, you can use animations for individual images. There are highly customizable features for users.
What Are the Benefits of Parallax Effect in WordPress?
So, we already have mentioned some of the benefits of parallax backgrounds. It creates a user-friendly interface in a WordPress site. The customization option in ElementsKit allows grabbing audience attraction at a first impression.
Is parallax scrolling bad for SEO?
Well, if you consider a blog post, you shouldn’t use the parallax effect. Why? It makes keyword optimization difficult for the post. On the other hand, for landing pages or one page WordPress websites, using the parallax effect won’t be a bad idea regarding SEO.
Can I Add Advanced WordPress Background with the ElementsKit Plugin?
Yes, it is possible to add a custom and advanced background with the ElementsKit plugin. From the ElementsKit Effect option, find out all the customizable features and choose the right one as you need.
Should I Use A WordPress Theme that Has Built-In Parallax Scrolling?
Well, you can install a parallax WordPress theme with the default parallax effect. But that won’t be a feasible idea. Adding advanced background images could be hard with default features. Also, you might have to sacrifice some other essential features just to grab the scrolling effect.
Final Words
If you have gone thoroughly to this post, it is now easy for you to add the parallax effect WordPress to any website. Though we have shared three different methods, using the ElementsKit plugin is the best idea. ElementsKit has highly customizable features for the scrolling effect.
Adding custom CSS could also be the solution, but that requires a deep knowledge of coding. So, install the ElementsKit Plugin and explore new opportunities for the website design.


Leave a Reply