
Are you having difficulty adding auto-populate fields in WordPress form? Or have no idea how to do it? We’ll teach you how to do it most comprehensively.
Integrating auto-populated form fields into your platform or website empowers users with an efficient, time-saving mechanism that enhances user satisfaction. It eliminates the hassles of repeatedly entering identical information across multiple forms, making the user’s journey smoother and more enjoyable.
Let’s cut to the chase and begin our journey on how to add auto-populate fields in WordPress form.
Unraveling the Concept of Auto-Populated Fields
What is an Auto-Populate Field in WordPress?
An auto-populate field in WordPress is a dynamic form element that automatically fills in its content based on predefined data or user input. It is typically achieved using query strings or data from other form fields, making filling forms more efficient and user-friendly.
Moreover, having an auto-populate form is a testament to your commitment to optimizing user experiences. It reflects a deep understanding of your user’s needs and a genuine desire to streamline their interactions with your platform. This user-centric approach can foster long-term loyalty and positive word-of-mouth, ultimately driving business growth and success.
How Does an Auto-Populate Field Enhance User Experience?
Here are the few reasons how it improved user experience:
✔️ Enhances Accuracy
An auto-populate field improves accuracy by filling in form answers for visitors. Auto-populate field eliminates the need for manual data entry. Mistakes and inconsistencies are more likely to happen when users type their information. Auto-populate fields ensure the information on the form is correct and consistent.
✔️ Minimizes Form Abandonment Rate
An auto-populate field speeds up form-filling, reducing abandonment. It leads to a higher likelihood of form abandonment. Long, complex forms can overwhelm users and lead to a higher form abandonment rate.
✔️ Keeps Data in Sync and Updated
An auto-populate field automatically fills in data from a single source. It ensures that all data examples are the same and up-to-date. If a user updates their contact information in their profile, it will reflect in any form.
Getting Started with MetForm Pro
We know that there are various plugins available in the market today. All deliver the same purpose and function but vary differently in features.
In this article, we will use MetForm, an ideal plugin for building WordPress forms. Since we are talking here about the “Auto Populate Field,” we need the MetForm Pro version.
First, let us know its Pro features which make it as an ideal plugin:
- Multi-Step Form: Divide lengthy forms into user-friendly sections, boosting completion rates.
- Conditional Logic: Organize questions into categories, showing relevant queries based on user selections.
- Calculation: Use this pro field to perform instant calculations and display results.
- WooCommerce Checkout: Combine product selection and checkout forms on a single page.
- REST API Support: Integrate form submissions with third-party API URLs or Webhook.
- Zapier Integration: Integrate MetForm with Zapier for enhanced automation.
- Auto Populate Field: Customize form fields with extra settings for improved functionality.
Click here to get started with MetForm Pro.
Adding an Auto-Populate Field in WordPress Form Using MetForm
The auto-populate field is a premium feature within MetForm. It enables you to set default configurations to populate form meaningfully. Easily showcase elements in an enabled state for your visitors or customers. You can effortlessly assign default values to fields by modifying the URL, streamlining your form creation process like never before.
You can use this feature to auto-populate fields like:
- Switch
- Image Select
- GDP Consent
- Checkbox
Adding an Auto-Populate Field for Switch
Follow the steps to create an auto-populate field for Switch:
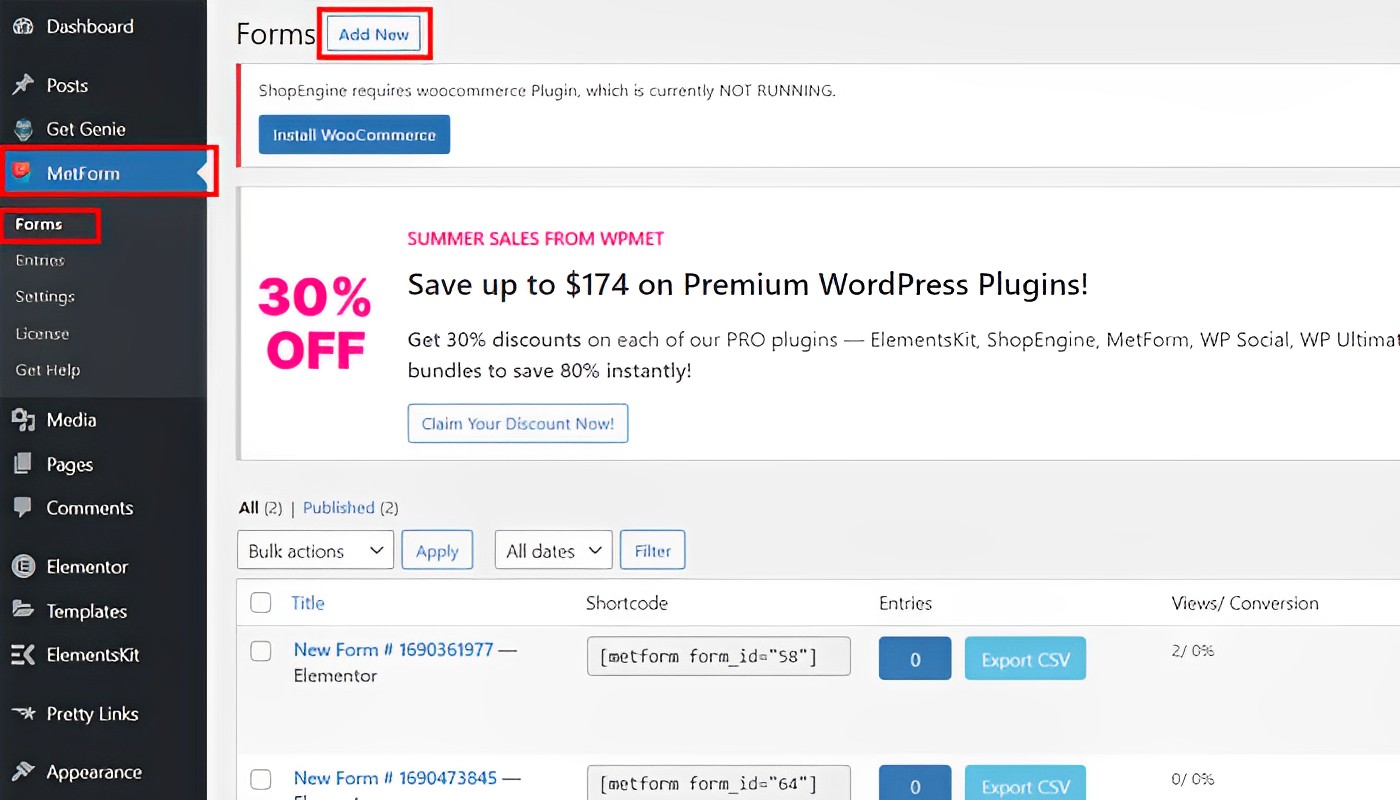
1. Open your website and navigate to your dashboard➡Locate MetForm from the menu➡Choose “Form” ➡Click “Add New”. You will be directed to the different forms.
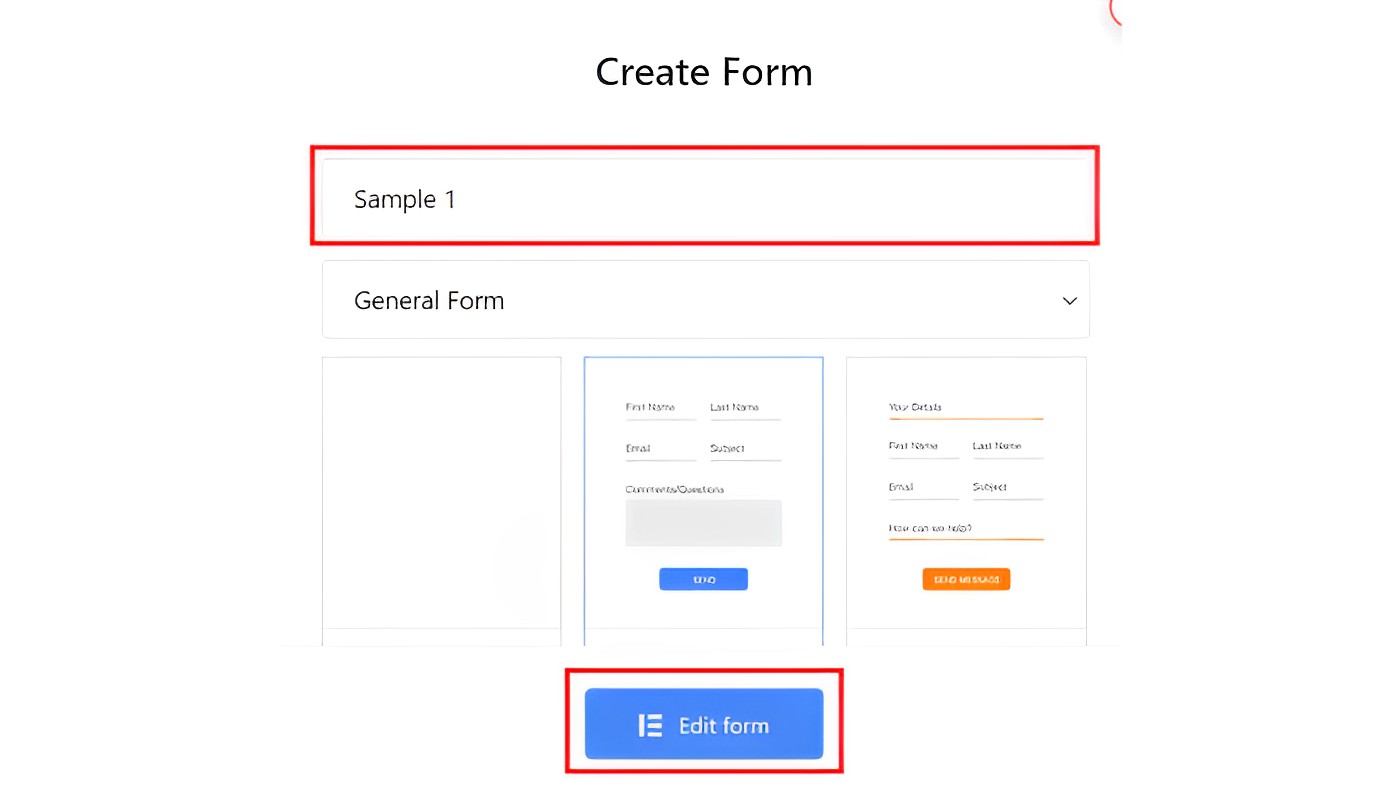
2. Enter your Form Name and select your template (Note: if you want to create your form from scratch, choose the blank form). Click on “Edit Form” to redirect you to its settings.
3. Add section (+)➡Look for Switch and drag the widget.
3.1. Go to “Settings” ➡ Turn on “Get Value from URL?“

3.2. Go to “Content” ➡enter the name for your switch field (ex. “switch” as name)➡enter “yes” in the “Active Text” field.
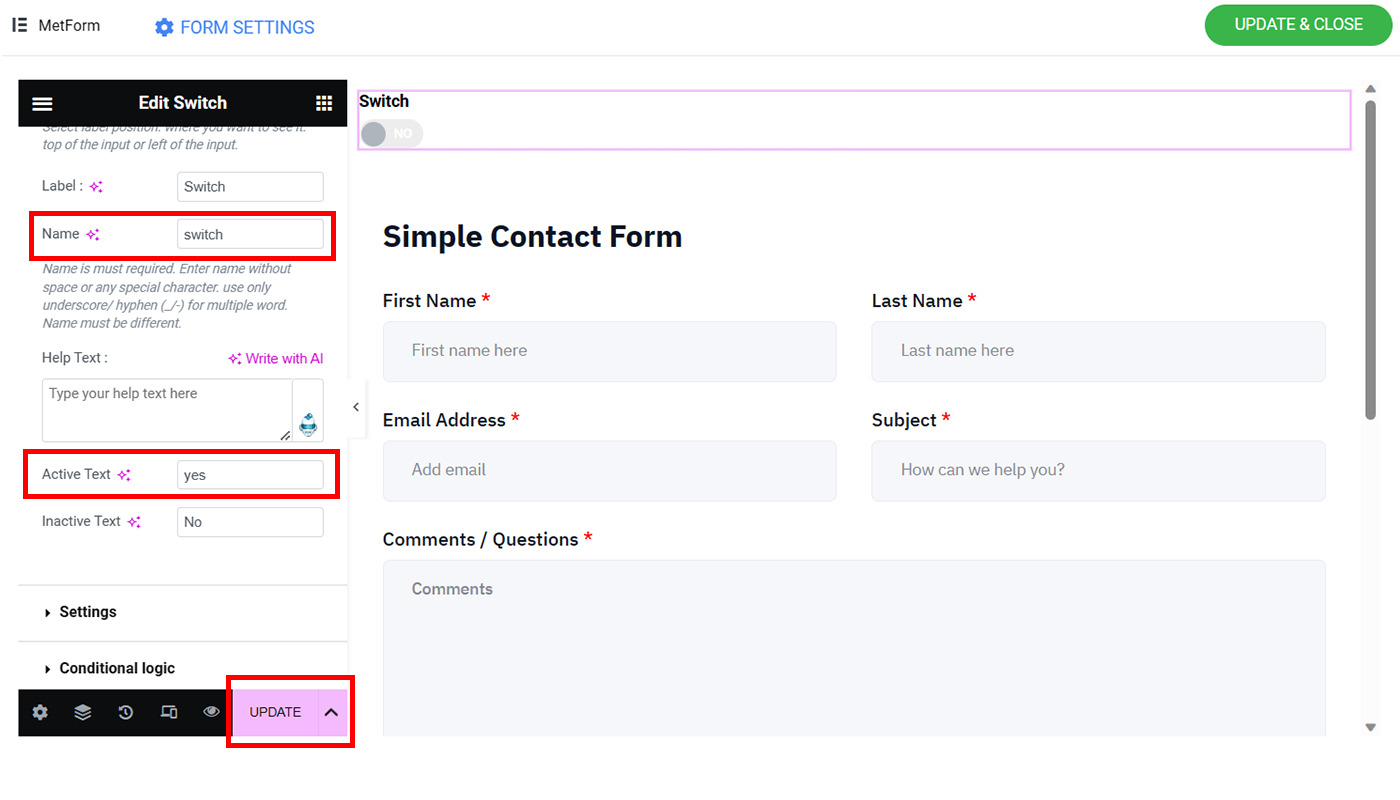
4. Click on the “Update” button.
Adding an Auto-Populate Field for Image Select
To add the image select in your auto-populate field, follow these steps:
1. Add section (+)➡Click on the 3 lines➡Look for Image Select and drag the widget.
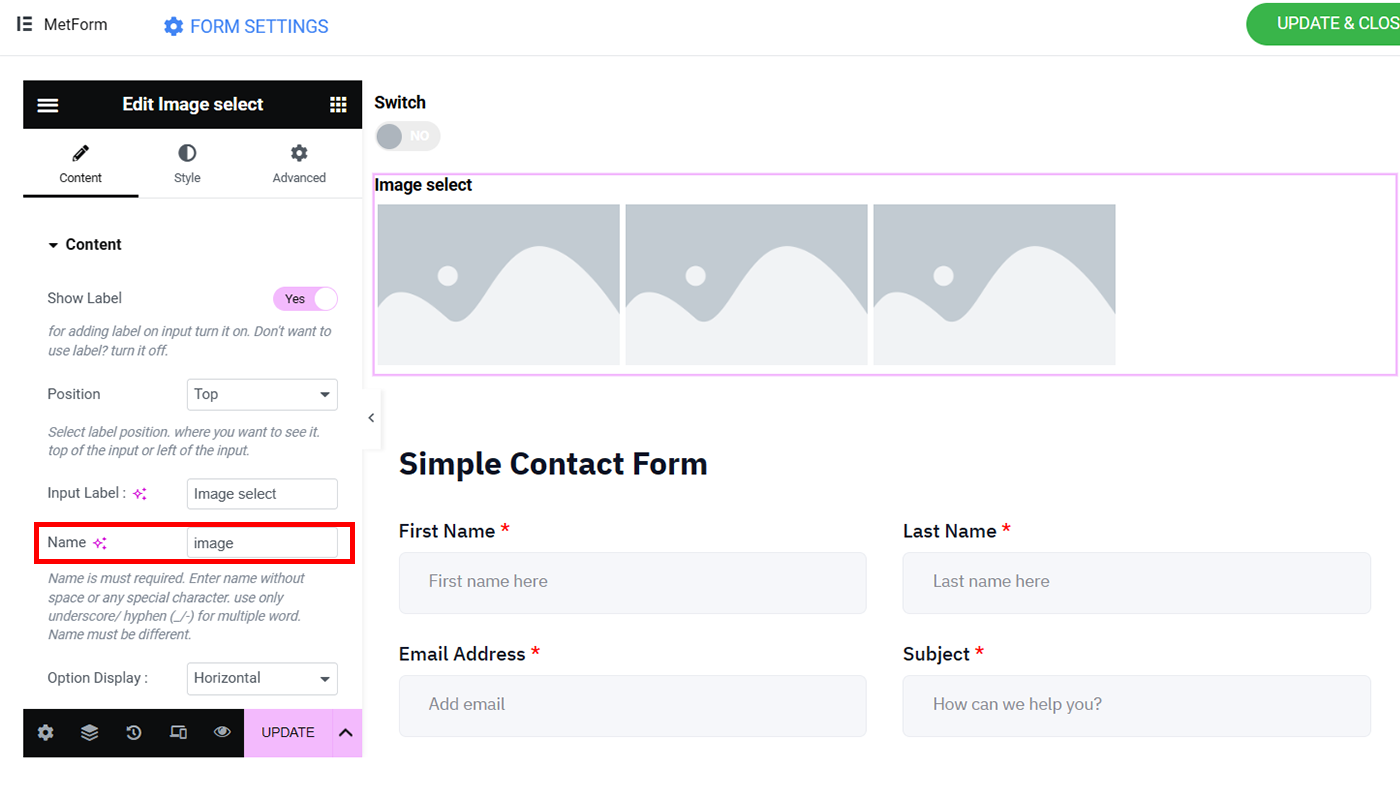
2. Go to “Settings” ➡ Turn on “Get Value from URL?“

3. Go to “Content” ➡ and enter the name for your image select field (ex. “image” as name).
4. Under “Image Select Options,” you will see a list of items for your image selection.
5. Click the first item➡. Upload your thumbnail➡Under “Option Value,” enter the number for the sequence of your image (ex. 1).
6. Repeat step 5 until you complete setting up your items. Note: You can add as many items you want.
7. Click on the “Update” button.
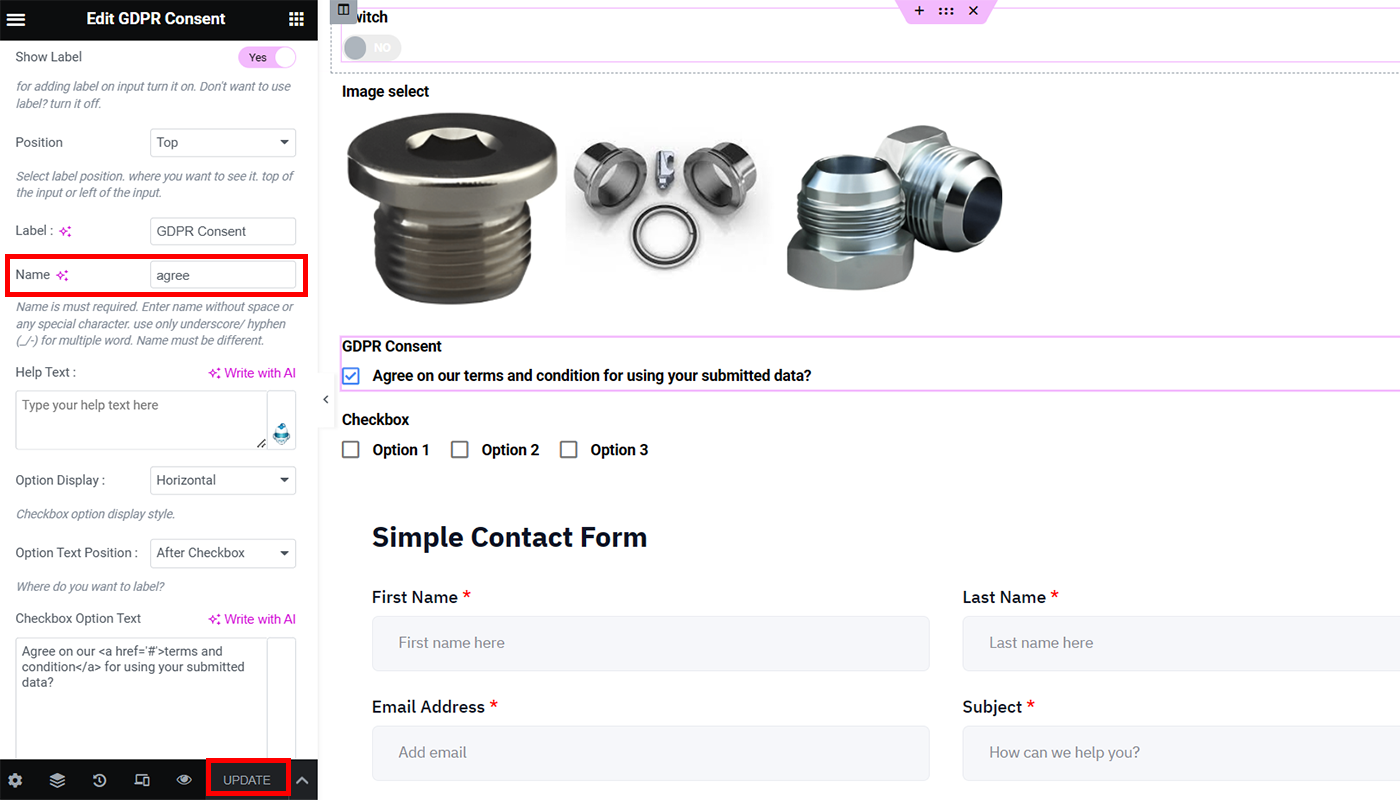
Adding an Auto-Populate Field for GDPR Consent
Follow these steps to add GDPR consent to your auto-populate field:
1. Add section (+)➡Click on the three lines➡Look for “GDPR Consent” and drag the widget.
2. Go to “Settings” ➡ Turn on “Get Value from URL?“
3. Go to “Content” ➡Enter the name “agree” for your GDPR Consent➡Click on the “Update” button.
Adding an Auto-Populate Field for Checkbox
Follow these steps to add a checkbox on your auto-populate field:
1. Add section (+)➡Click on the three lines➡Look for the “Checkbox” and drag the widget.
2. Go to “Settings” ➡ Turn on “Get Value from URL?“
3. Go to “Content” ➡Enter the name “checkbox” ➡Under “Checkbox Options,” you will see a list of options (Note: You can add as many checkboxes as you want). Make sure that you remember the option value you entered, as it should be needed when you enable your checkbox auto field in your final output.
4. Click on the “Update” button➡Click on the “Update & Close” button at the top right corner of your screen. Then, you will be directed to your MetForm menu.
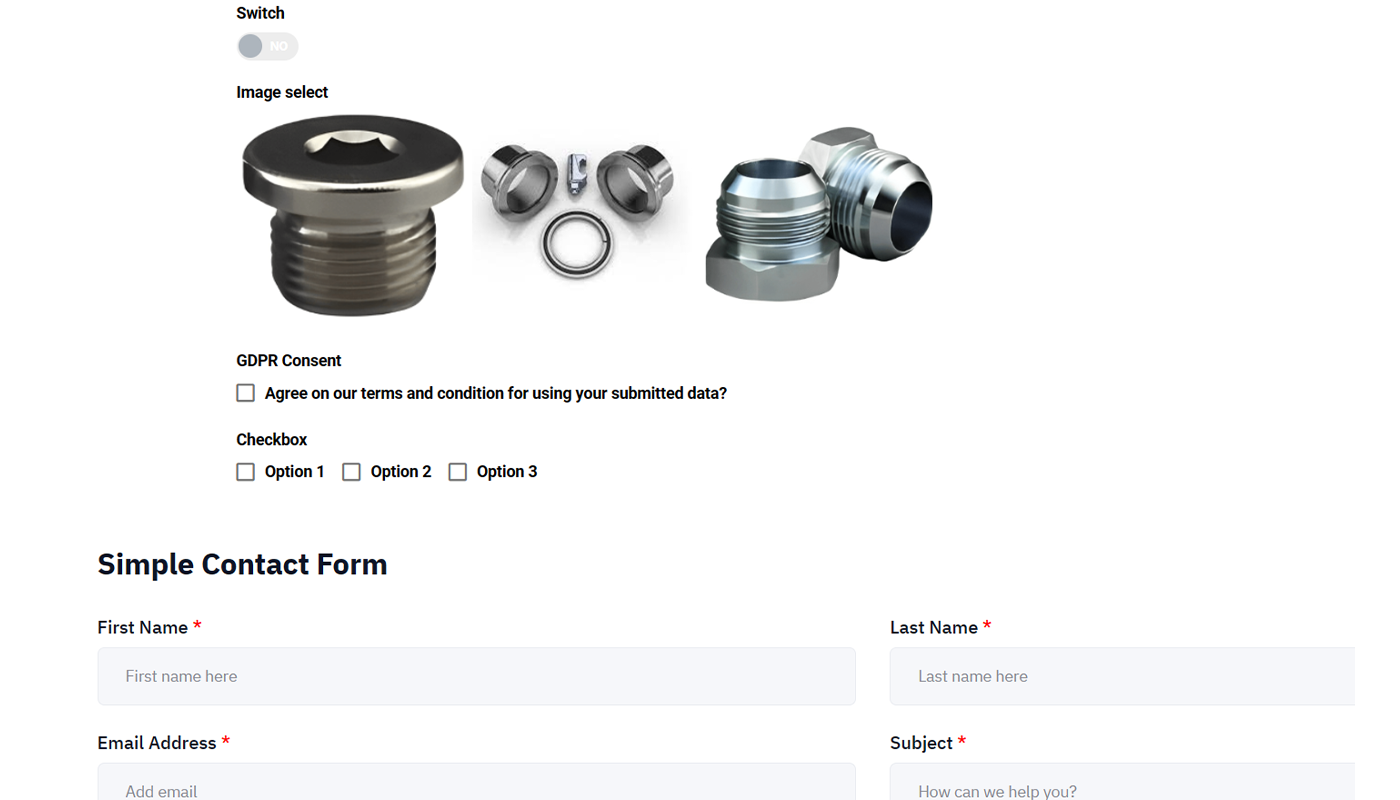
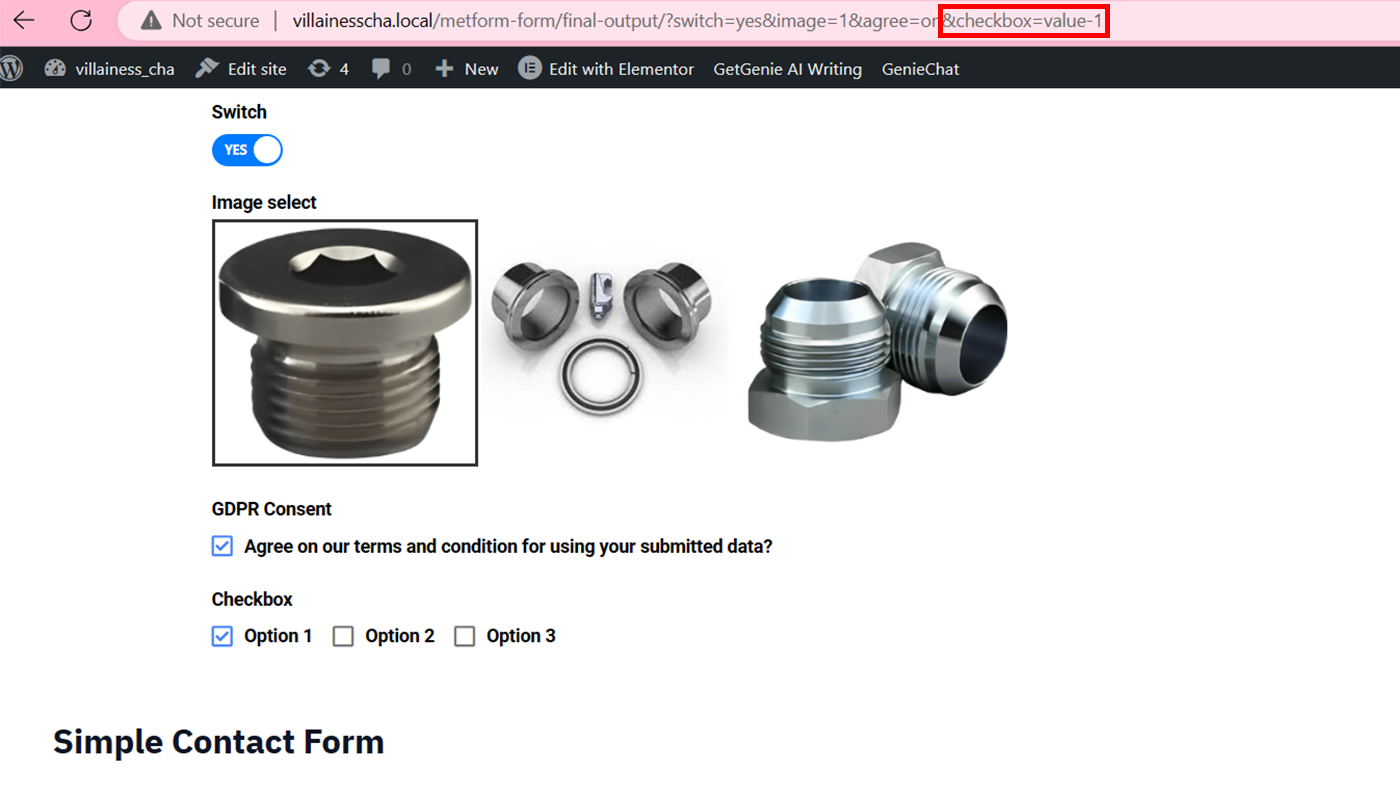
Final Output
View your form to see the final result. This is what our auto-populate example looks like:
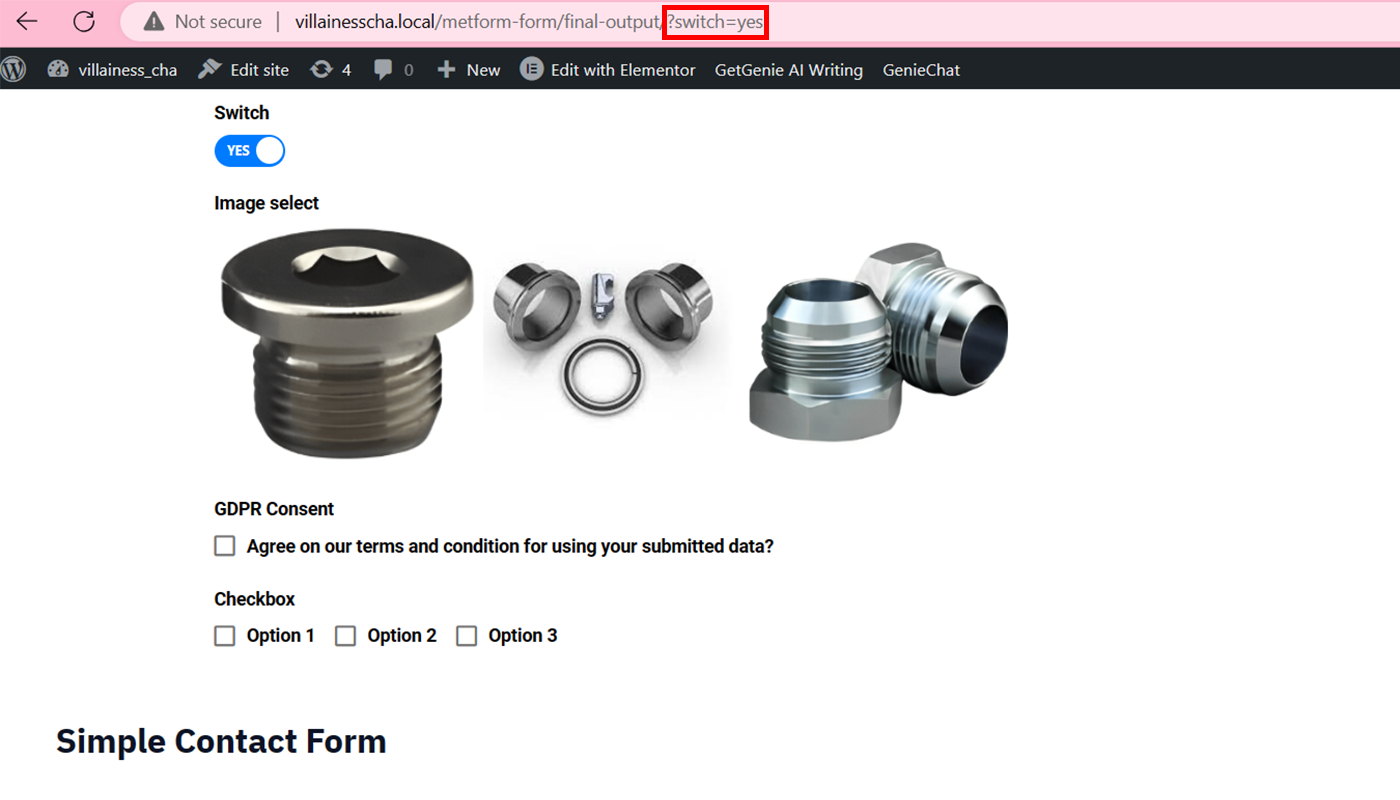
To enable your Switch auto-populate field, go to the URL➡enter “?switch=yes” at the end of your URL➡Hit the “Enter” button. Note: Make sure to enter the correct name and the active text. If they were written with the first letter as capitalized, then you need to enter it the same way.
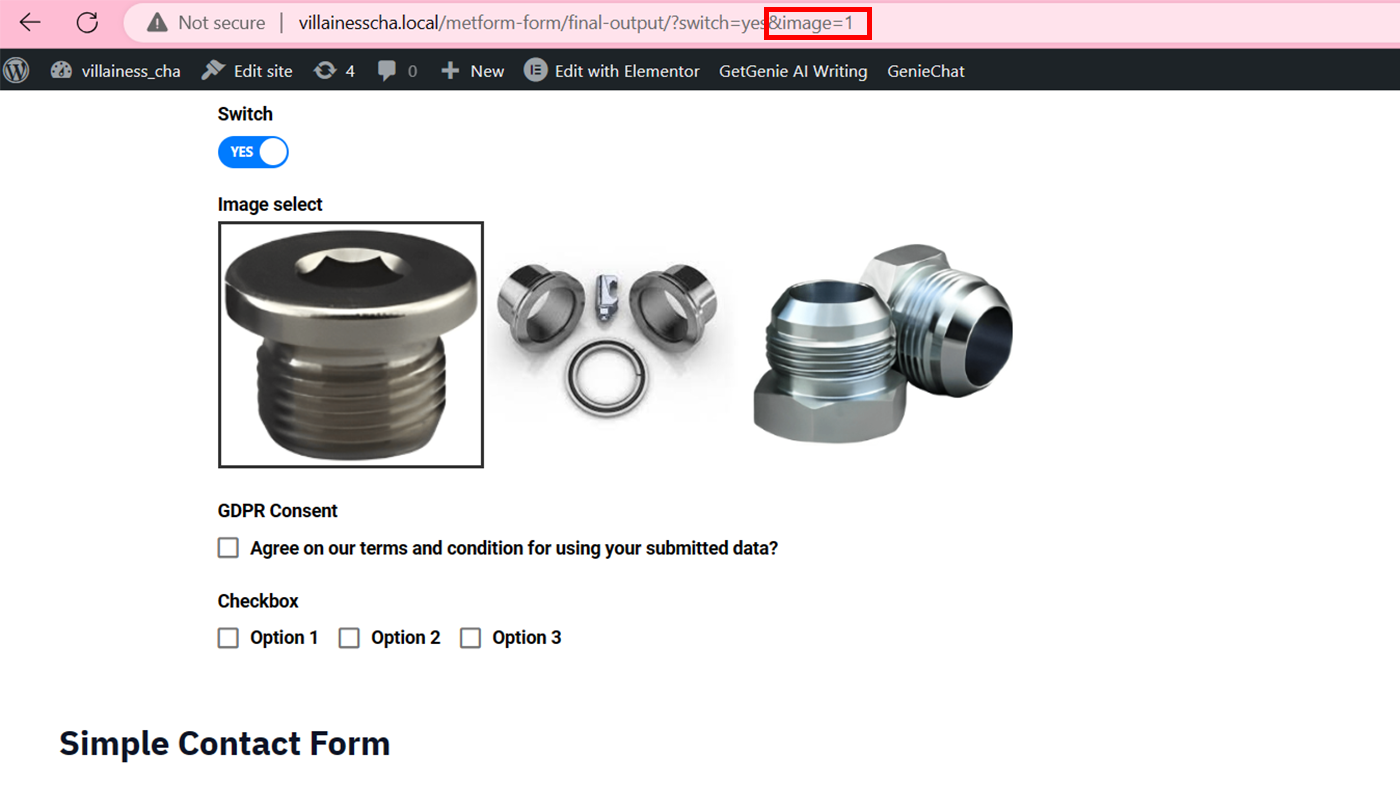
To enable your image to select and Switch fields, go to your current URL➡enter “&image=1” ➡Hit the “Enter” button. The result will differ based on the name and option value that you insert.
To add your GDPR consent, go to your current URL➡enter “&agree=on” ➡Hit the “Enter” button.

To add your checkbox field, go to your current URL➡enter “&checkbox=value-1” ➡Hit the “Enter” button. If you want to add more than one option, you will need to separate the value by a comma (,) (“&checkbox=value-1,value-2“).

FAQs
Is coding knowledge necessary to use MetForm?
No coding skills are necessary to use the MetForm plugin on your website. It offers a drag-and-drop form builder within Elementor. You can design forms using shortcodes or choose from over 30 pre-designed form styles. Using MetForm for contact forms eliminates the need to buy the Elementor Pro version.
What is required to use MetForm?
MetForm is an addon designed for the Elementor builder. It enables users to create various forms. The only need is the Elementor plugin. We recommend using the latest version of Elementor to leverage the capabilities of MetForm.
Does MetForm need Elementor Pro?
You don’t need to buy Elementor Pro to use our plugin. MetForm works with the accessible version of Elementor. But you can use MetForm alongside Elementor Pro if you need extra features.
How long is the support and updates period for MetForm?
The annual package of MetForm includes one year of support and updates from our team. Or, the lifetime package offers lifetime updates and support.
Will using MetForm slow down my website?
Not at all. MetForm is built for optimal performance. It delivers optimized code to ensure a smooth user experience.
Can MetForm be used with any WordPress theme?
Of course! MetForm is compatible with any theme of your choice. We have tested our plugin with all the popular themes to ensure seamless integration.
Can I use MetForm on my client’s websites?
Yes, you can! All pricing options for MetForm permit usage on your client’s websites. It provides you with flexibility in offering form-building solutions.
🔥🔥🔥Looking for steps on how to add a multi-step form in WordPress? Well, check out these 5 easy steps on adding a multi-step form.🔥🔥🔥
Final Thought on MetForm
Having an auto-populate field in a WordPress form can save you time and effort during the form creation process without requiring coding skills. Integrate MetForm into your WP Forms dynamic field population for a user-friendly form-filling experience. Additionally, buying MetForm Pro gives you access to valuable tools that optimize form building.
MetForm offers a valuable solution for your website. With its intuitive interface and a wide range of customizable form elements, it allows you to create various types of forms quickly and easily. Its drag-and-drop functionality and pre-designed templates allow you to build and deploy professional-looking forms.
Take advantage of this opportunity to simplify your forms and please your users. To get the most out of your WordPress forms, upgrade to MetForm Pro today!
Leave a Reply