
 Portuguese
  English
  German
  Spanish
  Italian
  French
  Danish
  Swedish
  Polish
  Korean
  Japanese
 Geralmente, as pessoas precisam usar um widget de avatar para editar qualquer imagem, como imagem de perfil ou coisas relacionadas. Um widget de qualidade executa tarefas que incluem colocar a imagem de um usuário, editar e projetar detalhes de login ou registro. Nosso novo widget de avatar personalizável possui todas essas funções prioritárias. Você pode apresentar um site com melhor aparência com a ajuda deste módulo e widget.
Aqui, descrevemos as etapas de uso do módulo avatar e do widget de forma clara e fácil. Aprenda o processo abaixo.
Como usar o recurso Avatar #
Existem três etapas principais para usar a ferramenta avatar-
- Habilitando Módulo
- Habilitando widget
- Configurar widget
Etapa 1: Habilitando Módulo #
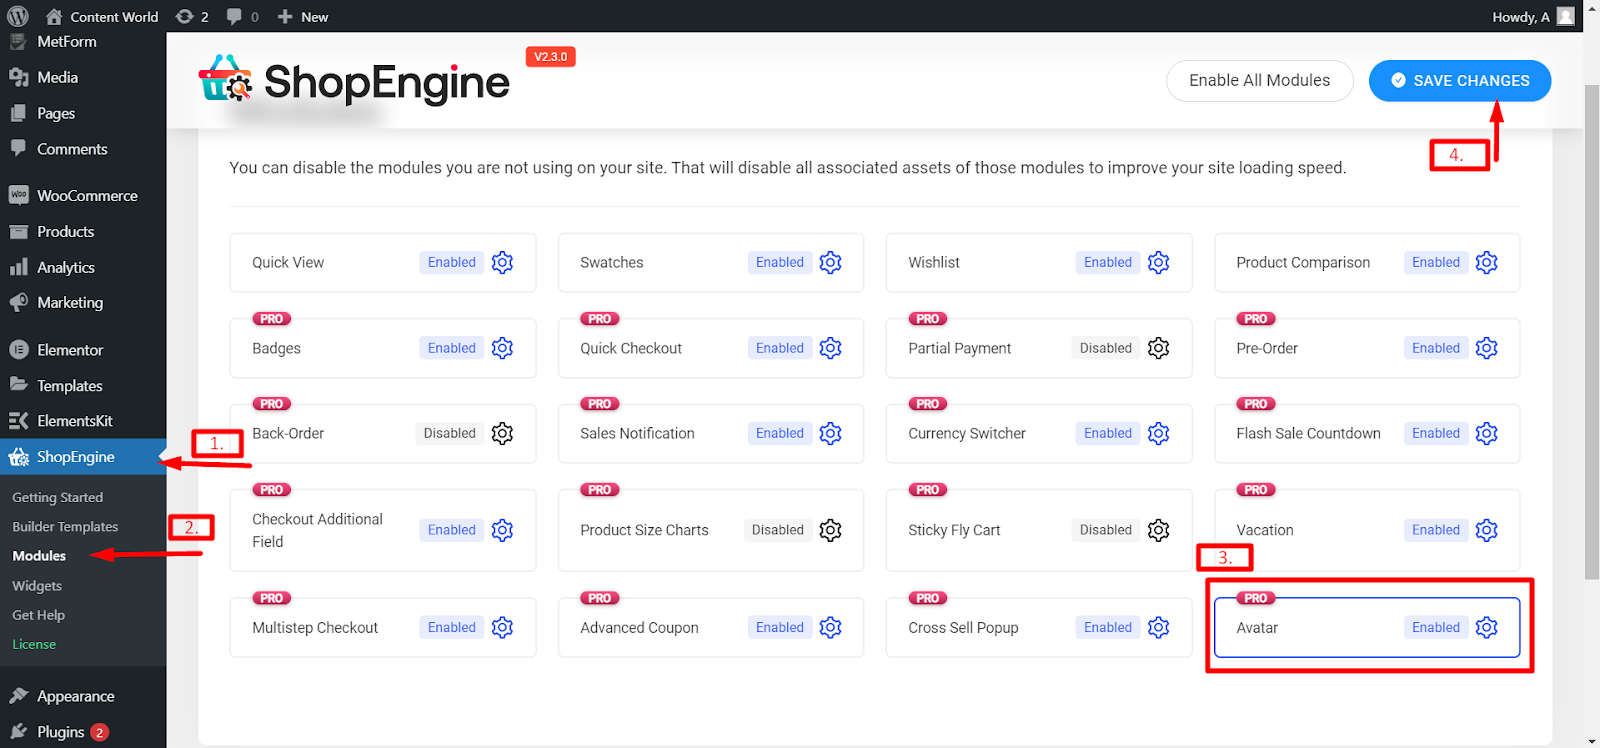
Para usar o widget Avatar é necessário Habilite o Módulo Avatar do ShopEngine.
Para ativar o módulo Avatar, navegue até Painel WordPress > ShopEngine > Módulos > Habilitar Avatar > Salvar alterações.
Leia a documentação completa do Módulo Avatar do ShopEngine:
Etapa 2: ativar o widget #
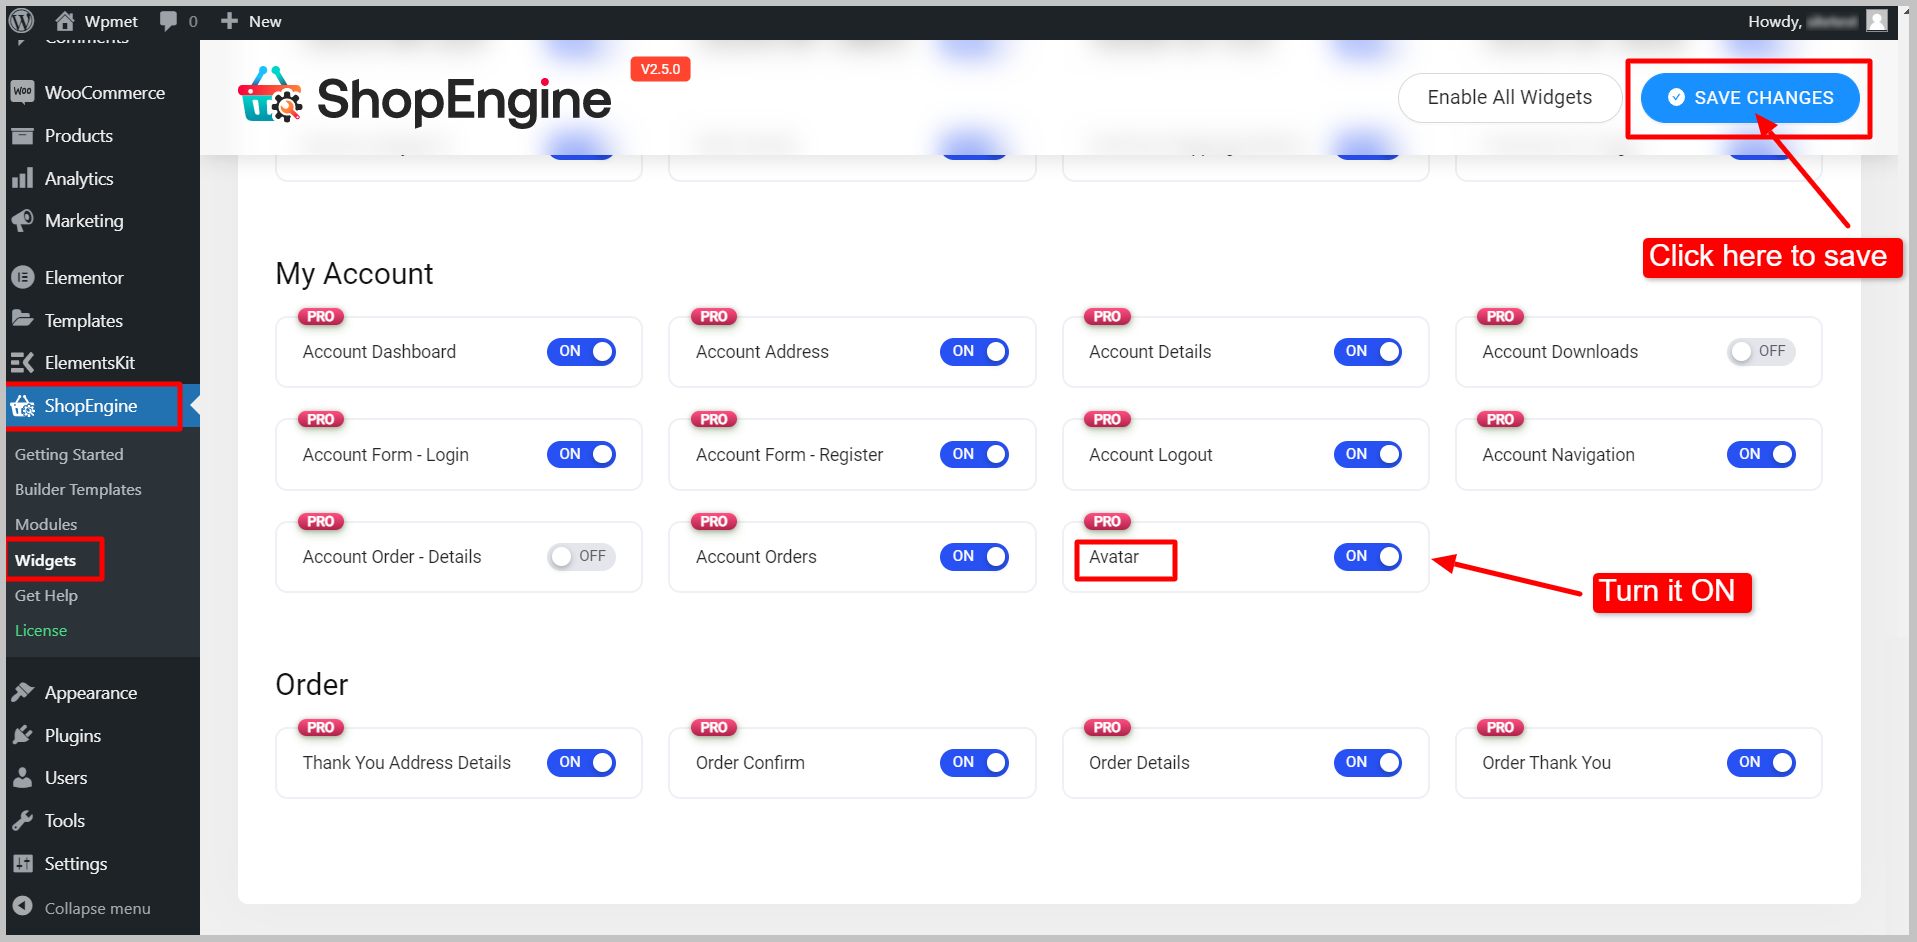
Navegue para: Seu Painel -> ShopEngine -> Widgets -> Habilitar Avatar-> Salvar Alterações.
Para ativar o widget ShopEngine WooCommerce Avatar,
- Navegar para Shop Engine > Widgets no painel do WordPress.
- Role para baixo até a seção Minha conta e encontre o avatar widget da lista.
- Habilite o widget alternando o botão de alternância para SOBRE.
- Clique no SALVAR ALTERAÇÕES botão.
Etapa 3: adicionar o widget Avatar ao modelo de painel Minha conta #
O widget Avatar funciona apenas na página Minha conta.
- Vá para a seção de páginas do WordPress no painel.
- Abra o Minha conta página no modo visualizador.
- Passe o mouse sobre a opção Editar com Elementor e clique em Temperatura da minha conta.
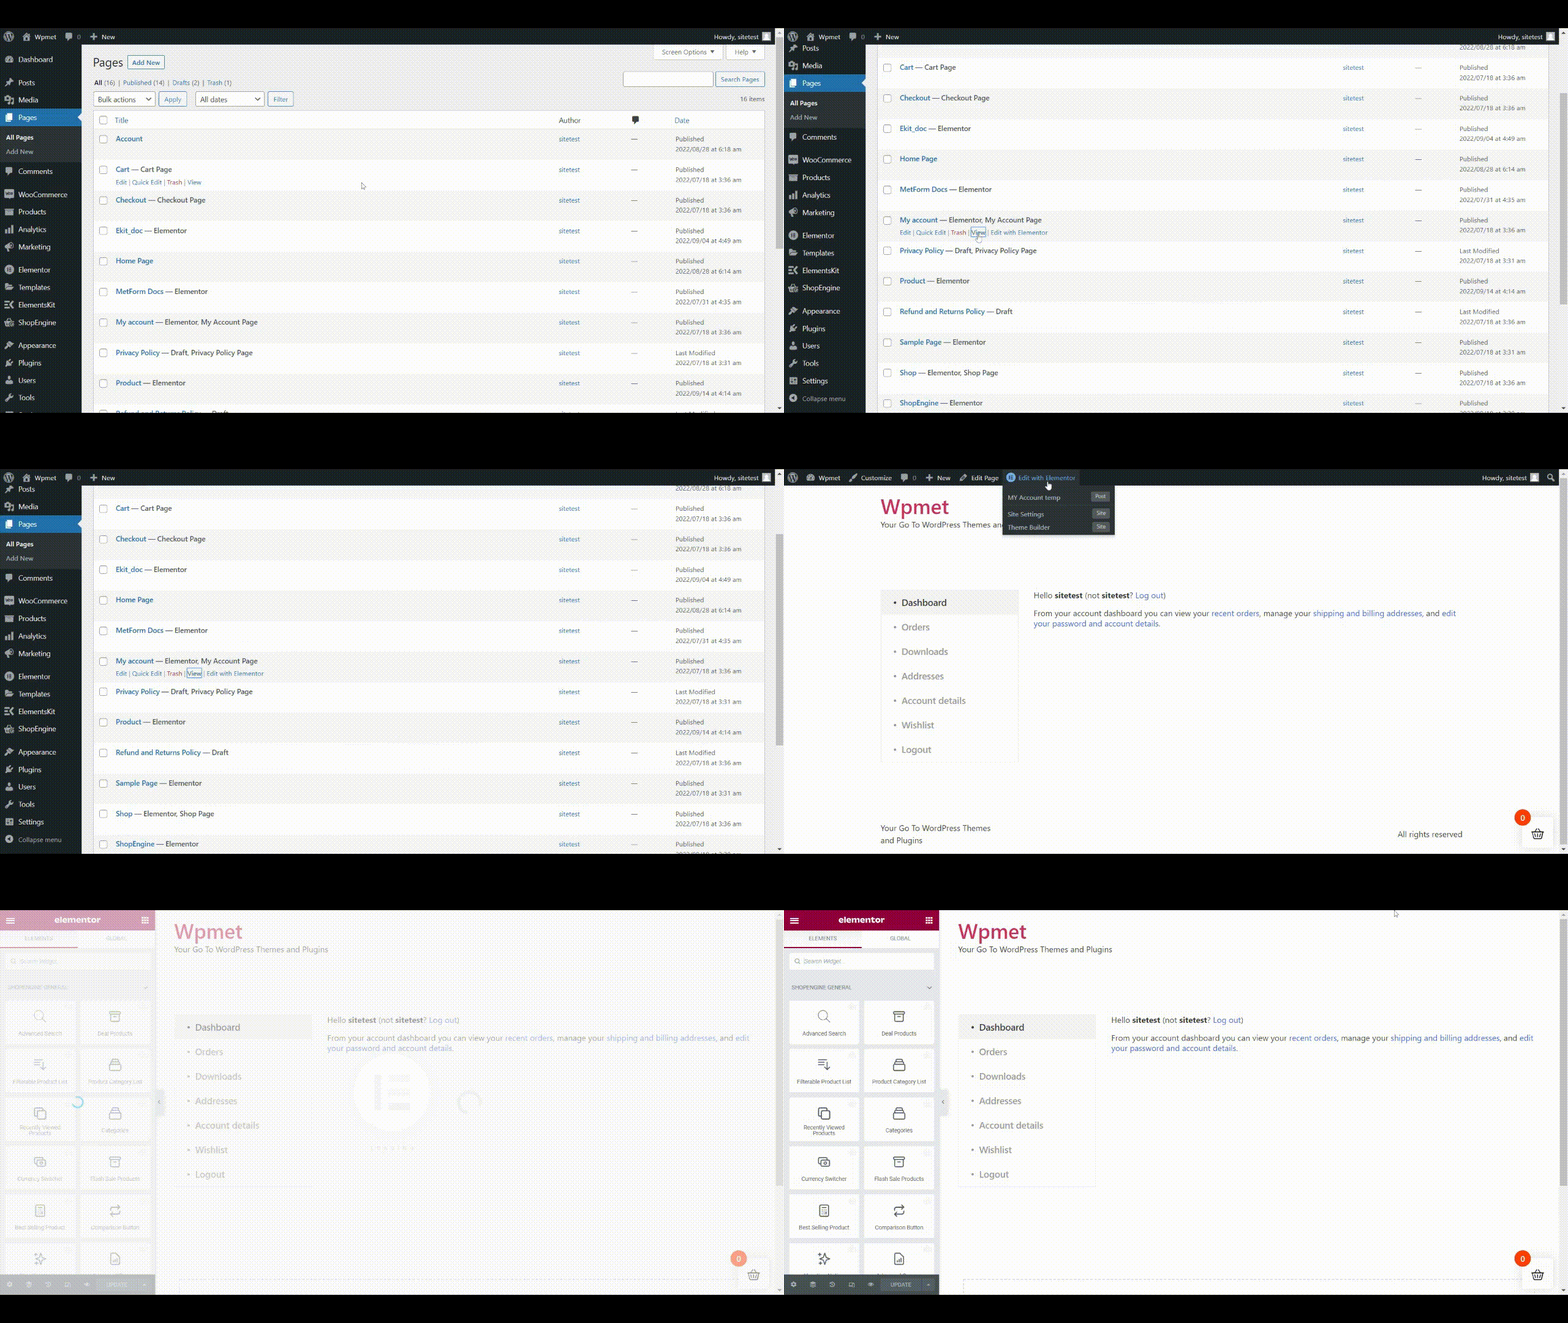
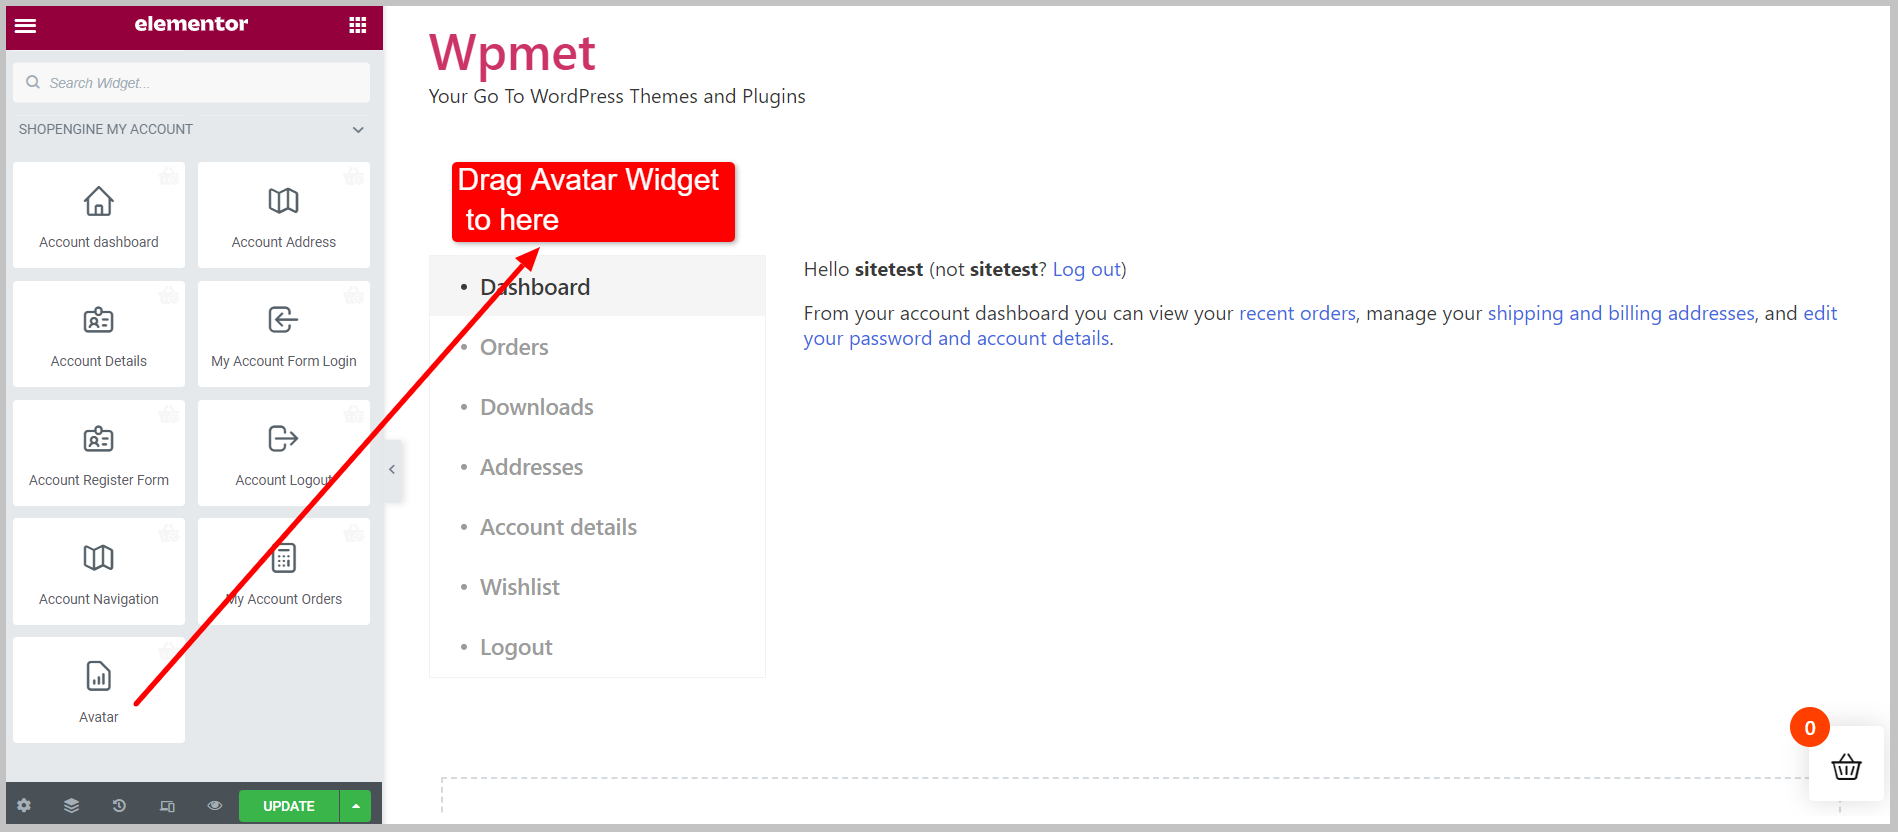
Depois de abrir o modelo Minha conta no modo editor,
Arraste e solte o widget Avatar no design do modelo.
Criando a página Minha conta #
Se sua conta não tiver uma página de conta, você deverá criar uma.
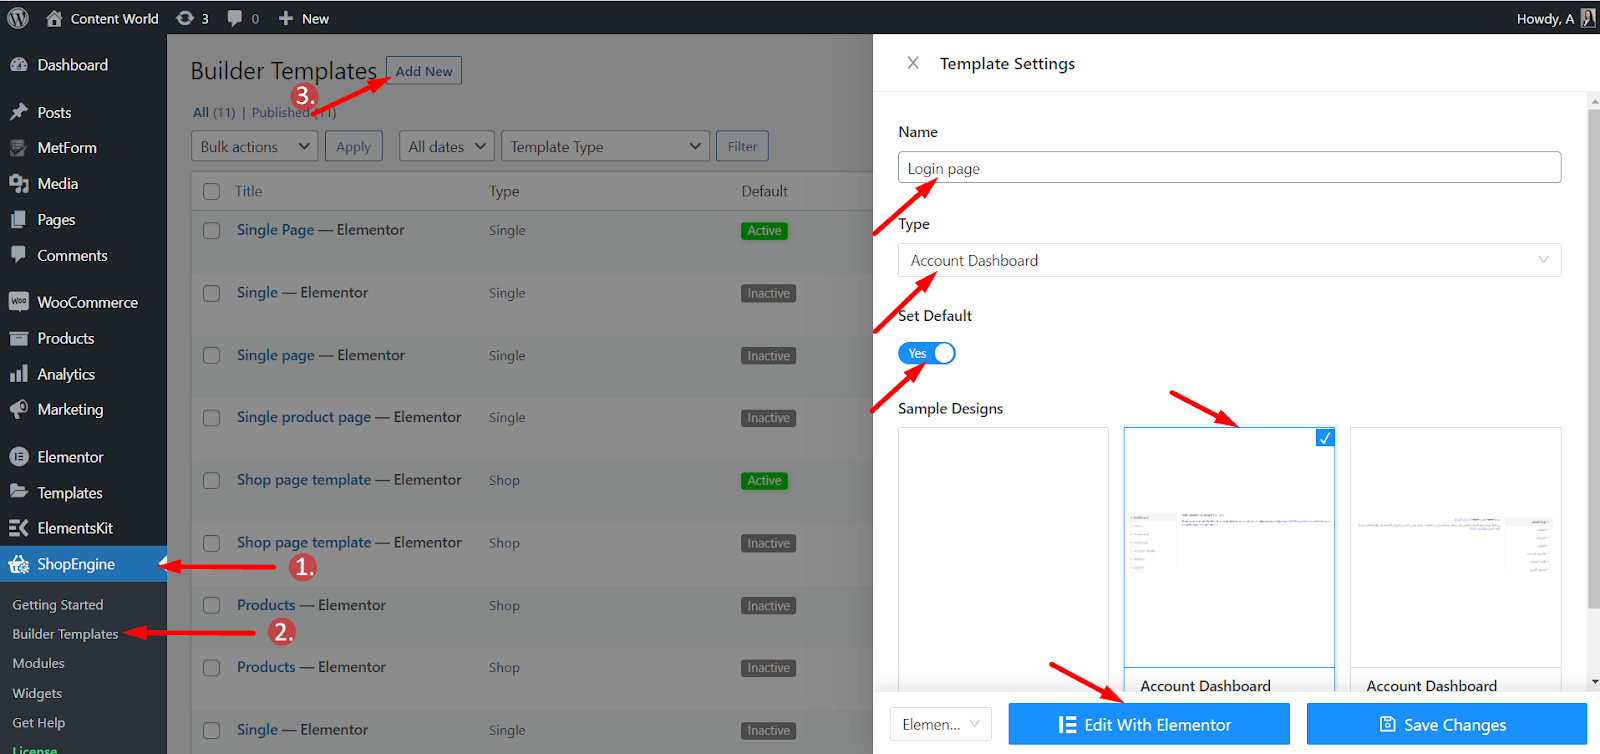
Navegue até: Seu painel > ShopEngine > Modelos de construtor > Adicionar novo > Configurações de modelo > Insira o nome > Defina o tipo de modelo para o painel da conta > Selecione o design de amostra > Editar com Elementor.
Aqui está a documentação para criar um Painel da conta com ShopEngine.
Etapa 4: configurar o widget Avatar #
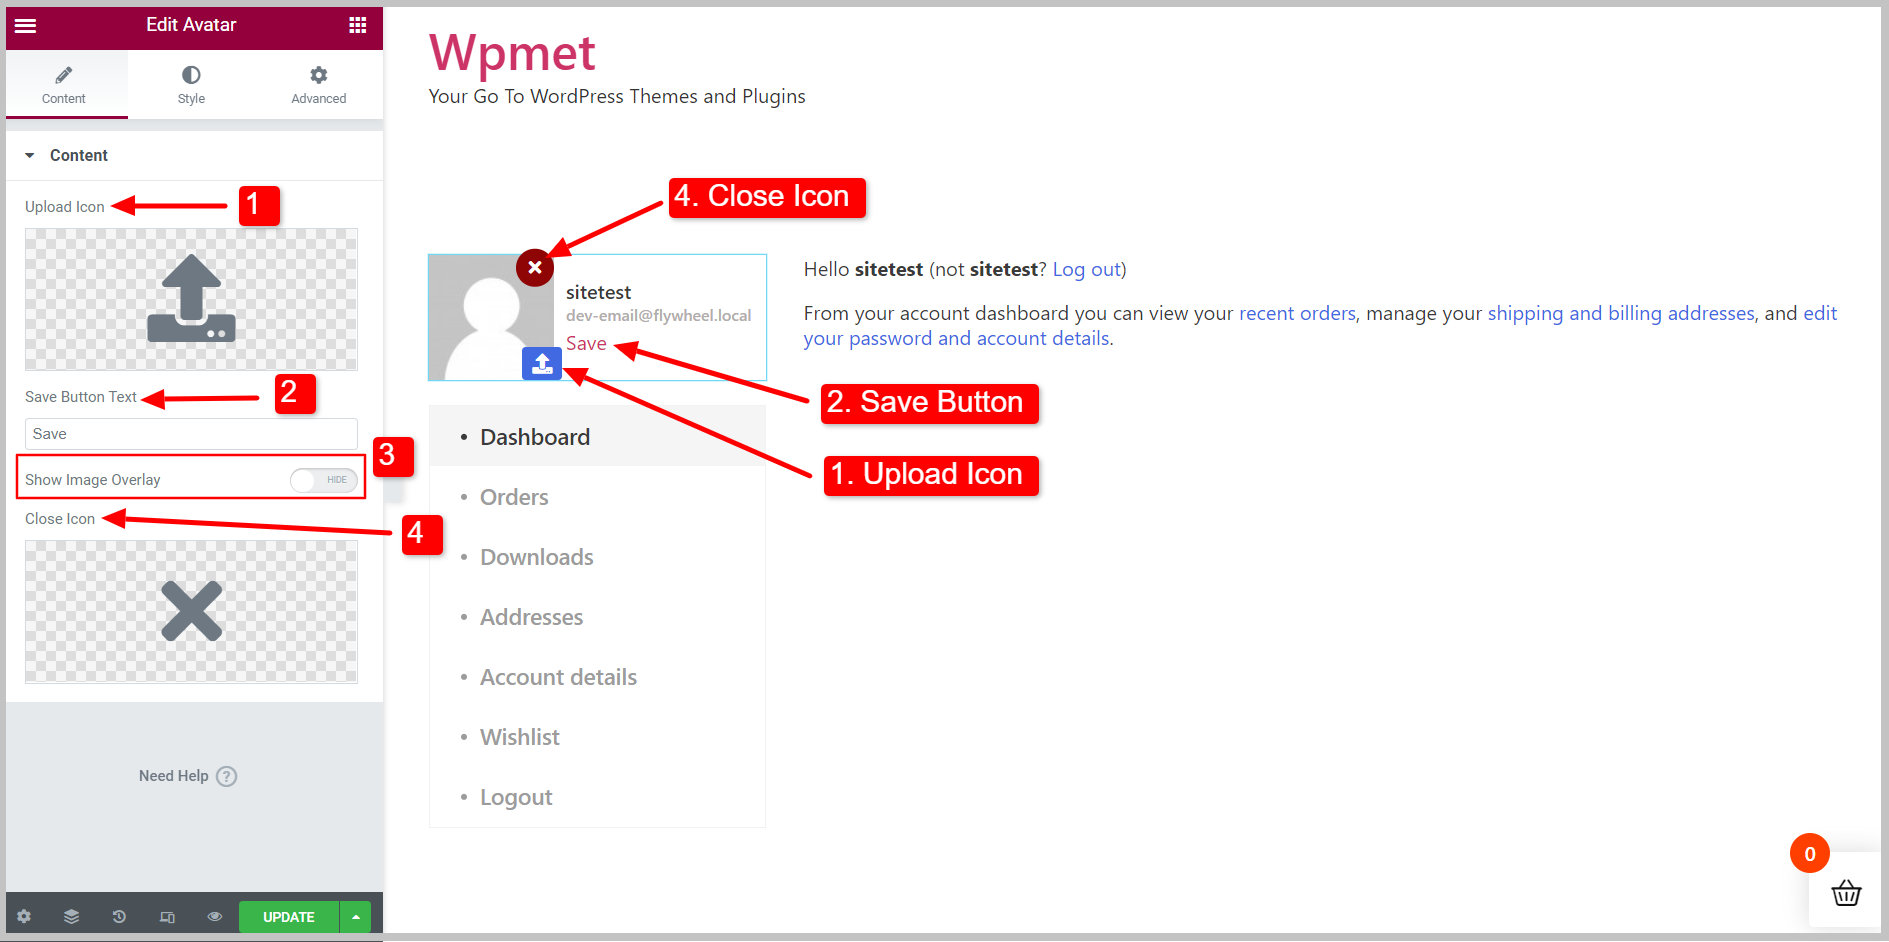
Agora você pode configurar o widget na guia Conteúdo.
- Escolha o Carregar ícone que permite ao usuário fazer upload de seu avatar.
- Definir "Salvar texto do botão”.
- Habilite ou desabilite o Mostrar sobreposição de imagem recurso.
- Escolha o Fechar ícone.
Como usar esses recursos? #
- Ícone de upload: O usuário pode enviar seu avatar clicando no ícone. Carregue o ícone da Biblioteca de Ícones ou carregue seu próprio Ícone SVG.
- Botão Salvar: Para salvar as alterações do usuário final.
- Sobreposição de imagem: Adicione uma sobreposição de imagem e o ícone de upload aparecerá quando você passar o mouse.
- Fechar ícone: Botão para fechar a seção. Escolha um ícone de fechamento na Biblioteca de ícones ou carregue seu próprio SVG.
*Todos esses recursos funcionam apenas no front-end.“
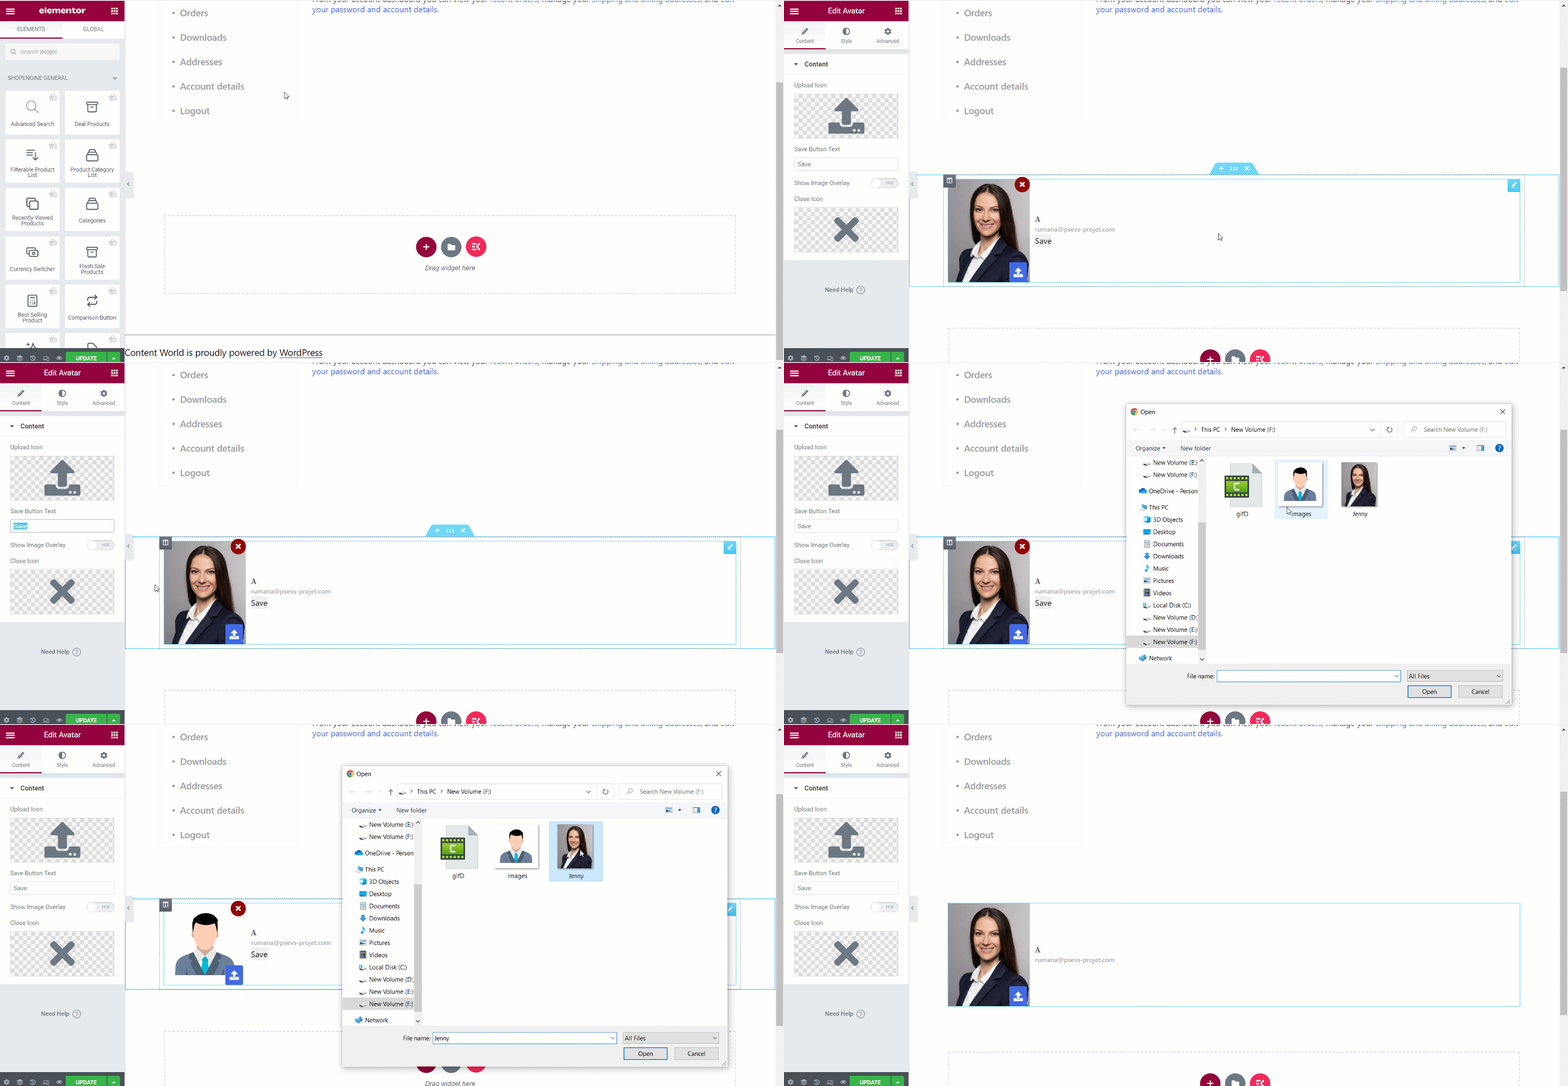
Etapa 5: personalize o estilo do avatar #
A seguir, você pode personalizar os designs do Avatar na guia Estilo. No Seção de estilo, as opções de edição aqui são-
- Embrulho- Definir alinhamento e lacuna de conteúdo da imagem.
- Imagem- Defina a largura da imagem de acordo com o design.
- Estilo de conteúdo- Você pode alterar a cor, tipografia, preenchimento, etc. para nome, botão Salvar e e-mail.
- Botão de upload- Faça as alterações necessárias no botão aqui.
- Botão Fechar- Edite o botão Fechar aqui.

Após publicar ou atualizar a página, ela ficará e funcionará assim de acordo com seus dados no front end
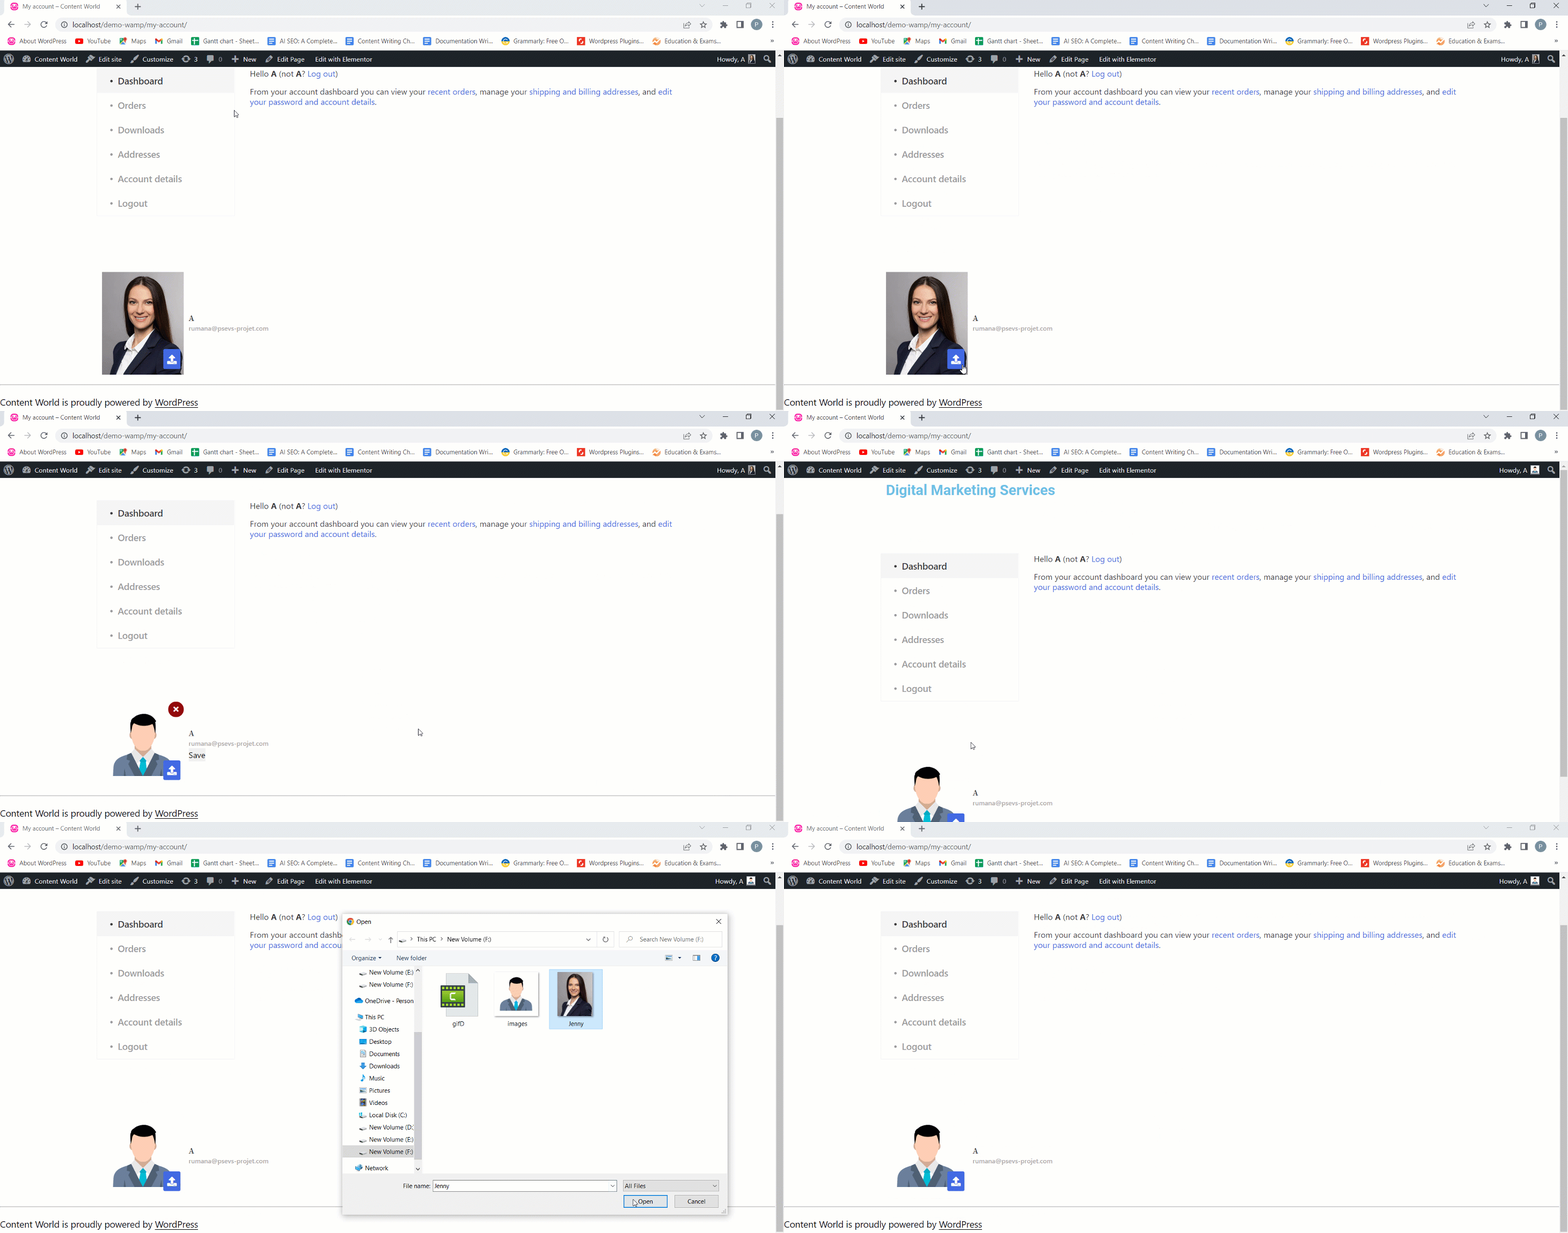
As configurações do widget são uma tarefa bastante simples. E como você viu, os recursos são úteis e encontrados nos campos da conta de hoje. Portanto, use este novo widget para criar perfis de usuário bonitos.
ShopEngine vem com recursos incríveis como Avatar Widget e muito mais. Obtenha o plugin ShopEngine para criar sites WooCommerce totalmente personalizáveis.


