


 Spanish
  English
  German
  Italian
  French
  Danish
  Portuguese
  Swedish
  Polish
  Korean
  Japanese
 Generalmente, las personas necesitan usar un widget de avatar para editar cualquier imagen, como la imagen de perfil o cosas relacionadas. Un widget de calidad realiza tareas que incluyen colocar la imagen de un usuario, editar y diseñar detalles de inicio de sesión o registro. Nuestro nuevo widget de avatar personalizable tiene todas estas funciones prioritarias. Puede presentar un sitio web con mejor apariencia con la ayuda de este módulo y widget.
Aquí, hemos descrito los pasos de uso del módulo de avatar y el widget de forma clara y sencilla. Conozca el proceso a continuación.
Cómo utilizar la función Avatar #
Hay tres pasos principales para usar la herramienta avatar:
- Módulo de habilitación
- Habilitar widget
- Configurar widget
Paso 1: Habilitar el módulo #
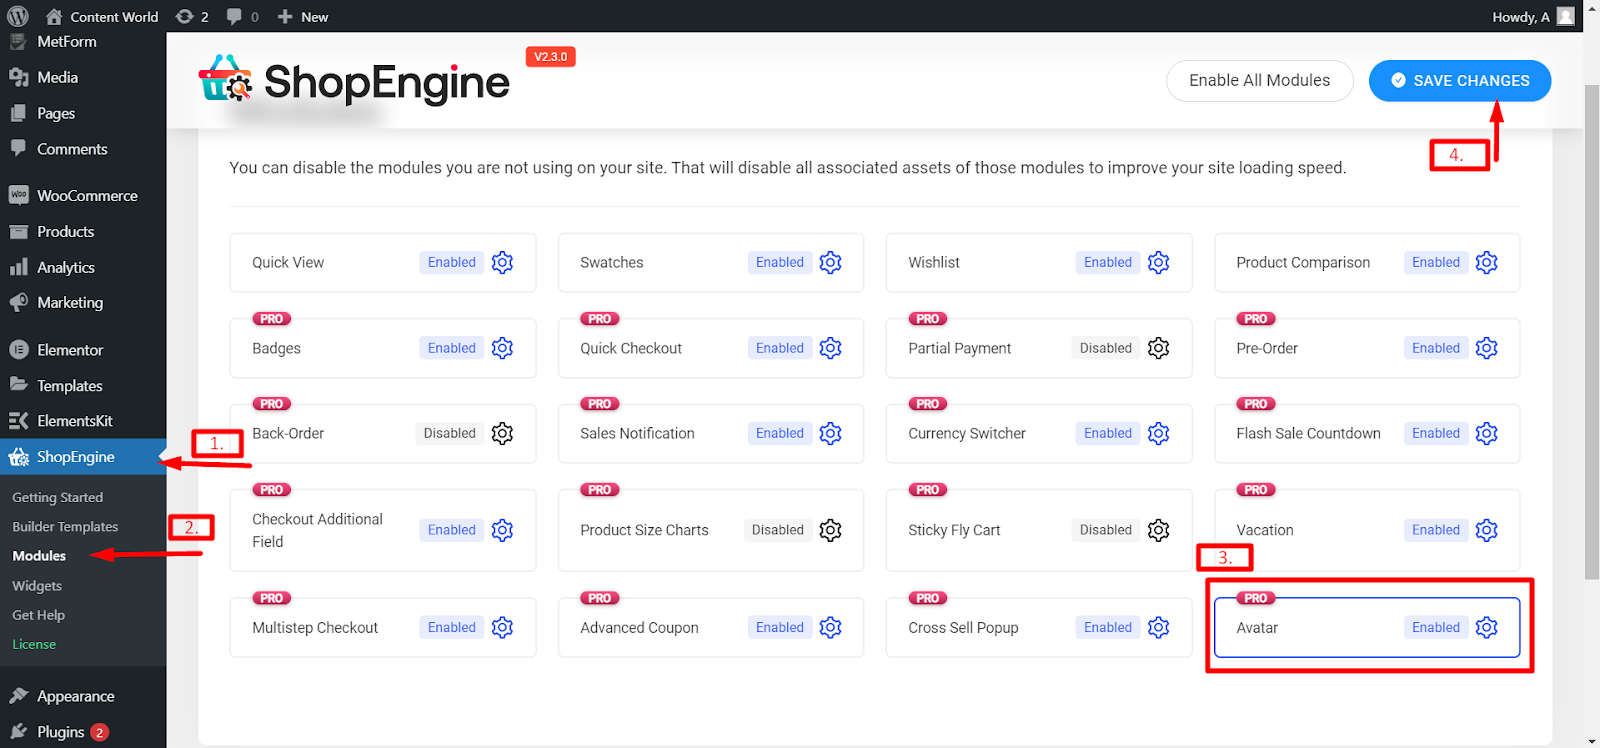
Para utilizar el widget Avatar debe tener que Habilite el módulo Avatar de ShopEngine.
Para habilitar el módulo Avatar, navegue hasta Panel de WordPress > ShopEngine > Módulos > Habilitar avatar > Guardar cambios.
Lea la documentación completa del módulo Avatar de ShopEngine:
Paso 2: habilitar el widget #
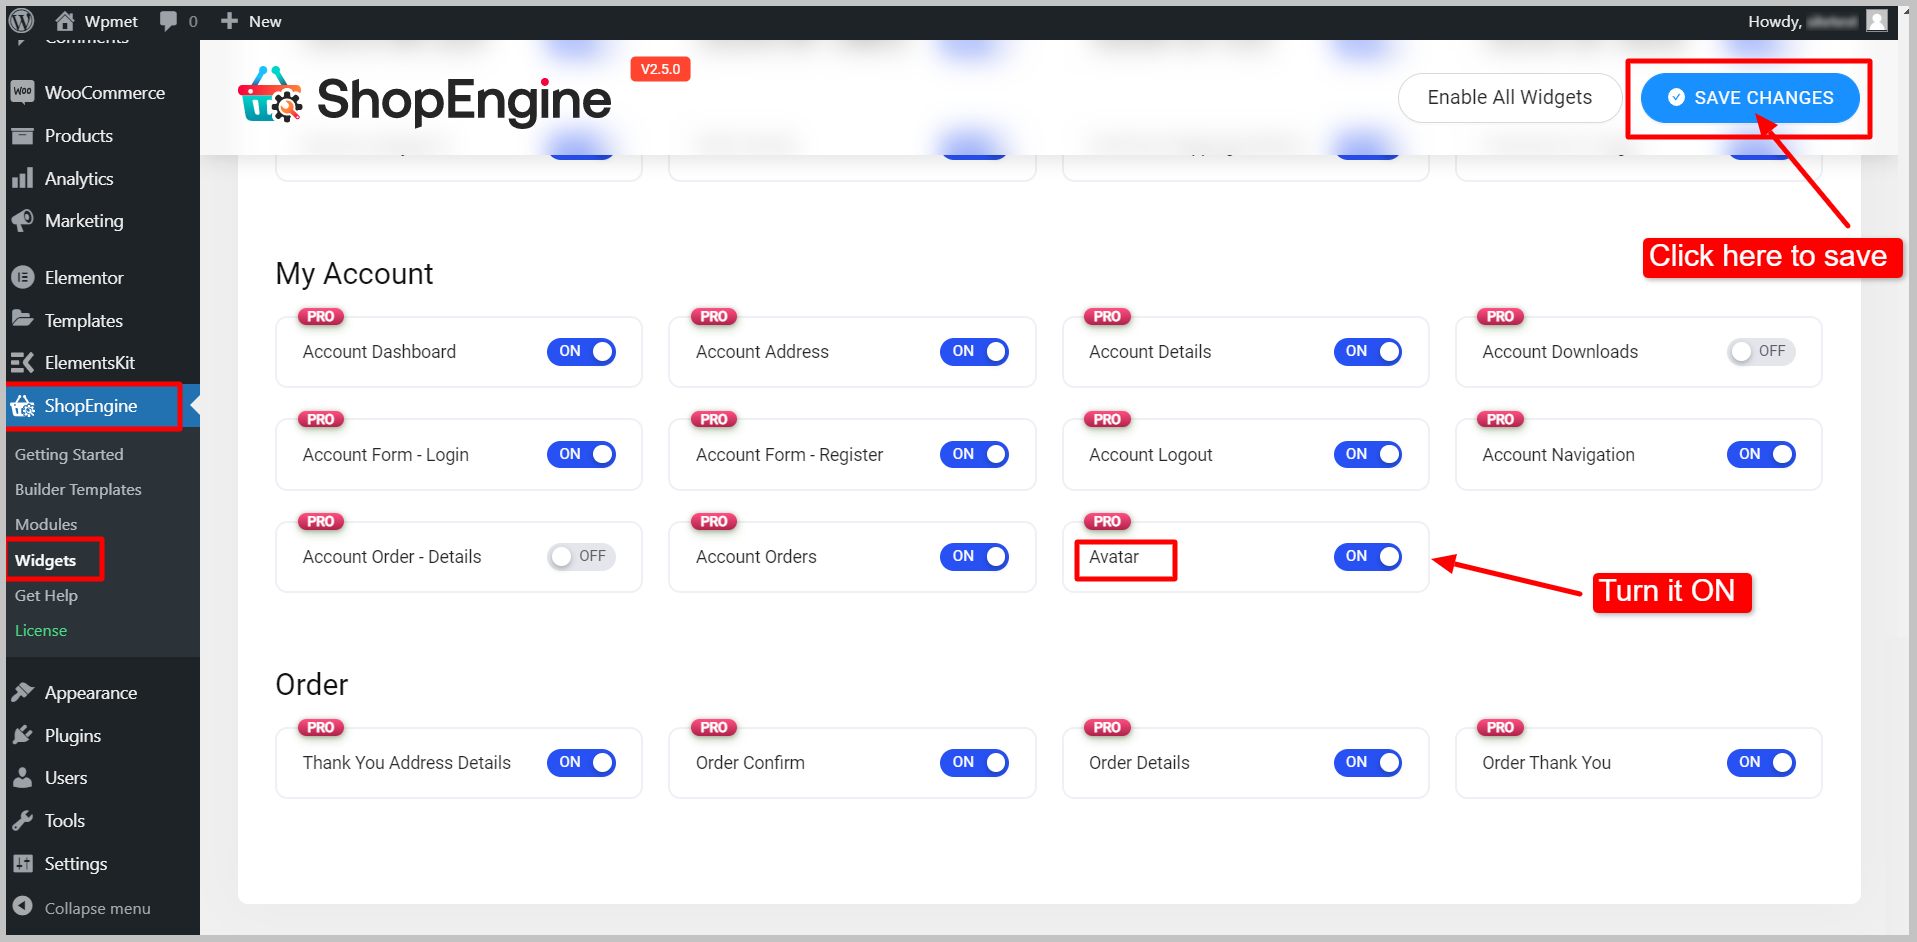
Navegue a: Su Panel de Control -> ShopEngine -> Widgets -> Habilitar Avatar-> Guardar cambios.
Para habilitar el widget de avatar de ShopEngine WooCommerce,
- Navegar a ShopEngine > Widgets desde el panel de WordPress.
- Desplácese hacia abajo hasta la sección Mi cuenta y busque el Avatar widget de la lista.
- Habilite el widget cambiando el botón de alternancia a EN.
- Clickea en el GUARDAR CAMBIOS botón.
Paso 3: agregue el widget de Avatar en la plantilla del panel de Mi cuenta #
El widget Avatar solo funciona en la página Mi cuenta.
- Vaya a la sección de páginas de WordPress desde el panel.
- Abre el Mi cuenta página en modo visor.
- Coloca el cursor sobre la opción Editar con Elementor y haz clic en Mi cuenta temporal.
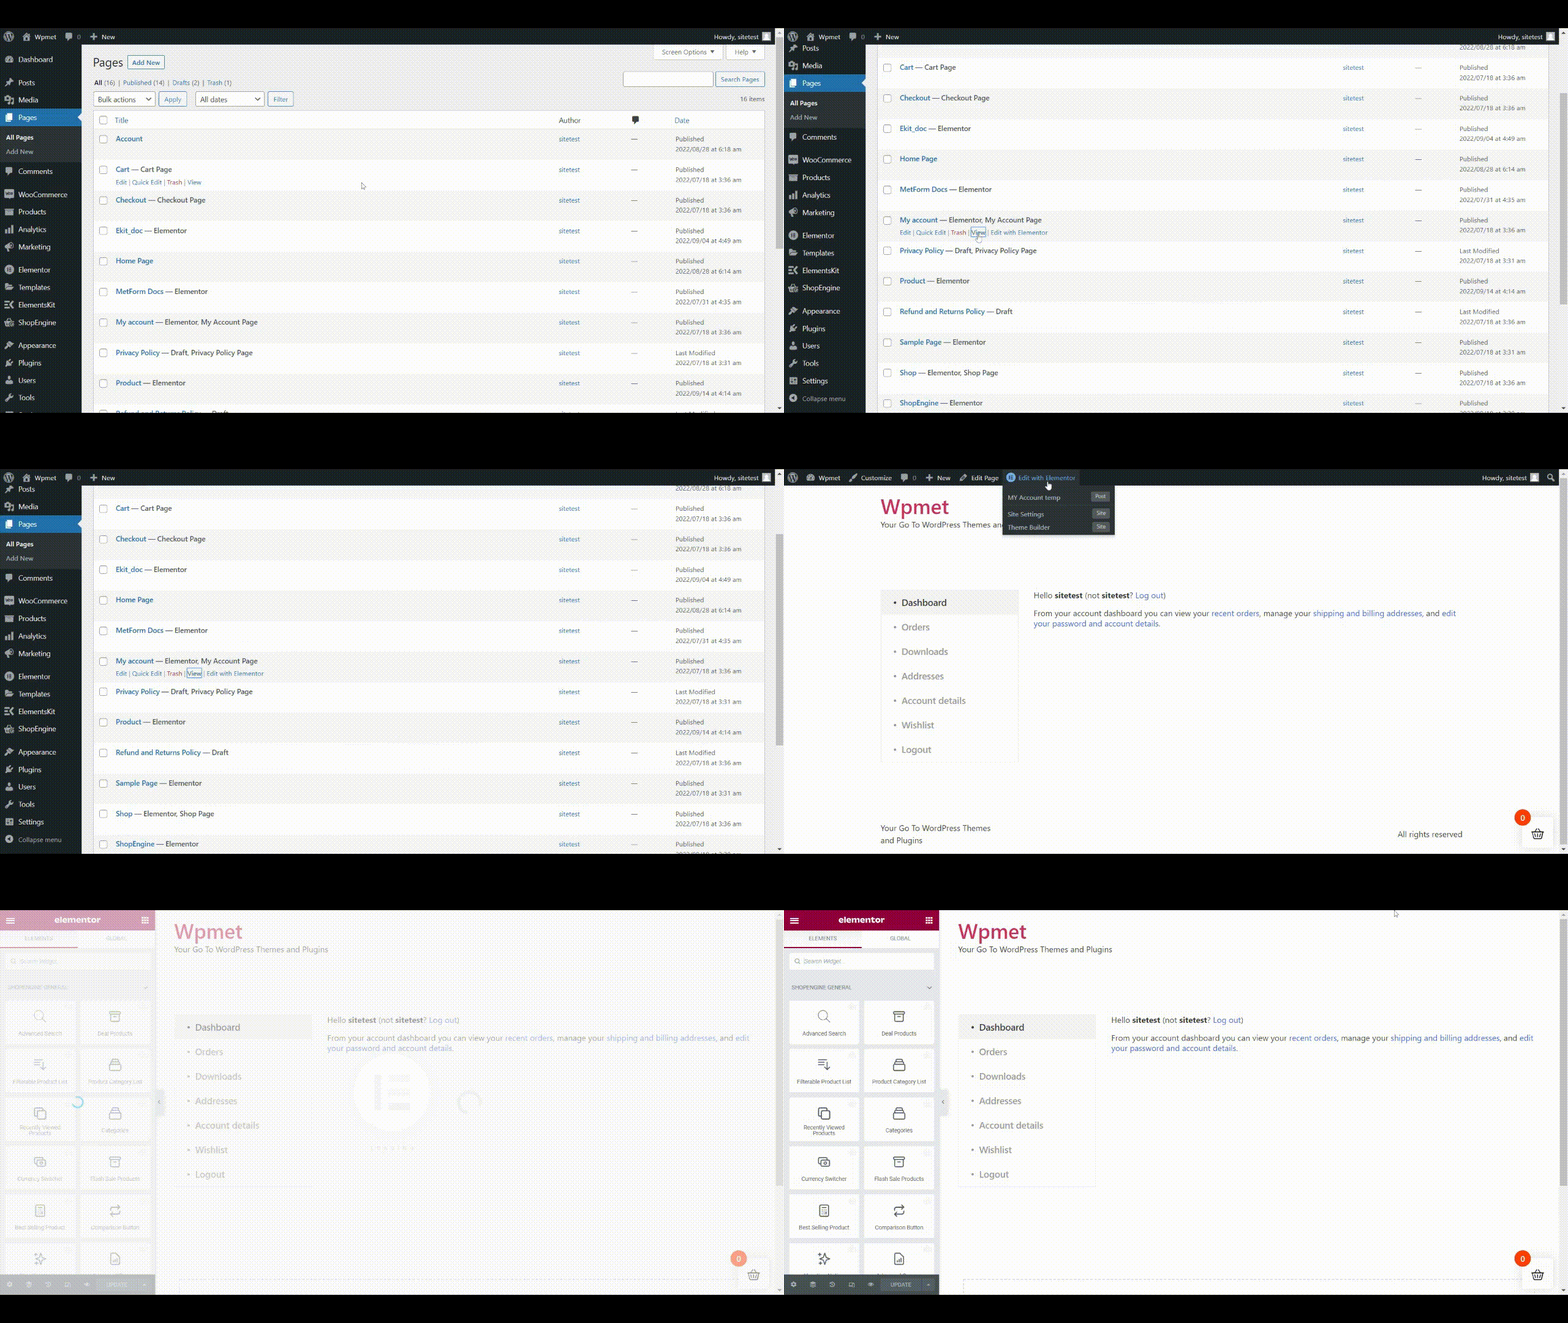
Después de haber abierto la plantilla Mi cuenta en modo editor,
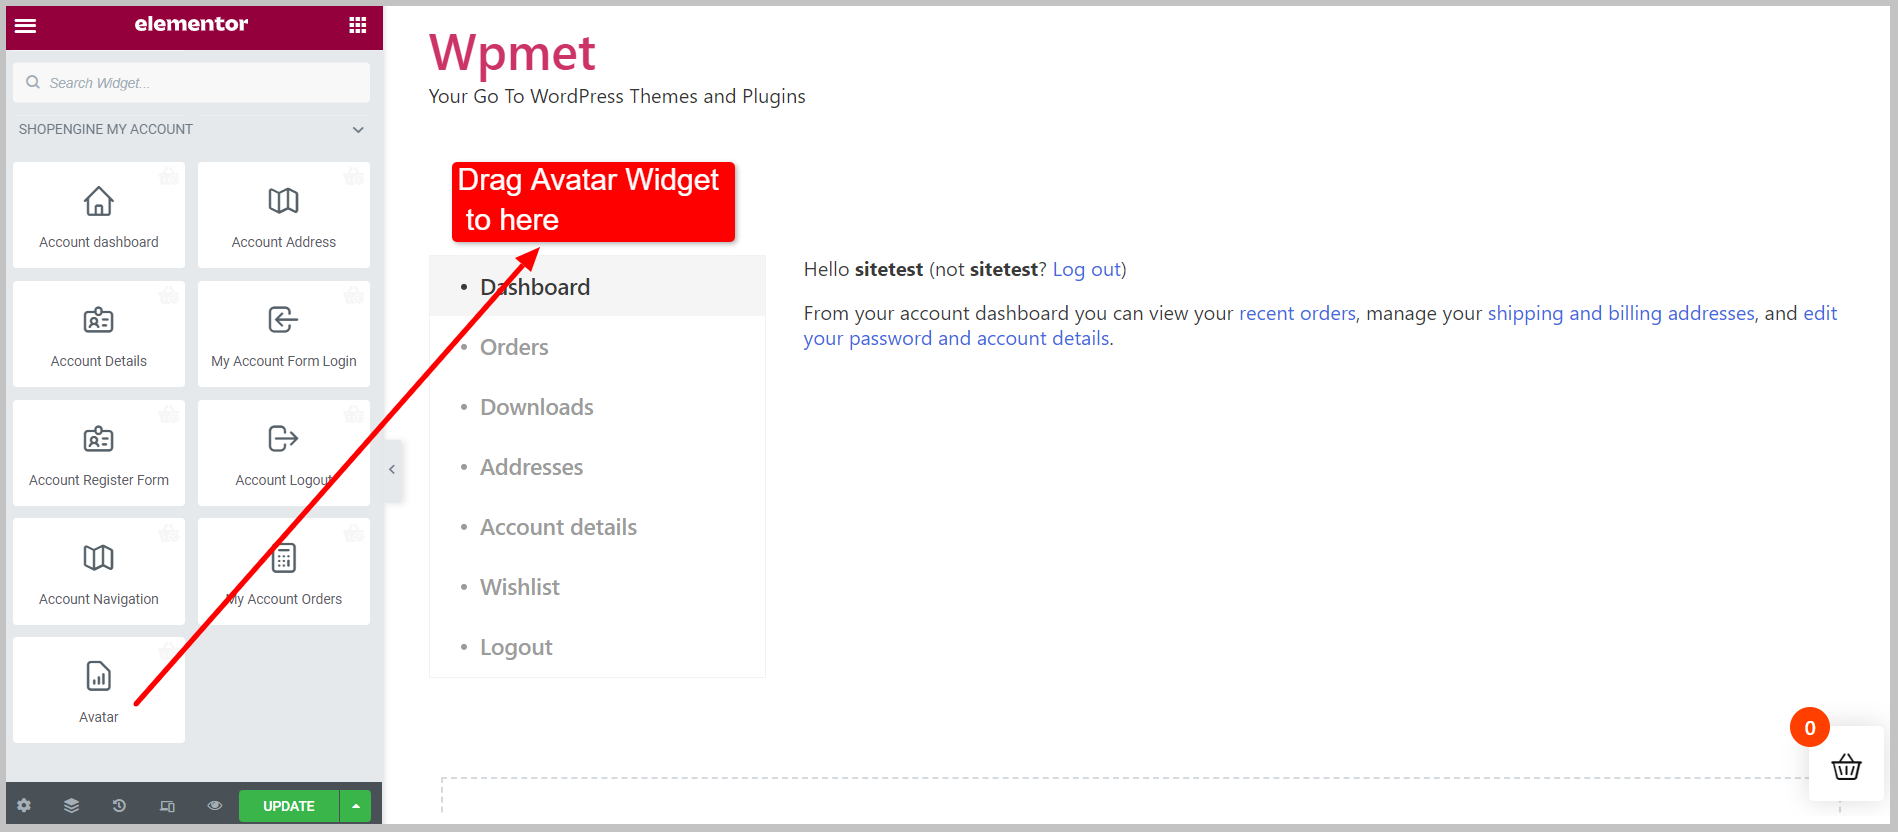
Arrastra y suelta el widget de Avatar en el diseño de la plantilla.
Creando la página Mi cuenta #
Si su cuenta no tiene una página de cuenta, debe crear una.
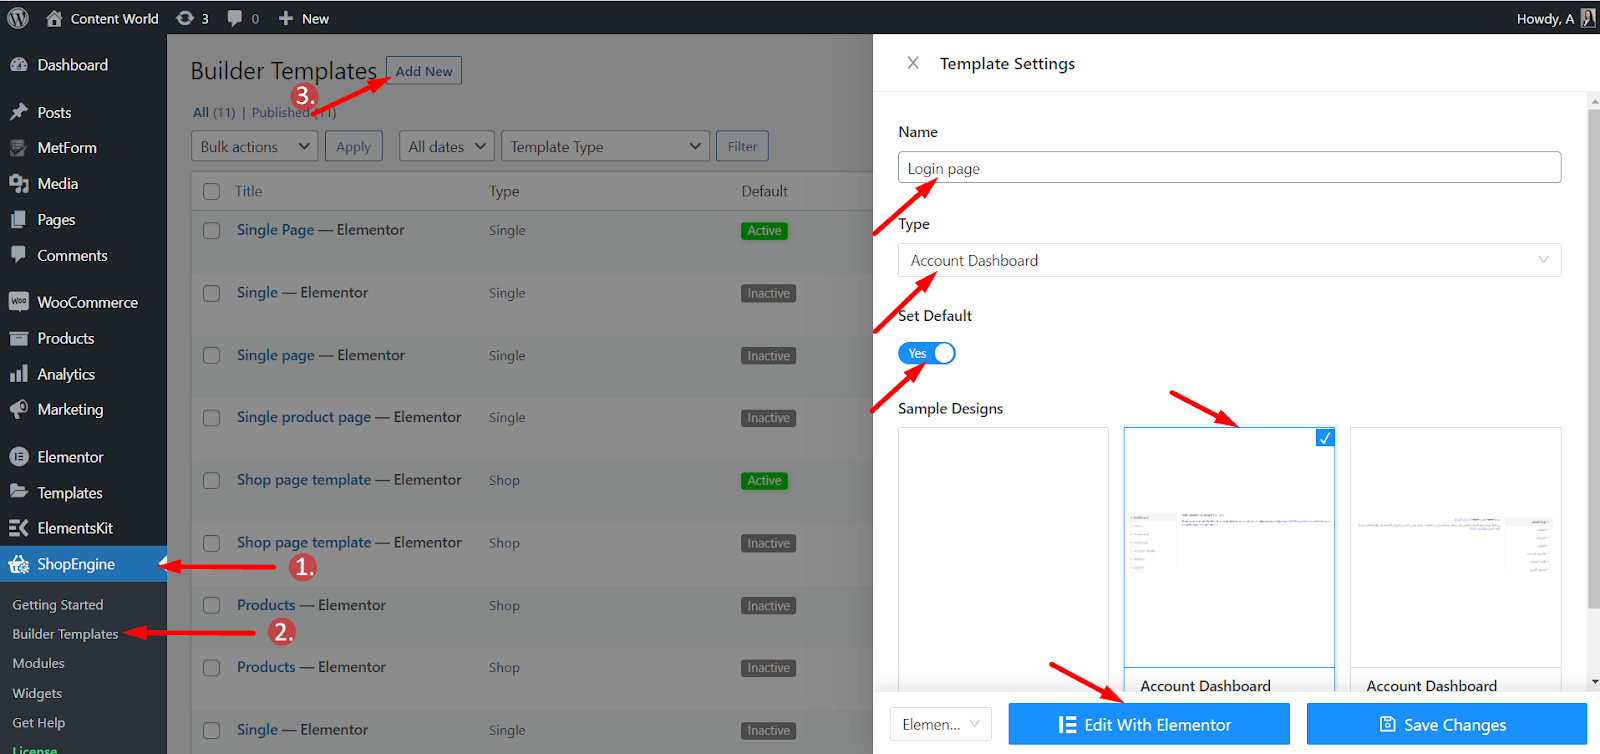
Navegue a: Su panel > ShopEngine > Plantillas de creación > Agregar nuevo > Configuración de plantilla > Ingresar nombre > Establecer tipo de plantilla en Panel de cuenta > Seleccionar diseño de muestra > Editar con Elementor.
Aquí está la documentación para crear un Panel de cuenta con ShopEngine.
Paso 4: configurar el widget de Avatar #
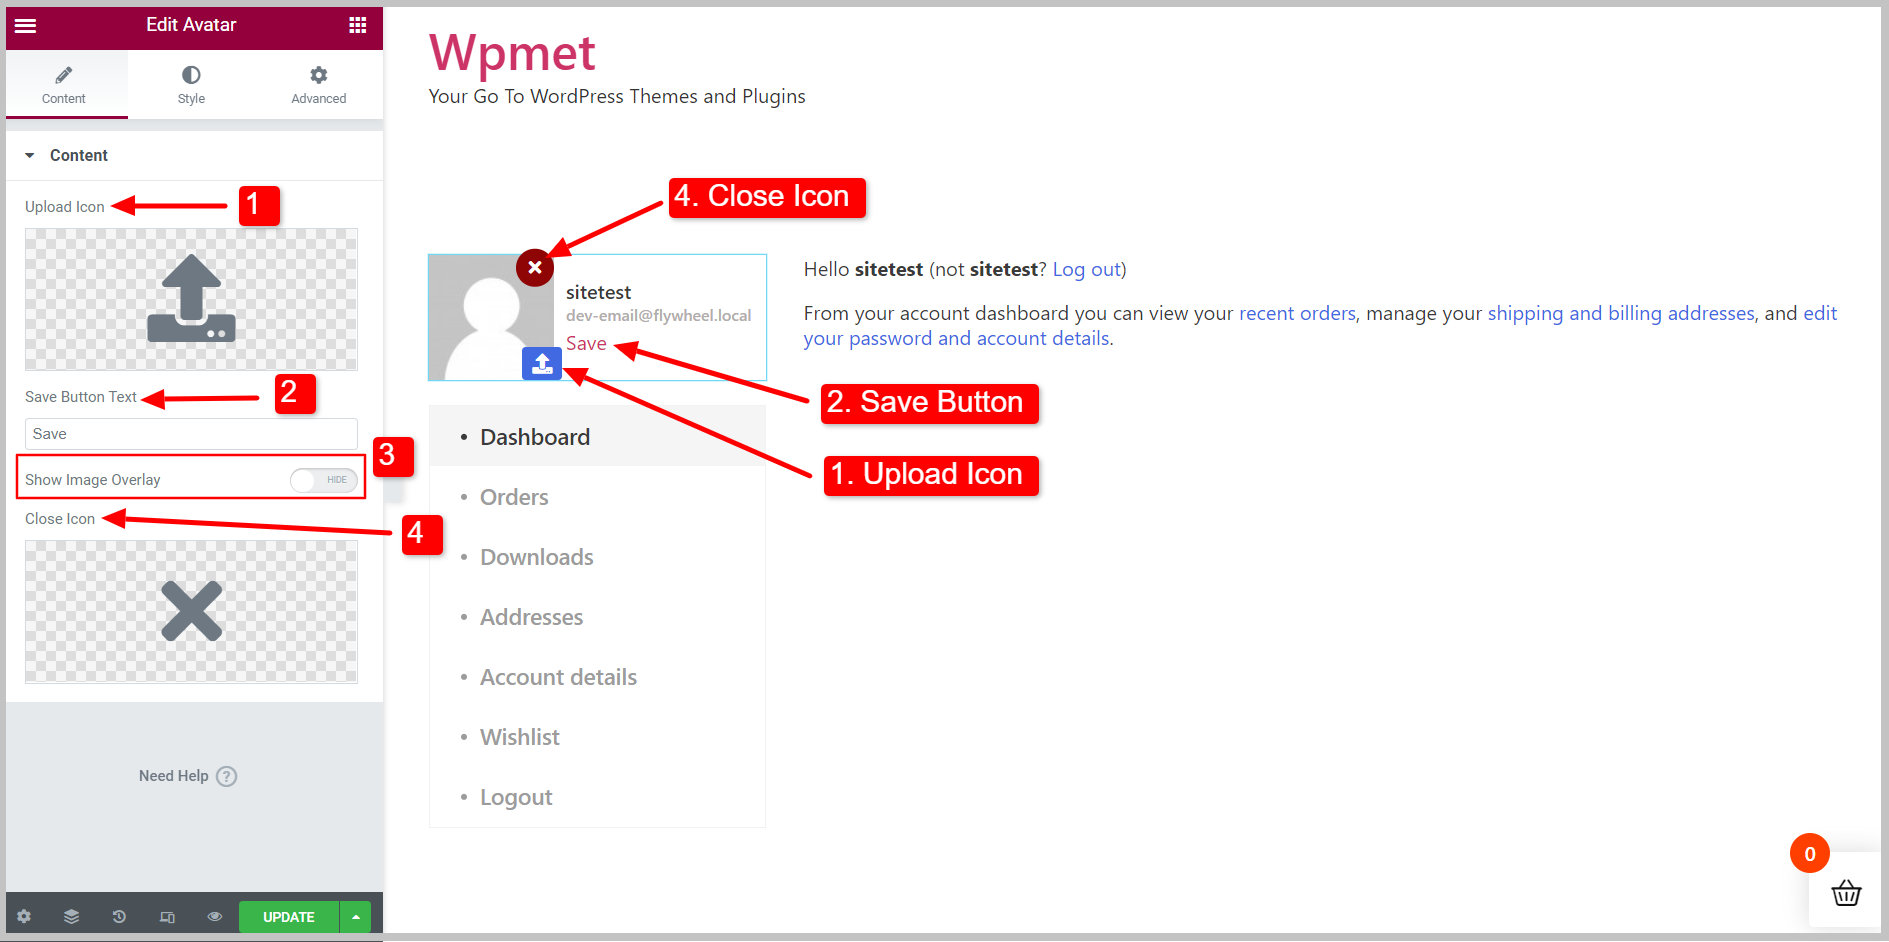
Ahora puede configurar el widget en la pestaña Contenido.
- Elegir el Icono de carga que permite al usuario subir su avatar.
- Colocar "Guardar texto del botón”.
- Activar o desactivar la Mostrar superposición de imágenes característica.
- Elegir el Cerrar icono.
¿Cómo utilizar esas funciones? #
- Icono de carga: El usuario puede cargar su avatar haciendo clic en el icono. Cargue el ícono desde la Biblioteca de íconos o cargue su propio ícono SVG.
- Botón Guardar: Para guardar los cambios desde el extremo del Usuario.
- Superposición de imágenes: Agregue una superposición de imágenes y el icono Cargar aparecerá cuando se coloque el cursor sobre ella.
- Icono Cerrar: Botón para cerrar la sección. Elija un ícono de cierre de la Biblioteca de íconos o cargue su propio SVG.
*Todas esas características funcionan solo en la parte frontal.“
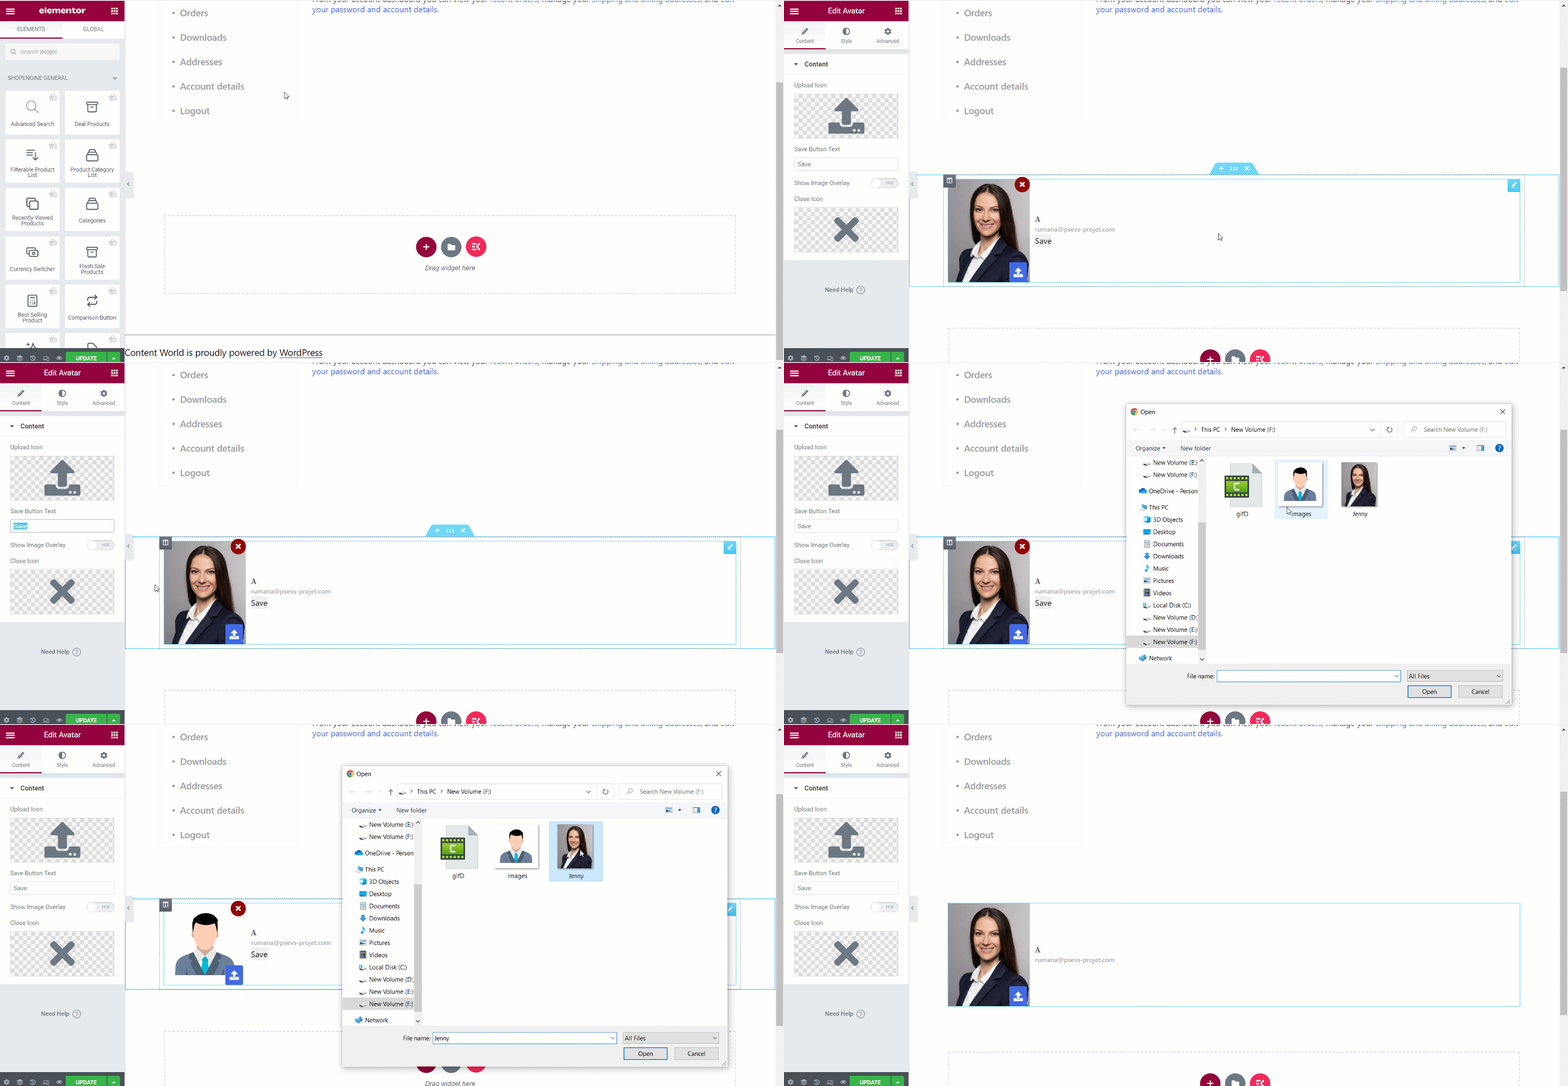
Paso 5: personaliza el estilo de Avatar #
A continuación, puede personalizar los diseños de Avatar en la pestaña Estilo. En el Sección de estilo, las opciones de edición aquí son-
- Envoltura- Colocar alineación y brecha de contenido de la imagen.
- Imagen- Establezca el ancho de la imagen según el diseño.
- Estilo de contenido Puede cambiar el color, la tipografía, el relleno, etc. del nombre, el botón de guardar y el correo electrónico.
- Botón Subir- Realice los cambios necesarios para el botón aquí.
- Botón Cerrar- Edite el botón de cerrar aquí.

Después de publicar o actualizar la página, se verá y funcionará así de acuerdo con sus datos en la interfaz.
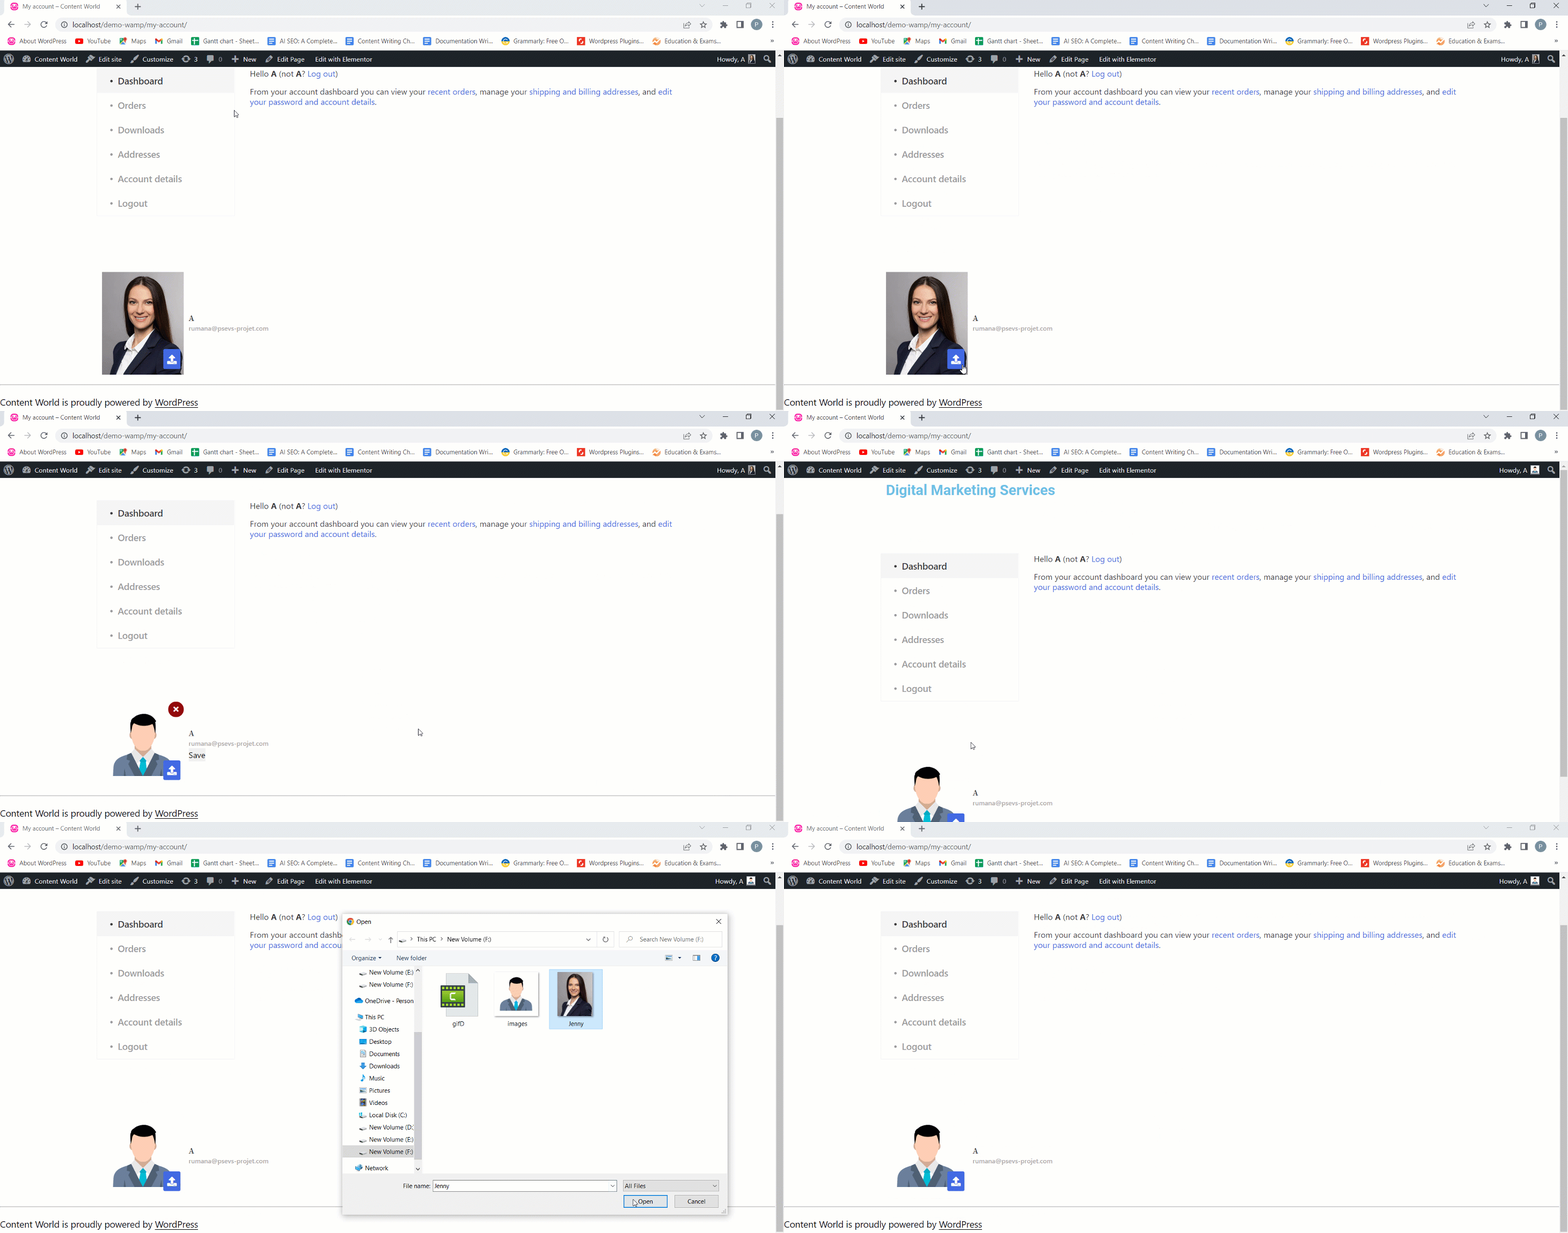
La configuración del widget es una tarea bastante sencilla. Y como vio, las funciones son útiles y se encuentran en los campos de la cuenta de hoy. Entonces, use este nuevo widget para crear perfiles de usuario atractivos.
ShopEngine viene con funciones sorprendentes como Avatar Widget y más. Obtenga el complemento ShopEngine para diseñar sitios web WooCommerce totalmente personalizables.


