


Dream of owning a booming online store without inventory headaches?
Start with dropshipping business. It is where you sell products without physically holding them. And WordPress is the world’s most popular website platform to make it happen. It offers the perfect foundation for your dropshipping empire.
But how do you build the best dropshipping website that converts visitors into loyal customers? Follow this comprehensive guide and watch your online business skyrocket.
Ready to build your eCommerce dream? Let’s get started!
🧐 What is Dropshipping?
Dropshipping is a retail fulfillment model where you sell products online without actually keeping them in stock. When a customer makes an order, you purchase the item from a third-party supplier (typically a wholesaler or manufacturer) who then ships it directly to your customer.
Here’s a breakdown of the key players:
You (the dropshipper): You run the online store, handle marketing, customer service, and manage orders.
Supplier: They hold the inventory, pack and ship orders, and manage returns.
Customer: They purchase products from your online store and receive them directly from the supplier.
Think of it this way: You act as a bridge between the supplier and the customer. You list products on your website, take orders, handle customer inquiries, and collect payments. But you never physically touch the products yourself.
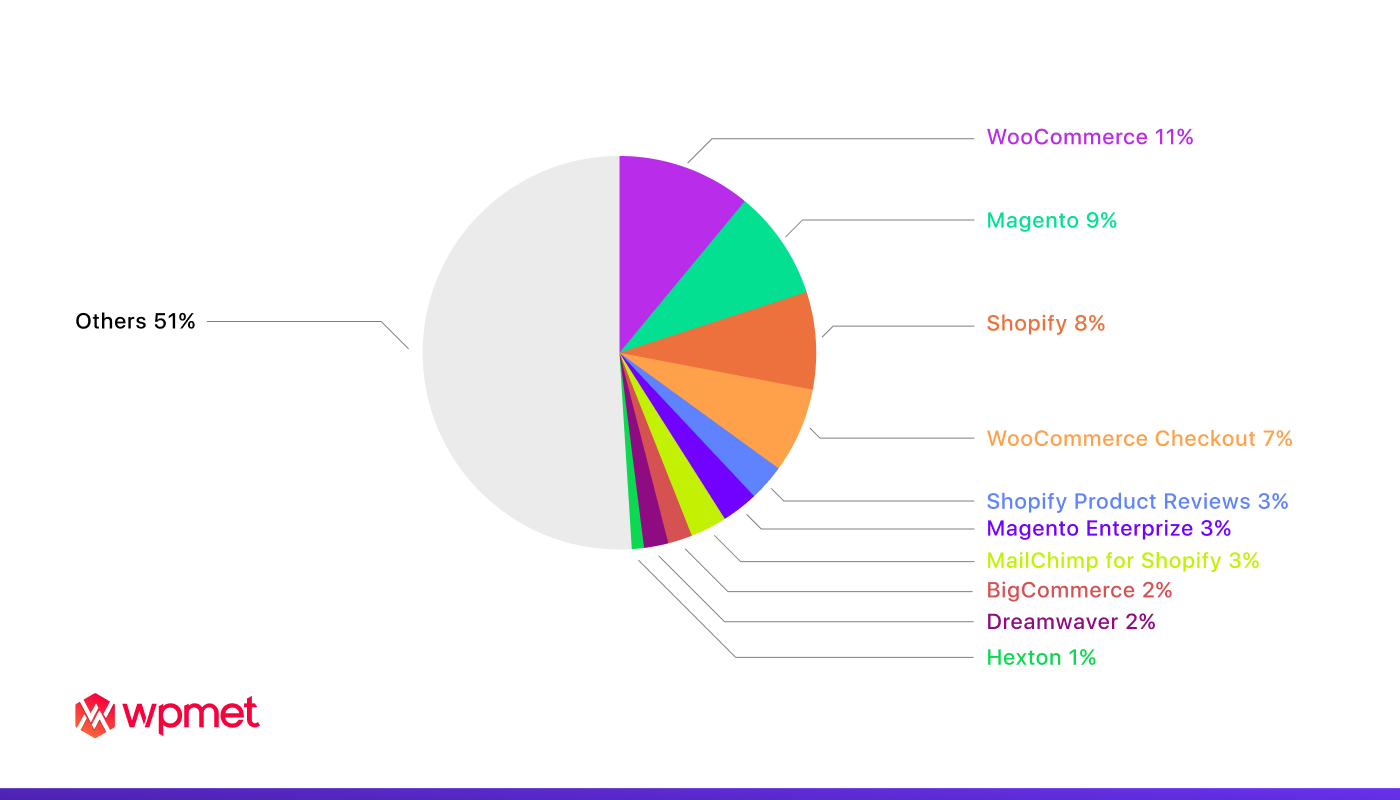
🛒 Best Online Platform for a Dropshipping Business
While various platforms cater to dropshipping, WordPress shines brightest. Here’s why:
🔥 Easy to use: WordPress is known for its user-friendly interface. This makes it easy for even beginners to create and manage their own websites.
🔥 Highly customizable: WooCommerce offers a vast library of themes and plugins. It allows you to personalize dropshipping stores to fit your brand and niche.
🔥 Scalable: As your business grows, you can easily add more features and functionality to WooCommerce stores.
🔥 Accessible: Both WordPress and WooCommerce are open-source software, meaning they are free to use.
If you want to the whole article on how to create a WooCommerce Website a to z bigginers guide, with real step-by-step images and explanations… Check the button below 👇👇👇
Steps to Build the Best Dropshipping Website in WordPress
With countless platforms and endless advice, building the best dropshipping website can feel overwhelming. Fear not, aspiring entrepreneur! This guide cuts through the noise. It delivers a step-by-step roadmap to crafting a high-converting dropshipping powerhouse in WordPress.
From choosing the right niche and products to launching with confidence and optimizing for conversion. We’ll equip you with the essential tools and strategies to turn your online vision into a dropshipping empire.
1. Pre-requisites in Building Your Dropshipping Website
Before diving in, ensure you have the essential tools:
➡️ WordPress: Install and configure WordPress on your web hosting.
➡️ WooCommerce: This free plugin powers your online store functionalities.
➡️ Secure Socket Layer (SSL) Certificate: Secure your website and build customer trust. You can get one from a Certificate Agent (CA). Or ask your web host if they offer an in-house alternative.
2. Choose a Theme and Design Your WooCommerce Site
First impressions matter. Pick a visually appealing theme that reflects your brand and niche. Opt for a theme optimized for WooCommerce for seamless integration. Customize it with colors, fonts, and logos to create a unique online personality.
As for WooCommerce builder and customizer plugins, there are many in the market now. Choosing one to design your WooCommerce site can be tough. Thus, a careful selection is a must. One that has exhibited the best choice for a WooCommerce site is ShopEngine.
Why ShopEngine?
- Drag-and-drop WooCommerce builder.
- Lightweight WooCommerce solution for Elementor.
- Ensures fast loading WooCommerce site.
- Packed with features needed for WooCommerce such as product comparison, wishlist, checkout and payment processes, order management and so many more……
- With highly customizable widgets and modules.

3. Choose a Niche and Products
Focus on a specific niche where you can stand out. You can conduct thorough competitor research, scrutinize market trends, and pinpoint products characterized by high demand and low competition. Additionally, you can offer curated selections that resonate with your target audience.
Before picking products, decide on the type you want to sell. For instance, if clothing and accessories are your focus, narrow it down by style or by target audience. Remember to choose a niche you’re familiar with and passionate about to make the process smoother.
After picking a niche, look for products with low competition and high demand. You may check the trends on Amazon and other online platforms to explore the best-selling and top-rated products.
4. Find Dropshipping Suppliers and Vendors
Research reliable dropshipping suppliers with high-quality products, competitive pricing, and efficient fulfillment services. Prioritize those offering product variations, fast shipping, and transparent communication.
Numerous online marketplaces host a diverse array of dropshipping suppliers and vendors globally. Below is a brief compilation of the top dropshipping marketplaces. You can explore potential suppliers there.
- Etsy
- Doba
- SaleHoo
- AliExpress
5. Add Products to Your Store
Import your chosen products using WooCommerce, or add them manually. Optimize product descriptions and titles for SEO. Upload high-quality images and highlight unique selling points.
Access the process by going to Products > Add New in your dashboard. Once you’ve provided all essential details and published your product, it becomes accessible for various WooCommerce functions. This becomes crucial in the next step. You will link your dropshipping information to these new products.
6. Set up Your WooCommerce Elements
This is where things get exciting! WooCommerce has a vast array of plugins. They can extend your store’s functionality and make it more user-friendly.
Here are some essential WooCommerce elements:
- Product Management: Adding, editing, and managing product information, variations, descriptions, and images.
- Inventory Management: Tracking product stock levels and setting low stock alerts.
- Order Management: Processing orders, managing refunds, and tracking customer interactions.
- Customer Accounts: Creating and managing customer accounts, offering wishlists, and facilitating order tracking.
- Checkout and Payment: Configure various payment gateways for secure transactions. Also, offer guest and quick checkout options.
- Shipping, Fulfillment and Return: Set up shipping rates and zones. Integrate with shipping providers. Offer order tracking and return options. Allow product exchanges if needed.
- Testimonial Sliders and Customer Reviews: Build trust and social proof. Showcase positive feedback.
Worry no more! The combination of WooCommerce and ShopEngine has got your back! ShopEngine offers convenient solutions to the most essential elements. This plugin is designed as:
- Shop page builder
- Cart page builder
- Check out page builder
- My account page builder
- Success page builder
- Quick checkout builder
- Quick view builder
Now, I’ll teach you how you can set up some of your WooCommerce elements using ShopEngine!
Building your Shop Page with ShopEngine
1. Create a Shop Template: Go to your WordPress dashboard ➡ Builder Template ➡ Add New.
2. Provide a name to your template ➡ Select “Shop” as page type ➡ Enable Active ➡ Select your design from the “Sample Designs” ➡ Save Changes.

3. Once your template is created and visible on your templates list, Click “Edit with Elementor” to switch to the Elementor window.
4. Choose your structure from the selected area.
5. Enhance your Shop Page template with Product Archive Widgets. You’ll need to go to the Product Archive Block and drag archive widgets including Archive Title, Products Filter, Archive Products Per Page Filter, Archive Product, Archive Result Count, etc. to enhance your shop page.
6. After you design your template, publish it.
Building your Cart Page with ShopEngine
ShopEngine allows you to create your Cart Page in 2 styles; Border Cart and RTL styles.
1. Navigate to your WordPress dashboard ➡ ShopEngne ➡ Builder Templates ➡ Add New
2. Provide a name to your template ➡ Select “Cart” as page type ➡ Enable Active ➡ Select “Empty Sample Design” to create your own design ➡ Click “Edit with Elementor”.
3. Drag and drop the Block structure and start creating your design.
4. To elevate the aesthetics of your Cart page, go to ShopEngine Cart Block. You will see different widgets including Cart Table, Cart Total, Cross-sells, Empty Cart message, Return to Shop, etc. Just drag and drop the widgets.
5. Publish your Cart page template.
If making your own template is troublesome, you can insert a pre-built ShopEngine Cart Page Template. Follow step 2 but instead of selecting the “Empty Sample Design”, either choose Border Cart Style or RTL template.
Building your Checkout Page with ShopEngine
A Checkout page facilitates the entry of payment details and finalizes the order for your visitors. Within this page, both payment information and shipping/billing details are seamlessly integrated into the structure of your WooCommerce store.
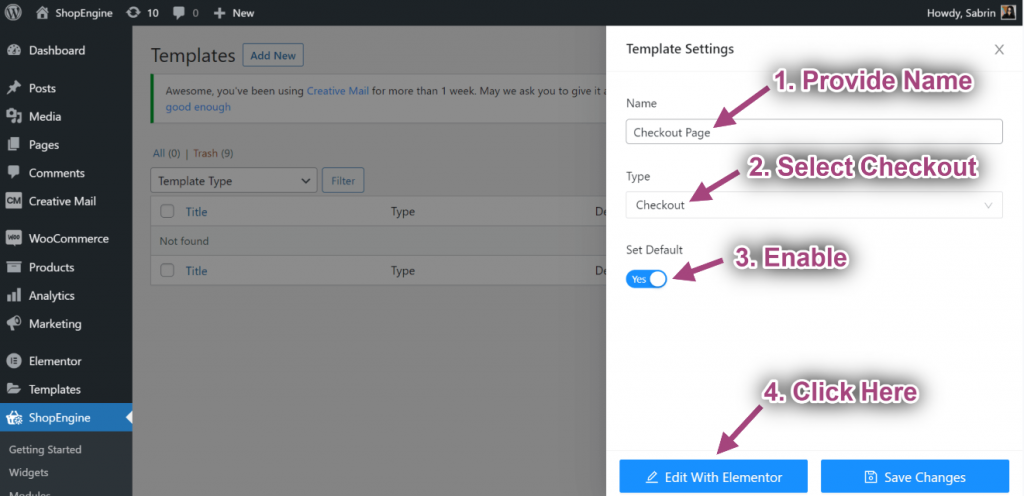
1. Navigate to your WordPress dashboard ➡ Look for ShopEngine ➡ Templates ➡ Add New.
2. Name your Template ➡ Select “Checkout” as page type ➡ Enable Default template ➡ Click on Edit with Elementor to add an Elementor checkout page template.
3. Choose your structure from the selected area.
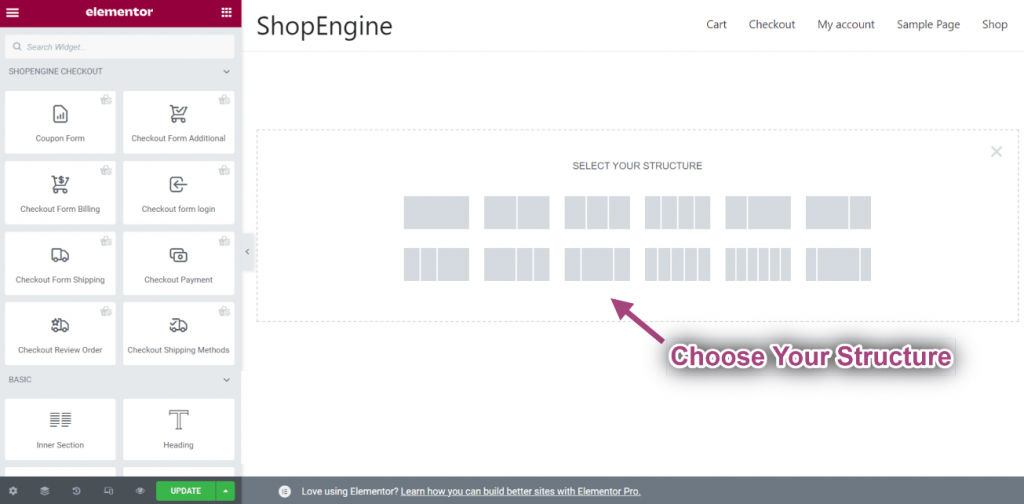
4. Go to a ShopEngine Checkout Block to select the widgets including Checkout Form Billing, Coupon Form, Checkout Review Order, Checkout Payment, etc to design your own template.
5. Publish your template.
Building your Account Page with ShopEngine
ShopEngine simplifies the process of account page creation including;
- Account Dashboard Page
- Account Order Page
- Account Order Details Page
- Account Downloads Page
- Account Address Page
- Account Details Page
- Account Login/Register Page
With ShopEngine, you can effortlessly generate a dedicated “My Account” page that empowers customers to seamlessly navigate their dashboard, monitor order progress and downloads, and modify account addresses and particulars. This multifaceted page also serves as a convenient access point for customers to log in or register on your website.
Just go to your WordPress dashboard and look for ShopEngine. Select “Widgets” to see all the widgets you need to enable to create your Account Page. After you enable the required widgets, go to “Templates” and click “Add New” to start the creation of your template.
For complete instructions, visit this documentation.
Building your Quick View with ShopEngine
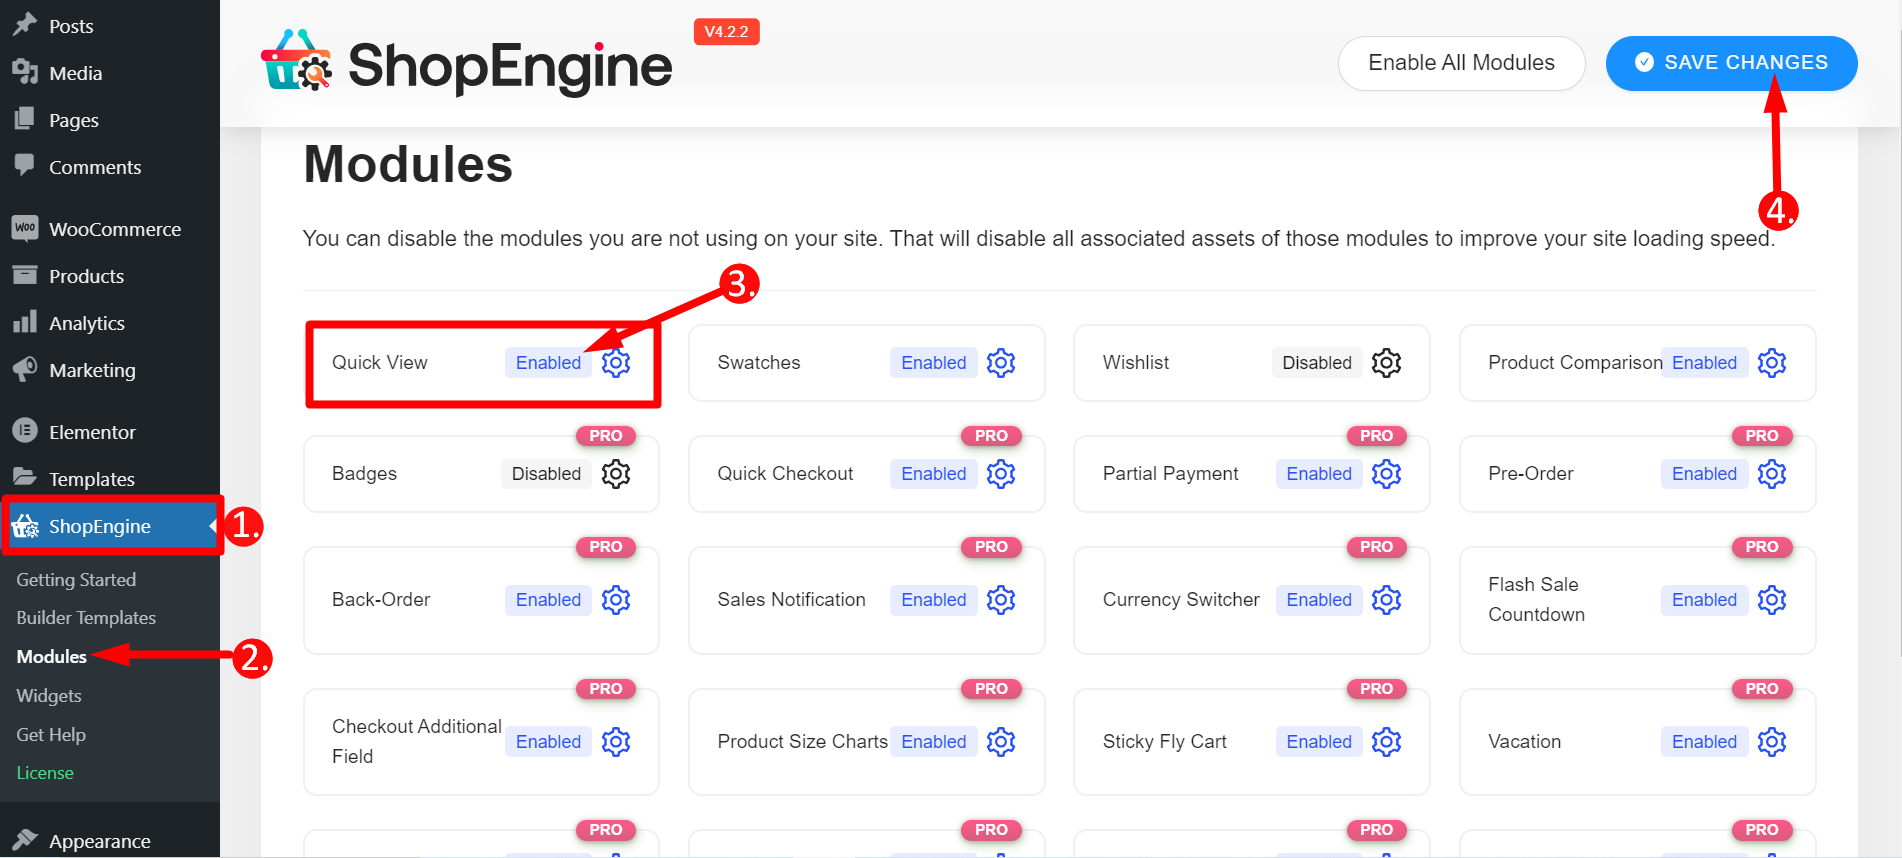
The quick view functionality enables users to swiftly grasp an overview of WooCommerce products. This feature allows individuals to inspect any product without the need to navigate to the detailed page.
On your WordPress Dashboard, look for ShopEngine and select “Module”. Find the Quick View Module and enable it, then, save changes.
Go back to ShopEngine and select “Builder Templates and click “Add New”. Fill in the required fields and click “Edit with Elementor”.
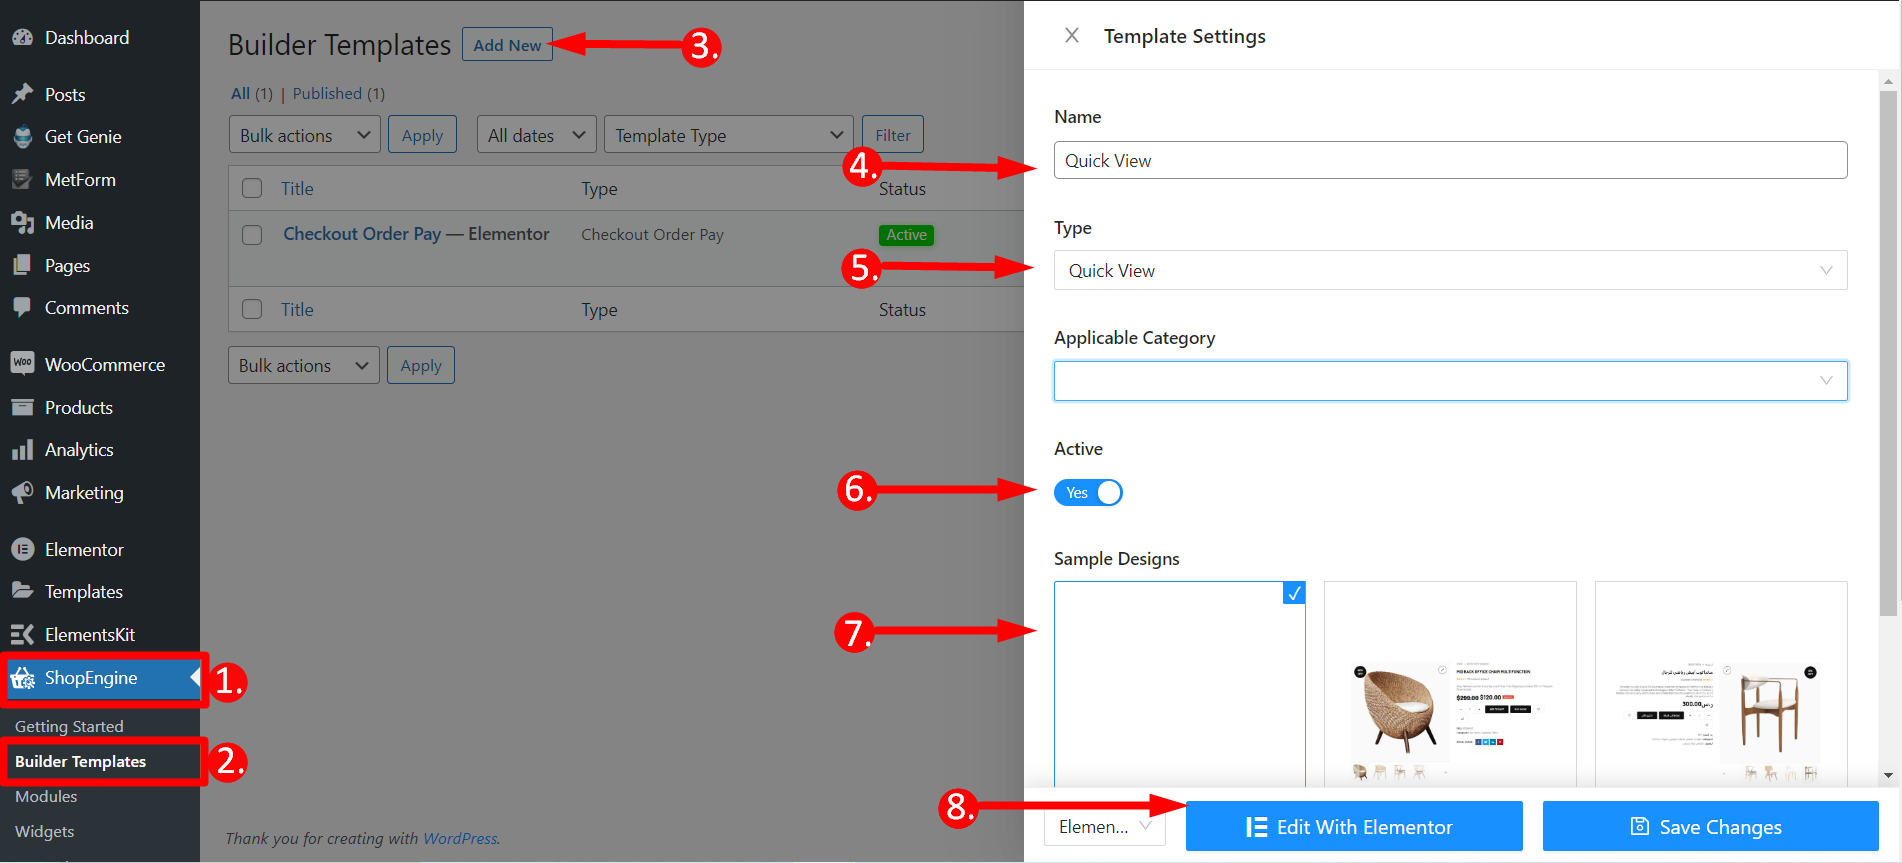
A window will pop up where you’ll need to write any product’s name or you can also create a new product. Then, click “Edit with Elementor” to modify the recently added single product by incorporating any desired edits. Optionally, enhance the page by including additional widgets such as Related Products, Recently Viewed Products, or others, and tailor the page to meet your preferences. Finally, click the update button.
7. Test Your Dropshipping Website
Before launch, thoroughly test your website. Focus on user experience and optimize your website for mobile devices. Ensure page loading speeds are fast and offer a smooth navigation flow.
Moreover, you should check product pages, checkout processes, and payment gateways. Fix any bugs or glitches to ensure a seamless user experience.
8. Launch Your Dropshipping Website
Congratulations! Your dropshipping website is ready to go live. Promote your store through social media, paid advertising, and SEO. Be patient, analyze customer feedback, and continuously optimize your store for better results.
9. Optimize for Conversion
Implement conversion-boosting strategies like product reviews, discount codes, and limited-time offers.
Additionally, use social media, email marketing, and paid advertising to drive traffic to your website. Promote your products on social media platforms where your target audience is active.
Furthermore, build an email list and send engaging newsletters. To reach new clients, think about running tailored advertisements.
Final Thoughts
Building a successful dropshipping website takes dedication and strategic planning. Follow these steps. Continually adapt to market trends. You can transform your WordPress-powered online store into a dropshipping powerhouse.
Remember, success lies in offering top-notch customer service. It also lies in building trust and staying committed to your niche. Now, go forth and conquer the world of dropshipping!
Leave a Reply