

 Danish
  English
  German
  Spanish
  Italian
  French
  Portuguese
  Swedish
  Polish
  Korean
  Japanese
 Med Product Size Charts module by ShopEngine, you can add a product size chart of any information you want in an image format on the product page. You can add as many charts as you want and a single one from the product settings of each product.
Sådan tilføjer du produktstørrelsesdiagrammer til dit WooCommerce-websted ved hjælp af ShopEngine #
You can add Product Size Charts to your WooCommerce Elementor website by following 7 simple steps.
Before that, get ShopEngine Pro now 👇
Trin 1: Aktiver modulet Produktstørrelsesdiagrammer i ShopEngine #
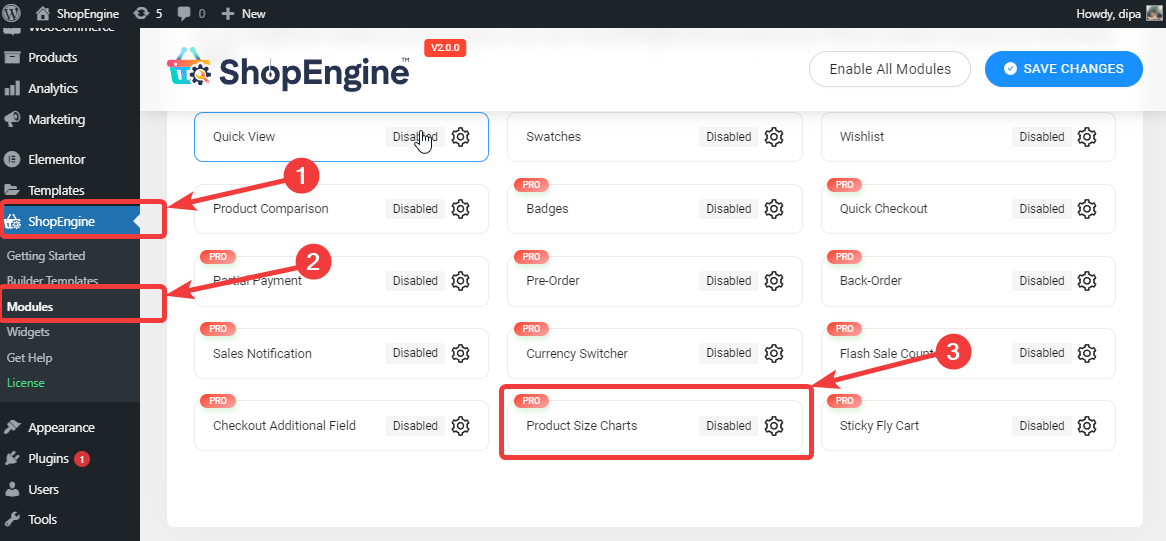
Fra WordPress dashboard, gå til ShopEngine ⇒ Moduler ⇒ Produktstørrelsestabeller og klik på indstillingsikonet.
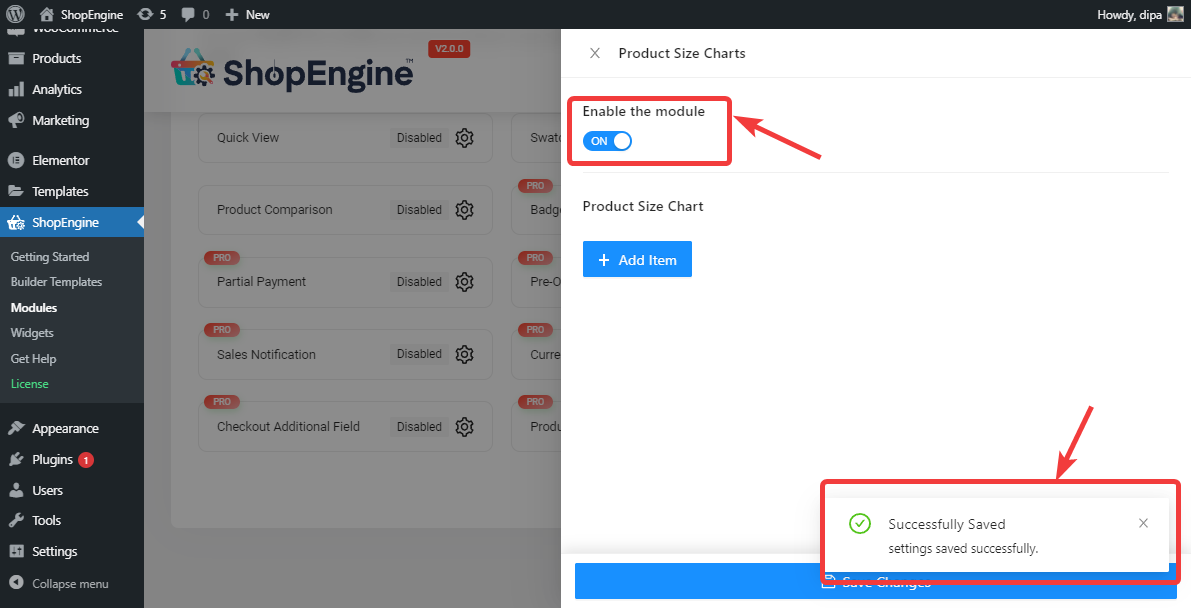
Når du ser indstillingerne, tænd for Aktiver modulet mulighed. Du bør se en vellykket gemt meddelelse efter det.
Bemærk: Du kan også aktivere alle modulerne på samme tid. Tjek hvordan du kan tænde for alle moduler på én gang.
Trin 2. Tilføj et nyt produktstørrelsesdiagram #
For at tilføje et nyt størrelsesskema, klik på +Tilføj ny knap
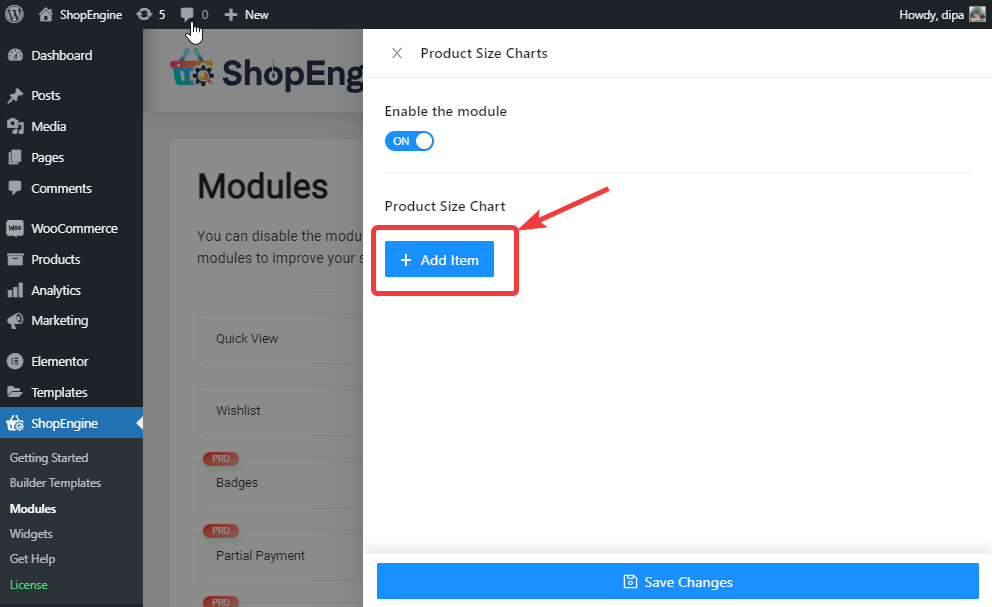
Udvid piletegnet, giv et navn til diagramflisen, klik på vælg-ikonet for at vælg et billede for dette produktstørrelsesskema og vælg den kategori, som du vil tildele størrelsesskemaet til. Når du begynder at skrive kategorinavnet, vises en rullemenu, du kan vælge fra det. Og til sidst, klik på Gem ændringer.
Bemærk: Det tildelte størrelsesskema vil være gældende for alle produkter i kategorien.
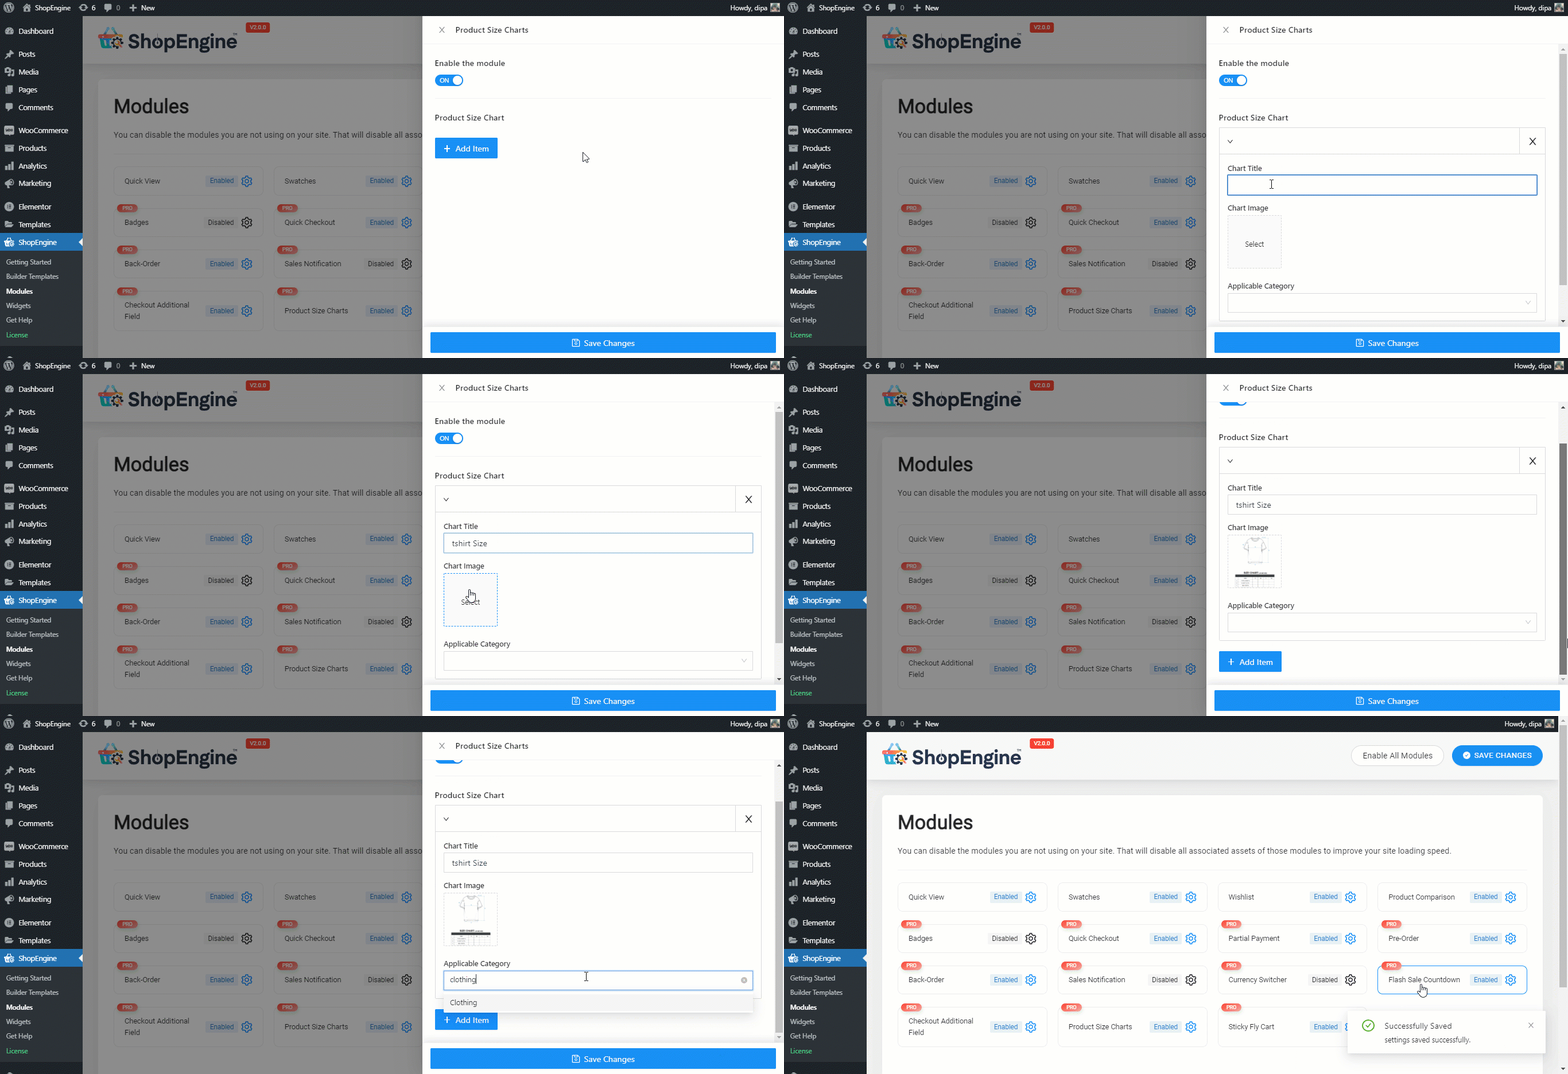
Bemærk: Du kan tilføje så mange diagrammer, som du vil. Når du har tilføjet og gemt, kan du vende tilbage til enhver tid rediger diagrammets titel og billede af allerede tilføjede diagrammer. Og også slette nogen af de eksisterende diagrammer.
Trin 3. Føj widgets til produktstørrelsesdiagrammer til en enkelt produktskabelon #
Når du er færdig med at oprette dine størrelsesdiagrammer, skal du tilføje produktstørrelsesdiagrammer-widgetten til din enkelt produktsideskabelon af ShopEngine for at gøre den synlig på frontenden.
Bemærk: Hvis du har brug for hjælp til hvordan oprette og redigere en enkelt produktskabelon af shopEngine tjek vores dokumentation.
Når du er i Rediger med Elementor-tilstand for den enkelte produktskabelon, skal du søge efter Widgets til produktstørrelsesdiagrammer og simpelthen bare Træk og slip på dit ønskede sted.
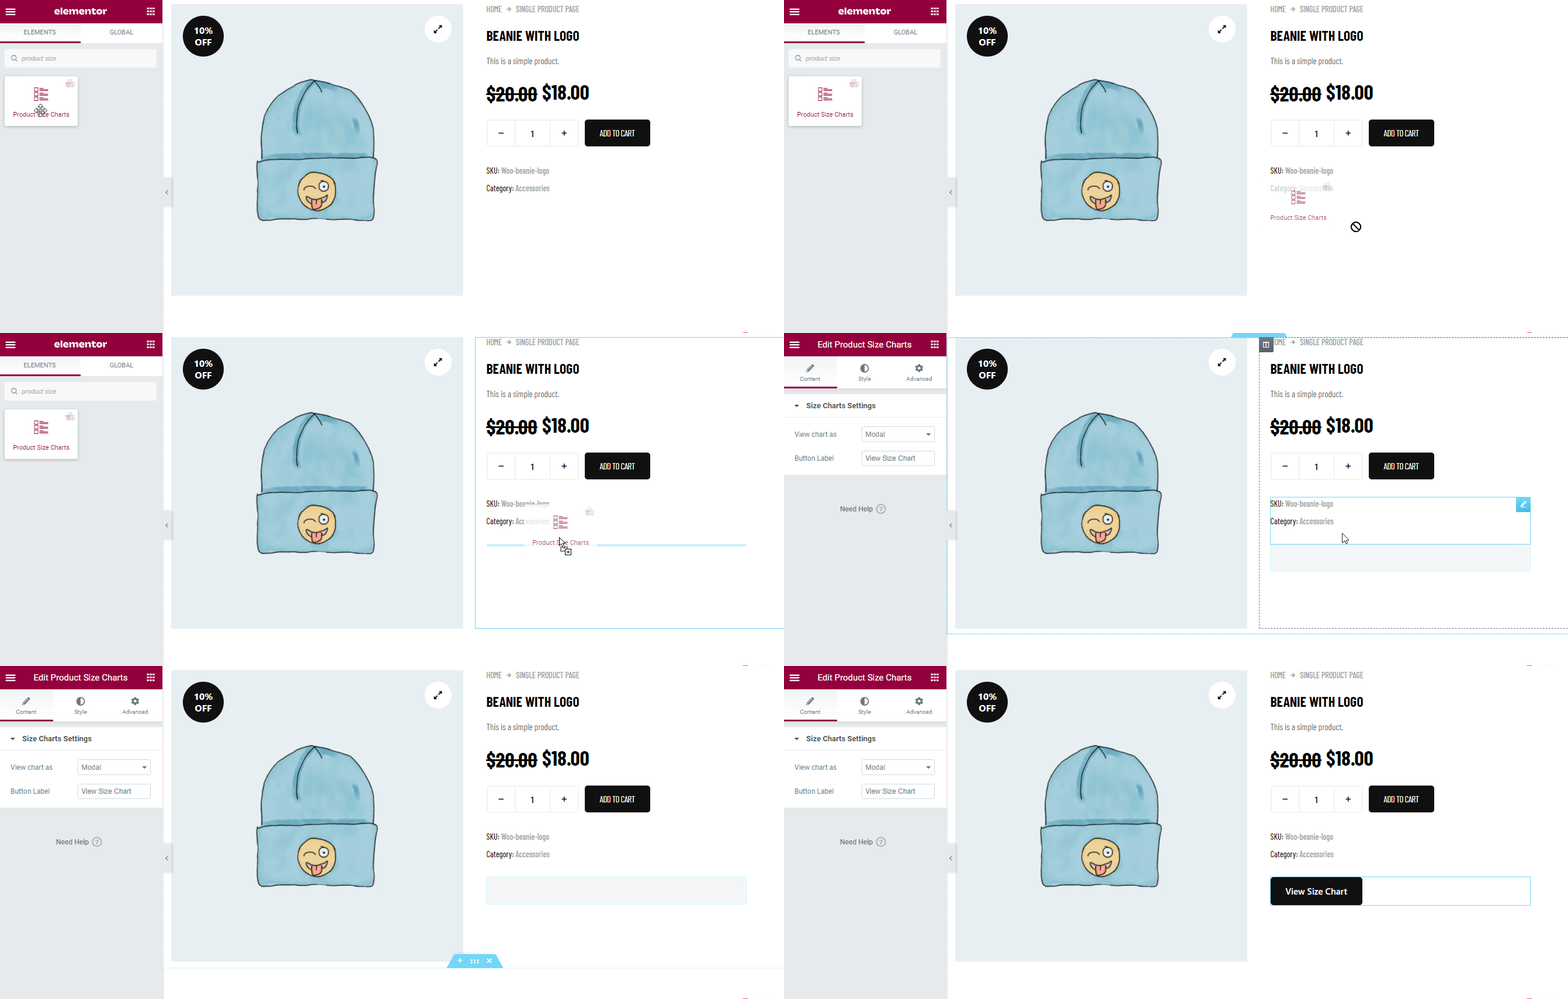
Trin 4. Vælg Normal Størrelsesdiagram/ Modal Størrelsesdiagram Type og tilpas #
Du får to indstillinger for størrelsesdiagram, som inkluderer:
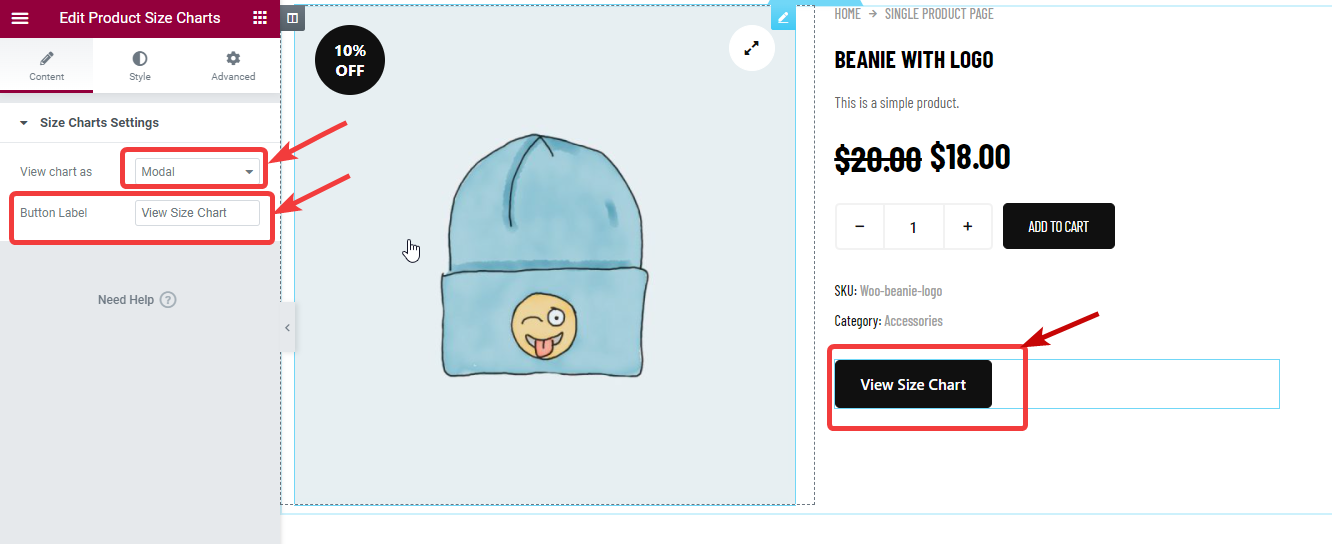
Du kan vise størrelsesdiagrammet på to måder, Modal og Normal.
Modal størrelsesdiagram: #
Modal er standardindstillingen og med modal får du også mulighed for indstille en brugerdefineret knaplabel.
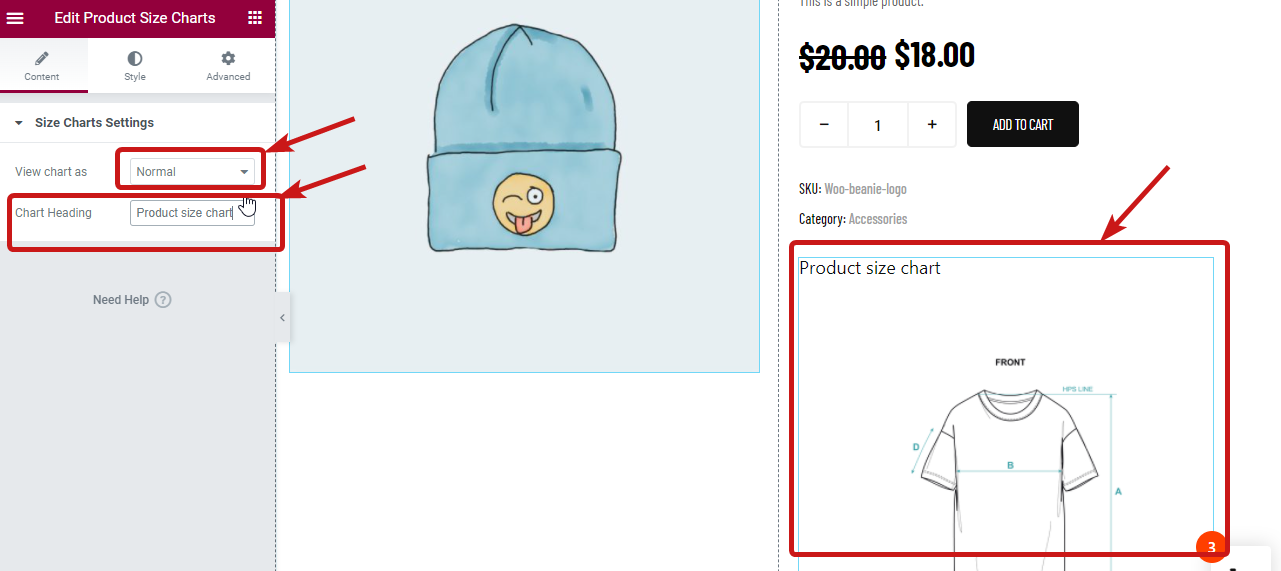
Normal størrelsesskema: #
Hvis du vil vælge en normal tilstand, skal du vælge Normal fra rullemenuen Vis diagram som. Når du har valgt normal, får du en ny indstilling Diagramoverskrift, hvor du kan indstille en brugerdefineret overskrift til billedet.
Trin 5. Stilindstillinger for Modal/Normal produktstørrelsesdiagram #
Afhængigt af hvilken type visningsstørrelsesdiagram du vælger, får du relevante stilindstillinger. For at få adgang til stilindstillingerne skal du flytte til stilfanen i Elementor-editoren.
Stilindstillinger for modalt størrelsesskema: #
For den modale visningsmulighed for størrelsesskema får du følgende stilindstillinger, som du kan tilpasse efter dit valg.
Størrelsesdiagramknap: Udvid størrelsesskemamenuen, og du vil finde følgende mulighed:
- Typografi:Vælg skriftstørrelse, skrifttypefamilie og skriftvægt.
- Farve og baggrundsfarve: Vælg farve og baggrundsfarve for både svæve- og normalvisning.
- Kanttype: Du kan vælge kanttype som ingen, solid, fordoblet, stiplet osv.
- Bredde: Vælg venstre, højre, top og bund bredde.
- Farve: Vælg en farve til kanten.
- Kantradius (px): Angiv en kantradius.
- Polstring (px): Juster top, højre, bund og venstre polstring.
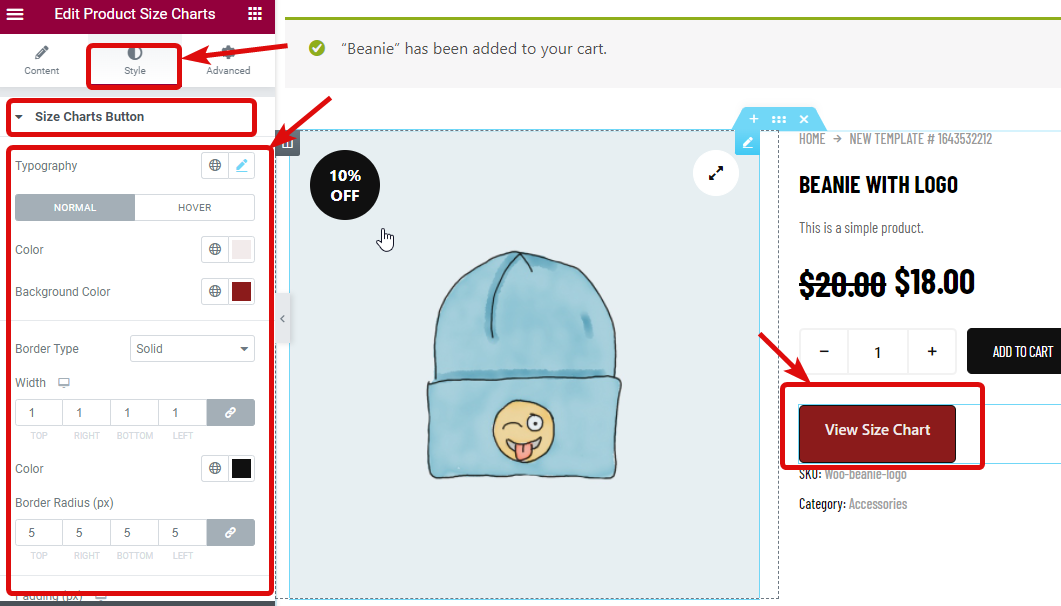
Størrelsesdiagram popups: Udvid pop op-vinduet med størrelsesdiagram for at tilpasse følgende mulighed:
- Kantradius (px): Vælg en grænseradiusværdi.
- Polstring (px): Juster top, højre, bund og venstre polstring
- Baggrundsfarve: Her kan du vælge billedets baggrundsfarve.
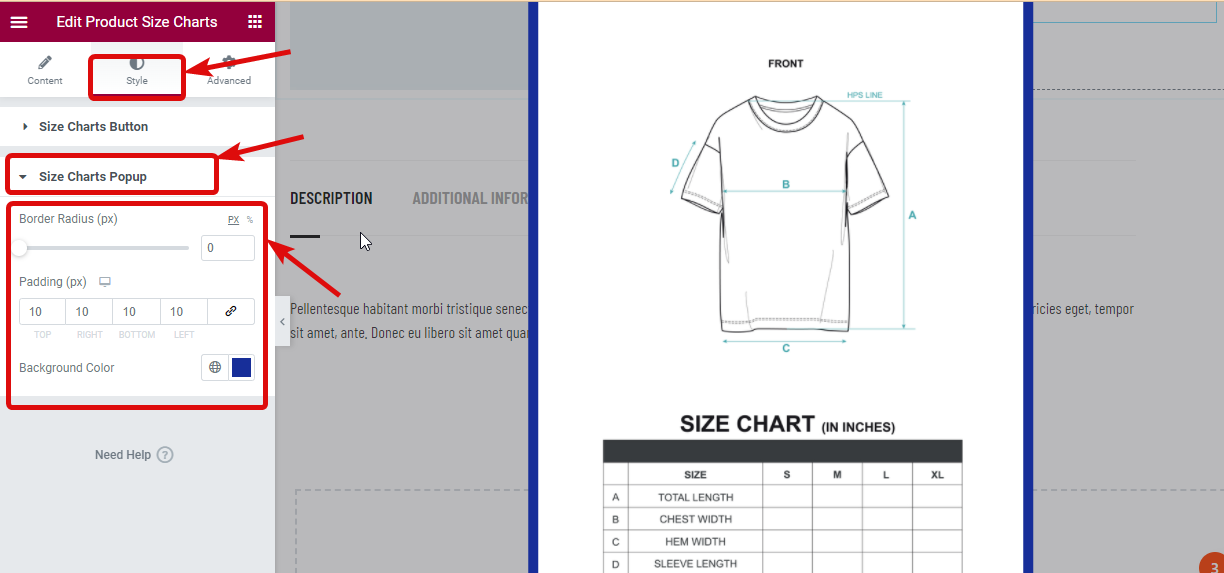
Hvis du vil gå efter Modal-visningen derefter efter at have foretaget alle ændringerne klik på opdater for at gemme og gå videre til næste trin.
Størrelsesindstillinger for normal størrelsesdiagram: #
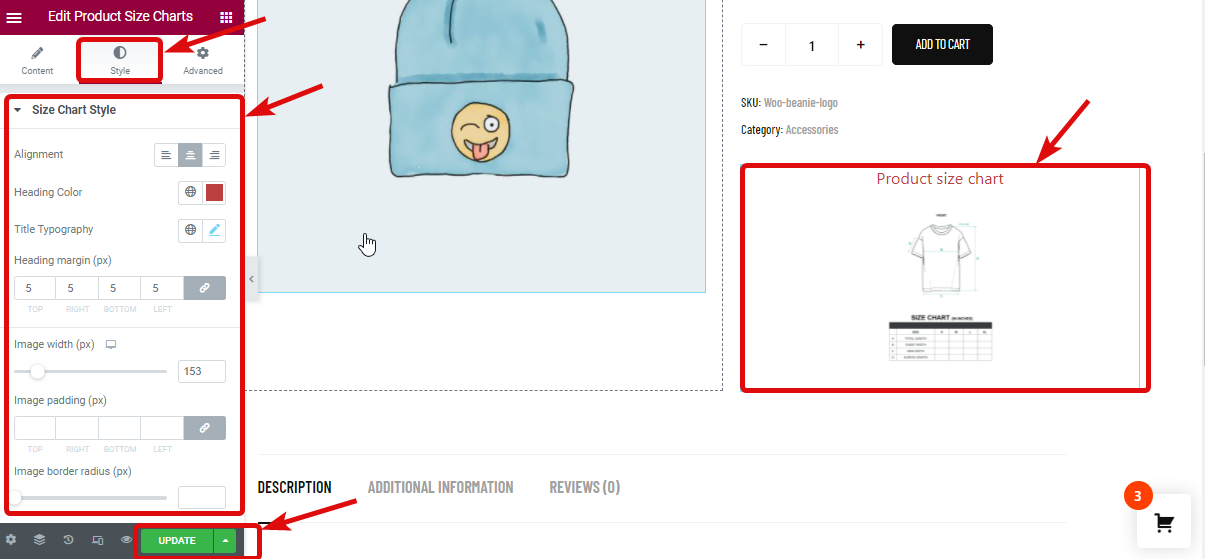
På den anden side, hvis du går efter en normal visning, vil du finde mange muligheder under indstillingen Størrelsestabelstil, som du kan tilpasse:
- Justering: Her kan du justere justeringen af størrelsesskemaets overskrift.
- Overskriftsfarve: Vælg en farve til overskriften.
- Titeltypografi: Her kan du tilpasse skrifttypefamilie, størrelse, skriftvægt og linjehøjde.
- Overskriftsmargen (px): Juster margenen omkring overskriften her.
- Billedbredde (px): Her kan du justere højden på billedet.
- Billedpolstring (px): Angiv polstringsværdi for billedet
- Billedkantradius (px): Vælg en værdi for kantradius.
Klik endelig på opdater for at gemme.
Trin 6. Tilføj størrelsestabeller til produktet (Valgfri) #
Bemærk: Hvis du vil tildele et nyt andet størrelsesskema til et specifikt produkt, så kan du følge dette trin. Det nye størrelsesdiagram, som du vil tildele et nyt produkt, vil have højere prioritet end kategoristørrelsesdiagrammet.
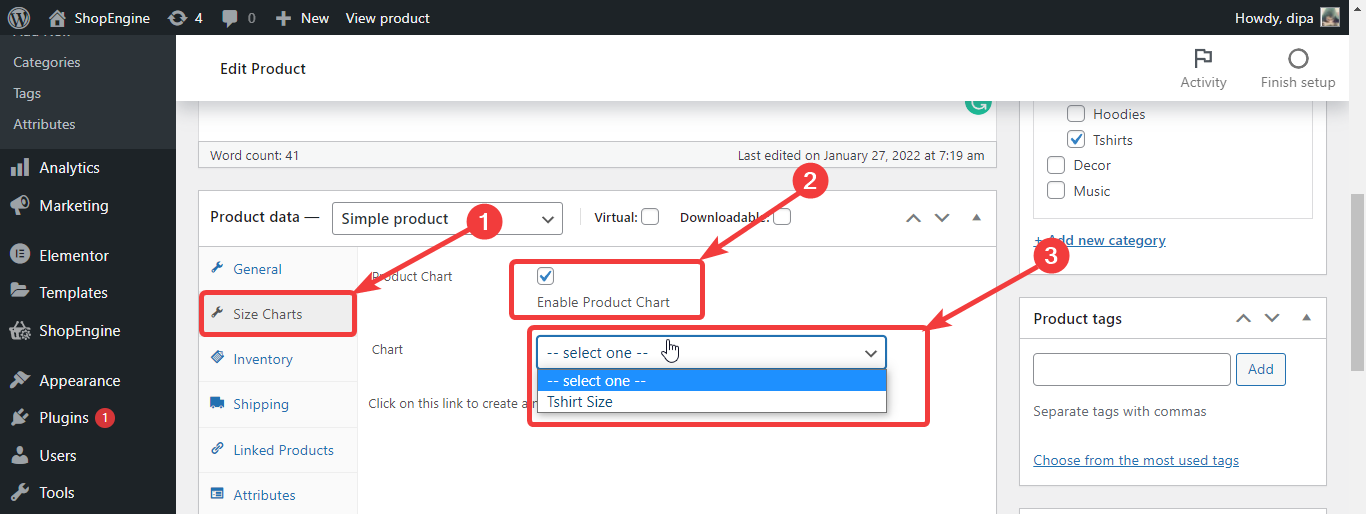
For at tilføje produktstørrelsesdiagrammet til dine produkter skal du fra WordPress-dashboardet gå til Produkter ⇒ Alle produkter og klik på rediger mulighed for det produkt, du vil redigere.
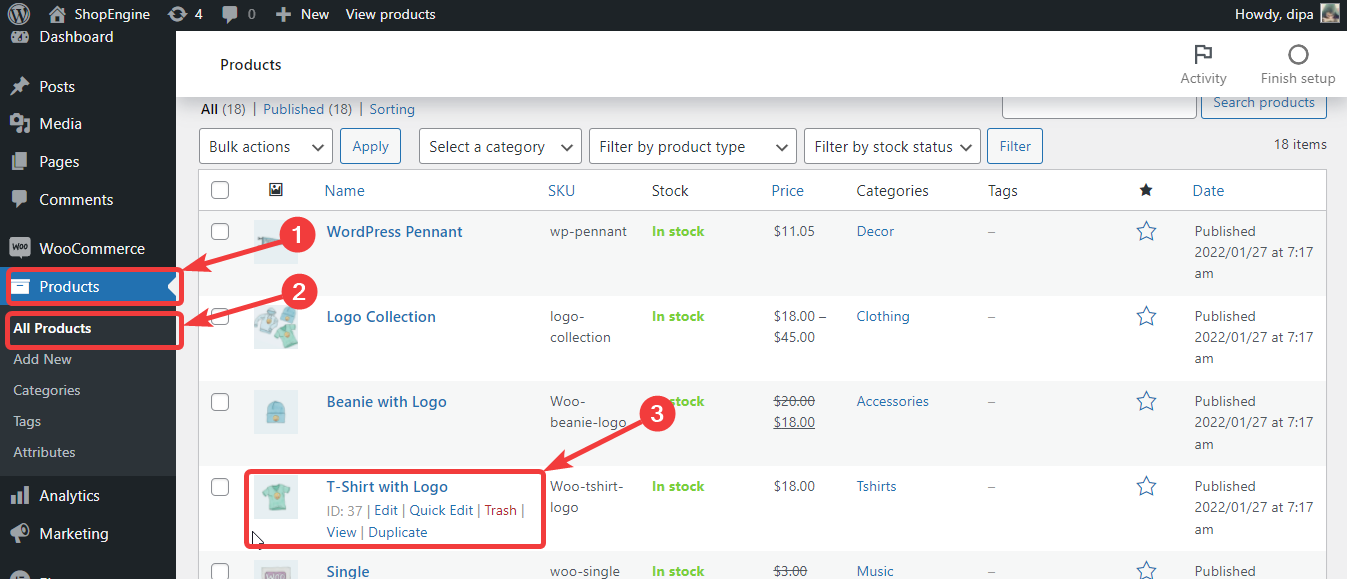
Nu fra produktindstillingerne, gå til Størrelsesdiagrammer, Marker indstillingen Produktdiagram. Når du har markeret diagramindstillingen, vil diagramrullemenuen være tilgængelig. Vælg den mulighed, du ønsker, fra rullemenuen
Trin 7. Opdater til sidst produktet og se preview #
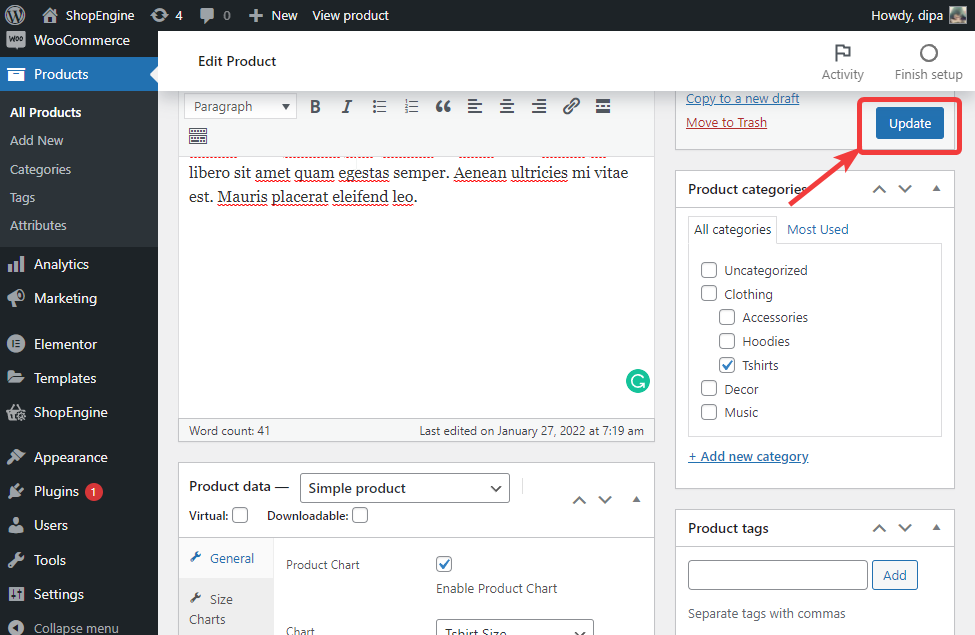
Når du har valgt dit produktdiagram, skal du klikke på opdater for at gemme.
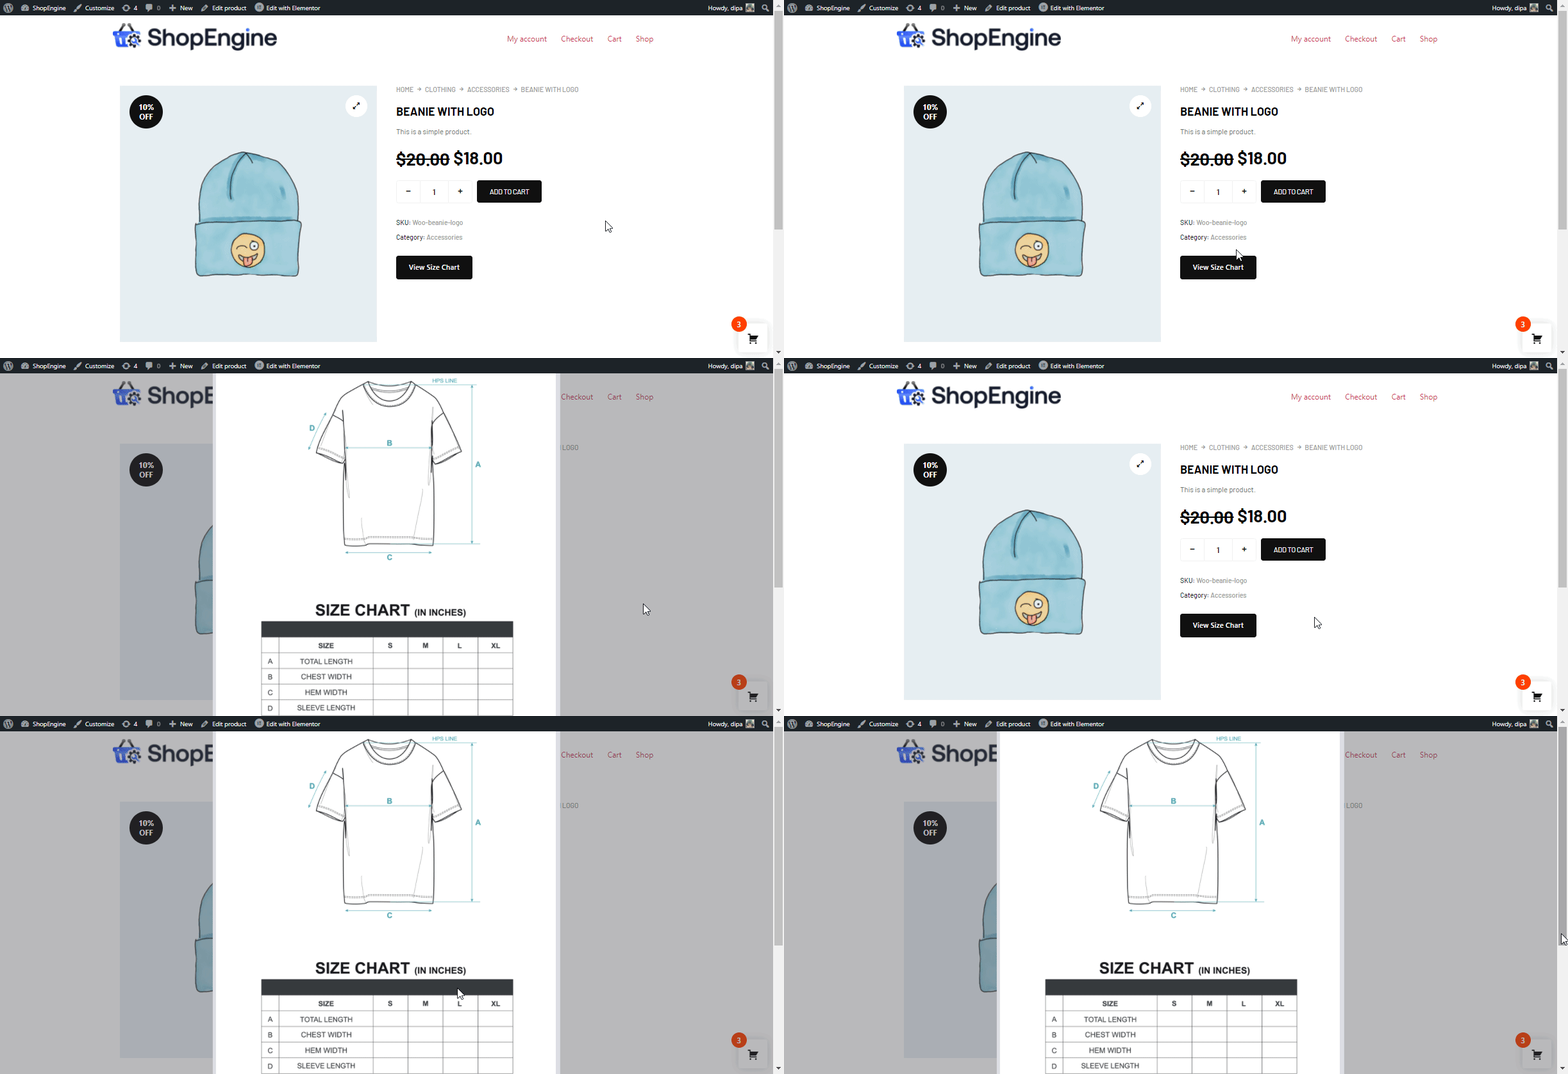
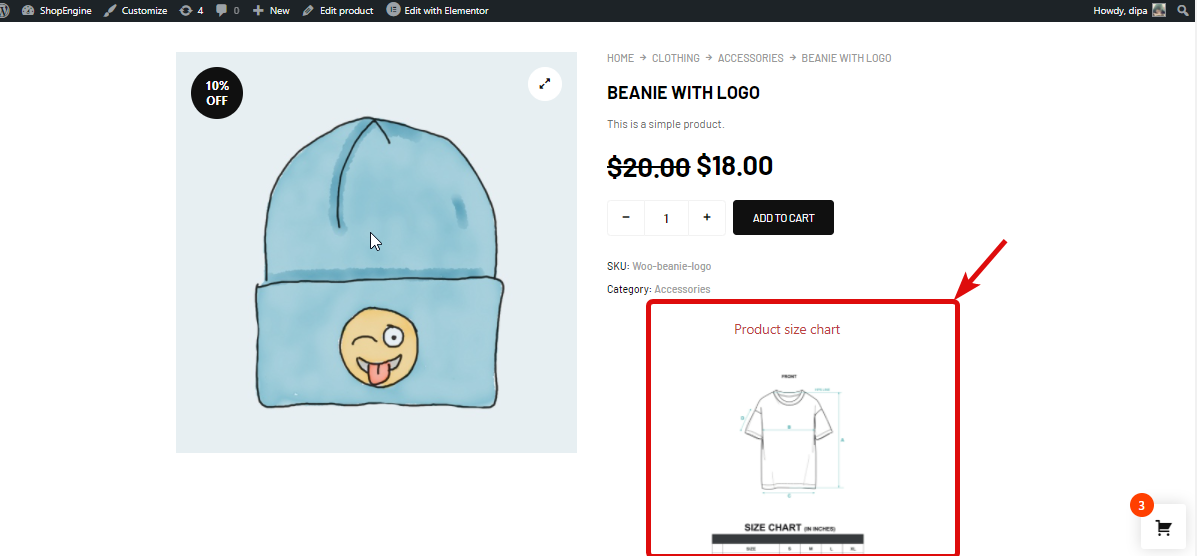
Gå nu til den produktside, du lige har redigeret for at se det endelige resultat, og du bør se produktdiagrammet som eksempelet nedenfor.
Bemærk: Du skal manuelt tilføje størrelsestabeller til alle de produkter, som du vil vise størrelsesskemaet for.
Her er en forhåndsvisning af vognen i produktstørrelse med normal visning
Her er forhåndsvisning af produktstørrelsesdiagram med popup-visning