

 Spanish
  English
  German
  Italian
  French
  Danish
  Portuguese
  Swedish
  Polish
  Korean
  Japanese
 Con el Product Size Charts module by ShopEngine, you can add a product size chart of any information you want in an image format on the product page. You can add as many charts as you want and a single one from the product settings of each product.
Cómo agregar tablas de tamaños de productos a su sitio WooCommerce usando ShopEngine #
You can add Product Size Charts to your WooCommerce Elementor website by following 7 simple steps.
Before that, get ShopEngine Pro now 👇
Paso 1: habilite el módulo de gráficos de tamaños de productos de ShopEngine #
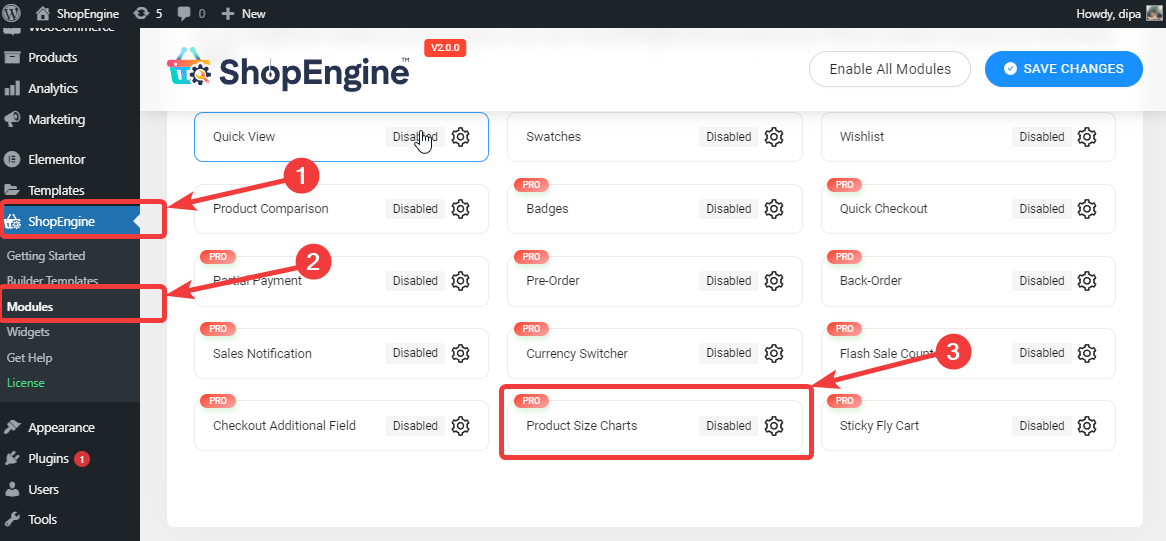
Desde el panel de WordPress, vaya a ShopEngine ⇒ Módulos ⇒ Tablas de tamaños de productos y haga clic en el icono de configuración.
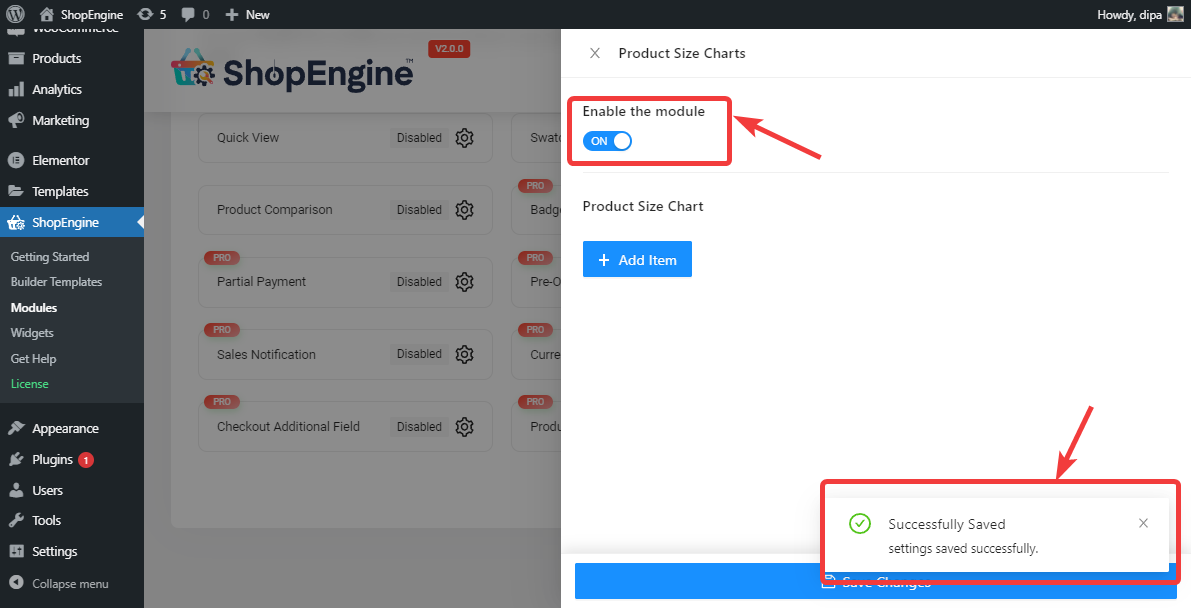
Una vez que veas la configuración, active Habilitar el módulo opción. Después de eso, deberías ver un mensaje guardado correctamente.
Nota: También puedes habilitar todos los módulos al mismo tiempo. Mira como puedes Encienda todos los módulos a la vez.
Paso 2. Agregue una nueva tabla de tallas de producto #
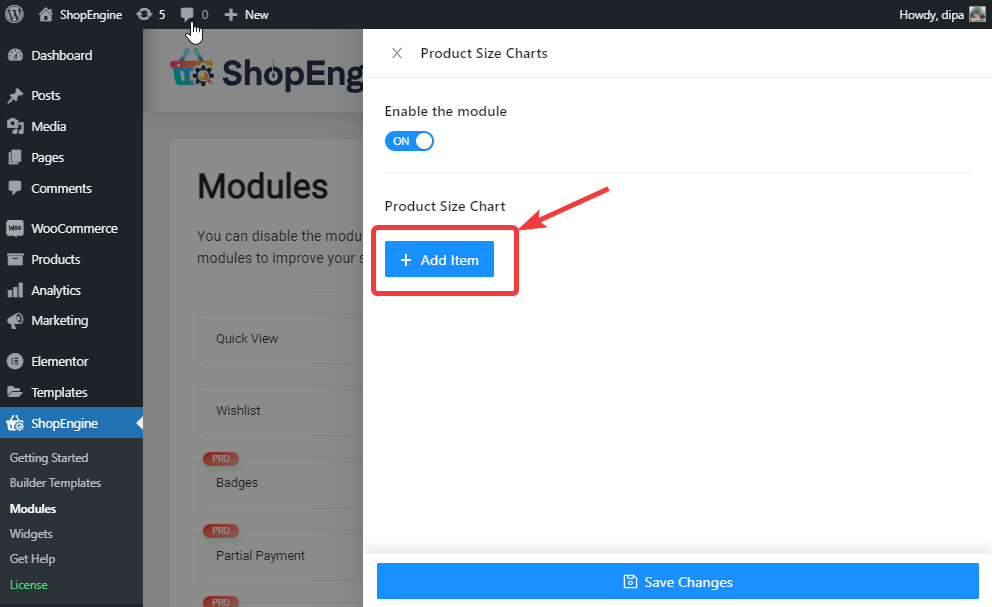
Para agregar una nueva tabla de tallas, haga clic en +Agregar nuevo botón
Expande el signo de la flecha, da un nombre del mosaico del gráfico, haga clic en el icono de selección para elige una imagen para esta tabla de tallas de producto y seleccione la categoría a la que desea asignar la tabla de tallas. Una vez que comience a escribir el nombre de la categoría, aparecerá un menú desplegable, puede seleccionar desde allí. Y por último, haz clic en guardar cambios.
Nota: La tabla de tallas asignada será aplicable en todos los productos de la categoría.
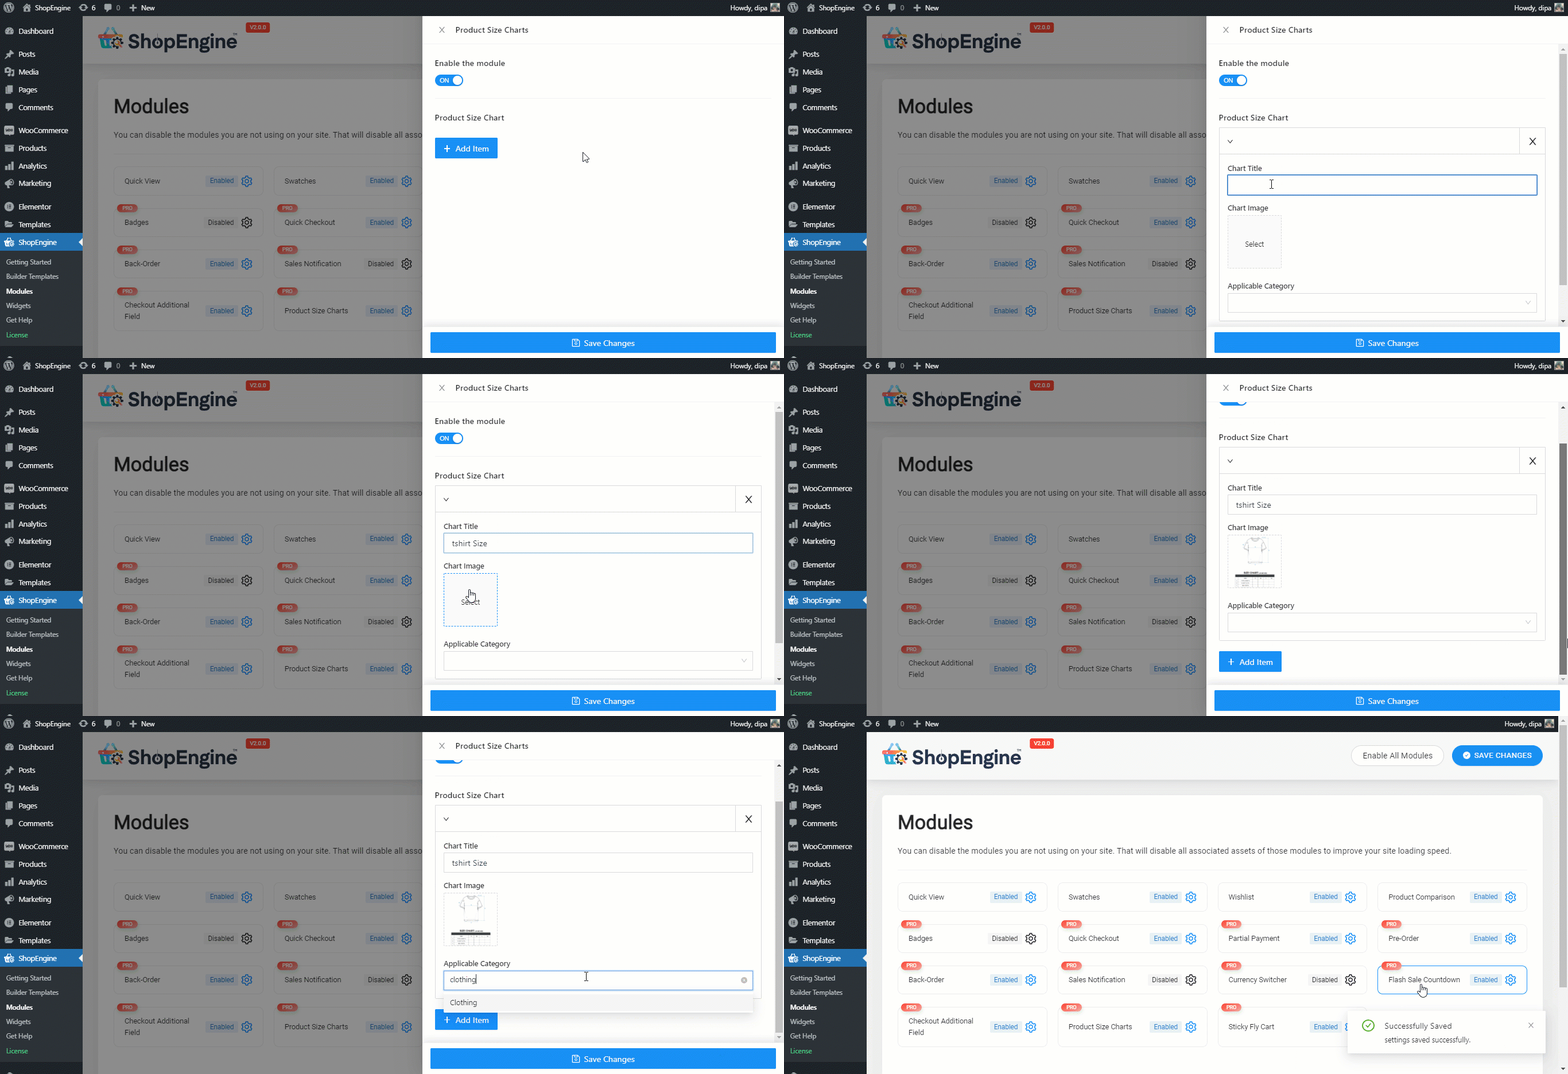
Nota: Puede agregar tantos gráficos como desee. Después de agregar y guardar, puedes volver en cualquier momento para editar el título y la imagen del gráfico de gráficos ya agregados. Y también borrar cualquiera de los gráficos existentes.
Paso 3. Agregue widgets de gráficos de tamaños de productos a una plantilla de producto único #
Una vez que haya terminado de crear sus tablas de tallas, debe agregar el widget Tablas de tallas de productos a su plantilla de página de producto único de ShopEngine para que sea visible en la parte frontal.
Nota: Si necesita ayuda sobre cómo crear y editar una plantilla de producto único de shopEngine consulte nuestra documentación.
Una vez que esté en el modo Editar con Elementor de la plantilla de producto único, busque Widgets de gráficos de tallas de productos y simplemente solo arrastrar y soltar en el lugar deseado.
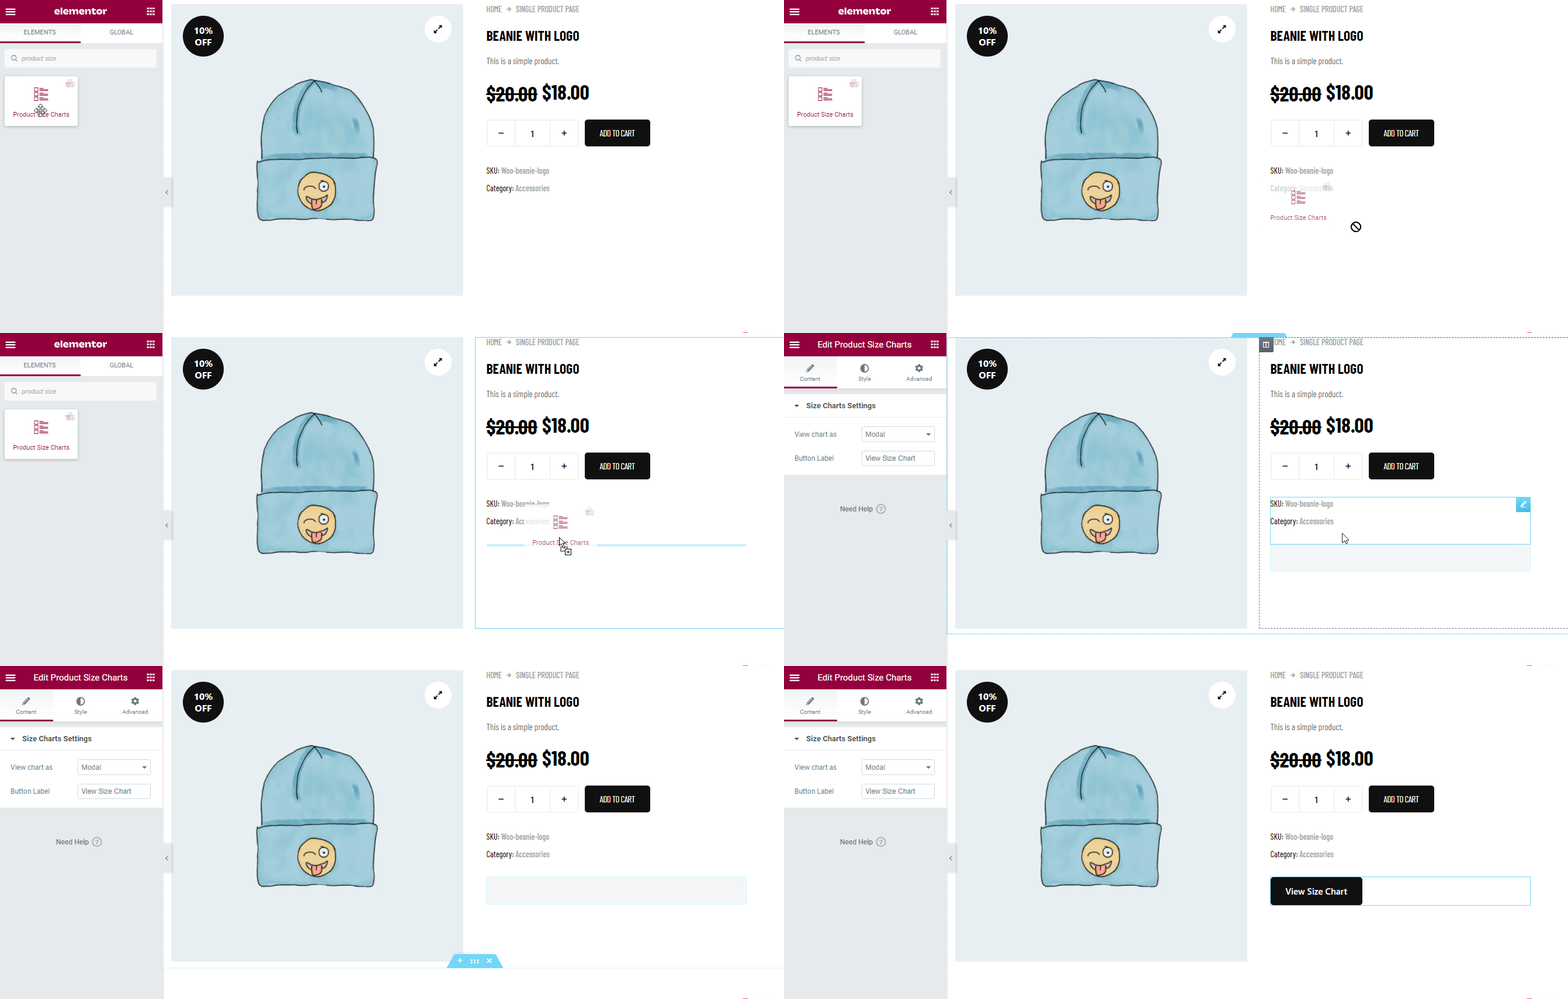
Paso 4. Elija el tipo de tabla de tallas normal/tipo de tabla de tallas modal y personalícela #
Obtendrá dos configuraciones para la tabla de tallas que incluye:
Puedes mostrar la tabla de tallas de dos maneras, Modal y Normal.
Tabla de tallas modales: #
Modal es la opción predeterminada y con modal también tienes la opción de establecer una etiqueta de botón personalizada.
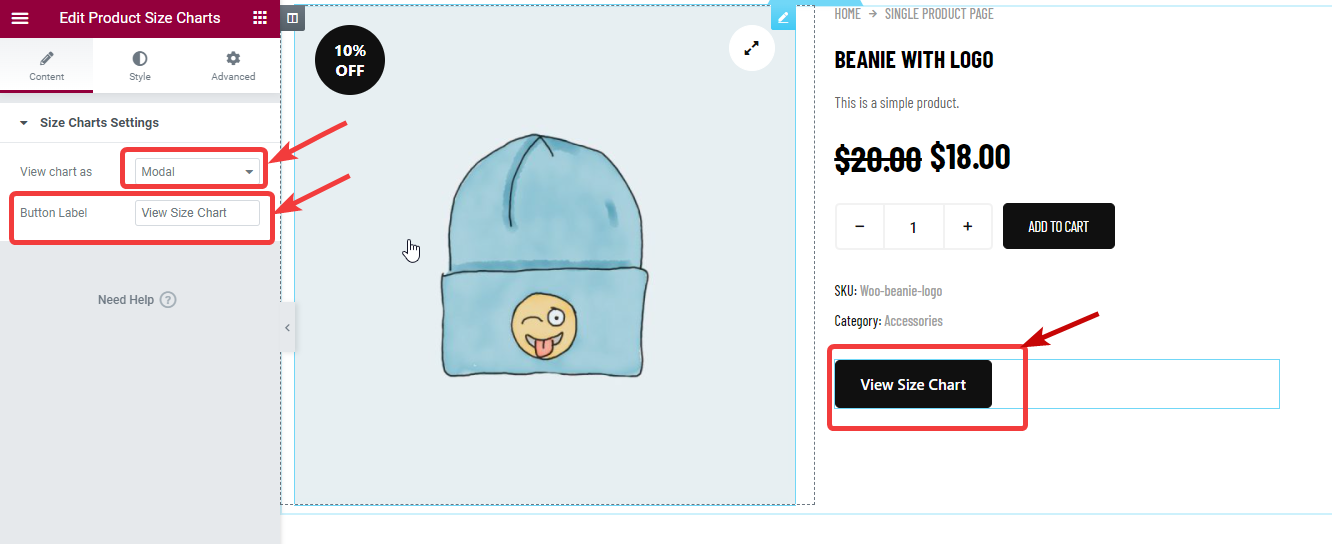
Tabla de tallas normales: #
Si desea elegir un modo normal, en el menú desplegable Ver gráfico como, elija Normal. Después de elegir normal, obtendrá una nueva opción Encabezado del gráfico donde puede establecer un encabezado personalizado para la imagen.
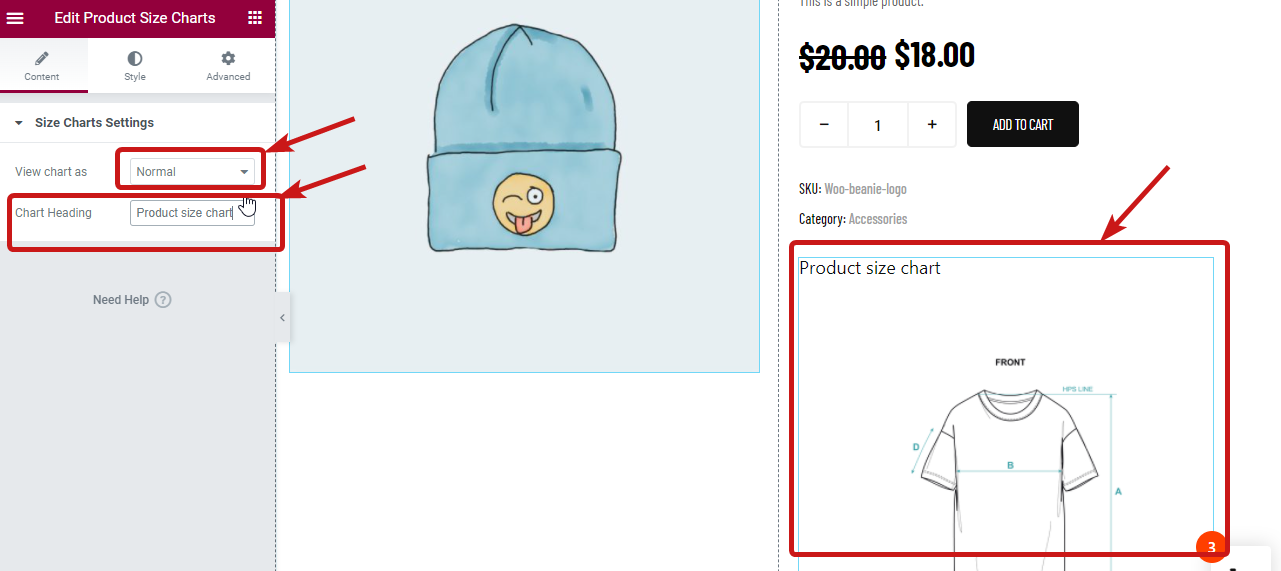
Paso 5. Configuración de estilo de la tabla de tallas de producto modal/normal #
Dependiendo del tipo de opción de gráfico de tamaño de vista que elija, obtendrá configuraciones de estilo relevantes. Para acceder a la configuración de estilo, vaya a la pestaña de estilo en el editor de Elementor.
Configuración de estilo para la tabla de tallas modales: #
Para la opción de vista modal de la tabla de tallas, obtendrá las siguientes configuraciones de estilo que puede personalizar según su elección.
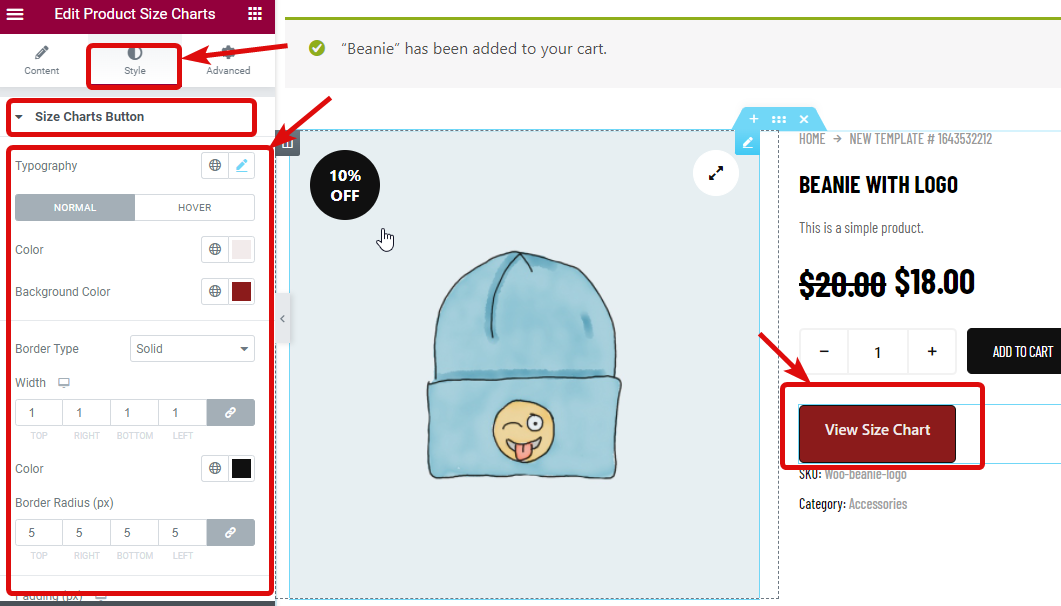
Botón de tablas de tallas: Expande el menú de la tabla de tallas y encontrarás la siguiente opción:
- Tipografía:Elija el tamaño de fuente, la familia de fuentes y el peso de la fuente.
- Color y color de fondo: Seleccione el color y el color de fondo para la vista normal y flotante.
- Tipo de borde: Puede elegir el tipo de borde como ninguno, sólido, duplicado, discontinuo, etc.
- Ancho: Elija el ancho izquierdo, derecho, superior e inferior.
- Color: Seleccione un color para el borde.
- Radio del borde (px): Proporcione un radio de borde.
- Relleno (px): Ajuste el acolchado superior, derecho, inferior e izquierdo.
Ventanas emergentes de tabla de tallas: Expanda la ventana emergente de la tabla de tallas para personalizar la siguiente opción:
- Radio del borde (px): Elija un valor de radio de borde.
- Relleno (px): Ajuste el relleno superior, derecho, inferior e izquierdo
- Color de fondo: Aquí puedes elegir el color de fondo de la imagen.
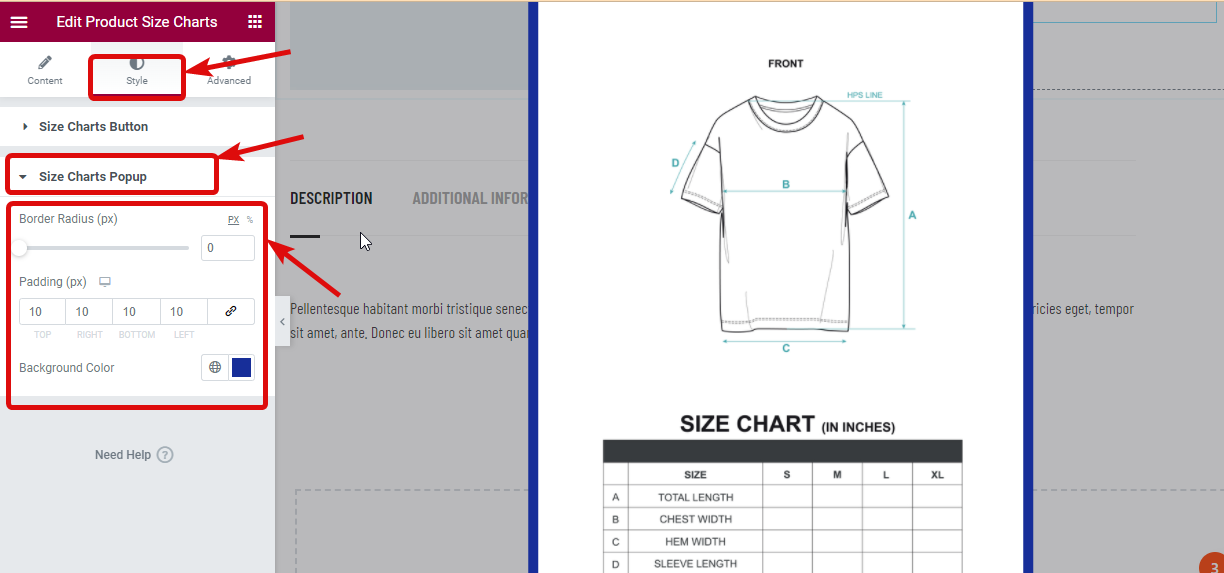
Si quieres optar por la vista modal luego de hacer todos los cambios haga clic en actualizar para guardar y pasar al siguiente paso.
Configuración de tallas para la tabla de tallas normales: #
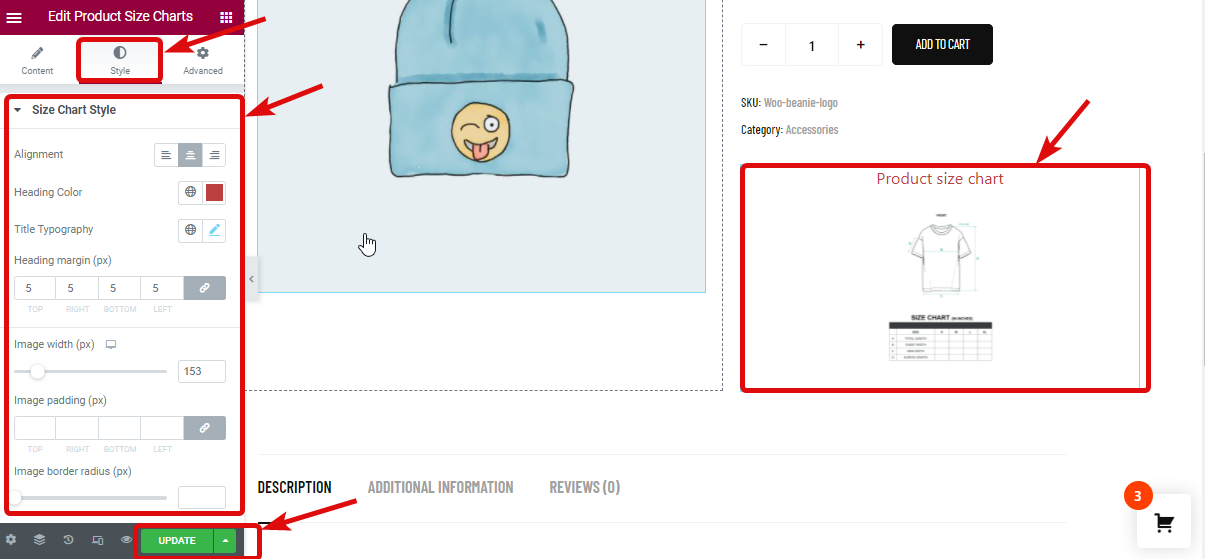
Por otro lado, si opta por una vista normal, encontrará muchas opciones en la opción Estilo de tabla de tallas que puede personalizar:
- Alineación: Aquí puede ajustar la alineación del encabezado de la tabla de tallas.
- Color del título: Elija un color para el título.
- Tipografía del título: Aquí puede personalizar la familia de fuentes, el tamaño, el peso de la fuente y la altura de la línea.
- Margen del encabezado (px): Ajuste el margen alrededor del encabezado aquí.
- Ancho de la imagen (px): Aquí puede ajustar la altura de la imagen.
- Relleno de imagen (px): Proporcionar valor de relleno para la imagen.
- Radio del borde de la imagen (px): Seleccione un valor para el radio del borde.
Finalmente haga clic en actualizar para guardar.
Paso 6. Agregue tablas de tallas al producto (Opcional) #
Nota: Si quieres asignar una nueva tabla de tallas diferente a un producto específico, entonces puedes seguir este paso. La nueva tabla de tallas que asignarás a un nuevo producto tendrá prioridad más alta que la tabla de tamaño de categoría.
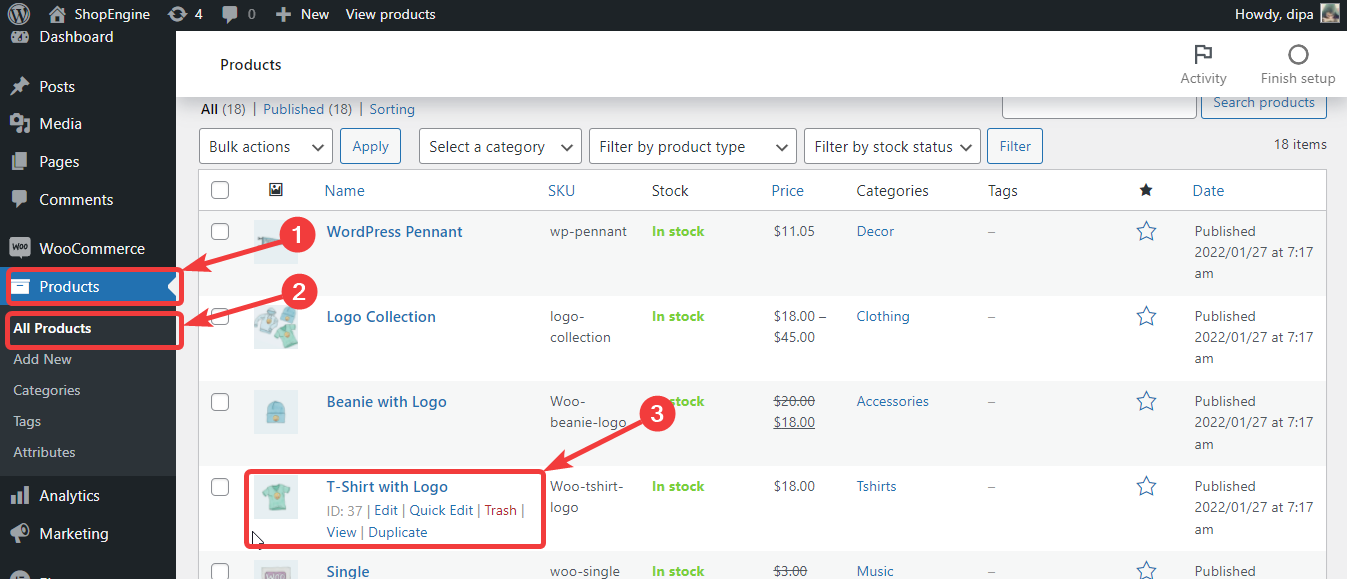
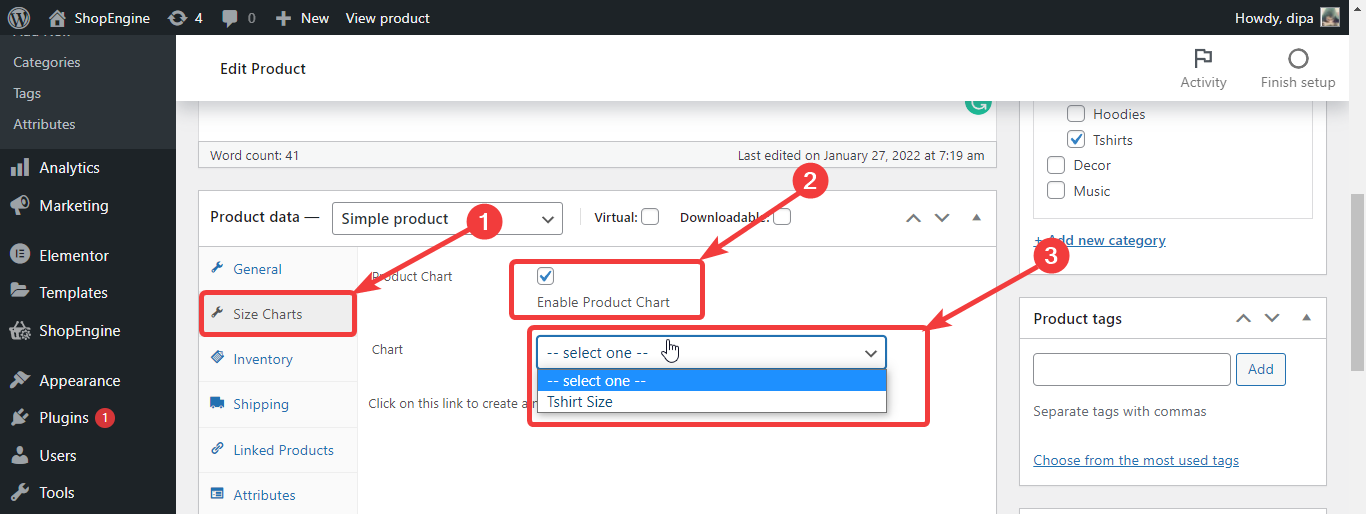
Para agregar la tabla de tamaños de productos a sus productos, desde el panel de WordPress, vaya a Productos ⇒ Todos los productos y haga clic en editar opción del producto que desea editar.
Ahora desde la configuración del producto, vaya a Tablas de tallas, marque la opción Tabla de productos. Una vez que marque la opción de gráfico, se podrá acceder al menú desplegable del gráfico. Elija la opción que desee del menú desplegable
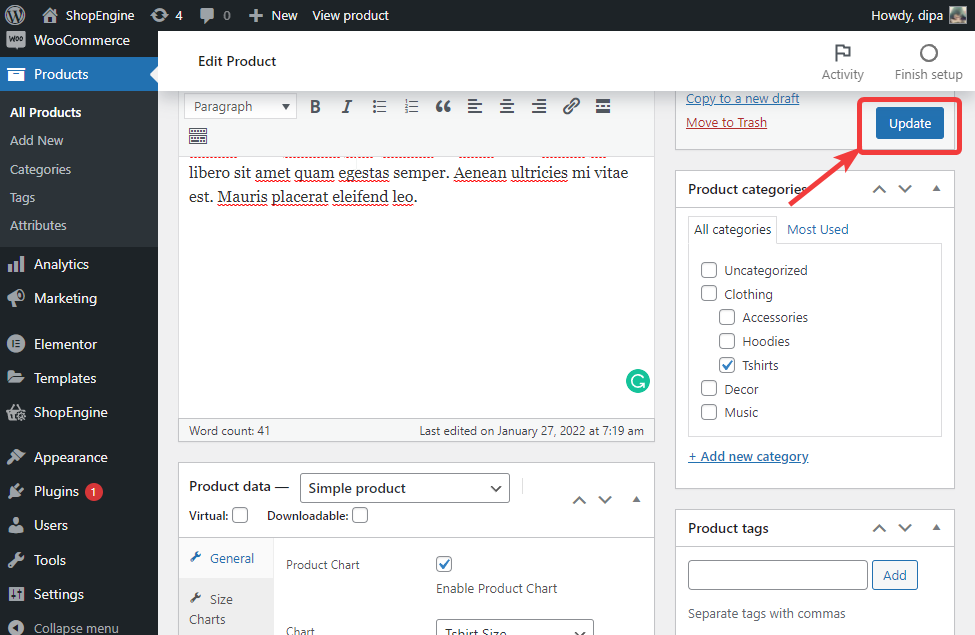
Paso 7. Finalmente, actualice el producto y vea la vista previa. #
Una vez que elija su tabla de productos, haga clic en actualizar para guardar.
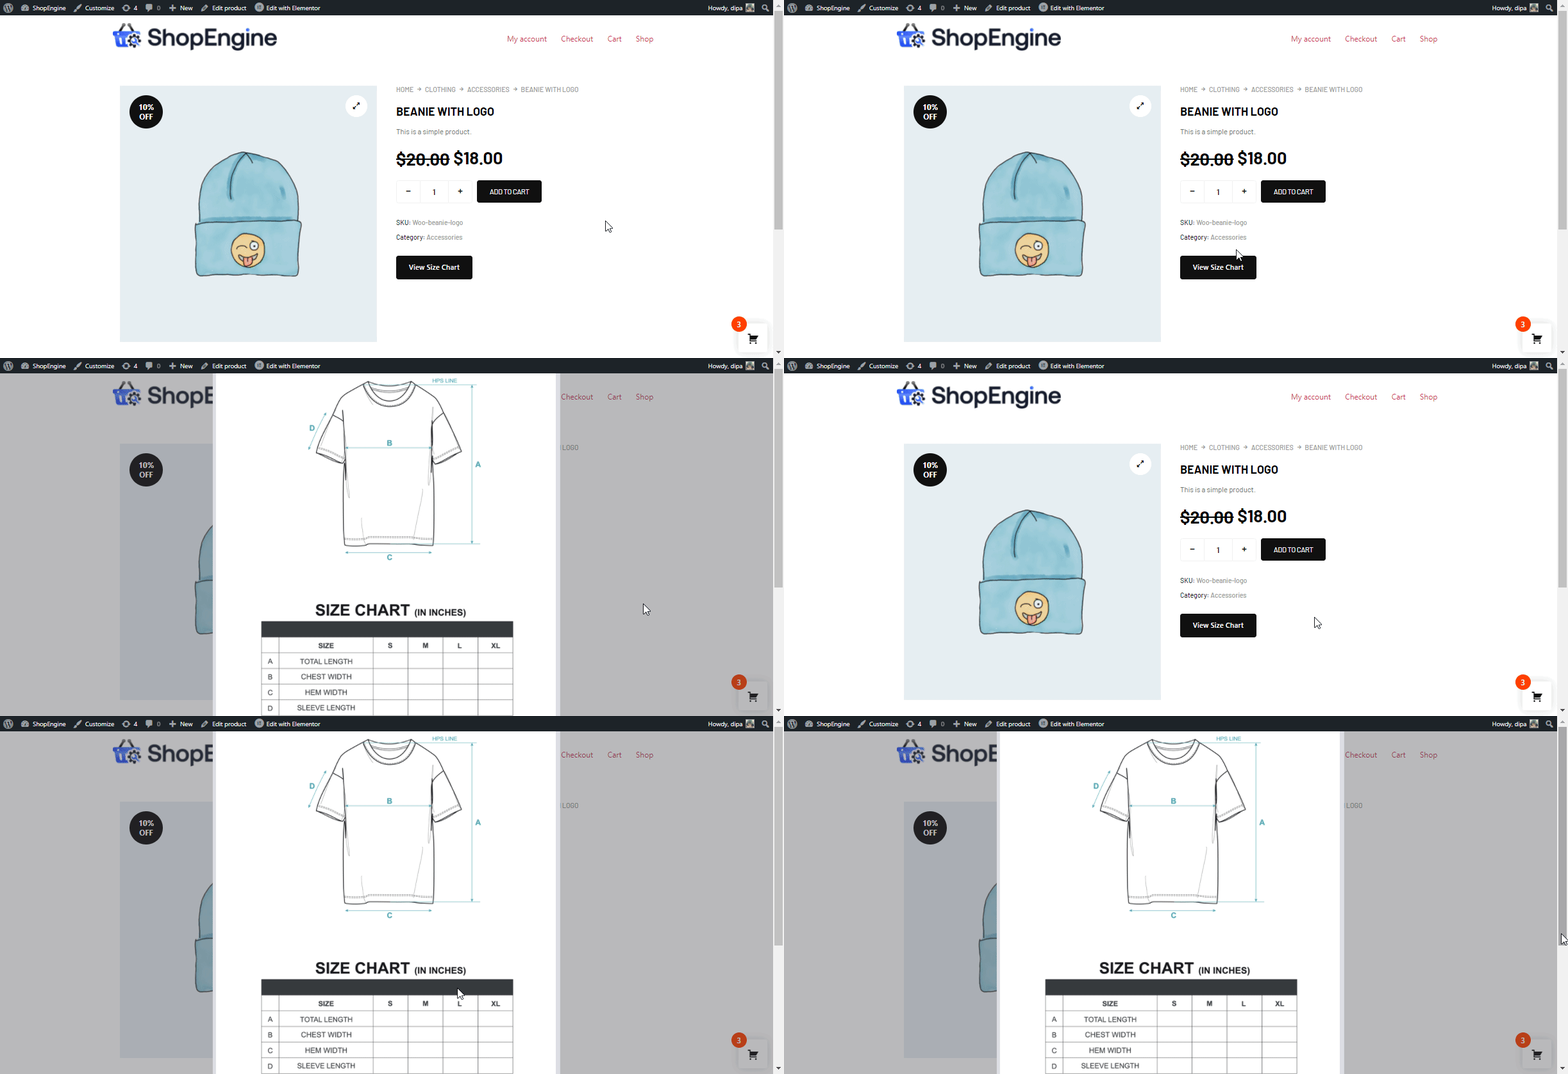
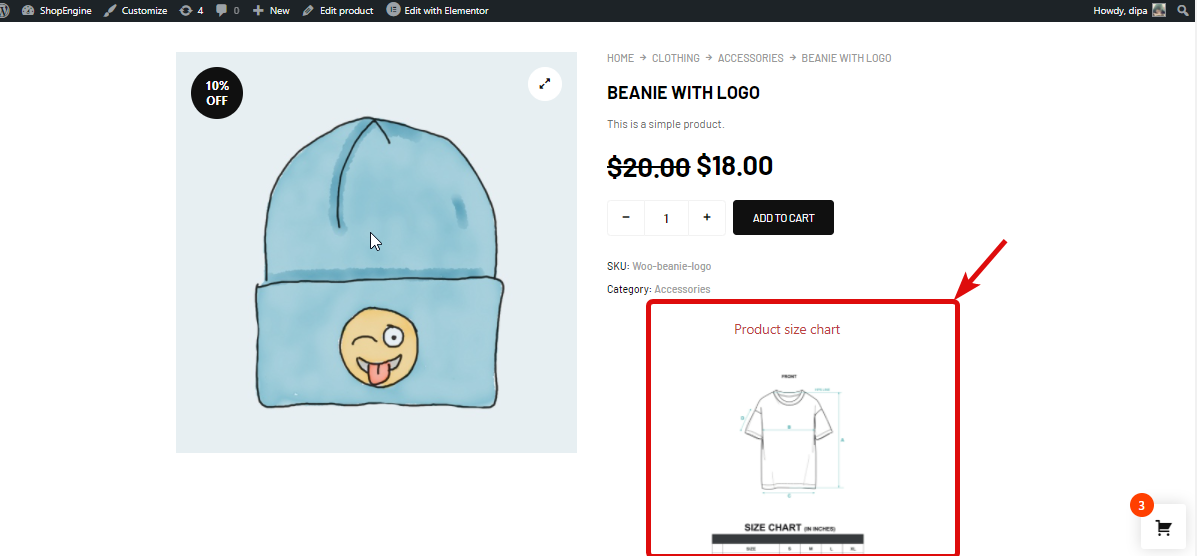
Ahora, para ver el resultado final, vaya a la página del producto que acaba de editar y debería ver el gráfico del producto como se muestra en la vista previa a continuación.
Nota: Debe agregar manualmente tablas de tallas a todos los productos para los cuales desea mostrar la tabla de tallas.
Aquí hay una vista previa del carrito de tamaño del producto con vista normal.
Aquí está vista previa de la tabla de tallas del producto con vista emergente