


Do you want your Elementor form users’ input to match your requirements? Need to restrict certain formats or expressions? Or perhaps you’re looking to add some personalization? Applying custom validation to your website form can do this.
But despite its effectiveness, it’s not an easy catch for all website owners. Mostly for those without any coding knowledge and use page builders like Elementor. How do we know? Because we have a drag-and-drop form builder tool dedicated to Elementor users – MetForm. You can set custom validation within its builder interface.
You can read more about its implementation in this “how to add custom validation rules in Elementor form” tutorial.
Quick Overview
Integrating custom field validation in Elementor form fields requires form builder that comes with this opportunity. WordPress plugin like MetForm has this function in its premium version. So, you will need both the free and premium version installed on your site.
Plugins needed: Elementor, MetForm free, and MetForm pro.
You can add validation rules on diverse fields of WordPress forms such as text, email, number, telephone, text area, name, and password fields. Besides, after adding field validation, you need to test it on the frontend for final check. The entire process takes only a few minutes to accomplish with MetForm, the best WordPress field validation form builder.
What is Custom Validation in Elementor Form
Elementor custom validations are tailored solutions that allow you to apply personalized rules and criteria to form fields beyond Elementor’s default validation capabilities. This way, you can force submitters to insert only correct information or data. For instance, you might require users to enter data in a specific format or prevent them from using certain characters in form fields.
Custom validation also improves user experience. It helps you to show instant feedback messages on any wrong submission.
Limitations of Default Validation in Elementor Form
Configuring custom validation processes in Elementor form widgets requires working with action hooks. You can use action hooks for a specific Elementor form field type or all field types. Here, the biggest drawback is that hook implementation requires some technical knowledge. This can turn out to be challenging for non-technical Elementor users, as it doesn’t align with the no-code philosophy of a WordPress builder.
Further, you will be limited to only some basic things when using the default validation in Elementor. You can’t set requirements for some specific expressions. Even if you are coding obstacles will always be there.
How to Add Custom Validation Rules in Elementor Form
As we have already discussed the complexity of using code for Elementor users. The best way to add custom validation rules in an Elementor form is to use a plugin that resonates with the same environment as a drag-and-drop WordPress page builder.

A dedicated form plugin for Elementor is MetForm. With this plugin, you don’t need to use any coding knowledge or go through any long learning curve. Check its installation and activation guide.
Then, using the MetForm plugin create a form for your website, you can create your WordPress form from scratch or use premade templates. In both cases, you can apply custom WordPress field validation.
So, let’s know how to add custom validation to the Elementor form with MetForm, the best WordPress field validation plugin.
Applying custom validations on a form is like personalizing the form. We can’t identify everyone’s requirements. But what we can do is show a custom validation process for all desired field types in your form.
Let’s apply custom validation for the Elementor form fields:
Add Custom WordPress Validation to Text Field
You can set most form fields in Metform as required or must be submitted. From the field widget settings, go to the Content tab, under the Settings option, toggle the button next to “Required”. Doing this will reveal a new box for warning messages, type your warning message here.
You can then select the validation type from the dropdown to submit the text type field:
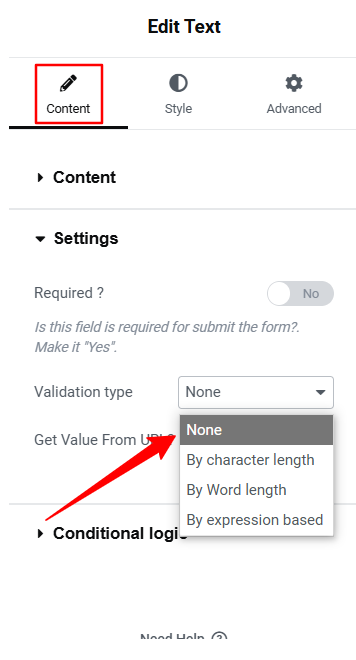
- By Character Length: Set up the minimum and maximum Character length of the submitted text.
- By Word Length: Define the maximum and minimum number of words.
- By Expression Based: Enter form rules for expression for validation.
You can also show a warning message for any wrong input for your custom validation.
Add Custom Validation to Elementor Form Email Fields
You can set custom validation for unique email addresses by just toggling the button. Then from the validation dropdown menu take the following steps to set email length validation:
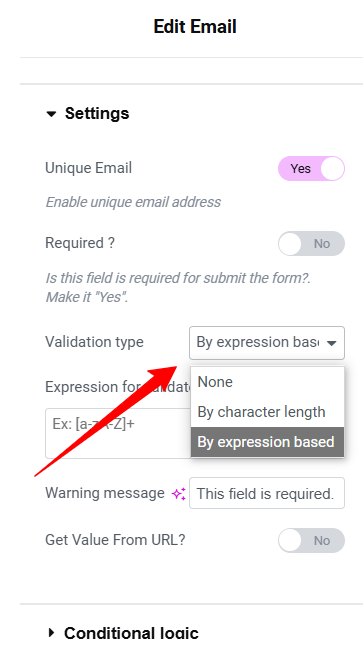
- By Character Length: Define the minimum and maximum character length of the submitted text to set up email validation rules.
- By Expression Based: Set up expression-based validation.
Add Custom Validation to Number Fields
For number requirements, you can set the following validation types:
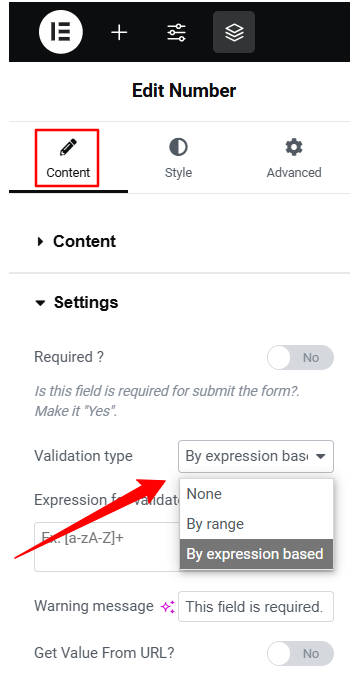
- By Range: Determine the minimum and maximum range for the number field.
- By Expression Based: Define validation based on expressions.
Add Custom Validation to Telephone Fields
Here are the available validations for your Telephone field in the ElementsKit.
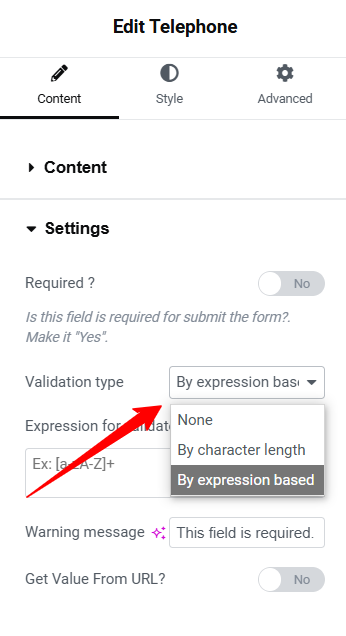
- By Character Length: Assign the minimum and maximum number of digits for the telephone.
- By Expression Based: Set the sequence of characters to validate the format of user input.
Add Custom Validation to Text-area Fields
Use validation to guide users in filling out the text area according to your specified format.
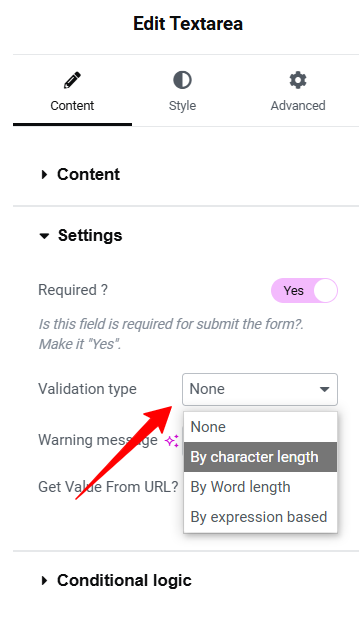
- By Character Length: Set up the minimum and maximum character limit of Elementor form text submissions.
- By Word Length: Define the maximum and minimum number of words.
- By Expression Based: Validating text using expressions to check for correct formatting.
Add Custom Validation to First Name & Last Name Fields
Validation types for the first name and last name field elements are the same. You can set the following:
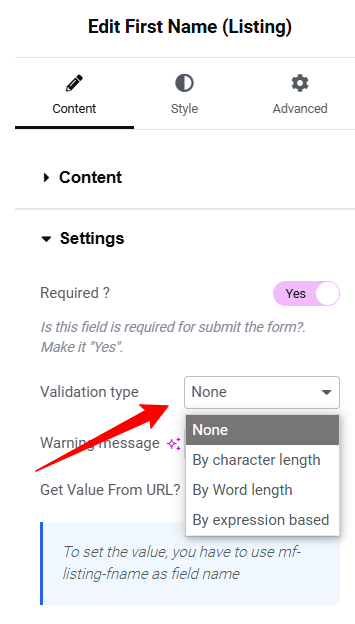
- By Character Length: Set up the minimum and maximum character length for the submitter’s first name and last name.
- By Word Length: Set the maximum and minimum number of words.
- By Expression Based: Validating text using expressions to check for correct formatting.
Add Custom Validation to Password Fields
Ask the users to set their password with the following conditions:
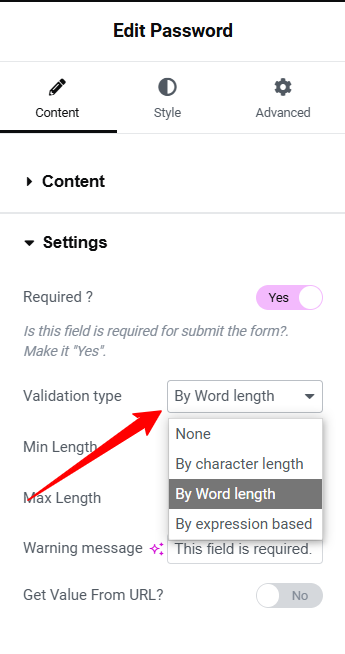
- By Character Length: Define the maximum and minimum character length for the password.
- By Word Length: Validate the password by setting the maximum and minimum number of words.
- By Expression Based: Expression-bassed method for validating the format of the submitter’s password.
Checking Elementor Form Validation on the Front End
After configuring custom validation in your Elementor form, the next important step is to thoroughly test the form on the front end. Here, you can do more than just preview your form. There should be a few more steps before your WordPress validation form goes live.
First, enter form data like a unique email and a valid phone number that comply with your custom validation rules. Then, submit the WordPress validation form. If it’s accepted without any Elementor form errors, your custom validation is functioning properly.
Next, insert some invalid input that goes against the custom validation rules to check the accuracy of Elementor form acceptance such as incorrect format or extra characters, and click the submit button. If your WordPress form is submitted then your custom validation is not working. However, if the form is not submitted, it indicates that the custom validation is functioning correctly.
Here, one important thing you need to notice is the error message. It should appear for incorrect input to guide users in making the appropriate submission. In some cases, you may apply conditional logic, so you need to test the form in that environment. Also, check your form on different devices and browsers.
➡️ Go through the blog to learn 👉 how to create high converting lead form in Elementor.
Identify Your Custom Validation Needs
We’ve demonstrated how to add custom validation rules in an Elementor form. Now it’s your turn to apply validation to your form fields. But first, be sure to identify your specific needs. Determine the data that requires a particular format for accurate validation.
Additionally, there’s a risk of spam or malicious submissions. Identify which fields may be targeted by hackers, and apply validation to those areas to prevent potential attacks.
Customizing your Elementor website form is an effective way to ensure users provide accurate information. When adding custom validation, it’s equally important to focus on clear feedback or warning messages.
Another key point is the need for a plugin to easily implement custom fields in Elementor form. We recommend using a Elementor form plugin like MetForm, as it eliminates technical challenges and provides a modern, user-friendly builder interface. Further, it simplifies the process of creating any type of form including WordPress survey form, donation form, conditional logic form, contact form, etc.

Leave a Reply