Looking for an appropriate guide to adding WooCommerce variable products to your store that makes your website different from your competitors?
Variable products add variations to a single product which helps customers to pick the right product for them. If you are a coder then you can add variable products by coding but, it is not a user-friendly method. Adding WooCommerce variations using the swatches plugin is the easiest method of all.
So, here in this blog, you will know why variable products are essential for your online shop and how to add WooCommerce variable products using a swatches plugin.
Quick Overview
ShopEngine includes variation swatches module along with 18+ modules. The process is simple. You need to configure the swatches module and add variations to your products after installing the following solutions:
Needed plugins: ShopEngine (free & pro), Elementor (free), & WooCommerce (free).
Follow the below steps after installing required solutions:
✅ Variation swatches module activation.
✅ Variable product’s attributes setting.
✅ Variable product adding.
What is a variable product in WooCommerce?
A variable product is a type of product that will let you add different variations to a single product based on color, size, etc. For example, if you are running a men’s clothing website, then you need to add different sizes and colors to the same design shirt.
In WooCommerce, variable products will let you add that. Besides, you can set different prices, images, and stock statuses for each variation.
Why is adding product variation necessary for WooCommerce?
Customers always prefer options while choosing a product. No matter what type of product you sell, they want it. Because everyone wants to purchase the perfect product for them. Variable products will let you provide multiple options for a single product.
This can be product variation on color, size, etc that lets your customers pick the right product for them. You can also set different prices for your WooCommerce variable product swatches. Apart from this, WooCommerce variation offers other benefits. Here are some advantages of adding product variations in Woocommerce:
- It enhances customer satisfaction because they can buy the product they want by getting multiple options through product variation.
- Your digital shop can stand apart from your competitors by adding this WooCommerce feature.
- After getting a great shopping experience, customers will recommend your shop to their friends and relatives. Thus, you can also do word-of-mouth marketing by adding WooCommerce variations.
- This will increase the sales and revenue of your business since your customers can buy multiple products by getting multiple options.
- Product variation will increase the brand value of your business because your customers can get the exact product they want.
So, these are the benefits that product variation will add to your eCommerce store. Now, let’s discover how to add these variable products to your WooCommerce store.
How to add WooCommerce variable product
You will need no coding or any special technical skills to add variations to your WooCommerce products. All you need is to pick a suitable WooCommerce variable product plugin. Speaking of the WooCommerce variation swatches plugin, ShopEngine is the Ultimate plugin that will let you add variations along with other WooCommerce options.
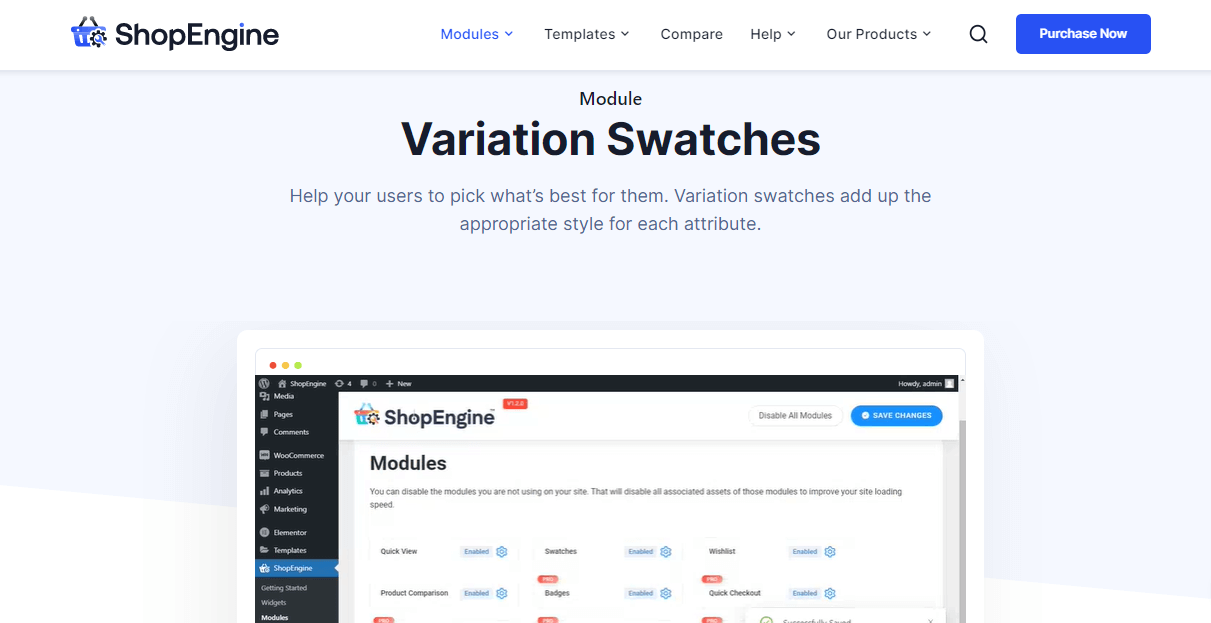
Using its Swatches module, you can add variations within a few minutes by adopting the below four steps. So, go through the following steps to add product variations in WooCommerce:
Step one: Install and activate the WooCommerce variation swatches plugin.
First, you need to install the WooCommerce variation swatches plugin to add variations to your products. ShopEngine is the most compatible WooCommerce variation plugin that offers a swatches module to add variations in minutes.
Now to install and activate ShopEngine, you need to go to your admin dashboard. After that, go to Plugins>> Add New, then search for ShopEngine in the search box. Now press the “Install” button and activate ShopEngine.
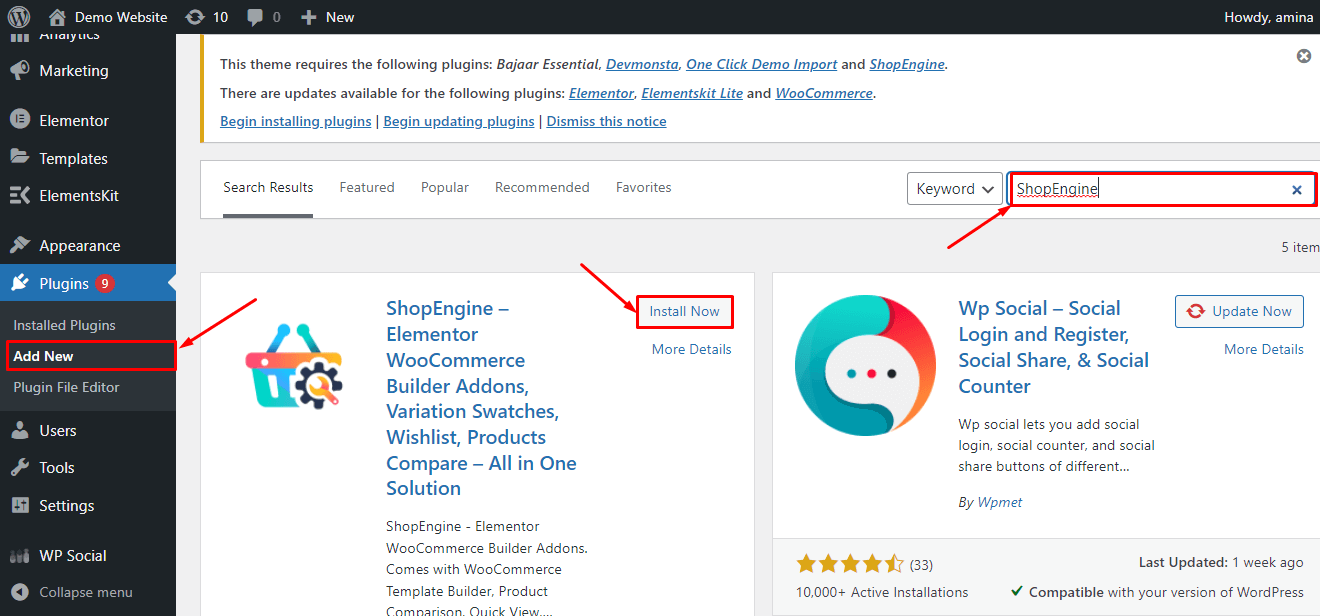
Note:
You need to be a user of Elementor and WooCommerce to use ShopEngine. That’s why, install these plugins first, if you don’t have them installed on your website.

Step two: Enable the swatches module to add WooCommerce variations.
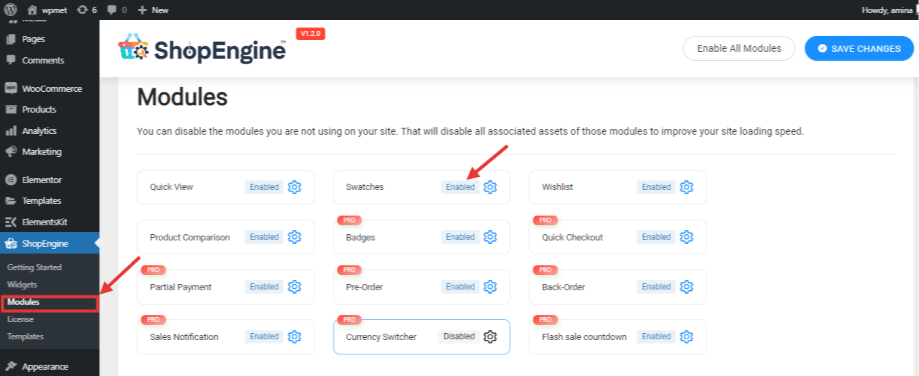
After installing and activating ShopEngine, you need to enable its “Swatches” module. Go to the Modules which you will find under ShopEngine, then click the swatches module to enable it.
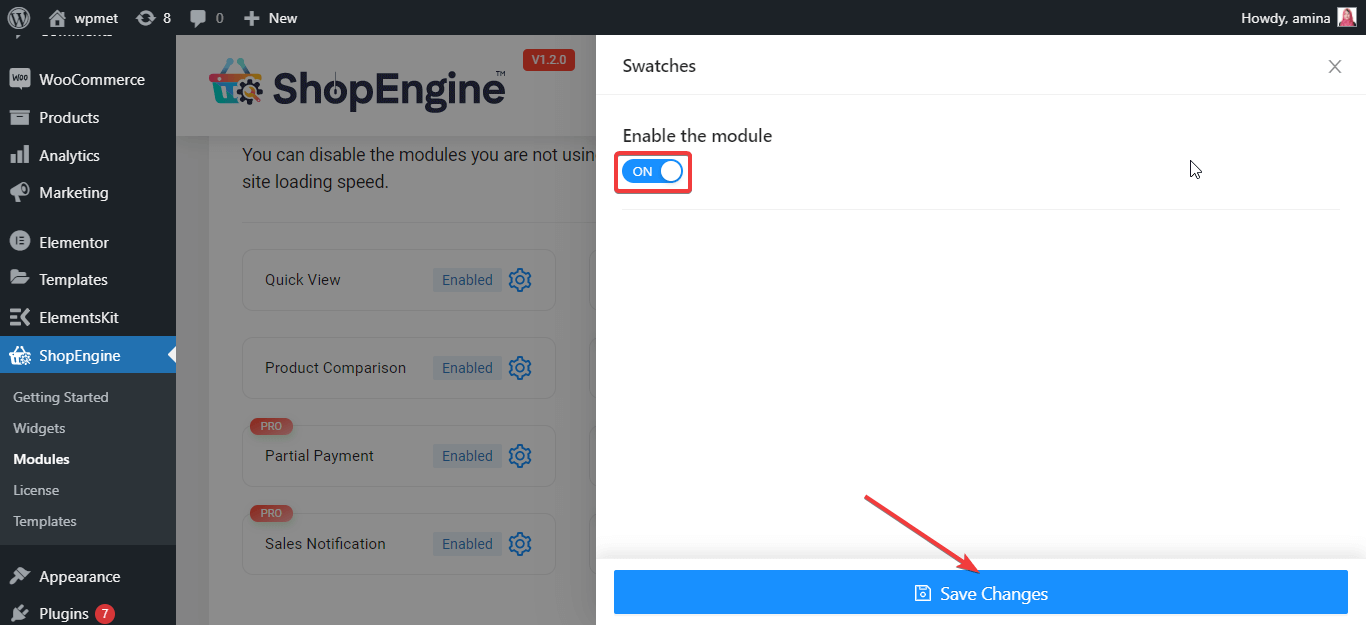
Now turn on the swatches module and press the save changes button.
Step three: Add attributes for product variation.
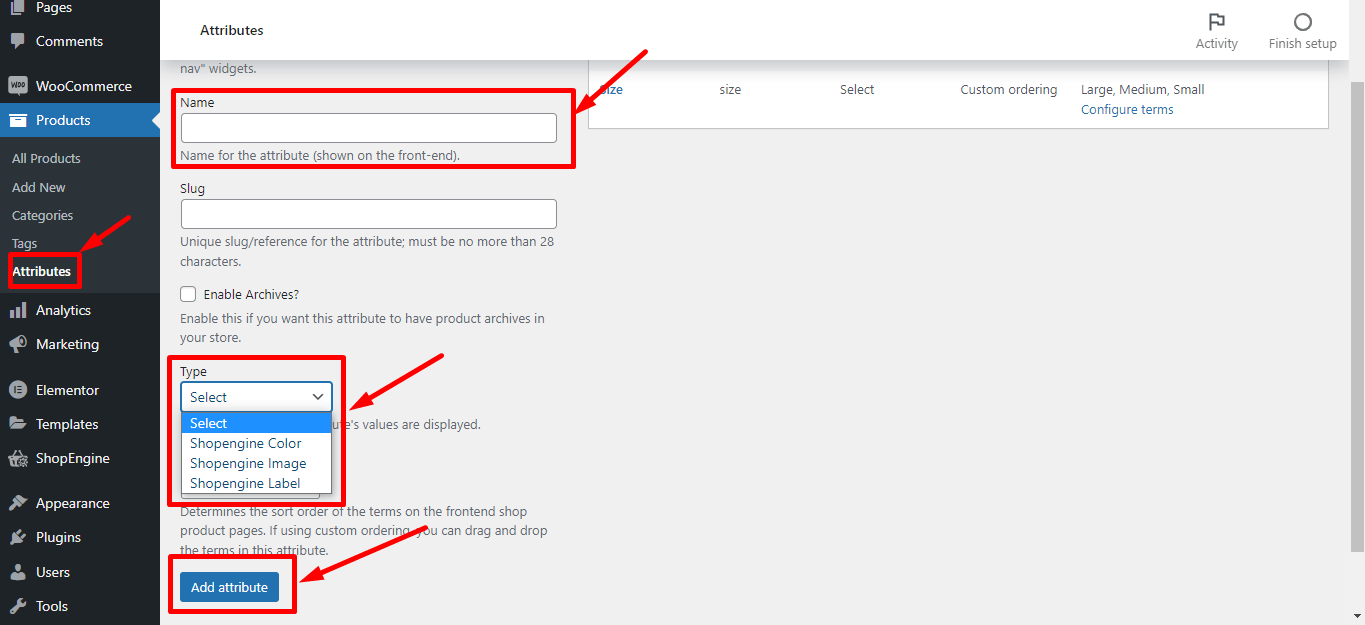
It’s time for adding attributes to your variable product. To do that, go to Products>> Attributes, then fill the following fields:
- Name: Enter the name of the attributes.
- Types: Select the type of attribute you want to add. if you have put the name of your attribute as “color”, then select ShopEngine color.
Now after putting this information, press the “Add attribute” button.
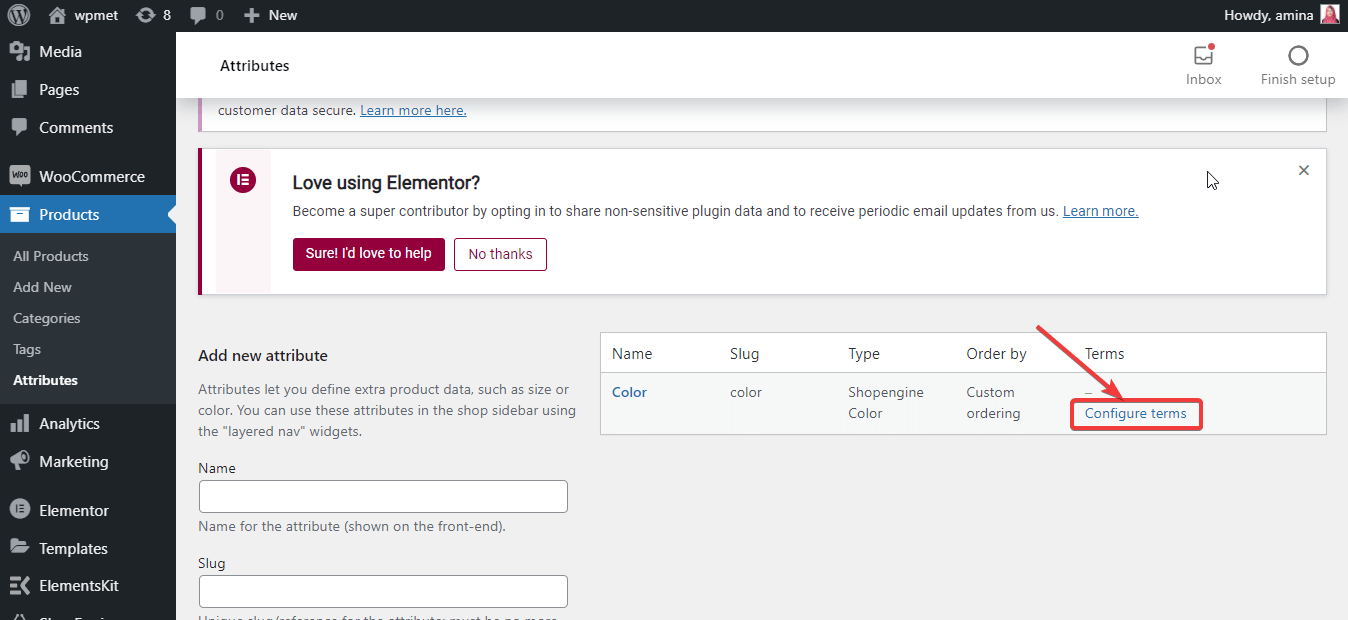
After adding an attribute, press the “Configure terms” option like the added image.
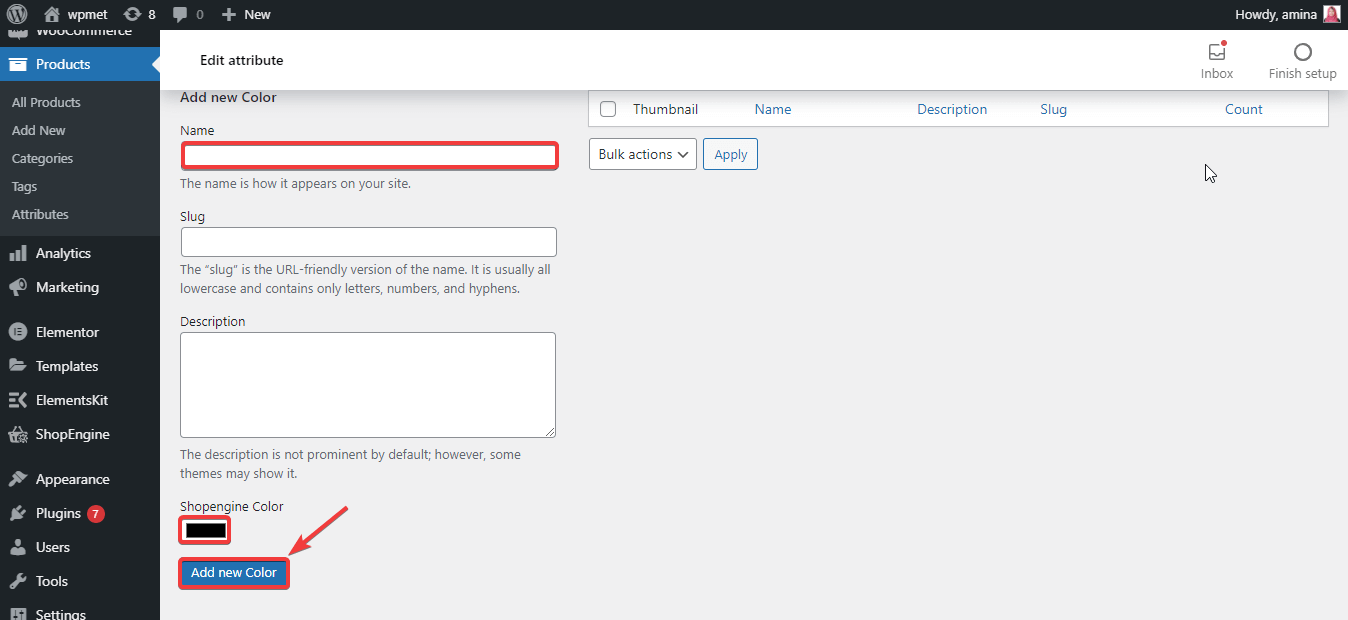
Now you have to enter the name and color for your color attribute, then press the “Add new color” button.
For example, if you want to add blue color, then enter blue in the name box and choose the blue color from the ShopEngine color picking option. After that, click the Add new color button.
Step four: Create WooCommerce product variations.
In the fourth step, you have to visit Products>> All Products, then choose a product to which you want to add variation.
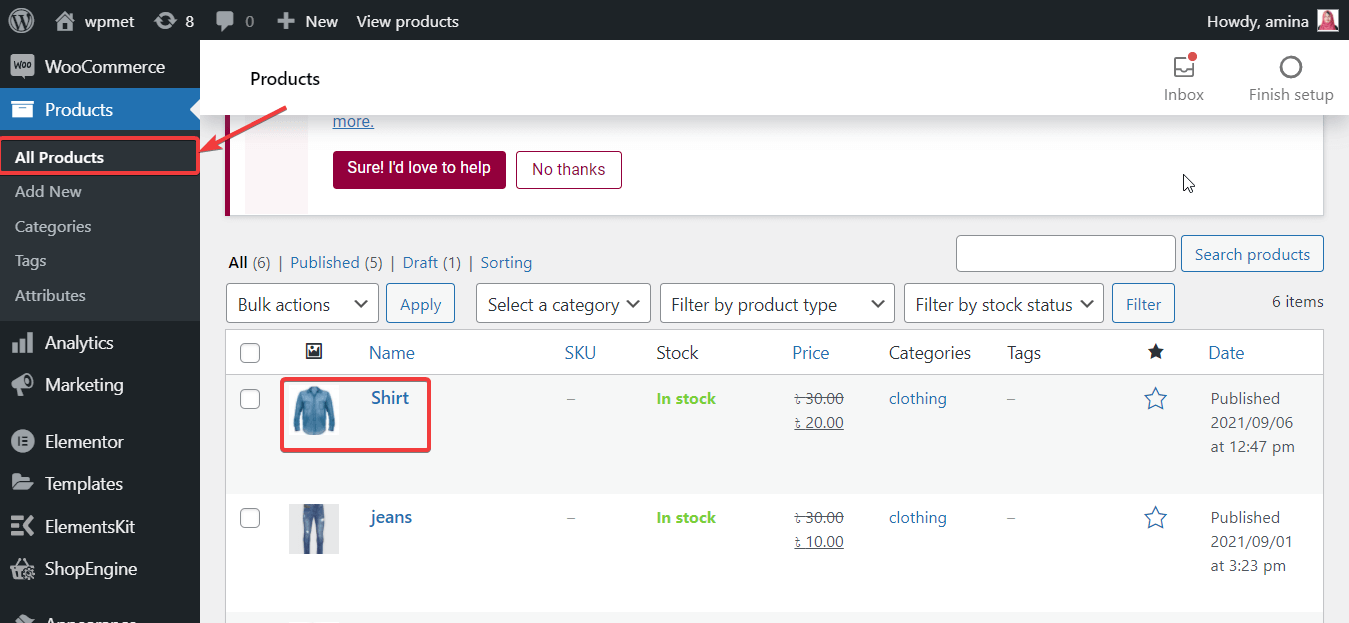
This will redirect you to the edit product page from where you need to select Variable product as Product data.
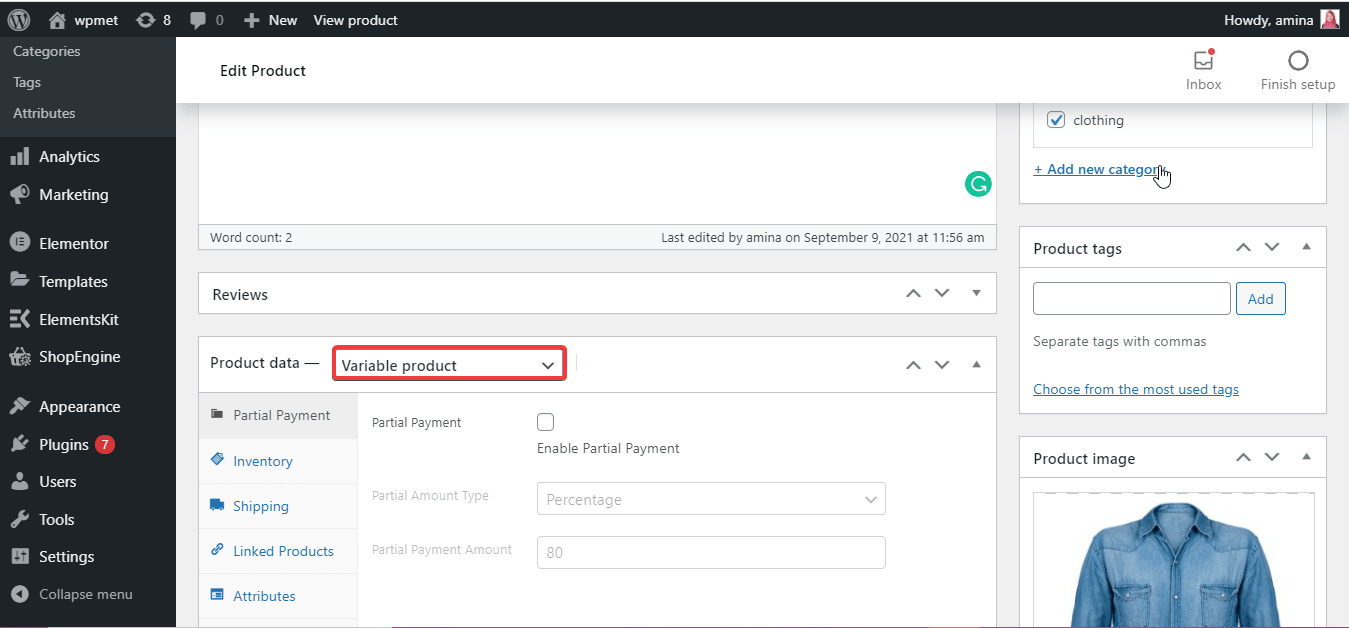
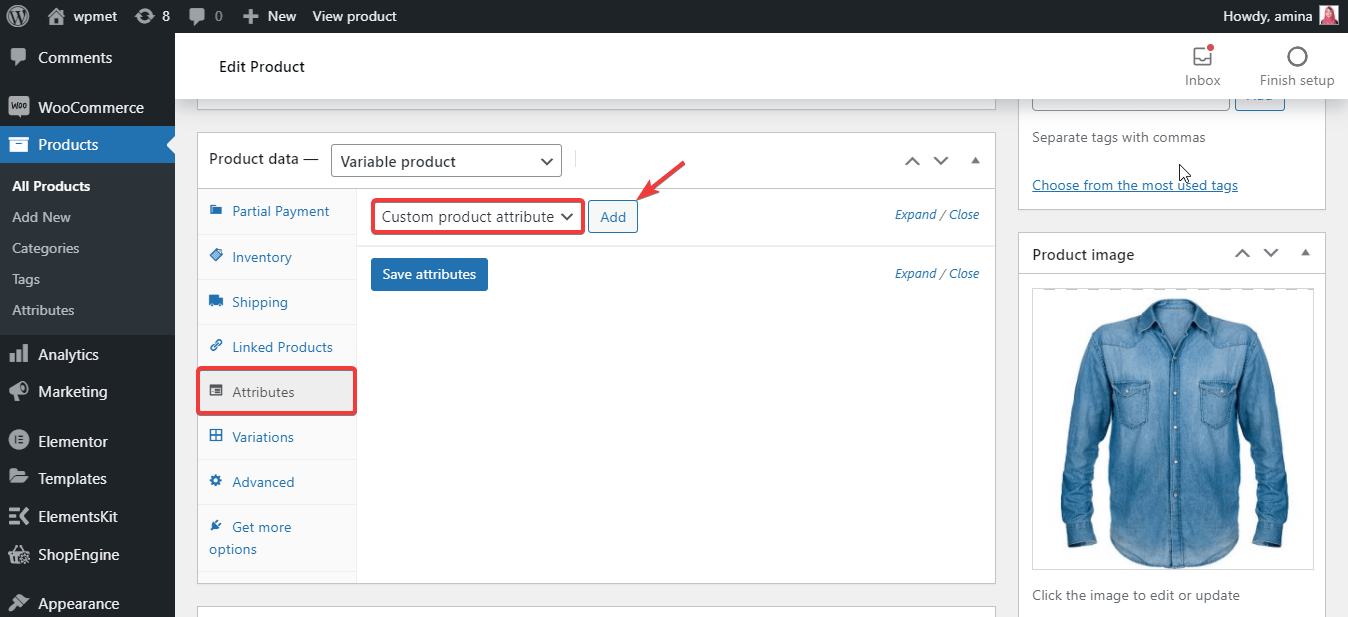
After that, press the “Attributes” and choose the “Custom product attribute”. Then click the “Add” button after selecting the custom product attribute.
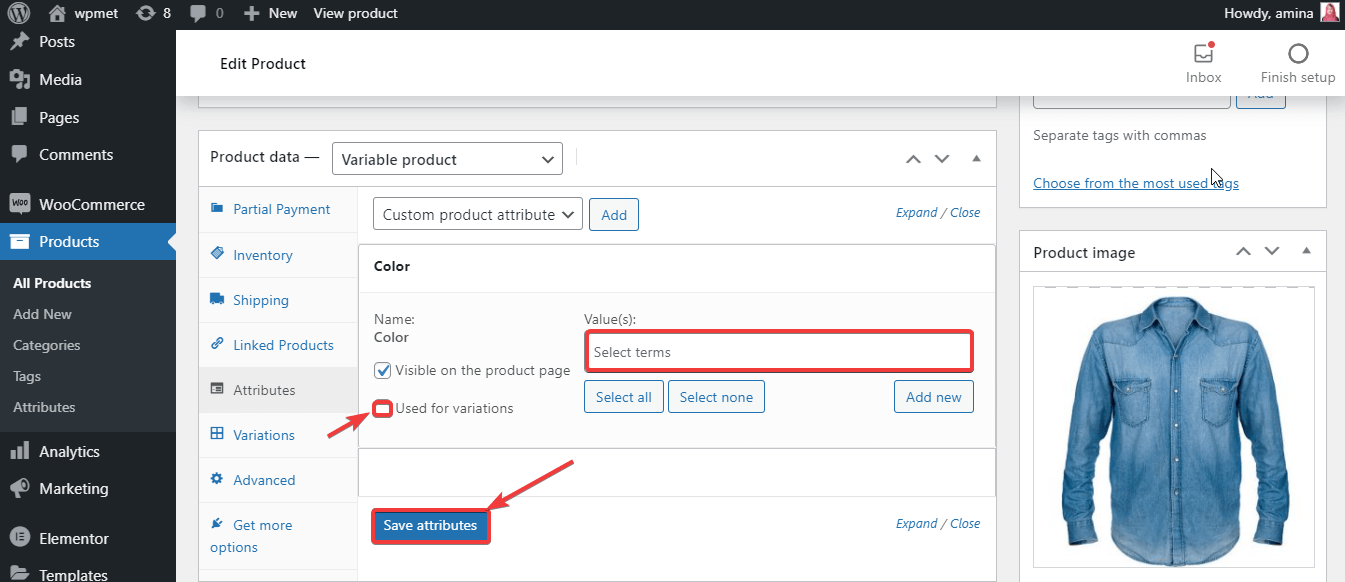
Here enter the color names in the select terms box that you want to use for WooCommerce variations, then click the “Used for variations” option. Finally, press the “Save attributes” button.
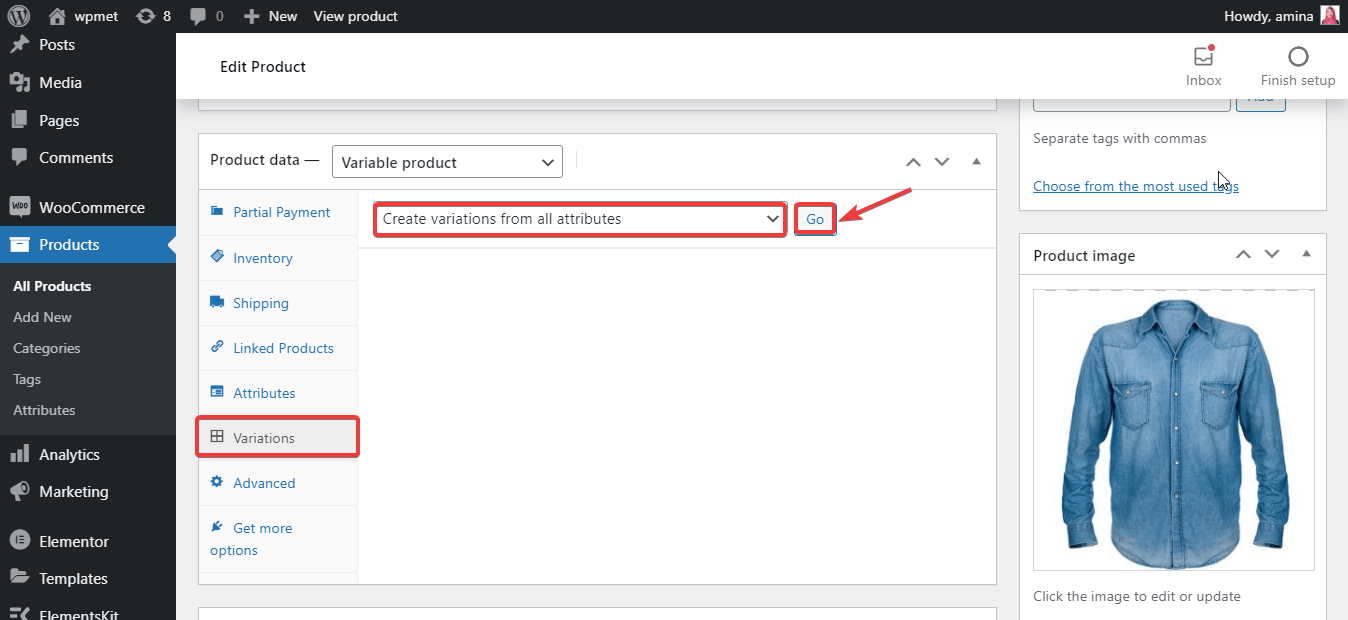
After that, visit variations under attributes and select “Create variations from all attributes”, then press the “Go” button.
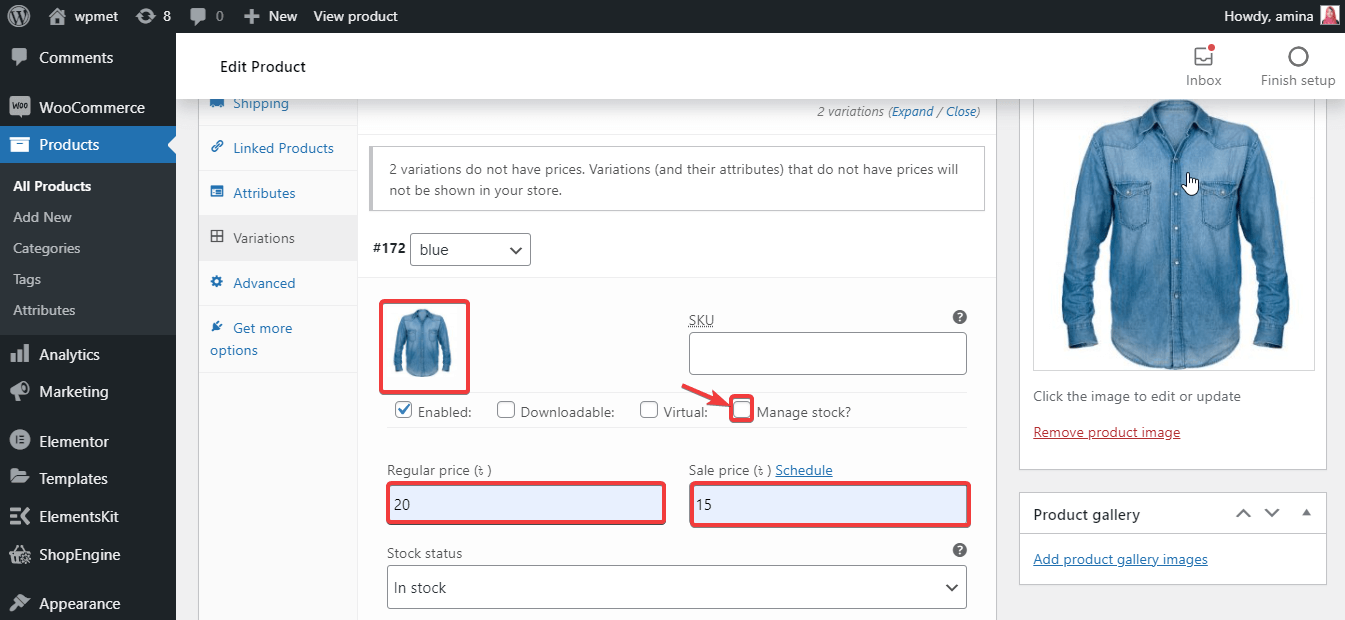
Now enter the image, regular price, and sale price and click the manage stock for each variation.
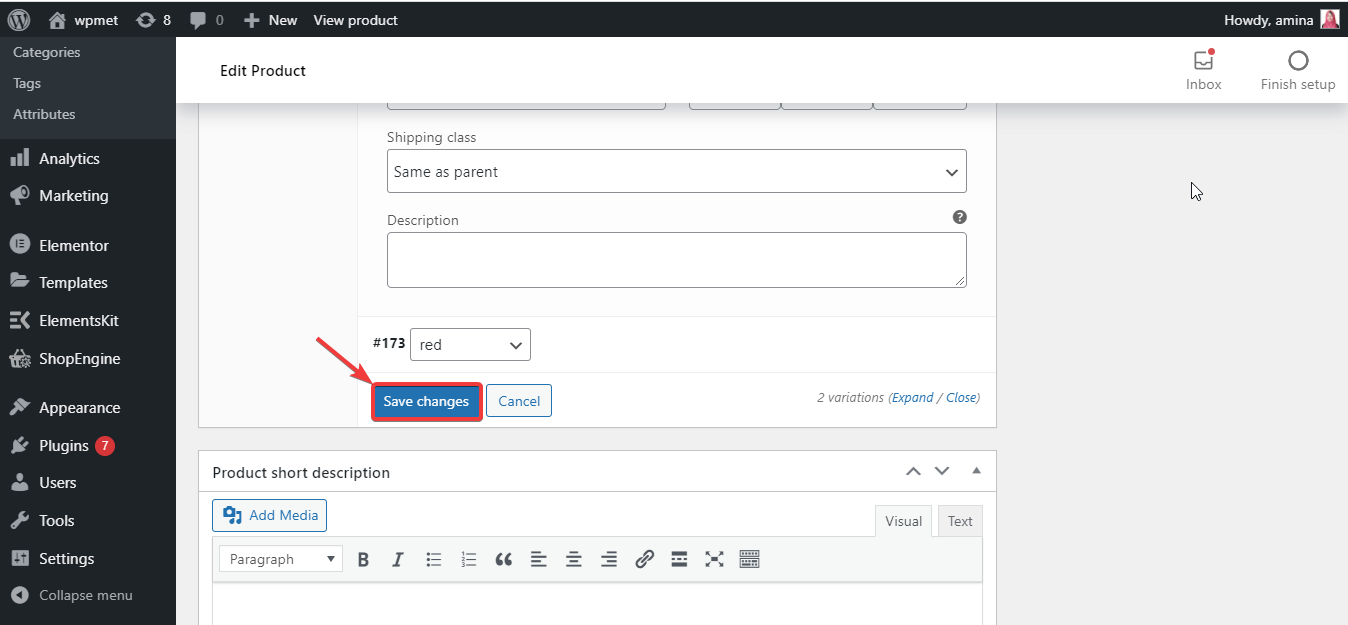
After adding info to all variations, click the “Save changes” button.
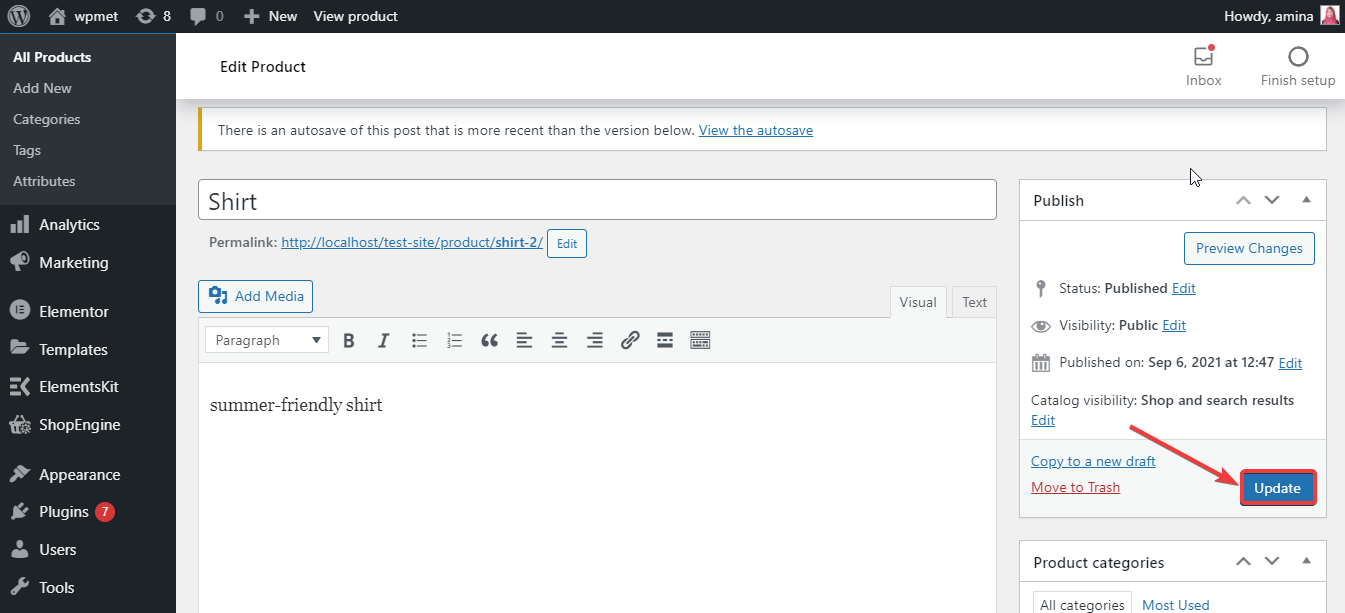
Finally, press the “Update” button to add product variations in WooCommerce.
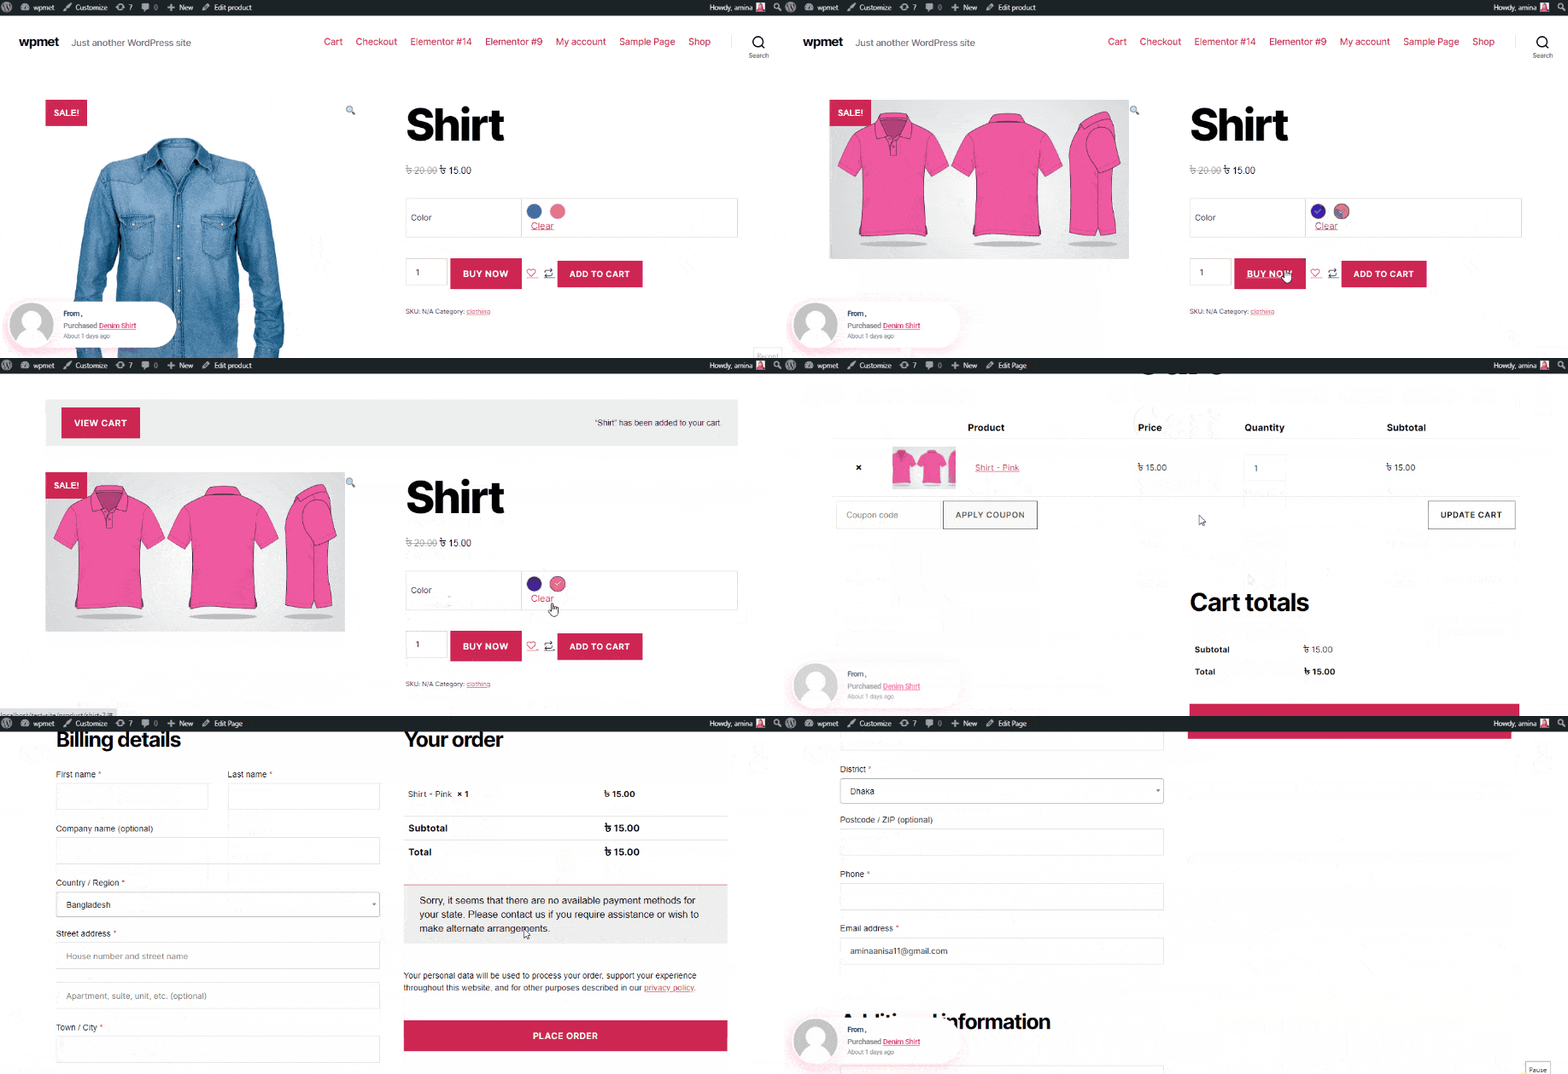
Now, your added Variable product will look like this:
Still, confused about how to add variable products to your WooCommerce store? Then do check out this video to know more in detail:
Why should you choose ShopEngine to add product variation in WooCommerce?
ShopEngine is the multi-purpose WooCommerce builder that not only lets you add product variation but also pre-orders, flash sales, etc to your eCommerce store. You can use this plugin to fulfill multiple WooCommerce requirements as it is not a dedicated plugin.
Besides, thinking about the betterment of your website, you should always use as few plugins as possible. Because having lots of plugins installed on your website can slow down your site. Moreover, plugins are always updated over time. It will be very tough for you to check out all the updates on the staging site before updating those on your live site.
This can break down your whole site if you somehow update the version that you shouldn’t. By using the all-in-one WooCommmerce plugin like ShopEngine, you can keep your site safe from these disasters. On top of that, ShopEngine is a well-optimized plugin for search engines and speed. So, you don’t need to bother about your website performance anymore.
Apart from these, ShopEngine continuously brings new features for providing an awesome eCommerce website building and maintaining experience. That’s why using ShopEngine is more beneficial than any other dedicated WooCommerce plugin.

Get Started with WooCommerce product variations
Adding product variation is essential for your WooCommerce website and you have already figured out why it is. So, follow the above steps to add product variations to your WooCommerce store. This will boost your overall sales and revenue. You can also adopt another method but try not to use a dedicated plugin for adding WooCommerce variable product swatches. Use a plugin that offers various WooCommerce features along with a product variation option like ShopEngine.

Leave a Reply