
If you are a skilled photographer and don’t have a photography portfolio website, you are missing lots of opportunities. With a professional photography website, you can reach more audiences and targeted customers. And the result? More customers and more profit!
The biggest question is how would you create a professional photography website if you are not a coder? Well, this blog post is to provide the easiest solution for you.
Creating a photography portfolio website is easier than you might think. Different page builders have come into the market that are highly beginner-friendly. Even professionals are using them.
Why create a photography portfolio website?
It is needless to say that any professional has to reach his/her target audience. Traditionally, people used to try media like newspapers, magazines, billboards, etc. But the trend has changed.
Nowadays there is no alternative to creating a portfolio website to reach potential customers. For photographers, it is more relevant.
Having your own website means you can showcase all your work directly on the website. Whenever someone asks about your previous works, you can simply provide the link to your website.
At the same time, there won’t be any need for negotiation with the customers. You can provide the pricing details, terms and conditions, and all other details on a single page. It is beneficial for both the photographers and customers.
Steps to create a professional photography website
If you have never created a website before, you might be wondering what to do and where to start! In the following steps, I have shared everything from scratch. Whether you are a beginner or have some sort of web design knowledge, you will be able to follow the guide.
Step 1: Choose a domain and hosting
The first step for any kind of website is choosing a domain. Domain name is the identity of a website by which people will reach you. If you have a name for your business, it is better to keep the domain name the same.

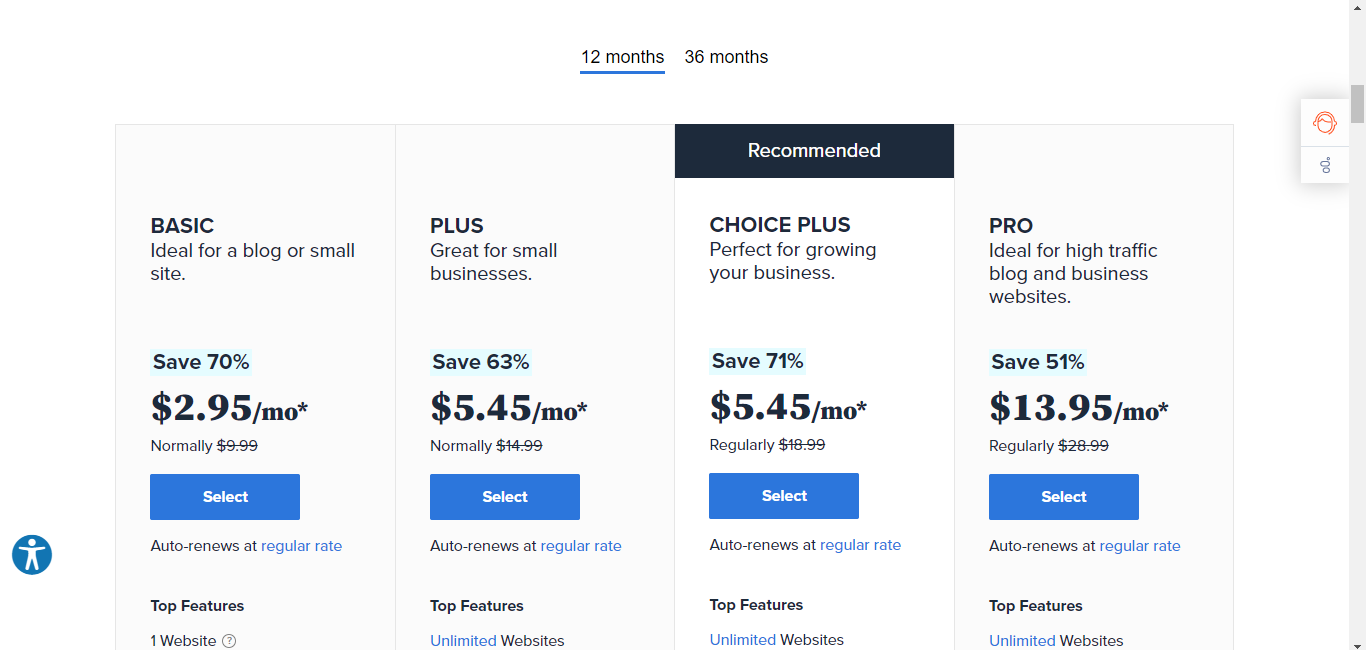
To purchase a domain name, you can use platforms like GoDaddy and Namecheap. Visit any of the platforms and type your desired domain name in the search box. You will see if the domain is available or not. Also, you will find similar options from which you can choose one. It could cost around $10 to purchase a fresh domain name.
Next, you need a web hosting service that will work as the virtual storage for the website. There are different affordable hosting services available out there. You can try Bluehost and Hostinger for affordable hosting packages. Depending on the package, it could cost around $3 per month.
Step 2: Choose the right Content Management System
You want to create a professional photography website without coding, right? So, you need to choose the right Content Management System (CMS). And when you search for the best CMS, you will find tons of options.
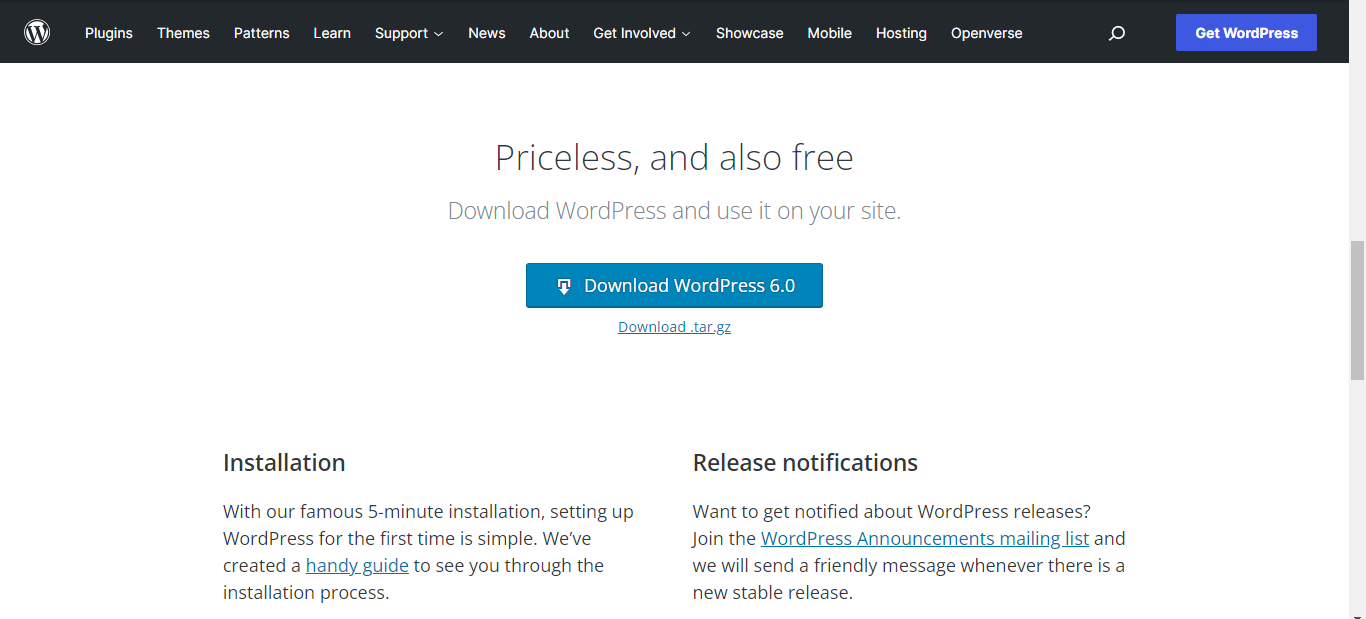
Here I am going to share the process with the WordPress CMS. Why? Because WordPress is the most advanced open-source CMS where you can start for free. Also, whatever hosting package you choose, you will get a one-click WordPress installation.
So, go to the hosting’s C panel and install WordPress. For instance, you can install WordPress for Bluehost with a few clicks.
Step 3: Install the page builder
After installing WordPress with your hosting, you have a site where you can showcase your works. Now it is time to build a photography website with a professional look. You will have to create the homepage and some other essential pages.
To create the pages, here we will use the Elementor page builder and the ElementsKit addon for Elementor.
Download Elementor and then choose the right package of ElementsKit. Then you will get access to all the functions of ElementsKit.
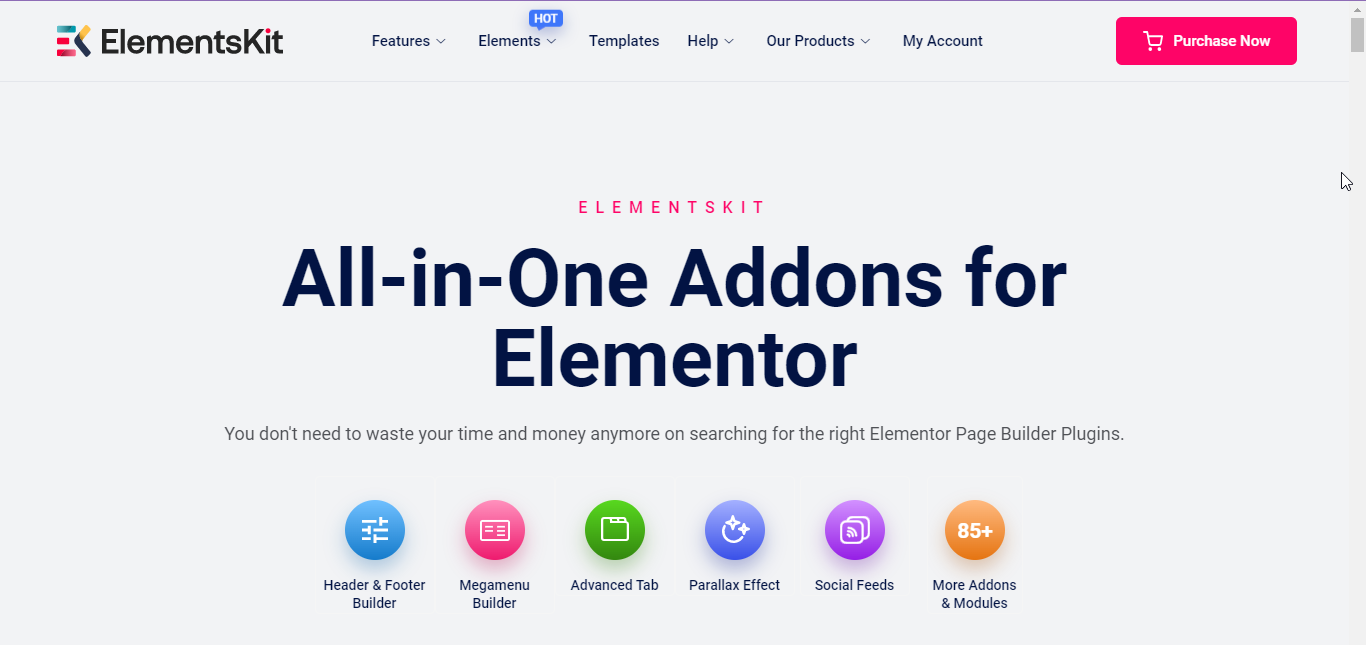
However, it won’t cost much to get these plugins.
Step 4: Choose a theme
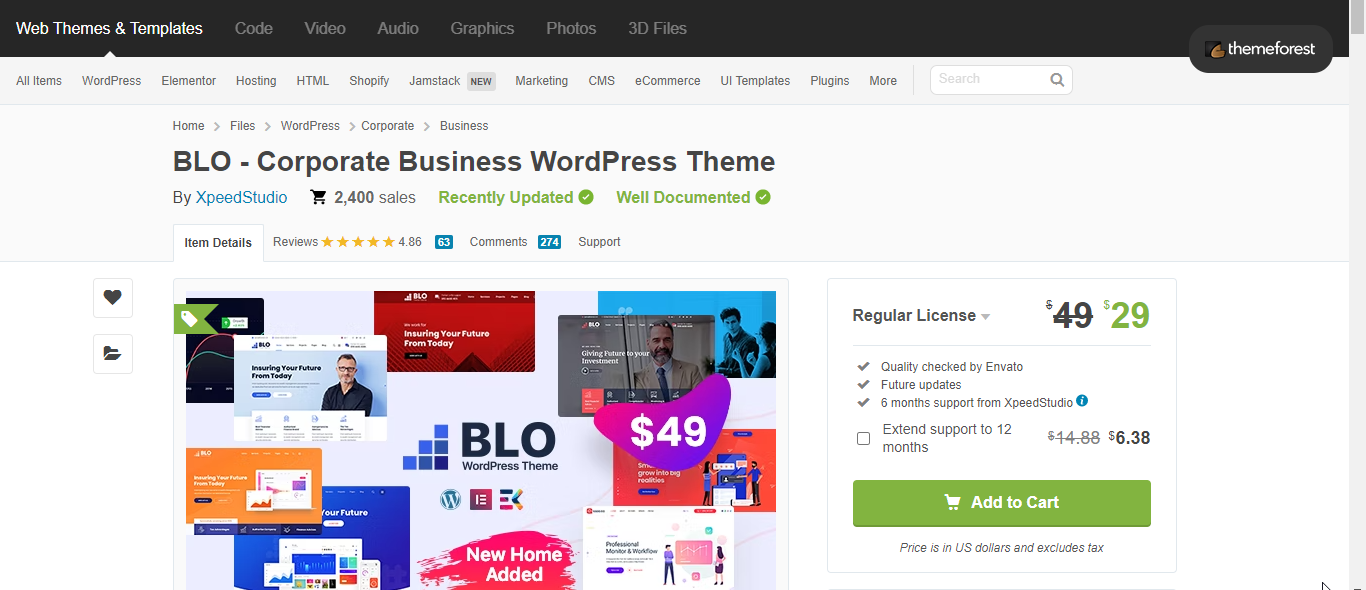
Though the page builders will create the pages, you will need a theme to give a good look to your WordPress website. If you are looking for an affordable option, I will highly suggest using the BLO WordPress theme. The benefit of this theme is, it has some ready pages that might help you for further customizations to the photography portfolio website.
However, there are free options as well. If you don’t have any budget for a premium WordPress theme and are okay with limited customization, check the free portfolio WordPress themes. But it is always better to start with a premium one.
Step 5: Create a new page and integrate the photography template
Completed the above steps? Congratulations! You have done 50% work to create a photography portfolio website. It is time to start creating the pages. First, go to your WordPress dashboard > Pages > Add New.
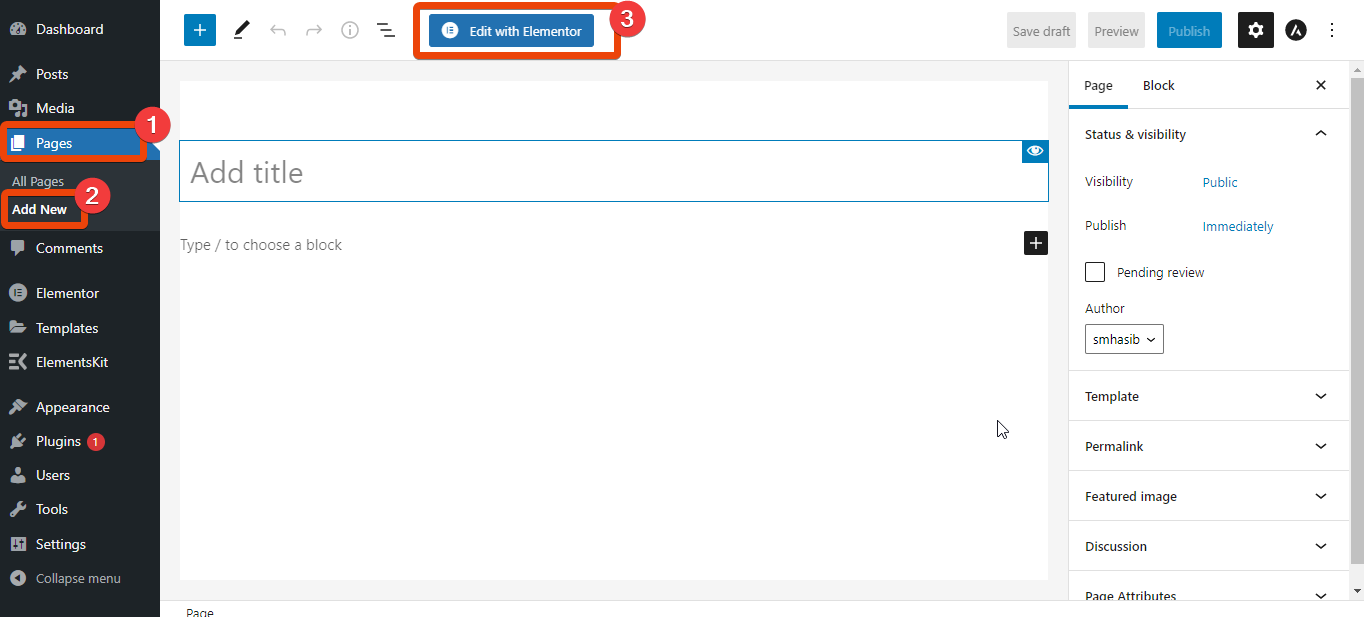
Create a new page and select Edit with Elementor. It will redirect you to a new page where you can enjoy the features of Elementor.
From the right bottom, click on the EKit button. You will see all the available templates. From there, select the Grafhy Photography template from the list.
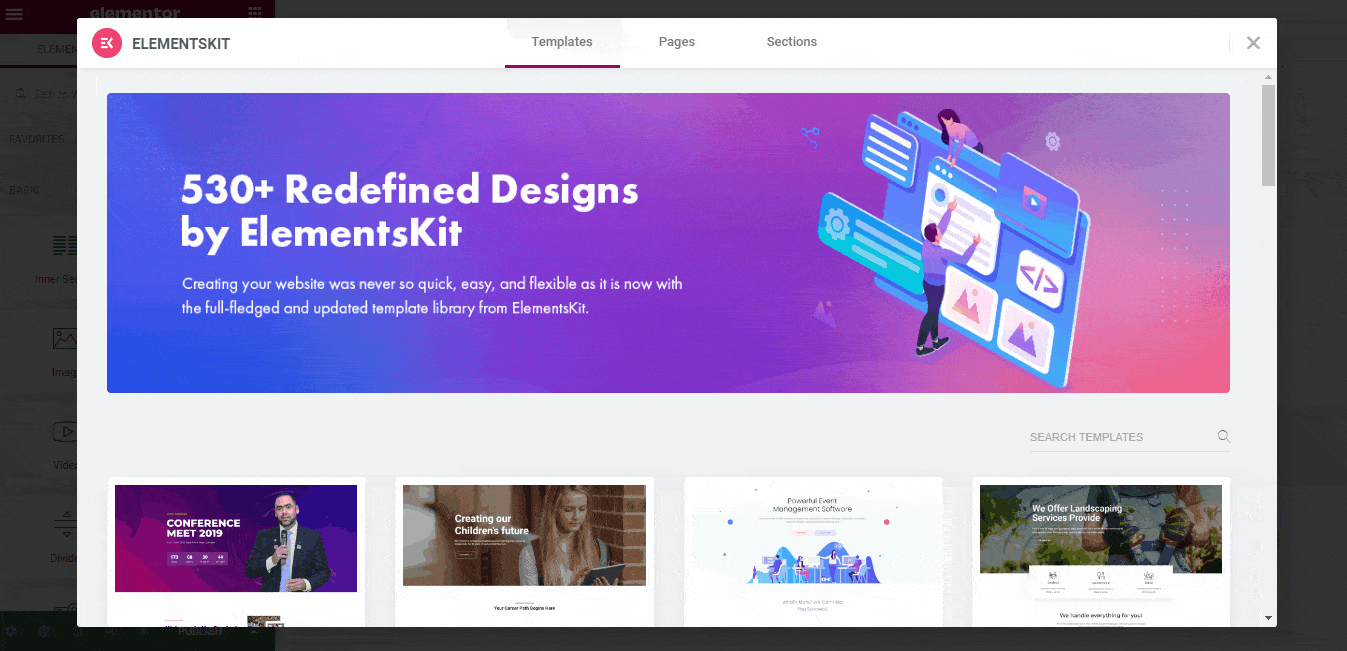
You will see a layout as shown below. The good thing is, you can customize any of the sections of this template.
Step 6: Customize the photography website template
To customize any of the sections of this template, you just have to click on the edit icon. It will then show all the options to customize that particular section. For instance, to edit the heading of the site, click on the heading and then click on the edit icon.
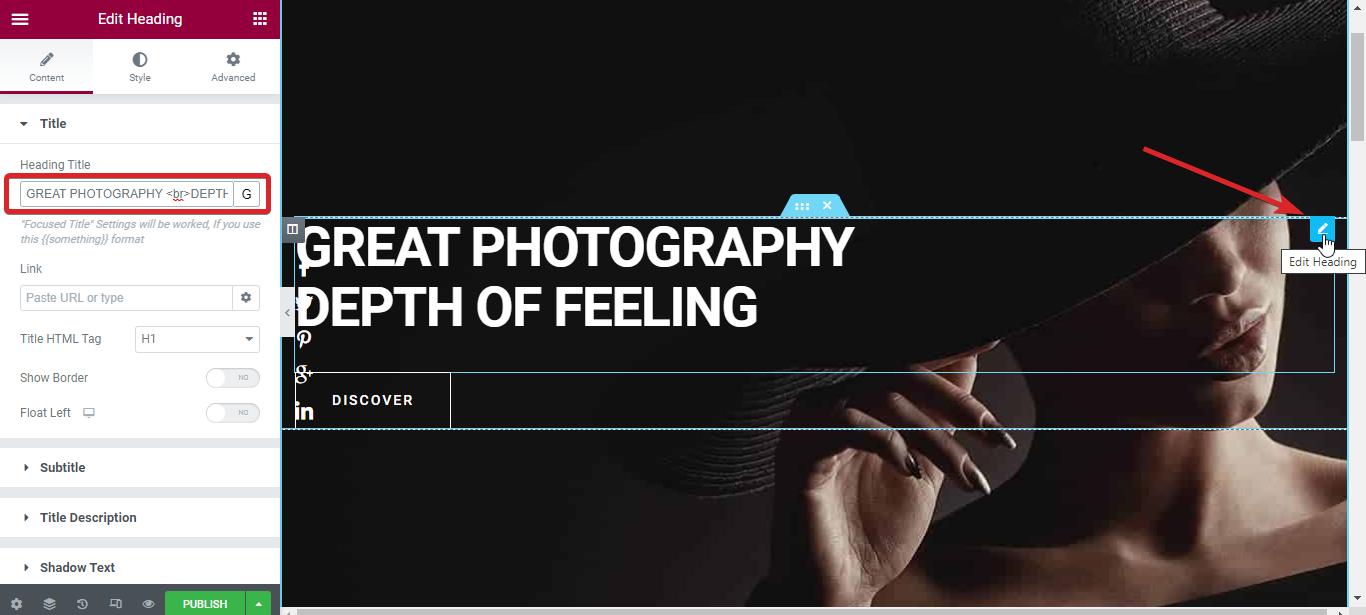
It will show the options like heading text, alignment, fonts, and more. You can choose custom options for all of these fields.
Do you want to show some of your best works in the website? Scroll down on the template and you will see a section named
The customization process is the same for all the sections. So, whenever needed, just hover over to the particular area, check the options, and choose what you want to show.
While inserting the photography template, there will be a heading for the site. But don’t worry, there are custom header and footer templates available with ElementsKit. Go to the ElementsKit’s ready templates > Sections. Then choose the category from the list. For heading, choose the heading category and select a template that you like.

Similarly, for a custom footer, select the footer as the category and choose a ready footer. Like other templates and ready sections, header and footer are also highly customizable.
Step 9: Preview the page and publish
Once you have created the pages and all the necessary sections of the photography website, preview the pages. If everything looks good, publish it.
Step 10: Do SEO for the website
Finally, you have created a professional photography website. It is time to bring some traffic to your website and that requires optimizing your website. For this, you need to use industry-relevant words in the copies of the site.
You can also create a blog section with ElementsKit so that you can do content marketing. Like the photography template, ElementsKit has a blog template that you can use to design the blog section for your website. Write on different topics based on photography.
Frequently Asked Questions
Here are some frequently asked questions regarding how to create a professional photography website.
What is the purpose of a photography website?
The main purpose of creating a photography website is to maintain a portfolio. It helps to get more clients and showcase the works in a better way.
What is the easiest way to create a photography website?
The easiest way to create a photography website is using WordPress CMS and designing pages with photography website templates. There won’t be any need of writing codes or designing pages from scratch.
How much does it cost to build a photography portfolio website?
It depends on what you are looking for on the website. But if you follow the way I have shared here, you can complete a portfolio website within $200-$300.
How do I create an online photo gallery?
After designing the photography website, insert the Elementor gallery widget and upload the photos that you want to share in the gallery.
Once you create a professional photography website, share the link to the website with your clients. Clients can go through all the sections including the photos. Keeping a gallery section in the website is the best idea to share photos.
Wrap Up
Now you know the right way to create a portfolio photography website. Follow each of the steps I have shared above and your website will be ready within a few hours. Customize the website once you are familiar with the templates, widgets, and customization.

Leave a Reply