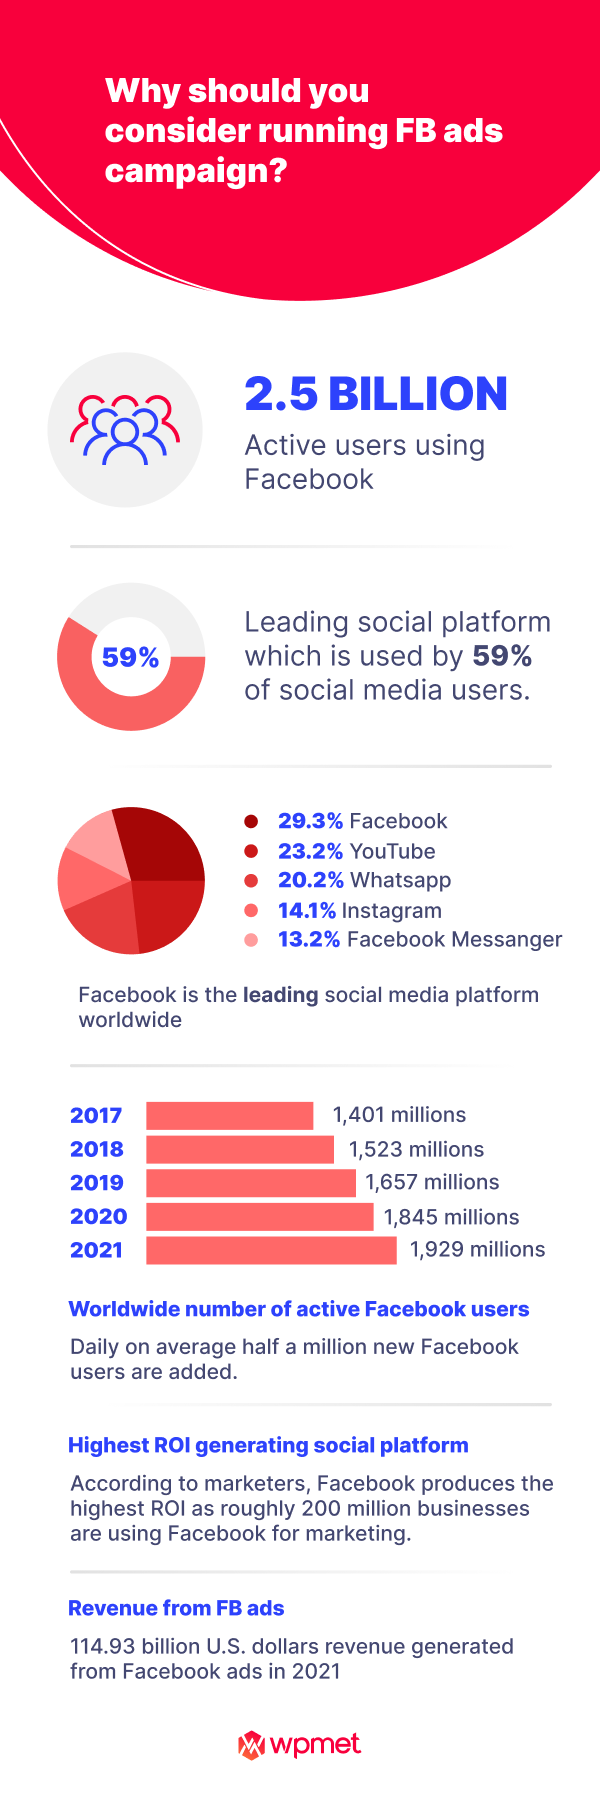
Did you know Facebook accounts for more than 9% of digital advertising and 18.4% of advertising on the mobile platform globally?
Wondering how? Well, around 2.8 billion people use Facebook actively on a monthly basis and people around the world make sure they cash on this audience to advertise their products.
And to advertise on this popular social media platform, you need to run a Facebook ads campaign. No worries, this is not at all a hard task to do, at least not if you follow this blog.
This blog is a step-by-step detailed guide on how to run a Facebook ads campaign with proper screenshots and gifs so you can easily follow along. So, let’s get started…
What is Facebook Ads Campaign and how does it work?
Ads Manager is your starting point for running ads on Facebook, Instagram, Messenger, or Audience Network. – Facebook
Honestly, it’s not just a starting point for your Facebook ads campaign rather an all-in-one tool that lets you create, manage and monitor Facebook advertisements. You can also easily manage the budget and schedule your ads using Facebook ads Manager.
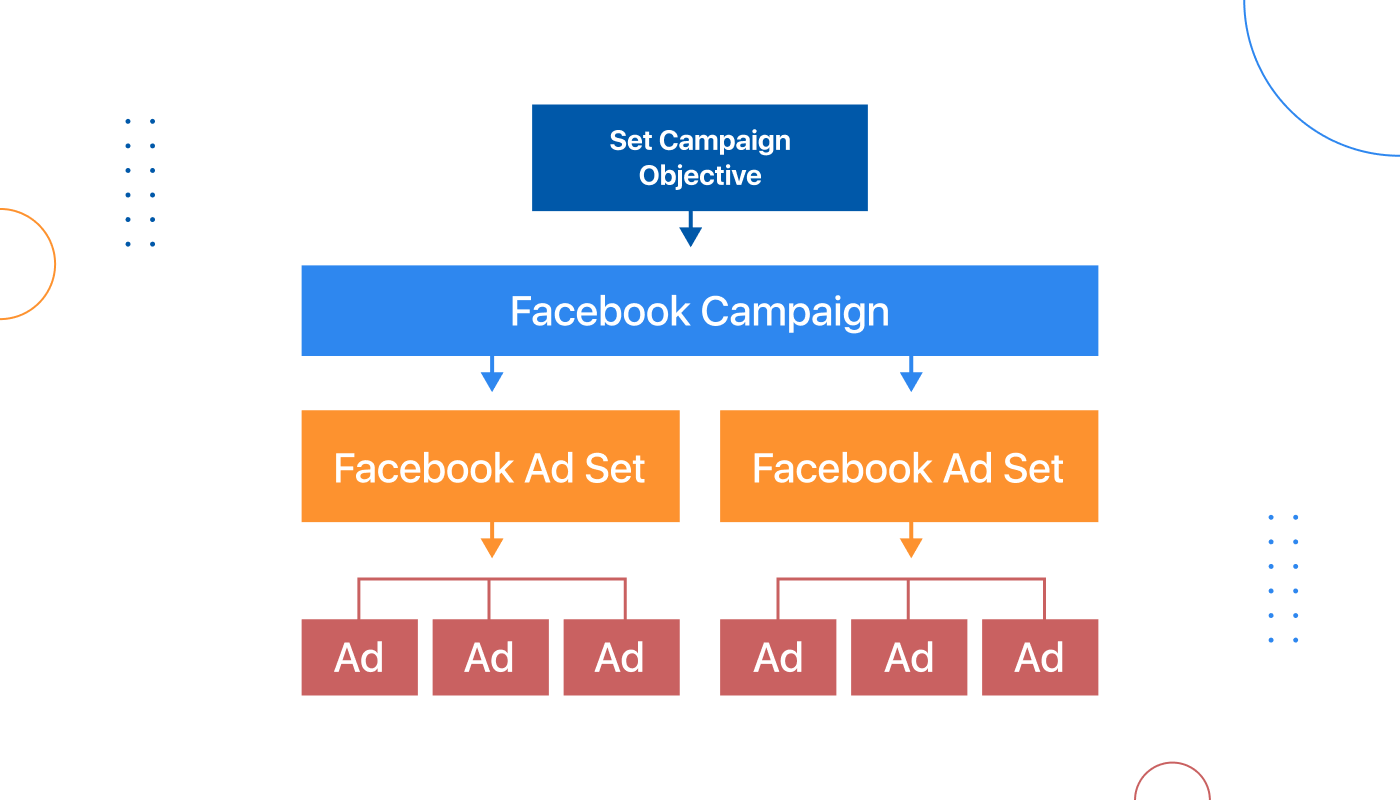
Facebook ads manager does the task of running Facebook ads in three layers. Those layers are:
- Campaign: Campaigns are the starting point in which you set the objective or purpose of your campaign. For example, whether you want traffic, increase app installation, etc.
- Ad set: Ad set lets you decide on an audience for your campaign. You can have multiple ad sets for one campaign.
- Ads: This is the final layer where you create ads for your specific ad set. You get options to create various types of ads and choose the platforms and placements where you want to display your Facebook ad.
Let’s have a look at the statistics that will convince you to use Facebook Ads for your business…
How to run a Facebook ads campaign : step by step guide
Follow the instructions mentioned below to run a Facebook ads campaign successfully. Here comes the 7 steps you need to follow to run your ad campaign…
Step 1: Create an account with Facebook Ads Manager
The first thing you need to do is to set up a Facebook ad campaign is to create an account with Facebook Ads Manager. Facebook Ads manager like the name suggests provides you with a user-friendly dashboard to create and monitor Facebook ad sets and Facebook ads. To create an account with Facebook ads manager:
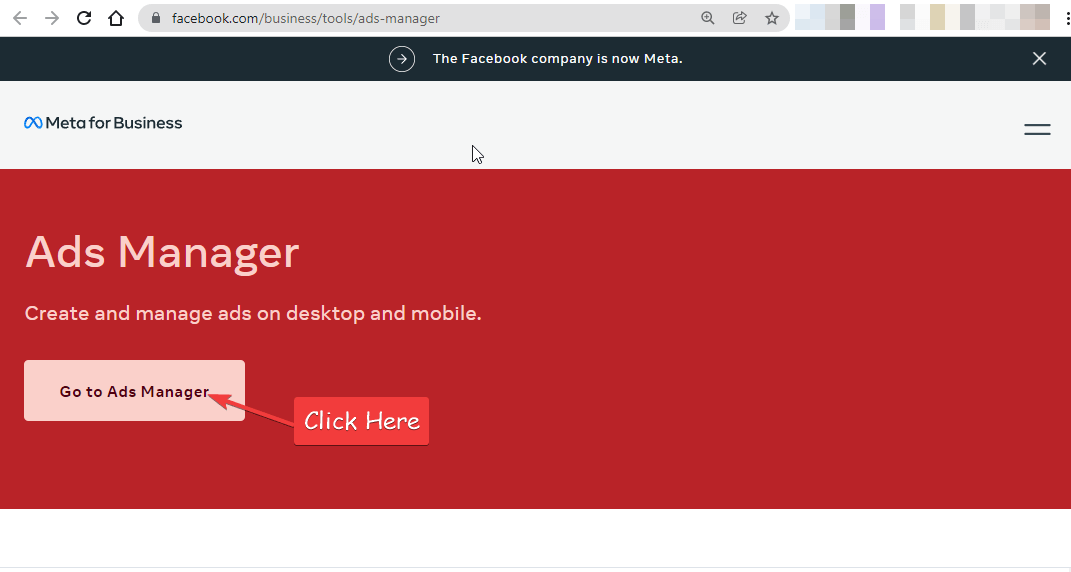
- Go to Facebook Ads Manager using this URL 👉🏽👉🏽 Facebook ads Manger
- Once the page loads, click on Go to Ads Manager
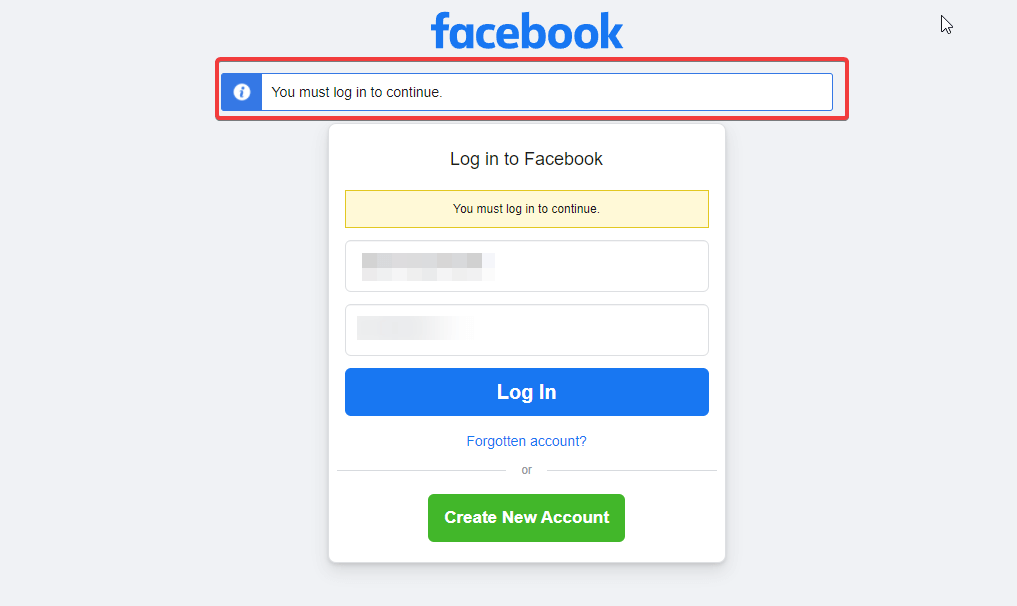
- You will be asked to log in so you can continue with further steps. Provide your Facebook account credentials and login
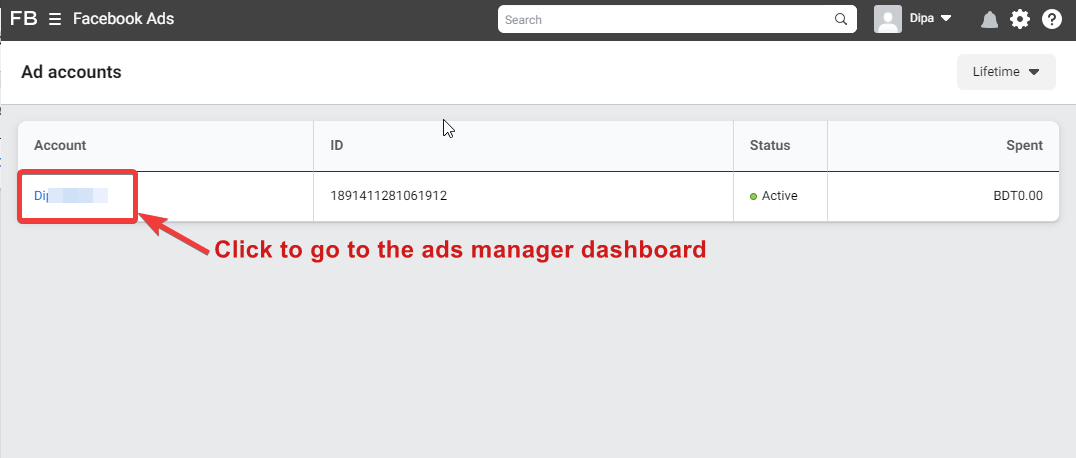
- Once you log in, choose the account to go to the account manager
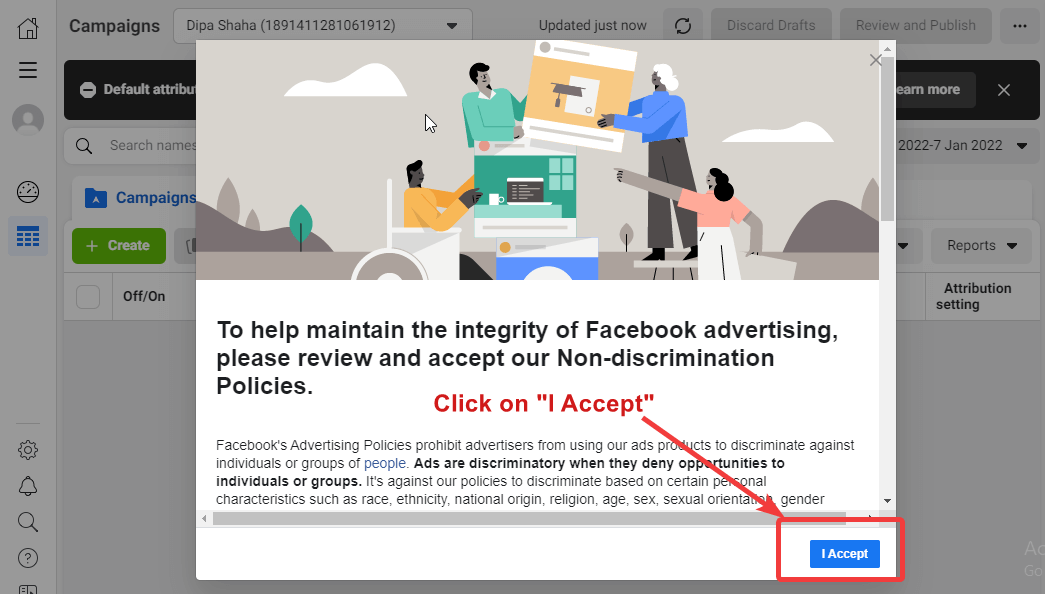
- Click on I Accept
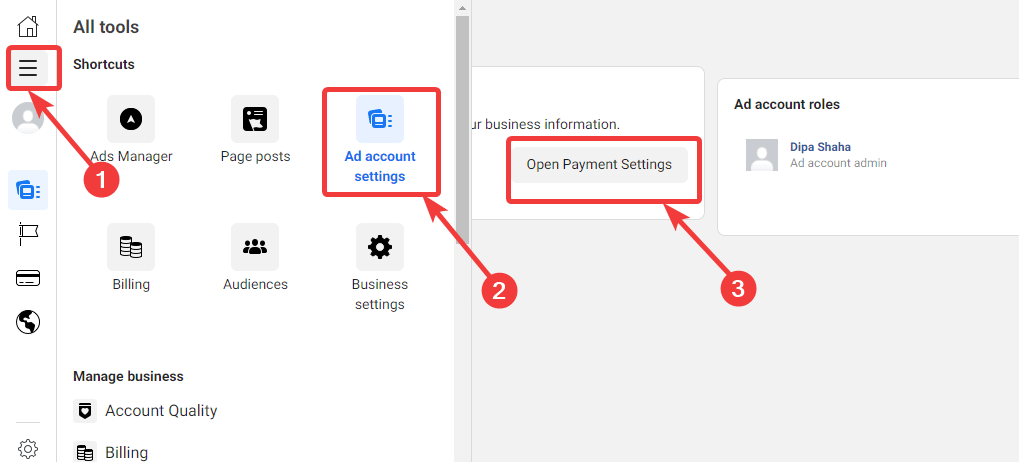
- From the toolbox go to Add Account Settings to complete all the account settings such as adding a payment method
Step 2: Create a new Facebook Ad Campaign
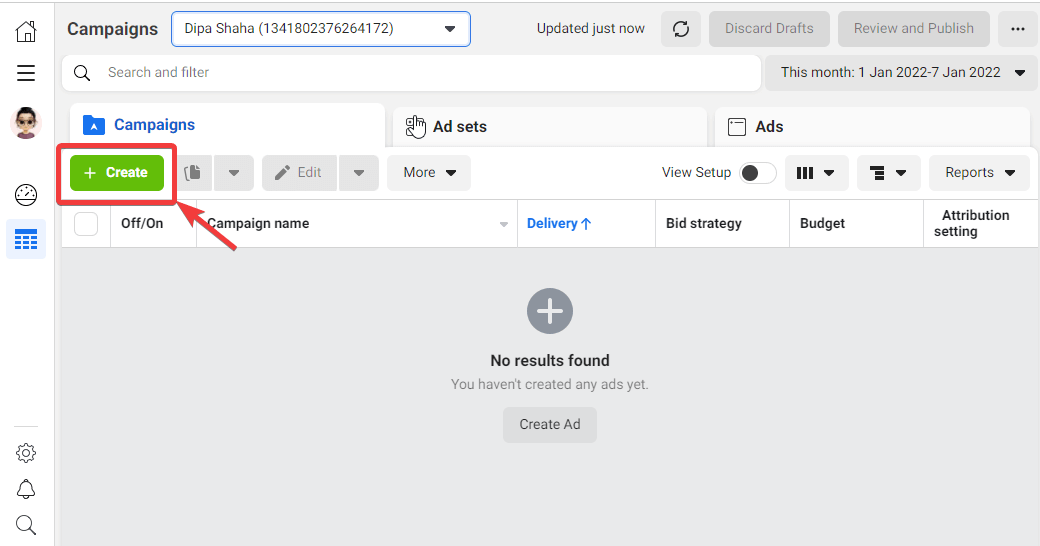
Now that you have a Facebook ads manager account, it’s time for the second step which is to create a Facebook Ads campaign. For this navigate to Facebook Ads manager from the toolbox and click on + Create.
⚡⚡ You can also read How to Add Facebook Login on Any WordPress Website
Step 3: Choose a campaign objective
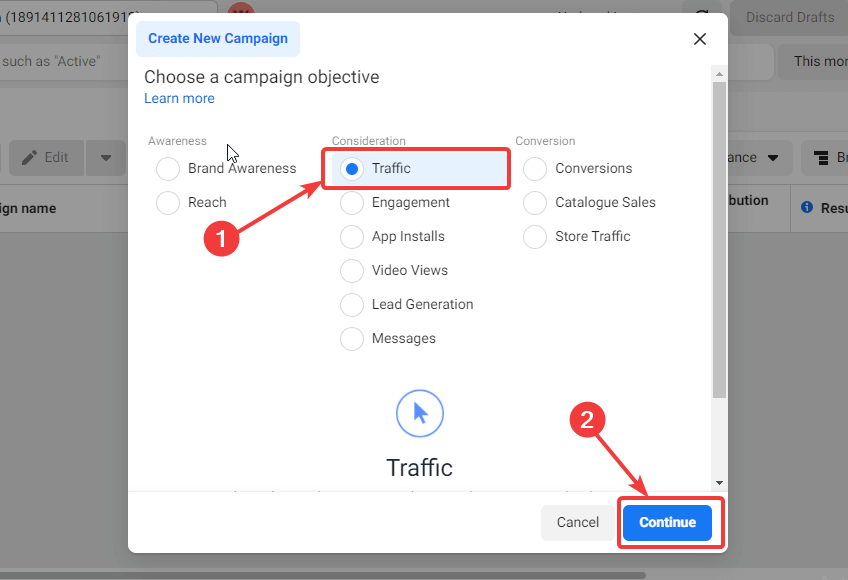
Now it’s time to choose an objective for your campaign. Facebook ads offer three main objectives; Awareness, Consideration, and Conversion. Under the mentioned three objectives there are other objectives using which you can select a more specific objective. Let’s have a look at the objective options you will get:
Awareness:
To increase awareness of your business, you will get two objective option which includes:
- Brand Awareness: Using this option, you can increase the brand awareness of your business by showing ads to the set of people who are most likely to pay attention to your very ads.
- Reach: This option can boost your business’s reach by showing ads to a maximum number of people. This way people get to know about services and products.
Consideration:
If you feel like your business has a good amount of reach, then you should for a campaign that will make your audience consider purchasing your products. As part of the consideration objective, you will get the following option:
- Traffic: This option will maximize the number of people who visit your site, app, or Messenger conversation. And the more traffic you will get, the more people will consider buying your product/service.
- Engagement: With the engagement objective, you can up the level of engagement between your product and consumers through likes, shares, and comments.
- App Installs: This option lets you link your App Store and Google Play Store app with ads as thus increasing your app installation.
- Video Views: Show videos to a set of people who are very likely to watch the video till the end.
- Lead Generation: Encourages customers to engage more with your brand and signup for more information.
- Messages: Encourages people to go specifically for Messanger interaction. This way you can have a personalized discussion with your probable customer.
Conversion:
In case your objective is to increase the conversion rate, then you will get three options:
- Conversions: Encourage customers to take action like downloading apps, registering for a site, or making a purchase.
- Catalogue Sales: With this option, you can showcase products from your e-commerce store’s catalogue to generate more sales.
- Store Traffic: This is a great option to promote your store location to nearby potential customers.
For this tutorial, I am going to choose the Traffic with the aim to get people to visit our site more. Once you choose your objective click on Continue.
⚡⚡ You can also read 10 Killer Sales Hacks to Multiply your Sales in no time
Step 4: Choose campaign name and campaign details
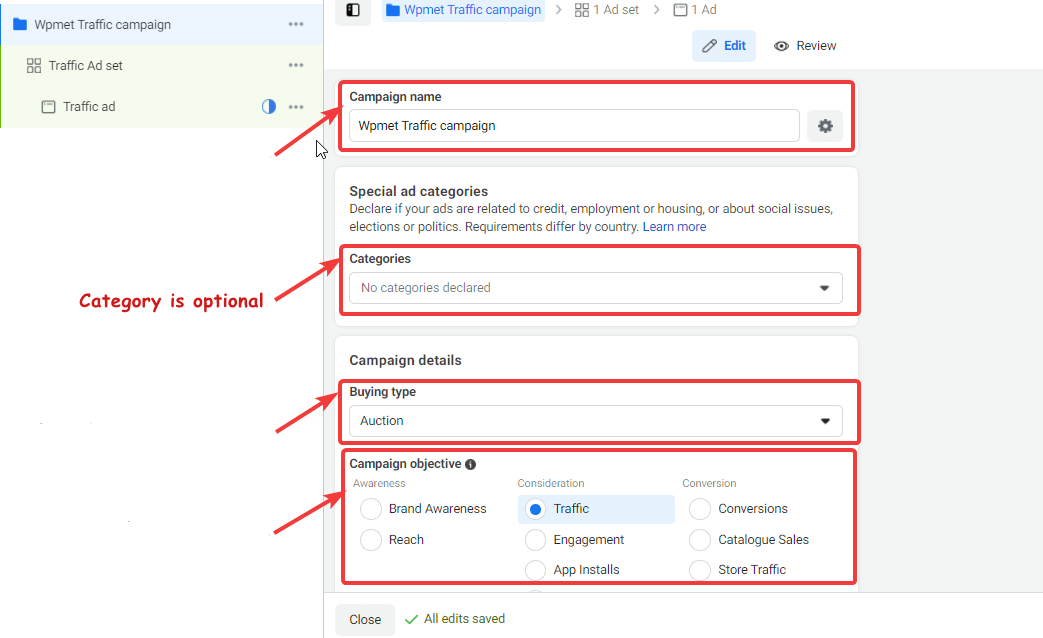
Once you choose your objective, you need to provide campaign-related information such as
- Campaign Name: Give a suitable name for your campaign.
- Categories: Check out the categories and if any of them suits your campaign objective, you can select that, otherwise skip this option.
- Buying Type: Choose buying type as auction.
- Campaign Objective: Here you can edit the objective you had chosen earlier if you wish to.
Step 5: A/B test and campaign budget setup
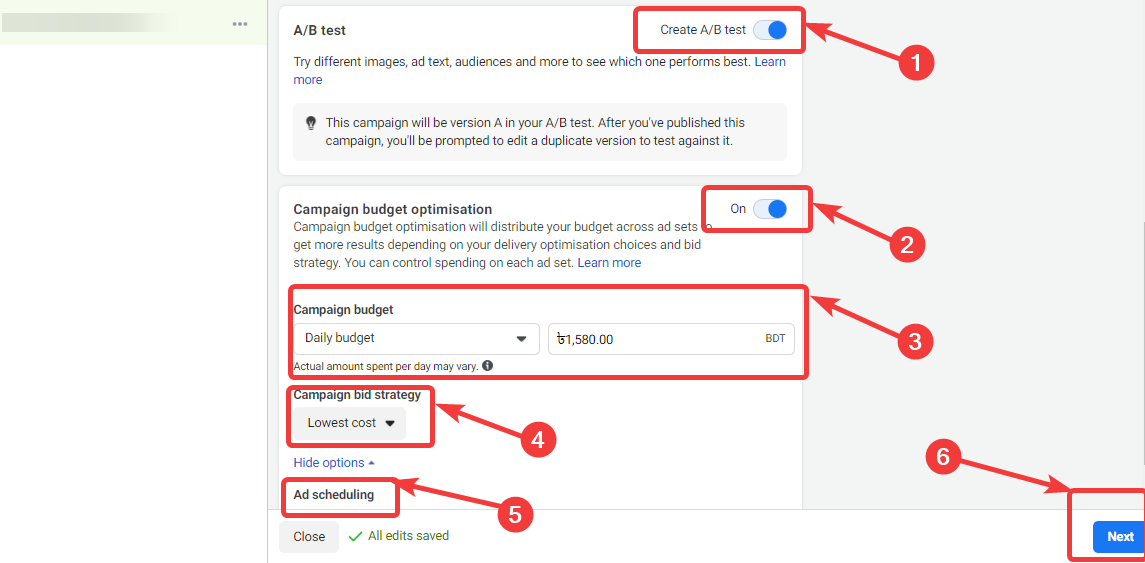
Scroll down a bit to set up the following options:
- A/B Test: If you want to run A/B tests on your ads of this campaign then turn this option on. A/B tests are a great way to find out what is working for your brand marketing and what isn’t.
- Campaign budget optimisation: If you are going to have multiple ad sets, then you can optimize the campaign budget here. Turn on the campaign budget optimization option and set the following options
- Campaign budget: You can choose a daily budget or lifetime budget. Then provide the amount you want to spend depending on your budget type.
- Campaign bid strategy: You can choose strategy as the lowest cost, cost cap, and bid cap.
- Ad scheduling: Here you can schedule your campaign date and duration. However, this option is only available for lifetime budgets.
🛎️ Note: You can skip the campaign budget optimization part here and set a budget for your ad set only later.
After doing all the setup click on Next.
Step 6: Set Ad set name
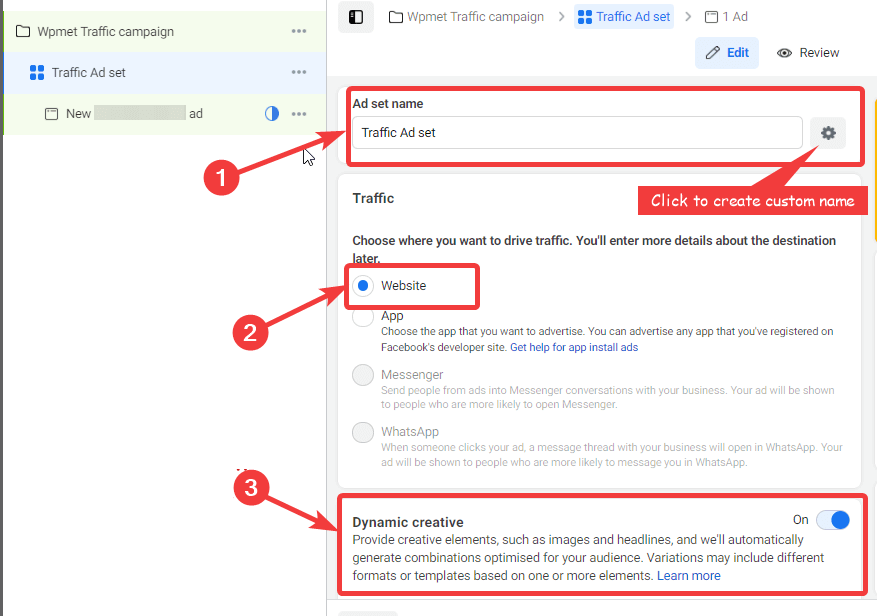
Now it’s time to set the add name, where you want to draw traffic to and optimization and delivery settings.
- Ad set name: Give a name to your ad set. You can also create a custom ad set name using existing information like Campaign ID, Campaign Name, Campaign Objective.
- Traffic: Choose where your traffic is to land. You can choose from Website, App, Messenger, or Whatsapp.
- Dynamic creative: You can turn this option on let Facebook create different combinations of ads for your audience.
⚡⚡ You can also read How to Add a Social Counter in a WordPress Site
Step 7: Set up budget & schedule for ad set
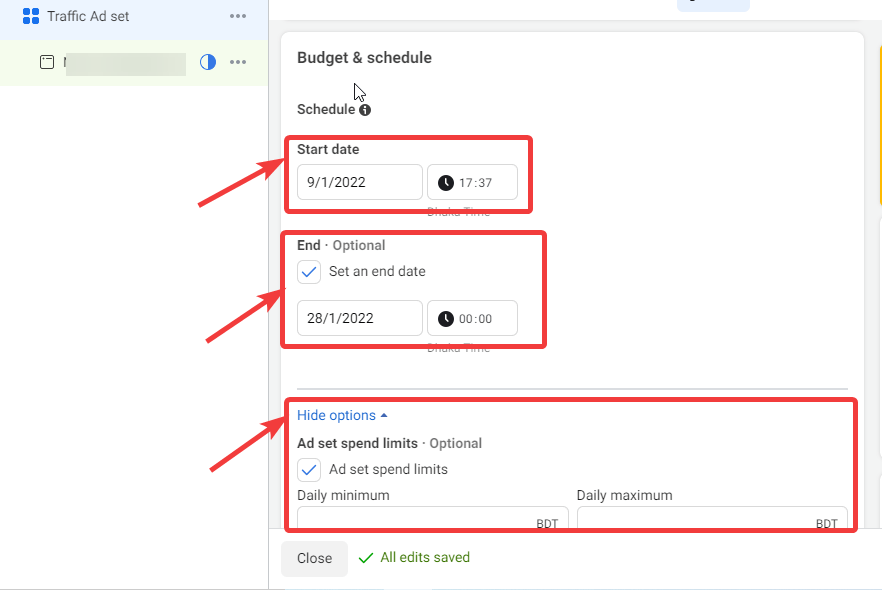
In this section, you can set the budget for your ad set and also the duration for which you want this ad set to run. You can set the following options:
- Start Date: Set a start date from which you want your ad set to go live. The date can not be in the past.
- End: Though this option is optional I would recommend you set the end date.
- Set Ad Spend limit: Here you can set minimum and maximum daily budget for this ad set.
Step 8: Set up the audience for the Facebook Ad set
Now it’s time to create or set up an audience for your Facebook ad set. You get different options to filter your audience such as
- Location: Here you can choose the location in which you want to display your ad. You can choose the people who currently live in this location or were recently in this location, or traveling to this location depending on the type of audience you want to target.
- Age: Chose the age group for your audience.
- Gender: You can choose male, female, or all depending on the audience you wish to target.
- Detailed Targeting: Under detail targeting, you can filter your audience depending on interest, demographics, and behaviors. Click on the Browse option to choose an audience depending on interest, demographics, and behaviors. You can also click on suggestions to target the audience who are interested in similar fields.
🛎️ Note: You can also choose to exclude or narrow down your audience further depending on your interests.
- Language: You can leave the option just as it is for now.
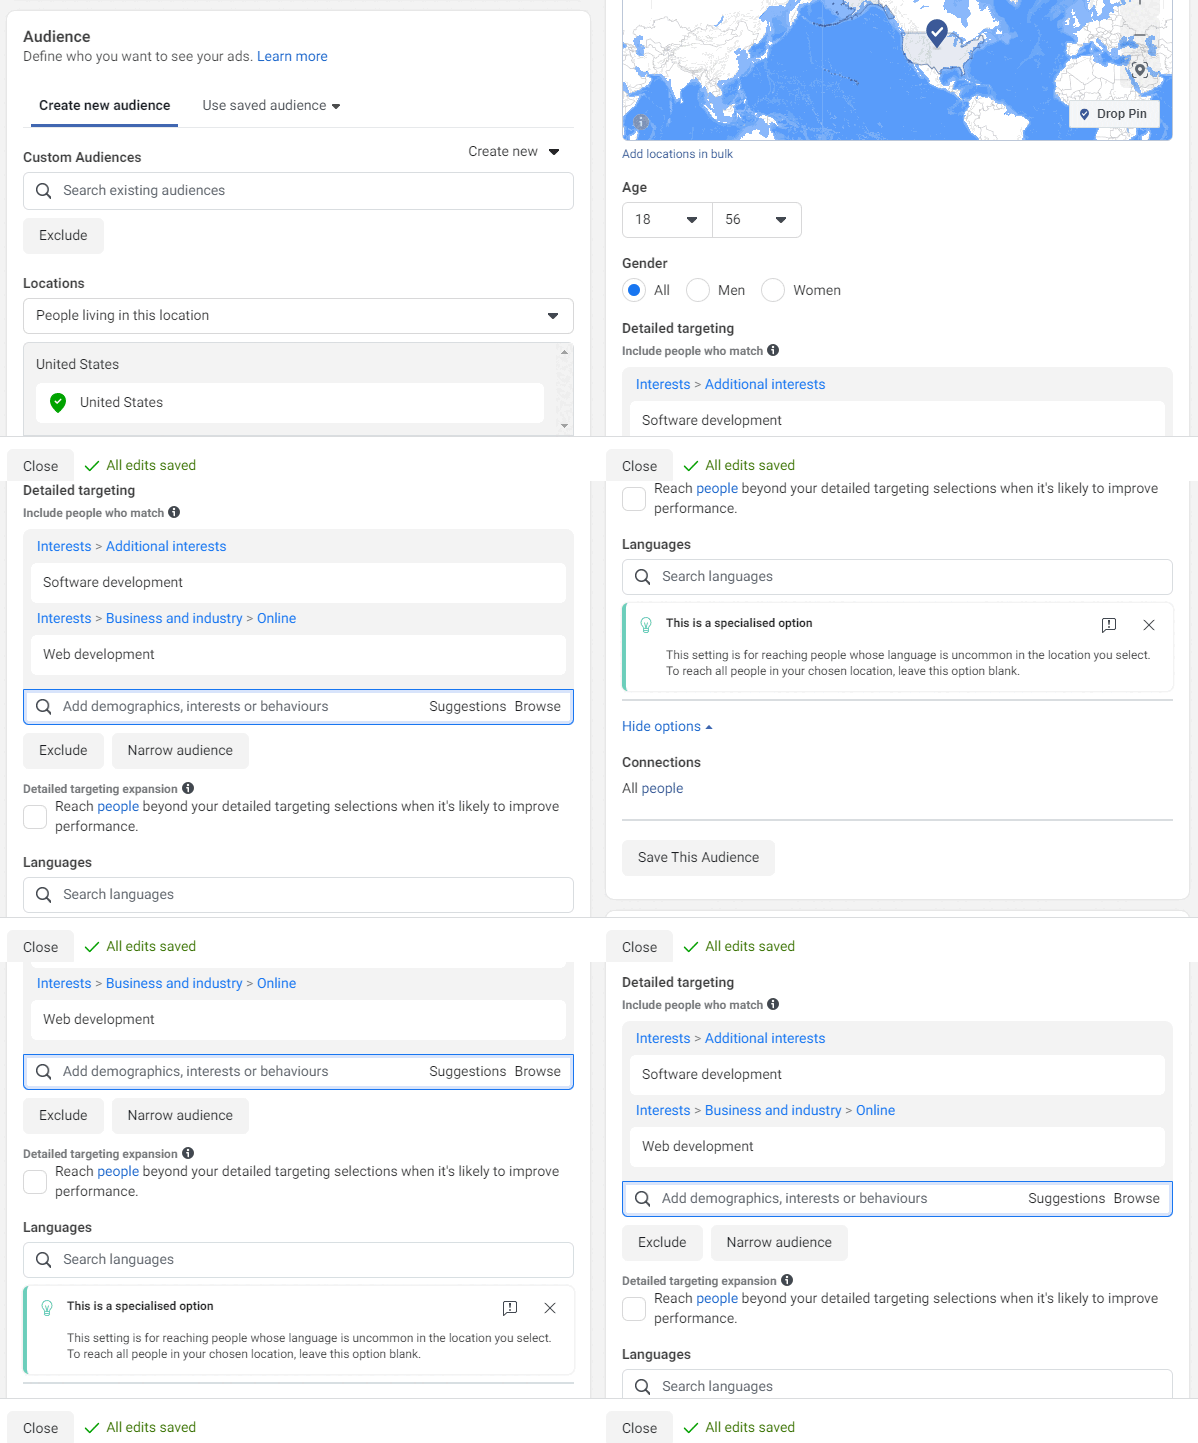
To save, click on Save This Audience.
Curious to know about the difference between two of the most popular eCommerce WooCommerce vs OpenCart? If yes, then click here.
Step 9: Set up Ad placement for the Facebook Ad set
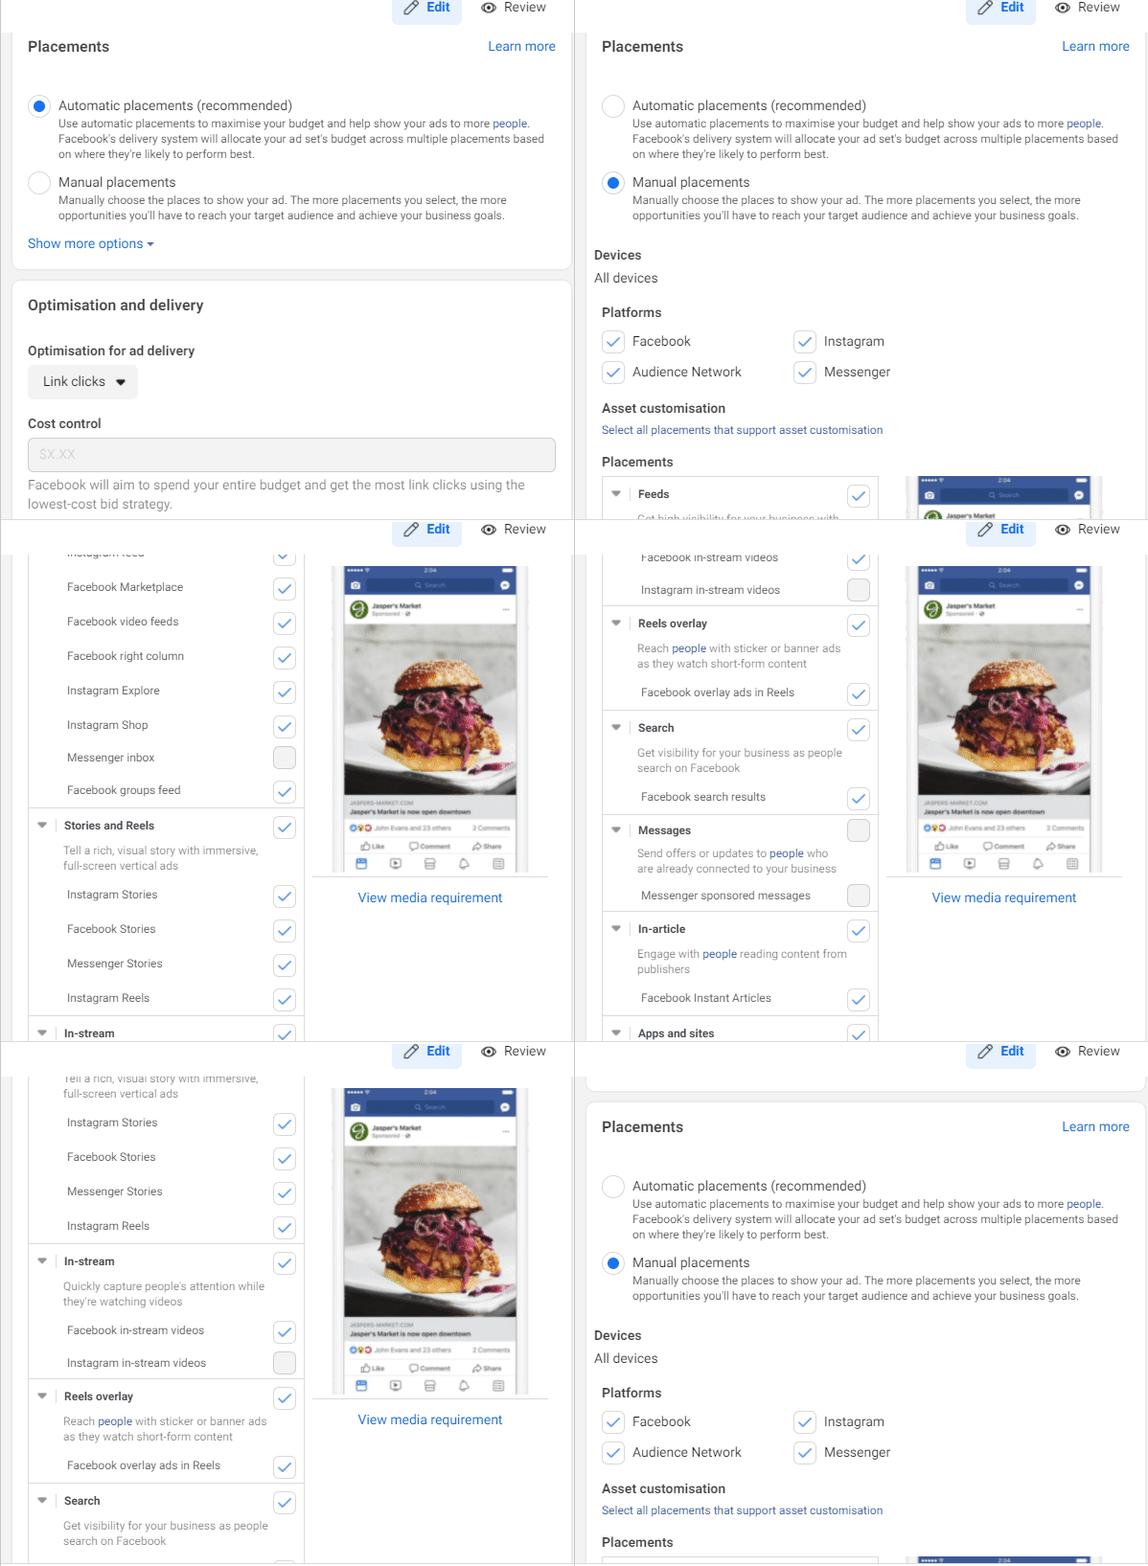
Now that you have your audience selected, it’s time to move on to the next option and choose which are the platforms you want your Facebook ads to run and what are placements you want your Facebook ads to show up. You get the following options to choose from:
Placements: Here you will get two options; Automatic placements and Manual placements. If you choose automatic placements then Facebook will optimize the platform and placement themselves depending on your business, budget, audience, and objective.
If you choose manual placement then you will get the following option:
Devices: You can choose Mobile, Desktop, or all devices.
Platforms: Platforms that you get to advertise on using Facebook Ads include Facebook Instagram, Audience Network, Messenger. You can choose all of them depending on your requirements.
Placements: All of the platforms show ads in multiple places and you can choose the placement where you want to showcase your ads. The options are Feeds, Stories, Reels, In-stream, Reels overlay, Search, Search In-article, and Apps and sites.
Step 10: Customize Optimisation and delivery option
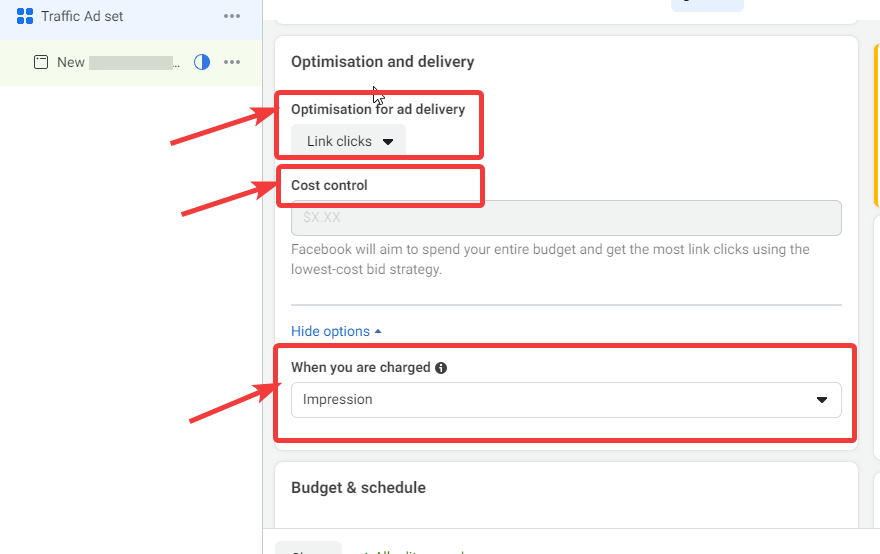
Scroll down to customize the following option
- Optimization for ad delivery: Here you need to choose how you want your ads to be optimized for example to get click on links, get more views on the landing page, increase the impression, or daily unique reach.
- Cost control: Here you can set up to optimize your expenditure on ads. However, this option is not available if choose the lowest bid.
- When you are charged: For now choose impression, the option only becomes available after you spend a certain amount on your Facebook Ads.
Step 11: Setup ad name and Identity
Finally, we have come to the final few steps of setting up a facebooks ads campaign which is all about creating the ads that you want to run for the audience you selected for your Facebook ad set.
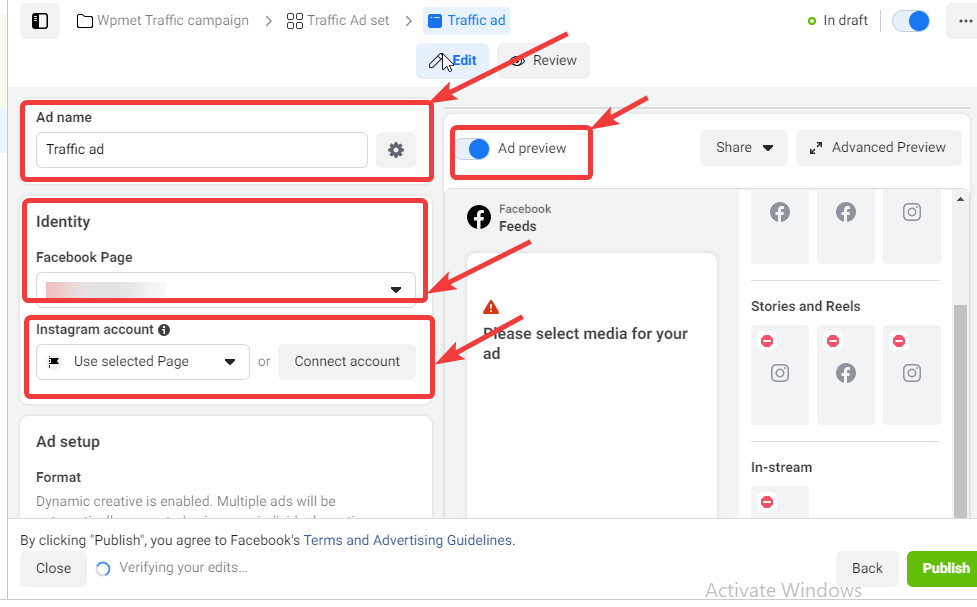
- Ad name: Give an ad name according to your choice.
- Identity: Choose the Facebook page for which you want to run the campaign and display ads.
- Instagram account: You can connect your Instagram account here.
🛎️ Note: Turn on the Ad preview option to see a live preview while you create your ads.
Step 11: Choose ad setup, and ads creative and publish
Now it’s time to choose the type of ads and ads creative for your Facebook Ads.
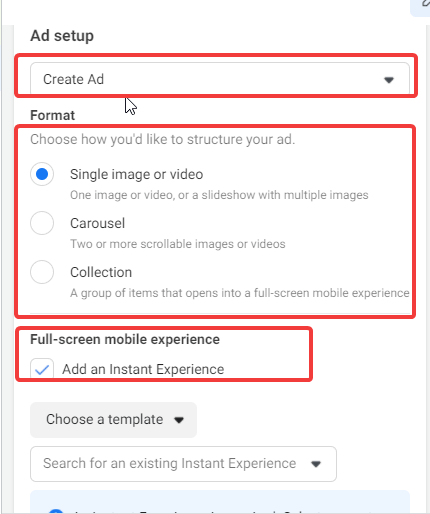
Ad setup: You can choose an existing post, creative hub mock-up, or create a post option for your ad. For this blog, I am going to choose to Create Ad.
For Create Ad, you get three ad Formats:
- Formats:
- Single image or video: Here you can add one image or video to your Facebook Ads.
- Carousel: Using this option, you can add multiple scrollable images or videos.
- Collection: You can display a collection of items that will show a full-screen ad to the users.
- Full-screen mobile experience: If you want to ensure a full-screen mobile experience, check the Add an Instant Experience option. Once you check, you will get another dropdown to choose an experience type. The options are Customer acquisition, story selling, Sell Products (Without catalog), etc.
Ad Creative:
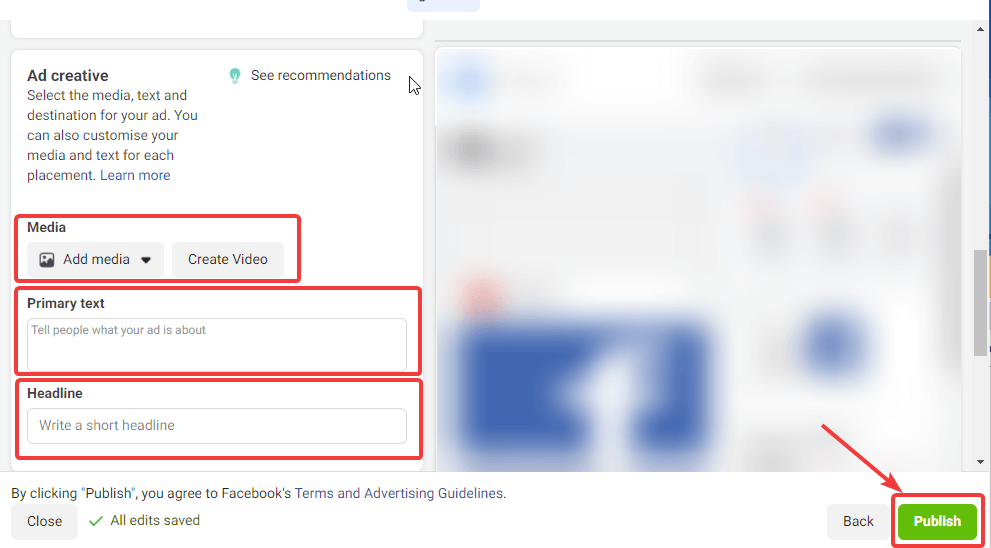
Once you choose your ad format, you need to add the creatives for your Facebook Ads. As part of ad creative, you need to provide the following information
- Media: here you can upload the images and videos.
- Primary Text: Add primary text. You can add up to 6 primary text options/
- Headline: This is optional, but it’s a good idea to use headlines in your ads.
Finally, click on publish to make your campaign live.
⚡⚡ WooCommerce is a great platform to start your online business,check our blog on How to Set Up WooCommerce in WordPress
Final Words
Now you know how to fun a Facebook ads campaign. Facebook ads are the biggest paid tools you can use to boost your business performance. So make sure to choose an appropriate objective and narrow audience set to advertise your product services to get maximum results.


Leave a Reply