

I hate to fill forms! How about you?
Do you hate filling forms too?
Then there’s a pair of us!
No, we are not alone. Research shows that four out of five (86%) people are bothered by the need to create new accounts when registering on a website.
What’s more alarming found in the same research is that 9 out of 10 people (90%) admit they have left a website if they forgot their password or log-in info, instead of answering security questions or resetting their password!
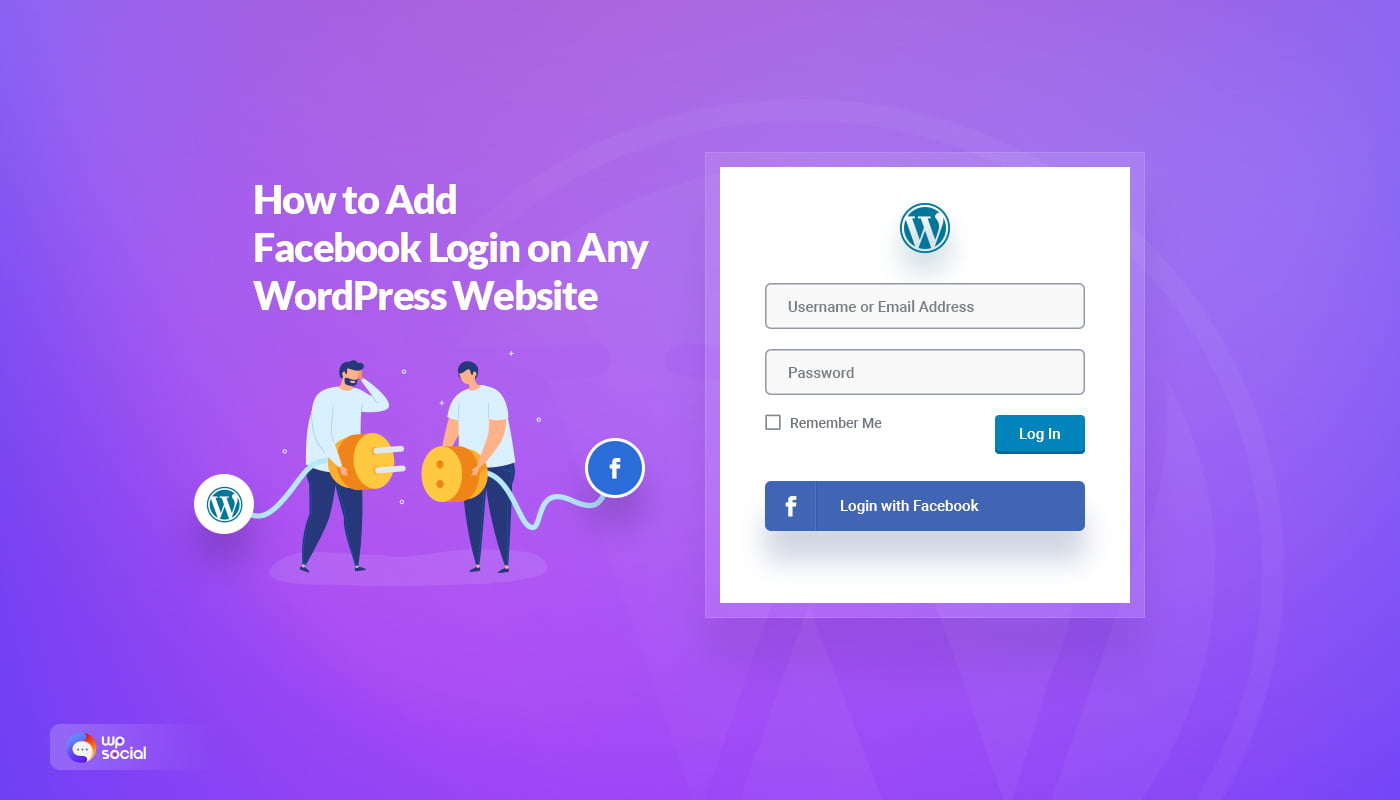
Are you a website owner experiencing a high bounce rate from your login page? Well, most possibly you can lessen it to a great extent by integrating Facebook login on your website.
If you are here to know exactly how to add facebook to wordpress website, you’re at the right page.
In this article, I will give you some reasons for integrating Facebook login on your WordPress site and walk you through the steps of adding a Facebook login for WordPress. Seems interesting? Let’s go ahead then.
Why Should You Add Facebook to Your WordPress Website?
Most people have Facebook accounts nowadays. I think that you might need to break a sweat to find a non-facebooker around you.
Integrating the ‘Log in with Facebook’ button on your WordPress website is a wise move for a bunch of reasons. When you let the users log in to your WordPress site with Facebook, they get rid of the password fatigue which they would otherwise go through.
On top of that, as the visitors do not need to fill out another login/registration form, they can save their valuable time to invest in exploring your website more.
However, you might now be wondering about the benefits you can reap by adding a Facebook login to WordPress websites. Well, I am now going to talk about some key reasons for Facebook integration on your website:
- You’ll get to know the full name of the users from Facebook. It will enable you to send personalized newsletters and updates.
- While many users sign up for websites with fake emails, the registered emails of the users on Facebook are more likely to be genuine.
- Adding a Facebook login to your website will also help you to get the location, gender, and age of the visitors. You can prepare your marketing plan more accurately with the personalized data.
- Tracking the “Likes” of the users, you can offer a more tailored service to them. Additionally, accessing their Facebook friend lists will enable you to recommend them the products or services their friends are using.
So, what are you waiting for? Keep reading this post till the end to know all the steps you need to follow for adding a Facebook login on your WordPress website.
Here’s What You Need
There are multiple ways to add Facebook login to your WordPress website. Most of them will require you to have a solid knowledge of coding.
However, if you do not have deep coding knowledge, it is better for you to choose a social login plugin to add a Facebook login to your site.
Wp Social is one of the best social media plugins for WordPress that can help you achieve your goal. Apart from letting you add a Facebook login button at any place on your website, it also features social share and social count options. So, if you get Wp Social, you are actually getting a 3-in-1 plugin.
How to Add Facebook Login to WordPress Website (Step-by-Step)
If you want to know how to integrate the Facebook login on your WordPress website seamlessly with a plugin, I am going to give you a step-by-step detailed guideline now using Wp Social. Follow the steps properly and add Facebook to WordPress for login.
Let’s go ahead:
Step 1: Install Wp Social
To install the Facebook login plugin for WordPress:
● Login to the admin panel area of your WordPress website.
● Go to Plugins ➔ Add New
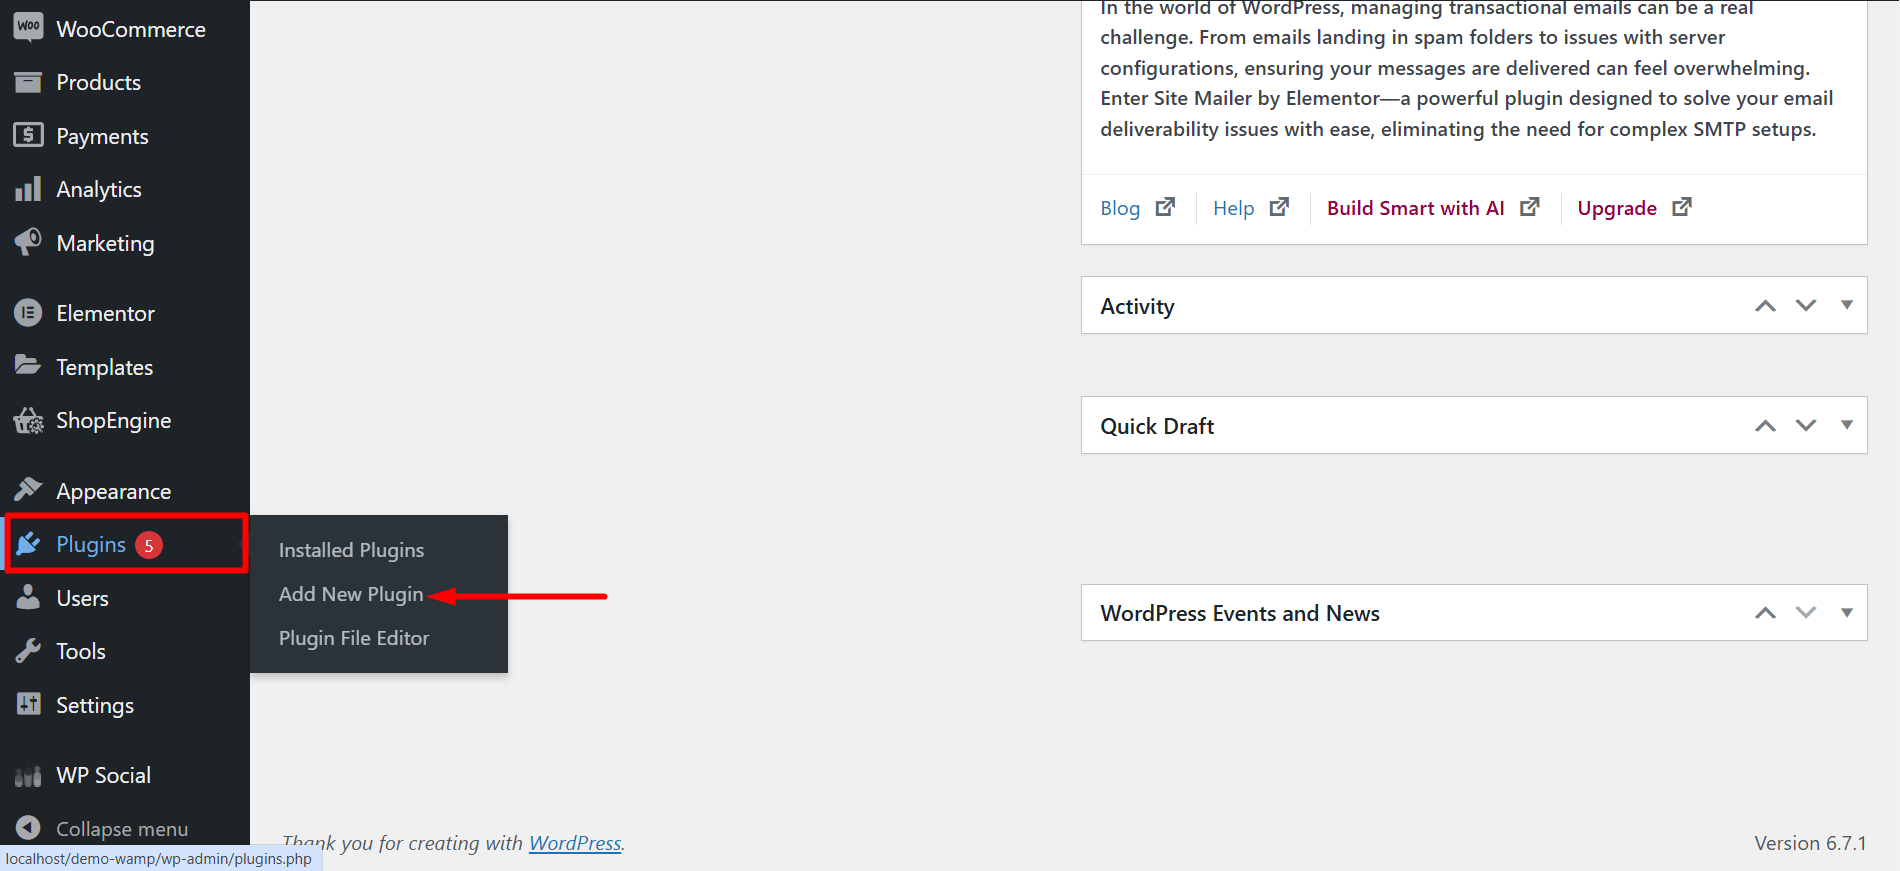
● Type “Wp Social” inside the search field.

- Find the “Wp Social-Social Login and Register, Social Share, Social Counter” from the search result. Now, click on “Install Now”
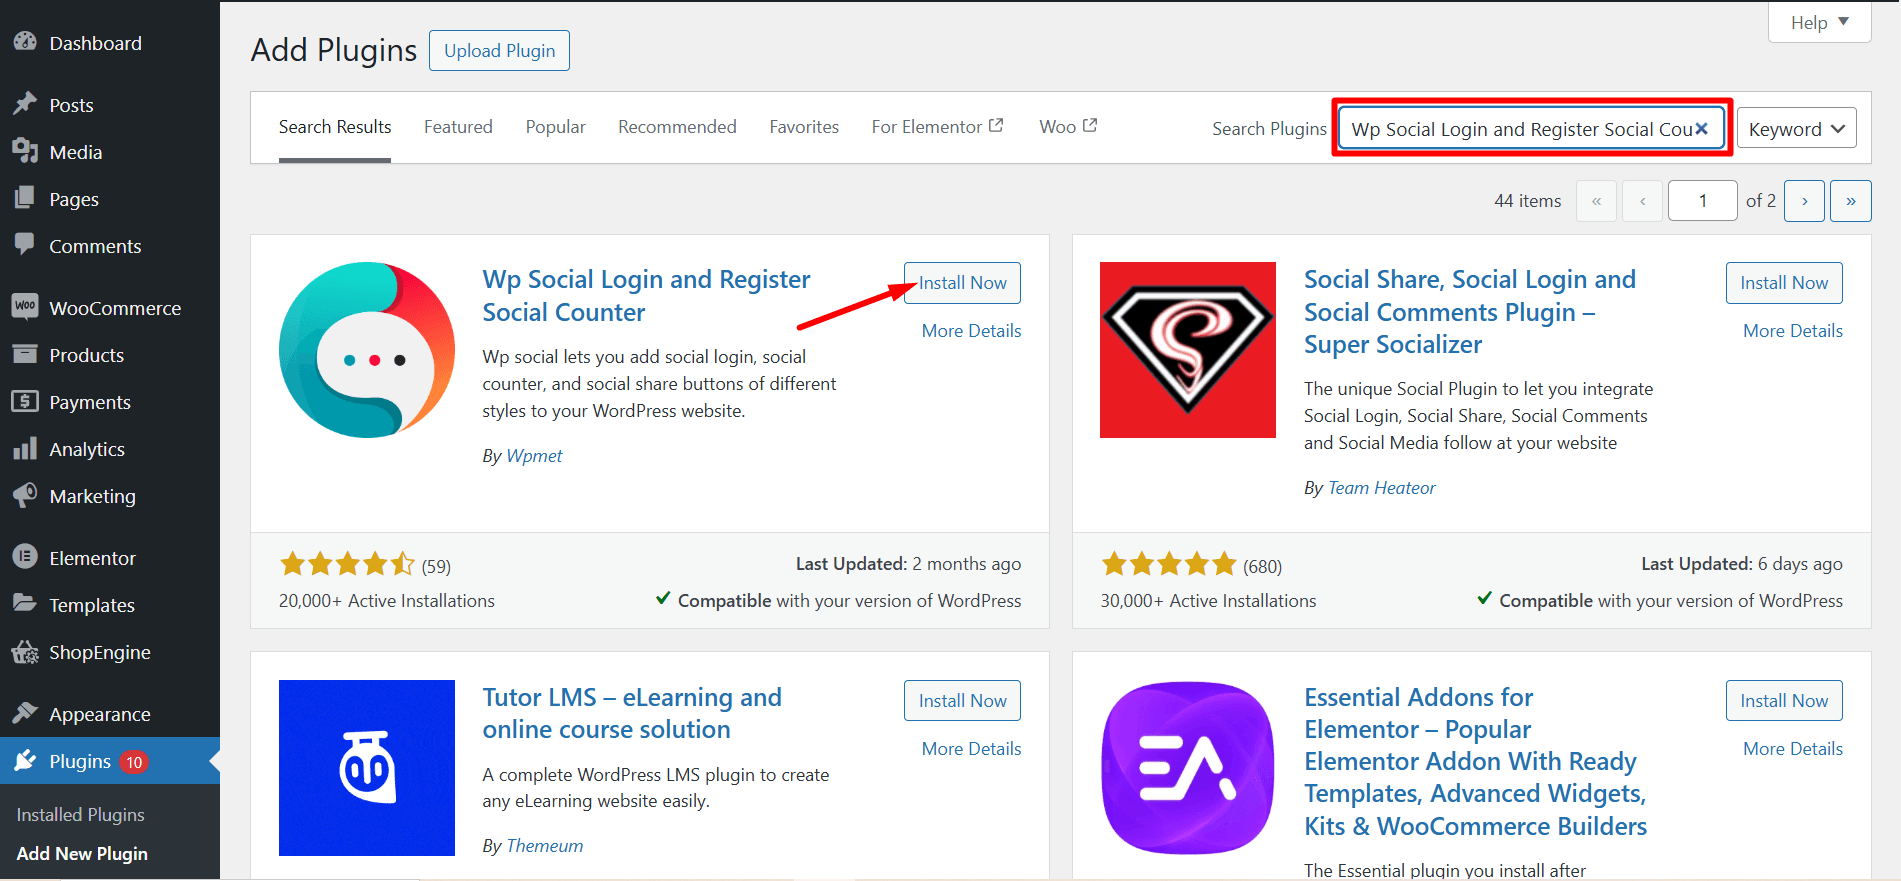
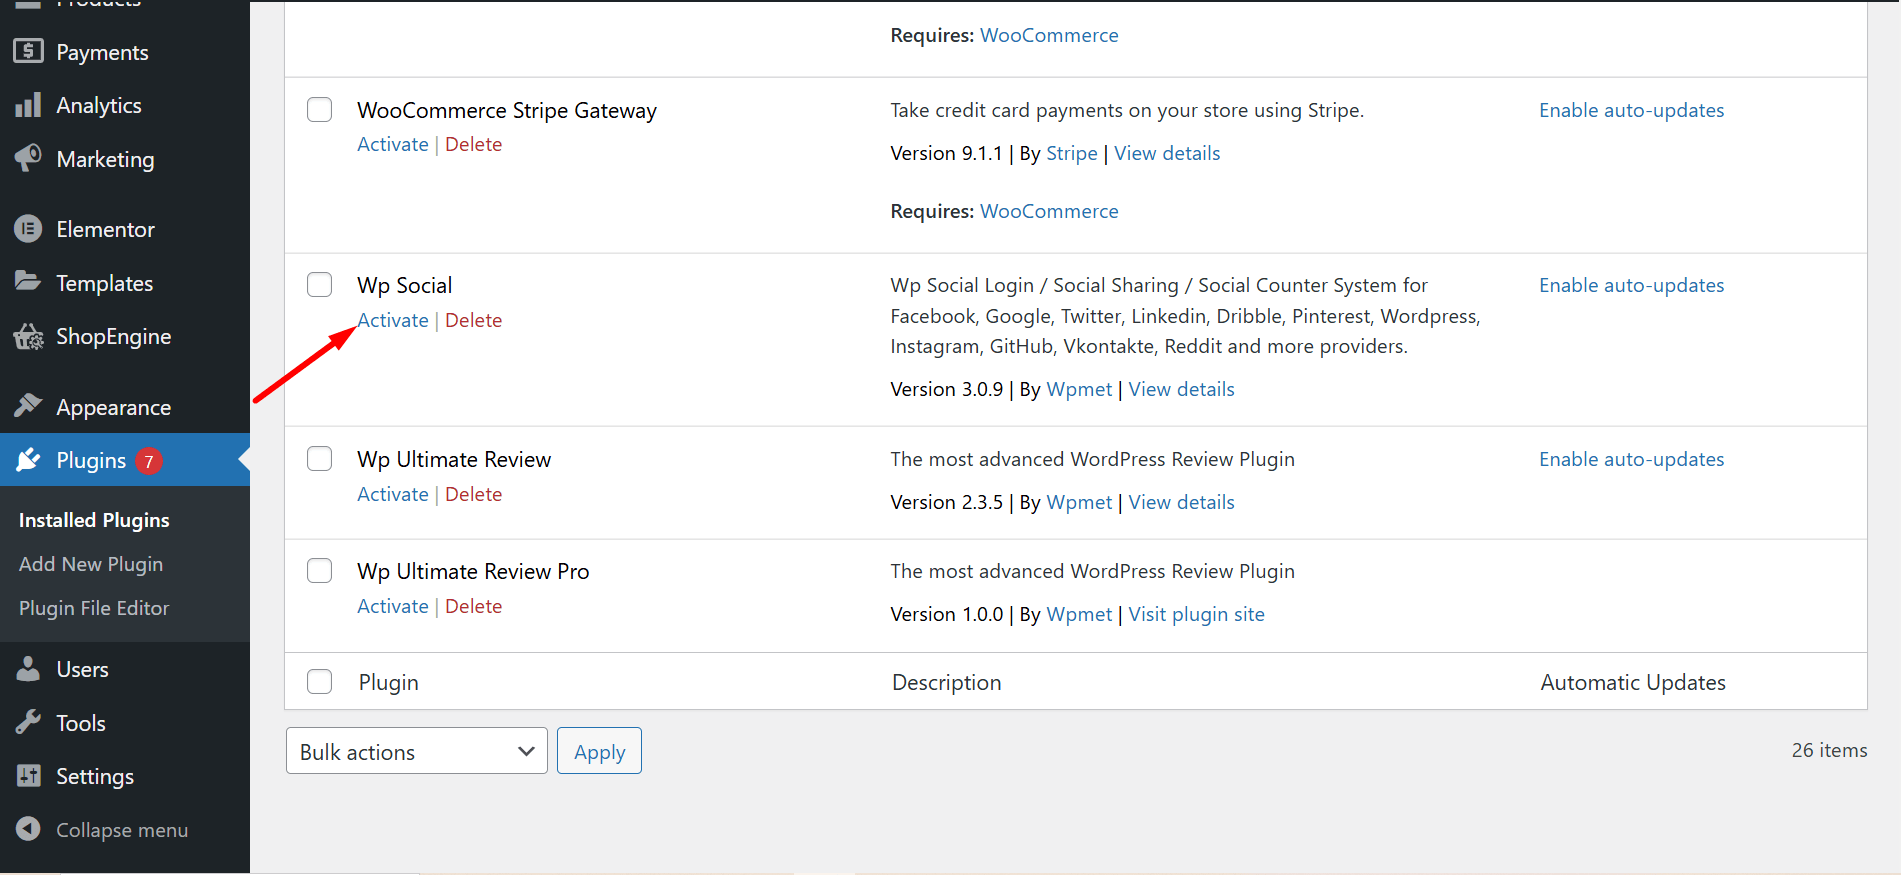
- After the end of the installation process, activate the plugin.
Step 2: Create a Facebook Developer Account
- Navigate to https://developers.facebook.com/apps/
- Login to your Facebook account If you are logged out.
- Click on the “Get Started” section to start creating your developer’s account. Follow the instructions step-by-step to complete your registration process for a Facebook developer account.

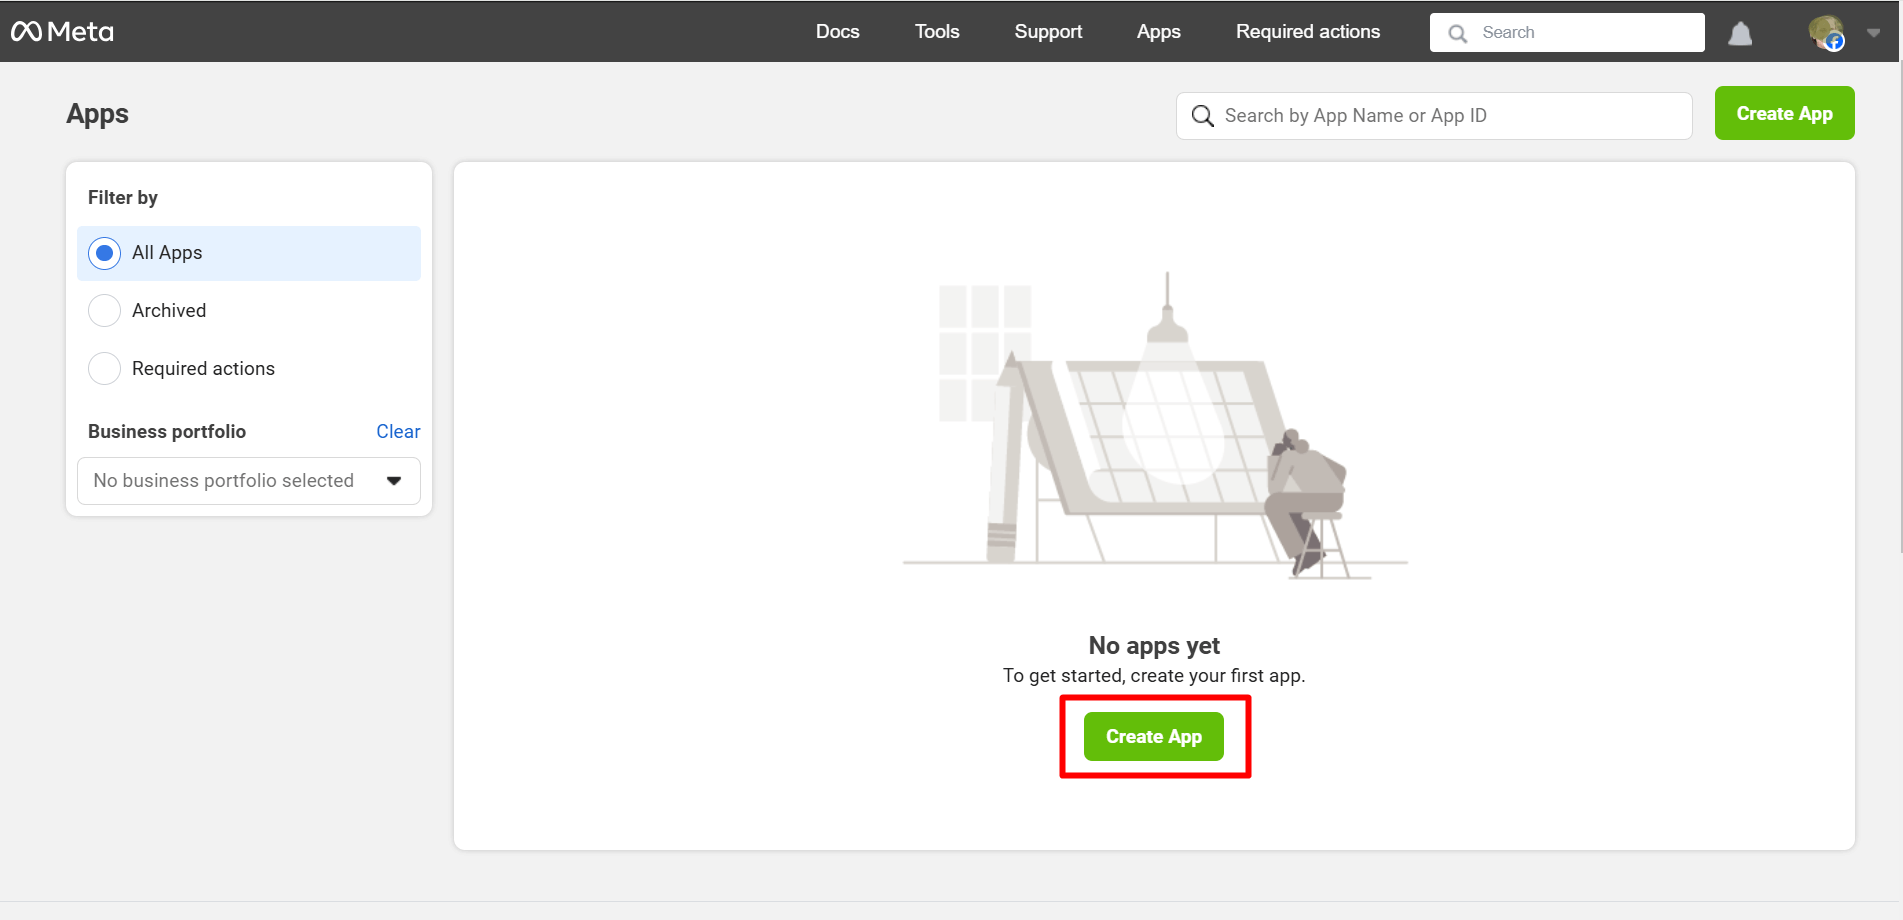
Step 3: Create a Facebook App
- After completing your registration as a developer, you’ll be redirected to the Facebook app creation page. Click on “Create App” to go ahead
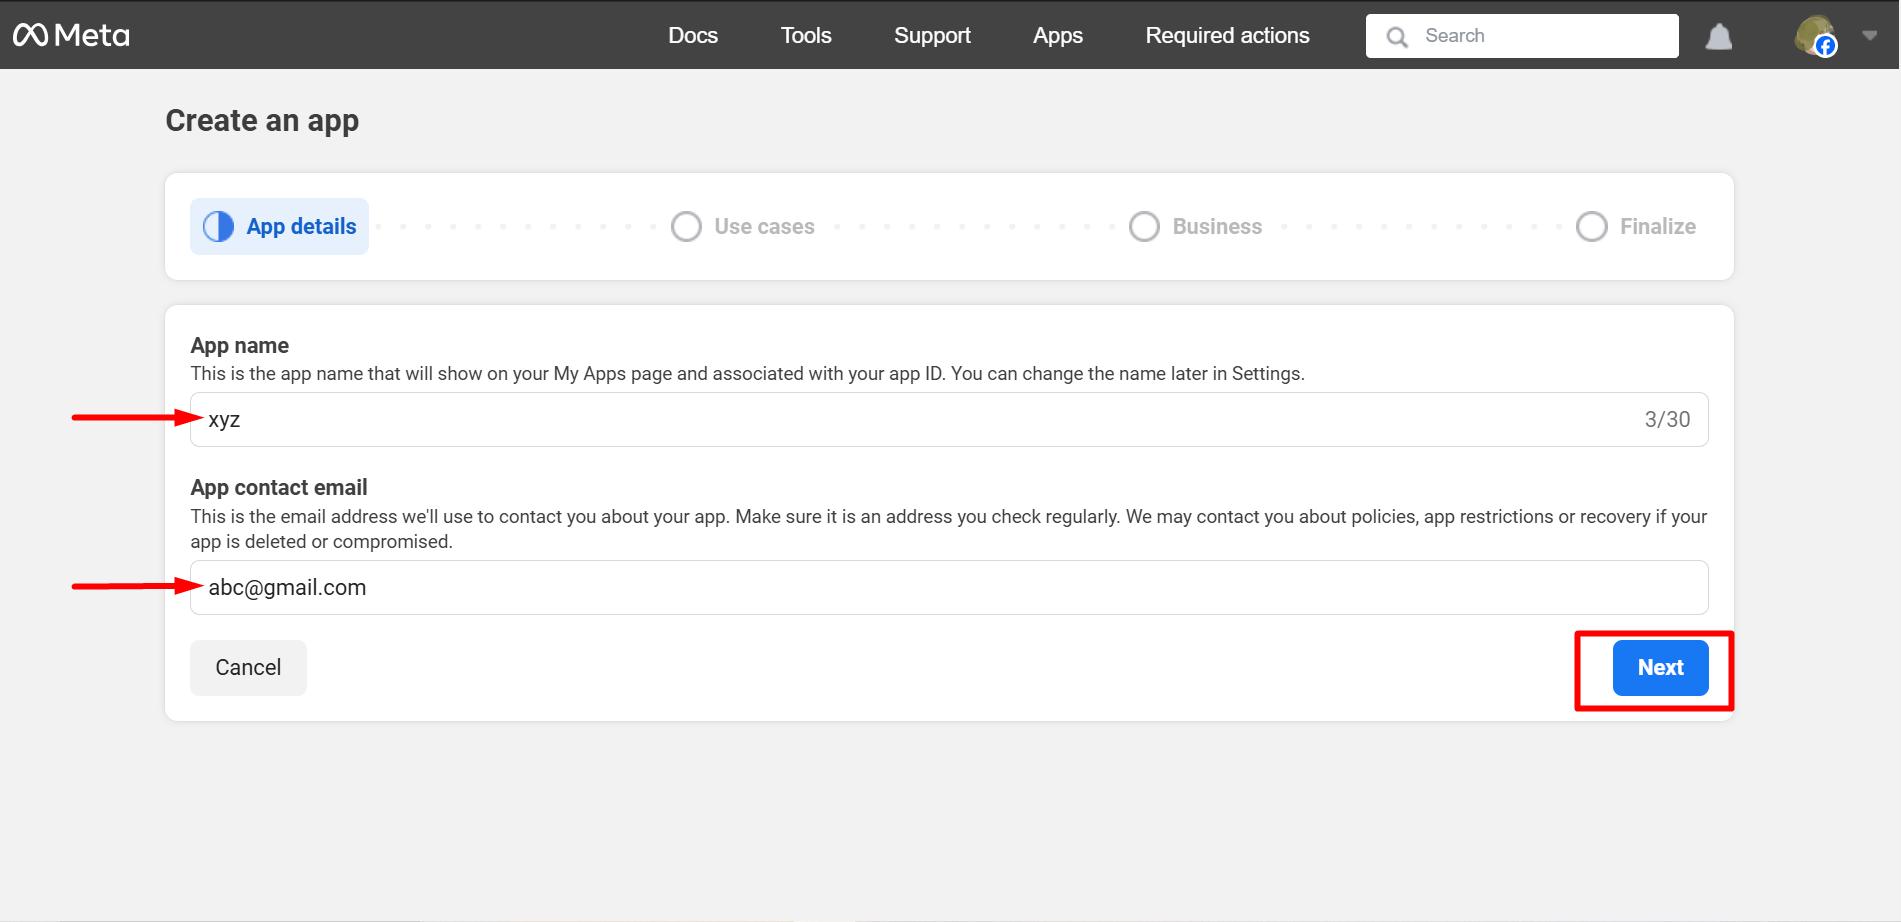
- At this step of app creation, set a meaningful App Name and Add contact email. After that, click on “Next”.
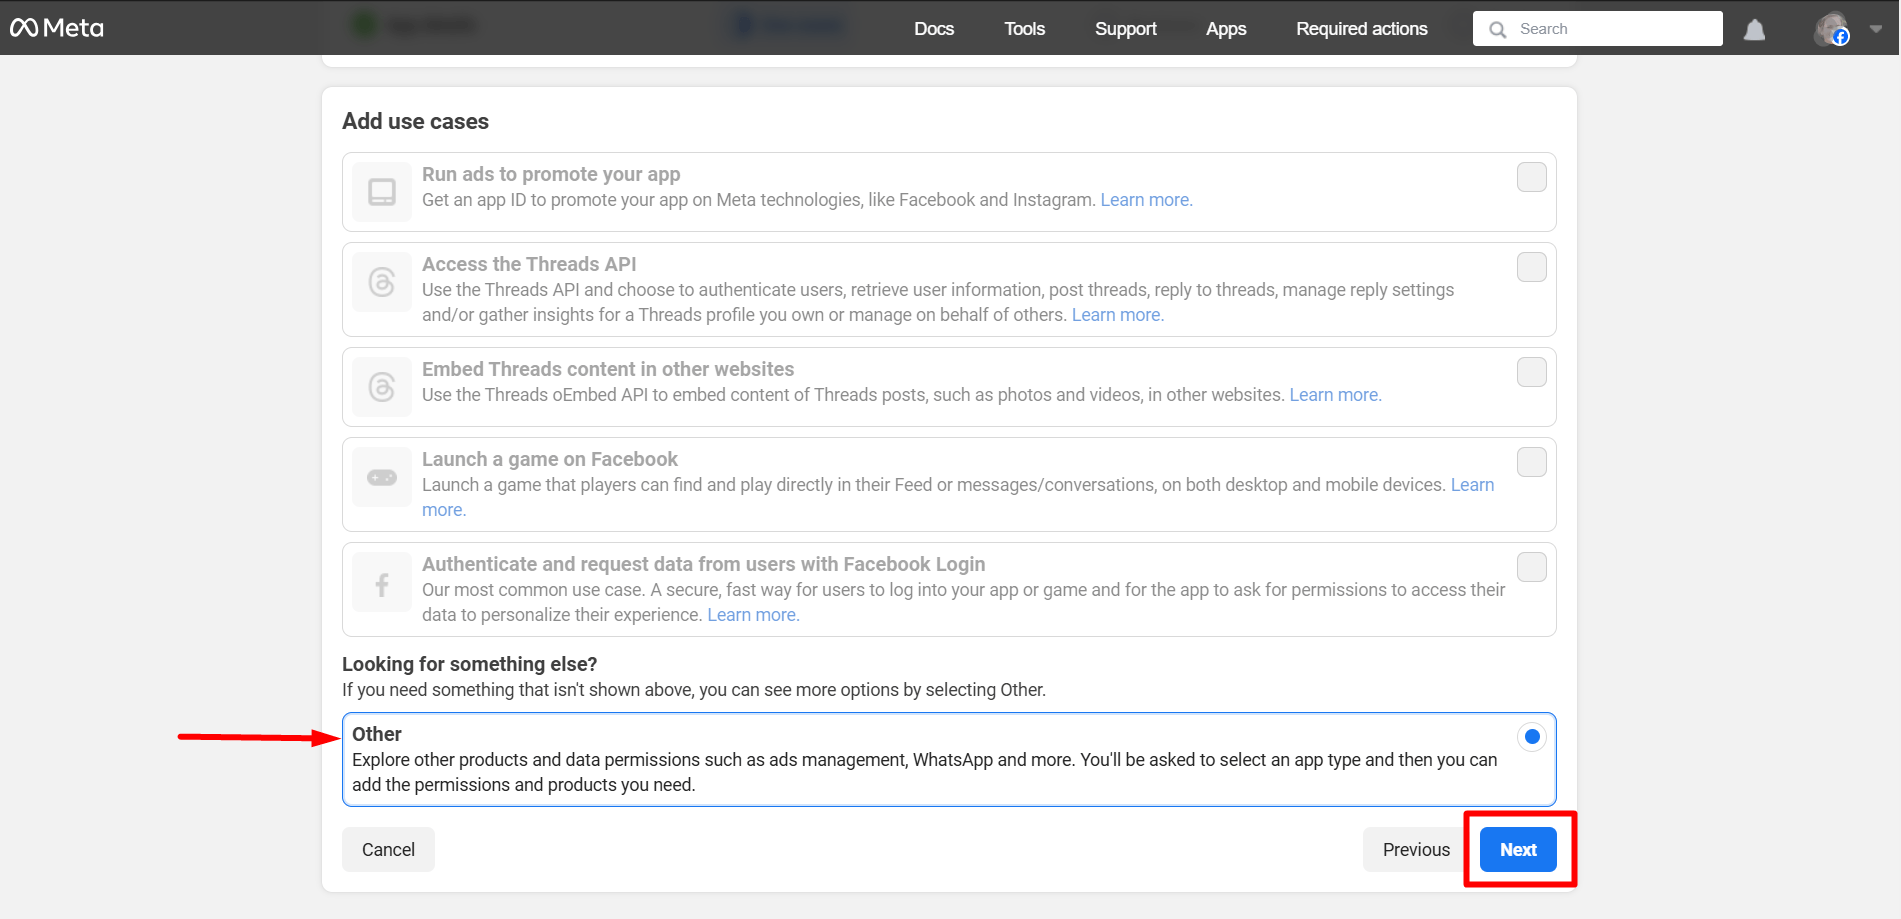
- You must select ‘Other’ as the use case here. Click on ‘Next’ when you are done.
Now, select Consumer and press the ‘Next’ button.

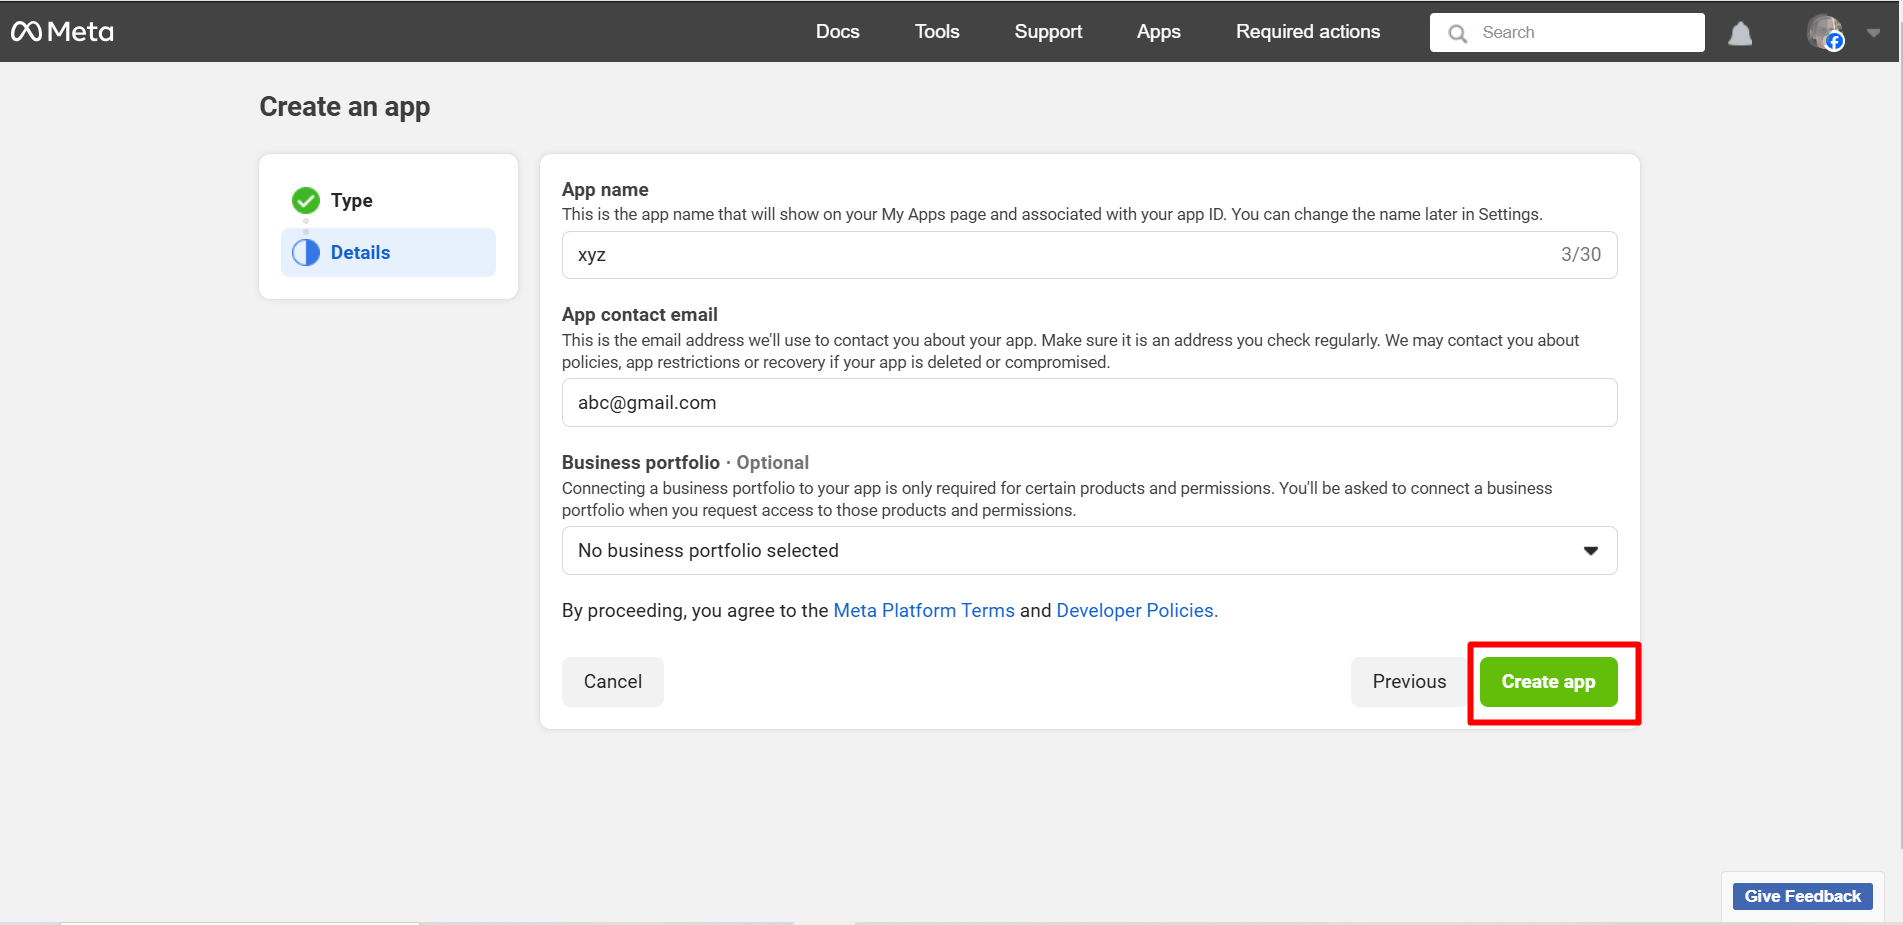
In this step, you can check the whole details again and press the ‘Next’ button.
After that, you may be required to log in to your Facebook account again.
Step 4: Configure Facebook Login
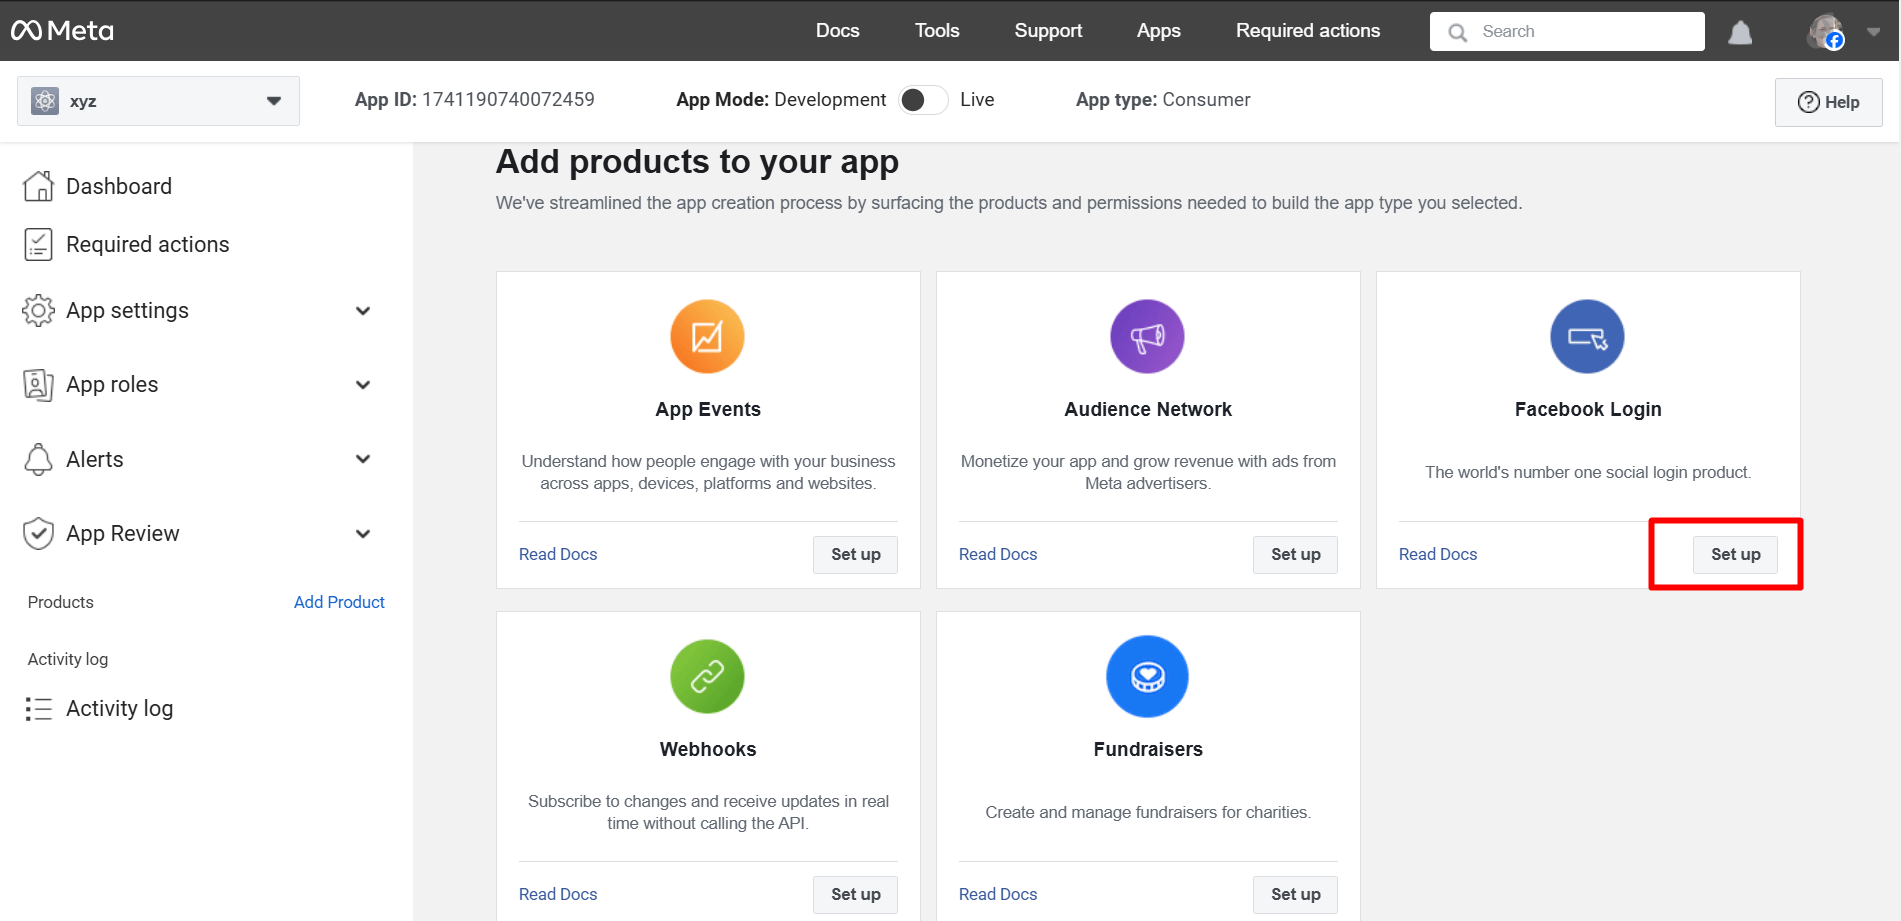
Finally, here is your App dashboard and
After the process mentioned above, you’ll be taken to the ‘Products’ page located under Dashboard. Click on the ‘+’. Find out ‘Facebook Login’ from the list and click on ‘Set Up’.
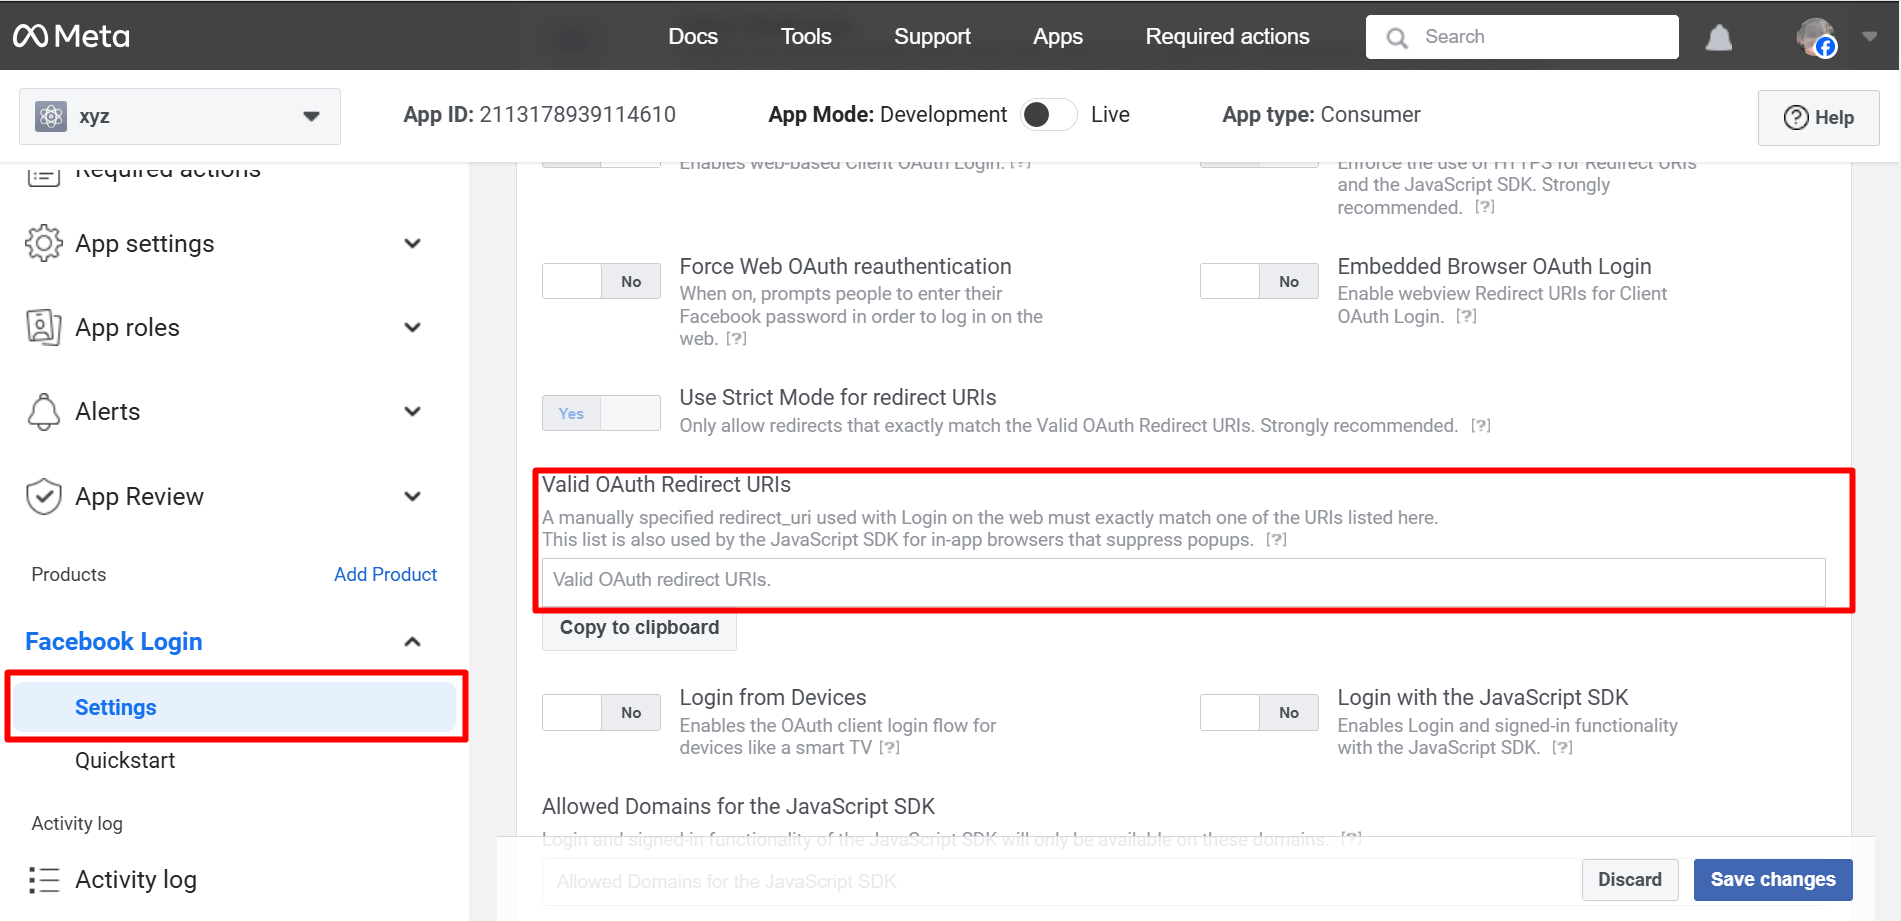
Go to Settings under the Facebook Login app. You have to enter Valid OAuth Redirect URIs under Client OAuth Settings.
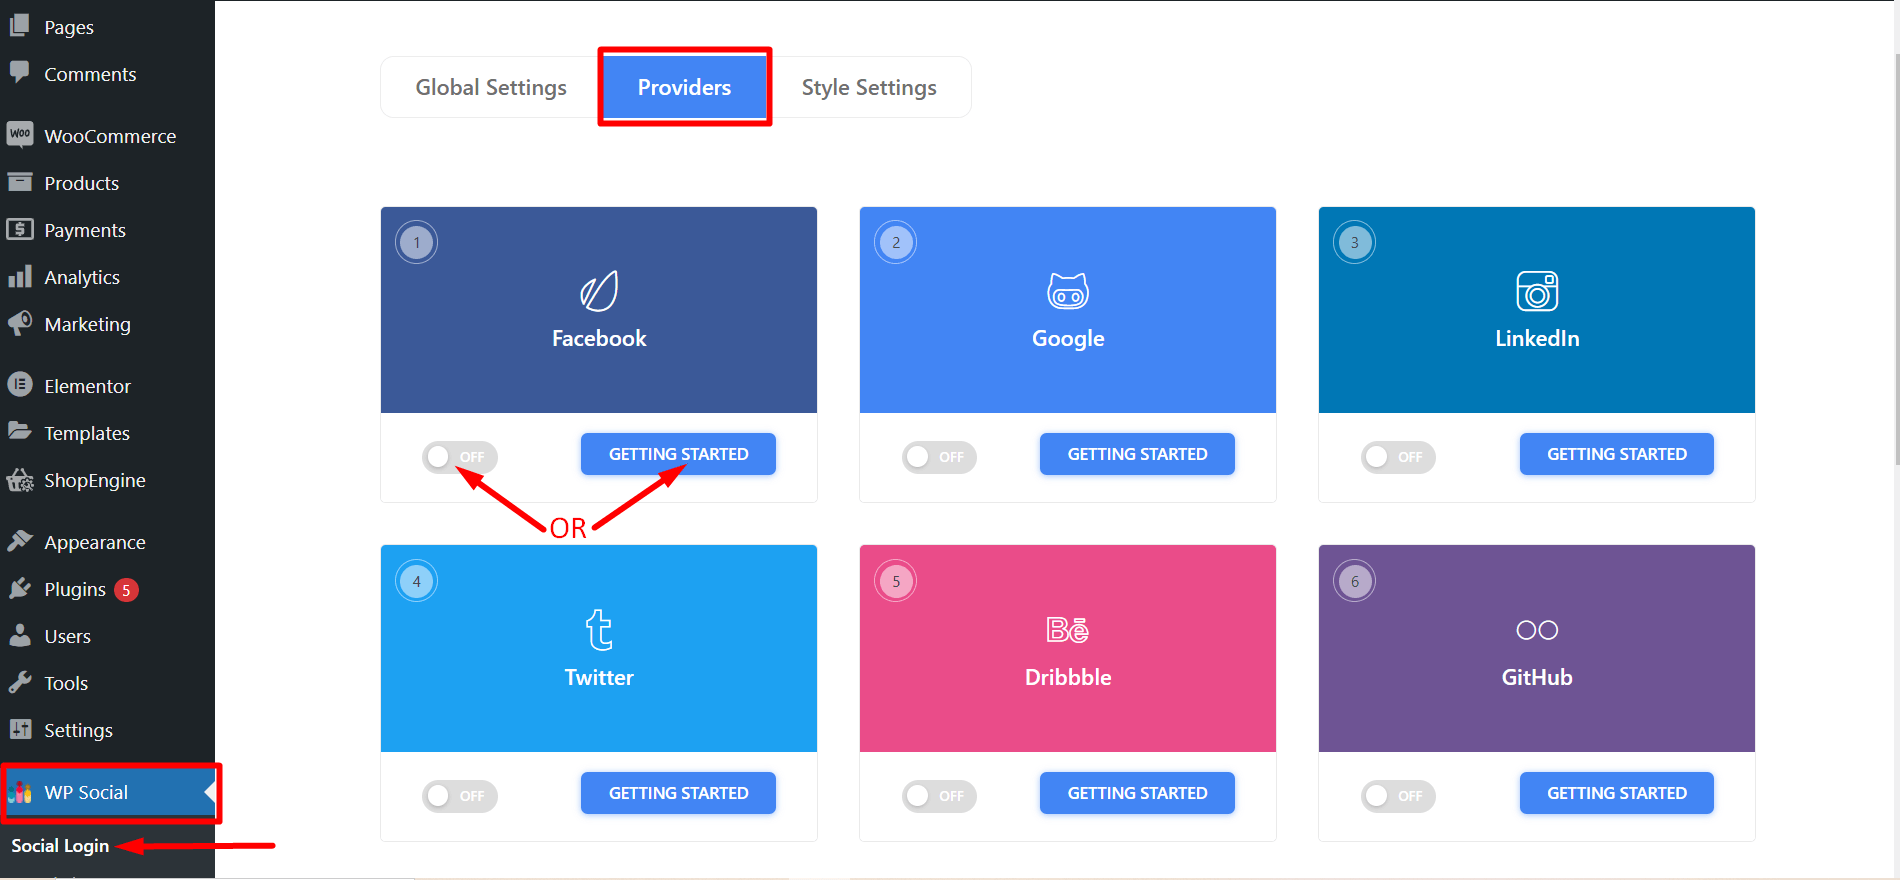
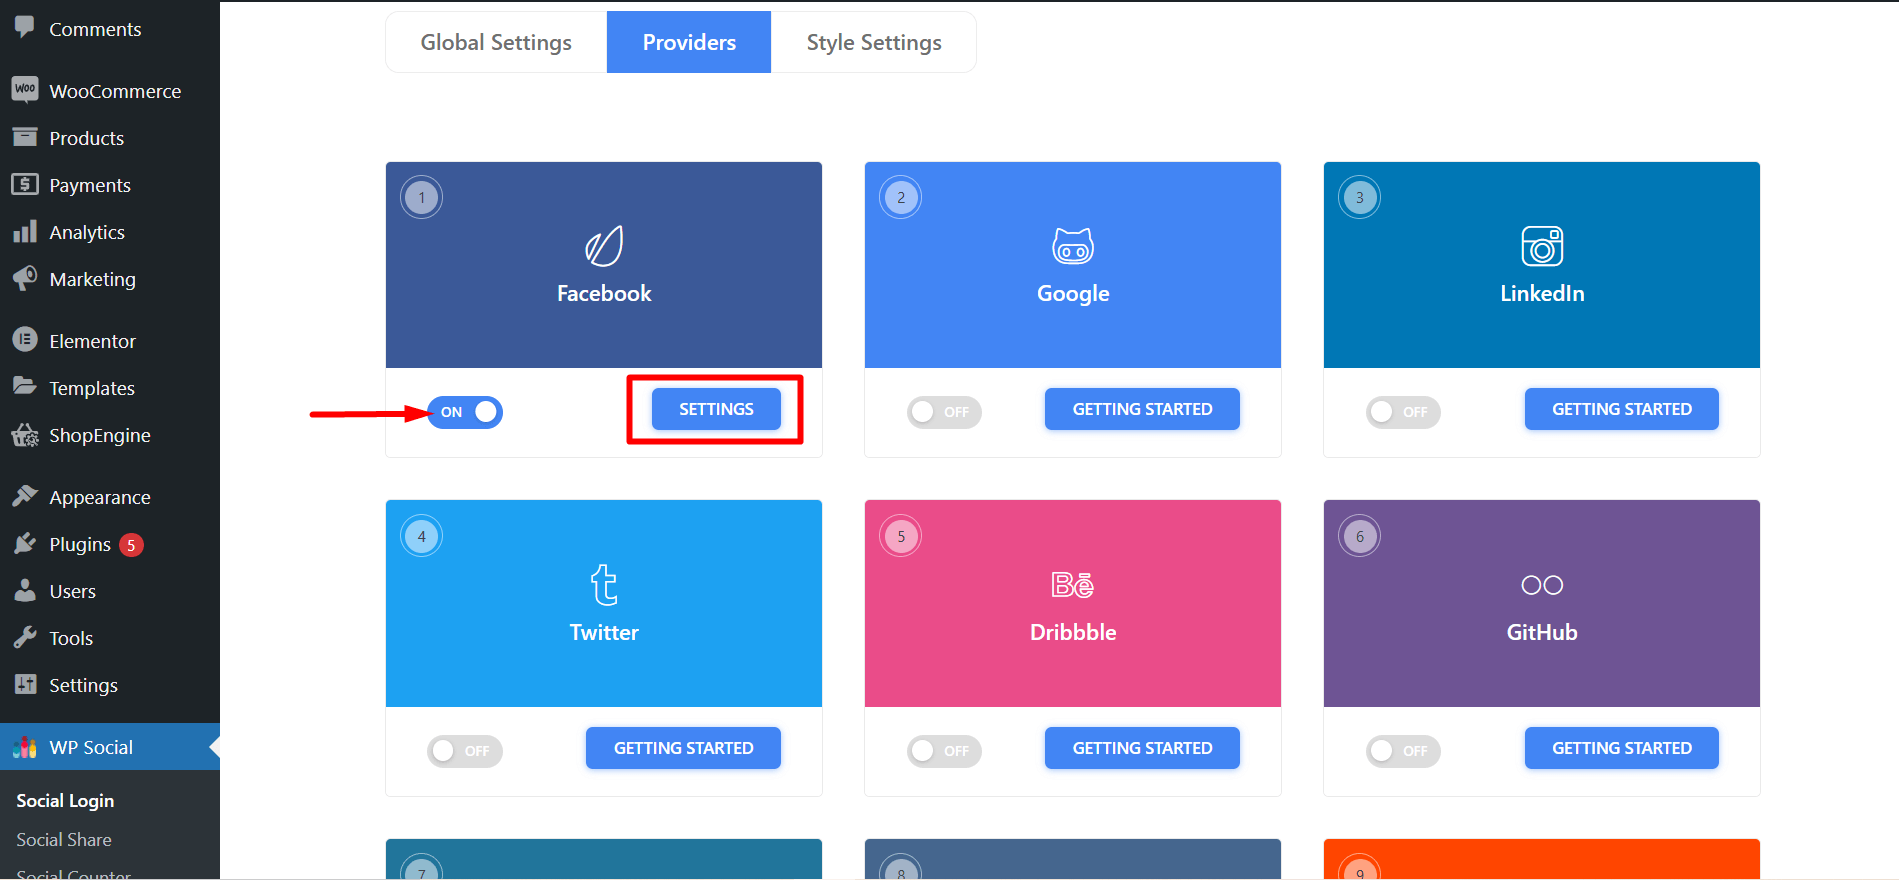
To get the Valid OAuth Redirect URIs, you have to go to your WordPress admin area. Navigate to WP Social ➔ Social Login ➔ Providers➔ Facebook➔ Click on the toggle button or Getting Started.
- You’ll now see a link to be used as Valid OAuth Redirect URIs. Copy it and go back to Facebook Login app settings to paste that on the ‘Valid OAuth Redirect URIs’ field.

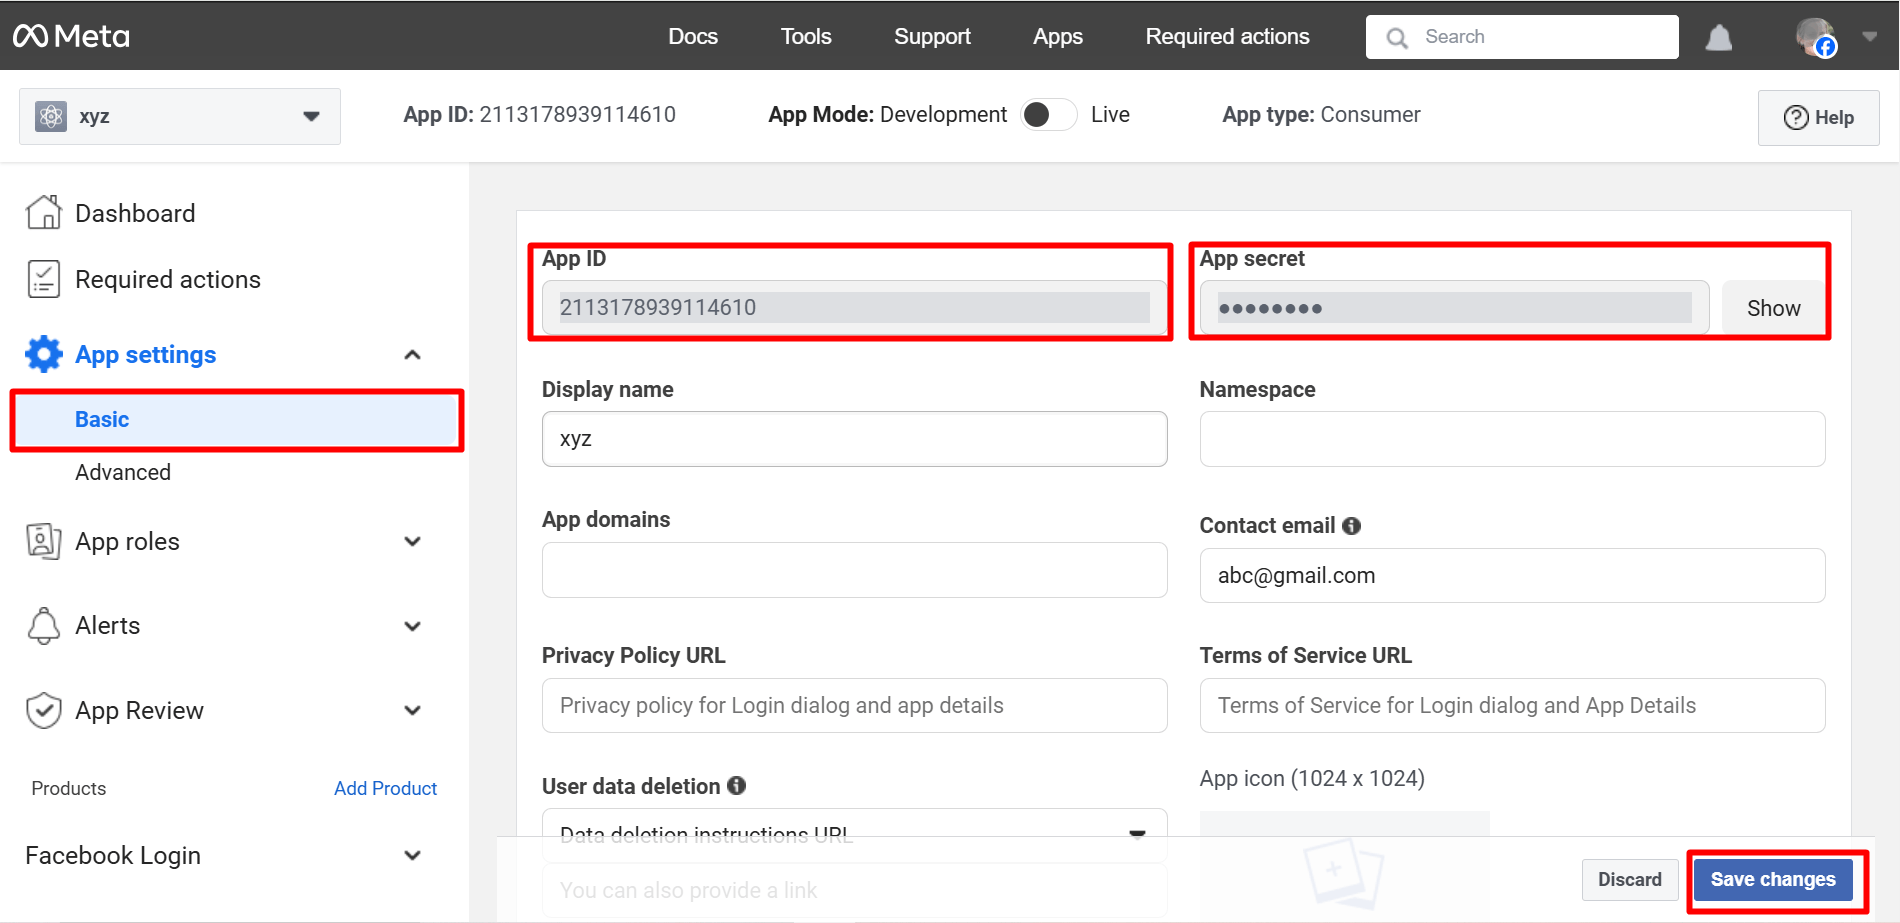
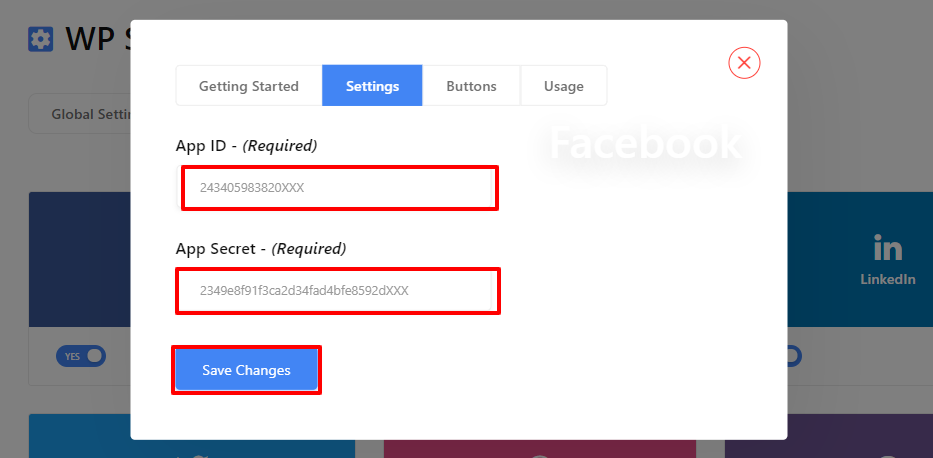
- Now, go to the ‘Basic’ submenu under Settings. Copy the App ID and App Secret for using those in the Wp Social app. Fill up other fields and click on ‘Save Changes’ when you are done.
Step 5: Use Your App ID and App Secret with Wp Social
- Once you’ve completed creating an app on Facebook, go to the WP Social login from the WordPress dashboard. Navigate to Social Login ➔ Providers. Switch the left button below Facebook ‘ON’ and then click ‘Settings’.
- Enter on the Settings tab and paste the App ID and App Secret received from Facebook. Once you are done, click on ‘Save Changes’.
Step 6: Configure WP Social Plugin’s Settings
- ● Navigate to the Global Settings of the Social Login and choose the page where you want to place the Facebook login and at which position. Once done, save the changes.
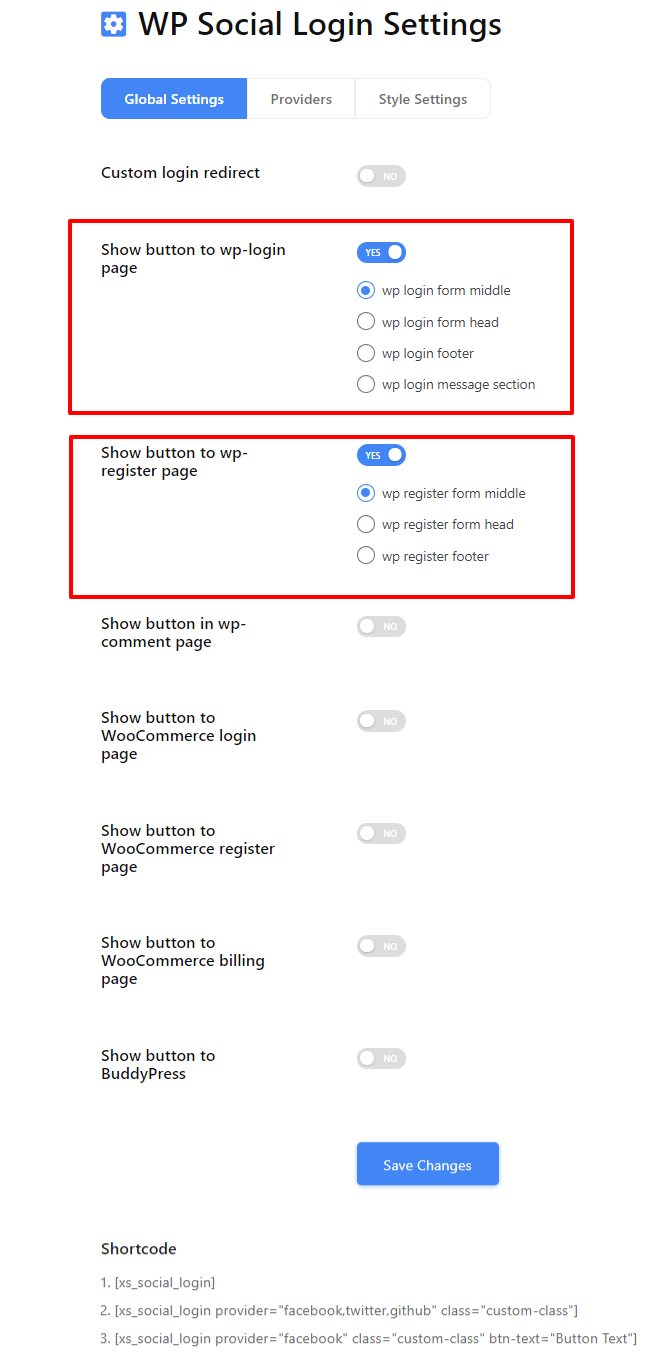
You will also get a list of social login shortcodes to use elsewhere on your WordPress website.
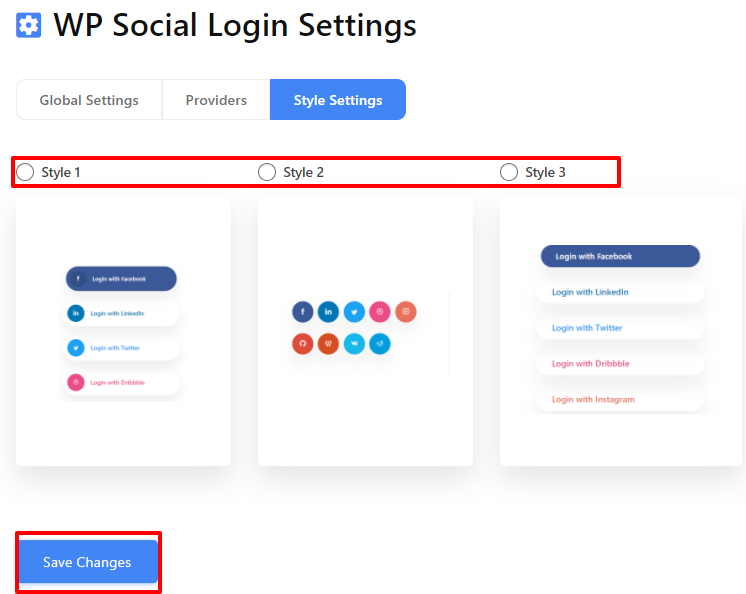
● Next, go to the style settings, choose your favorite style, and click on ‘Save Changes‘ to implement your choice.
That’s all. You can now see Facebook login exactly where you want on your WordPress website with your favorite style. So, you got the idea how to add Facebook to WordPress in a few simple steps. Now if you want to add social login to your website, you can see this post.
Frequently Asked Questions (FAQ)
Can I use PHP to add Facebook to WordPress website?
Yes, if you have enough technical knowledge, you can also make use of PHP to add a Facebook login into your WordPress website. However, that will take a good amount of time as you’ll need to install Facebook SDK for PHP into the project.
Fortunately, Yes! Wp Social offers shortcodes to let you use the Facebook login button wherever you want on your WordPress website.
Final Thoughts
Now that you know how to integrate Facebook social login on your website, it is time to check and try. Follow the steps mentioned above and you’ll get things done. Hope that you’ll be successful in adding a Facebook login for WordPress.
Leave a Reply