

 Japanese
  English
  German
  Spanish
  Italian
  French
  Danish
  Portuguese
  Swedish
  Polish
  Korean
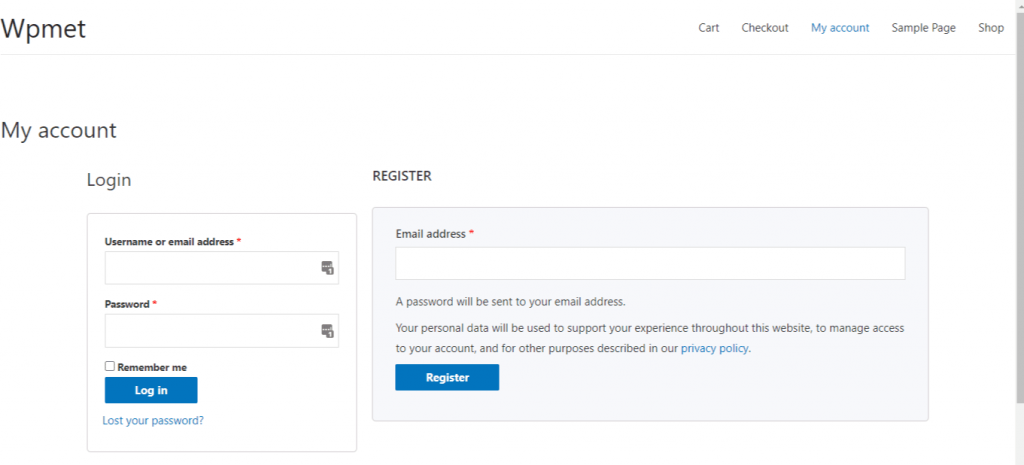
 ShopEngine を使用すると、顧客がダッシュボードを表示したり、注文やダウンロードを追跡したり、アカウントのアドレスや詳細を編集したりできる「マイ アカウント」ページを簡単に作成できます。このページから、顧客は Web サイトのアカウントにログインしたり登録したりすることもできます。
通常、「マイ アカウント ページ」には、アカウント ダッシュボード、アカウントの注文、アカウントの注文の詳細、アカウントのダウンロード、アカウントの住所、アカウントの詳細、アカウントのログイン/登録ページが含まれます。
Let’s get to know how to create each of these pages to create a complete “my account page” for your users with a friendly WooCommerce my account page builder.
Quick Overview
Starting from my account dashboard to account login page, this guide will demonstrate creating any type of account pages with ShopEngine, a no-code WooCommerce my account page builder.
Tools Used: ShopEngine, Elementor, and WooCommerce.
After installing and activating these plugins, you need to create and customize the following My Account pages:
- My account dashboard
- My account order
- My account order details
- My account downloads
- My account address
- My account details
- My account register
1. アカウントダッシュボードページの作成 #
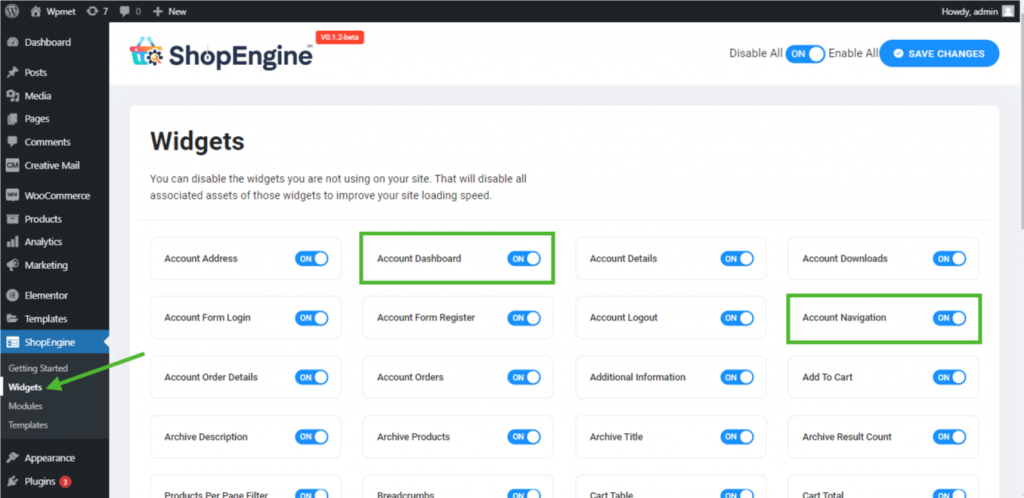
ステップ1: 必要なウィジェットを有効にする #
- Go to ShopEngine-> ウィジェット -> Make sure that the アカウントダッシュボード そして アカウントのナビゲーション ウィジェットは 有効.
ステップ2: ダッシュボードテンプレートを作成する #
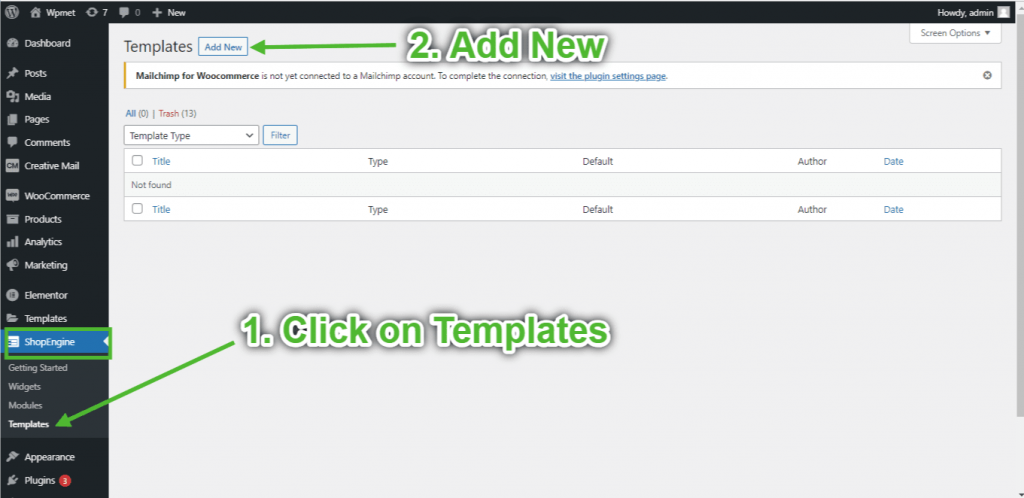
- Go to ShopEngine-> テンプレート -> 新しく追加する.
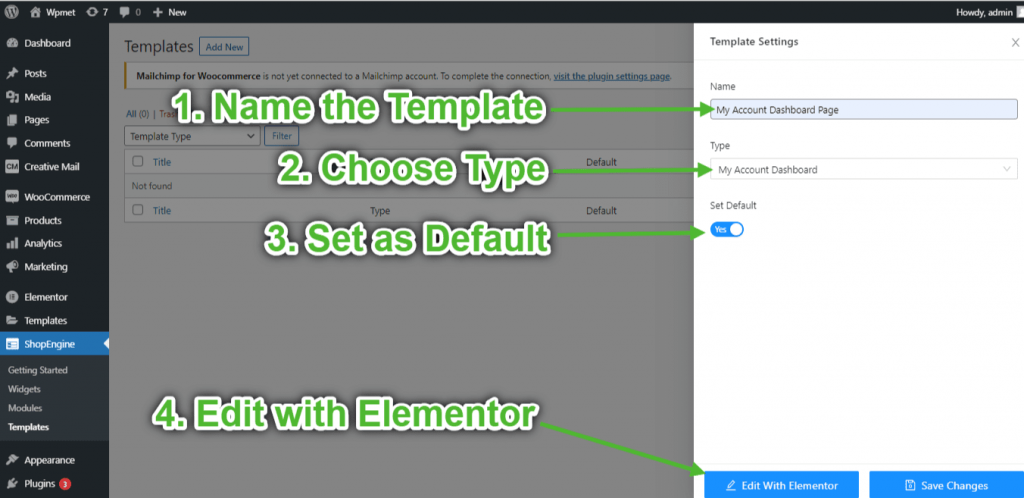
- テンプレートを提供する 名前-> Select Page Type: マイアカウントダッシュボード
- Enable Default Template-> Set Default->はい -> Click on Elementorで編集する (テンプレート設定は最初に挿入され、その後 Elementor ページ ビルダーで開かれます)
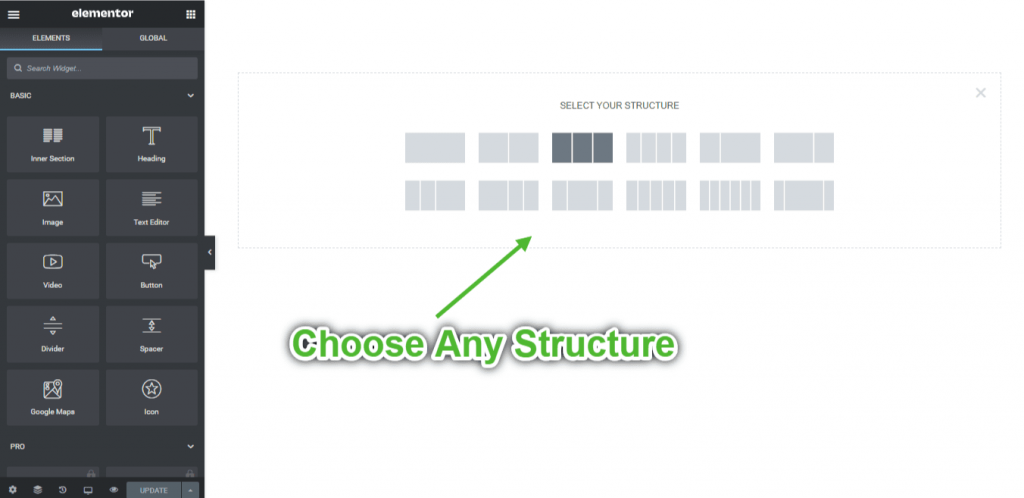
ステップ3: 構造を選択する #
- クリックしてください "+Elementor の「 」アイコンをクリックし、希望するセクション レイアウトを選択します。
ステップ4: ダッシュボードページを構築する #
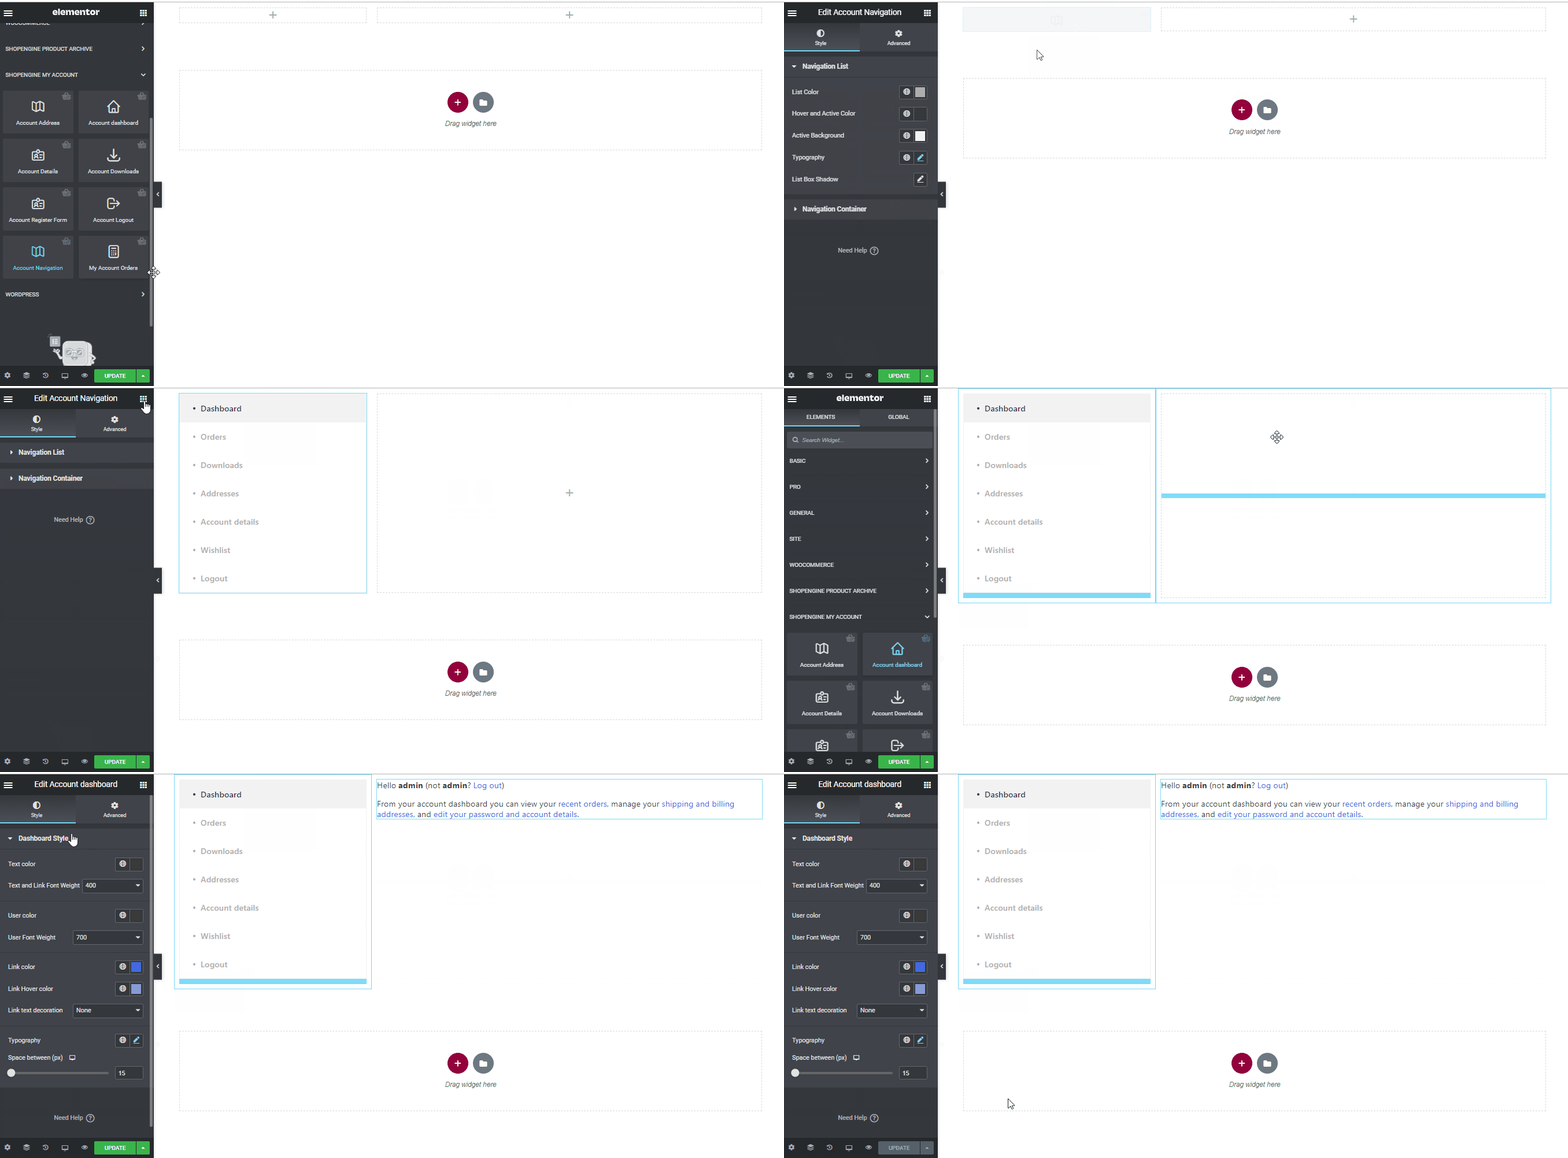
アカウント ダッシュボード ページを構築するには、次の 2 つのウィジェットを活用する必要があります。 アカウントのナビゲーション そして アカウントダッシュボード ウィジェット。
- Elementor の ShopEngine マイ アカウント要素ブロックからアカウント ナビゲーション ウィジェットをドラッグ アンド ドロップします。必要に応じて、スタイル設定タブからテキストとリンクの色、テキストとリンクのフォントの太さ、ユーザーのフォントの太さ、タイポグラフィ、リンクのホバー カラーなどを変更できます。
- また、同じブロックからアカウント ダッシュボード ウィジェットをドラッグ アンド ドロップして、必要な変更を加えます。
- Once you are done editing your Account Dashboard page, save it by clicking on -> アップデート.
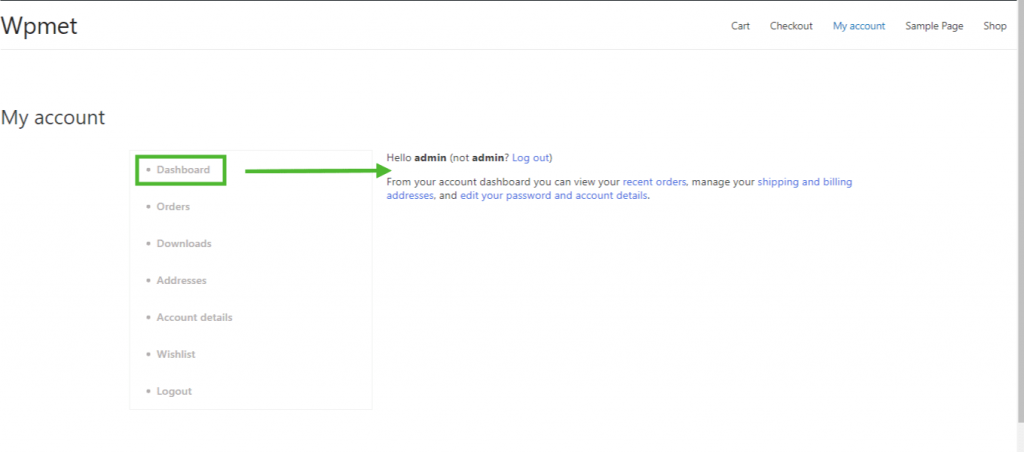
ステップ5: ダッシュボードページのプレビュー #
- さあ、に行ってください マイアカウントページ of your website->Click on ダッシュボードこれは、顧客がデバイスからアカウント ダッシュボードをどのように表示するかのプレビューです。
2. アカウント注文ページの作成 #
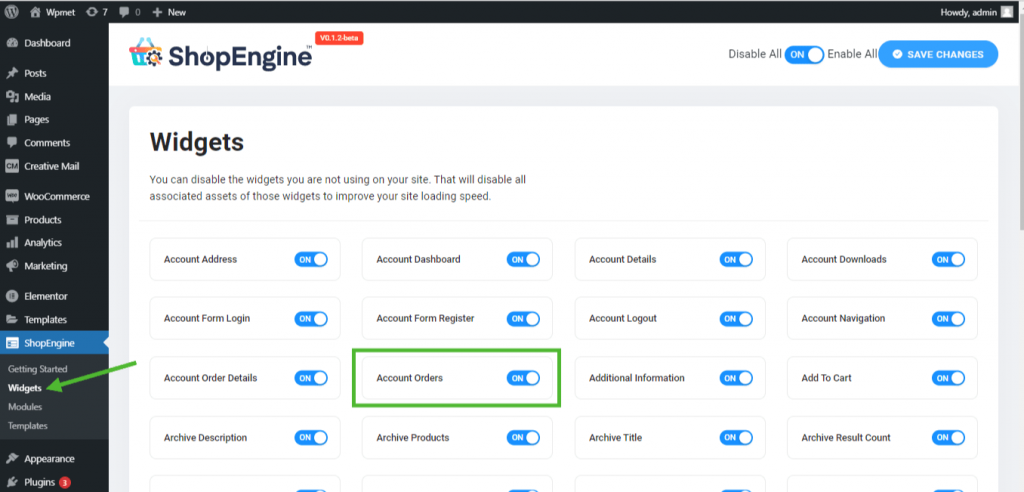
ステップ1: 必要なウィジェットを有効にする #
- Go to ShopEngine-> ウィジェット -> Make sure that the アカウント注文 ウィジェット アカウントのナビゲーション ウィジェットは 有効.
Step 2: Create WooCommerce My Account Order Page Template #
- Go to ShopEngine-> Templates -> Add New
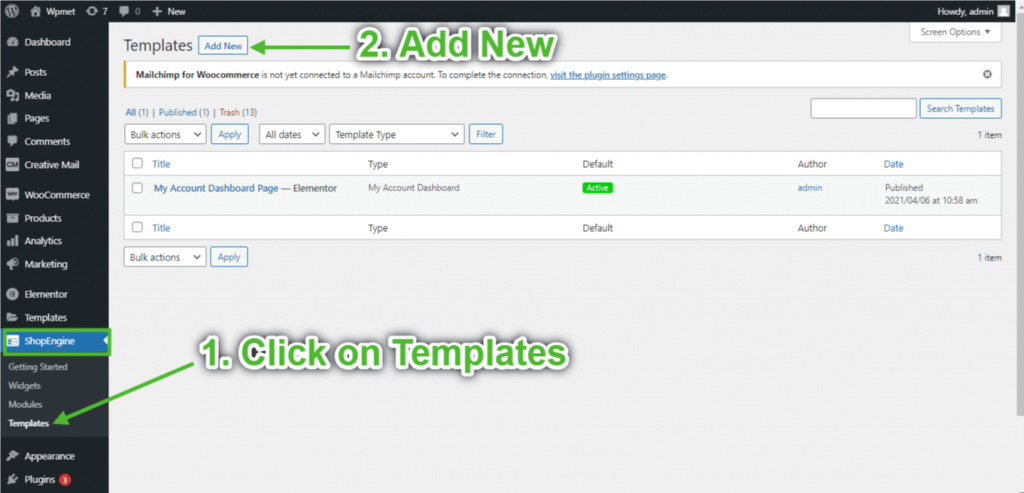
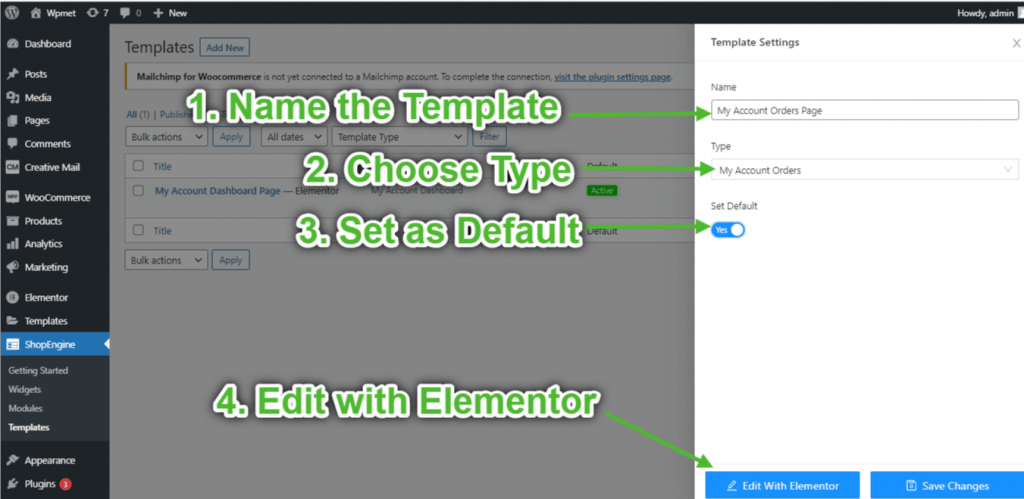
- テンプレートを提供する 名前-> Select Page タイプ: マイアカウント 注文
- Enable Default Template-> Set Default->はい -> Click on Elementorで編集する
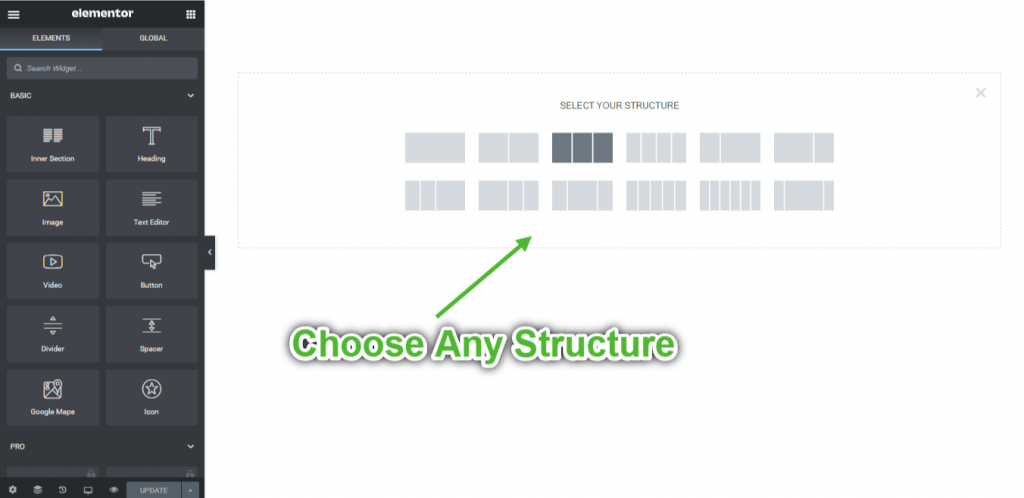
ステップ3: 構造を選択する #
- クリックしてください "+Elementor の「 」アイコンをクリックし、希望するセクション レイアウトを選択します。
ステップ4: アカウント注文ページを作成する #
アカウント注文ページを構築するには、次の 2 つのウィジェットを活用する必要があります。 アカウントのナビゲーション そして 私のアカウントの注文 ウィジェット。
- Elementor の ShopEngine マイ アカウント要素ブロックからアカウント ナビゲーション ウィジェットをドラッグ アンド ドロップします。必要に応じて、スタイル設定タブからテキストとリンクの色、テキストとリンクのフォントの太さ、ユーザーのフォントの太さ、タイポグラフィ、リンクのホバー カラーなどを変更できます。
- また、同じ要素ブロックからアカウント注文ウィジェットをドラッグ アンド ドロップし、必要な変更を加えます。
- Once you are done editing your Account Orders page, save it by clicking on -> アップデート.
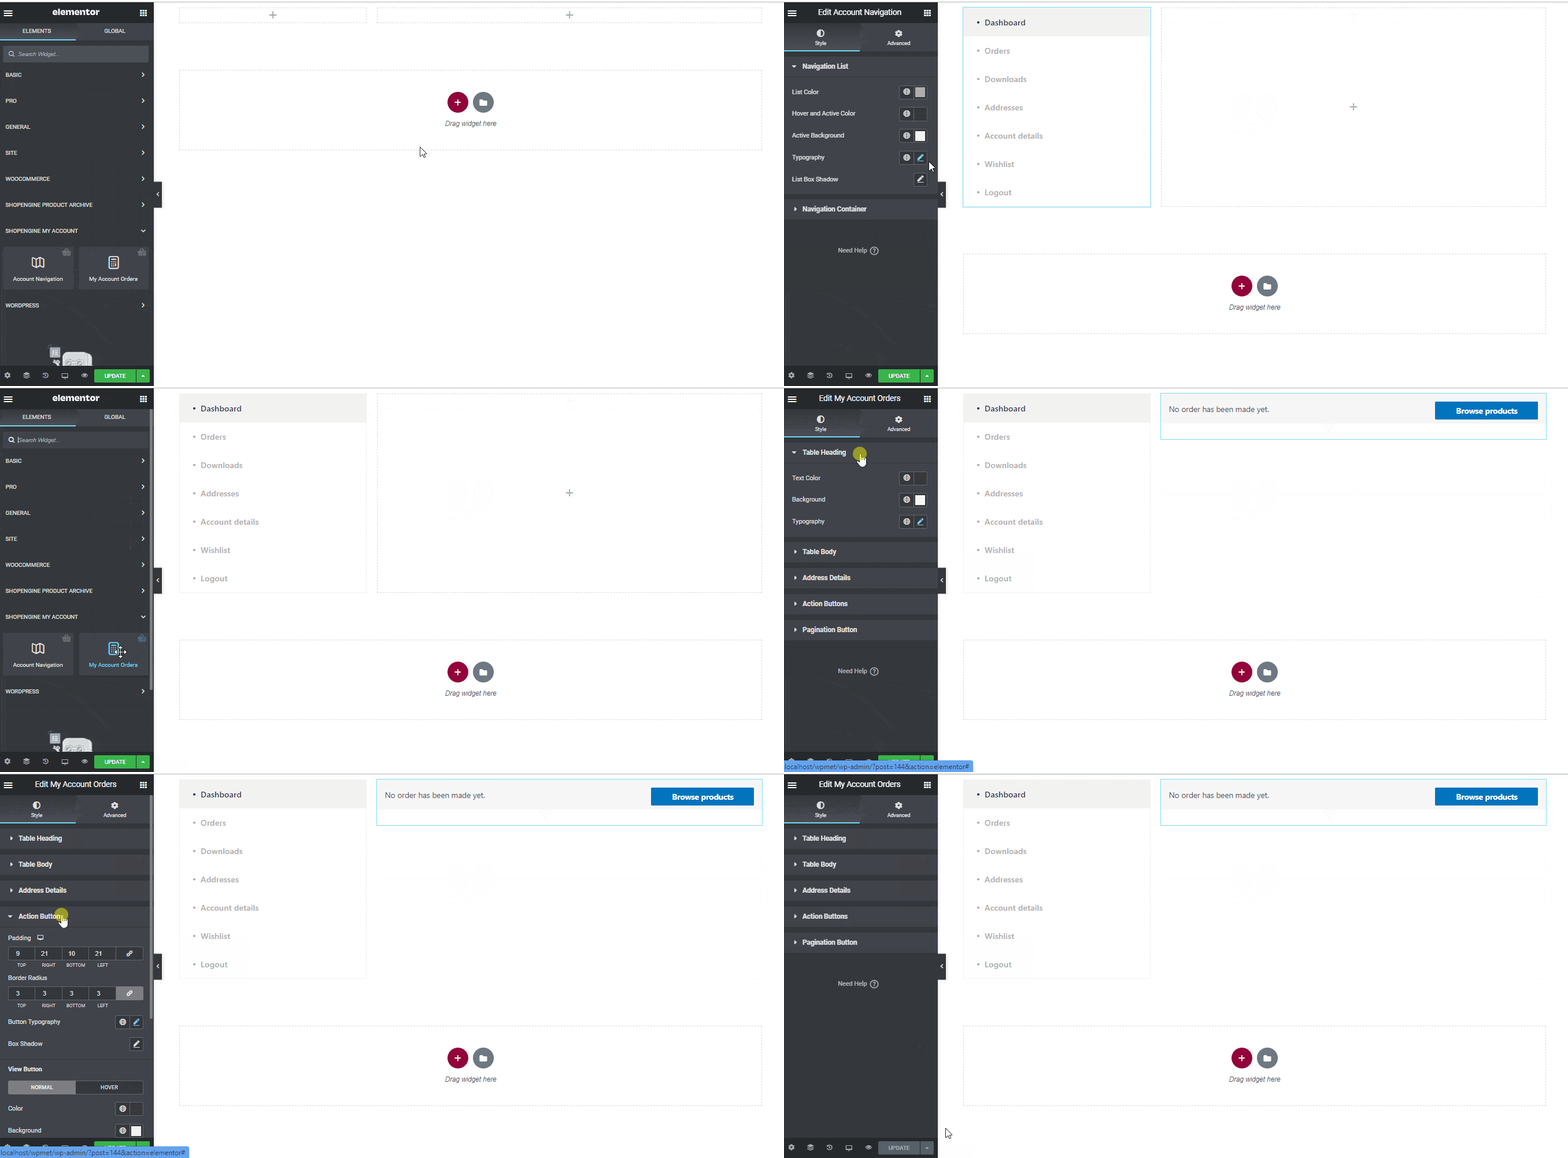
ステップ5: アカウント注文ページのプレビュー #
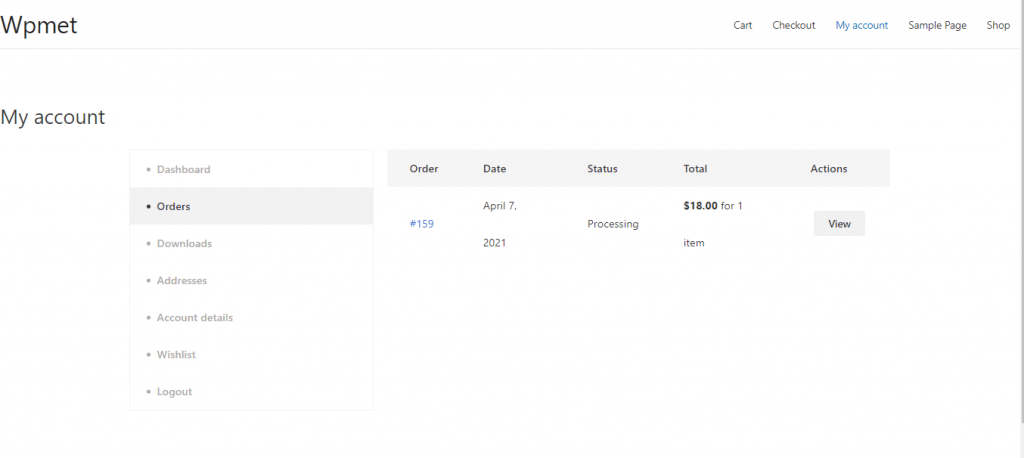
さあ、に行ってください 私のアカウント ウェブサイトのページ->クリック 注文これは、顧客がデバイスから注文ページをどのように表示するかのプレビューです。
3. アカウント作成注文詳細ページ #
ステップ1: 必要なウィジェットを有効にする #
- Go to ShopEngine-> ウィジェット -> Make sure that the 注文詳細 そして アカウントのナビゲーション ウィジェットは 有効.
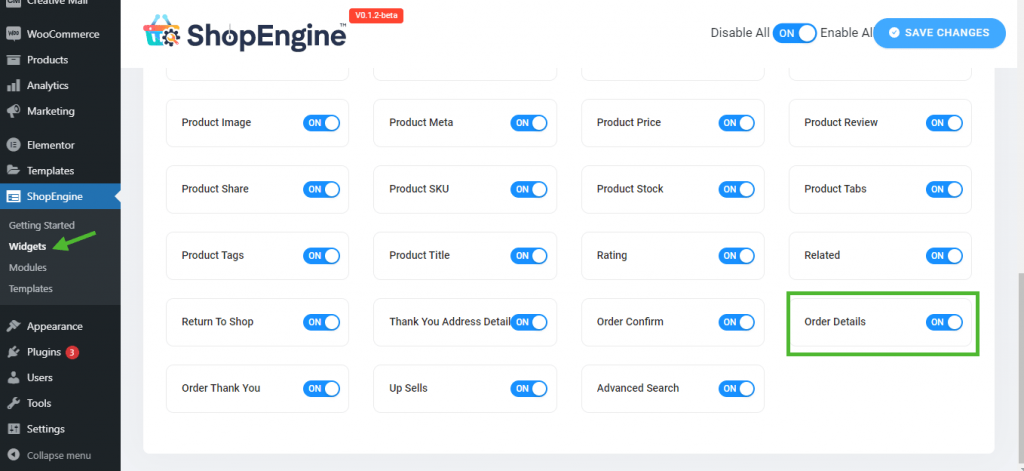
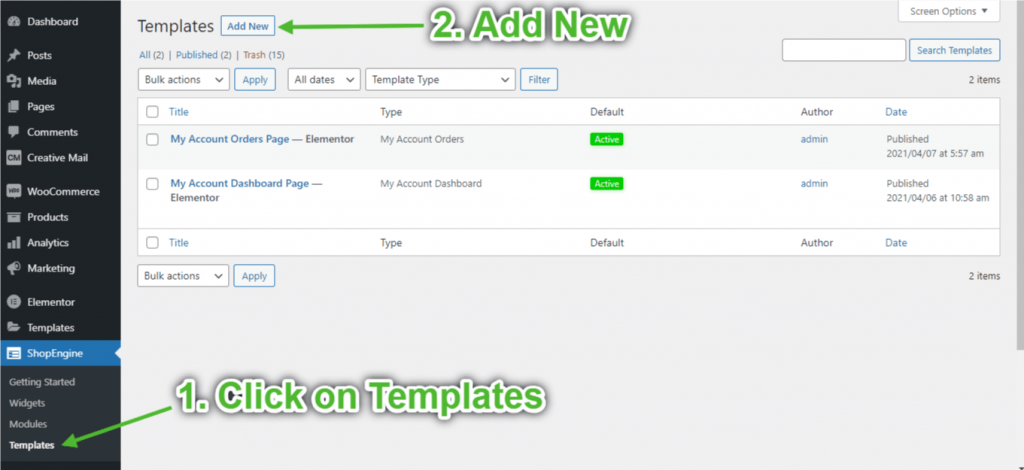
ステップ2: 注文詳細テンプレートを作成する #
- Go to ShopEngine-> テンプレート -> 新しく追加する
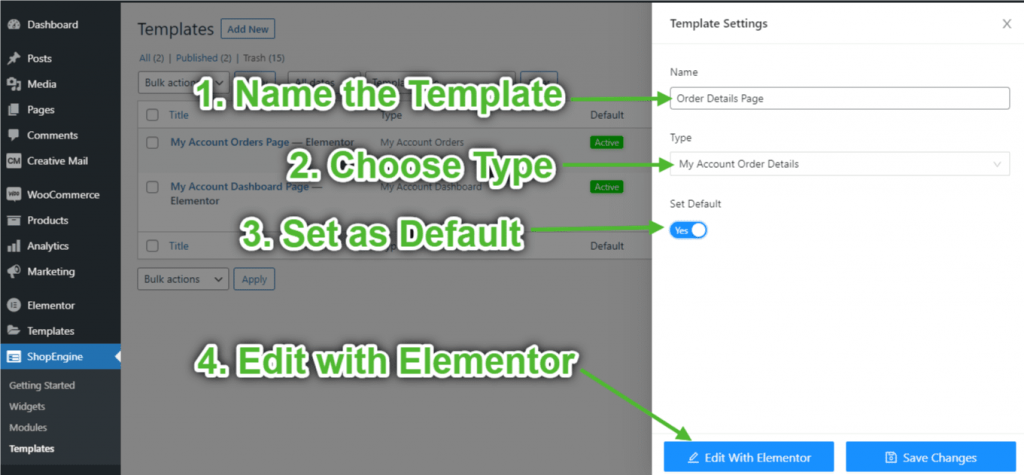
- テンプレートを提供する 名前-> Select Page タイプ: マイアカウント 注文詳細
- Enable Default Template-> Set Default->はい -> Click on Elementorで編集する
ステップ3: 構造を選択する #
- クリックしてください "+Elementor の「 」アイコンをクリックし、希望するセクション レイアウトを選択します。
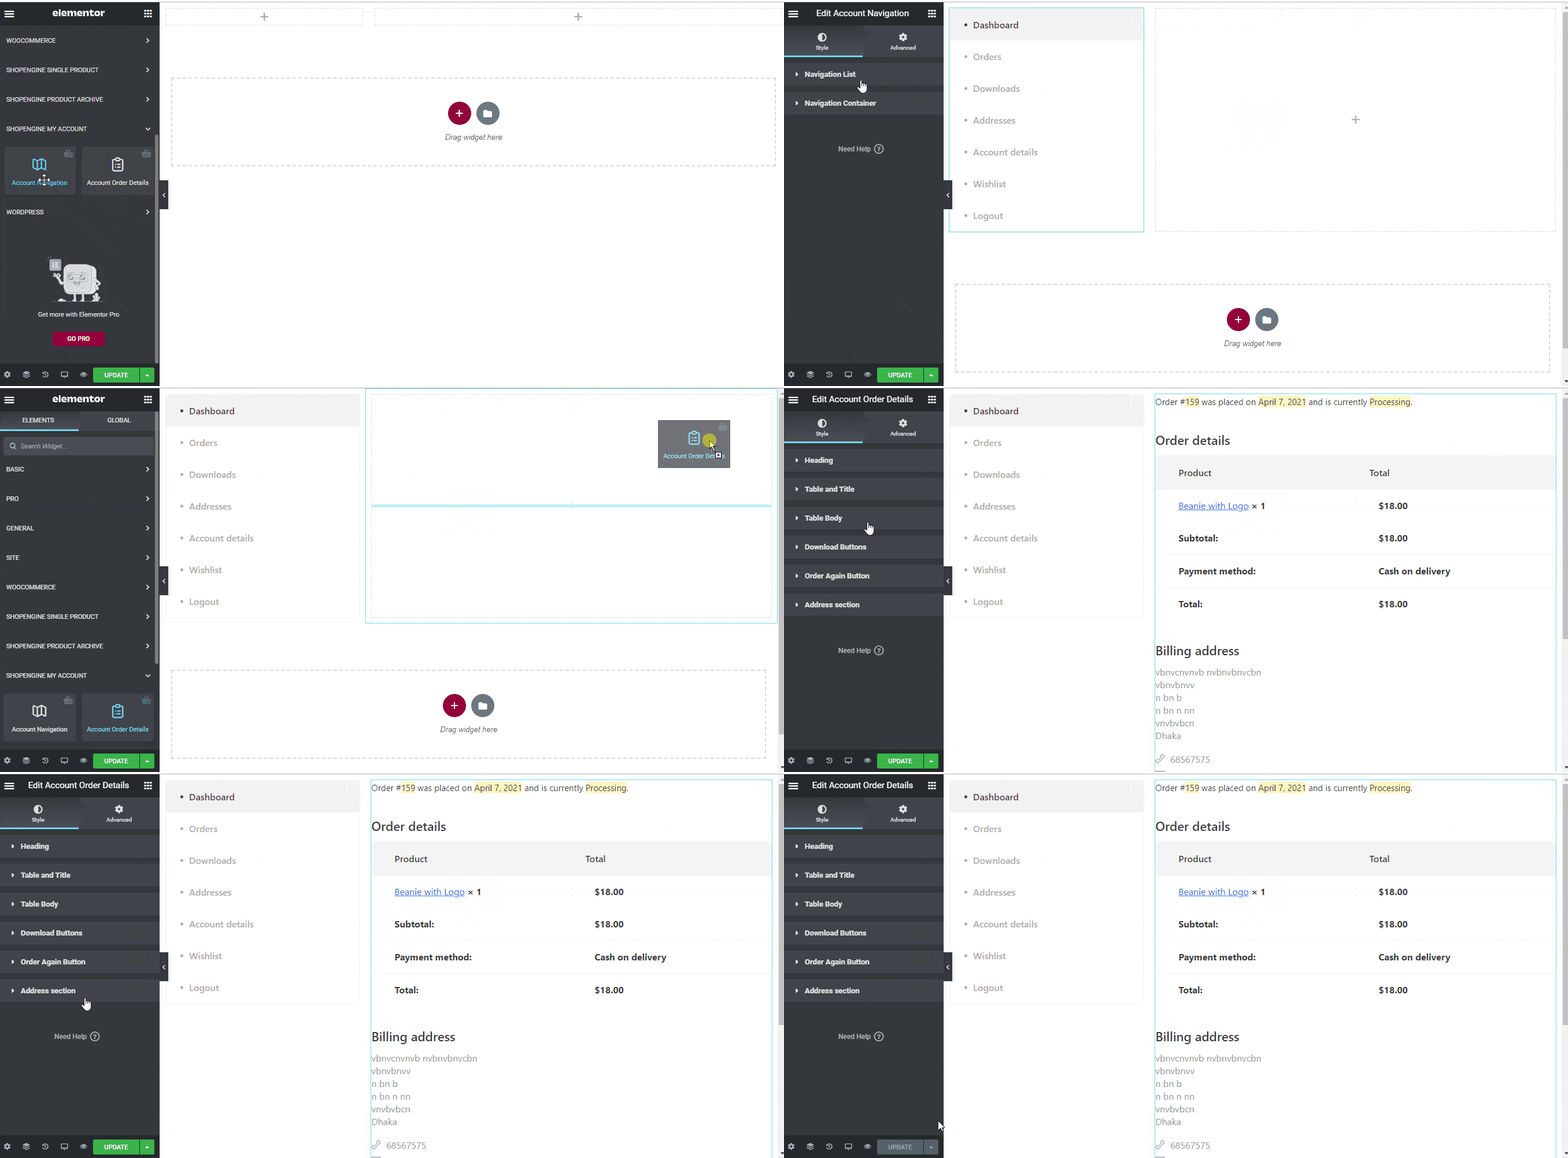
ステップ4: 注文詳細ページの作成 #
注文詳細ページを構築するには、次の 2 つのウィジェットを活用する必要があります。 アカウントのナビゲーション そして アカウント注文の詳細 ウィジェット。
- Elementor の ShopEngine マイ アカウント要素ブロックからアカウント ナビゲーション ウィジェットをドラッグ アンド ドロップします。必要に応じて、スタイル設定タブからテキストとリンクの色、テキストとリンクのフォントの太さ、ユーザーのフォントの太さ、タイポグラフィ、リンクのホバー カラーなどを変更できます。
- また、同じ要素ブロックからアカウント注文詳細ウィジェットをドラッグ アンド ドロップし、必要な変更を加えます。
- Once you are done editing your Account Order Details page, save it by clicking on -> アップデート.
ステップ5: 注文詳細ページのプレビュー #
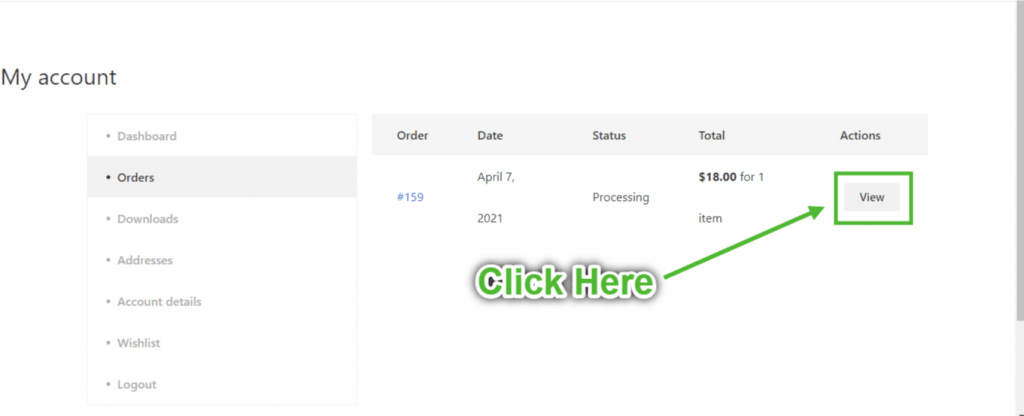
さて、My アカウントページ ウェブサイトの->クリック 注文-> をクリックします ビュー 注文の右端から。これは、顧客がデバイスから注文の詳細ページをどのように表示するかのプレビューです。
4. アカウント作成ダウンロードページ #
ステップ1: 必要なウィジェットを有効にする #
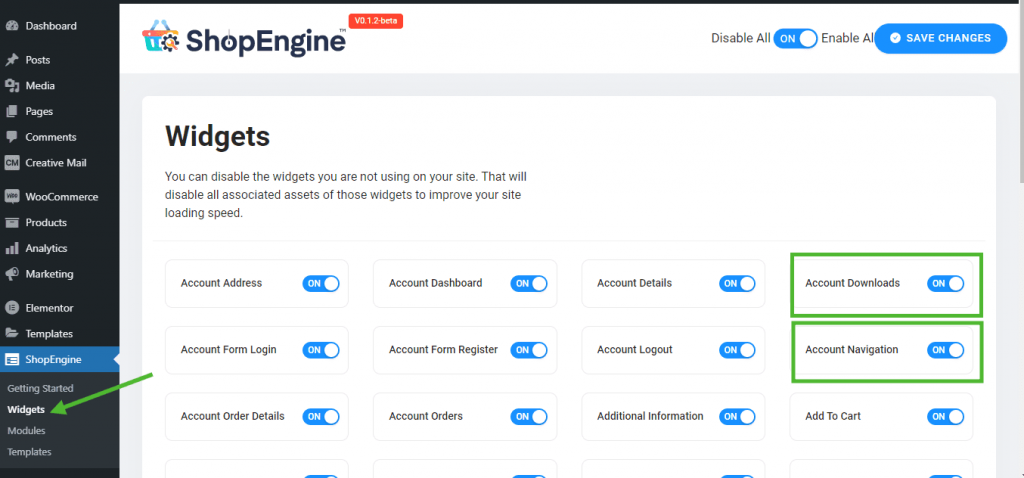
- Go to ShopEngine-> ウィジェット -> Make sure that the アカウント ナビゲーション そして アカウントのダウンロード ウィジェットは 有効.
ステップ2: アカウントダウンロードテンプレートを作成する #
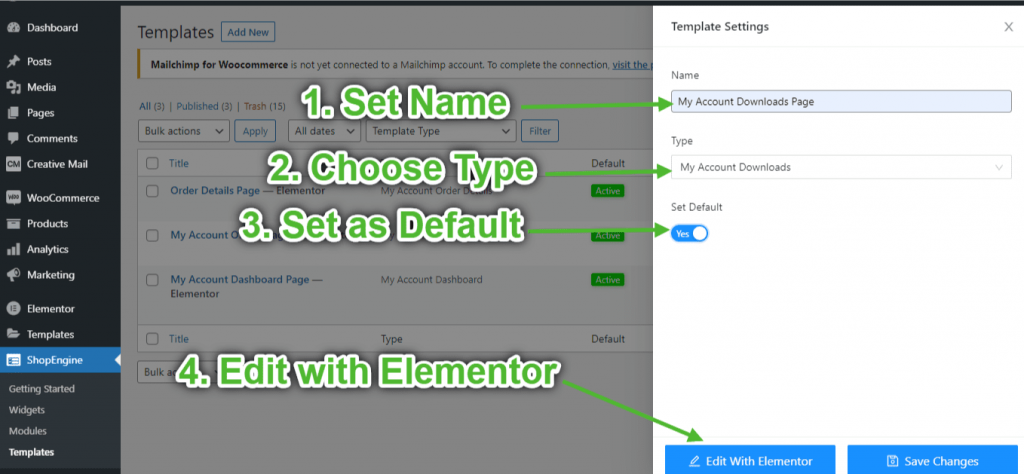
- Go to ShopEngine-> テンプレート -> 新しく追加する
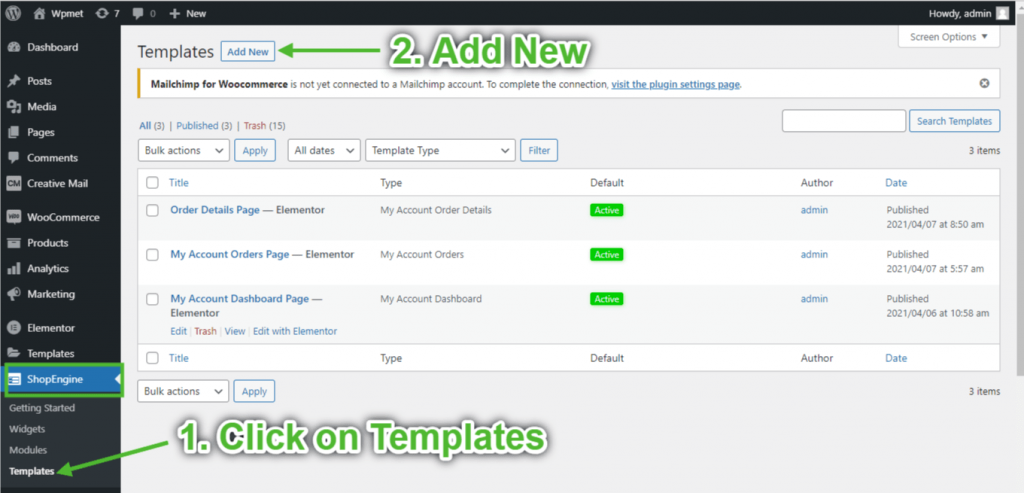
- テンプレートを提供する 名前-> Select Page タイプ: マイアカウント ダウンロード
- Enable Default Template-> Set Default->はい -> Click on Elementorで編集する
ステップ3: 構造を選択する #
- クリックしてください "+Elementor の「 」アイコンをクリックし、希望するセクション レイアウトを選択します。
ステップ4: アカウントダウンロードページを作成する #
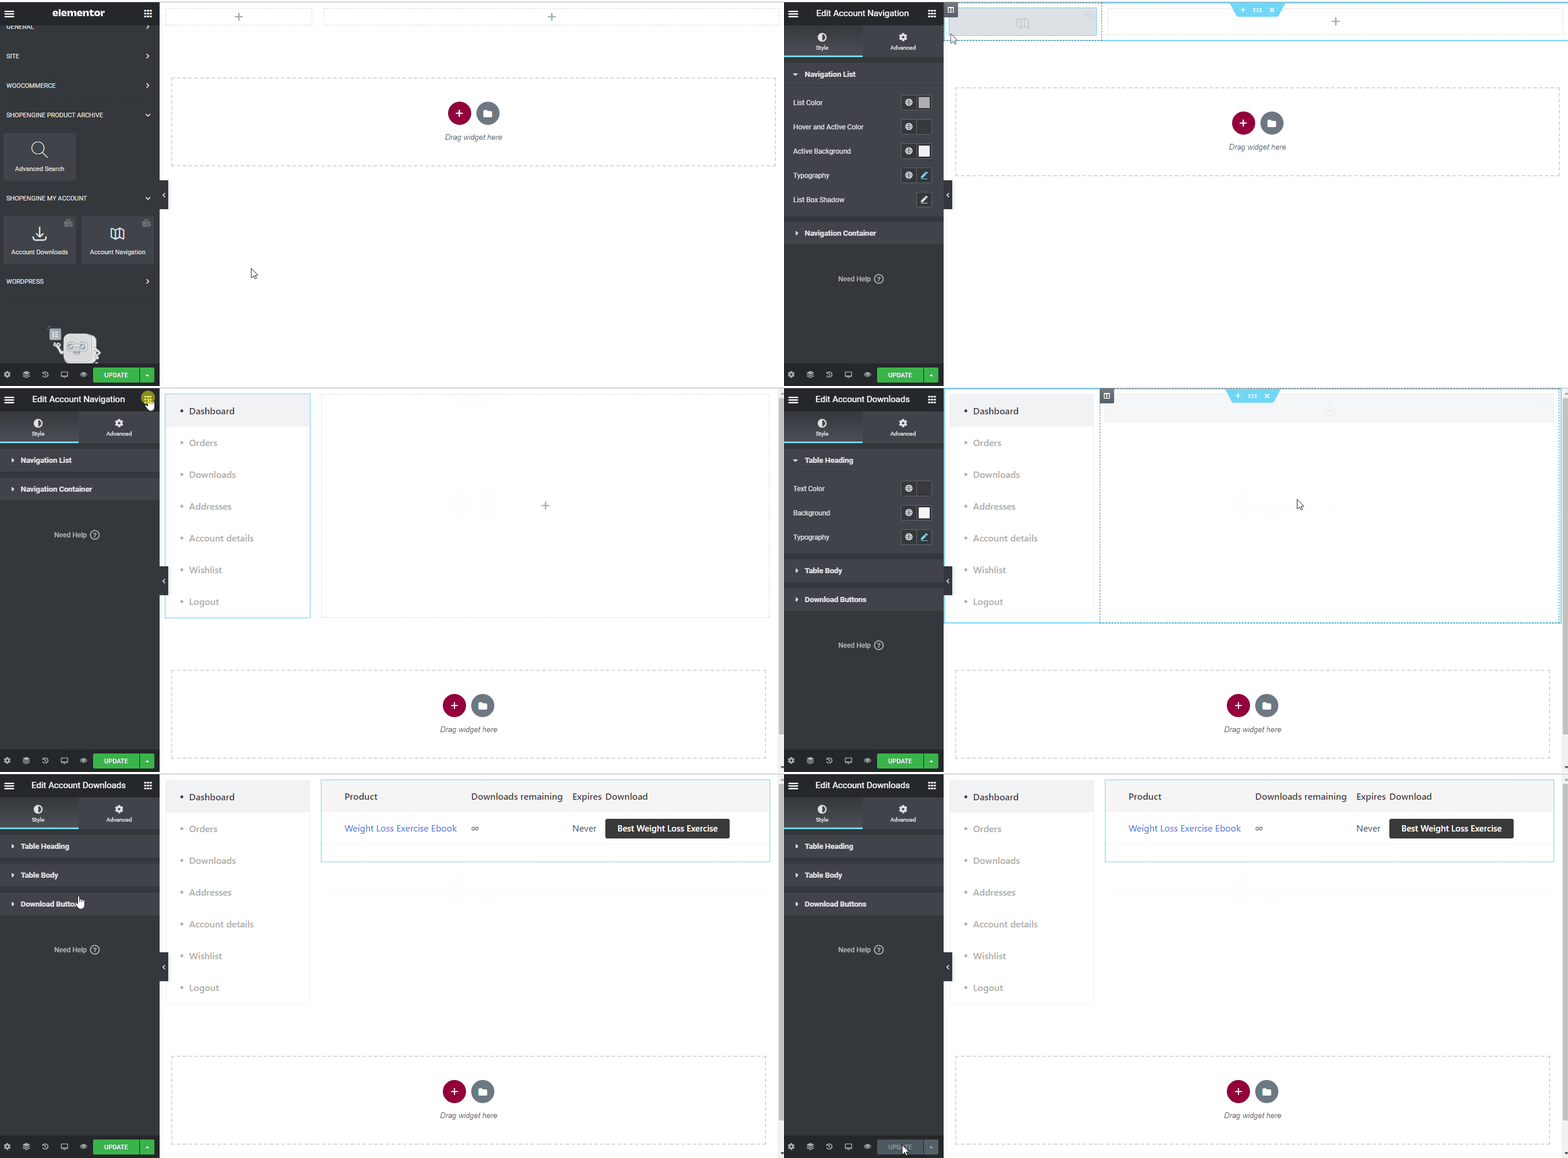
アカウント ダウンロード ページを構築するには、次の 2 つのウィジェットを活用する必要があります。 アカウントのナビゲーション そして アカウントのダウンロード ウィジェット。
- Elementor の ShopEngine マイ アカウント要素ブロックからアカウント ナビゲーション ウィジェットをドラッグ アンド ドロップします。必要に応じて、スタイル設定タブからテキストとリンクの色、テキストとリンクのフォントの太さ、ユーザーのフォントの太さ、タイポグラフィ、リンクのホバー カラーなどを変更できます。
- また、同じ要素ブロックからアカウント ダウンロード ウィジェットをドラッグ アンド ドロップし、必要な変更を加えます。
- Once you are done editing your Account Downloads page, save it by clicking on -> アップデート.
ステップ5: アカウントダウンロードページのプレビュー #
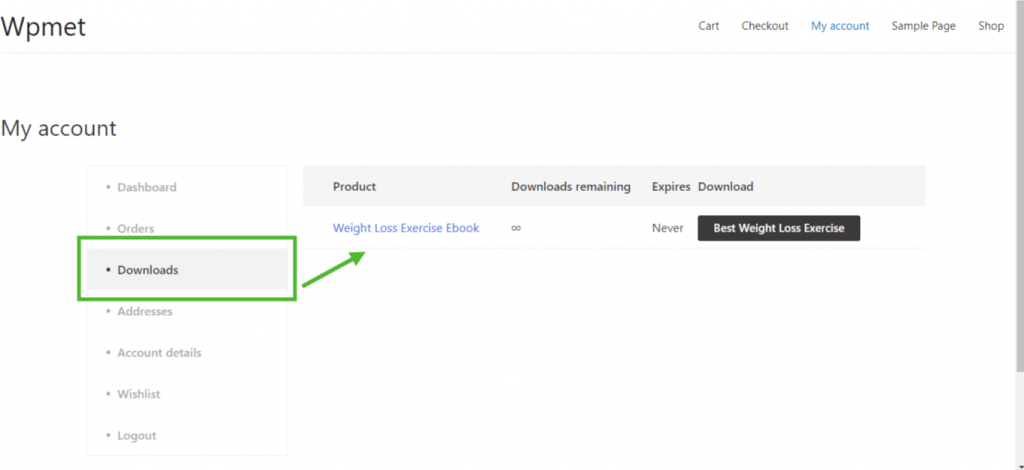
さあ、に行ってください 私のアカウント ウェブサイトのページ->クリック ダウンロードこれは、顧客がデバイスからページをどのように表示するかのプレビューです。
5. アカウント作成アドレスページ #
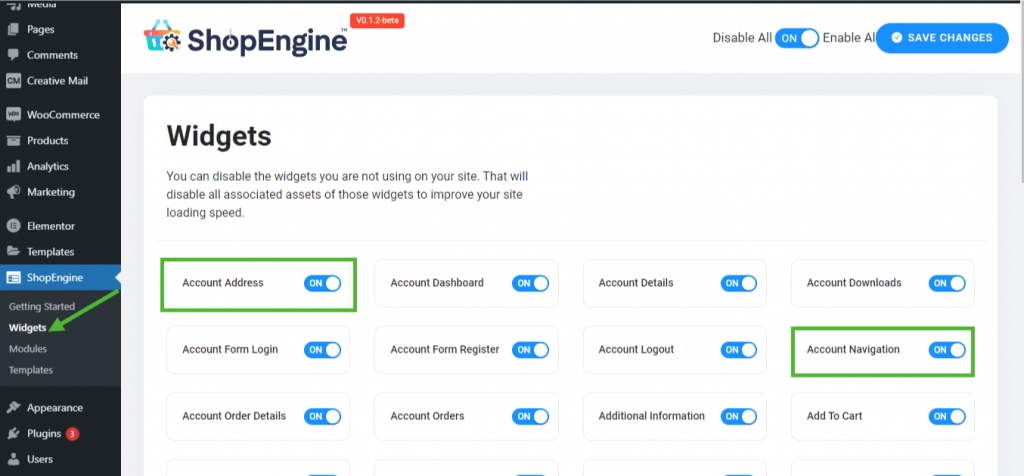
ステップ1: 必要なウィジェットを有効にする #
- Go to ShopEngine-> ウィジェット -> Make sure that the アカウント ナビゲーション そして アカウントアドレス ウィジェットは 有効.
ステップ2: アカウントの住所テンプレートを作成する #
- Go to ShopEngine-> テンプレート -> 新しく追加する
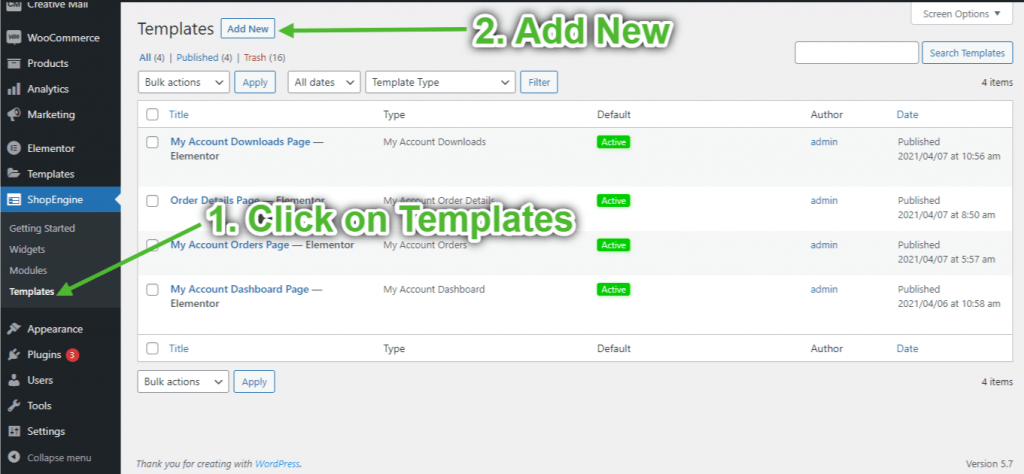
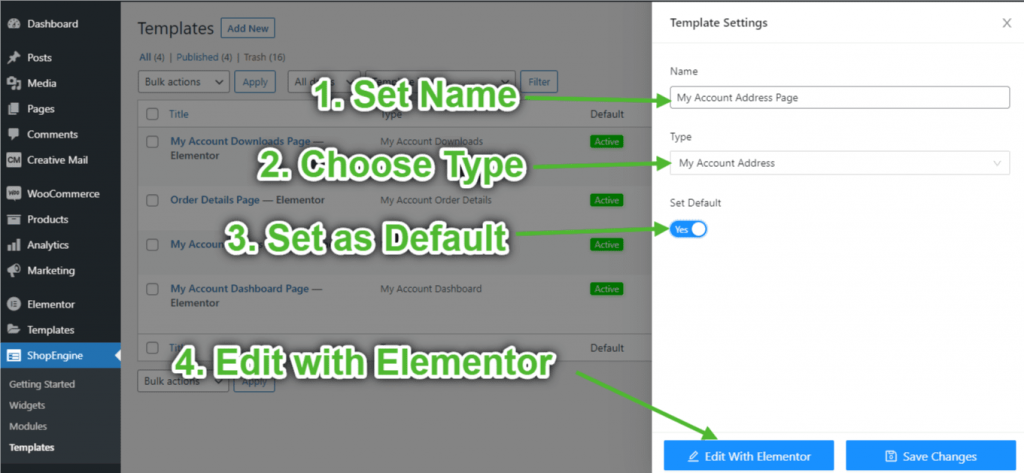
- テンプレートを提供する 名前-> Select Page タイプ: マイアカウントアドレス
- Enable Default Template-> Set Default->はい -> Click on Elementorで編集する
ステップ3: 構造を選択する #
- クリックしてください "+Elementor の「 」アイコンをクリックし、希望するセクション レイアウトを選択します。
ステップ4: アカウントアドレスページを作成する #
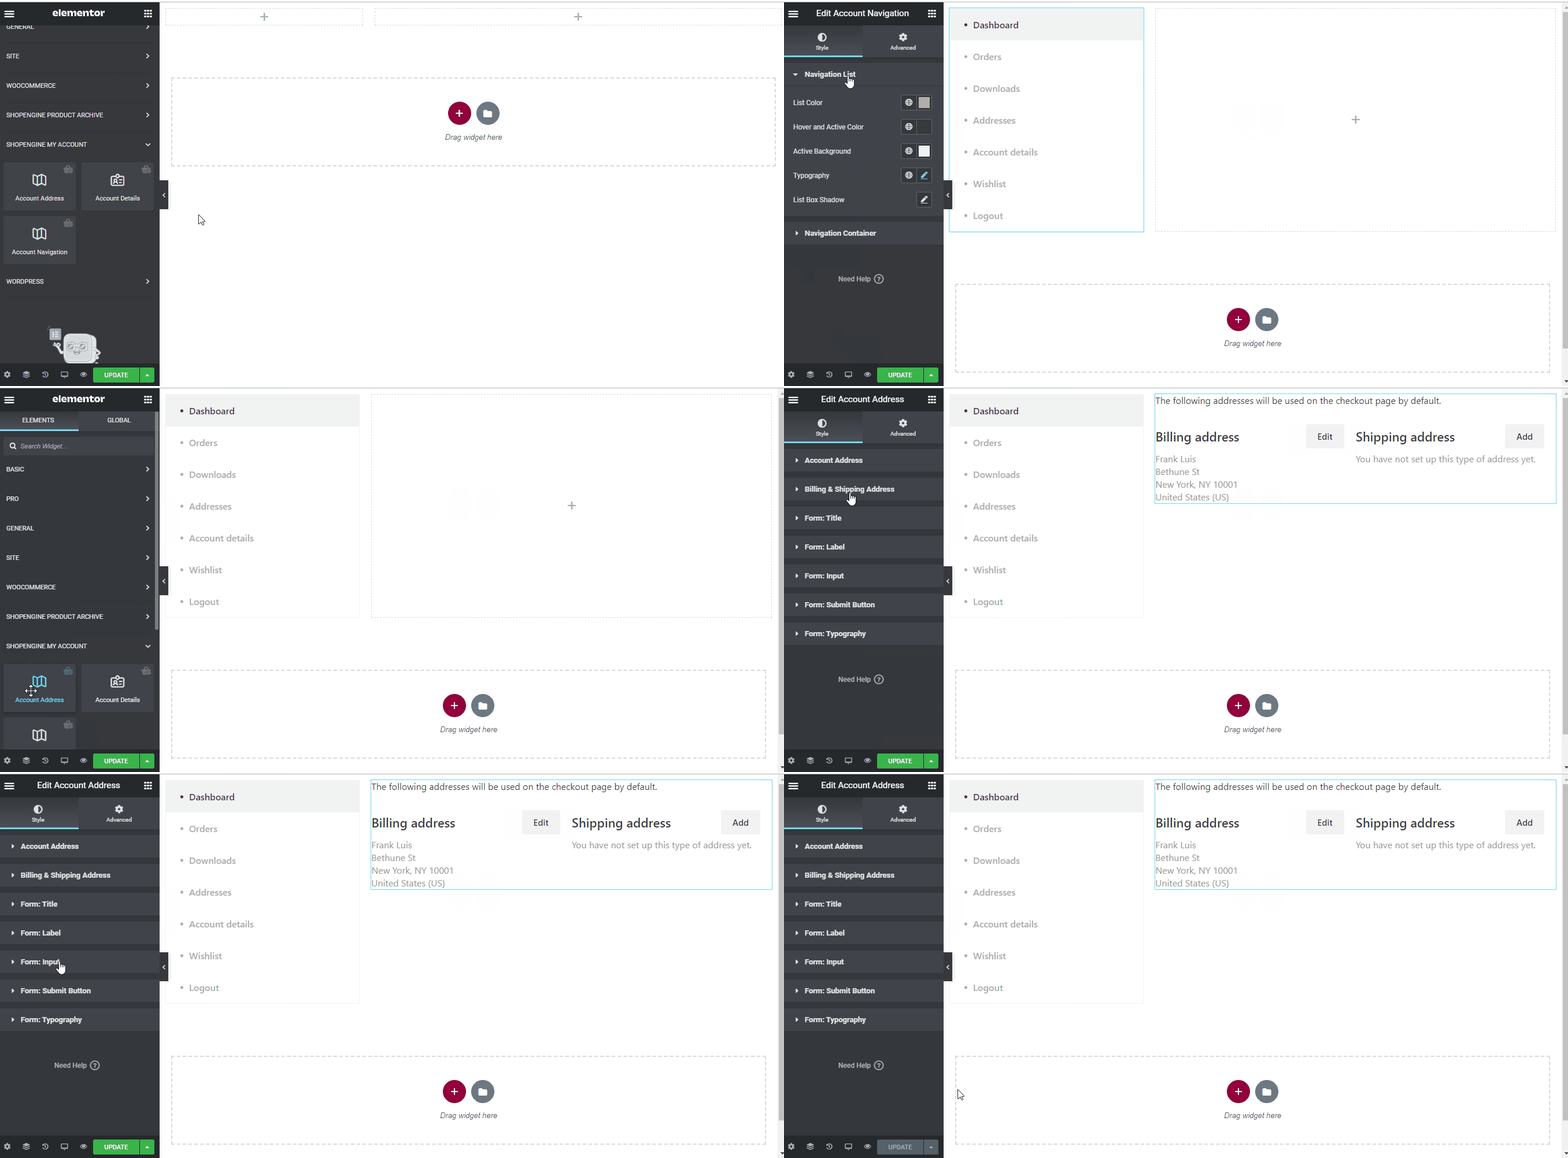
アカウント アドレス ページを構築するには、次の 2 つのウィジェットを活用する必要があります。 アカウントのナビゲーション そして アカウントアドレス ウィジェット。
- Elementor の ShopEngine マイ アカウント要素ブロックからアカウント ナビゲーション ウィジェットをドラッグ アンド ドロップします。必要に応じて、スタイル設定タブからテキストとリンクの色、テキストとリンクのフォントの太さ、ユーザーのフォントの太さ、タイポグラフィ、リンクのホバー カラーなどを変更できます。
- また、同じ要素ブロックからアカウント アドレス ウィジェットをドラッグ アンド ドロップし、必要な変更を加えます。
- Once you are done editing your Account Address page, save it by clicking on -> アップデート.
ステップ5: アカウントアドレスページのプレビュー #
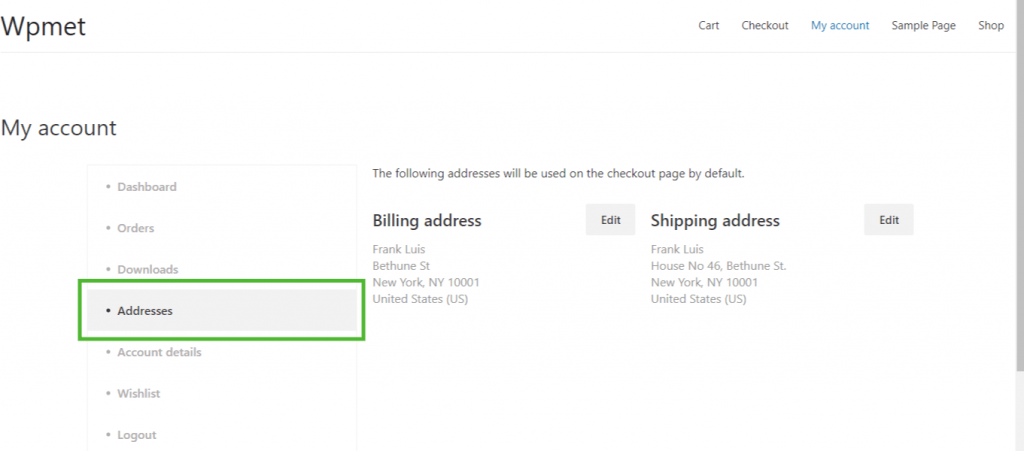
さあ、に行ってください 私のアカウント ウェブサイトのページ->クリック 住所これは、顧客がデバイスからページをどのように表示するかのプレビューです。
6. アカウント詳細ページの作成 #
ステップ1: 必要なウィジェットを有効にする #
- Go to ShopEngine-> ウィジェット -> Make sure that the アカウント ナビゲーション そして アカウント詳細 ウィジェットは 有効.
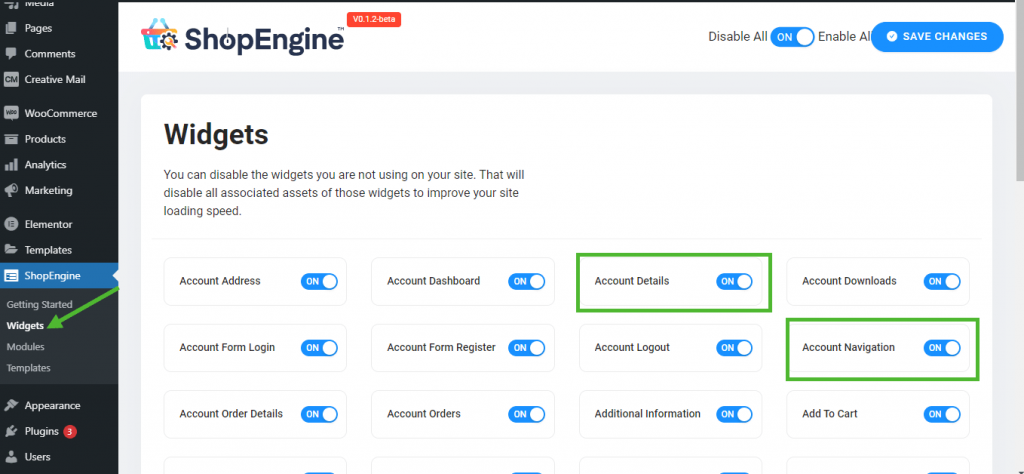
ステップ2: アカウント詳細テンプレートを作成する #
- Go to ShopEngine-> テンプレート -> 新しく追加する
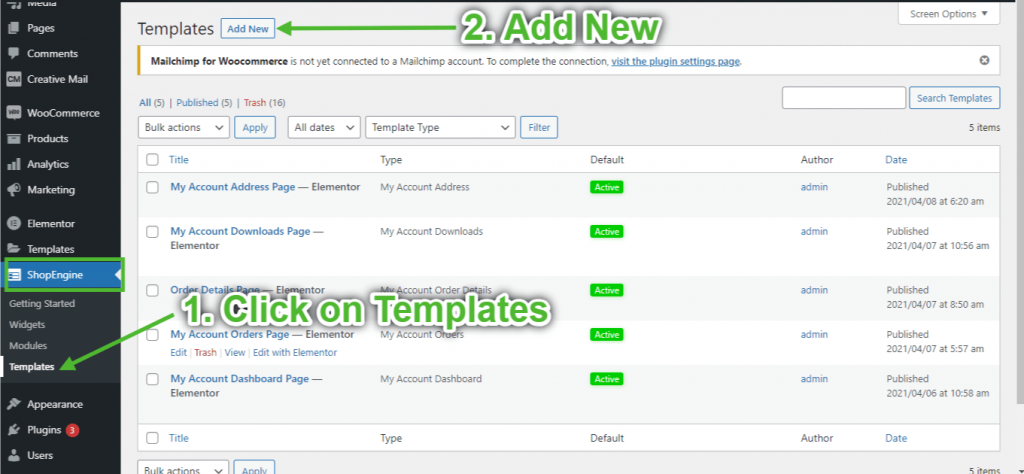
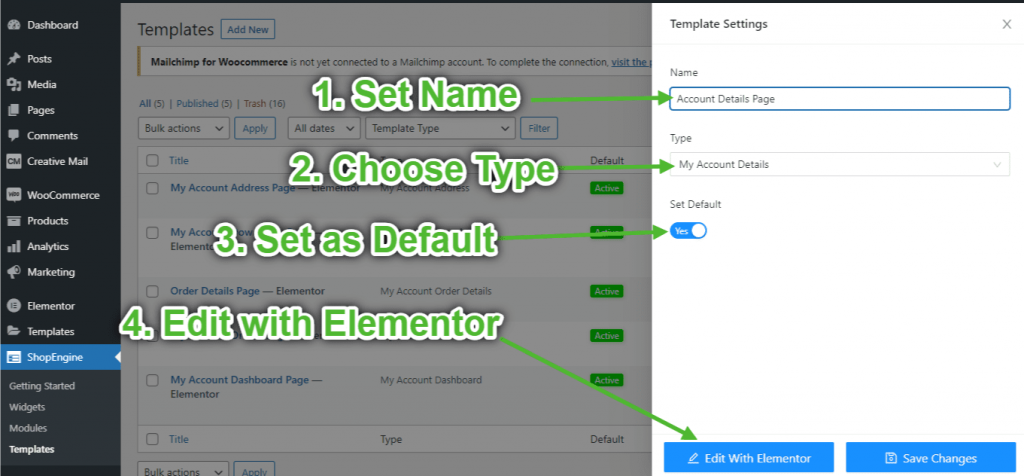
- テンプレートを提供する 名前-> Select Page タイプ: マイアカウントの詳細
- Enable Default Template-> Set Default->はい -> Click on Elementorで編集する
ステップ3: 構造を選択する #
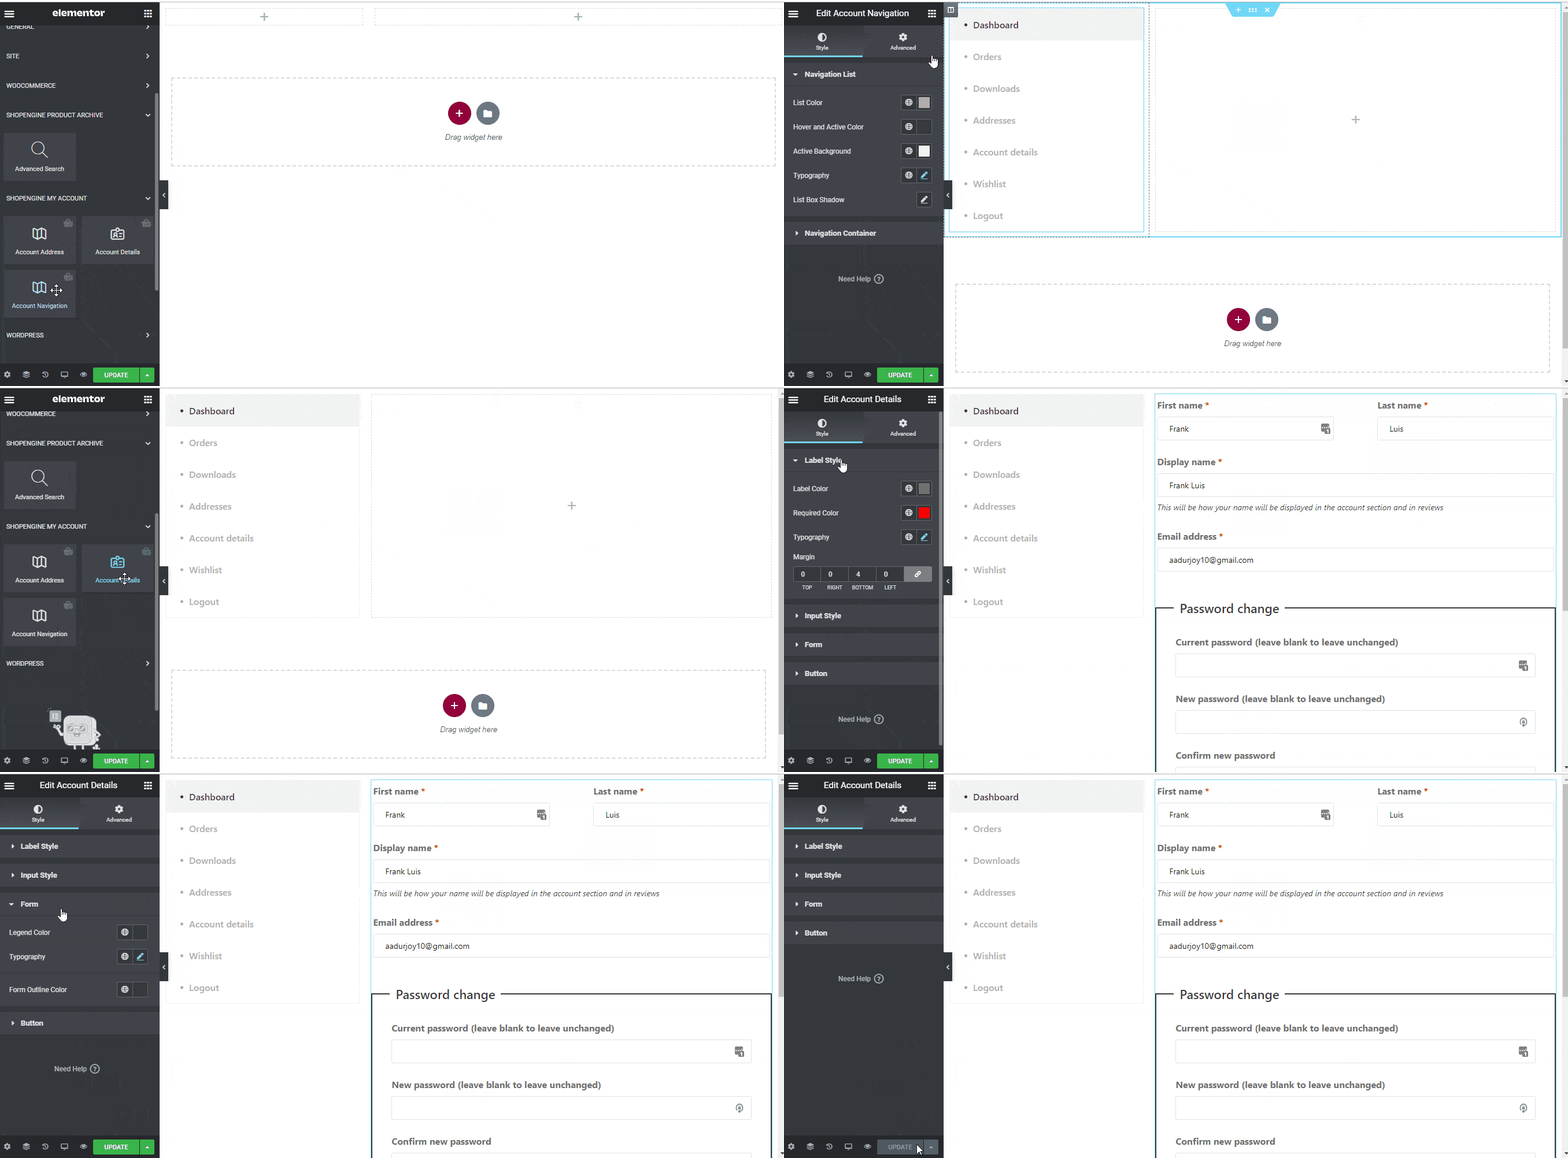
- Elementor の「+」アイコンをクリックして、希望するセクション レイアウトを選択します。
ステップ4: アカウント詳細ページを作成する #
アカウント詳細ページを構築するには、次の 2 つのウィジェットを活用する必要があります。 アカウントのナビゲーション そして アカウント詳細 ウィジェット。
- Elementor の ShopEngine マイ アカウント要素ブロックからアカウント ナビゲーション ウィジェットをドラッグ アンド ドロップします。必要に応じて、スタイル設定タブからテキストとリンクの色、テキストとリンクのフォントの太さ、ユーザーのフォントの太さ、タイポグラフィ、リンクのホバー カラーなどを変更できます。
- また、同じ要素ブロックからアカウント詳細ウィジェットをドラッグ アンド ドロップし、必要な変更を加えます。
- Once you are done editing your Account Details page, save it by clicking on -> アップデート.
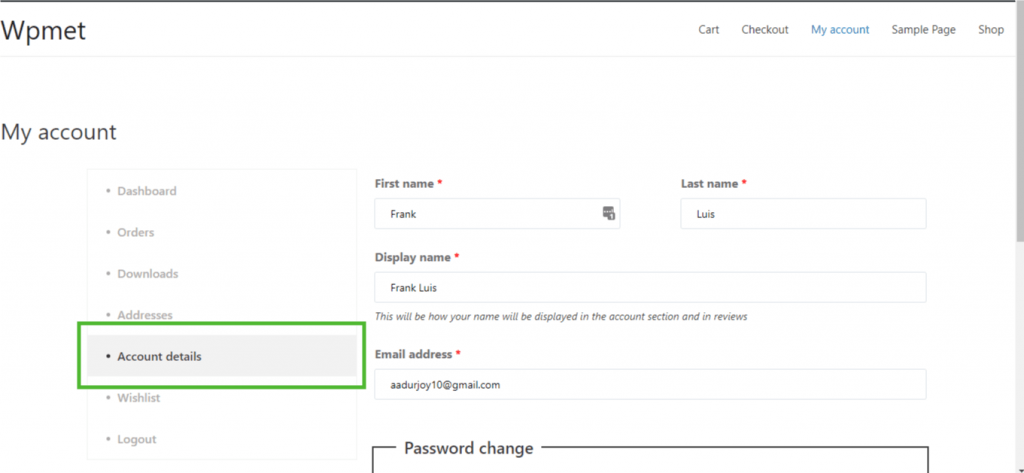
ステップ5: アカウント詳細ページのプレビュー #
さあ、に行ってください 私のアカウント ウェブサイトのページ->クリック アカウント詳細これは、顧客がデバイスからページをどのように表示するかのプレビューです。
7. アカウント作成ログイン/登録ページ #
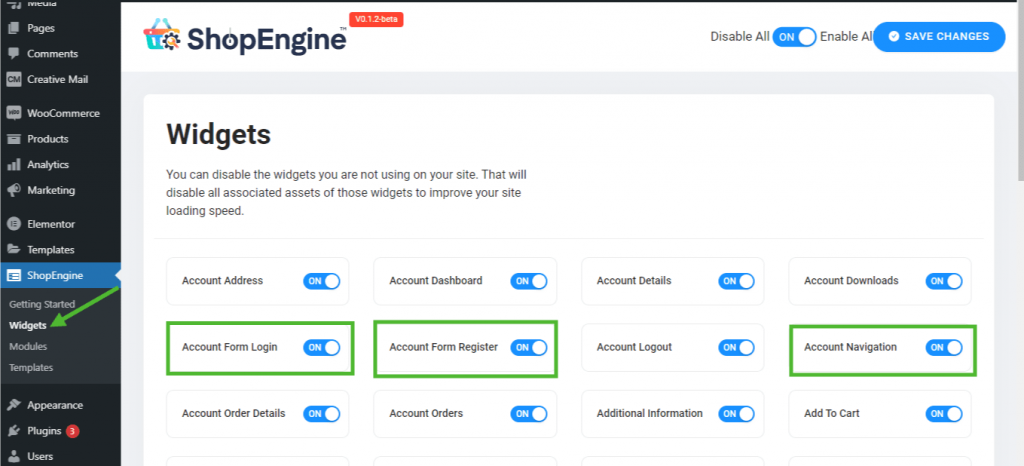
ステップ1: 必要なウィジェットを有効にする #
- Go to ShopEngine-> ウィジェット -> Make sure that the アカウント ナビゲーション, アカウントフォーム登録、 そして アカウントフォームログイン ウィジェットは 有効.
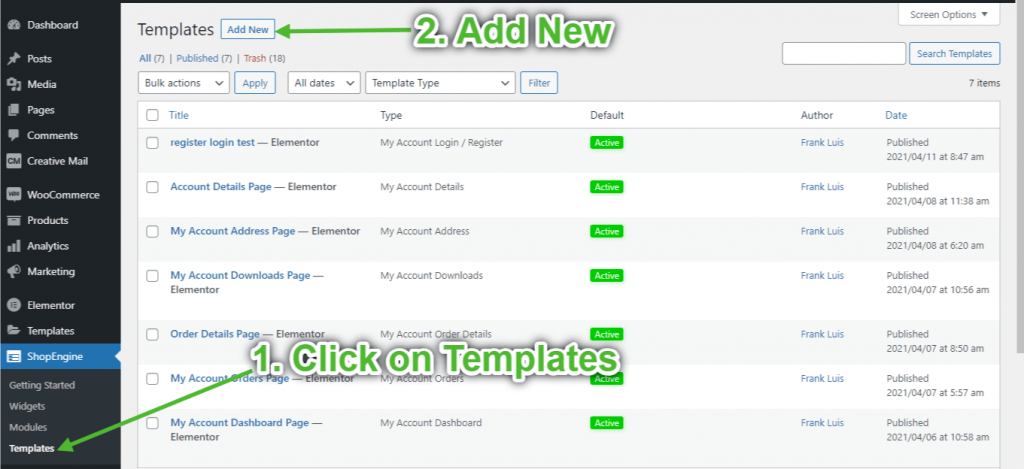
ステップ2: アカウントログイン/登録テンプレートを作成する #
- Go to ShopEngine-> テンプレート -> 新しく追加する
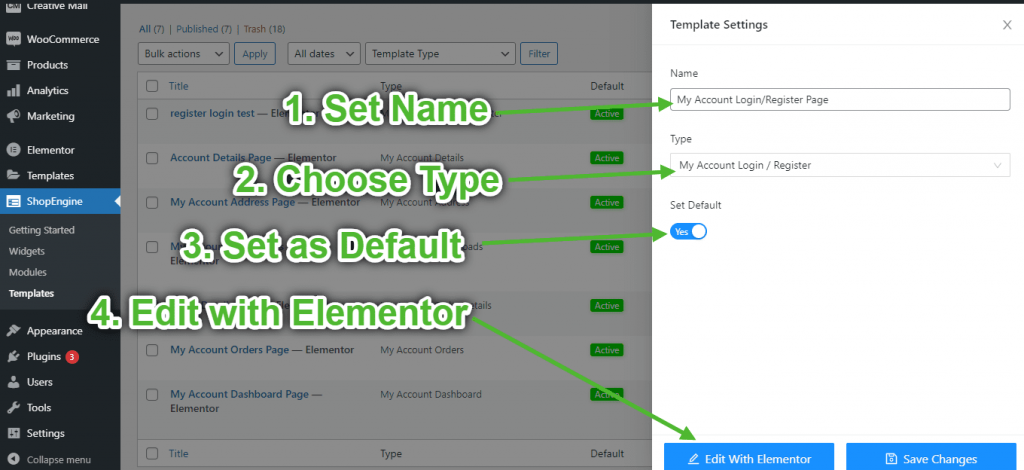
- テンプレートを提供する 名前-> Select Page タイプ: マイアカウント ログイン/登録
- Enable Default Template-> Set Default->はい -> Click on Elementorで編集する
ステップ3: 構造を選択する #
- Elementor の「+」アイコンをクリックして、希望するセクション レイアウトを選択します。
ステップ4: アカウントログイン/登録ページを作成する #
アカウント ログイン/登録ページを構築するには、次の 2 つのウィジェットを活用する必要があります。 マイアカウントフォームログイン、 そして アカウント登録フォーム ウィジェット。
- ドラッグアンドドロップ マイアカウントフォームログイン Elementor の ShopEngine My Account 要素ブロックからのウィジェット。必要に応じて、スタイル設定タブからタイトル、フォーム コンテナー、ラベル、入力、およびタイポグラフィを変更できます。
- また、ドラッグアンドドロップで アカウント登録フォーム 同じ要素ブロックからウィジェットを選択し、必要な変更を加えます。
- Once you are done editing your page, save it by clicking on -> アップデート.
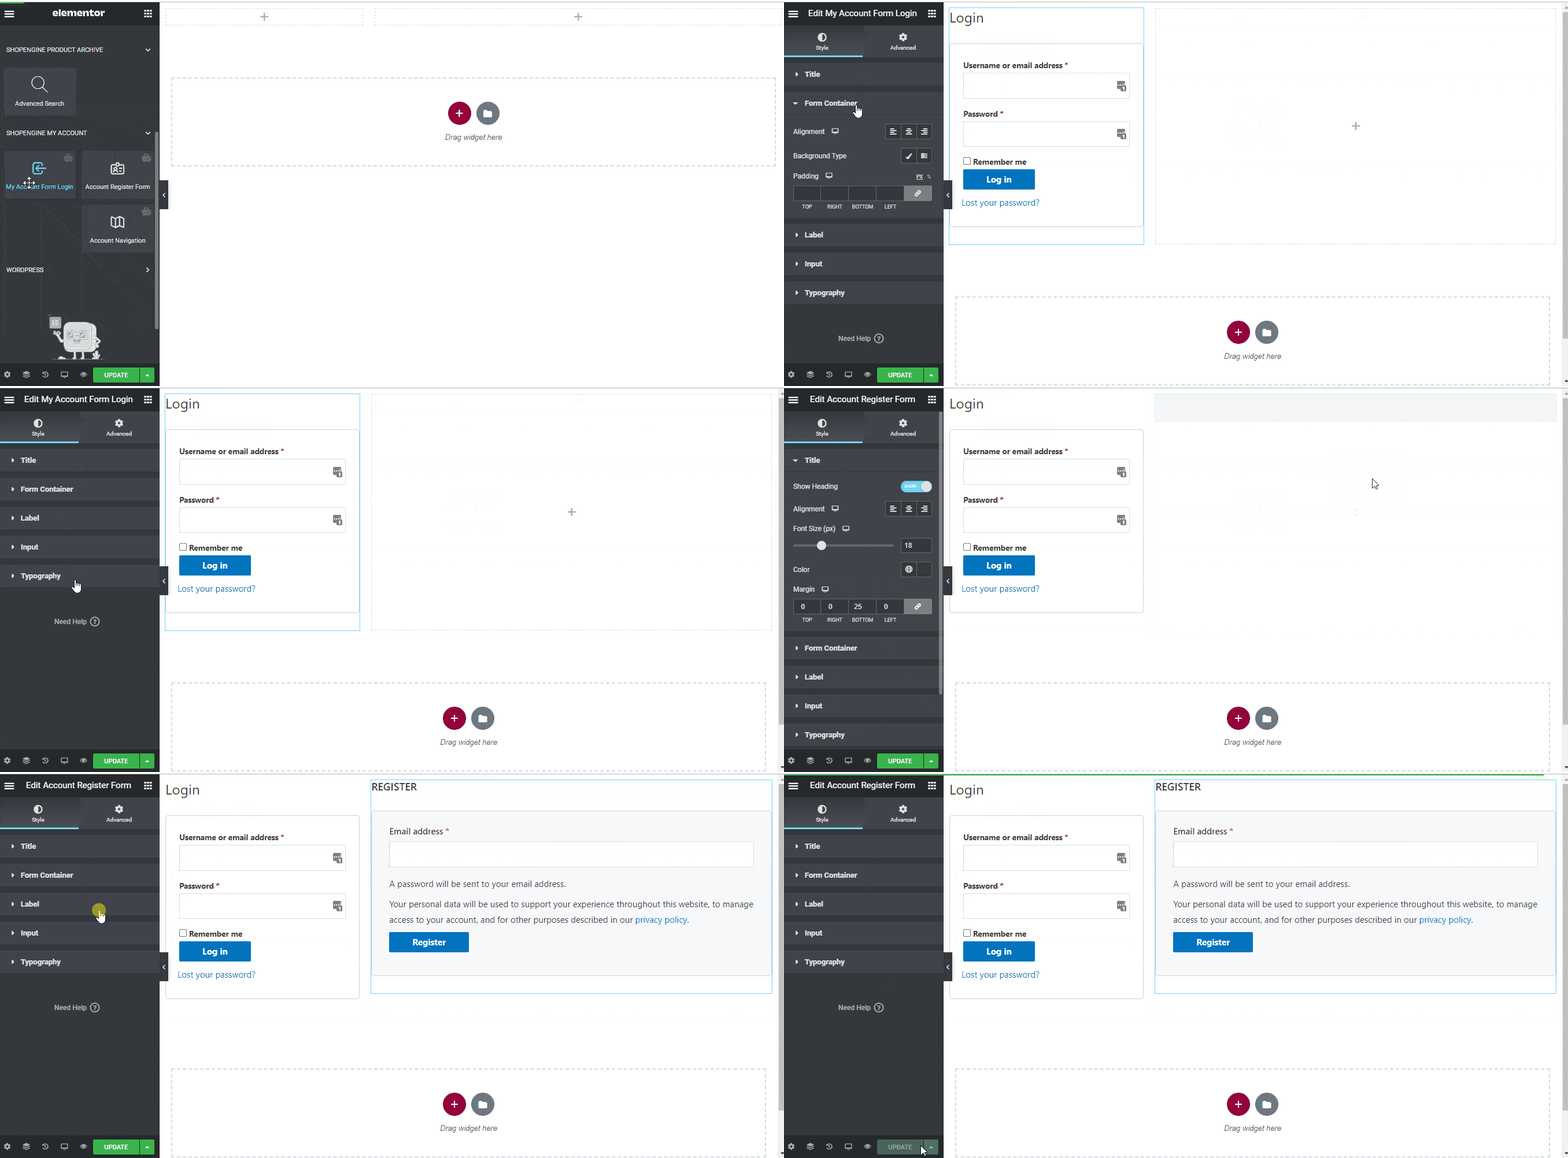
ステップ5: アカウントログイン/登録ページのプレビュー #
さあ、に行ってください 私のアカウント ウェブサイトのページ-> ダッシュボード -> をクリックします ログアウトこれで、顧客がデバイスからページをどのように表示するかをプレビューできるようになります。