

It’s no secret that images are an important component of any website. It improves the visual appeal of the website as well as engagement. In WordPress, inserting images into your posts and pages is quite easy.
One way of showing images is by simply adding media in the Classic Editor. Another way is using the Image blocks in the Gutenberg editor. In both cases, styles are predefined in the theme.
However, Elementor gives flexibility in displaying images in WordPress. It offers a variety of creative ways to display images on your website. More importantly, each image element is individually customizable.
Using elements like Image Boxes, Image Galleries, Image Masking
you can create stunning-looking image sections.
With a little creativity and attention to detail, you can make your website stand out from the crowd using those elements.
This article will guide you on how to display images in WordPress with Elementor to design an intuitive and user-friendly interface for displaying images on your website.
Why images are important for your web content
When we see an image, the human brain automatically begins to analyze and categorize the visual information it receives, without a conscious effort. This process makes the content easier to remember and recall.
Besides, pictures can make your content more engaging and catchy for visitors by enhancing the visual appeal of a website.
Here are a few reasons why images are important for web content:
- Captures attention easily: Images can be used to grab a visitor’s attention and draw them into your content. This is especially important for websites that aim to sell products or services.
- Convey information quickly: Sometimes, an image can communicate information faster and more effectively than text. For example, an infographic can convey complex information simply.
- Breaks the monotony: Large blocks of text can be tedious and monotonous to read. Images can help break up the long text and bring back attention to your content.
- Leaves a long-lasting mark on memory: The human brain can process visual information much faster than text or verbal information and can retain it for a long-term duration.
- Makes your content more shareable: Social media platforms like Facebook and Instagram are highly visual, and photos are often more shareable than text alone. By including high-quality images on your website, you can make it more likely that visitors will share your content on social media.
- Brand awareness: Images can help enhance your branding by featuring your logo or other visual elements associated with your brand.
How to add images in WordPress (Basic method)
The very basic way of showing images on WordPress is by adding an image to the media library and displaying it with default styles.
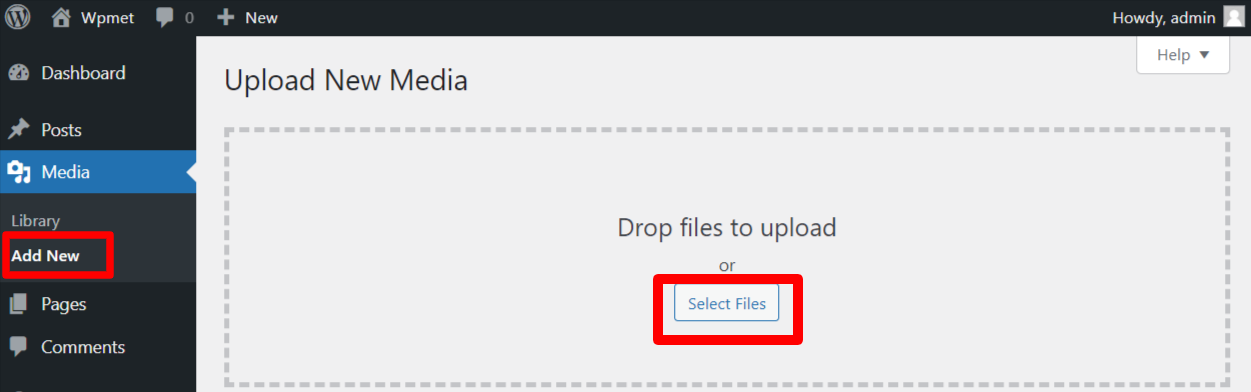
To add an image to the WordPress media library:
Log in to your WordPress, go to Media > Add New, and select the image from your computer to upload to the media library.
Now, displaying images on WordPress depends on which default editor you are using.
Gutenberg Editor:
In the WordPress default Gutenberg aka block editor, you can show images using image blocks. For that, open the editor and add the image block in the desired position for displaying the image. Then upload or select an image from the media library.
Classic Editor:
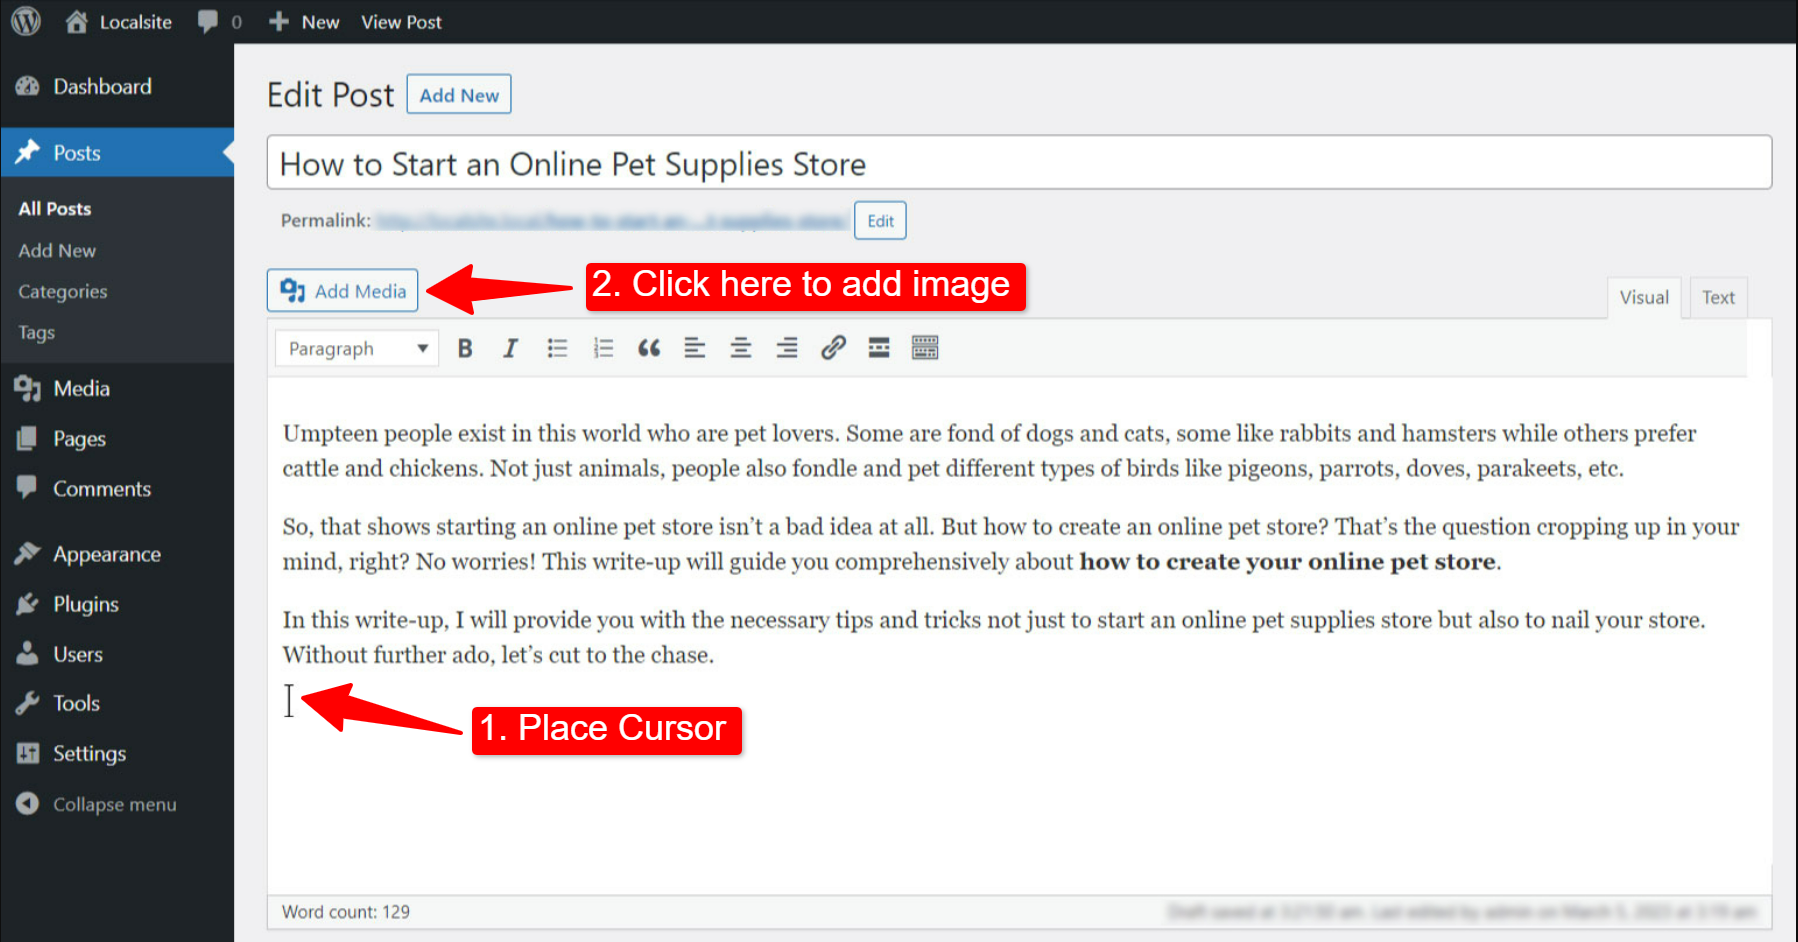
If you are using an old classic editor, open a page or post on the editor, then place the mouse cursor on the post/page, where you want to display the image. After that click on the Add Media button and select an image from the media library.
How to display images in WordPress using Elementor (Advanced methods)
Now if you want more advanced ways to display visuals, you can switch to Elementor page builder. With Elementor you can use the image widgets to showcase website images creatively.
Taking things to next level, the ElementsKit Elementor addon comes with a bunch of widgets that can let you stylishly display images with the most customizable features. ElementsKit comes with widgets like Elementor Image Box, Image Gallery, Image Swap, and so on. These widgets give you diverse options to exhibit pictures stylishly.
Following is a demonstration of how you can utilize those widgets to display images on WordPress and make your site more lively.
Install ElementsKit
To use the advanced image features, you need to install the ElementsKit Lite and ElementsKit Pro plugins on your WordPress site.
Here is the documentation to install the ElementsKit plugins
After installing the plugins, you can move forward with the widgets to display images on WordPress.
Method 1: Show pictures in a stylish Image Box
Using the ElementsKit Image Box widget, you can highlight a section with a combination of an image and text. It lets you show an image with text like a heading and a description. These styles are often used to highlight a flagship product, service, or feature.
To use the feature: enable the Image Box widget from ElementsKit > Widget
Here is how to use the ElementsKit Image Box widget for Elementor:
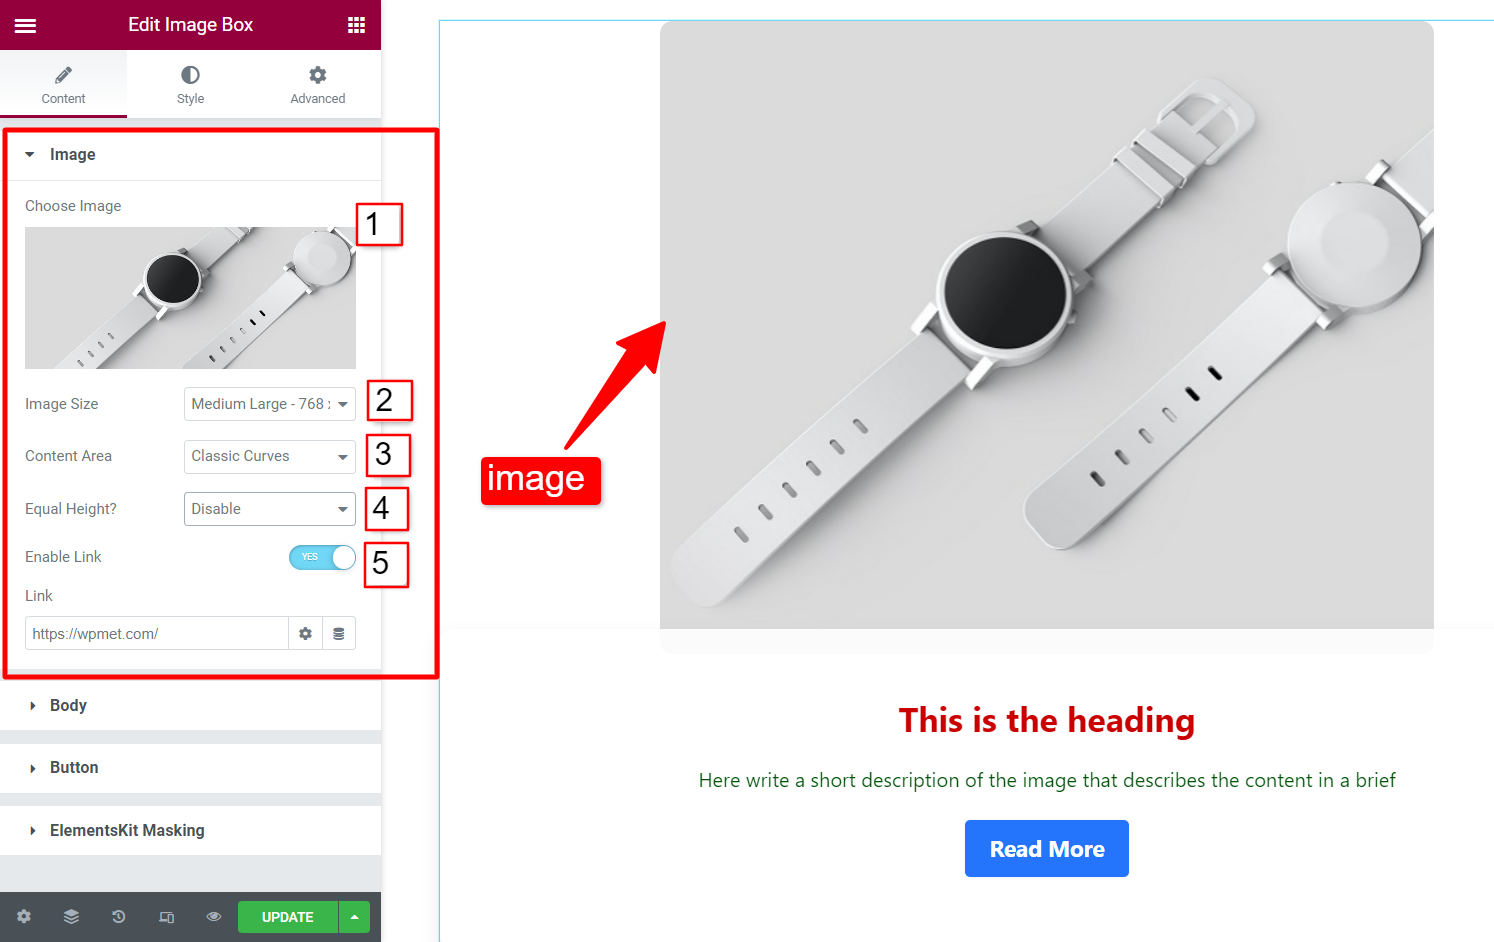
Image
In the image section, you can customize the image and its appearance.
- Choose Image: Select an image from the media library or upload one.
- Image Size: Set the size of the image.
- Content Area: You can choose the style of the content area from the given options.
- Equal Height: Enable or disable the equal height for the image and content area.
- Enable Link: You can use the image as an anchor section by enabling the link. When enabled add the link to the image.
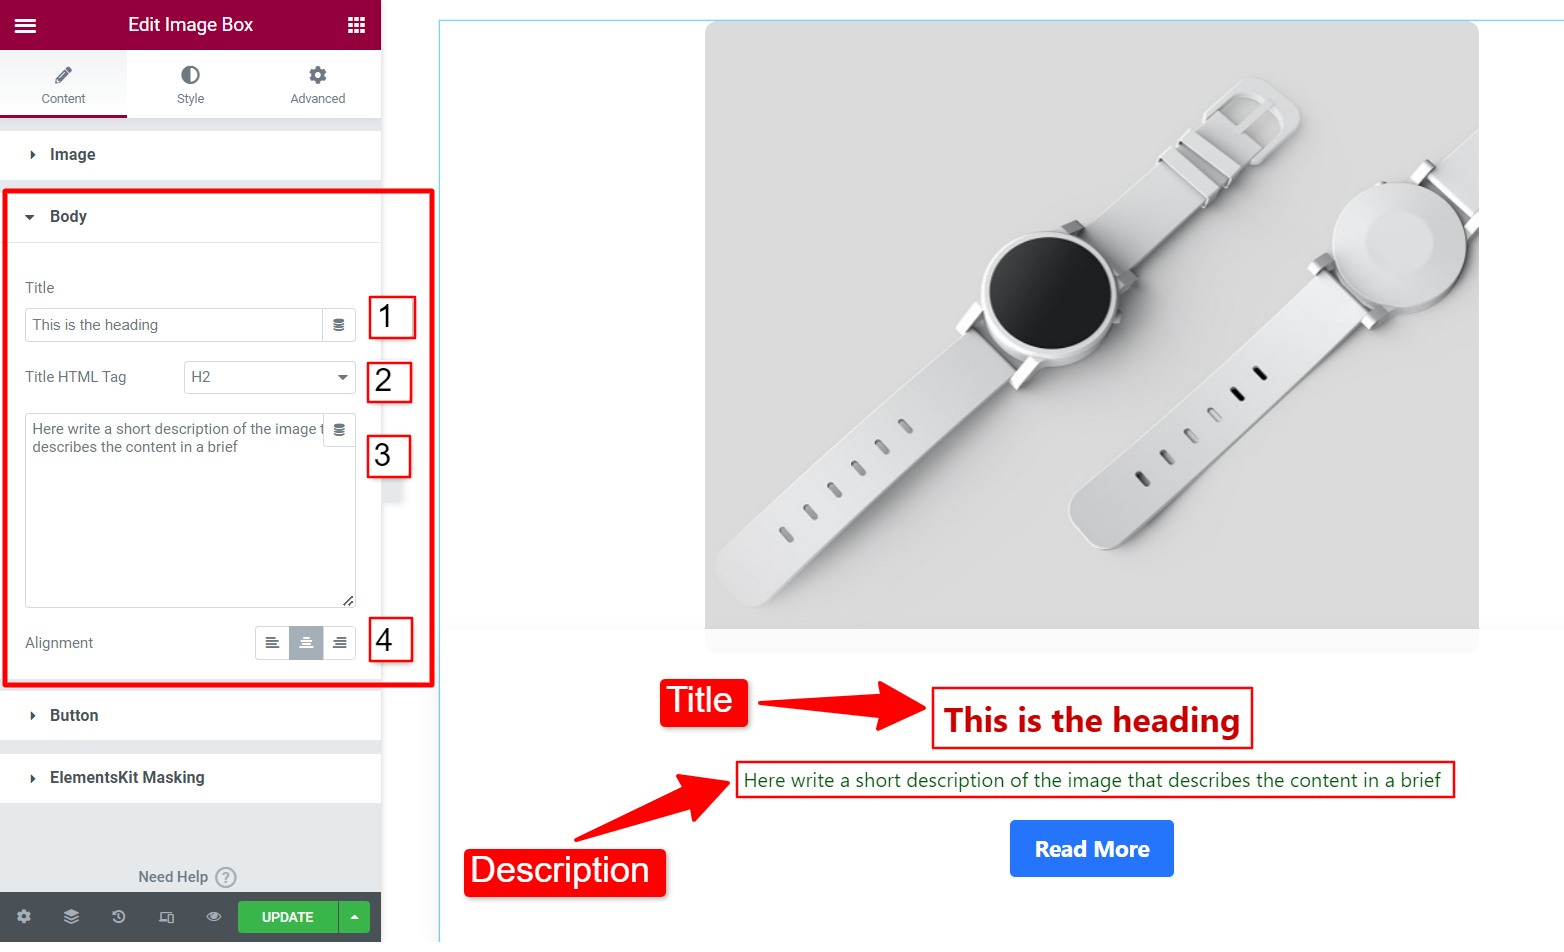
Body
In the body section, you can add all the text to the Elementor image box. This includes a heading, description, title HTML tag, and text alignment.
- Title: Add the heading text in this field.
- Title HTML Tag: Select which HTML tag you want for the heading (H1, H2, H3, div, span, paragraph, etc.)
- Description: In this field add a short description of the content.
- Alignment: Set the text alignment for the image, heading, description, and button.
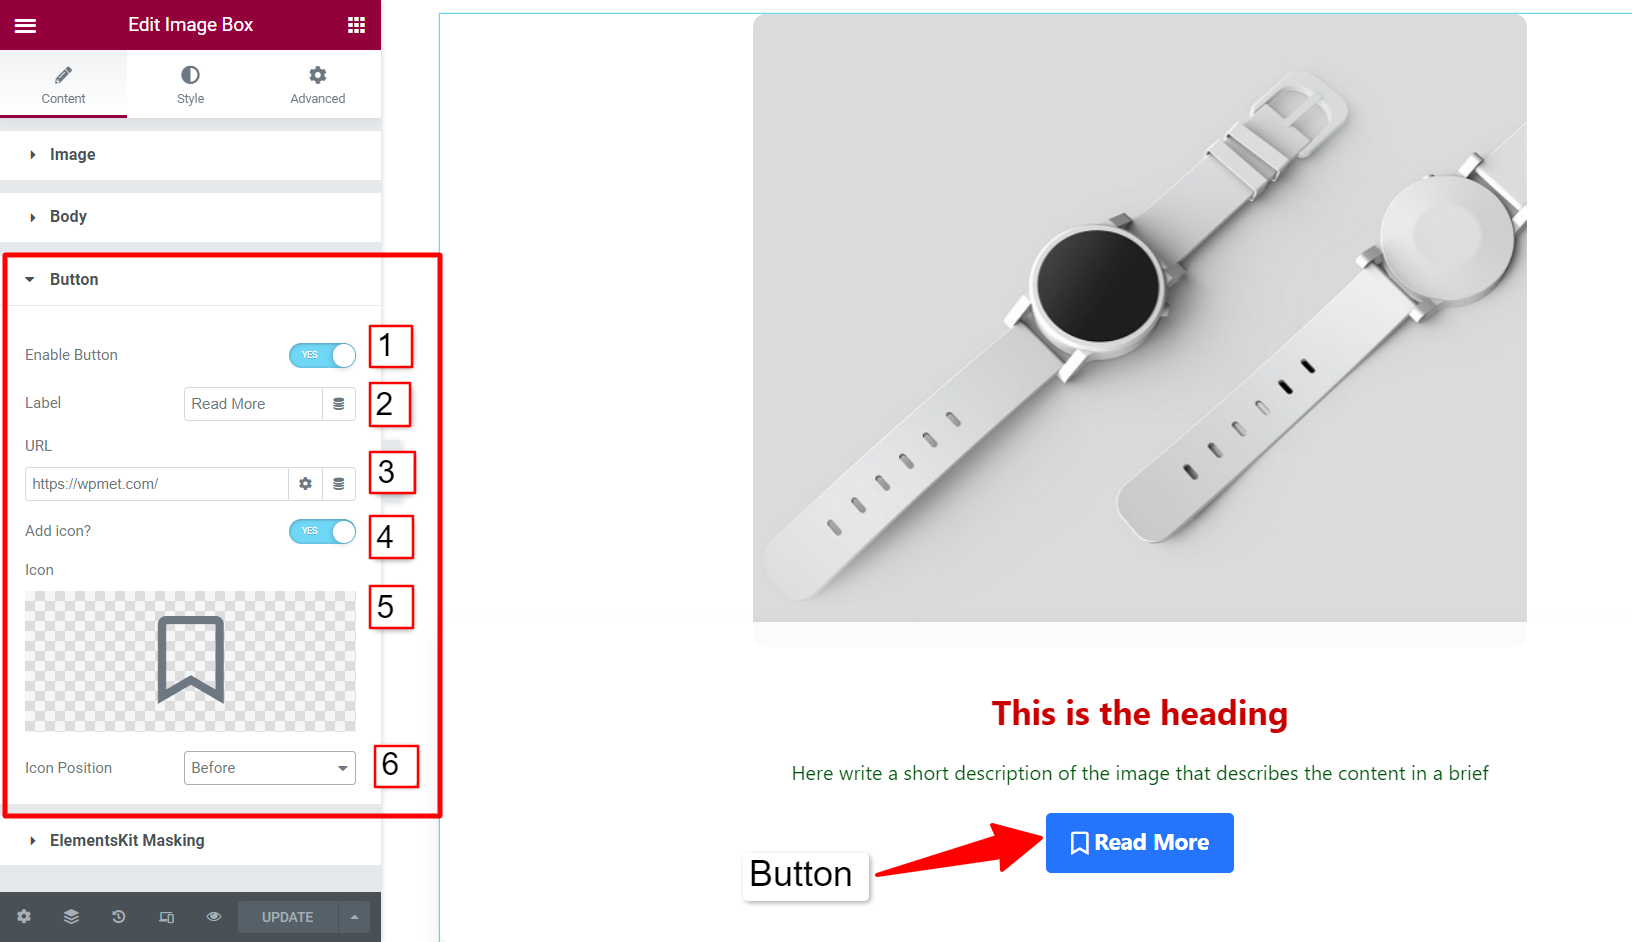
Button
You have the option to add a CTA button on the Elementor image box. For that,
- Enable Button: To add a button on the image box, enable this option.
- Label: Add a button label (text) that indicates the purpose of the CTA.
- URL: Enter the page link that you want to redirect the visitor once they click.
- Add Icon: If you want to show an icon with the button label, enable this feature.
- Icon: Choose an icon from the Elementor icon library.
- Icon Position: Select whether the icon will be before or after the button text.
Next up, under the style tab, you get to customize the appearance of the Elementor image box including the colors, background, typography, and so on.
In the Classic Curves section, you can adjust the width and margin of the content area. Then style the image by changing the padding and opacity.
Besides, you can customize the heading and description text appearance by changing color, typography, background color, and so on. Furthermore, tailor button styles and its icon with their attributes.
Watch the video to get more detailed knowledge on the ElementsKit Image Box widget.
Method 2: Display two images with swap animations
Image swap is a stylish way to show two alternative images in one place that swap when visitors hover or click on the image. The ElementsKit Image Swap widget comes with a couple of dozens of stunning effects that make your website even more visually appealing.
You can use this feature such as using the first image as a cover image that grabs the attention and the second image to provide the necessary information.
To use the feature: enable the Image Swap widget from ElementsKit > Widget
Here is how to use the ElementsKit Image Swap widget for Elementor:
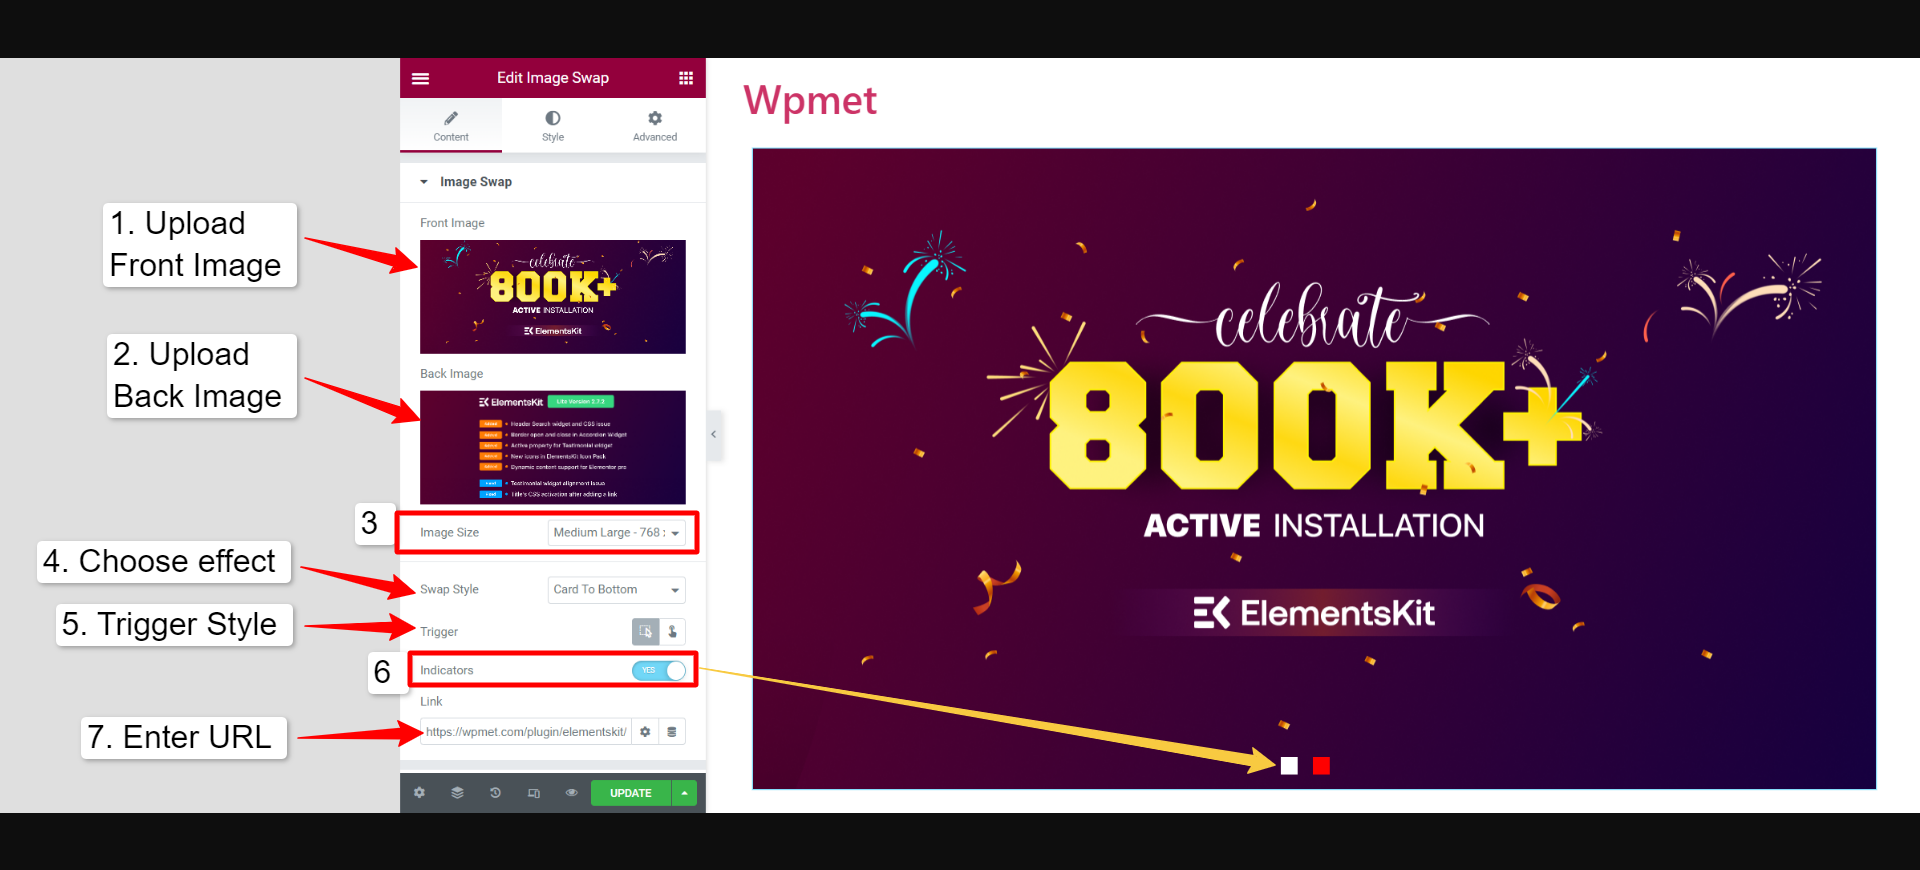
- Front Image: This is the image that appears by default when the page loads on the web browser.
- Back Image: This is the image that appears when the action is made i.e. a visitor hovers or clicks on the image.
- Image Size: Set the image size for both of the images.
- Swap Style: You have 21 different swap effects available with ElementsKit Image Swap widget, which can help you make your web design more appealing to visitors.
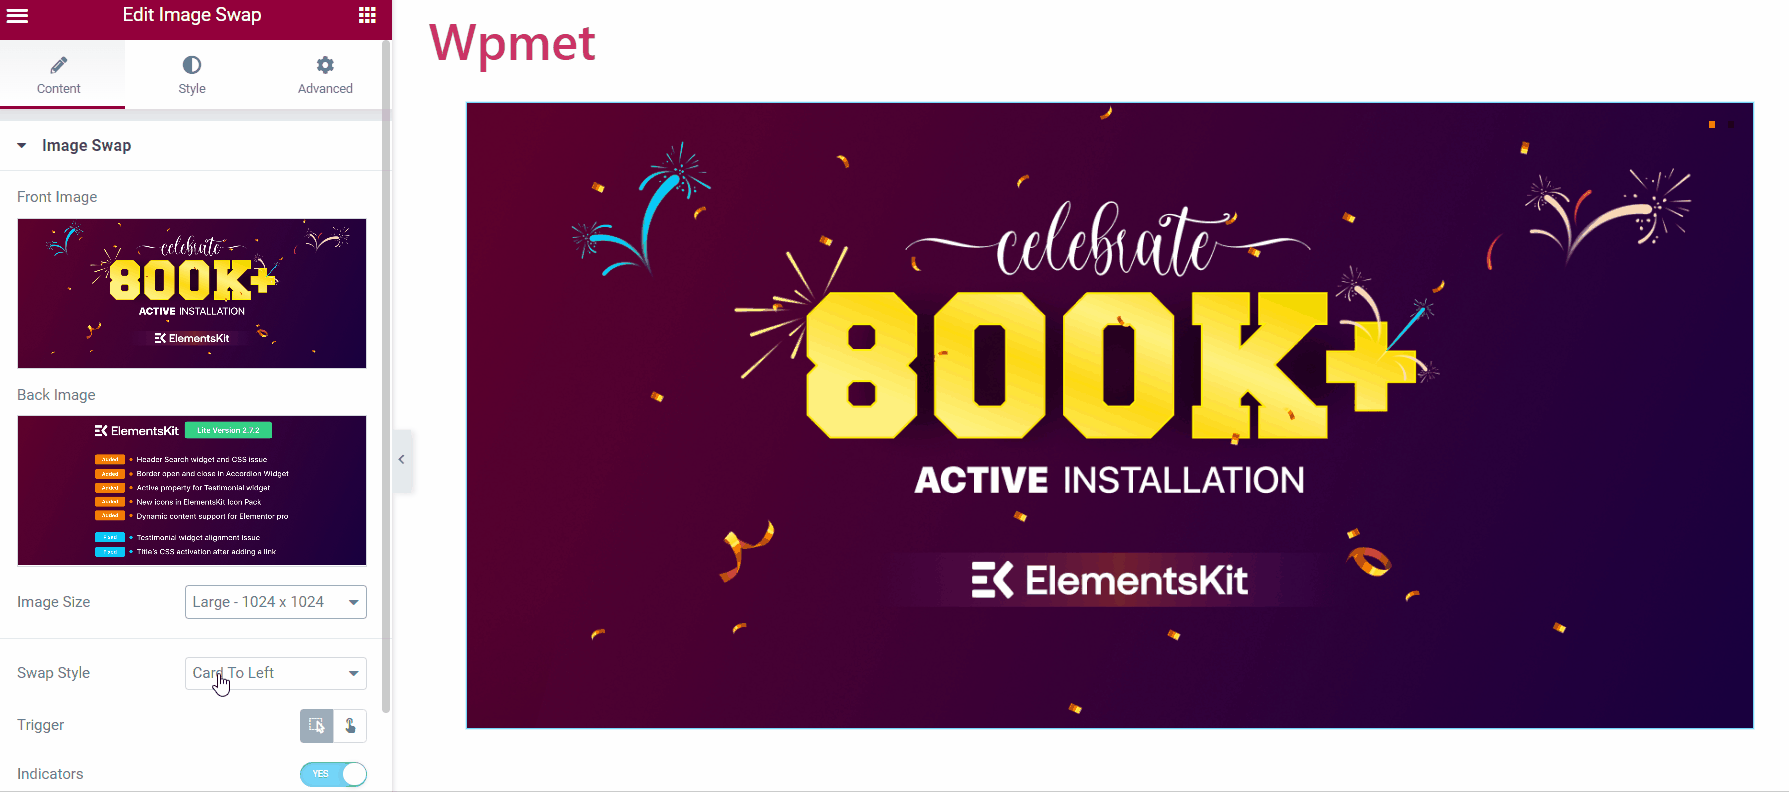
- Tigger: Here you can choose between Hover or Click action to trigger the swap images.
- Indicators: This works as a navigator, that indicates which image is on the show and which one is the background.
- Link: You can link up the images to a page if you want.
In the style tab, you can adjust the image height and duration of the swap animation duration. And if you enable the indicator, you can change their position and customize their size and colors.
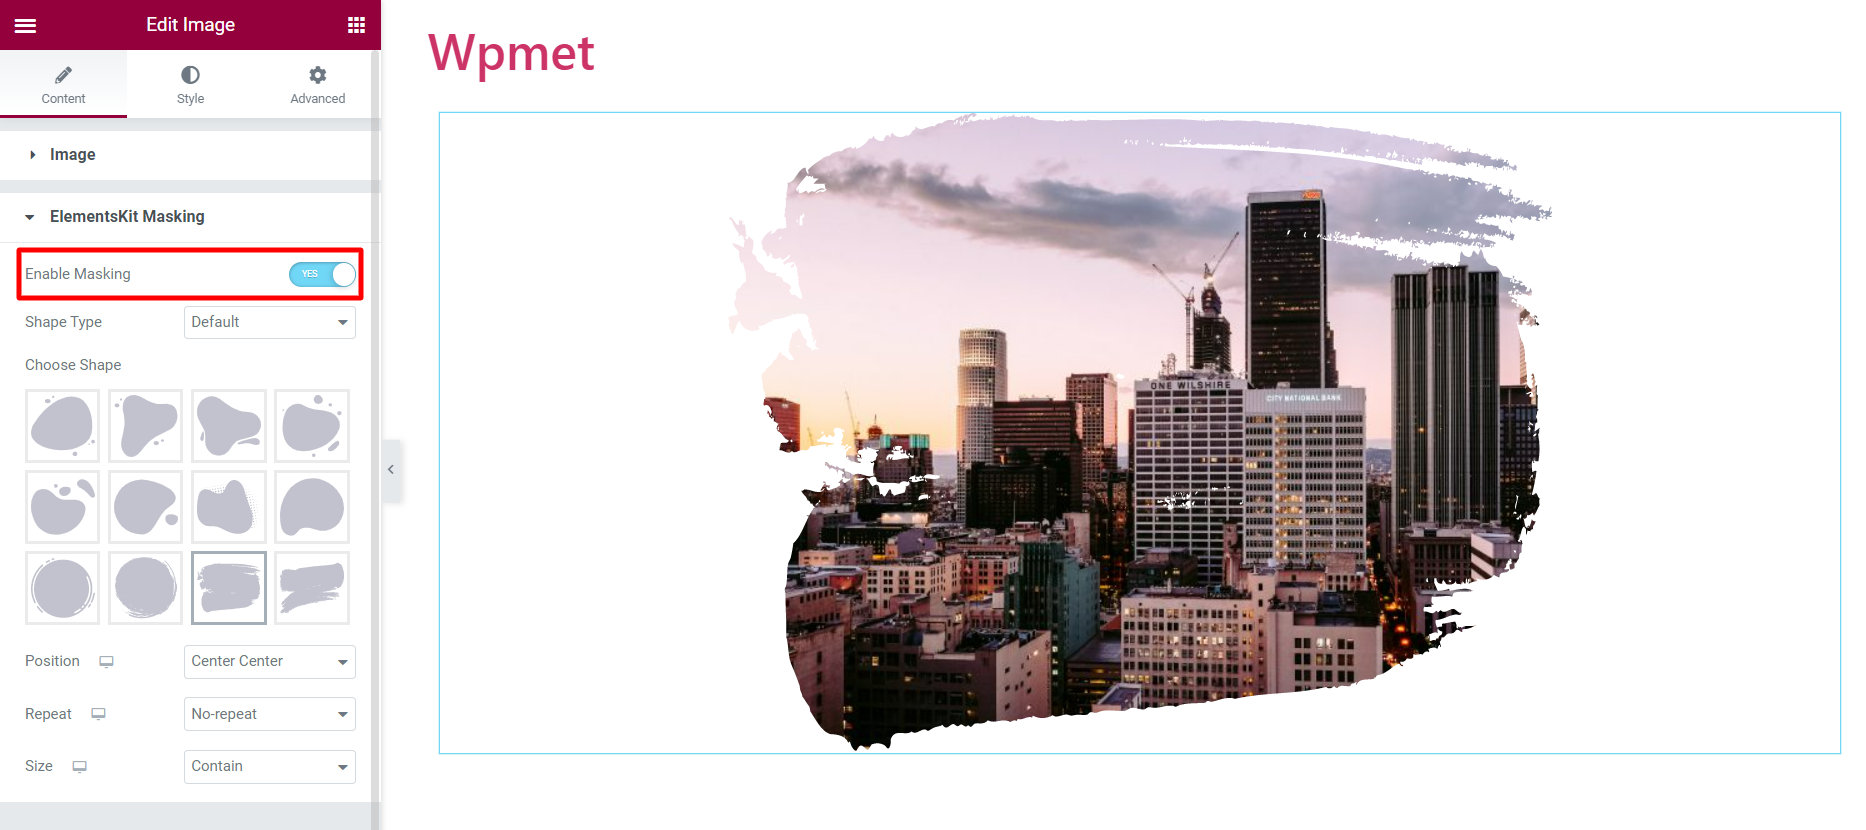
Method 3: Give unique shapes to the website images with image masking
This is a unique way to make your website lively with uniquely shaped images. The image masking features transform the traditionally shaped images into more engaging ones. In WordPress, masking is quite easy with Elementor.
The ElementsKit for Elementor comes with a masking module for images. The module is available for any elements in Elementor that involve an image. In the Elementor editor, enable the ElementsKit Masking and select a shape from the preloaded ones. You can also add a custom shape to the images.
Method 4: Showcase images in a gallery
Elementor comes with a great way to showcase multiple images in an elegant gallery. The Basic Gallery widget of Elemntor works with a traditional approach where you can add images, set the image size, and customize basics like spacing and borders of the image.
However, the ElementsKit Image Gallery widget comes with more flexible options. With the widget, you can customize the layout with descriptions, add filters on the gallery, and individually every aspect of the thumbnail, overly, image, and filters.
Learn more about the Image Gallery widget and how it can enhance your website design from our blog.

Wrap up
Overall, Elementor comes with several ways to display images in WordPress. To get the most out of Elementor’s capabilities, ElementsKit can be a great addition.
ElementsKit has diverse ways and styles: Image box to show an image with a heading and description; Image Swap to display two images alternatively; Also, there are Image Gallery and Image Masking widgets to give you more options.
Each of these elements offers unique features and customization options, allowing you to create engaging and visually appealing content for your website.
If you find this useful, there are more for you with ElementsKit. This Elementor addons comes with dozens more elements that can help you create and design a website with the highest number of features and optionalities.
Leave a Reply