


I hate to fill forms! How about you?
Do you hate filling forms too?
Then there’s a pair of us!
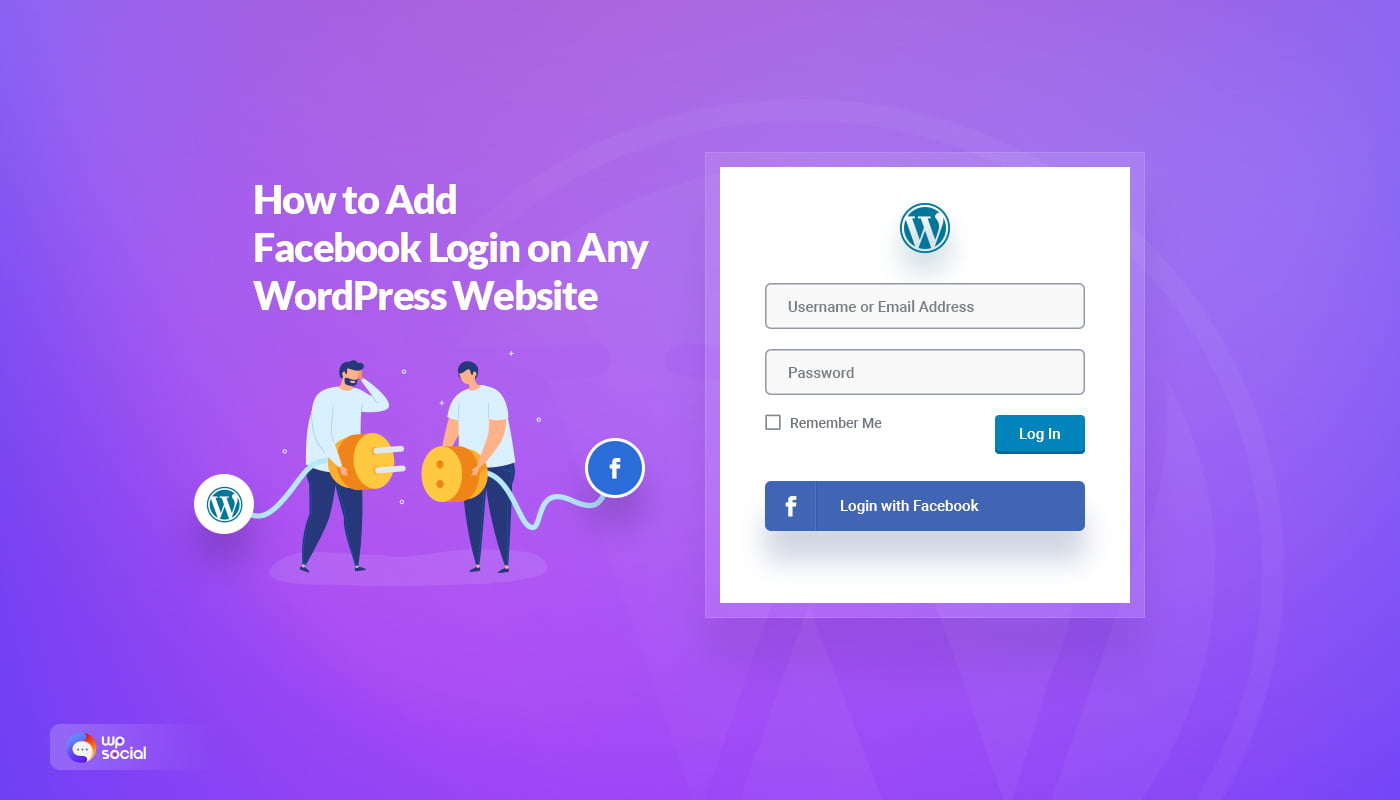
Facebook login lets users sign in to a WordPress website using their Facebook account instead of creating yet another username and password.
And no, we are not alone in feeling this way. Research shows that four out of five (86%) people are bothered by the need to create new accounts when registering on a website.
What’s more alarming found in the same research is that 9 out of 10 people (90%) admit they have left a website if they forgot their password or log-in info, instead of answering security questions or resetting their password!
Are you a website owner experiencing a high bounce rate from your login page? Well, most possibly you can lessen it to a great extent by integrating Facebook login on your website.
If you are here to know exactly how to add facebook to wordpress website, you’re at the right page.
In this article, I will give you some reasons for integrating Facebook login on your WordPress site and walk you through the steps of adding a Facebook login for WordPress. Seems interesting? Let’s go ahead then.
Quick Overview
This guide explains how to add Facebook login to a WordPress website.
It covers Facebook App setup, plugin-based integration, alternative methods, and common issues such as redirect URI mismatches.
For most WordPress sites, plugin-based login is recommended because it is easier to maintain and more secure.
Ways to Add Facebook Login on a WordPress Website
There are three common ways to add Facebook login to a WordPress website. The right approach depends on how much control you need and how comfortable you are with ongoing maintenance.
- The most common option is using a social login plugin. This method handles authentication, permissions, and API changes for you. It is suitable for most WordPress websites.
- Another option is manual integration using Facebook’s SDK. This approach requires custom development and direct handling of app credentials, redirect URLs, and user data.
- Some websites also rely on third-party identity providers that sit between Facebook and WordPress. These services simplify setup but add an external dependency.
In this guide, the focus is on the plugin-based method using WP Social, which works well for most WordPress use cases.
Why Should You Add Facebook Login on Your WordPress Website?
Most people already have Facebook accounts. That is not the real reason Facebook login works.
Integrating the ‘Log in with Facebook’ button on your WordPress website is a wise move for a bunch of reasons. When you let the users log in to your WordPress site with Facebook, they get rid of the password fatigue which they would otherwise go through.
On top of that, as the visitors do not need to fill out another login/registration form, they can save their valuable time to invest in exploring your website more.
When users log in with Facebook, they do not need to remember passwords or fill out long registration forms. This saves time and makes the login process smoother, especially for first-time visitors.
However, Facebook login is not a universal solution.
In practice, we have seen Facebook login improve access on content-driven and community sites, while causing drop-offs on email-first or compliance-heavy setups.
While it improves convenience, it also introduces dependency on a third-party platform. That tradeoff matters and should be considered before enabling it on your site.
However, you might now be wondering about the benefits you can reap by adding a Facebook login to WordPress websites. Well, I am now going to talk about some key reasons for Facebook integration on your website:
- You can get to know the full name of the users from Facebook. It can enable you to send personalized newsletters and updates.
- While many users sign up for websites with fake emails, the registered emails of the users on Facebook are more likely to be genuine.
- Adding a Facebook login to your website will also help you to get the location, gender, and age of the visitors. You can prepare your marketing plan more accurately with the personalized data.
- Tracking the “Likes” of the users, you can offer a more tailored service to them. Additionally, accessing their Facebook friend lists can enable you to recommend them the products or services their friends are using.
Recommendation:
Use Facebook login as an optional shortcut, not a replacement for email login. This keeps flexibility without dependency.
So, what are you waiting for? Keep reading this post till the end to know all the steps you need to follow for adding a Facebook login on your WordPress website.
Before You Continue: Is Facebook Login Right for Your Site?
Before moving forward, it is important to decide whether Facebook login actually fits your website.
Facebook login works well if your site targets general users, communities, or content-based platforms where quick access matters more than strict user qualification.
However, if email ownership is critical to your business, or if your site operates under strict compliance requirements, relying too much on social login may create issues later.
If your audience values speed and convenience, continue with the setup.
If control and data ownership matter more, use Facebook login for WordPress carefully and always keep alternatives available.
Here’s What You Need
If you do not have deep coding knowledge, it is better for you to choose a social login plugin to add a Facebook login to your site.
Wp Social is one of the best social media plugins for WordPress that can help you achieve your goal. The decision-making and setup principles explained in this guide apply regardless of the plugin you choose. Apart from letting you add a Facebook login button at any place on your website, it also features social share and social count options. So, if you get Wp Social, you are actually getting a 3-in-1 plugin. The video below walks through the same setup process visually on how to add social login for WordPress.
How to Add Facebook Login to WordPress Website (Step-by-Step)
If you want to know how to integrate the Facebook login on your WordPress website seamlessly with a plugin, I am going to give you a step-by-step detailed guideline now using Wp Social. Follow the steps properly and add Facebook to WordPress for login.
Let’s go ahead:
Step 1: Install a Facebook Login Plugin for WordPress
To install the Facebook login plugin for WordPress:
● Login to the admin panel area of your WordPress website.
● Go to Plugins ➔ Add New
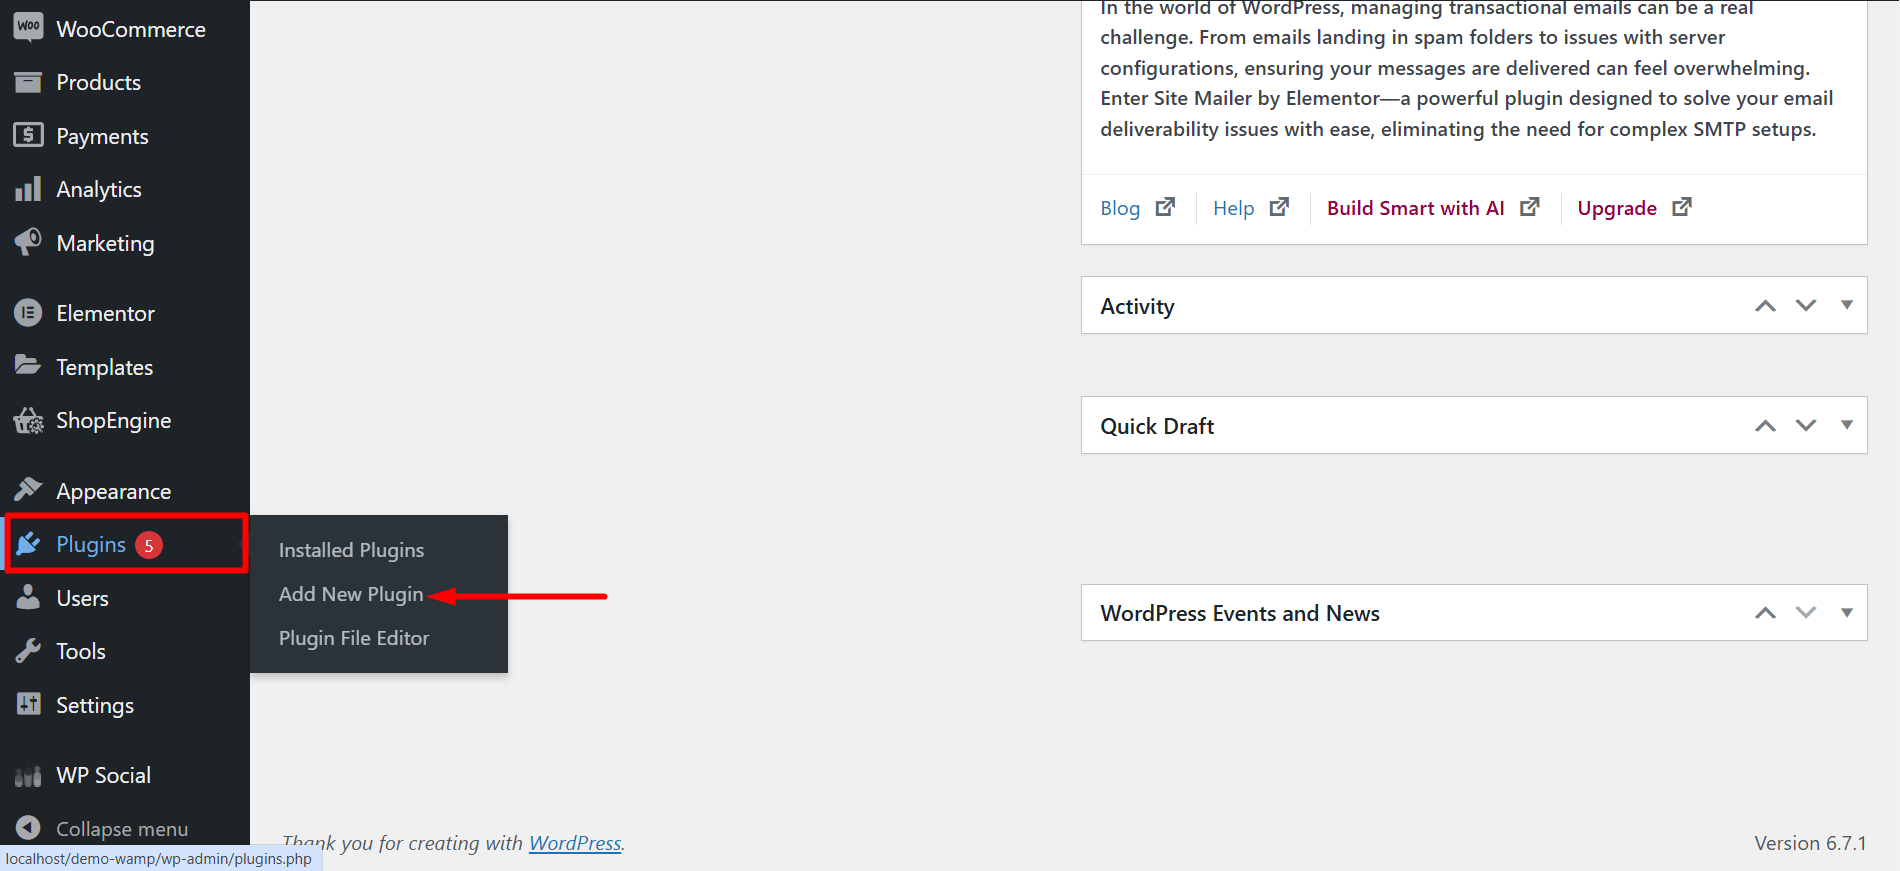
● Type “Wp Social” inside the search field.

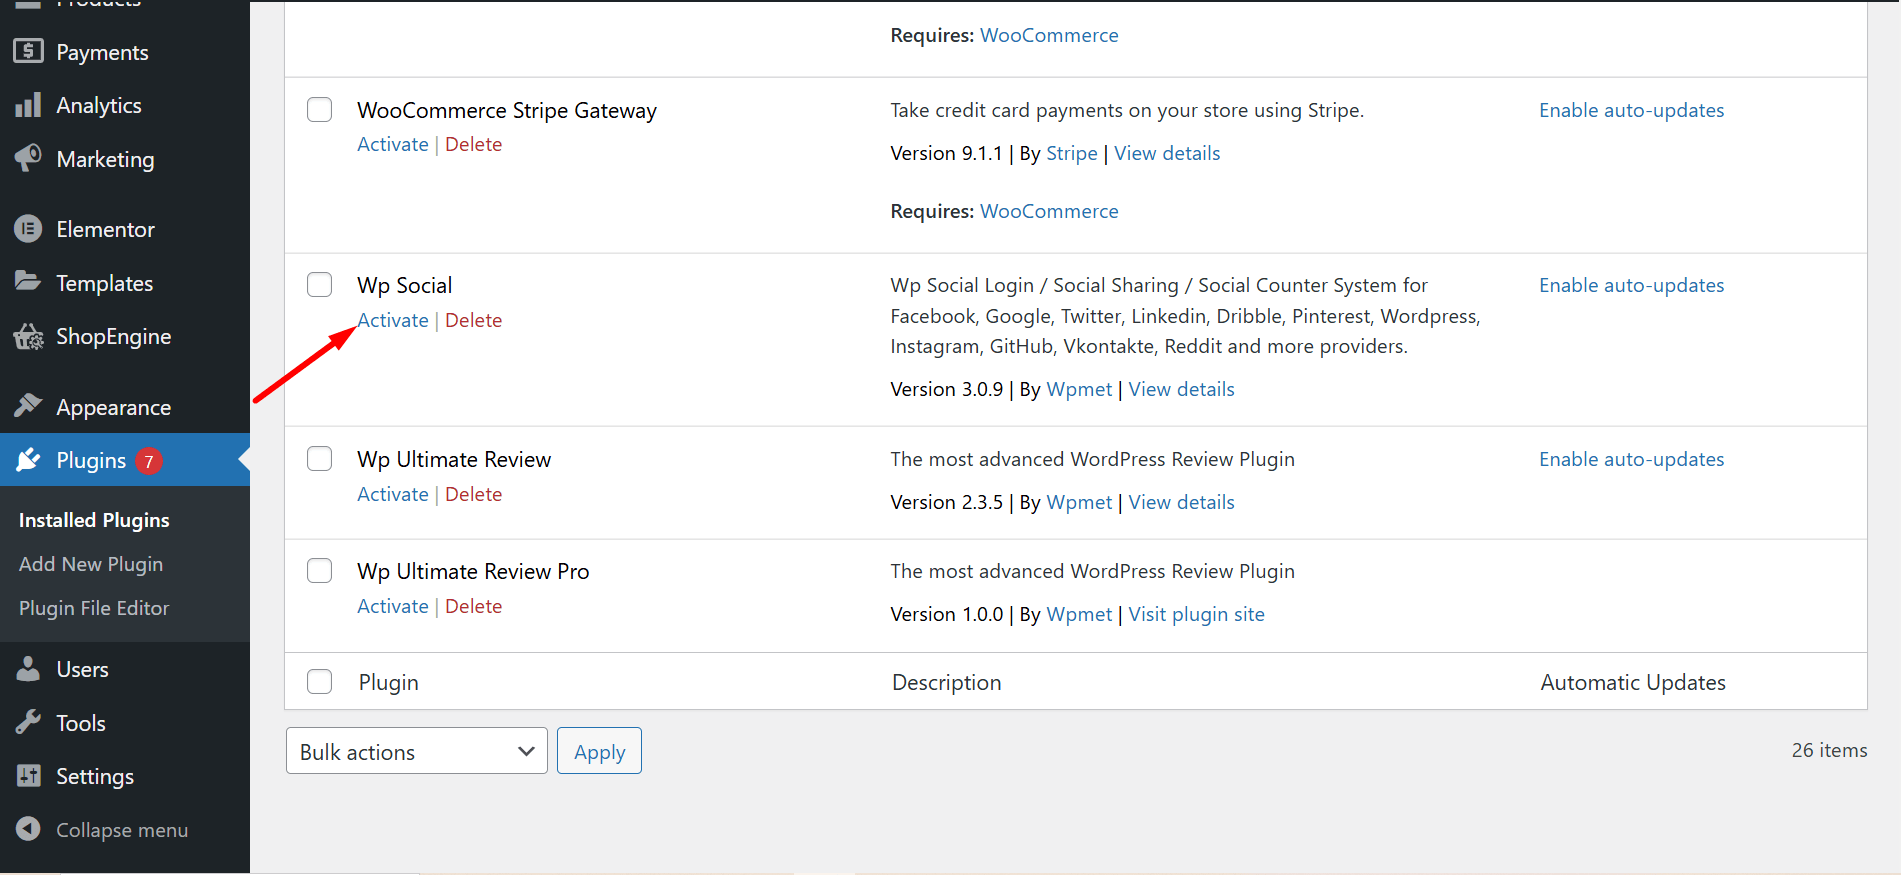
- Find the “Wp Social-Social Login and Register, Social Share, Social Counter” from the search result. Now, click on “Install Now”
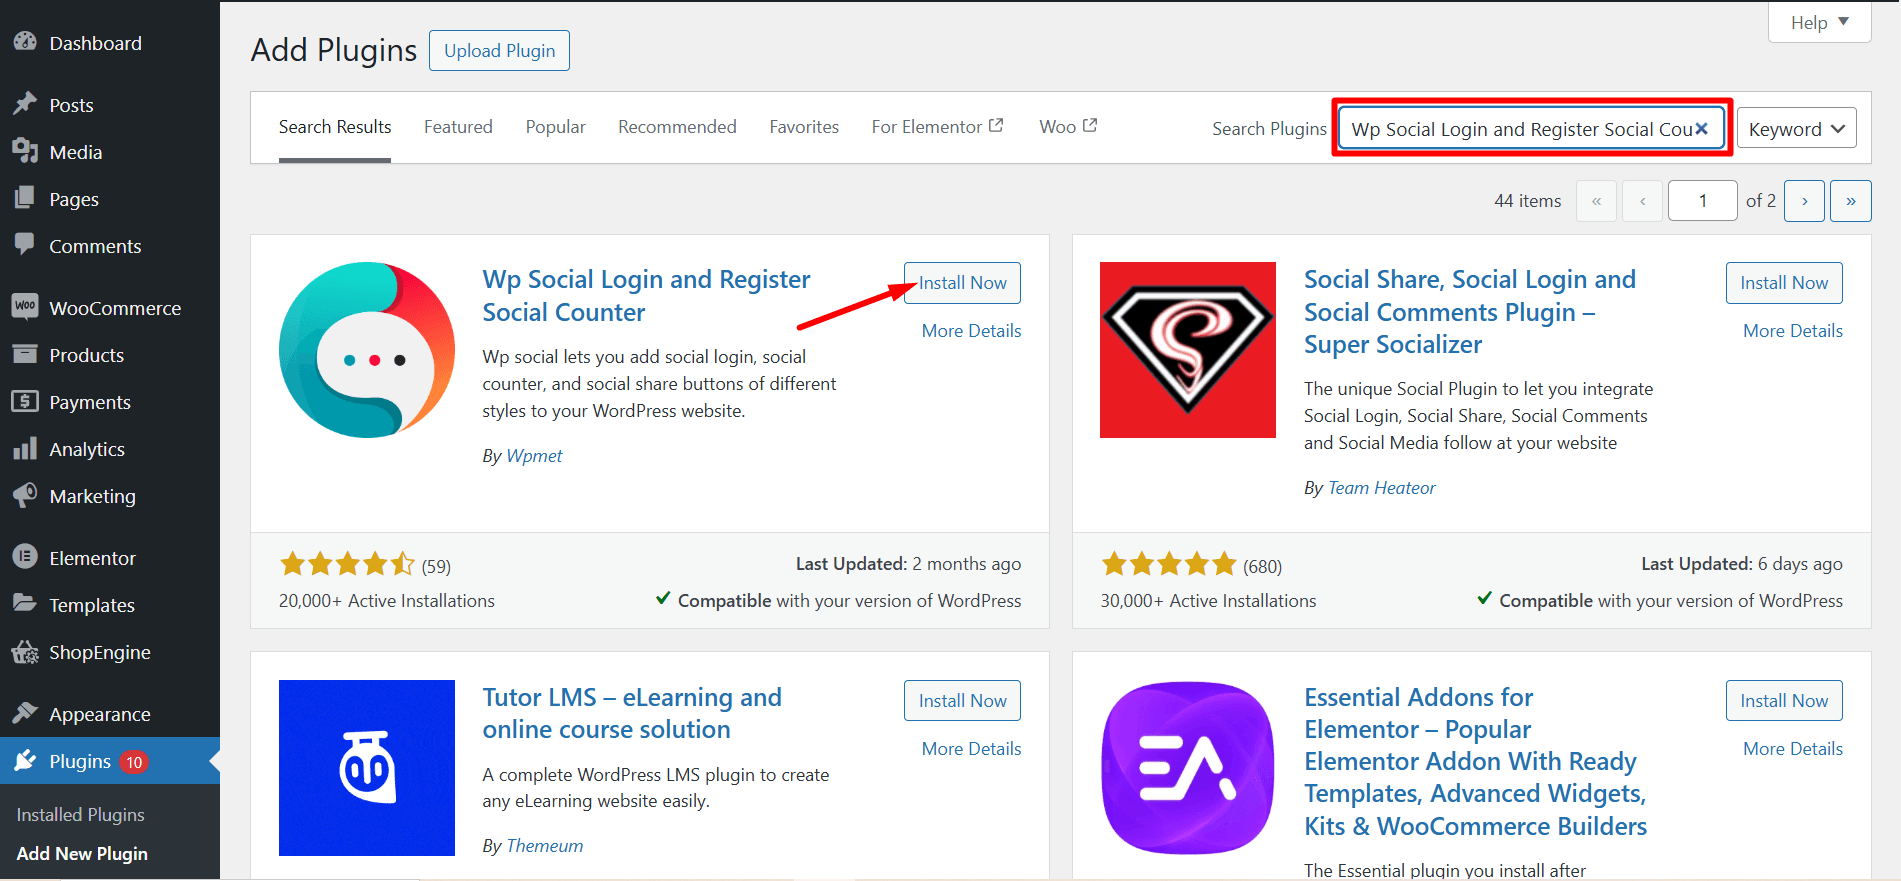
- After the end of the installation process, activate the plugin.
Step 2: Create a Facebook Developer Account
- Navigate to https://developers.facebook.com/apps/
- Login to your Facebook account If you are logged out.
- Click on the “Get Started” section to start creating your developer’s account. Follow the instructions step-by-step to complete your registration process for a Facebook developer account.

Step 3: Create a Facebook App
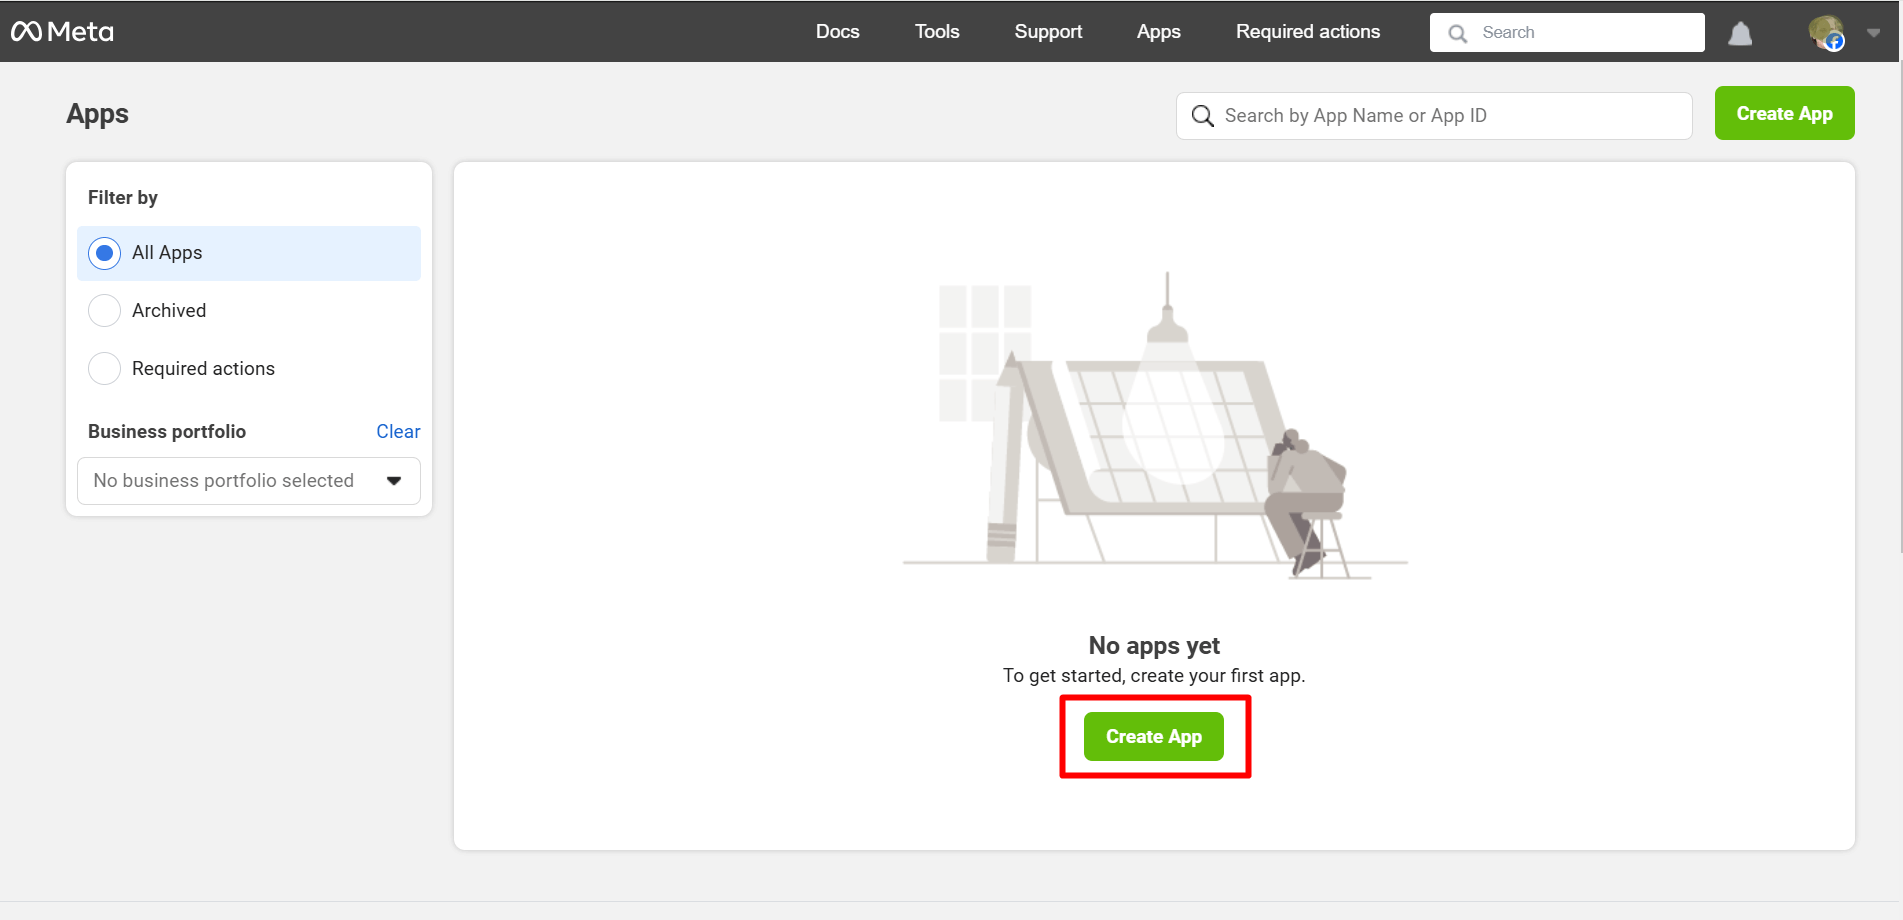
- After completing your registration as a developer, you’ll be redirected to the Facebook app creation page. Click on “Create App” to go ahead
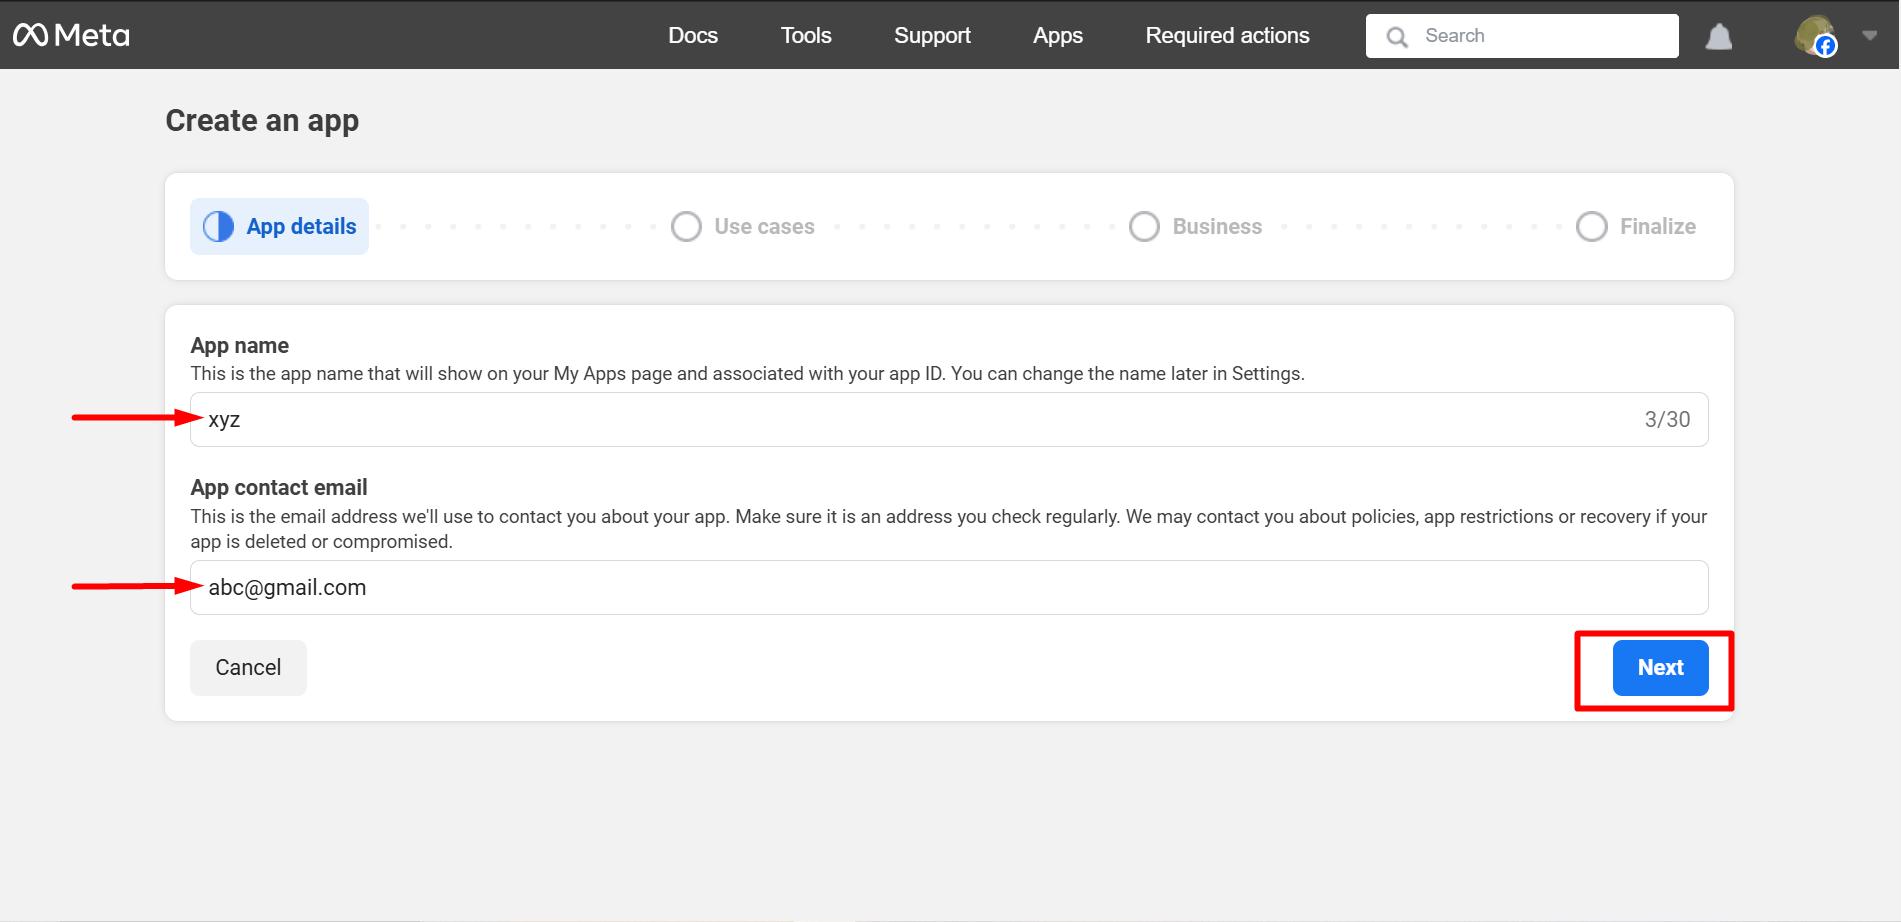
- At this step of app creation, set a meaningful App Name and Add contact email. After that, click on “Next”.
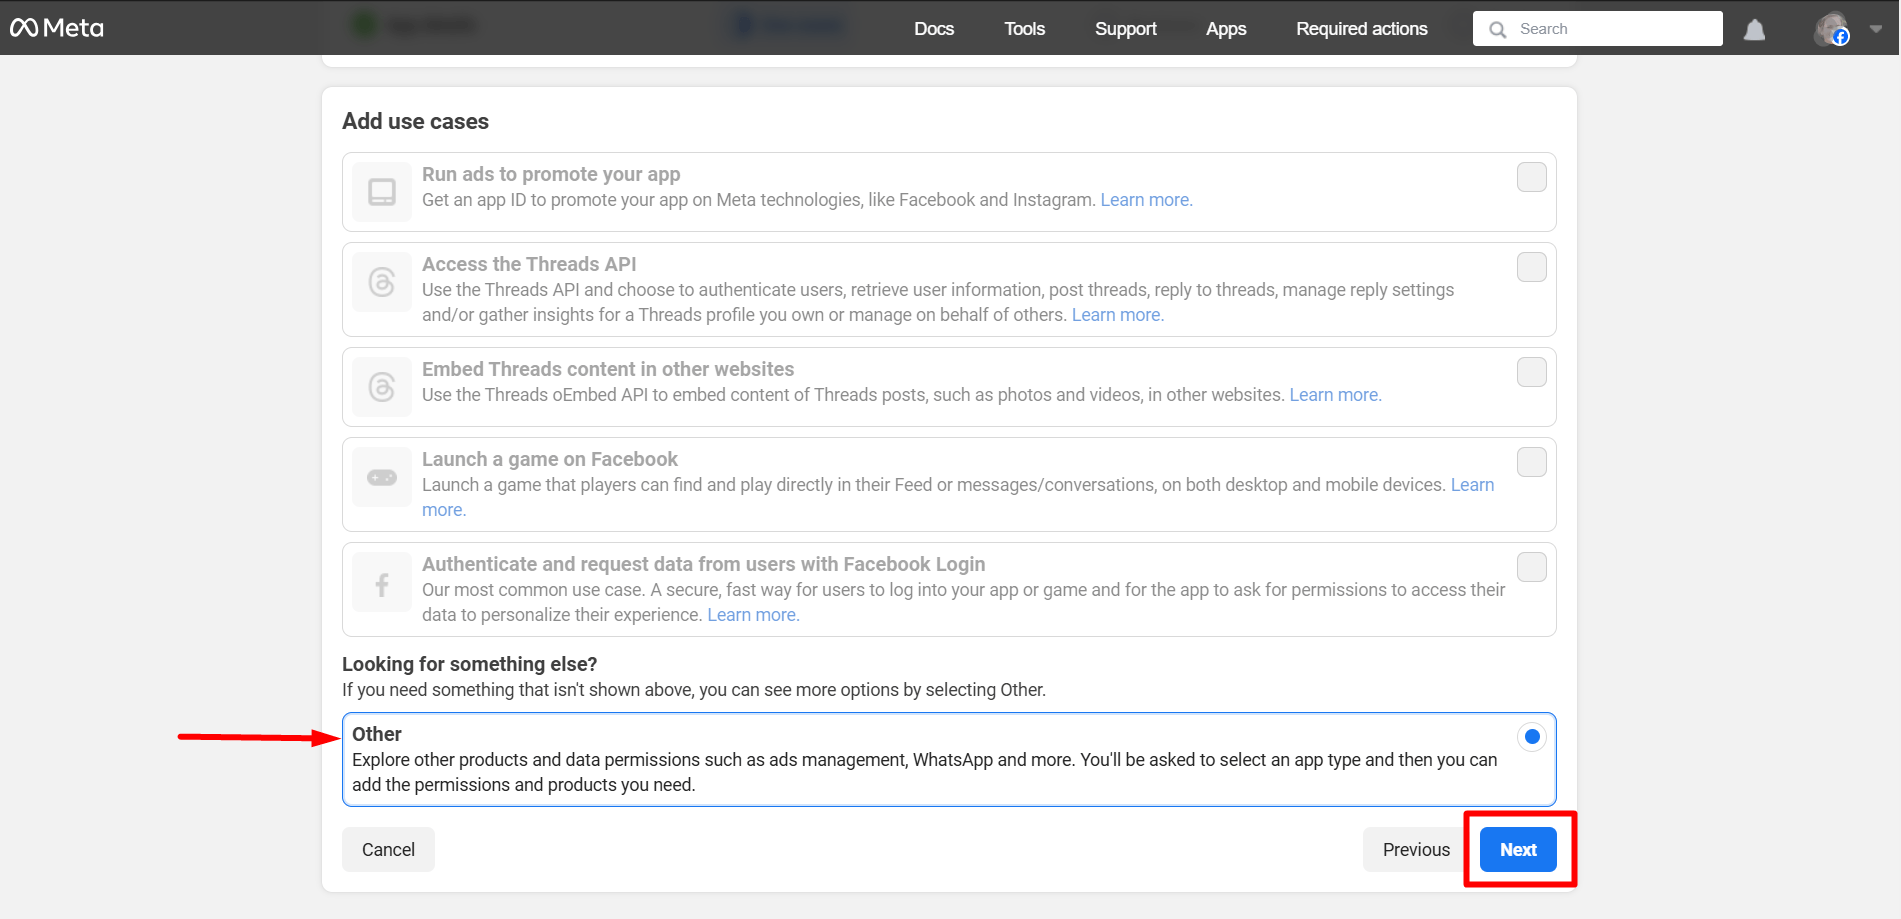
- You must select ‘Other’ as the use case here. Click on ‘Next’ when you are done.
Now, select Consumer and press the ‘Next’ button.

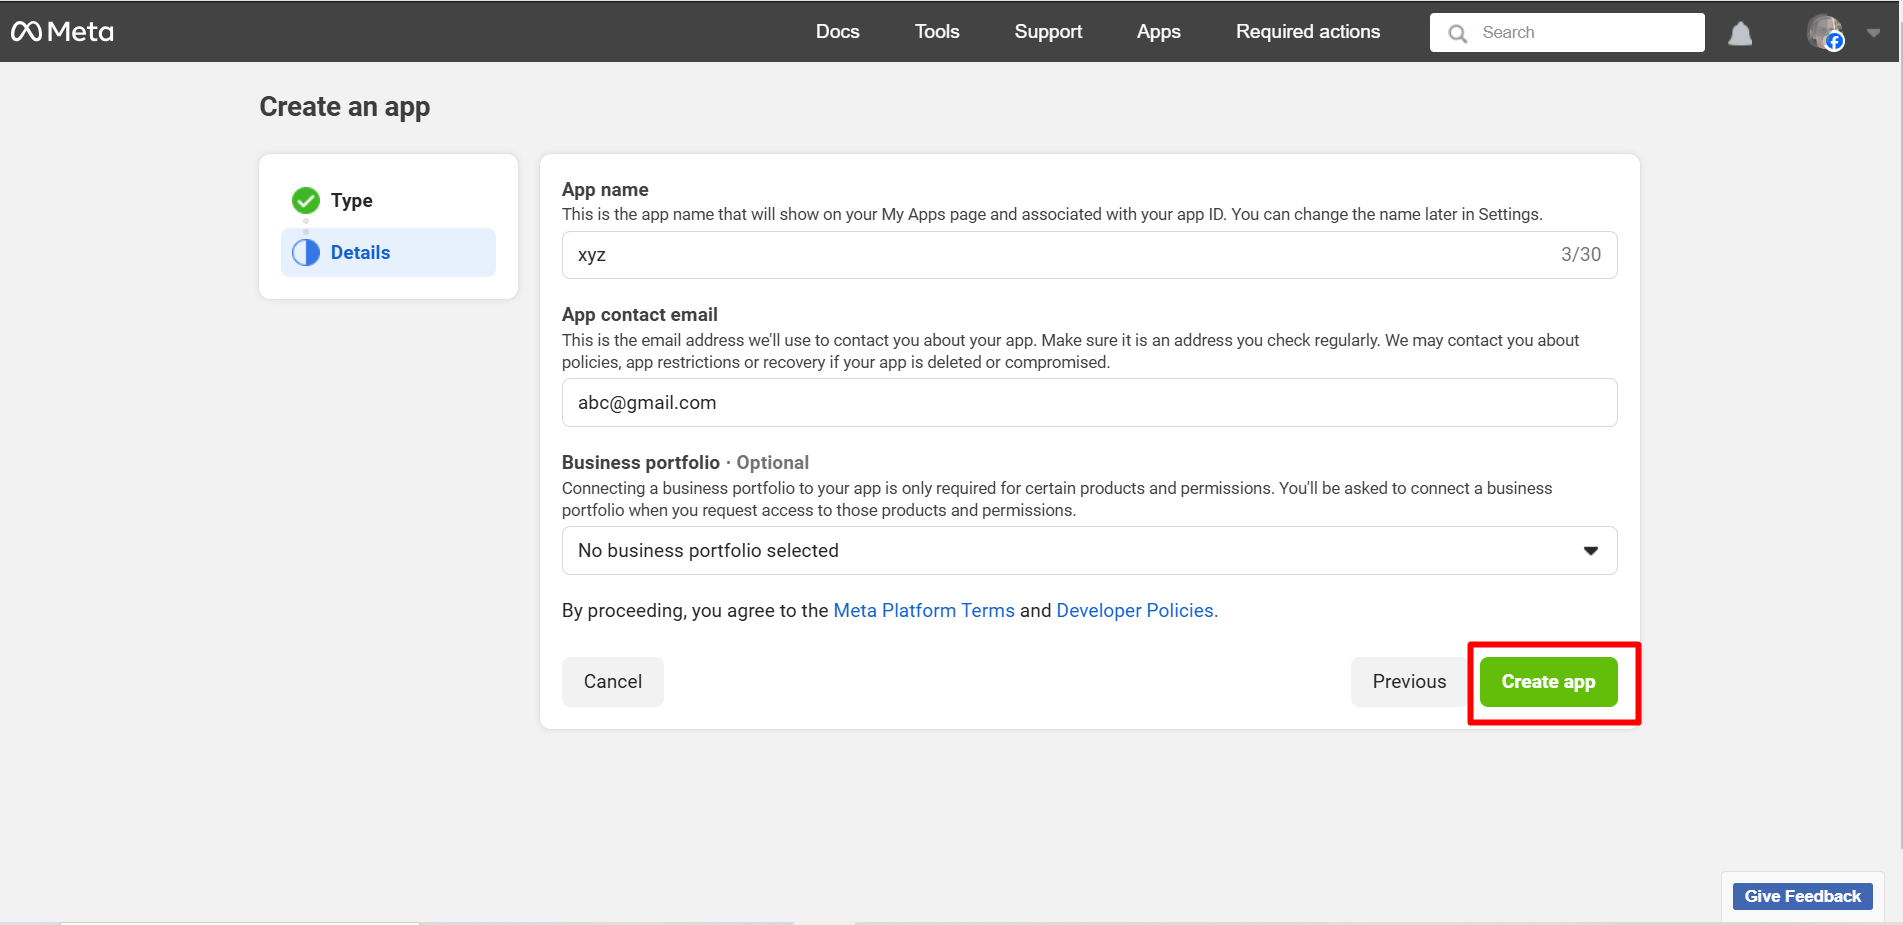
In this step, you can check the whole details again and press the ‘Next’ button.
After that, you may be required to log in to your Facebook account again.
Step 4: Configure Facebook Login
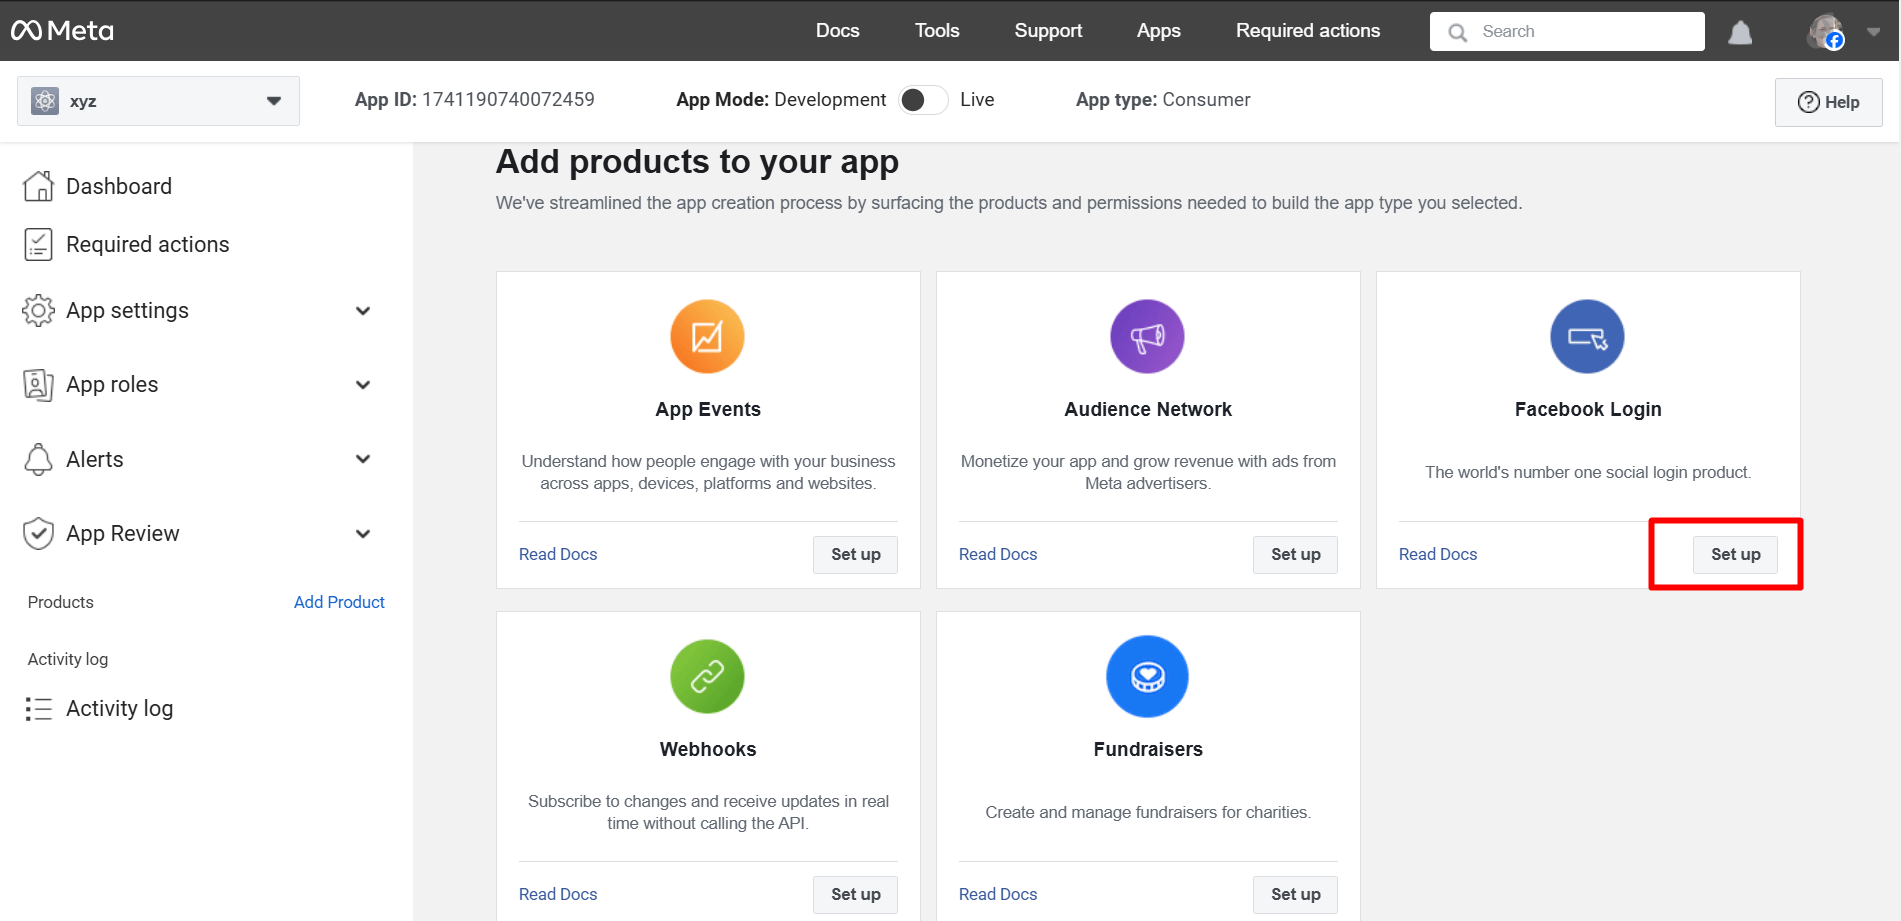
Finally, here is your App dashboard and
After the process mentioned above, you’ll be taken to the ‘Products’ page located under Dashboard. Click on the ‘+’. Find out ‘Facebook Login’ from the list and click on ‘Set Up’.
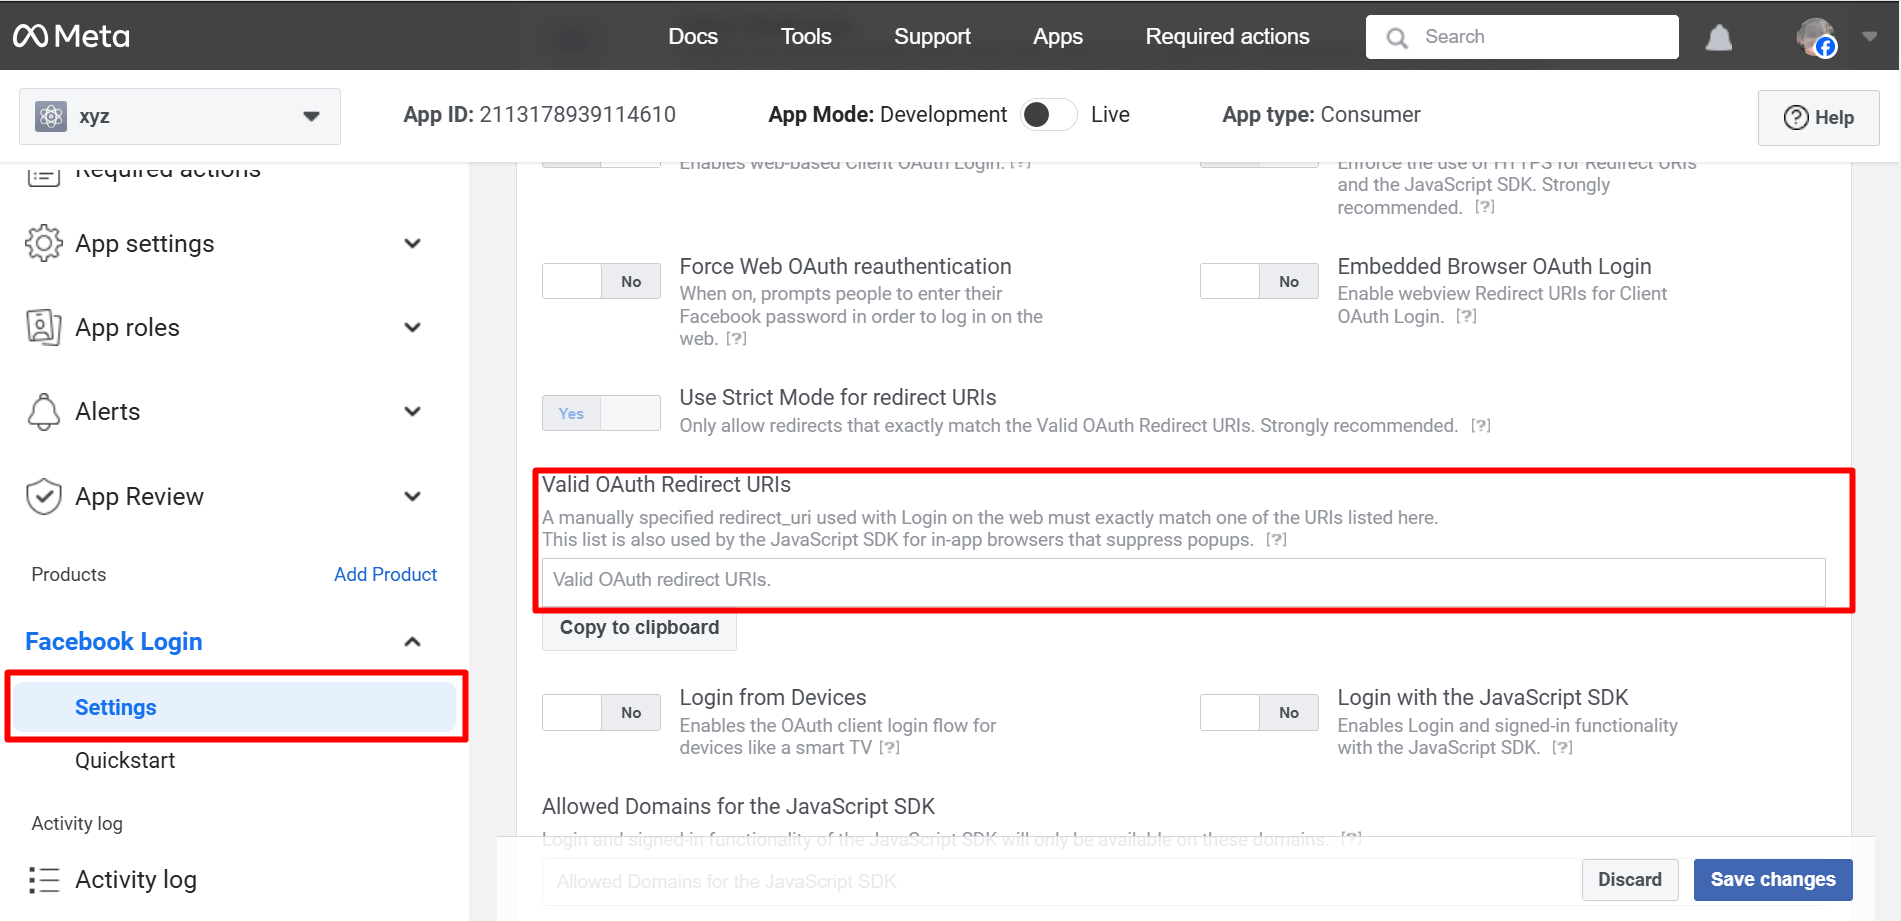
Go to Settings under the Facebook Login app. You have to enter Valid OAuth Redirect URIs under Client OAuth Settings.
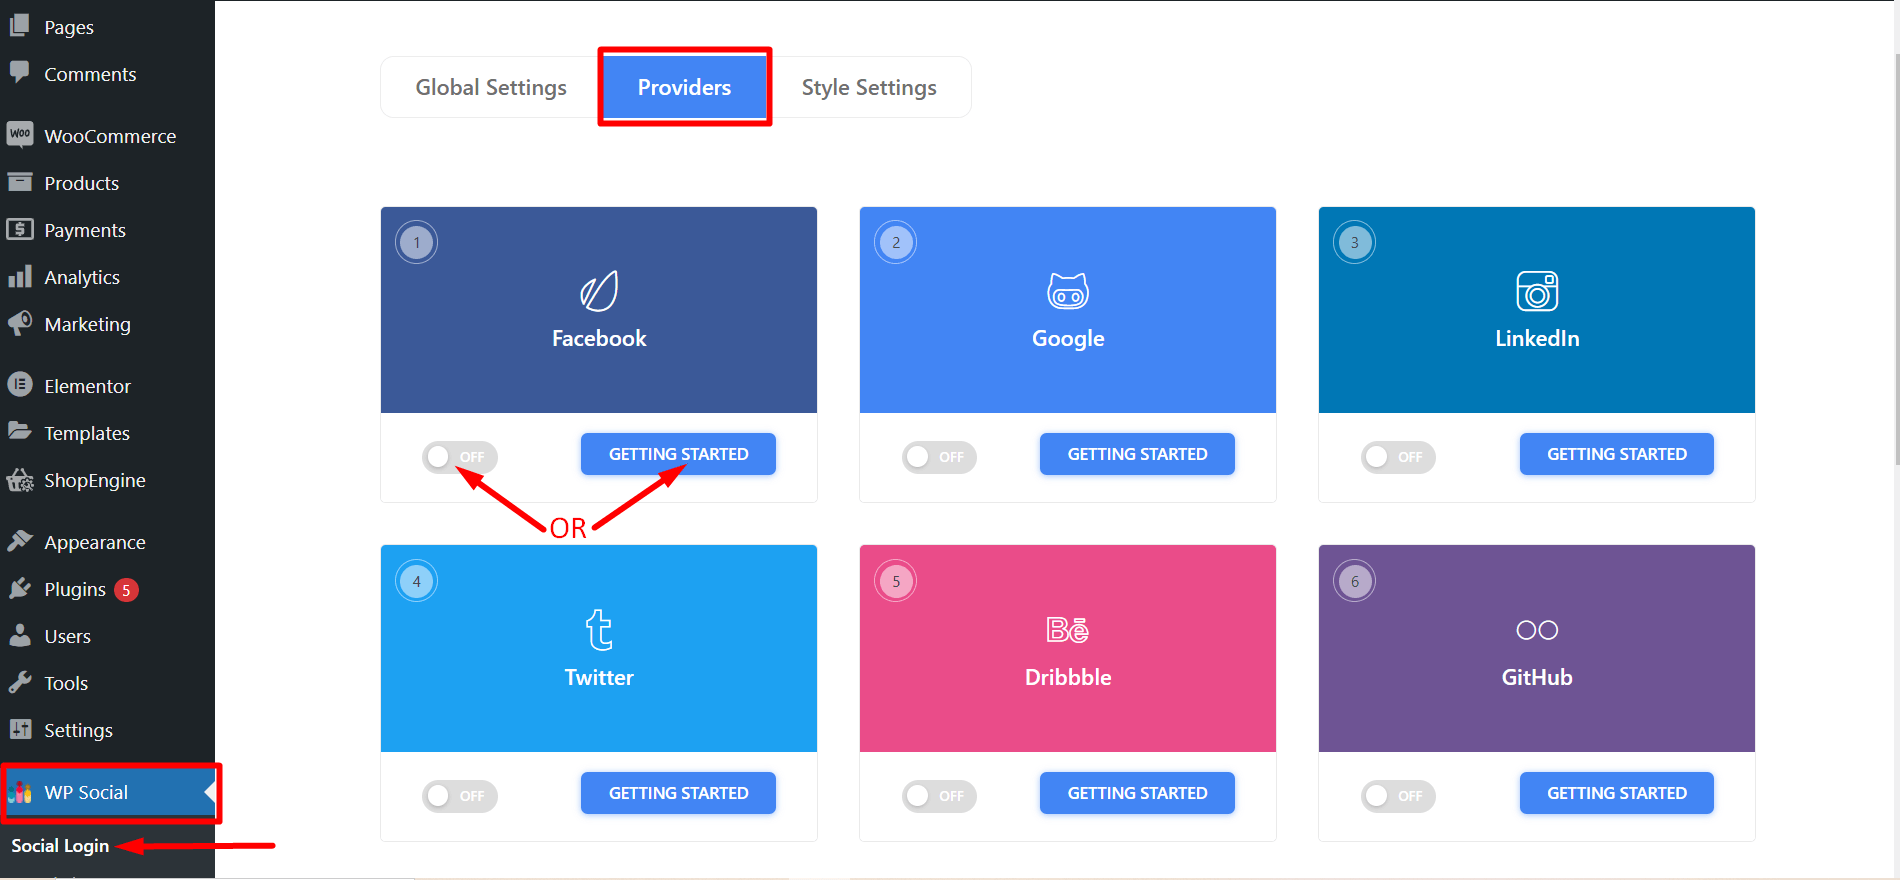
To get the Valid OAuth Redirect URIs, you have to go to your WordPress admin area.
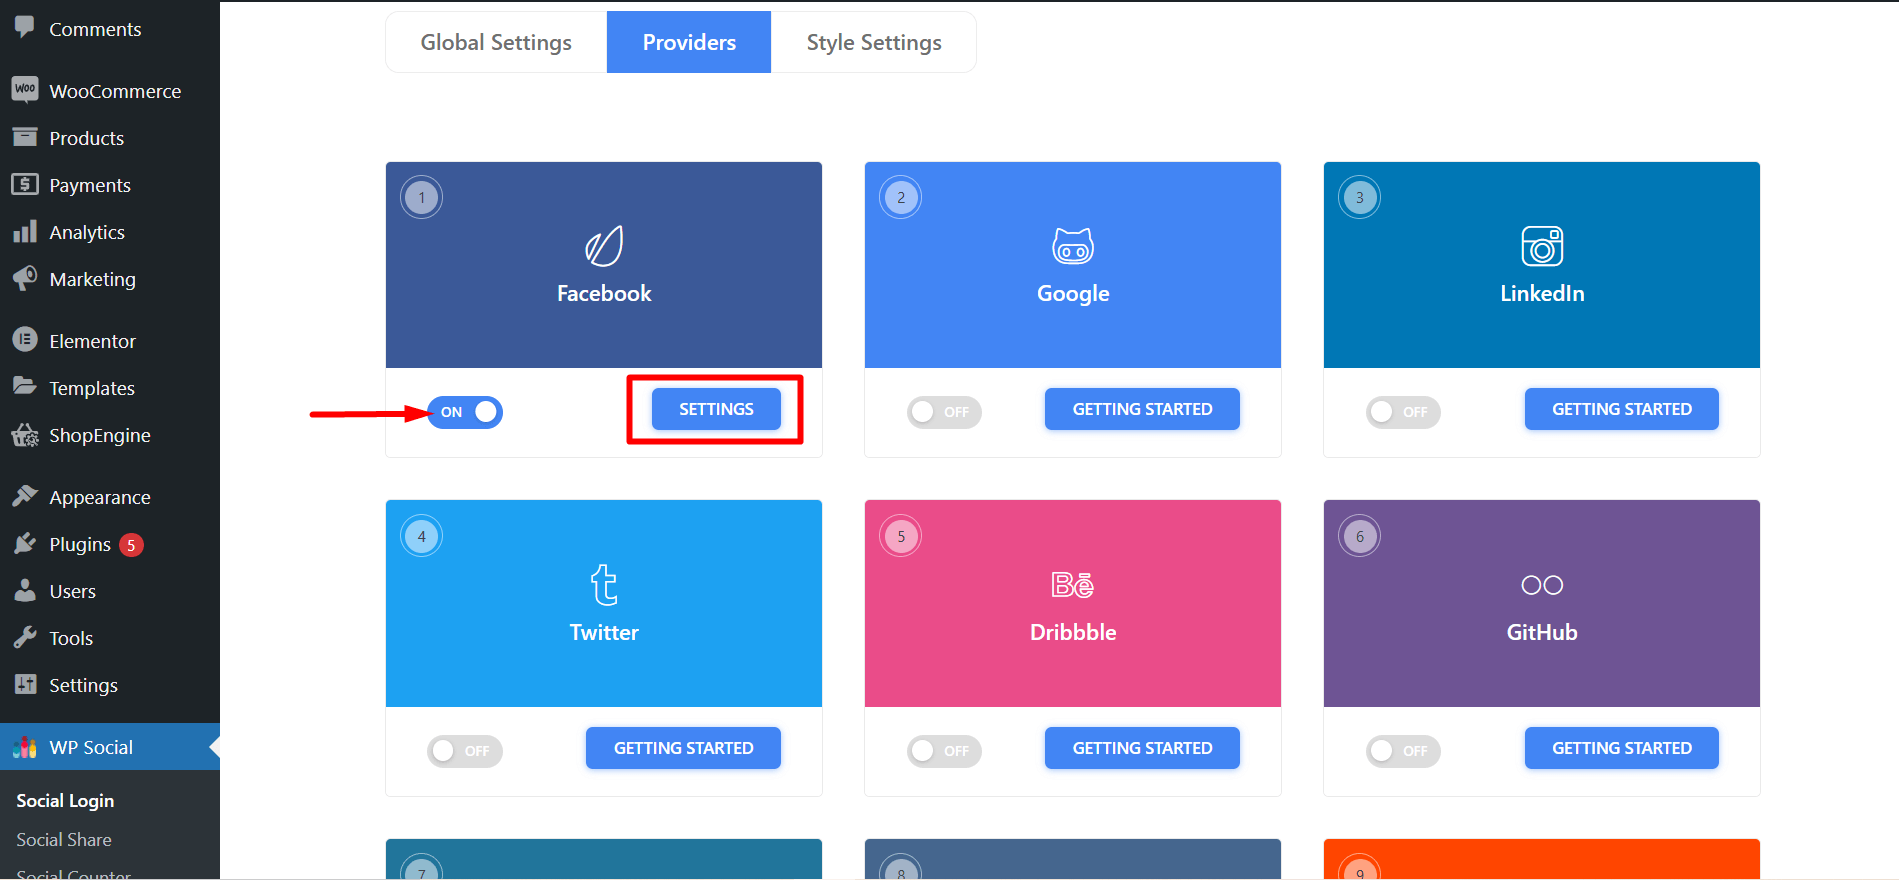
Navigate to WP Social ➔ Social Login ➔ Providers➔ Facebook➔ Click on the toggle button or Getting Started.
- You’ll now see a link to be used as Valid OAuth Redirect URIs. Copy it and go back to Facebook Login app settings to paste that on the ‘Valid OAuth Redirect URIs’ field.

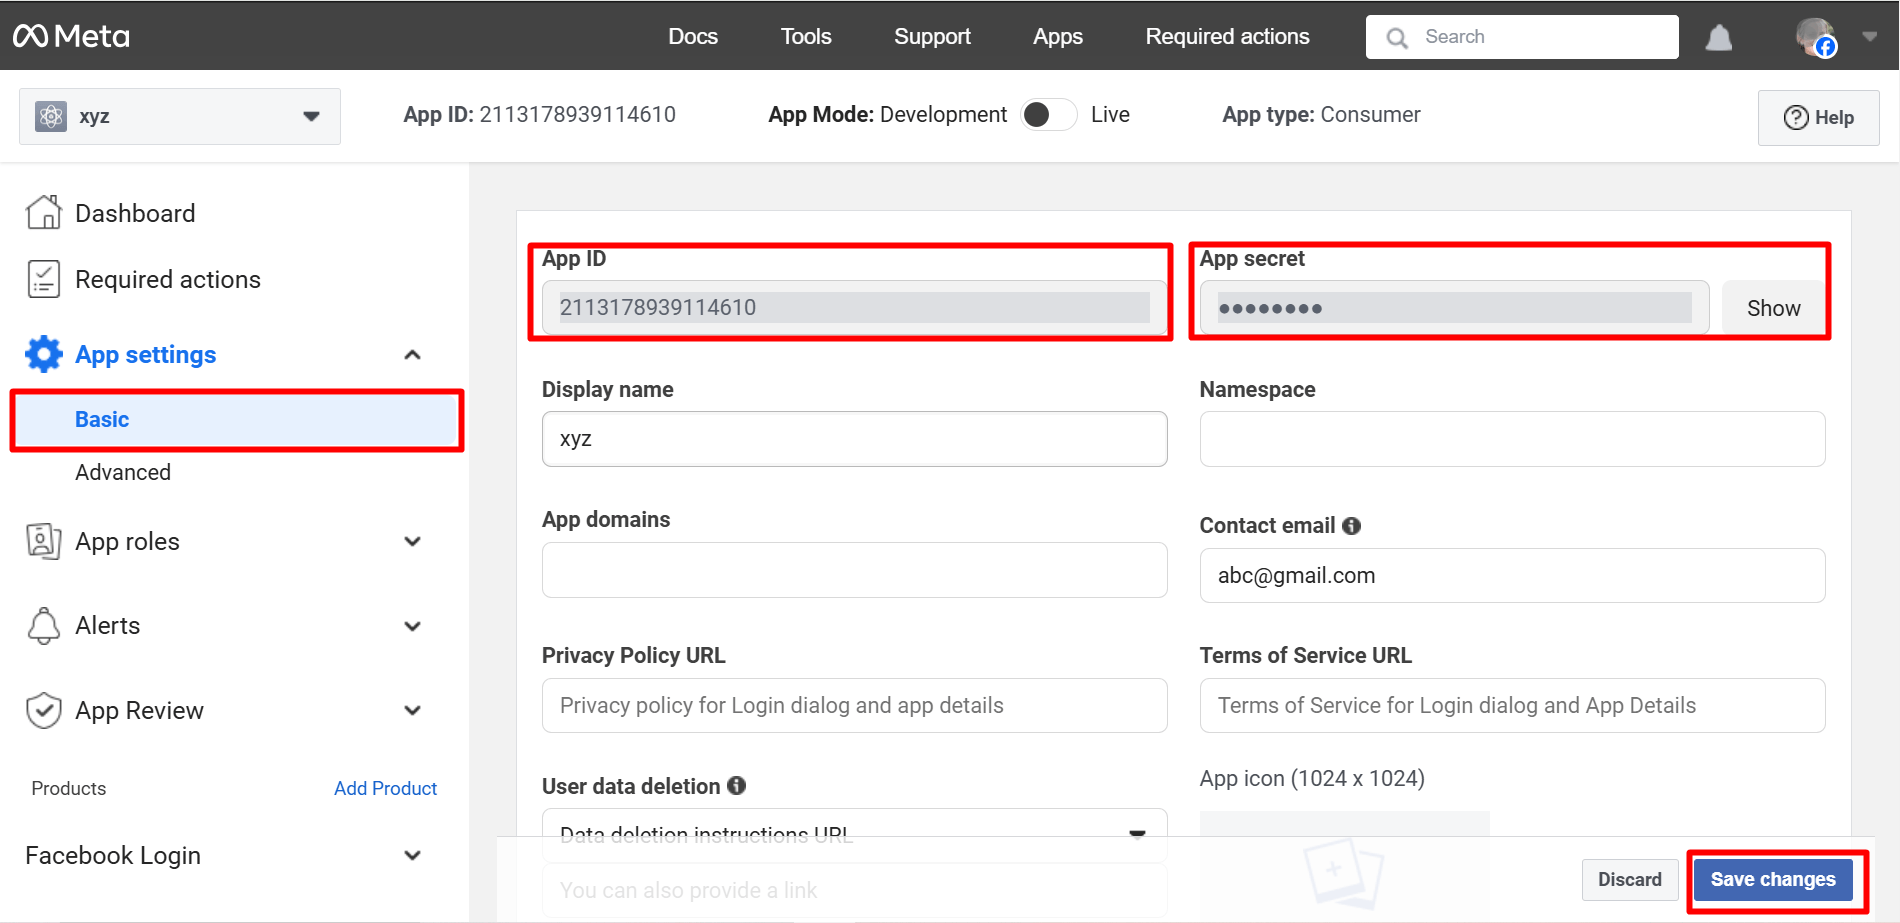
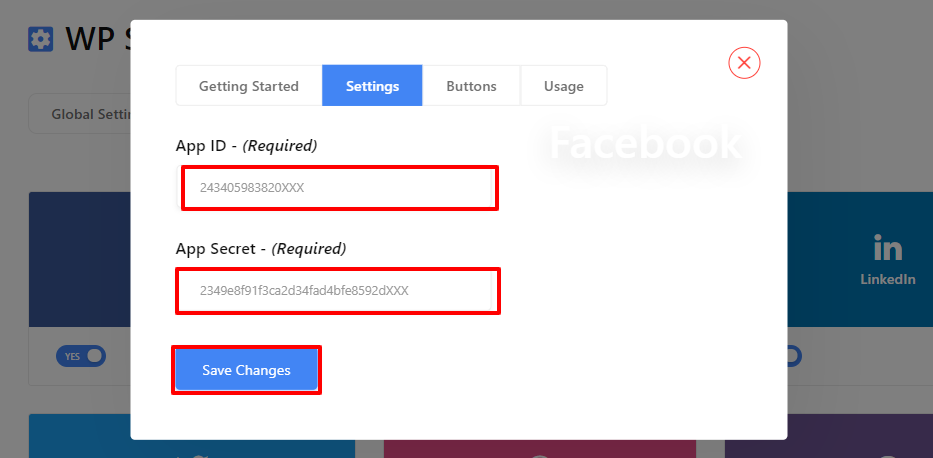
- Now, go to the ‘Basic’ submenu under Settings. Copy the App ID and App Secret for using those in the Wp Social app. Fill up other fields and click on ‘Save Changes’ when you are done.
Important Setup Insight (Often Missed)
Many Facebook login setups appear to work but fail in real usage.
This usually happens because of small configuration issues that are easy to overlook. For example, a mismatched OAuth redirect URI or unnecessary permission requests can silently break the login process.
Always make sure that:
- Your Facebook app is set to Live mode
- The OAuth redirect URI matches exactly
- Only the required permissions are requested
A visible login button does not always mean the login flow is working correctly. Testing matters more than installation.
Step 5: Use Your App ID and App Secret with Wp Social
- Once you’ve completed creating an app on Facebook, go to the WP Social login from the WordPress dashboard. Navigate to Social Login ➔ Providers. Switch the left button below Facebook ‘ON’ and then click ‘Settings’.
- Enter on the Settings tab and paste the App ID and App Secret received from Facebook. Once you are done, click on ‘Save Changes’.
Step 6: Configure WP Social Plugin’s Settings
- ● Navigate to the Global Settings of the Social Login and choose the page where you want to place the Facebook login and at which position. Once done, save the changes.
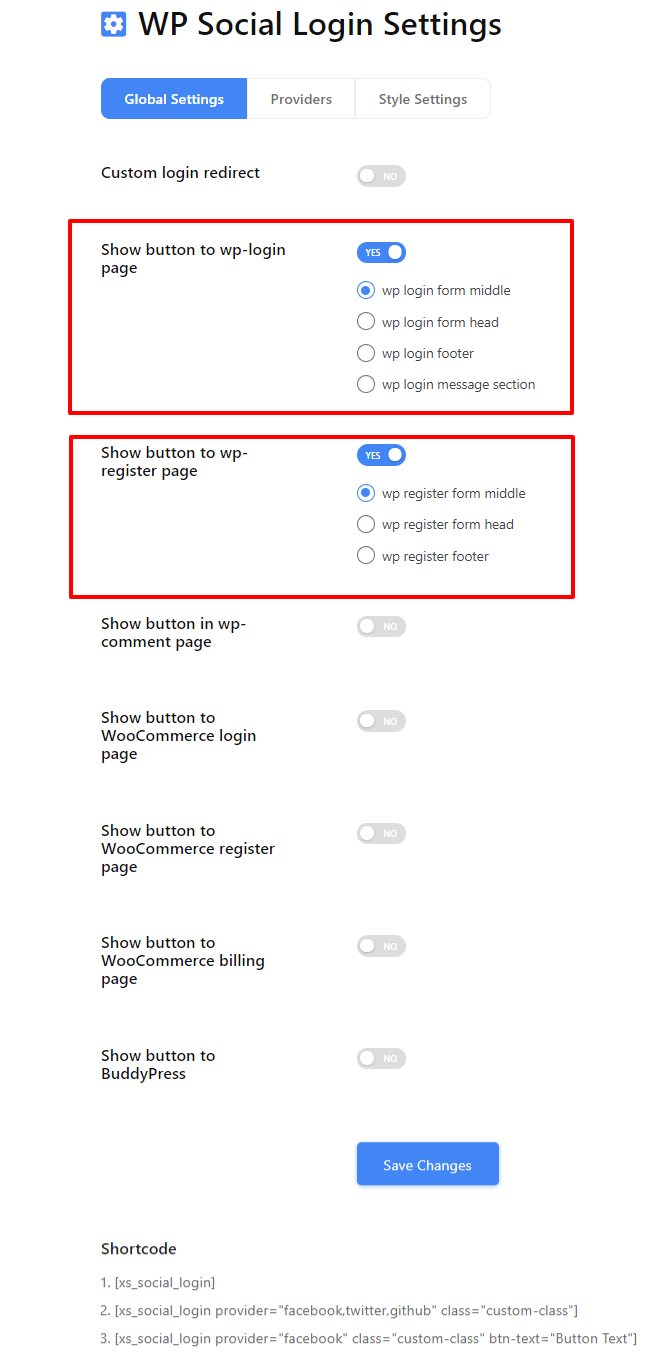
You will also get a list of social login shortcodes to use elsewhere on your WordPress website.
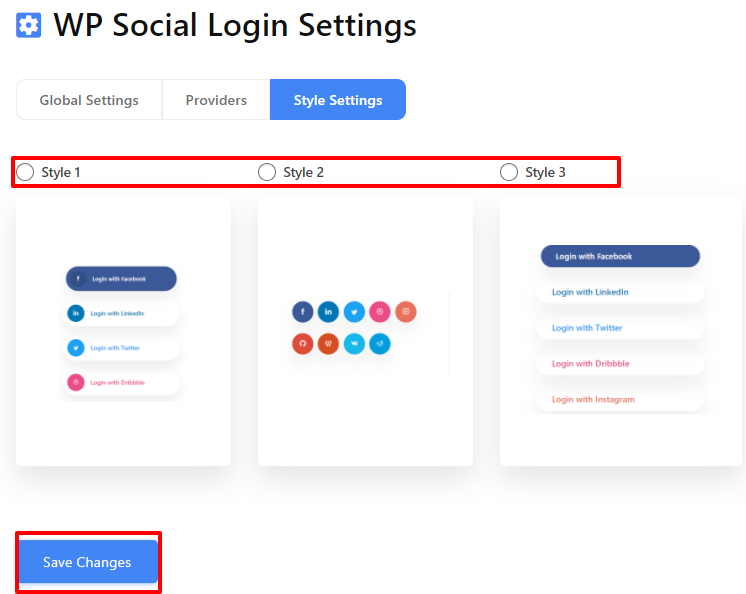
● Next, go to the style settings, choose your favorite style, and click on ‘Save Changes‘ to implement your choice.
How to Know Your Facebook Login Is Working
After completing the setup, do not stop at seeing the login button.
You should test whether:
- New users can log in and get WordPress accounts created
- Existing users can log in again without errors
- Facebook login works properly on mobile browsers
- Logout and re-login works as expected
When configured correctly, Facebook login usually results in faster first-time access and fewer abandoned registrations. If login numbers increase but engagement drops, placement and usage should be reviewed.
That’s all. You can now see Facebook login exactly where you want on your WordPress website with your favorite style. So, you got the idea how to add Facebook to WordPress in a few simple steps. Now if you want to add social login to your website, you can see this post.
Manual Facebook Login Integration (Advanced Method)
Facebook login can also be added manually without using a plugin. This approach is typically used when a site needs full control over the authentication flow.
Manual integration requires working directly with Facebook’s JavaScript or PHP SDK. You must configure the App ID and App Secret securely, set correct redirect URIs, and manage permission scopes such as public profile and email.
This method also requires ongoing maintenance. Facebook API changes, permission reviews, and security updates must be handled manually.
Because of this complexity, manual integration is generally recommended only for developers or highly customized WordPress setups.
Common Facebook Login Issues and Fixes
Facebook login on WordPress issues are often caused by configuration mismatches rather than plugin errors.
A redirect URI mismatch usually occurs when the callback URL in Facebook Developer settings does not exactly match the WordPress login URL.
If login works only for admins, the Facebook app may still be in development mode and not publicly available.
Some users may not receive an email address if the email permission is not approved or available on their Facebook account.
Login buttons may not appear if page caching or CDN settings block dynamic scripts.
Facebook login on WordPress also requires HTTPS. Sites without a valid SSL certificate may fail authentication.
Final Thoughts
Facebook login can reduce friction. It can also create dependency. So, it is always highly recommended to use it intentionally.
However, here are some key points that you should keep in mind –
- Keep email login available
- Request minimal permissions
- Test every login scenario
Finally, when Facebook Login is used as a shortcut, it improves access.
However, when used blindly, it creates silent drop-offs.
So, choose based on your audience, not trends.
Now that you know how to integrate Facebook social login on your website, it is time to check and try. Follow the steps mentioned above and you’ll get things done. Hope that you’ll be successful in adding a Facebook login for WordPress. The exact plugin may change over time, but the decision factors and setup checks covered here remain the same.
Frequently Asked Questions (FAQ) on Login with Facebook on WordPress
Can I use PHP to add Facebook to WordPress website?
Yes, if you have enough technical knowledge, you can also make use of PHP to add a Facebook login into your WordPress website. However, that will take a good amount of time as you’ll need to install Facebook SDK for PHP into the project.
Fortunately, Yes! Wp Social offers shortcodes to let you use the Facebook login button wherever you want on your WordPress website.
Is Facebook login still relevant today?
Yes, but it should be used selectively. It works best as a secondary login option rather than the primary one.
What happens if Facebook is blocked or down?
Users will not be able to log in with Facebook. That is why email or username-based login should always remain available.
Is Facebook login safe?
Yes, when configured correctly. However, you should request minimal permissions and clearly inform users about what data is being accessed.
Can the same Facebook App be used on multiple WordPress websites?
Yes. A single Facebook App can be used on multiple websites as long as all domains are added to the app settings and the redirect URIs are configured correctly.
What permissions are required for Facebook login?
At minimum, Facebook login requires access to the public profile. Email permission is commonly requested but may require review and is not guaranteed for all users.
Does Facebook login work with WooCommerce or membership plugins?
Yes. Facebook login works with WooCommerce and most membership plugins as long as user registration is enabled and the plugin supports standard WordPress authentication.
Leave a Reply