Creating a professional WordPress website has never been more accessible, thanks to the revolution of the Gutenberg block editor.
If you have been using WordPress for a while, you can recall how we (the WordPress users) had to depend entirely on other page builder plugins. Most of them with completely different environment than the native WordPress.
Now, things have changed with the block editor. Gutenberg offers a flexible and powerful way to design your site with zero coding knowledge.
Yet, when you feel the need for advanced site editing features, there are block editor plugins that bring page builder features to the same interface. They also match the performance level of Gutenberg while doing so.
So this guide will walk you through the steps to create a complete website using WordPress and Gutenberg, from acquiring a domain to crafting intricate layouts to build a professional website.
Creating a Complete Professional Website in WordPress with Gutenberg
WordPress offers a reliable foundation for building professional websites, and with the Gutenberg block editor, the process becomes even more intuitive. Whether you’re starting from scratch or customizing an existing site, using Gutenberg in WordPress makes it easy to design quickly and efficiently. Here’s a step-by-step guide to help you navigate the process.
# Step 1: Get a domain and hosting service
The first step in building any website is selecting a domain name and a reliable hosting service. Your domain name is your website’s address on the internet (e.g. wpmet.com), while the hosting service provides a storage space on their server to store your website’s data and make it accessible online.
- Pick a Domain Name: Select a domain name that reflects your brand or the purpose of your website. It should be easy to remember, spell, and type.
- Choose a Hosting Provider: Opt for a trusted hosting provider with good uptime, speed, and customer support. Some popular options include Bluehost, Kinsta, Hostinger, etc.
For WordPress websites, there are a good number of hosting providers dedicated to WordPress. These hosting servers are configured specifically for WordPress, which can result in better compatibility and fewer technical issues. You may also have the WordPress installed in your site.
# Step 2: Use a block theme
To use the Gutenberg editor, you must have a block theme installed on your site. Block themes are designed to work seamlessly with the Gutenberg editor.
For any latest version of WordPress, you will have a default block theme installed on your website like Twenty Twenty Five or Hello Blocks theme.
If you wish to use any third-party block theme, here’s the process 👇
- Install a Block Theme: Go to your WordPress dashboard, navigate to Appearance > Themes, and search for a block theme.
- Activate the Theme: Once you find a block theme that suits your needs, install and activate it.
# Step 3: Install a block editor plugin
To extend the functionalities of Gutenberg, you can consider installing a block editor plugin to your WordPress site. A plugin would add more functionalities with additional blocks, patterns, and ready templates,making it easier to design your website.
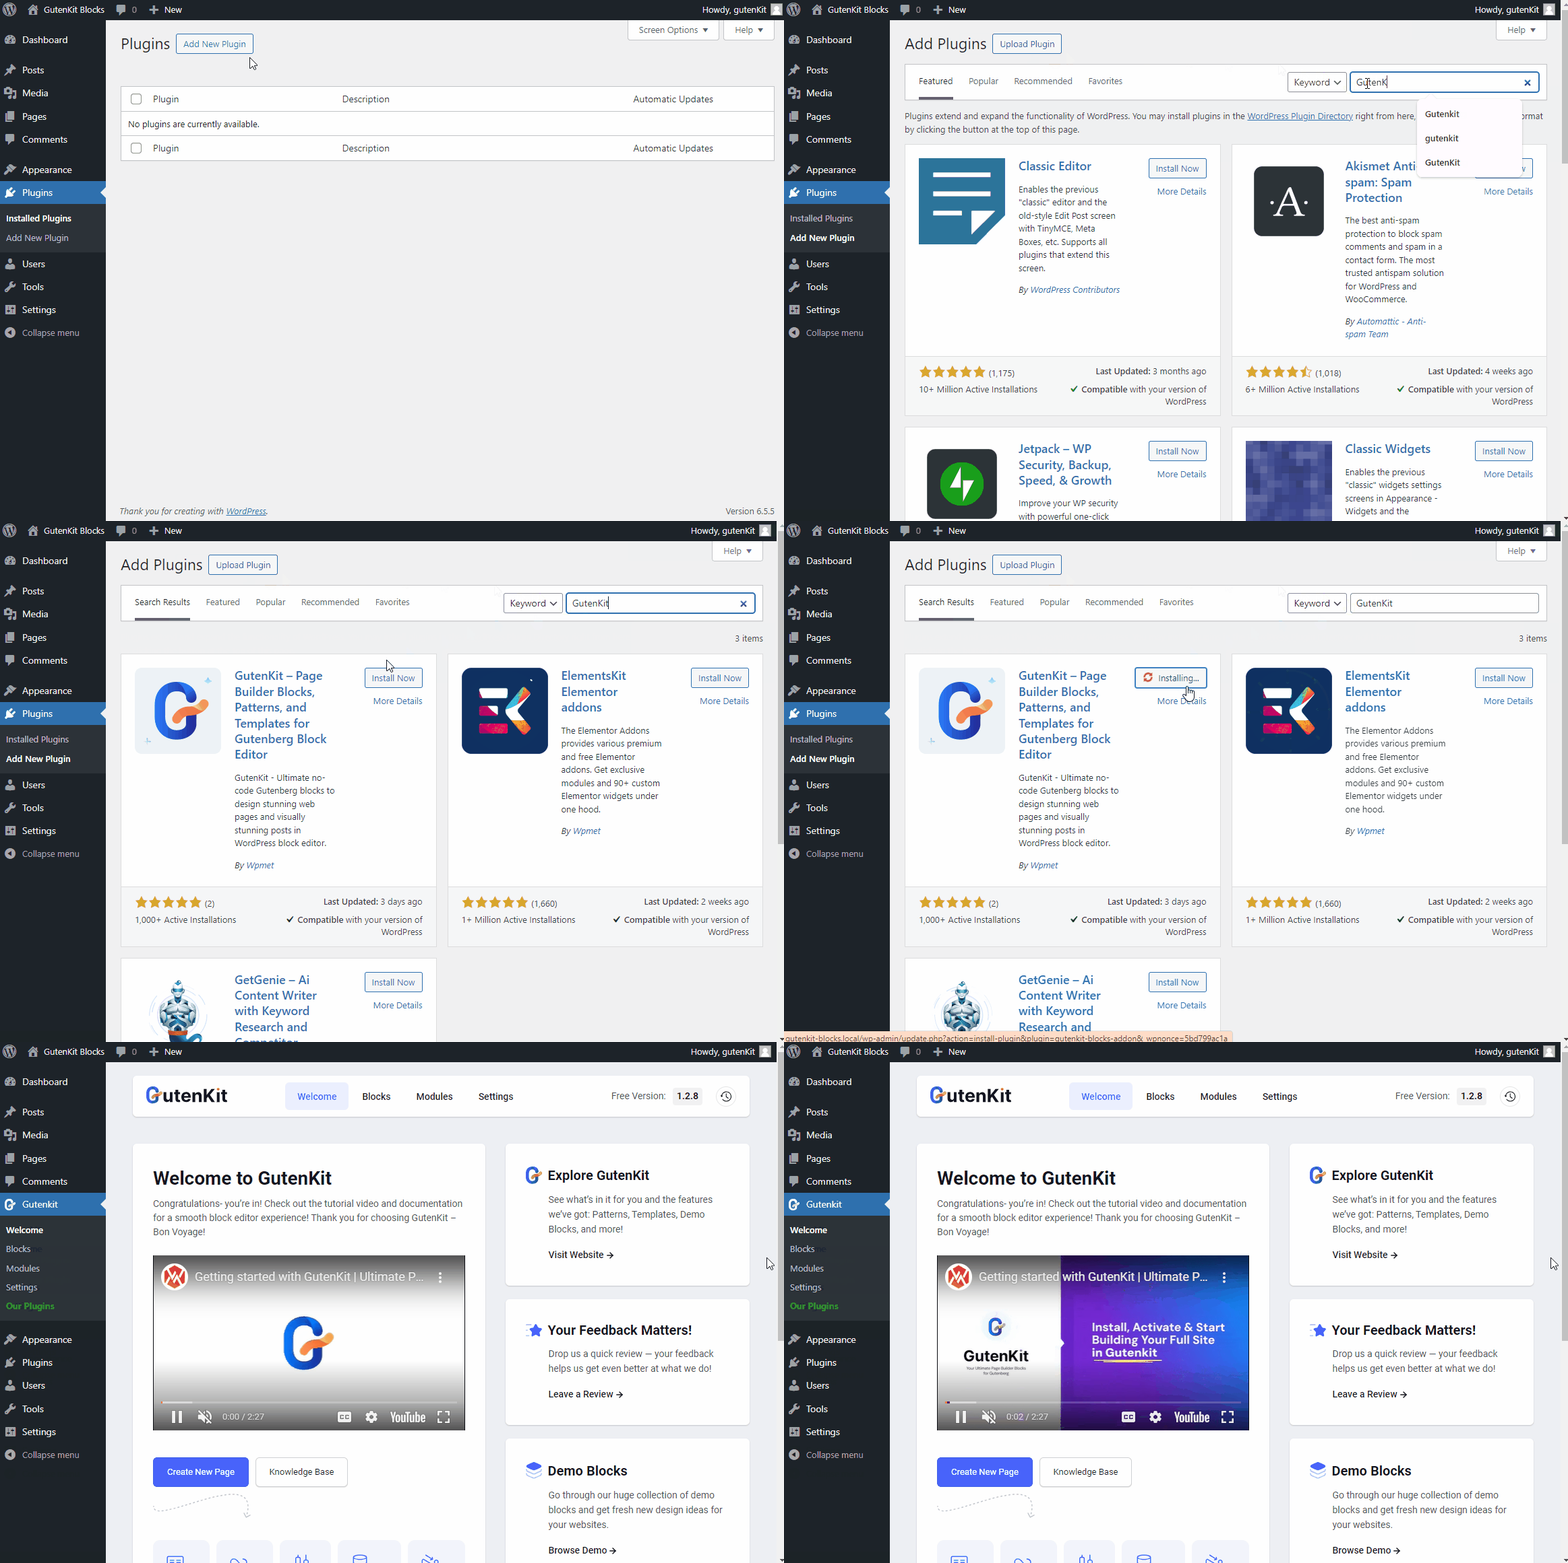

For this tutorial, we will be using the GutenKit block editor plugin. GutenKit is a powerful block editor plugin that adds a wide range of blocks, templates, and many page builder features to Gutenberg. It’s lightweight, ensures faster loading times, and is fully compatible with Full Site Editing (FSE).
# Step 4: Create site-wide designs with Full Site Editor (FSE)
The full site editing in Gutenberg allows you to design and customize your entire website, from the header to global styles and pages.
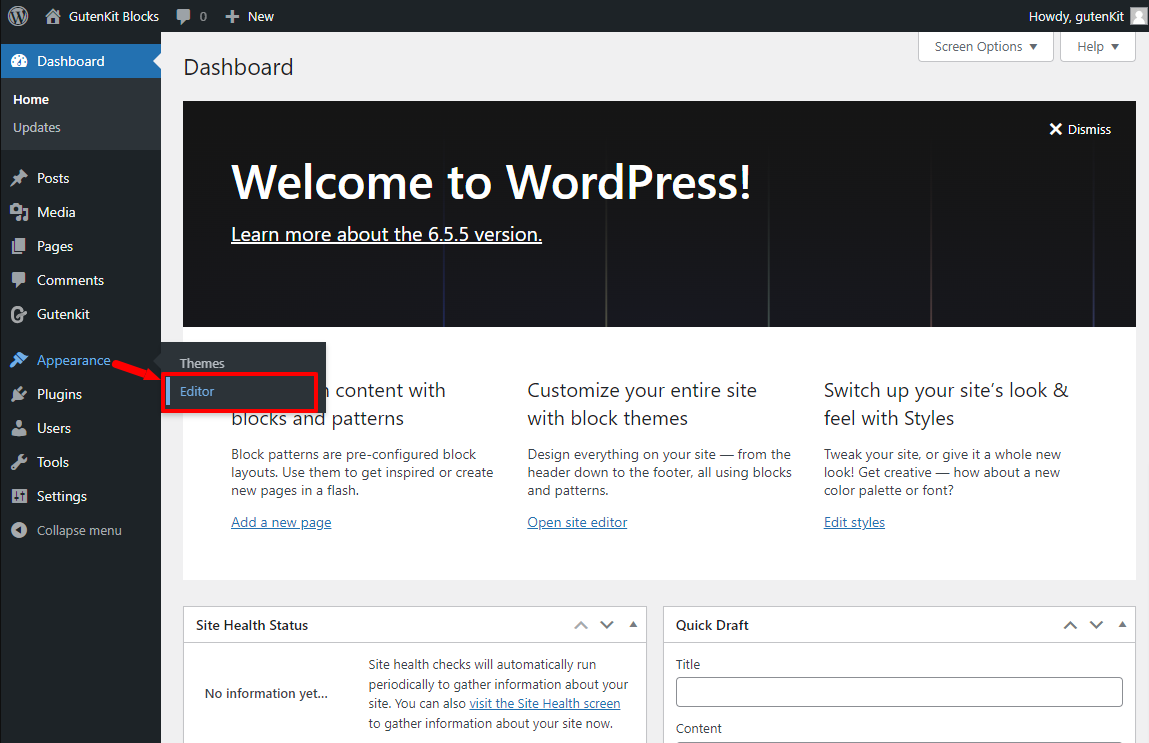
To access the WordPress full site, go to Appearance > Editor from your WordPress dashboard. Then, you’ll find yourself in the WordPress Full Site Editor.
Now in the site editor, you can create the navigation menu, website pages, custom templates, and so on.

To create the navigation menu, enter the Navigation from the full site editor. Then you can create the menu for your site.
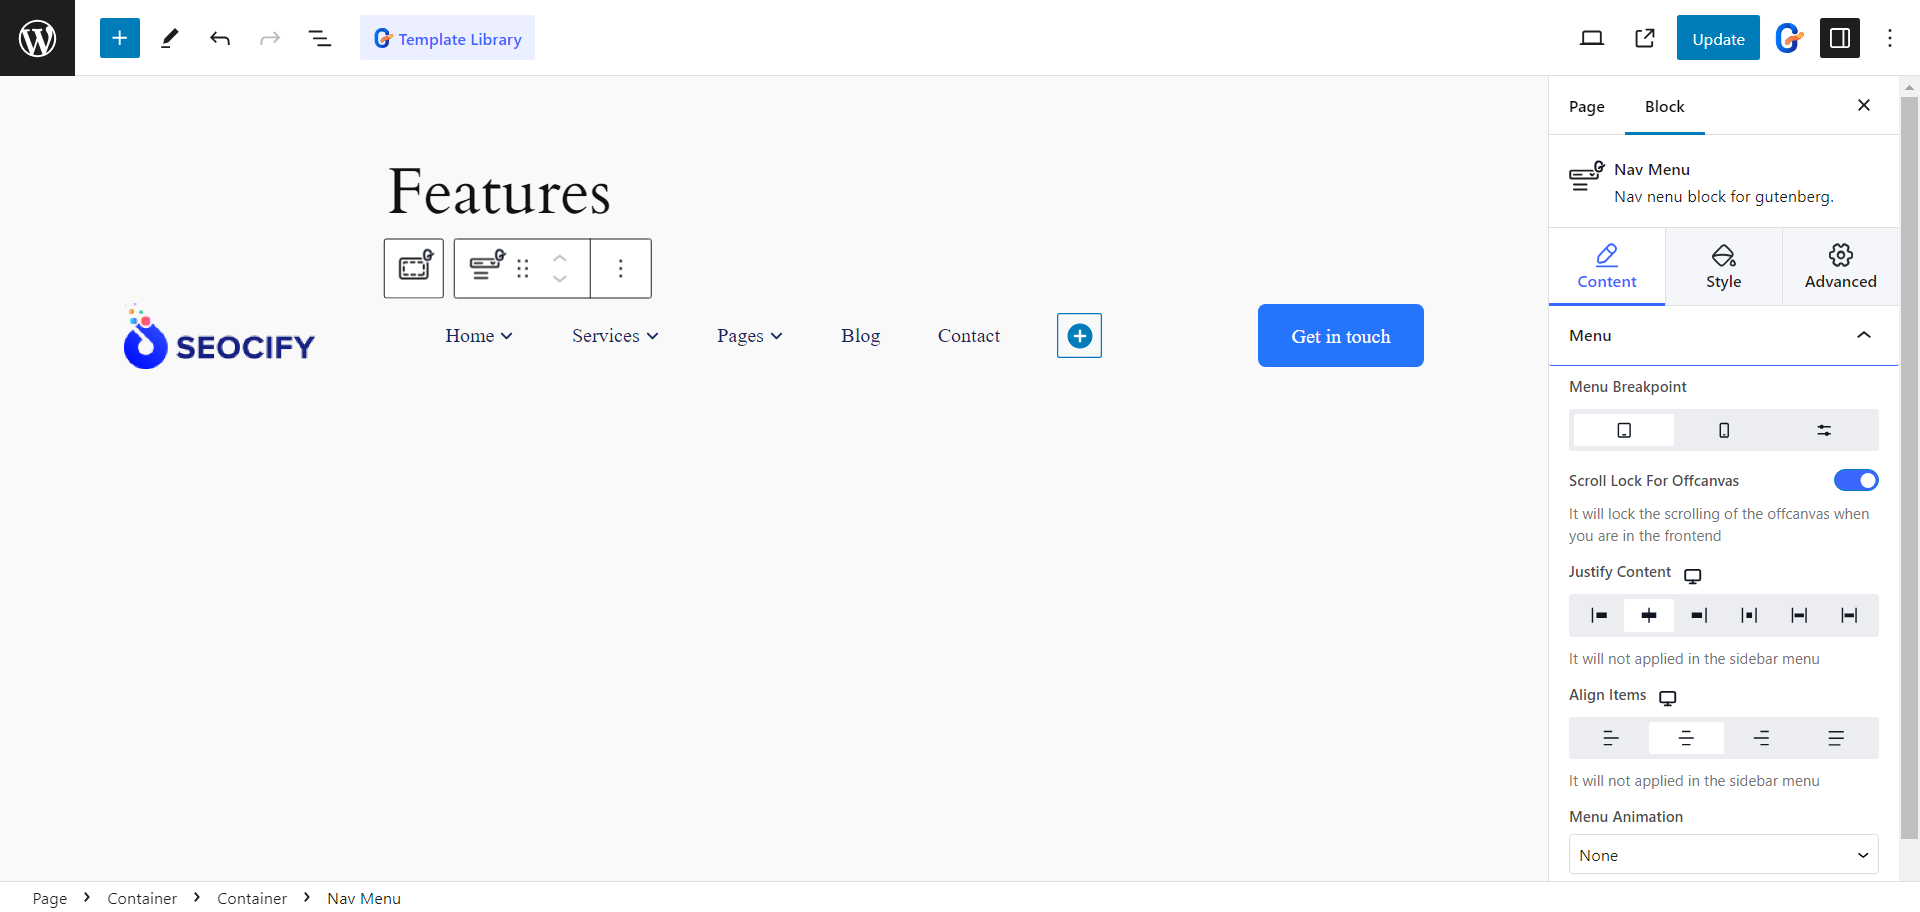
Now, you can use the default Gutenberg “Navigation” block. But since you want an advanced and functional menu, you might prefer GutenKit’s Nav Menu block. Using this, you can easily add and customize menus and submenu items.
Once you add the Nav menu block in the editor, it will automatically display all published pages as menu items, with a “+” icon to add new ones. Clicking on a navigation item brings up its settings in the right sidebar, offering more functions than other GutenKit blocks.
Menu Breakpoint: Design a responsive menu by setting the breakpoints for mobile and tablet, as well as custom breakpoints.
Scroll Lock For Offcanvas: Enable this feature to automatically transform the menu to an off-canvas menu on smaller devices.
Justify Content & Align Items: Set the alignment and justification of the menu.
Menu Animation: Decide whether to trigger an animation for the menu to make it more attractive.

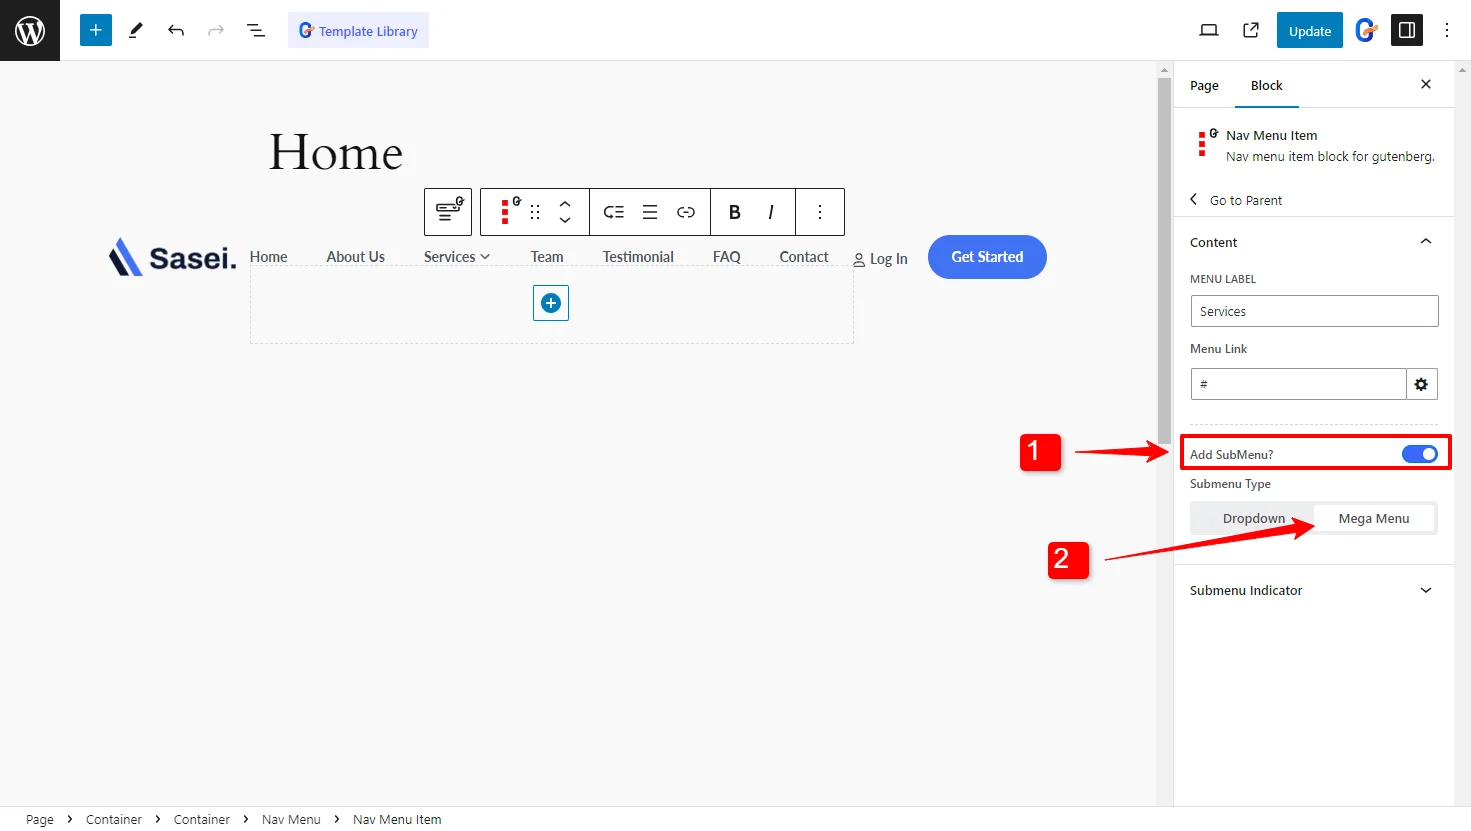
The Nav Menu block even extends to creating Mega Menu on the block editor.
You need to select a menu item and enable the Submenu feature to add the Mega menu. In the Submenu, you find the option to choose the submenu type to Dropdown or Mega Menu.
If you choose the Mega Menu, you can add any block as a menu item to create a multidimensional mega menu for your website. You can now choose a full-width menu or set the menu width to inline or custom.

Additionally, you can customize the mega menu appearance including adjusting the position to the right or left, changing the submenu icon, and customizing the menu appearance as a whole.
4.2: Choose your site’s global styles
Next in the full site editor is Styles options, where you can choose the global styles for your site.
On the styles page, you will find the preset styles. Each style has a different color combination, typography, and layout settings. You can use these predefined style options, or create a custom style for your site.
To create custom styles, click on the Edit ( 📝) button.
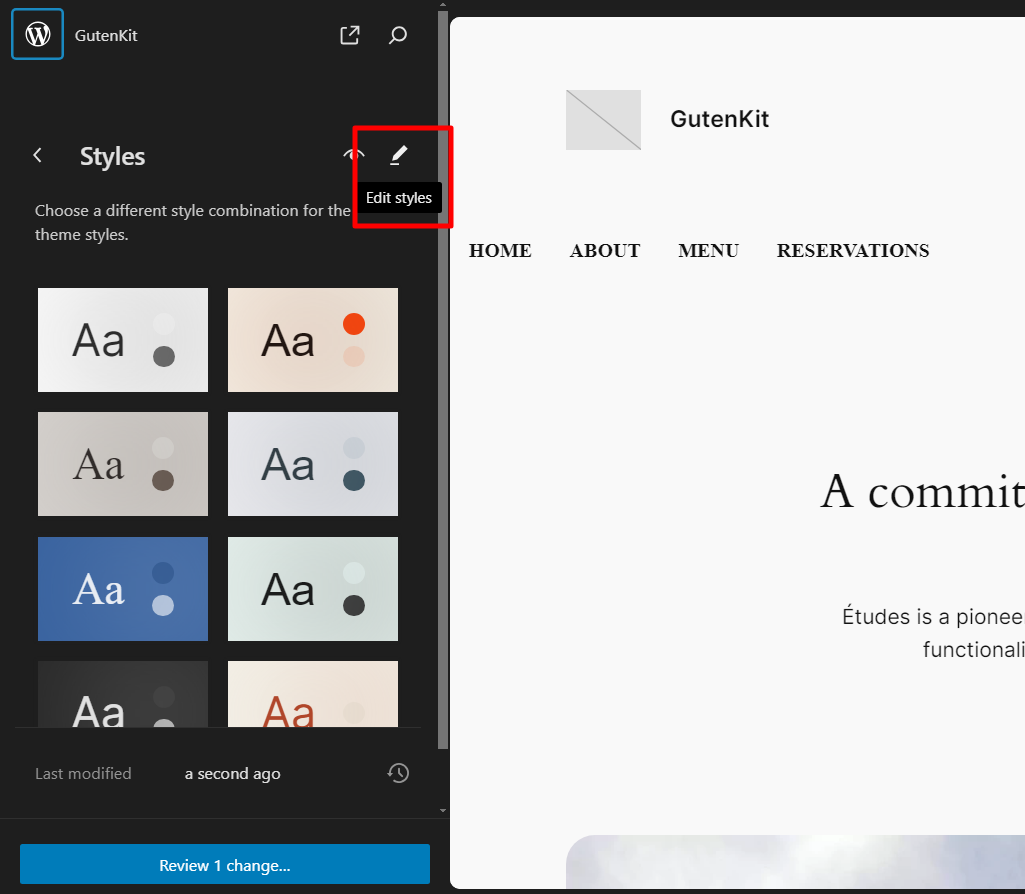

Typography: You can change your site’s fonts, font size, and text elements including, different styles for text, links, heading, etc.
Layout: As for the layouts, you can set the content width, padding, and block spacing for the entire site.
Global Colors: In the editor, navigate through Colors > Palette. Now add custom global colors under the Custom section by clicking the + (plus) button. After adding custom colors, click on the done button. Finally, click on the Save button.
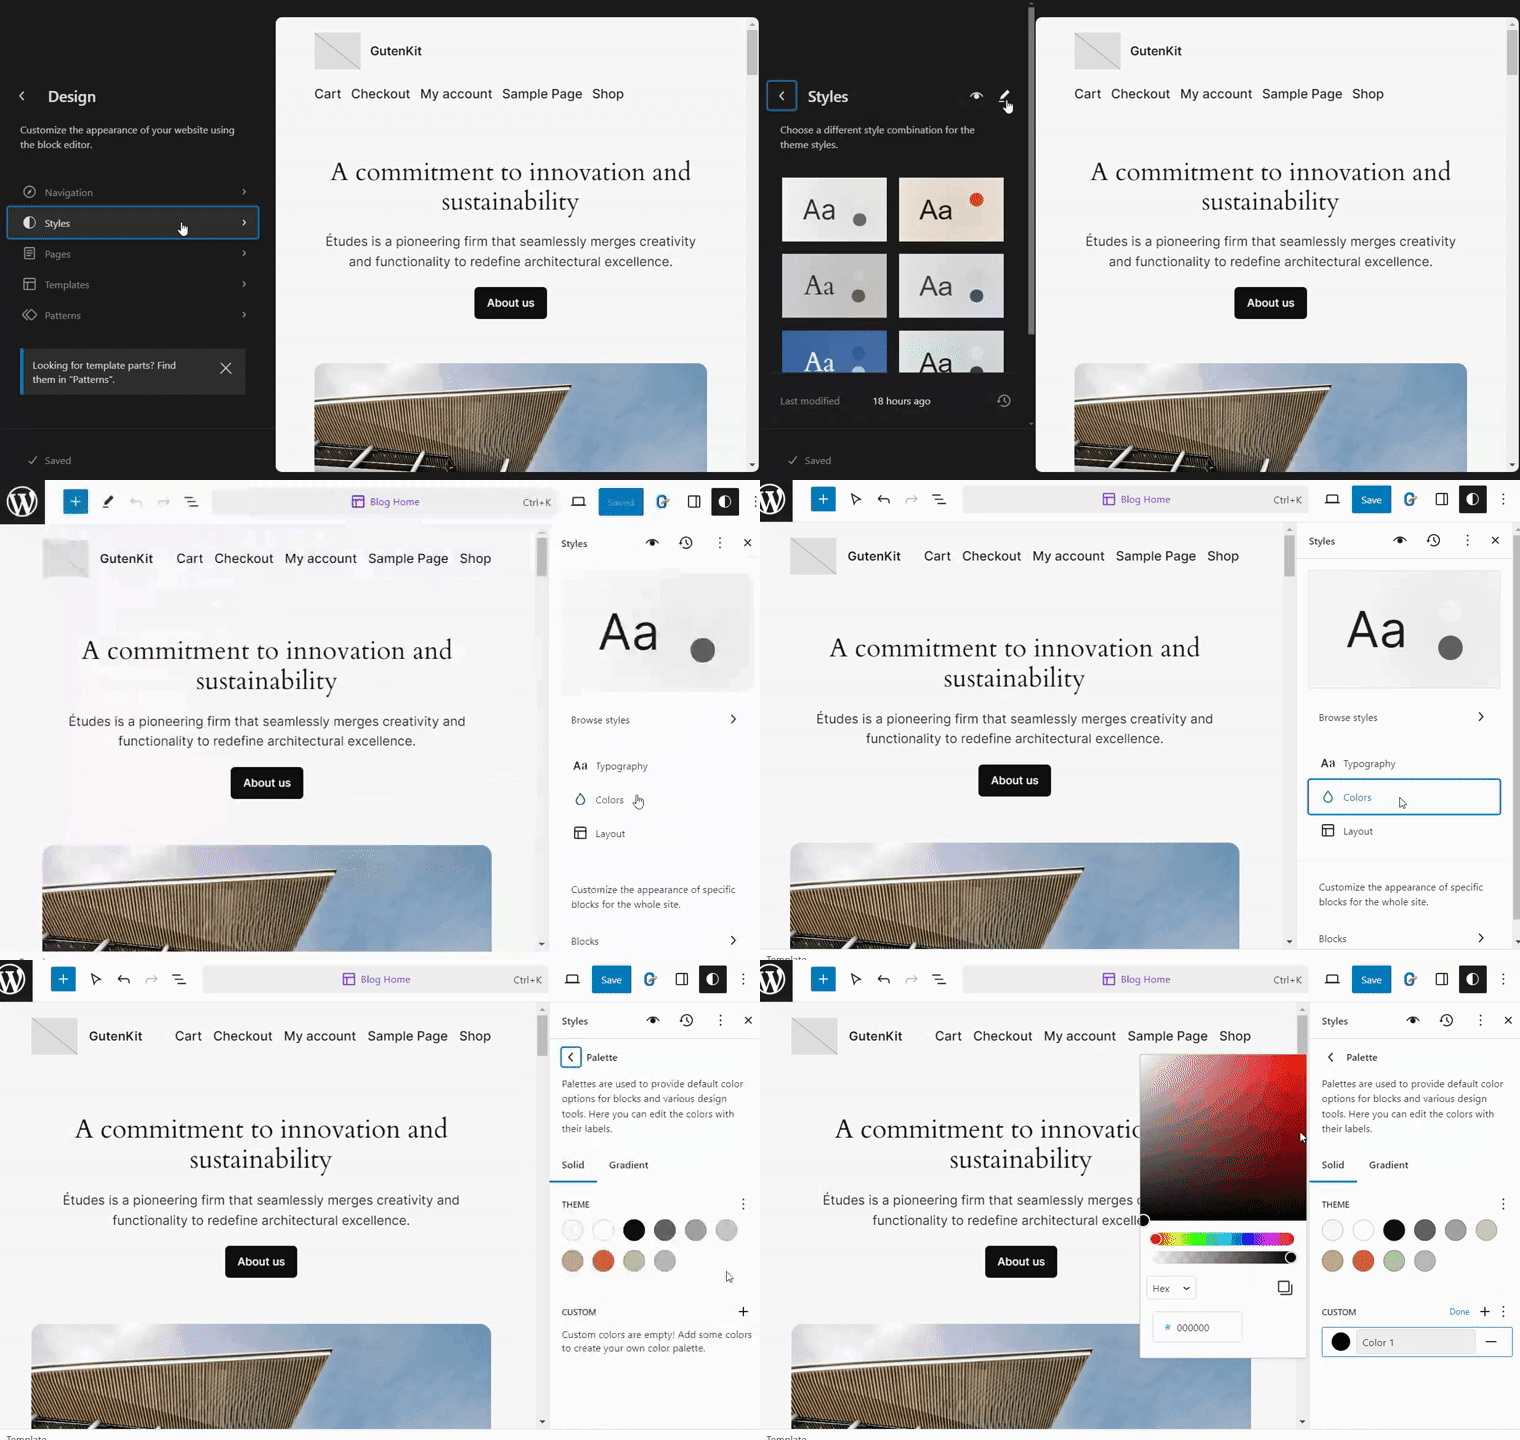

All the GutenKit blocks support WordPress’s global color palettes. So, you can use the custom color palettes on any blocks.
4.3: Customize WordPress pages with complex designs
You can design layouts for website pages for blogs, feature pages, and more in the site editor. Click on the “Page” in the site editor, and you will find all of the existing pages of your website.
In the full site editor, you can customize the existing pages, as well as create new web pages for your site.
With GutenKit blocks, you can design complex designs in Gutenberg easily. GutenKit lets you overcome design limitations and build complex layouts using blocks like containers, tabs, and accordions.
GutenKit Container block has an awesome feature – inline editing with draggable width. You can easily adjust the container width by dragging your mouse cursor vertically, just like you do in page builders.
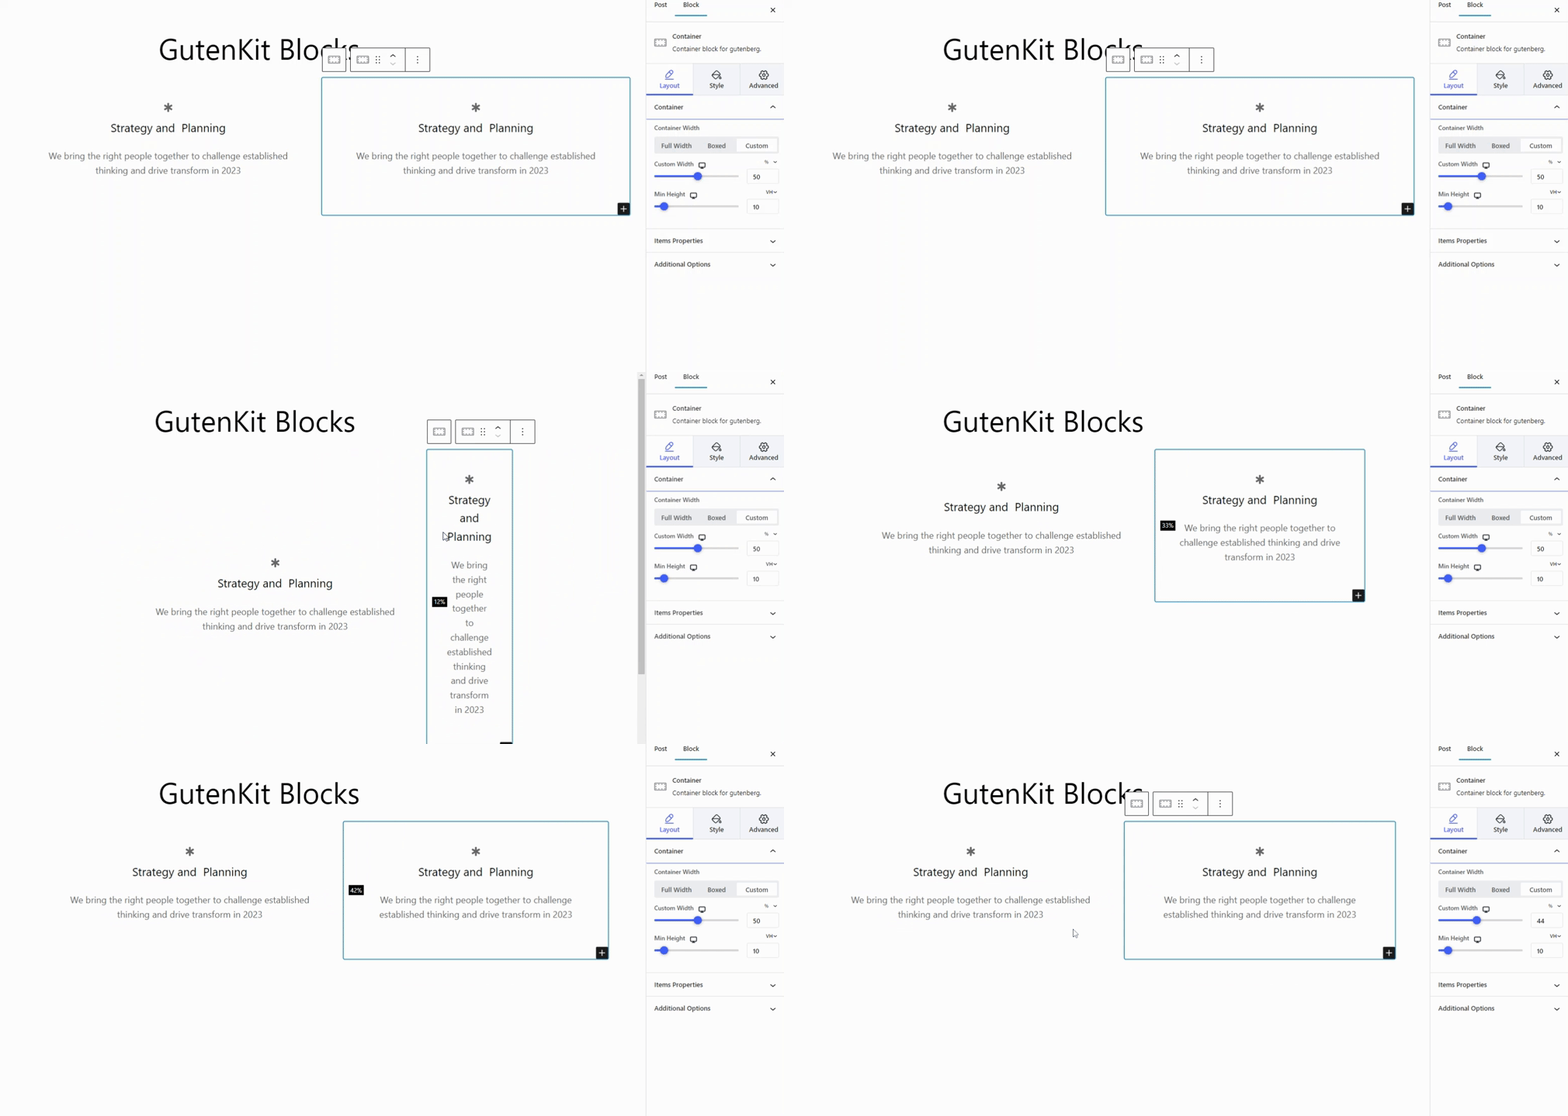

You can easily create custom sections and structure your content for a unique design in the Gutenberg editor. With plenty of layout options, you can tweak the width, background, padding, and more for seamless customization.
Use ready templates and block patterns for quick site-building
GutenKit enhances the design experience with its library of over 500 pre-designed templates and block patterns. These unique templates simplify website design in WordPress.
For example, let’s design a website for a digital marketing service using GutenKit’s template library.
if you are building a website for your digital marketing service, you will find a template with ready designs for different pages and pre-made patterns for every part of your website.
👉 Designing website pages
Let’s start by designing a landing page for your WordPress site. In the template library, you will find three different styles of the landing page aka the home page for digital marketing. Choose any of the styles you like and then customize the design.
Similarly, you will find ready designs for different pages of your website including the contact page, service page, and about page.
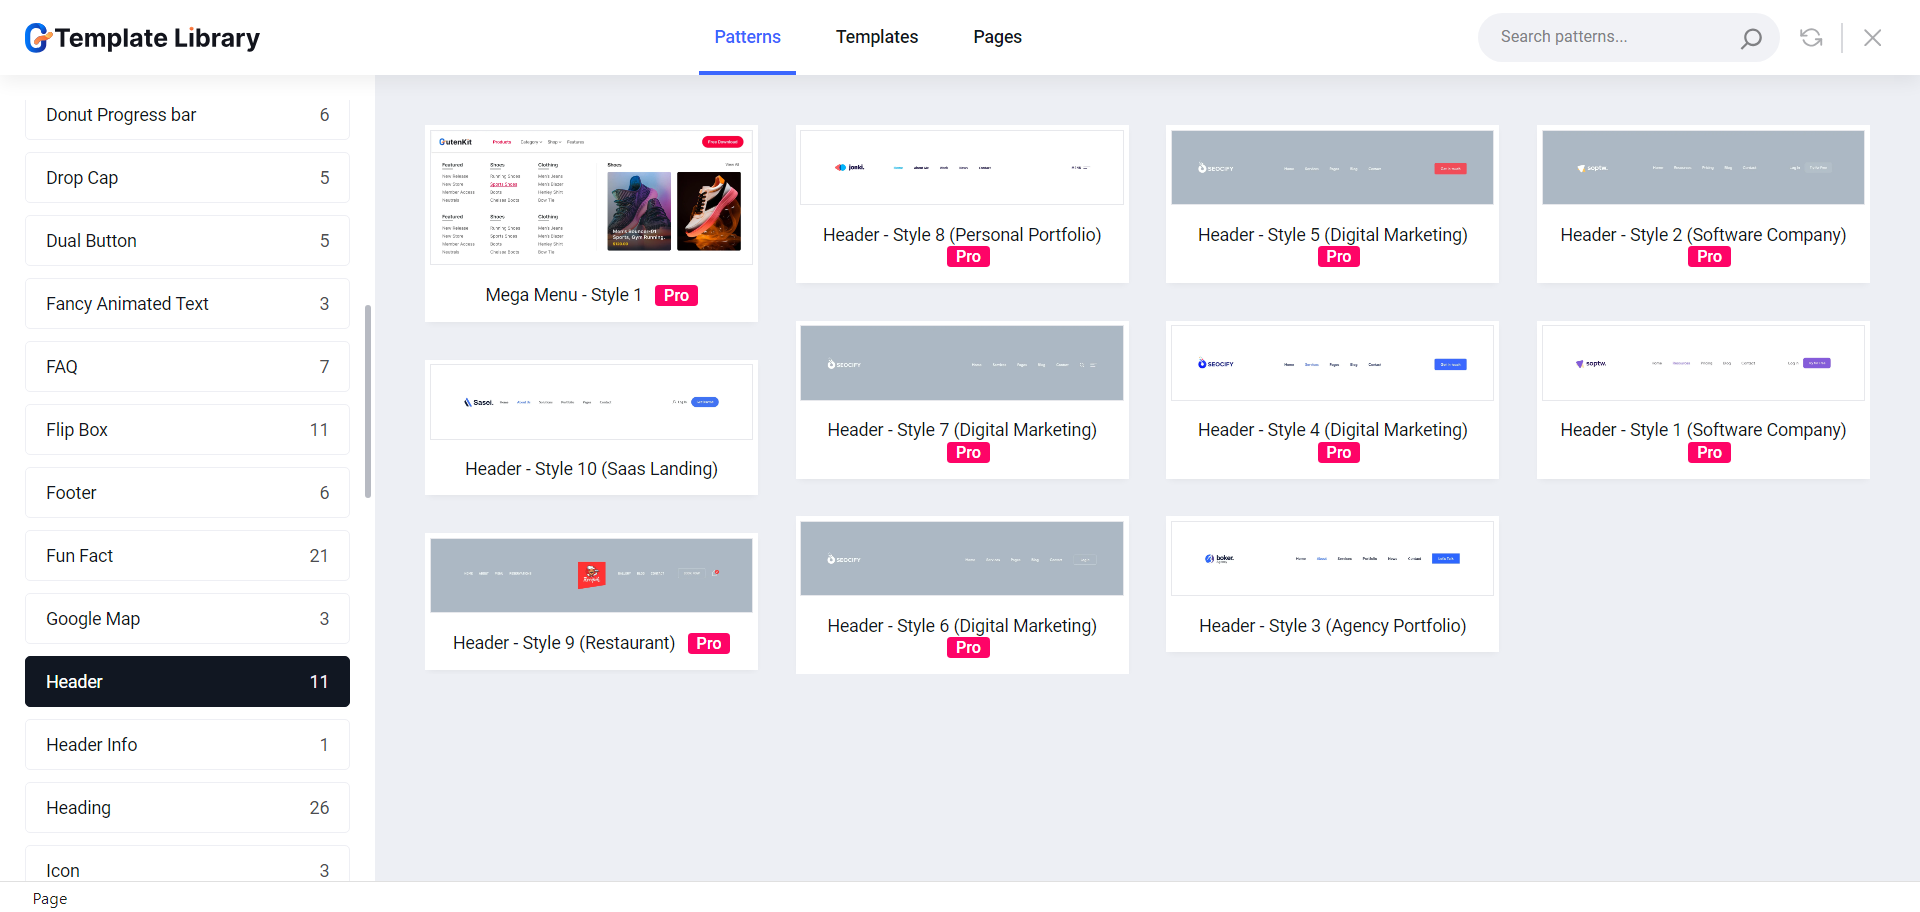
While creating a website, you can design the header and footer easily with the pre-made block patterns of GutenKit. For headers, the GutenKit template library has around a dozen headers and half a dozen footer patterns ready to use on your websites.

What makes the GutenKit block editor plugin the best choice?
Now the obvious question is, over all of the block editor plugins, why would you choose the GutenKit? Let’s try to find the answers:
✅ Lightweight & faster loading plugin
Despite being a feature-loaded plugin, GutenKit is still lightweight maintaining a higher rating both in terms of performance and SEO.
The clean-coded plugin is developed with a smart asset loading mechanism, where all of the libraries and assets only load when it is been used on the website. This helps the website to reduce the server requests and load faster on the browsers.


✅ All blocks and templates are FSE-compatible
If there’s a block editor plugin that is truly compatible with WordPress Full Site Editor (FSE), GutenKit is the one. All of its blocks, modules, and templates work perfectly with WordPress full site editing.
Besides, features like a global color palette support and a Dynamic Content module make the Gutenberg site editing experience even better.
✅ Brings all the page builder features to Gutenberg
If you have shifted from the conventional page builders, GutenKit is the ultimate choice for you. The following features make GutenKit the ultimate page builder block for Gutenberg.
- Mega Menu
- Query Loop Builder
- Parallax Effect
- One Page Scroll
- Sticky Content
- Glassmorphism
- Copy paste styles
All of these features and more, bridge the gap between Gutenberg and page builders to give a true website-building experience.
Wrapping it up!
Throughout this guide, we have briefly explained the easiest ways of creating a professional WordPress website with Gutenberg.
We have explored the Full Site Editor, where you can design every aspect of your website using blocks. Besides, creating site-wide designs, including crafting a professional header and footer, building complex layouts is now made easy with the GutenKit’s ready-made templates, patterns, and modules.
If you find this article useful, please leave a comment below. And don’t forget to try the GutenKit – The ultimate page builder blocks for Gutenberg.


Leave a Reply