


Have you ever been browsing the internet and suddenly been greeted by a popup? A poping window that appears with overlay while you are visiting a web page.
Sometimes these popups can be super helpful, offering you useful information or great deals. Or, they can feel a bit annoying and intrusive.
But from a WordPress website owner’s point of view, Gutenburg popups have turned out as a powerful way to capture attention, promote offers, and generate leads. So building the right popups that engage the user without annoying them at the same time is crucial.
To help you with this, we will walk you through each step of setting up effective popups tailored to your website’s goals. By the end of this guide, you’ll have the easiest way to create popups that not only attract attention but also enhance user experience.
Quick Overview
This tutorial will guide you through the entire process of crafting popup with Gutenberg blocks or pre-built templates using PopupKit, an ultimate popup builder. For that, first you have to install and activate the following solutions:
Tools Used:
- Plugin: PopupKit (free & pro)
- Theme: Hello block theme or any WordPress block theme
- Here are the two methods to integrate popup on Gutenberg:
- Create popup with block templates.
- Build popup using Gutenberg blocks:
- Add campaign
- Set smart condition
- Integrate trigger
- Schedule popup
What is a WordPress Gutenberg popup on the website?
Popups are small windows that appear on a webpage, typically as an overlay, to grab the user’s attention. These windows can include various forms of content like promotional ads, discount offers, subscription offers, notifications, or call-to-actions.
Popups often require interaction, such as entering or exiting a page, clicking a button to close them, or filling out a form. They are designed to stand out from the rest of the page to prompt immediate engagement.
When do people usually use popups on their websites?
Popups are most commonly used to achieve specific goals related to user engagement and lead conversion. Here are some common scenarios when people use WordPress popups on their websites:
- To capture leads or build an email list with a subscription.
- Promote exclusive deals, discounts, or limited-time offers.
- Announce new products, features, or major updates.
- To provide important notices to alert visitors.
- Ask visitors to sign up for an account on the website.
- To collect feedback or conduct surveys among audiences.
- Show cookie consent or privacy policy notification.
- Drive the users to register for events, webinars, or workshops.
These strategic uses of popups help enhance user engagement and conversion, but it’s essential to implement them thoughtfully to avoid disrupting the user experience.
How to create WordPress popups in Gutenberg
Let’s jump into the core part of this tutorial guide on how to add a popup on WordPress using the Gutenberg block editor.
The default Gutenberg editor doesn’t come with a popup builder. So when you are using Gutenberg you need to pick a WordPress popup plugin for the block editor. For this tutorial, we have used the PopupKit plugin.
PopupKit is one of the best WordPress popup plugin for Gutenberg, designed specifically for the Gutenberg. With this WordPress popup maker, creating popups in Gutenberg is now easier than ever.
Here is the step-by-step process of creating a Gutenberg popup in WordPress editor.
Install and activate WordPress popup plugin PopupKit for Gutenberg
To install the PopupKit plugin, you need to have a block installed on your website. Here are the required plugins and themes to use popup builder seamlessly on your website.
☑️Required Plugins:
- PopupKit: Download free WordPress popup plugin
☑️ Theme: Hello Blocks Theme or any WordPress block theme like Twenty Twenty-Five.
Once you’ve installed all the plugins, you’re all set to start building WordPress popups in Gutenberg for your WordPress site. Now you can pop up under Campaign, get through the Subscriber information, see the campaign Analytics, get advanced Integration, explore template, and so on.
How to add a popup on WordPress using PopupKit blocks
Now, we will start creating WordPress popups in Gutenberg. With PopupKit you can design popups from the scratch with any Gutenberg blocks. Or, you can use the pre-designed templates to quickly build high-converting popups.
In this tutorial, we will demonstrate both of the methods of creating WordPress popups in Gutenberg.
Method 1: Create Gutenberg popups for WordPress with pre-designed templates
While creating a professional WordPress website with Gutenberg, you can save time and effort by using the ready designs rather than starting from scratch. With 100+ templates available in PopupKit’s Template Library, you can quickly create professional-looking popups in just minutes.
First, let’s see how to use the ready templates to build popups. Go through the following steps to create WordPress popup in Gutenberg:
- Go to PopupKit > Templates
- Click on the “Choose From the Template” button.
- Set the campaign type to: Popup
- Then browse through the template library and import one.
You can easily narrow down your search in the PopupKit template library by using the built-in filters. Here’s a quick look at what you can sort by:
☑️ Type:
- All: Browse both free and pro templates.
- Free: Show only the free ones.
- Pro: See the premium templates.
☑️ Seasonal:
Filter the templates by seasonal events like Black Friday, New Year, summer sales, and more to match your campaign’s vibe.
☑️ Goal:
Find templates that can help you achieve specific campaign goals, such as growing your email list, making time-sensitive offers, reducing bounce rate, etc.
☑️ Industry:
Use templates tailored for your niche, whether you’re Blogger/ Publisher, running an eCommerce, working with a Local Business, Marketing Agency, Non-profit or SaaS brands.
☑️ Feature:
Choose templates with specific built-in features like Countdown Timers, Coupon wheels, Gamification, Multi-step campaigns, Exit intent, and Video support.
Method 2: Design WordPress popups from scratch using any PopupKit blocks
Alternatively, if you want a fully custom-designed WordPress popup, you can build one entirely from scratch using any Gutenberg blocks (default ones and third-party add-ons) directly in the block editor. Follow the steps bellow:
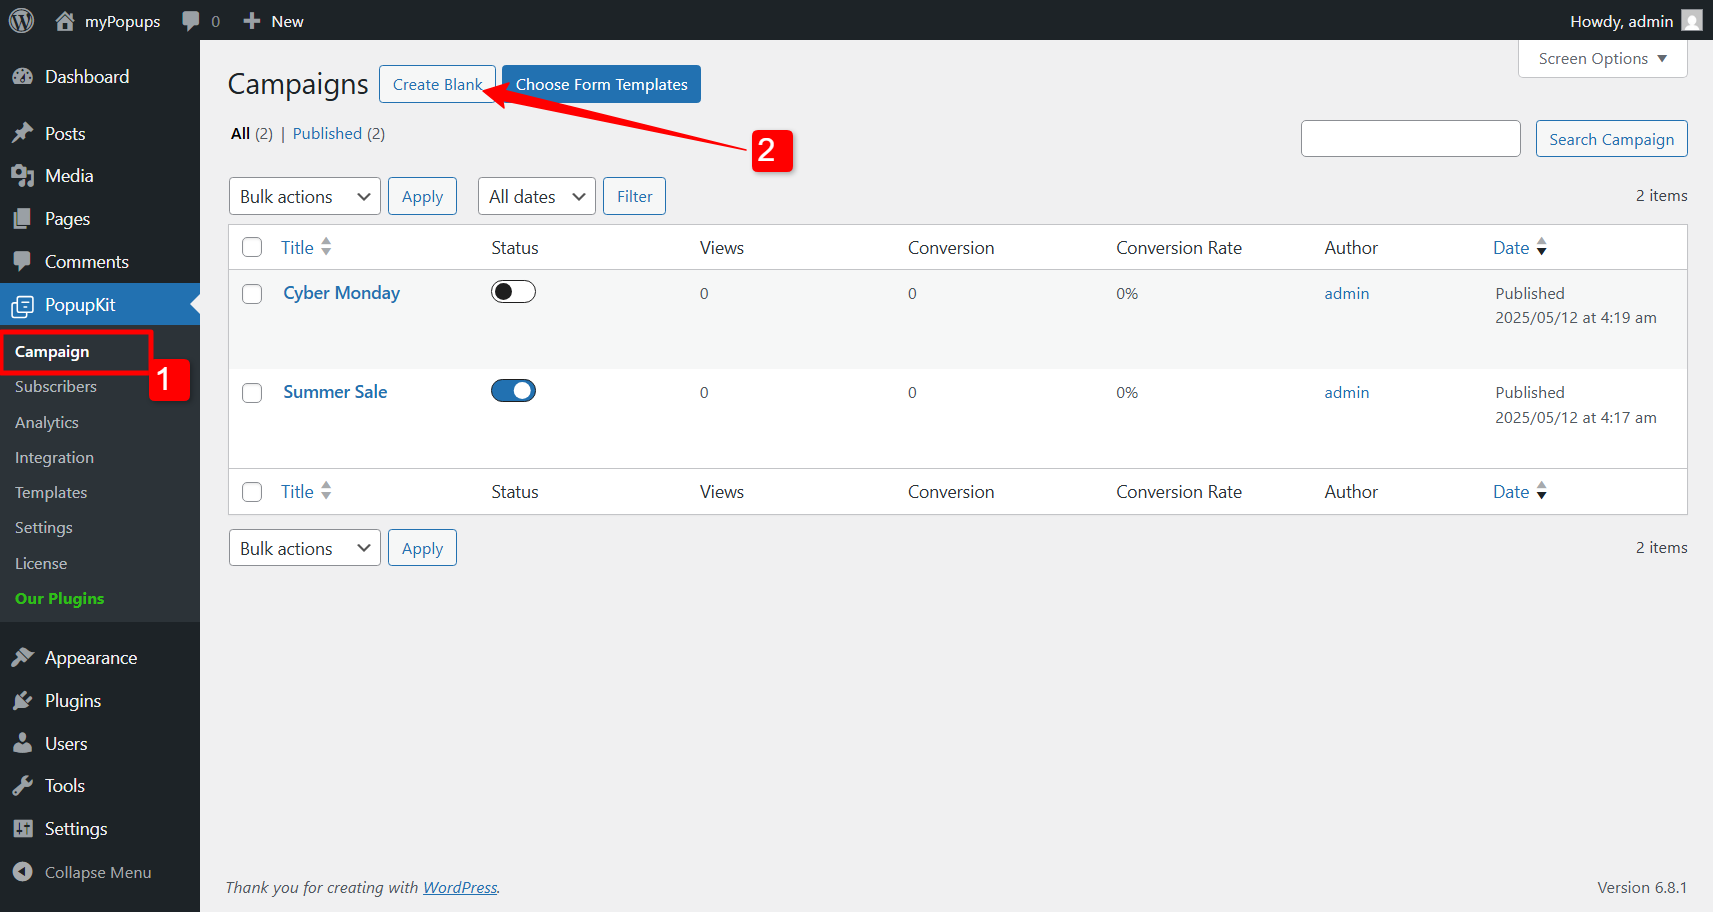
- Navigate to PopupKit > Campaigns from your WordPress dashboard. Here you will see the popups you have created for your website.
- Then click on the Create Black to open the popup editor. In the editor you have a blank canvas to create popup with blocks.
Now in the block editor, use various Gutenberg blocks to deisgn the kind of you popup you want for your WordPress website.
PopupKit initially have a set of essential blocks for creating WordPress popups. Beyond that, you can use block editor plugins like GutenKit to get more flexibility in designing popups with a more varsatile collection of blocks.
With GutenKit page builder for Gutenberg, you can use 74+ blocks and 18+ modules to design a modern and sophisticated popup for your site. This includes blocks like headings, paragraphs, buttons, images, and even videos to your popup, making it highly customizable.
Here are some basic examples of creating a WordPress popups in Gutenberg.
Use smart conditions to display Gutenberg popups on your website
With PopupKit, you have the flexibility to choose which pages you’d like your popups to appear on. Just head over to the popup block editor, and under the “Content” tab, you’ll see an option named “Conditions.”
From there, simply click the + Add Condition button and set the rules for where you want your popup to be displayed. It’s that easy!
With the PopuKit, you can set the Include and Exclude conditions.
- Include condition: With the Include conditions, you can add popups to the entire website, specific pages, or archive pages.
- Exclude condition: You can decide where not to show the popups on your site with the exclude conditions.
Here is how you can display popups on your website using smart conditions:
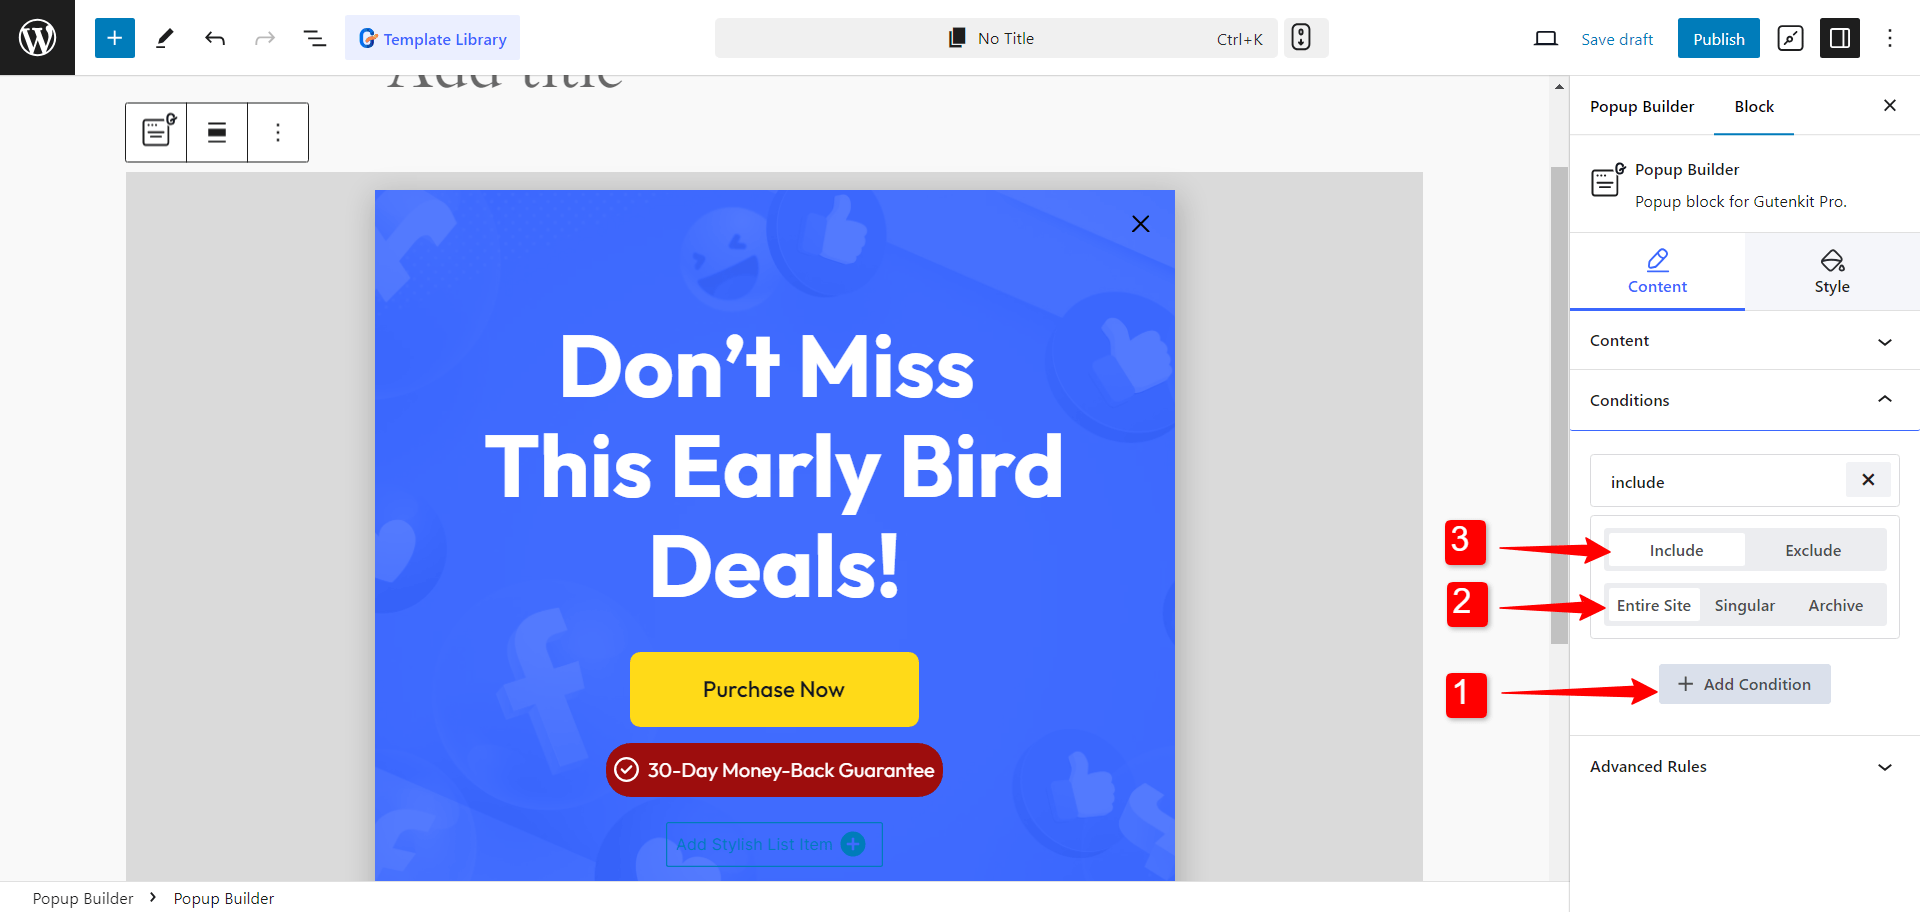
Show popups on the entire website
To show the popup on all of the pages of your website,
👉 Step 1: Add a new condition for popups.
👉 Step 2: Select the “Include” condition.
👉 Step 3: Choose “Entire Site” to show popup on every page.
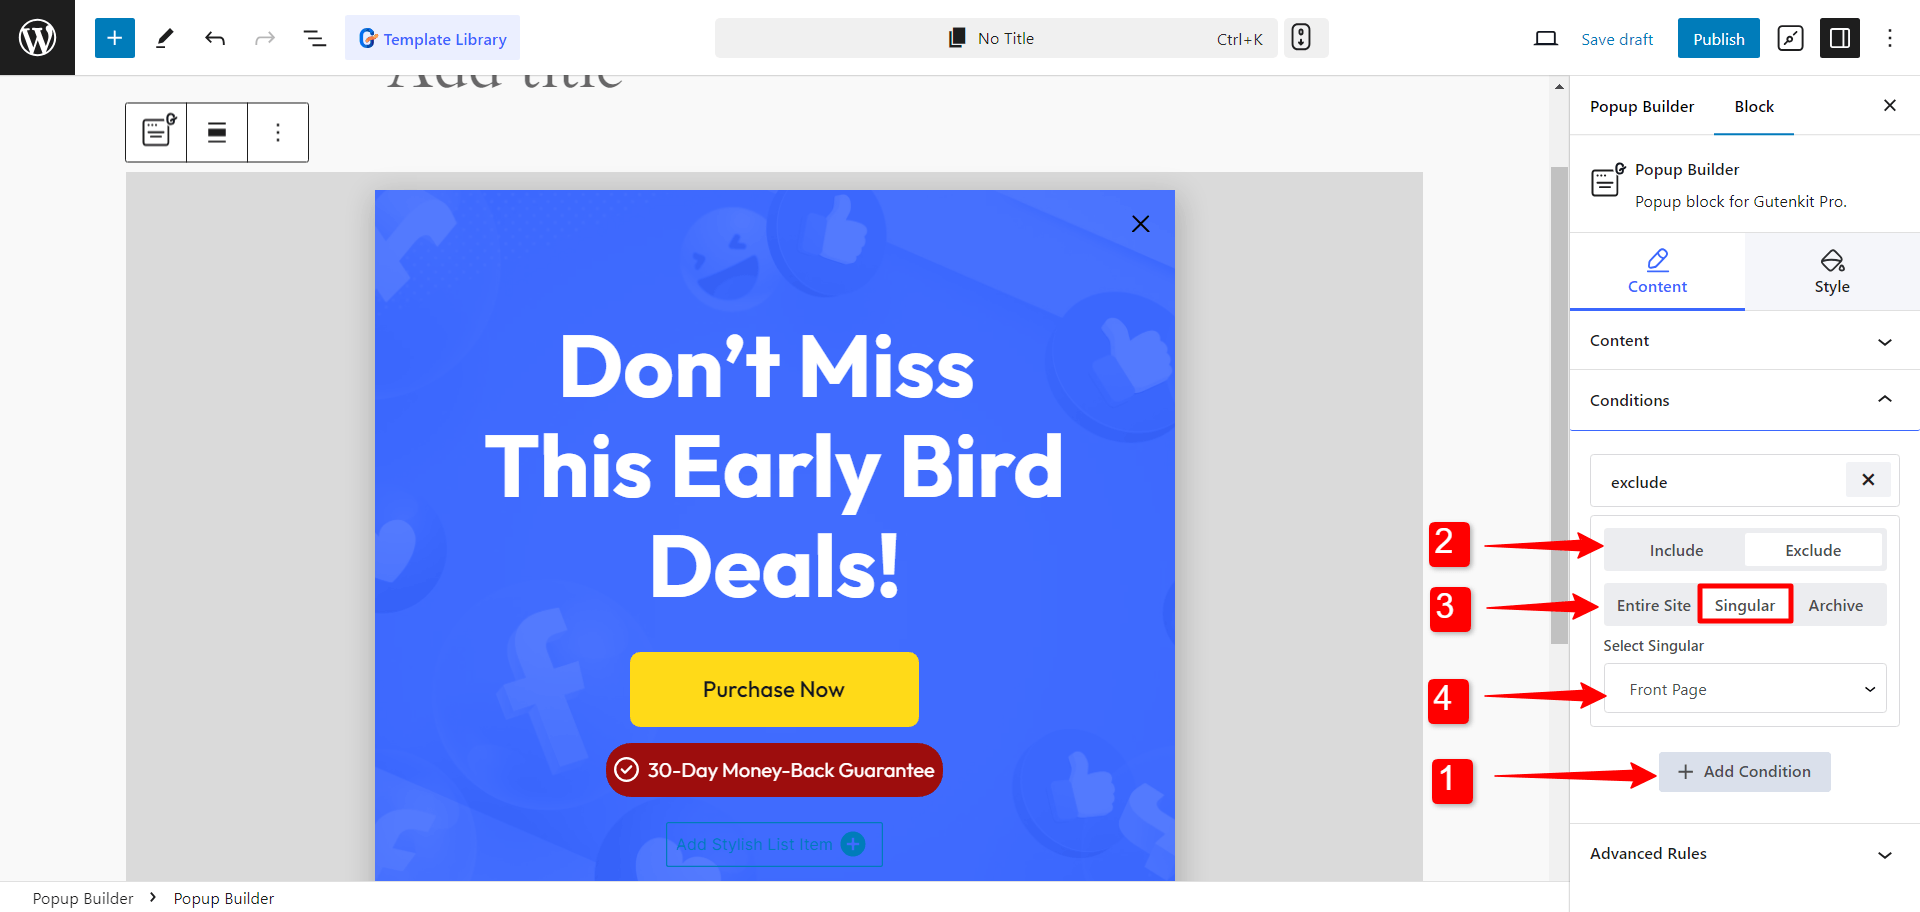
Opt out specific pages from showing popups
There might be times when you don’t want popups to appear on certain pages. You can do it with Exclude conditions.
👉 Step 1: Add a new condition for popups.
👉 Step 2: Select the “Exclude” condition.
👉 Step 3: Choose “Singular”.
👉 Step 4: Select a page to exclude the popups from appearing.
Display popups on specific pages only
If you’re aiming for more focused campaigns, you might want to display popups on certain pages of your website.
👉 Step 1: Add a new condition for popups.
👉 Step 2: Select the “Include” condition.
👉 Step 3: Choose “Singular”.
👉 Step 4: Select a page to display a popup.

Besides, to be sure that the popup doesn’t show up on other pages, you can add an exclude condition, and select the entire site to restrict the the popup from showing on the whole website.
WordPress popups on the archive pages
You can also display popups on any WordPress archive page by setting a condition. For that, Add Condition > Include > Archive > Select Archive page.
On the other hand, if you want to prevent popups from showing on a particular archive page, you can set up an exclude condition. Just follow the same steps: For that, Add Condition > Exclude > Archive > Select Archive page.
Decide how and when to trigger the WordPress popups
You have complete control over how popups appear on your website pages. You can decide if the popups will appear on page load, exit intent, or after an interaction.
With this popup maker for WordPress, you can select how the popups will trigger on your website from Content > Open Events on the block editor.
This helps you to develop different types of popups on Gutenberg. Here are the types of WordPress popups on Gutenberg you can design with Popup Builder.
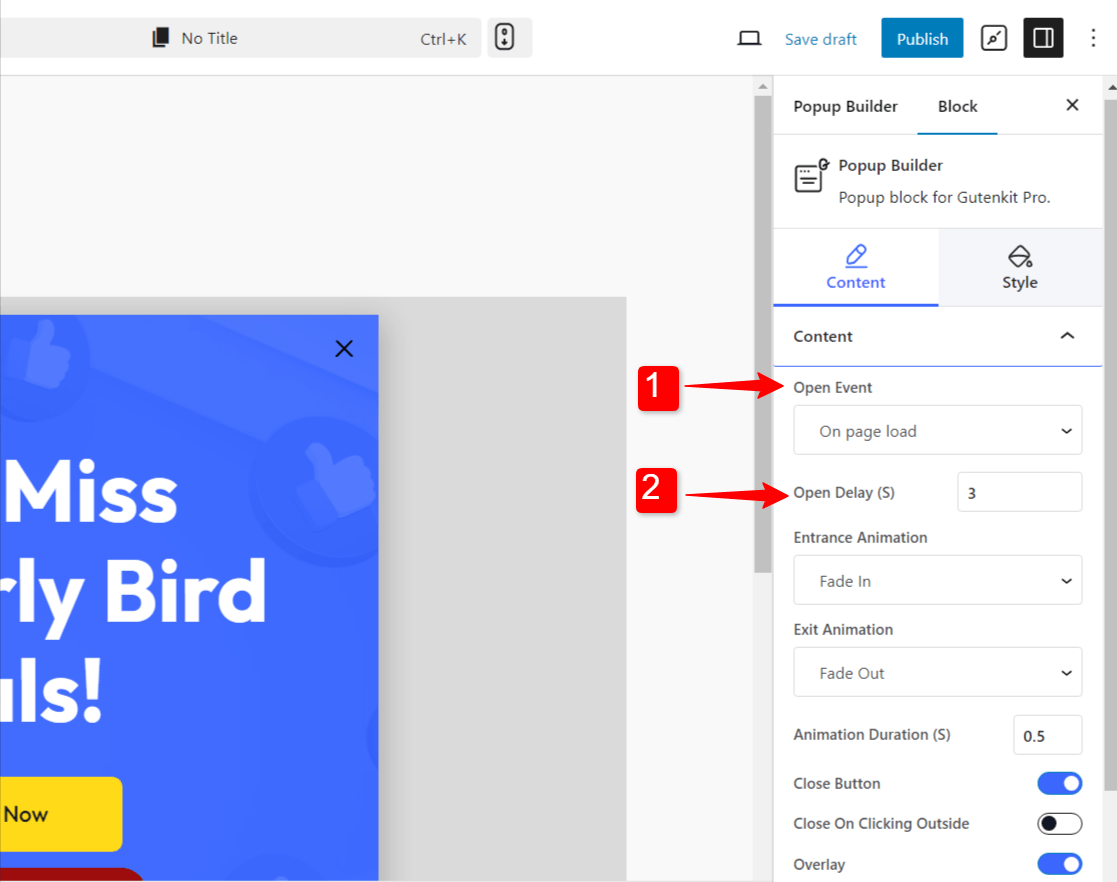
1. Entry Popups
- Trigger: Instantly triggered when the page loads on the user’s browser.
- Purpose: Engages users as soon as they land on the website.
- Use Case: Welcomes users with a discount, event announcement, or asks for a subscription right away.
💡 How to trigger? Select the Open Event as “On Page Load”
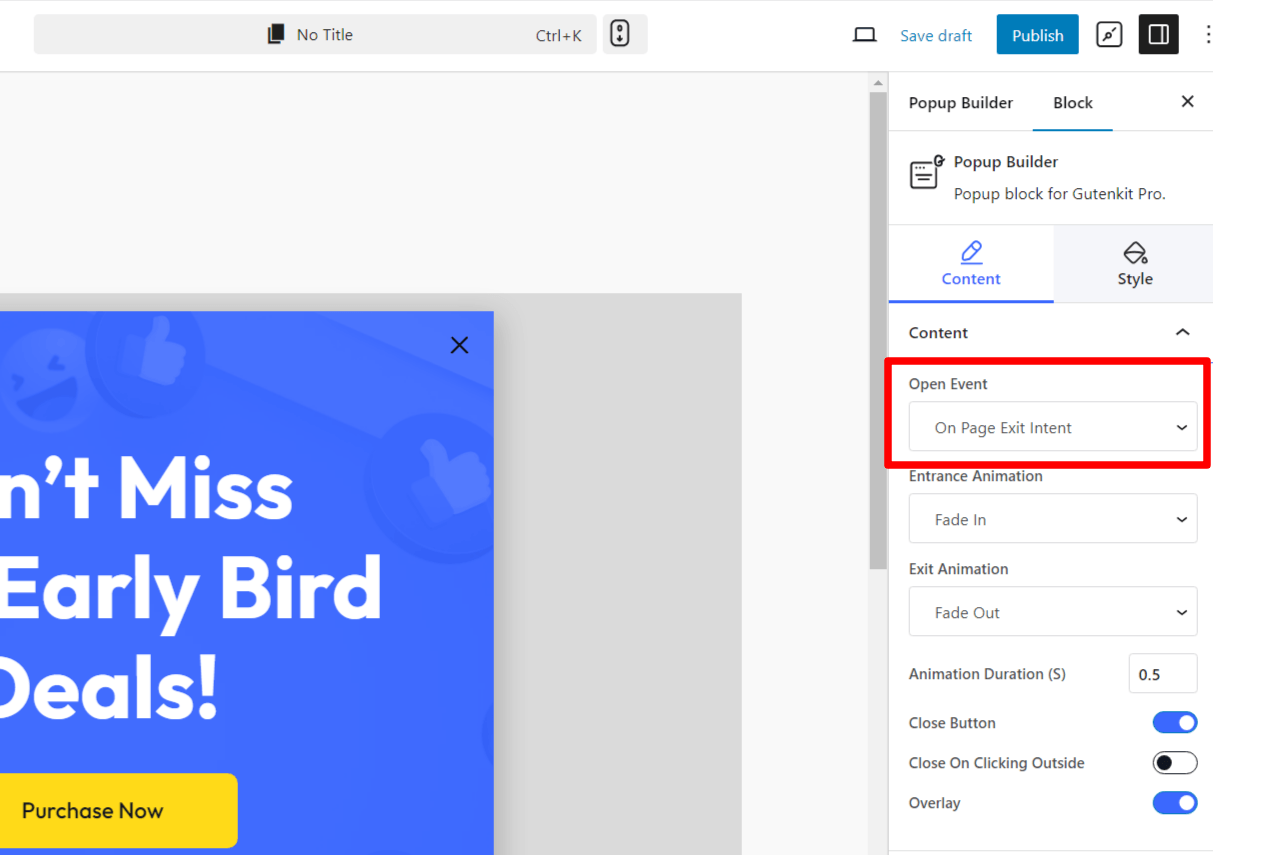
2. Exit-Intent Popups
- Trigger: Activated when the user intends to close the tab or browser.
- Purpose: Captures users before they leave the site.
- Use Case: Offers a discount, newsletter subscription, or special deal.
💡 How to trigger? Select the Open Event as “On Page Exit Intent”
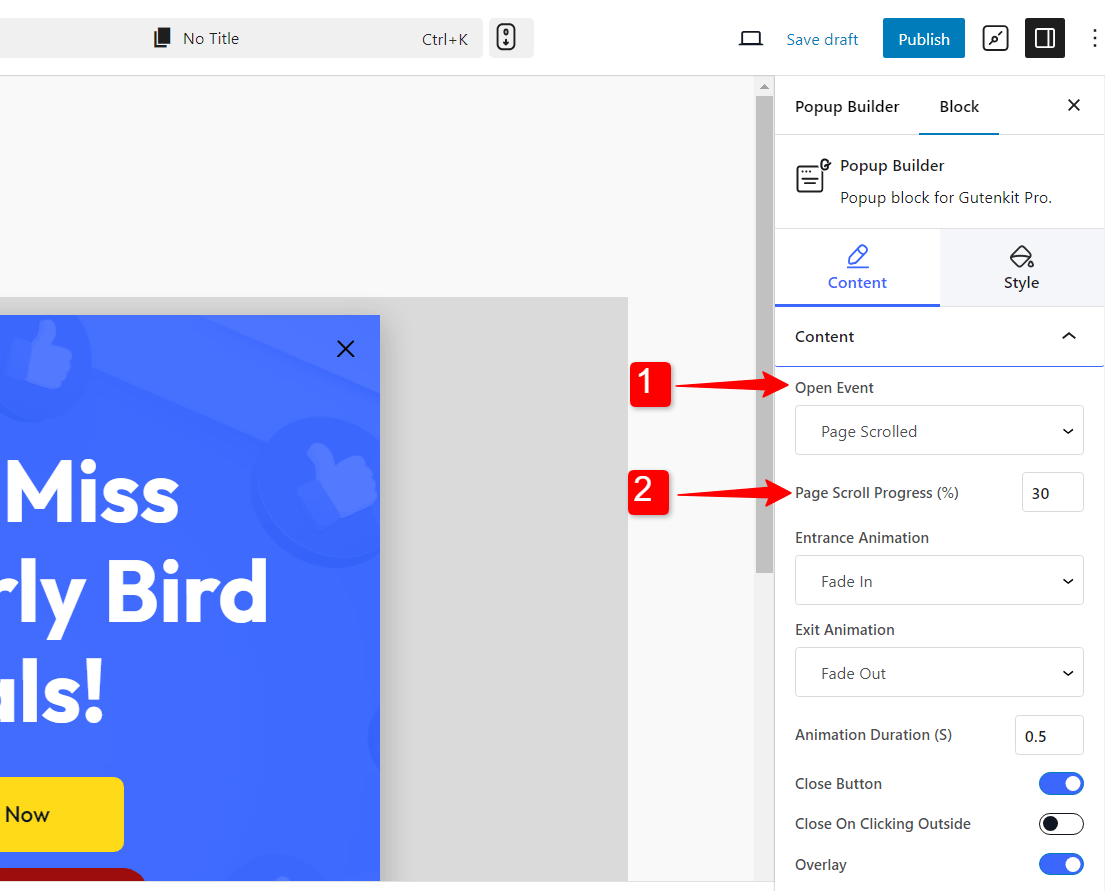
3. Scroll Trigger Popups
- Trigger: Triggered by the user scrolling down a page.
- Purpose: Offers a promotional deal or asks for feedback after the user has explored a certain portion of the page.
- Use Case: Promotes additional content, a sign-up form, or a limited-time offer.
💡 How to trigger? Select the Open Event as “Page Scrolled”.
After that set the “Page Scroll Progress to decide at what point the popup will appear as the user scrolls down the page.
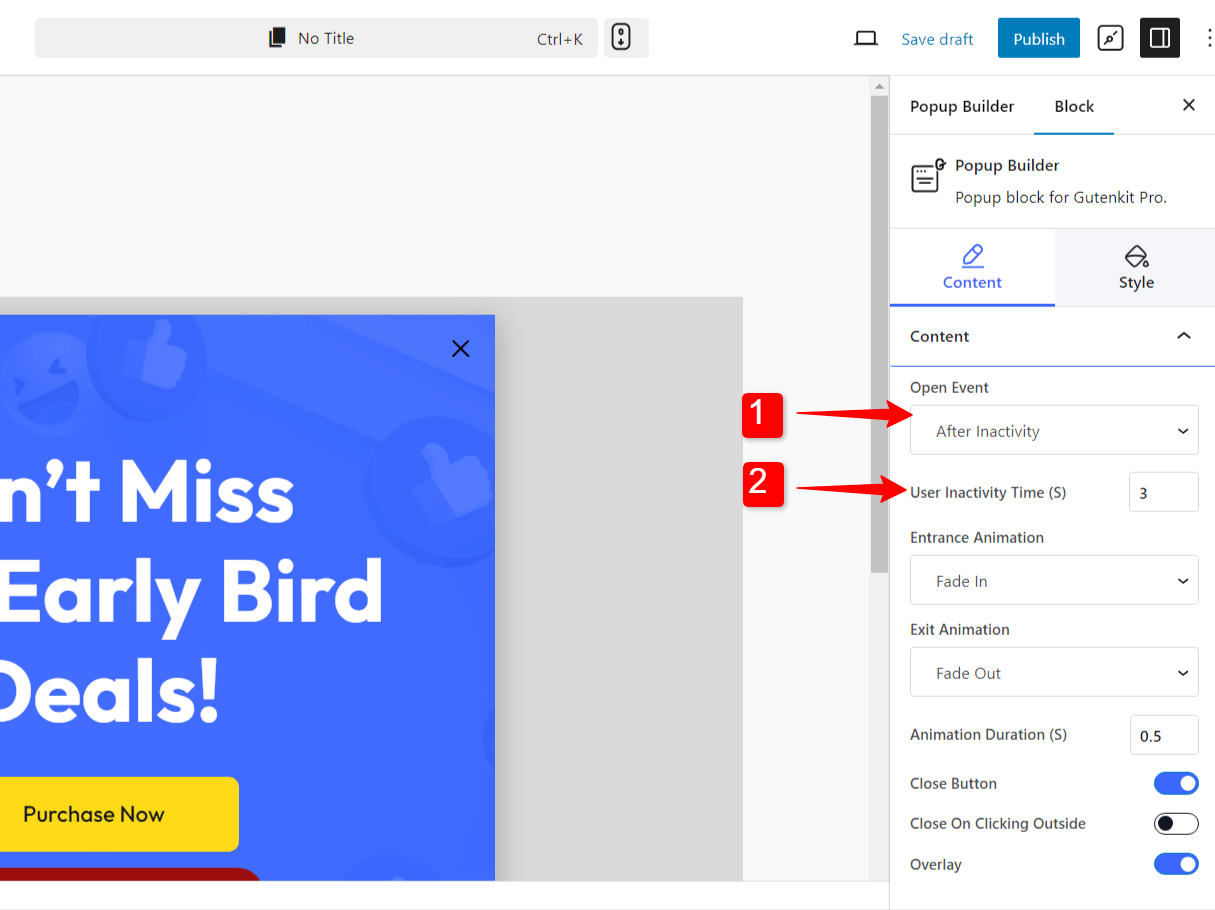
4. User Inactivity Popups
- Trigger: When the user is inactive for a certain amount of time.
- Purpose: Re-engage users who have been idle for a certain period of time on the site.
- Use Case: Reminds users of special offers, prompts them to take action, or suggests items they might have left in their cart.
💡 How to trigger? Select the Open Event as “After Inactivity”.
Now set the User Inactivity Time in seconds to decide when the popup will appear after the user has gone inactive.
5. On-Click Popups
- Trigger: Activated by user interaction with a section on the page.
- Purpose: Displays content when the user clicks on a specific page element (e.g., a button or image).
- Use Case: Often used for product details, additional form submissions, or video playbacks.
💡 How to trigger? Select the Open Event as “Custom Selector Click”.
Now add Selector Class for the section.
With these various types of WordPress popups available in Gutenberg, you have the flexibility to choose the best format that aligns with your goals and enhances user experience, making your website more engaging and effective in capturing attention and driving conversions.
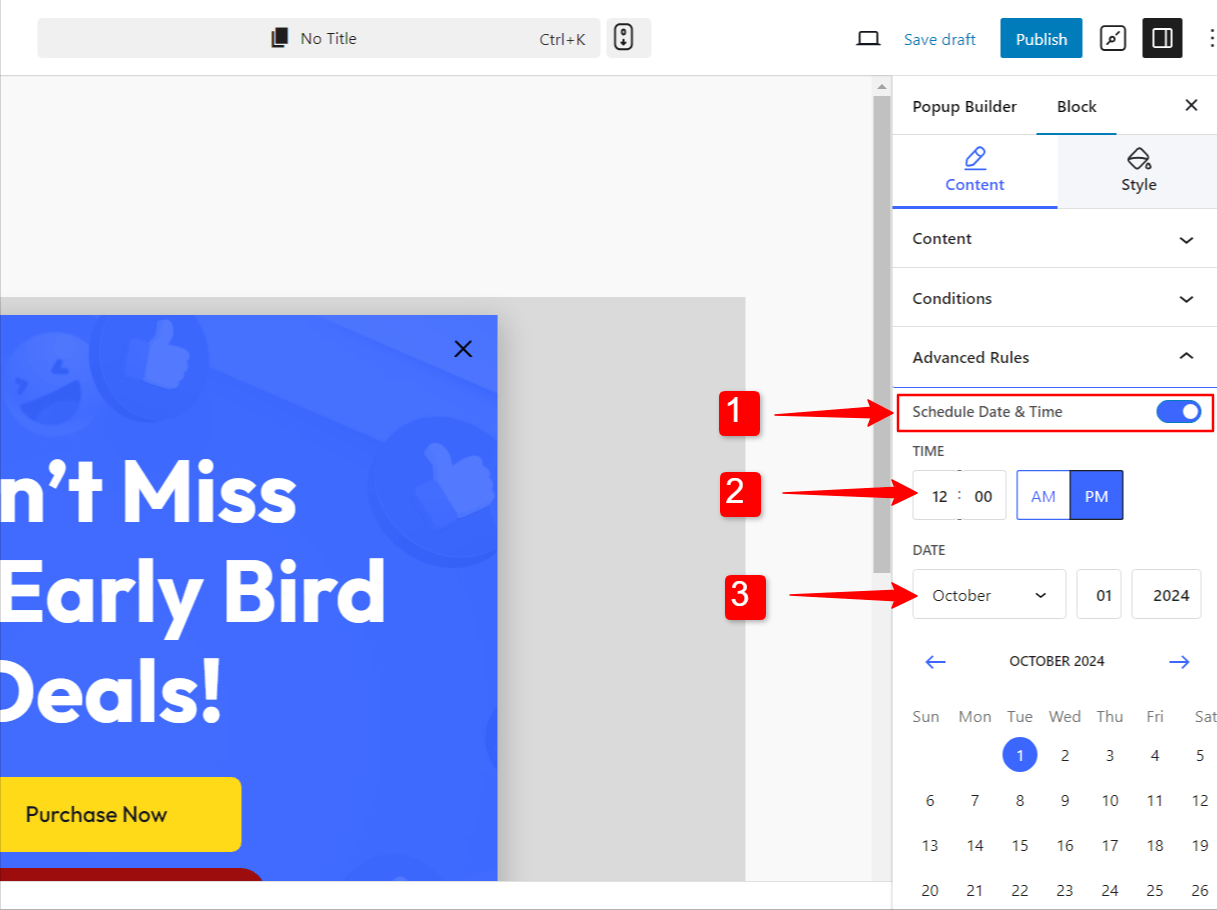
Schedule popup activation for your campaign
Sometimes, you will use the popups to promote campaigns on your website. Now, these campaigns have a certain date and time for launch. So you need to match that exact timing to activate the popup.
You can do that with the Advanced Rules.
➡️ Step 1: Toggle the button to on for “Schedule date & Time”.
➡️ Step 2: Set the Time when you want to activate the popup.
➡️ Step 3: Choose the Date of the popup campaign launch.
Why Choose the PopupKit for WordPress?
The PopupKit stands out as a top choice for creating popups in WordPress due to its easy integration with the Gutenberg block editor, offering an intuitive and highly customizable experience for users. Here’s why it’s an excellent solution for WordPress sites:
✅ Seamless Gutenberg Integration:
PopupKit is built specifically for Gutenberg, meaning you can design and manage popups using the same block-based interface you’re already familiar with. This eliminates the need for external popup builders or coding, streamlining the entire process and allowing for a cohesive experience.
✅ Pre-designed Templates for Quick Setup:
This popup builder pluigin comes with a variety of professionally designed popup templates that can be easily customized to fit your brand’s style. These templates save time and effort, offering a starting point for those who don’t want to build popups from scratch but still want a polished, modern design.
✅ Advanced Display Rules:
With PopupKit, you have full control over when and where your popups appear. You can set precise display conditions based on which pages you want to show the popup.
This ensures that your popups are shown at the most optimal moments, improving engagement without being intrusive.
✅ Multiple Trigger Options:
It offers multiple trigger options for displaying popups, such as on page load, after a timed delay, on scroll, or when the user is about to exit the page.
You can also trigger popups when users interact with specific elements, giving you complete control over the user journey.
✅ Flexible Customization
The PopupKit, popup builder allows for extensive customization of your popups, from animations and styles to typography and colors.
You can even add custom CSS for more advanced styling, ensuring that your popups match your website’s unique design and branding.
✅ Responsive and Mobile-Optimized
Popups created with this popup builder plugin are fully responsive and mobile-friendly, ensuring that your popups look great on any device. You can customize the appearance with entrance and exit animations, background styles, overlay colors, and more.
✅ Lightweight and Performance-Oriented
Unlike many other popup plugins, PopupKit is designed to be lightweight and performance-optimized.
This means you won’t have to worry about popups slowing down your site, which is crucial for both user experience and SEO.
Wrapping up
By following these steps, you will be able to build and show popups on your WordPress sites easily. With the PopupKit—Popup Builder, you can easily integrate dynamic popups into your WordPress site, allowing you to communicate effectively with your audience.
Take the insights from this guide and start experimenting with different popup strategies to maximize your site’s potential!
Learn the steps, tricks, and best practices of 👉 Using Popups that Drive Lead Generation
FAQs
What plugin do I need to build popups in the Gutenberg editor?
How can I control when and where my popups appear?
Display Conditions lets you choose where popups show. It could be across your entire site, on selected pages, archives, or exclude specific pages. Trigger Options, on the other hand, set entry popups like on page load, exit‑intent, scroll‑triggered, user‑inactivity, or on‑click popups using custom CSS selectors, all configurable from the “Open Events” settings
Leave a Reply