Displaying Wp post lists enhances content showcasing and navigation on your WordPress site. Luckily, many widgets and plugins simplify the creation and customization of post lists. Don’t miss out on this comprehensive guide that will transform your website into a captivating hub of information. Learn expert tips, tricks, and step-by-step instructions on how to show a post list in WordPress through ElementsKit with style and finesse.
This guide explores two popular options: the Posts List and Blog Post widgets in ElementsKit. Embark on this journey as we guide you through using these widgets to create engaging post lists.
ElementsKit as WordPress Post List Plugin
Post lists are groups of posts organized and presented in a specific order. You can showcase them in various formats, including grids, carousels, or shortlists. Utilizing a list format for your posts can give readers a structured view of your content. It simplifies the process of locating and engaging with your articles.
ElementsKit is a WordPress post list plugin that offers two widgets streamlining the creation of custom post lists to suit your needs; Post list Widget and Blog Post Widget. These two widgets offer excellent features on how to show a post list in WordPress with a wide range of lay-outs to keep your viewers engaged.
ElementsKit widgets enhance website functionality and aesthetics without coding skills. When it comes to crafting post lists, these widgets offer 3 main benefits:
1. Effortless Customization: Widgets offer customizable interfaces for post-list appearance and behavior.
2. Time Savings: Creating and updating post lists is time-saving compared to manual coding.
3. Flexibility: Widgets allow you to showcase post lists on various website pages. It adapts to your site’s structure, covering the homepage, blog archive, and sidebar.

Understanding the Posts List and Blog Post ElementsKit Widgets
ElementsKit offers two robust widgets: Posts List and Blog Post. These widgets have gained popularity because of their ability to display post lists in diverse layouts and styles.
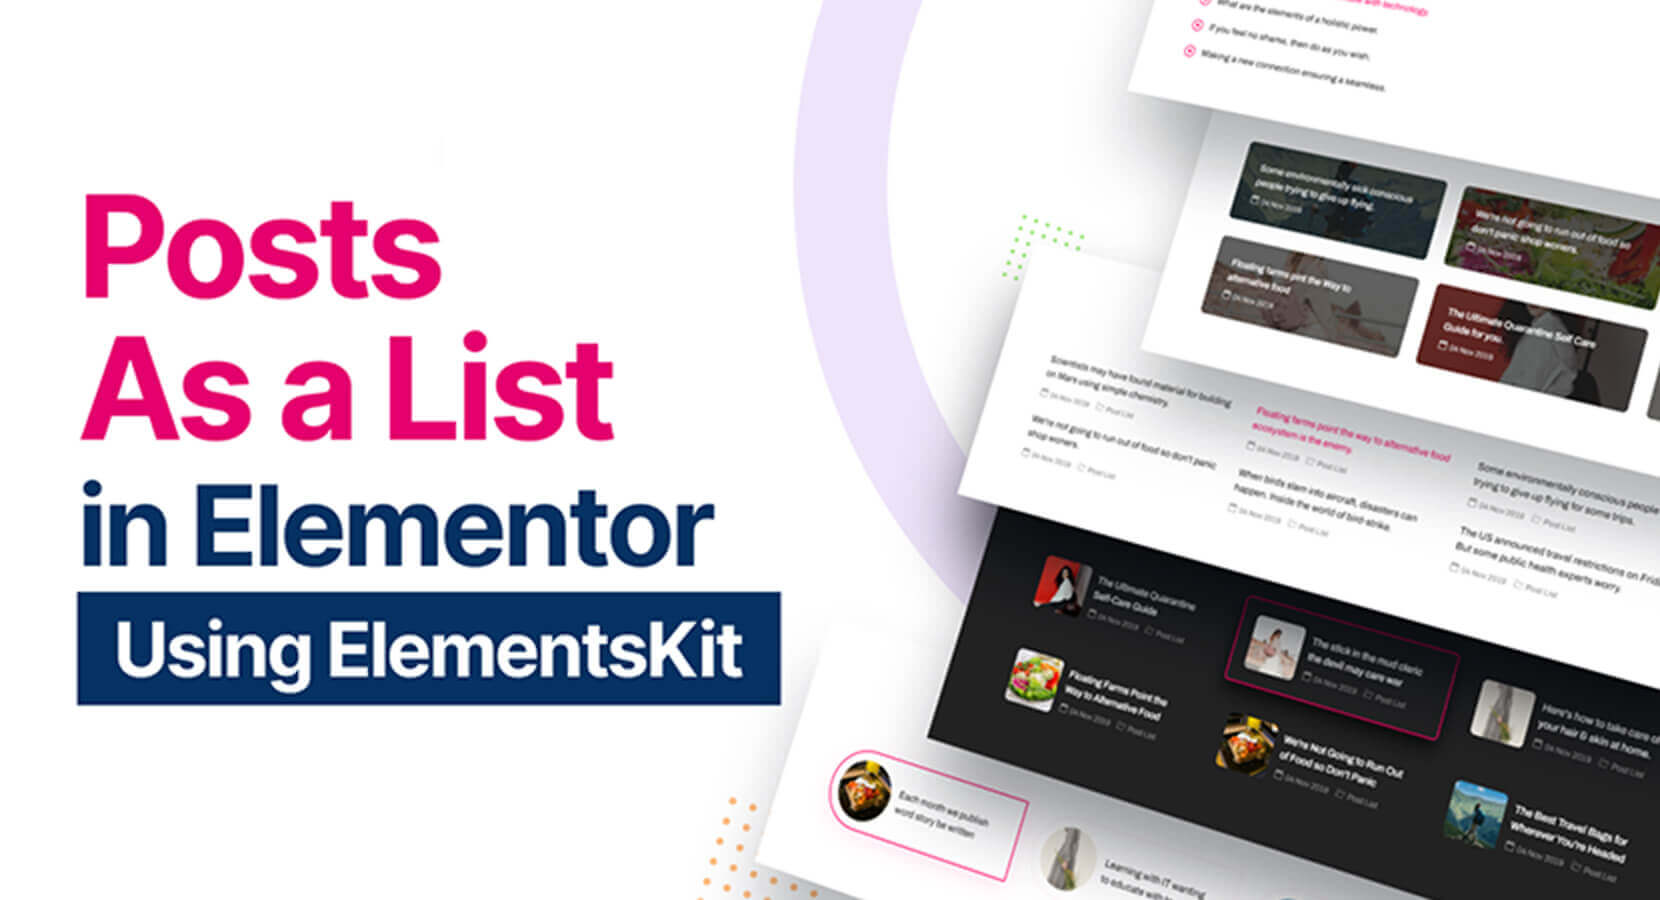
This widget lets you create WP post lists with diverse layout options. It provides customizable post types, categories, pagination, and more settings.
Key Features:
- Organized Post Lists: Showcase your posts in a well-structured list format.
- Personalized Post List Elements: Tailor your post list by customizing the layout, text, and more to match your preferences.
- Category Customization: Select categories to curate and highlight content based on relevant topics.
- Versatile Layout Choices: Explore diverse layout options, such as vertical and horizontal styles, to create visually appealing post lists that suit your needs.
- Styling Variety: Enjoy a plethora of styles to choose from, enabling you to create a post list that aligns with your website’s design and branding.
- Vertical Style with Icon
- Horizontal Style with Icon
- Horizontal Style with Background
- Flexibility in Displaying Post Lists: Arrange your post lists in various ways. You can showcase your content in a sidebar widget or a dedicated post list page in different locations.
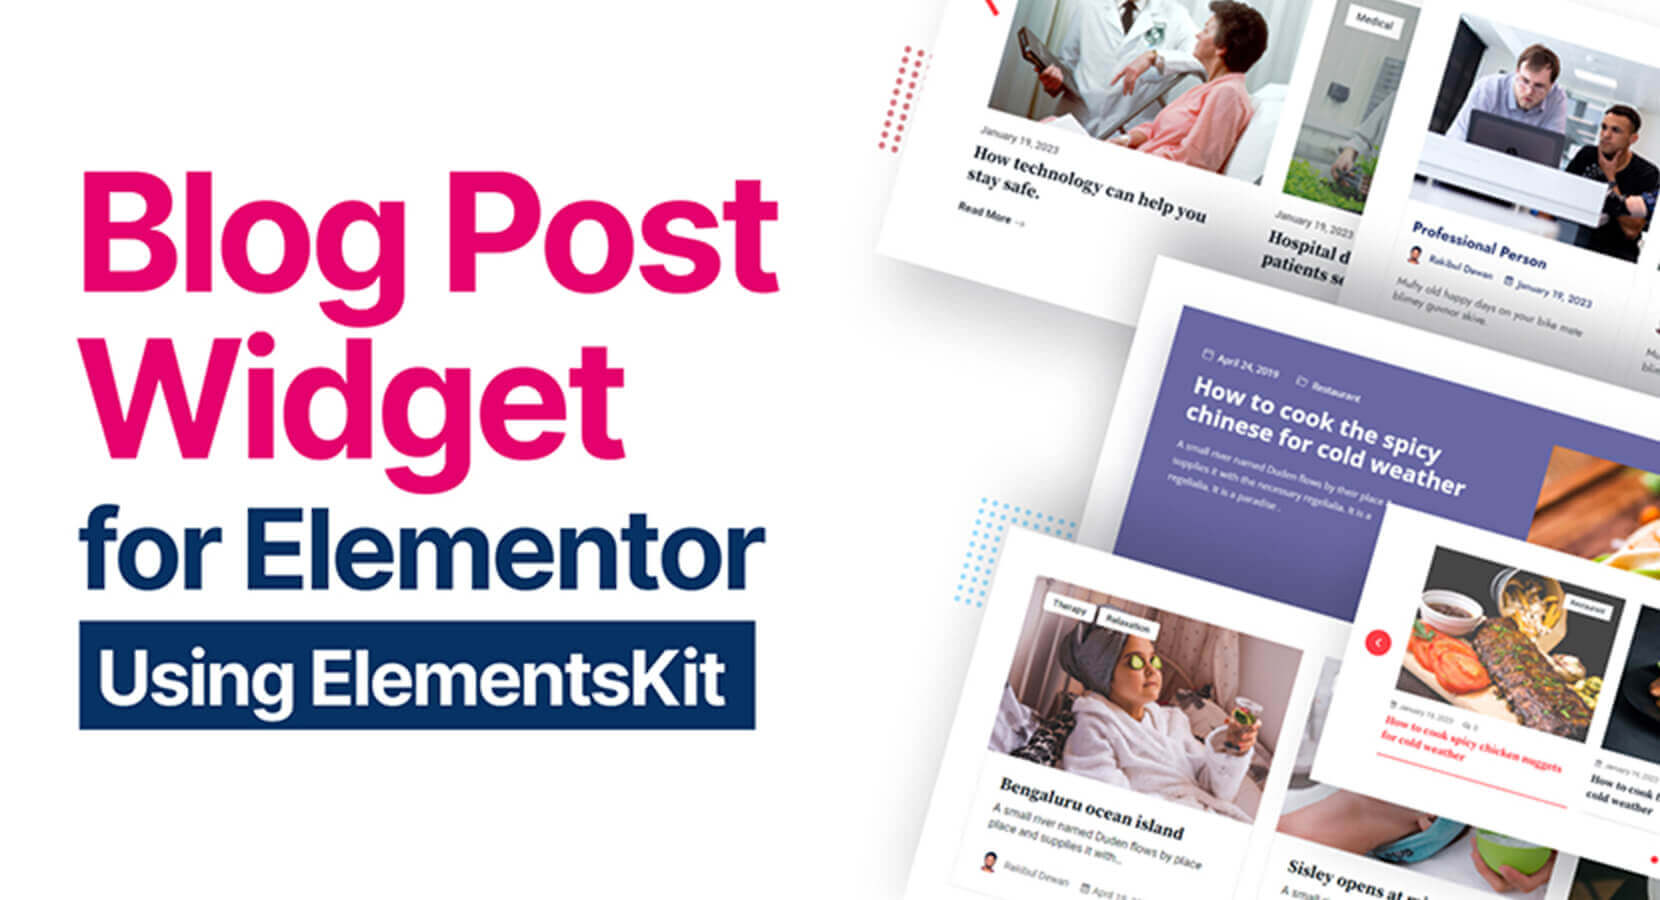
Blog post widget provides options for presenting posts in a blog format. It offers a variety of layouts, including a grid, carousel, and timeline. It allows WordPress to show featured images in a post list. It also has customizable post types, categories, metadata, and more settings.
Key Features:
- Layout Style: Choose from various layout styles to display your post lists appealingly.
- Featured Image Control: Show or hide the featured image and adjust its position. Customize the size of the featured image to ensure a perfect fit.
- Grid Configuration: Customize the number of posts displayed per row to create a balanced grid layout.
- Post Title Visibility: Easily show or hide the post title to achieve the desired presentation style.
- Pagination Options: Enable pagination to enhance navigation within your post lists.
- Category-based Filtering: Select posts based on specific categories and apply various parameters.
- Flexible Sorting: Order your posts based on date, title, author, modification, and comments.
- Customizable Read More Button: Tailor the appearance and text of the read more button.
- Style Customization: Make necessary style adjustments through the settings.
Step-by-Step Guide to Creating Post Lists in WordPress with ElementsKit
Let’s dive into the step-by-step guide on how to show a posts in WordPress websites using the Post List widget and Blog Post widget.
If you want to have simple and straightforward post lists on your WordPress site, then follow the simple and easy steps on how to show a post list in WordPress using the Post List widget.
On the other hand, you can follow the other set of steps using the Blog Post widget to customize your post lists to be more enhanced and appealing.
Using the Post List Widget
👉 Enable post list widget in your WordPress dashboard
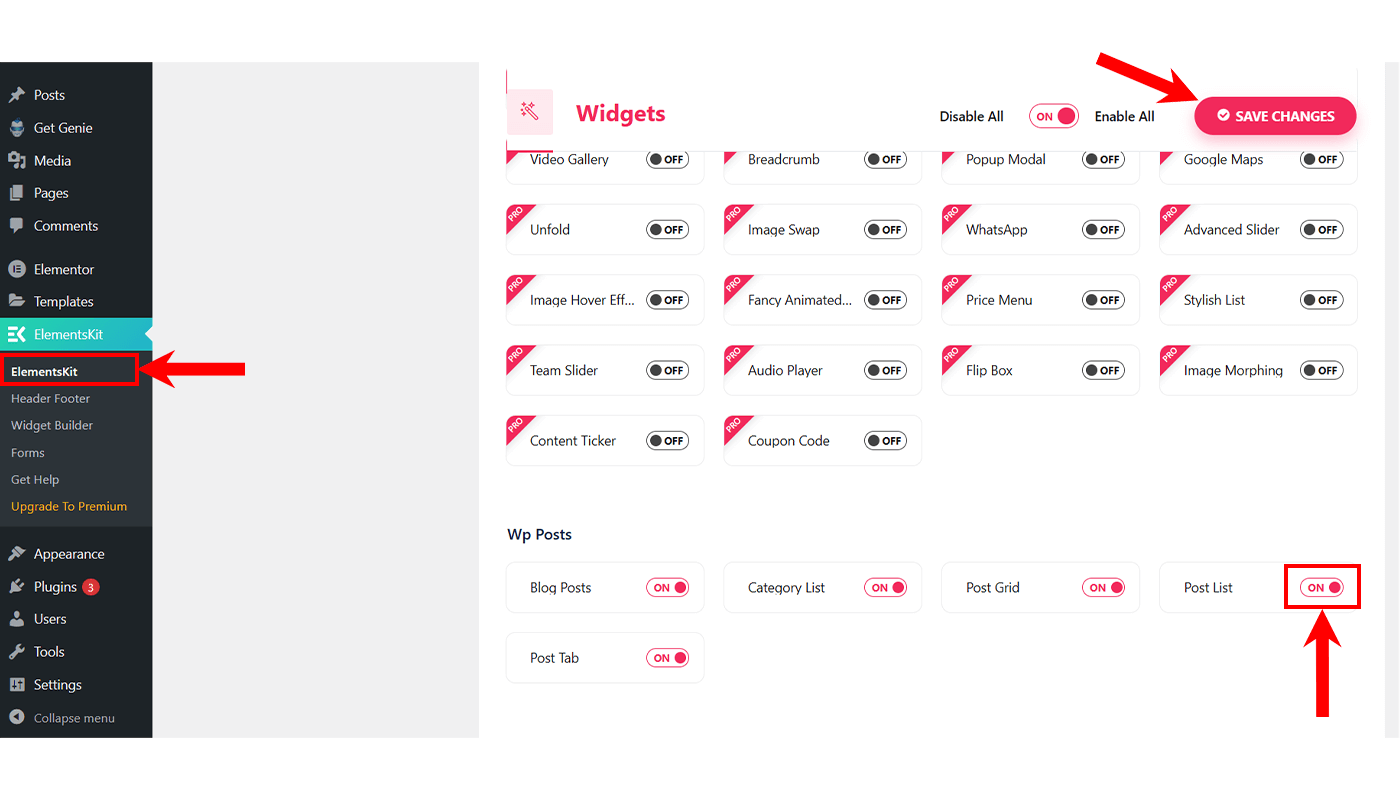
Go to Elementskit-> Widgets-> Make sure that your Post List is active/on-> Save Changes.
👉 Create your post list
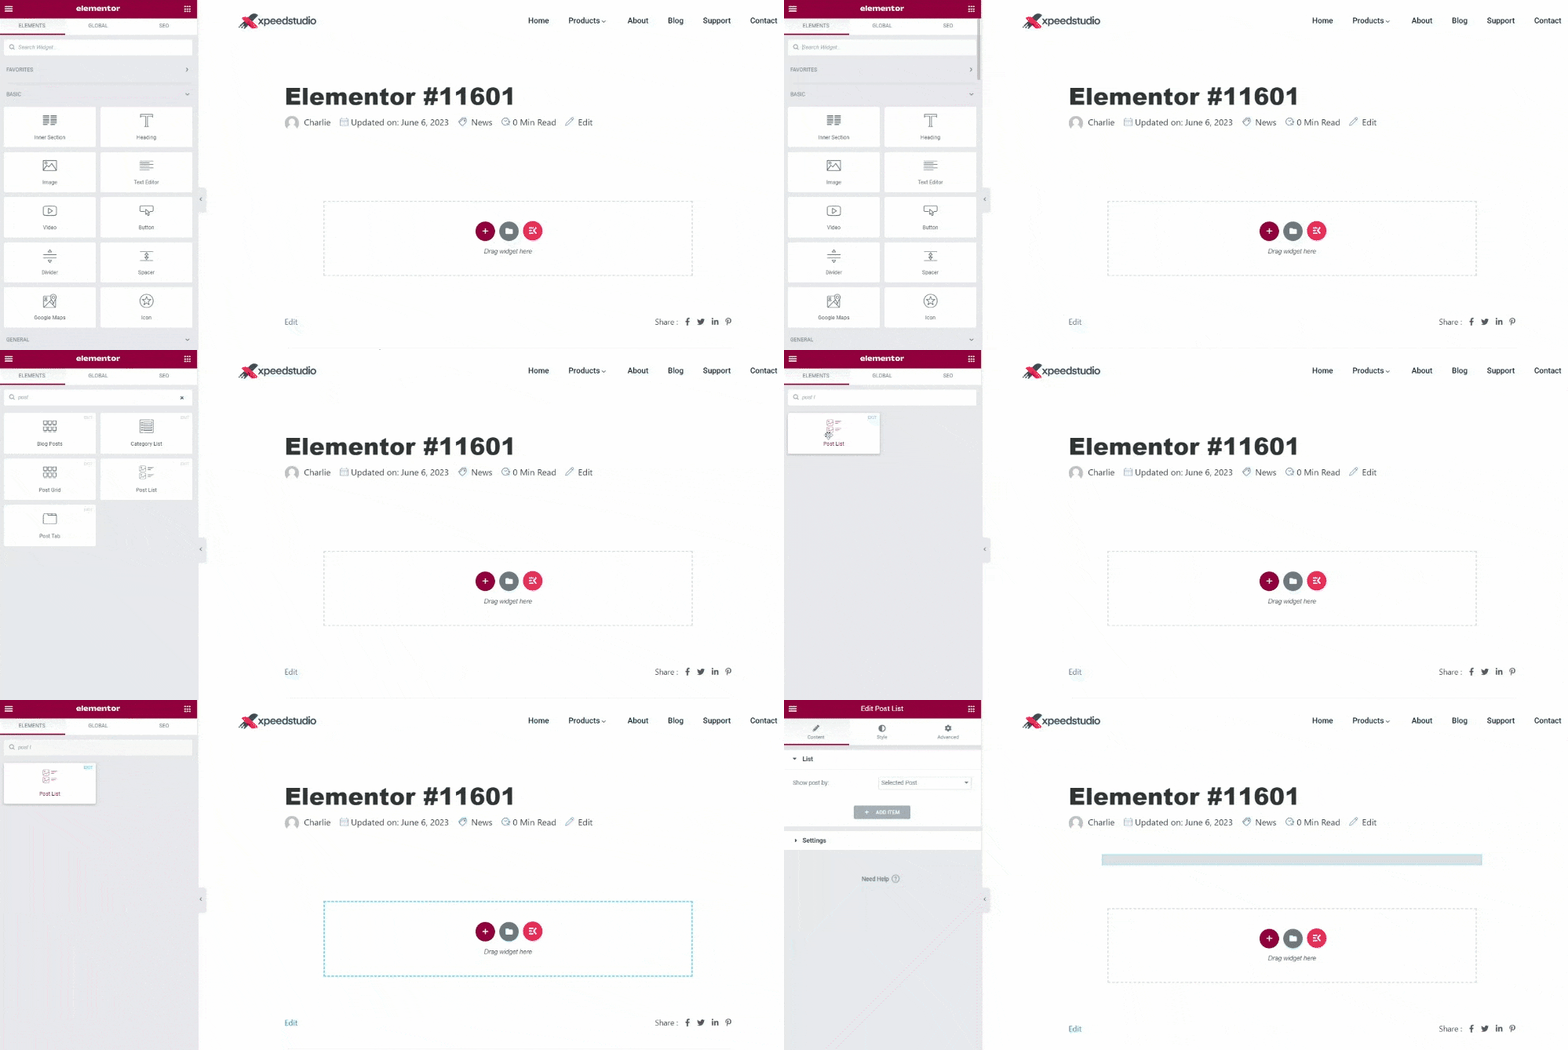
Go ahead and open up any page and then select “Edit with the Elementor. After that, from the widget panel, search Post List.
Then you’ll find the Post List widget with the Ekit badge. Drag in the widget on your page. Now on the left side of your screen, you’ll find some settings:
👉 Starting with “List”
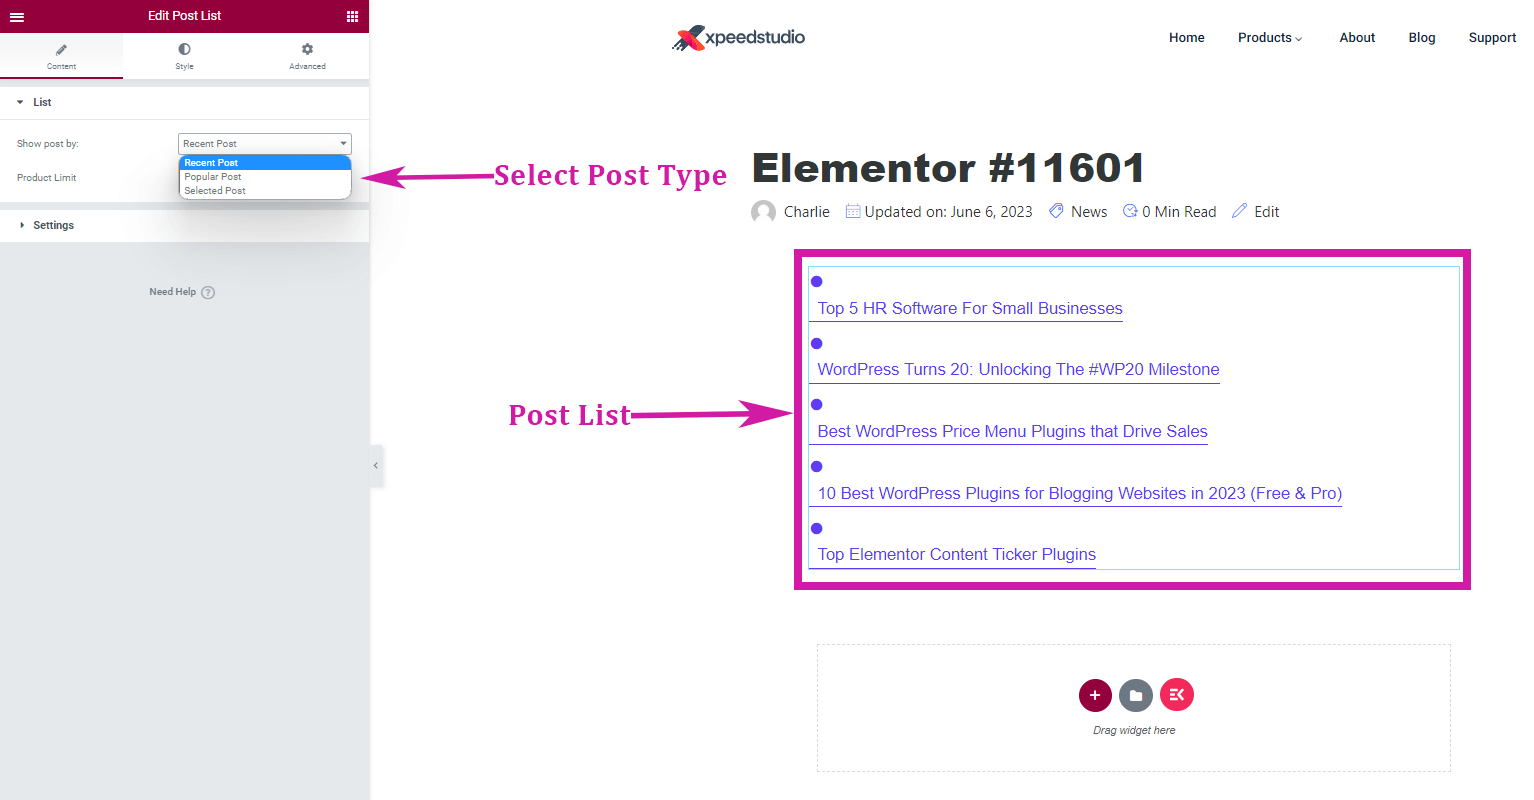
✅ Choose Show Post By: Recent Post, Popular Posts or Selected Post. By selecting the Recent Post from the drop-down, you’ll find all the recent posts from your articles.
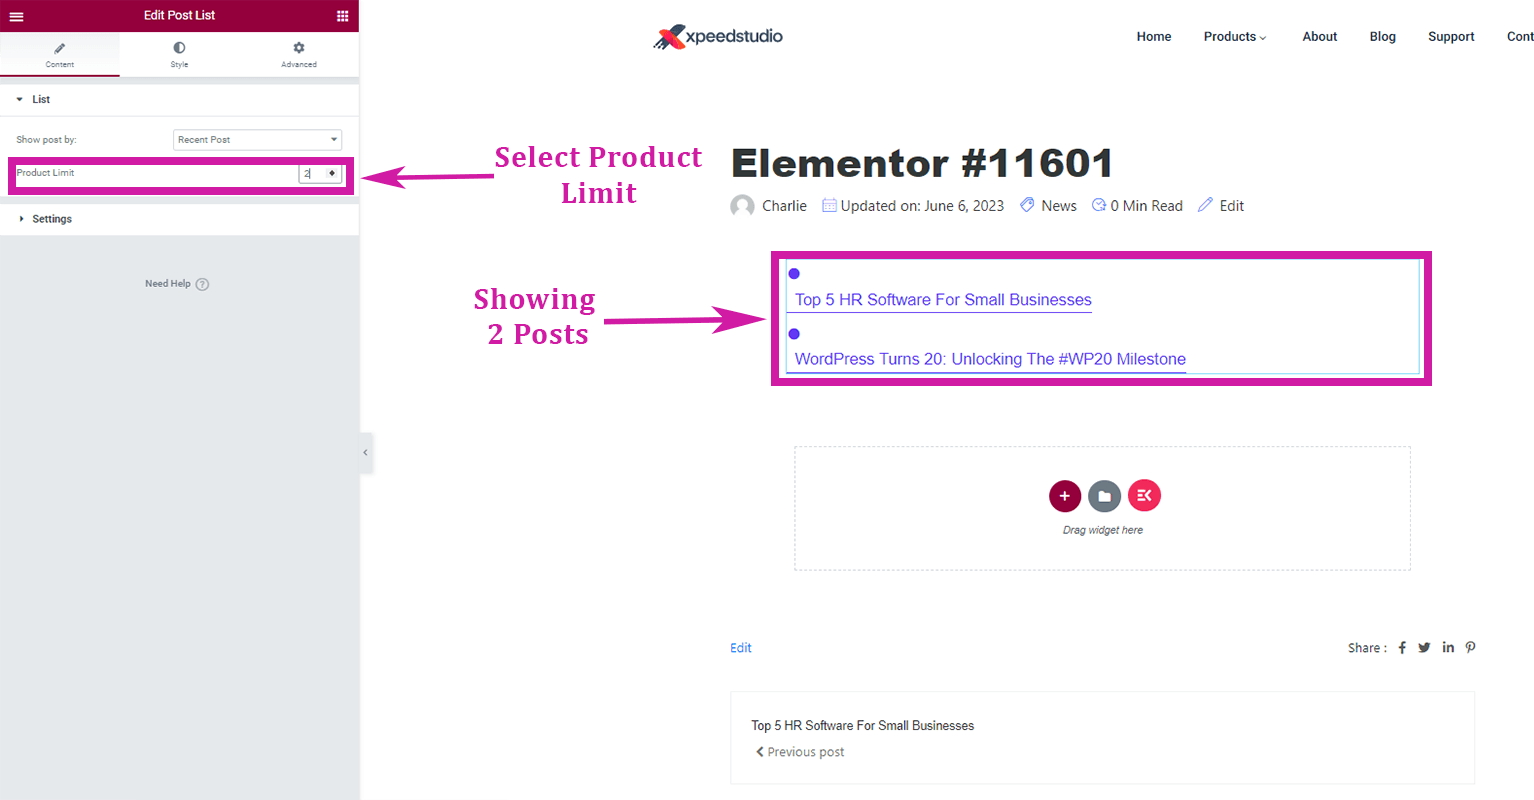
✅ Select Product Limit: You can set the limit of the number of articles you wish to appear in your post list. This is only applicable for recent and popular posts.
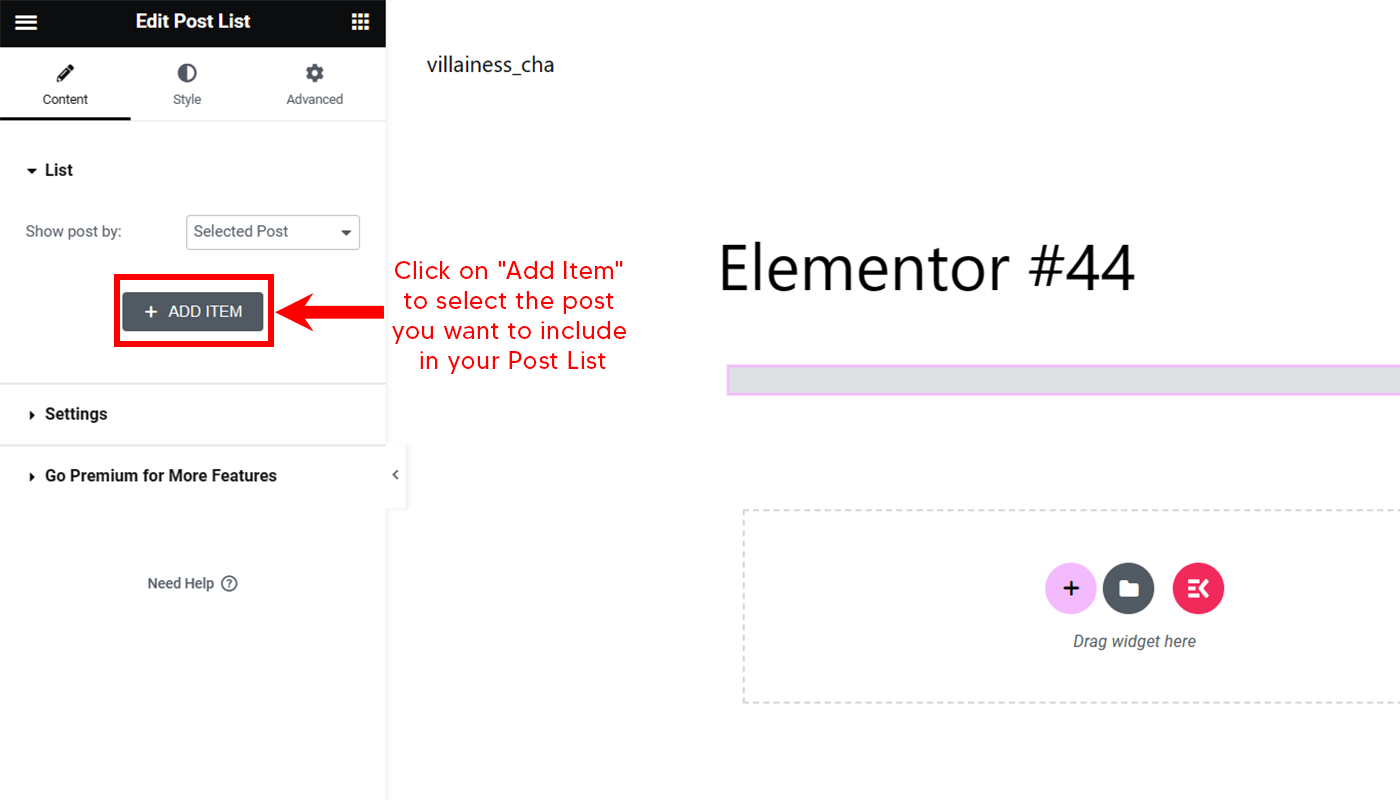
✅ Choosing “Selected Post”: Click on “Add Item” to select the post you want to include in your post list.
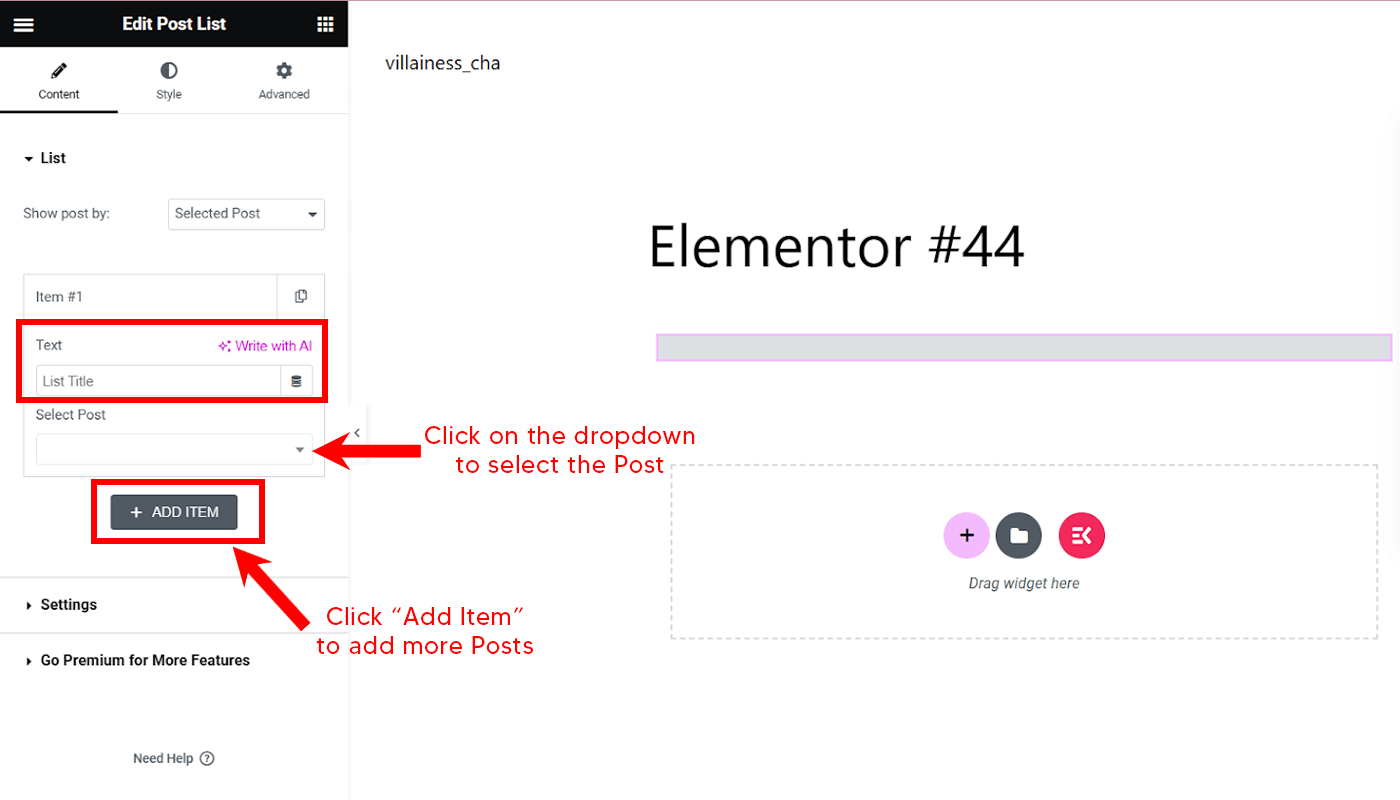
You can add as many as you want by clicking on “Add Item”. At the “Text” section, you can add the heading title of the selected article.
👉 Go to “Settings”
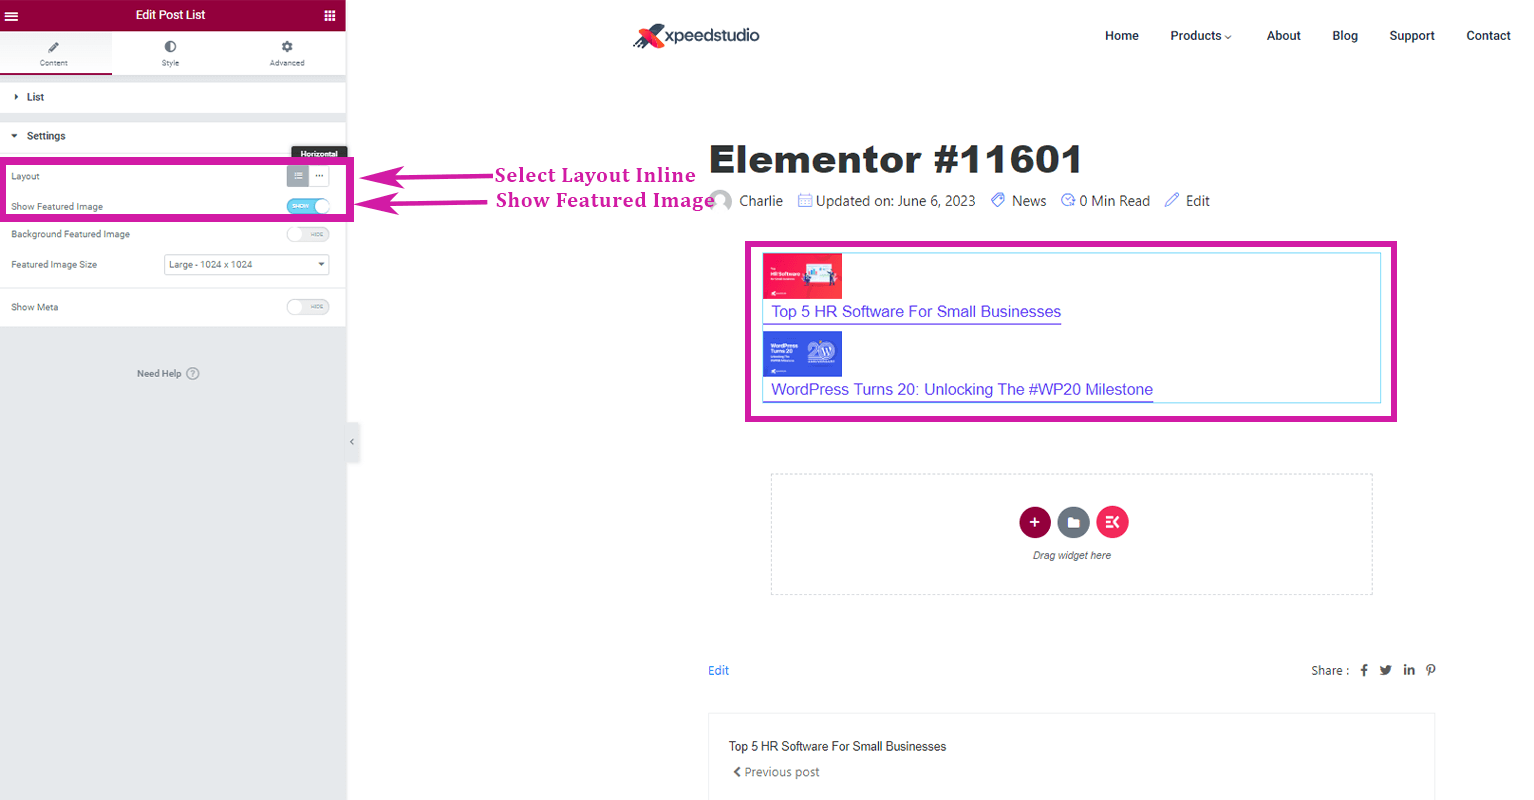
1. Select Layout: Default or Inline
2. Enable to Show Featured Image
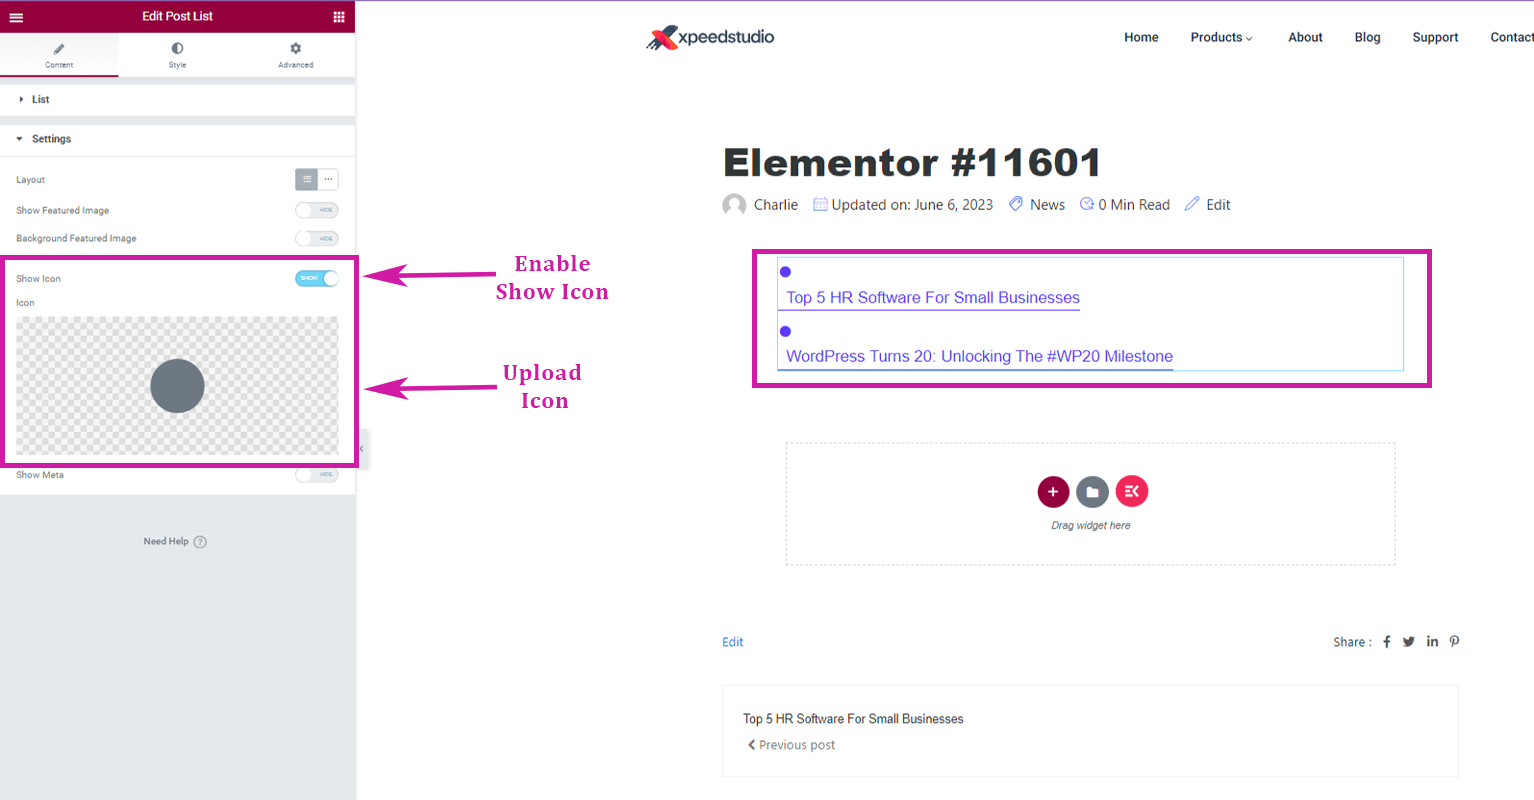
3. Enable to Show Icon
4. Upload Icon
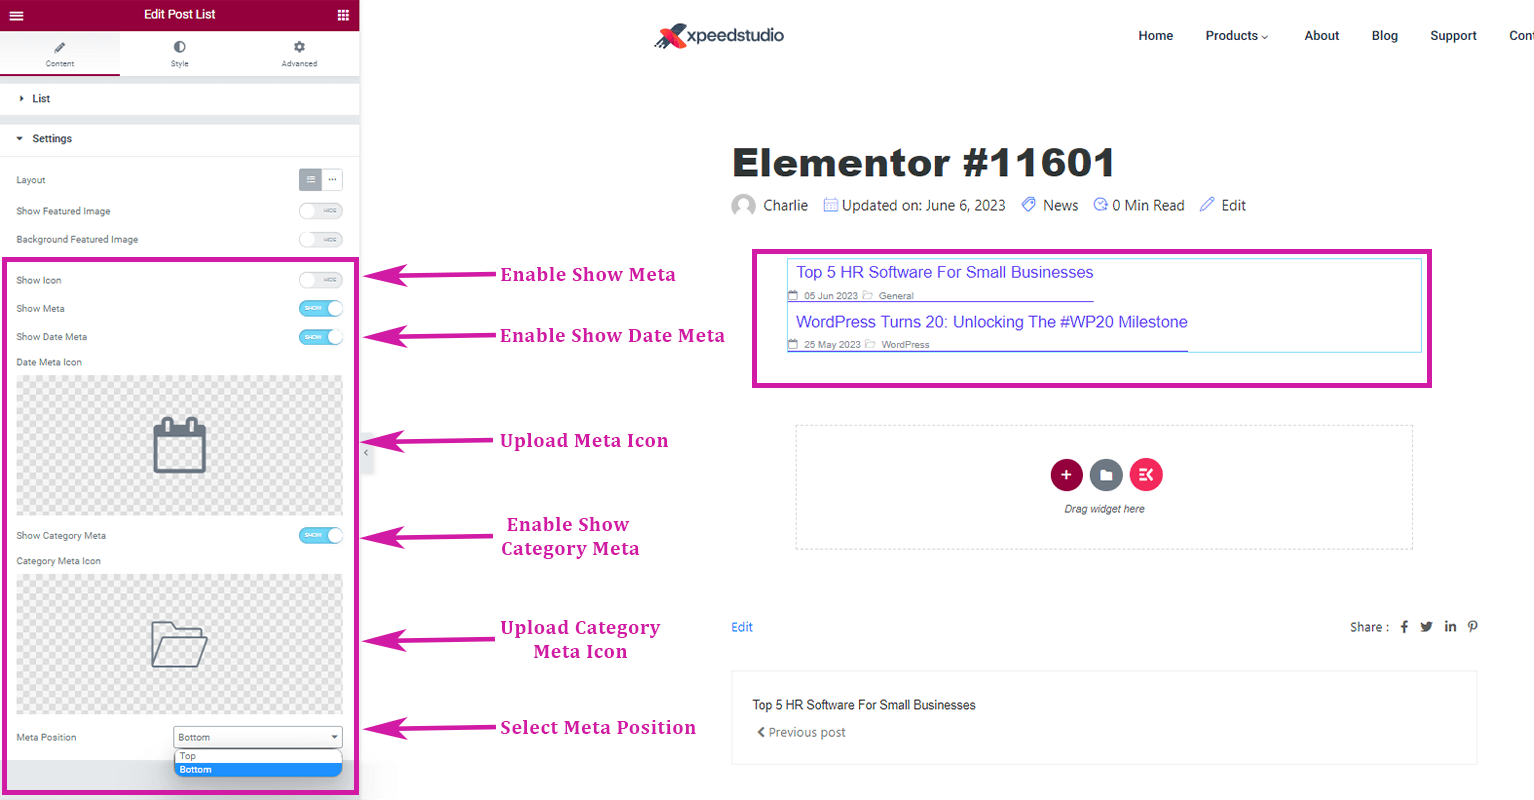
5. Enable Meta
6. Enable Show Meta Data
7. Upload Meta Icon
8. Enable to show Category Meta
9. Upload Category Icon
10. Select Meta Position: Top or Bottom
Using the Blog Post Widget
👉 Enable blog posts widget in your WordPress dashboard 👈
Go to Elementskit-> Widgets-> Make sure that your Blog Posts is active/on-> Save Changes.

👉Create your blog post list 👈
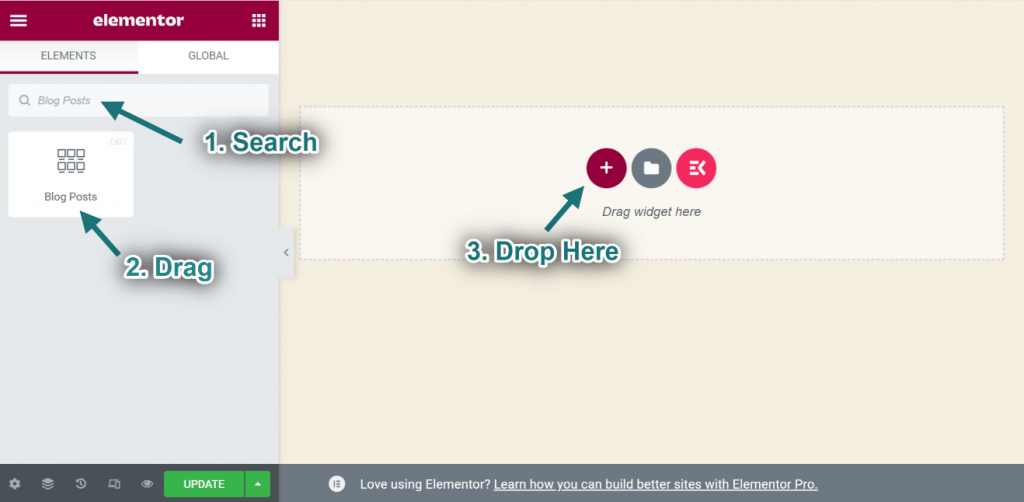
Go to the Elementor widget panel and search Blog Post. Then, drag in the Blog Post widget on your page. It will showcase all published blog posts. Follow the step-by-step guide to personalize the customization of your blog posts.
👉 Customize your blog posts list 👈
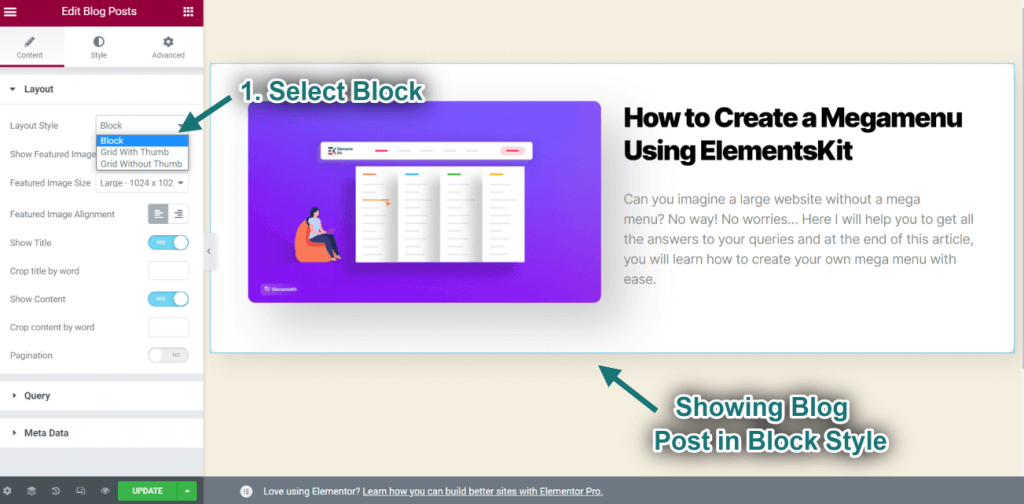
✅ Starting with “Layout”
🗸 Choose the Block layout style. Or, you can opt for the Grid with Thumb or Grid without Thumb style.
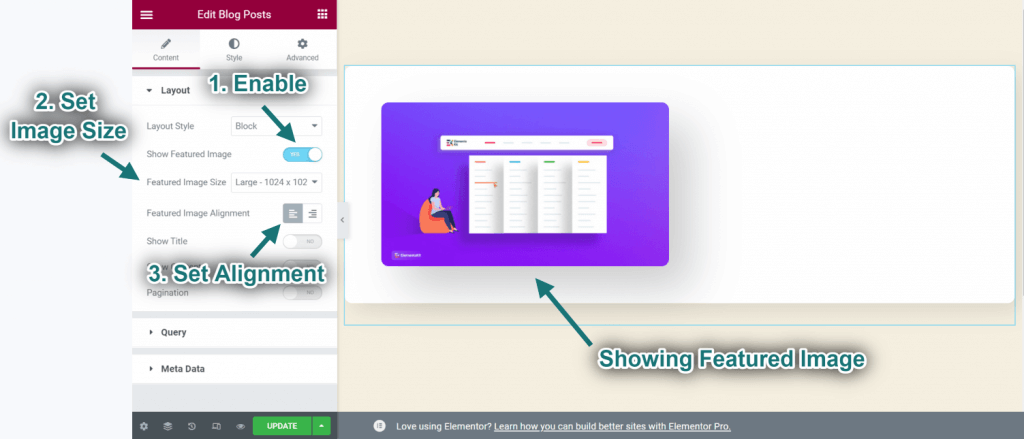
🗸 Featured Image
- Activate the Featured Image option.
- Configure the Image Size.
- Specify the Alignment as either Left or Right.
- Uploaded featured images will be displayed.
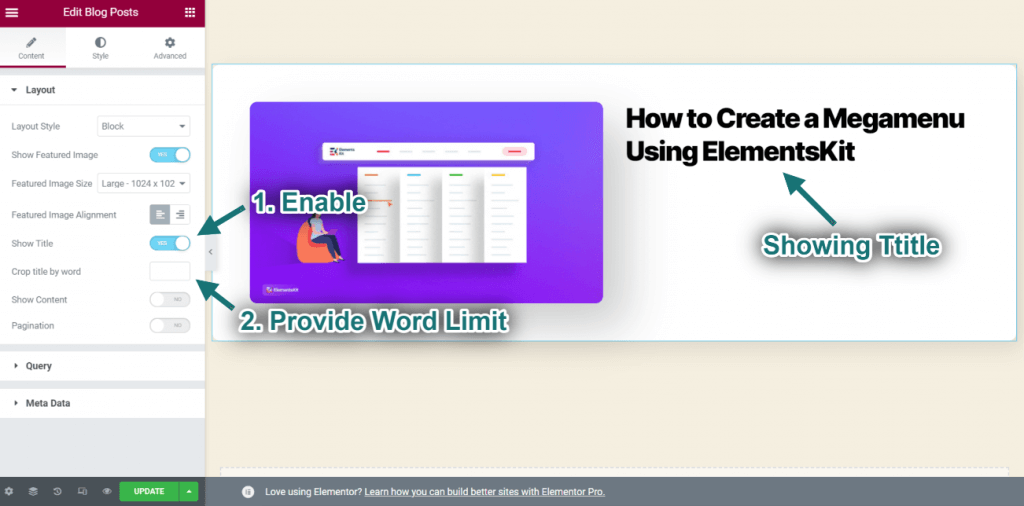
🗸 Title
1. Activate the Title option.
2. Specify the Word Limit: Most number of words permitted in the statement.
3. You can see the title displayed.
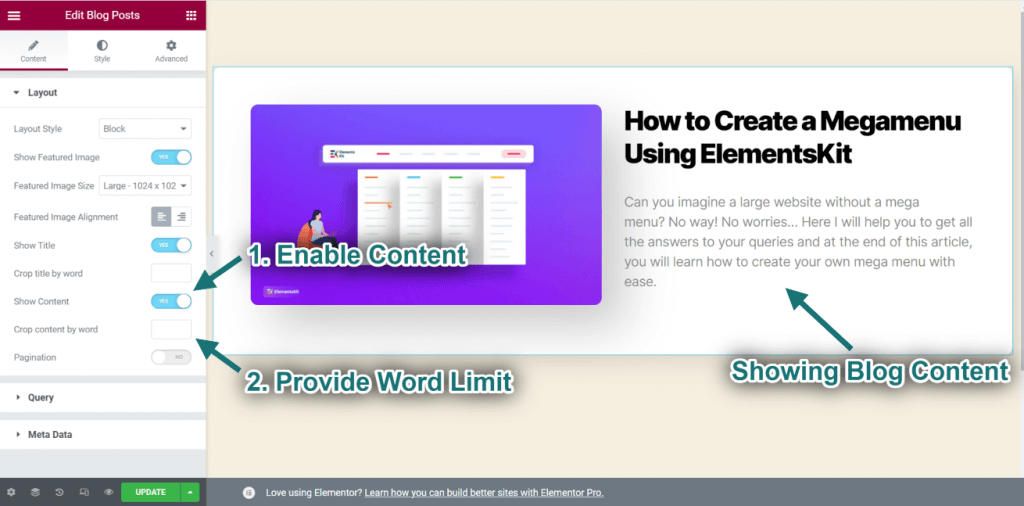
🗸 Content
1. Activate the Content option.
2. Specify the Word Limit: Most number of words permitted in the statement.
3. You can observe the content being displayed.
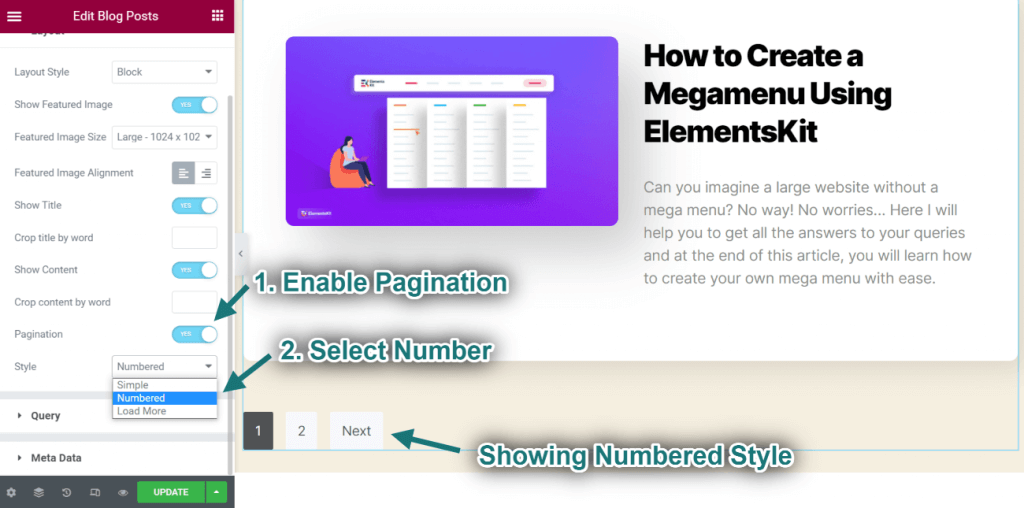
🗸 Pagination
1. Activate the Pagination feature.
2. Choose the Pagination Style: You can select Numbered or Simple or Load More.
3. You can view the numbered style displayed.
✅ Go to “Query”
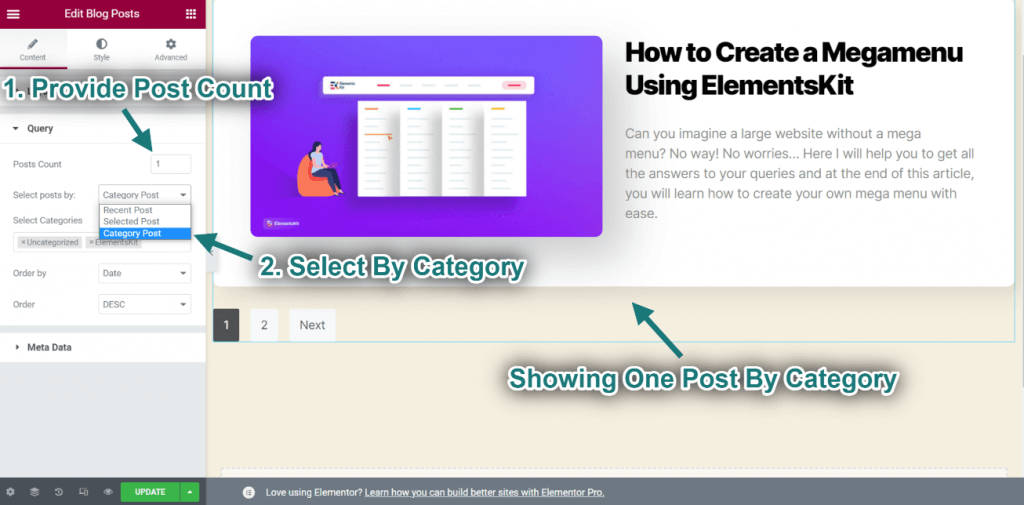
🗸 Choose the Post Count: You can select any count.
🗸 Select posts by Category or you can choose Recent Post or Category Post. You will observe that only one post is displayed based on the selected category.
👉 Select Posts by Category
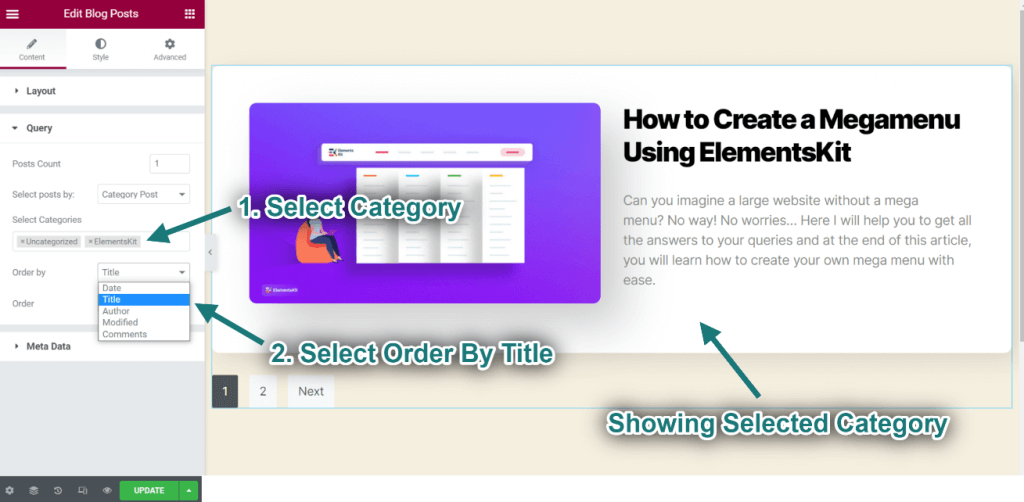
🗸 You can also choose your desired Category
🗸 Select the ordering by Title. As a result, it will display your selected category type.
👉 Select Posts by Selected Post
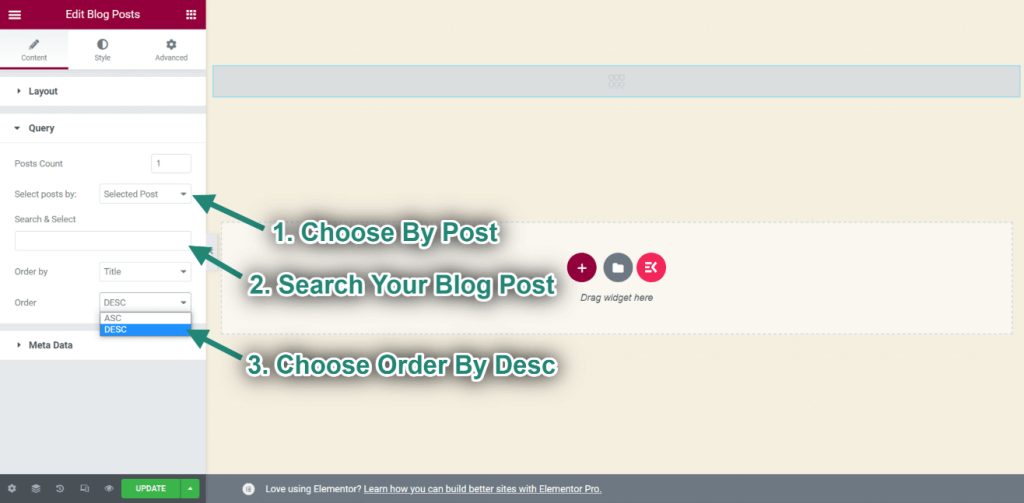
🗸 Choose posts by Selected Post. Or, you can select Recent Post or Category Post.
🗸 Now, select your desired blog post.
You can specify whether your blog post will be displayed in ascending or descending order.
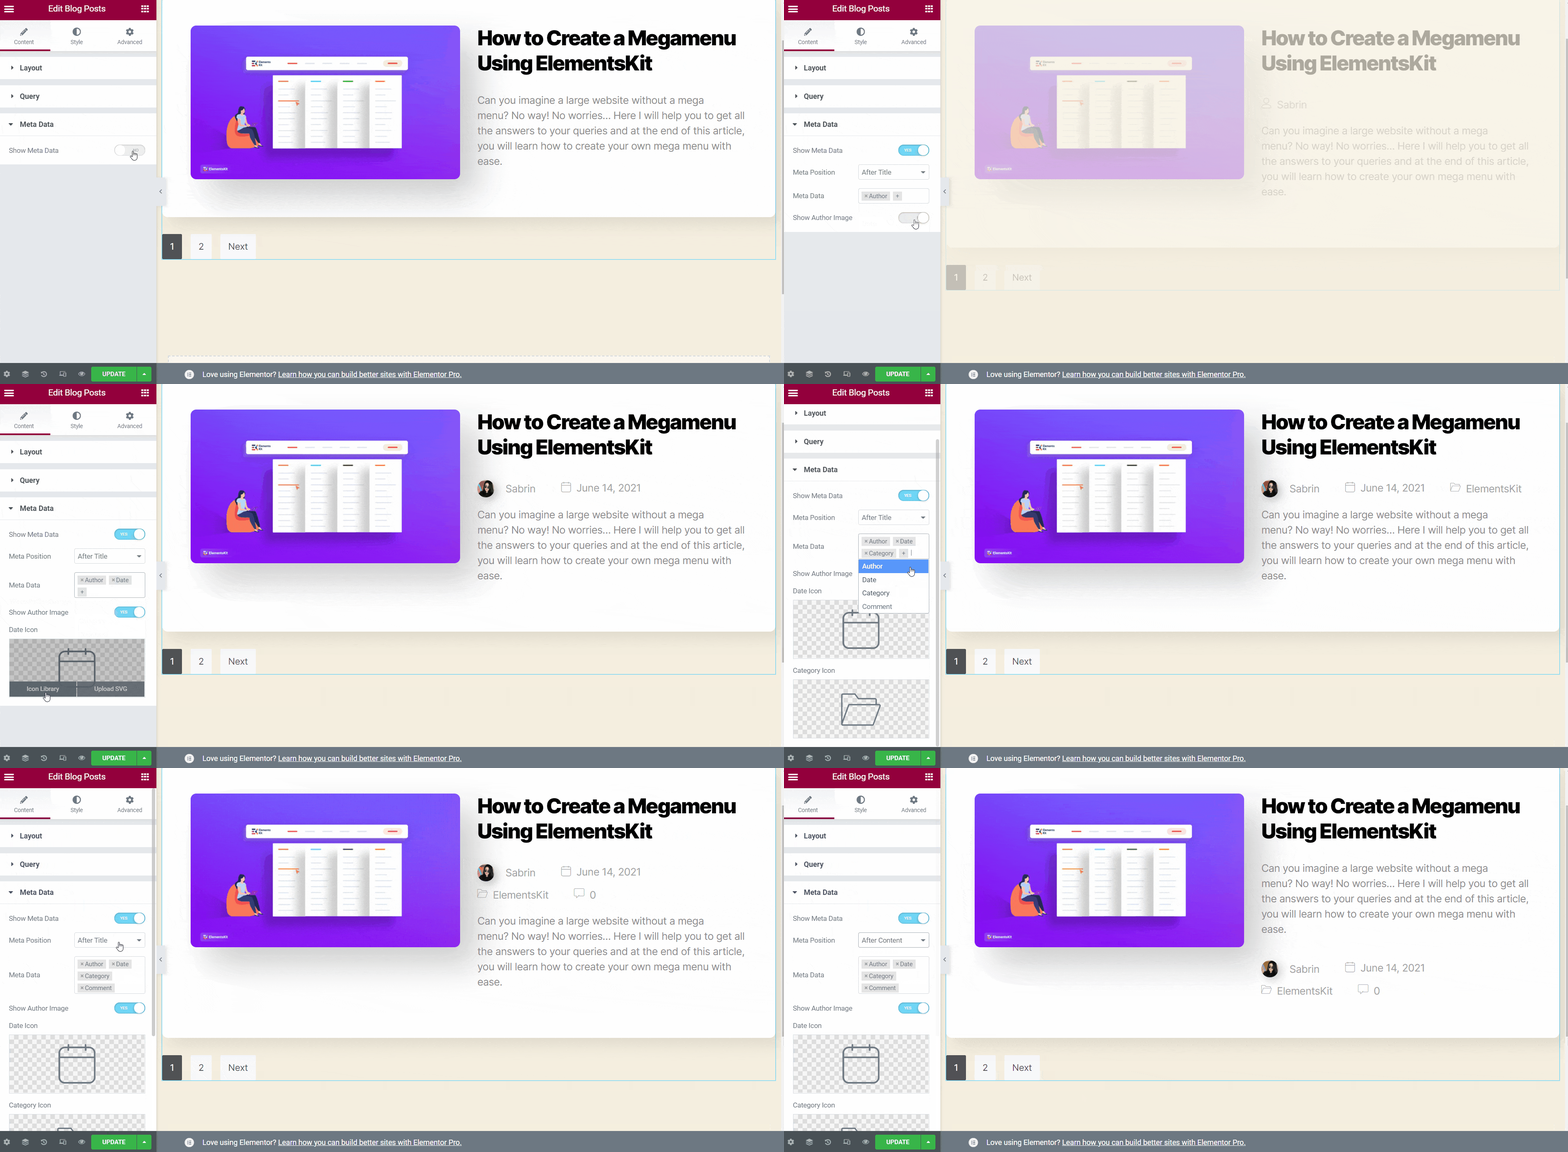
✅ Proceed to “Meta Data”
1. Activate the Meta Data feature.
2. Select the Meta data options: Author, Date, Category, Comment.
3. Choose the Meta Position: Before, After the Title, or After the Content.
4. You will be able to observe the changes displayed.
👉 Carousel 👈
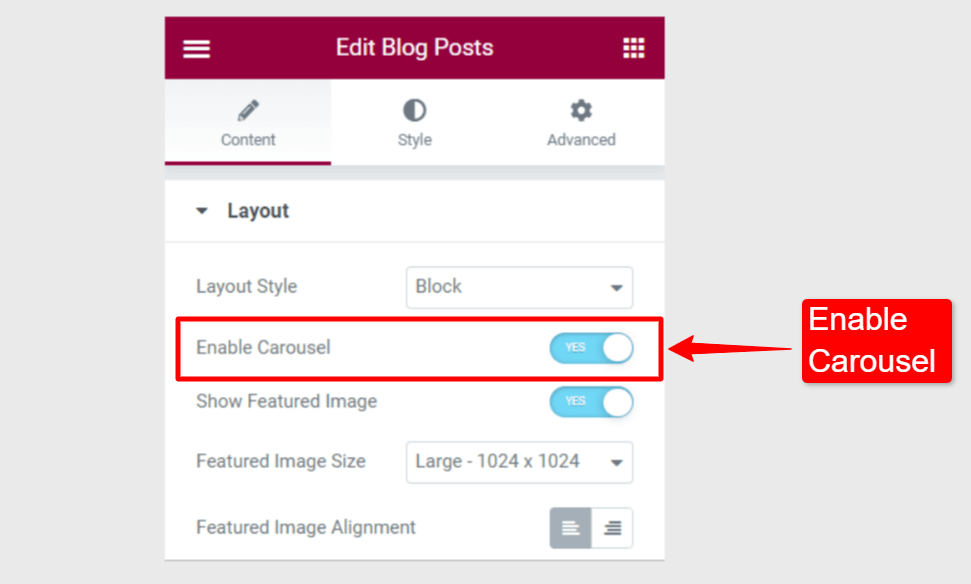
Additionally, you can present the blog posts in a carousel format. You must enable the Carousel feature within the layout section to do so.
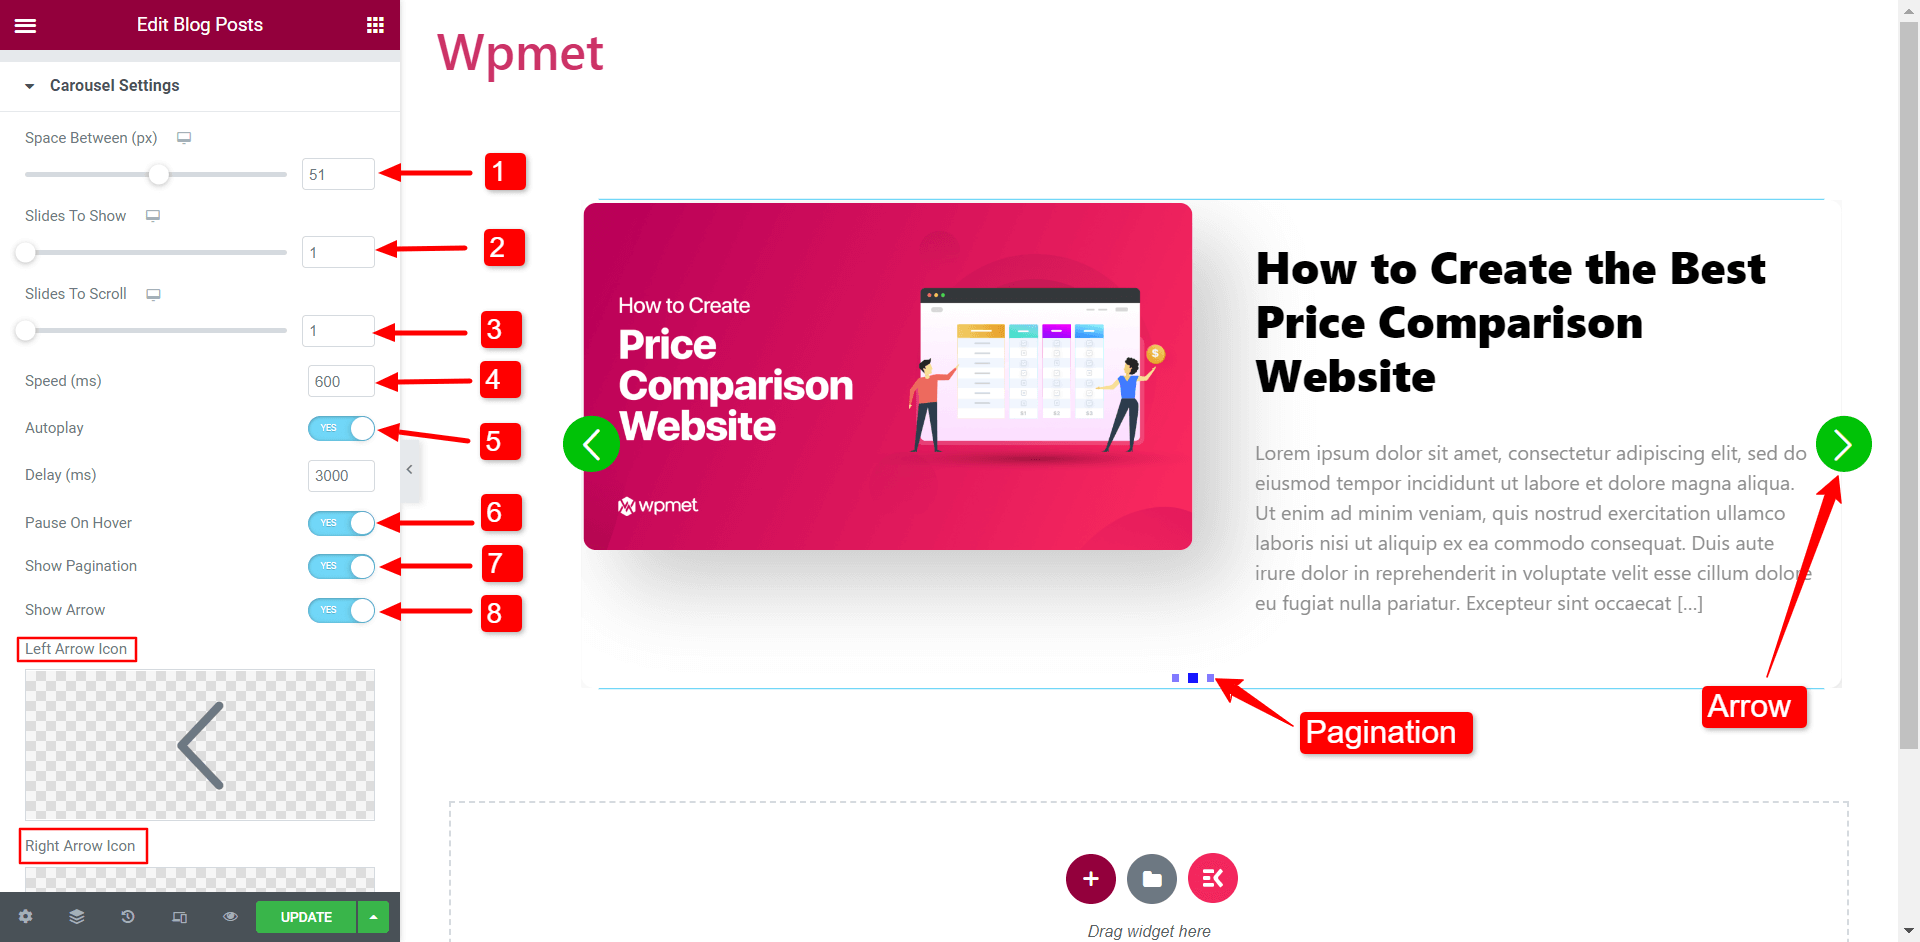
In the Carousel Settings:
🗸 Adjust the spacing between content.
🗸 Select the number of slides to display in one viewport.
🗸 Choose how many slides to move with each scroll.
🗸 Set the speed at which the slides scroll.
🗸 Enable autoplay for the carousel. If enabled, set the delay time in milliseconds (ms).
🗸 When users hover over the carousel, the autoplay will pause. (This option is available when Autoplay is enabled).
🗸 Enable pagination dots to navigate the slides.
🗸 Enable arrow navigation. If enabled, select the icons for the left and right arrows.
Troubleshooting and Common Issues
ElementsKit releases regular updates twice a month to address display issues and conflicts with other plugins or themes. These updates ensure compatibility with Elementor and other plugins, resolving possible disputes.
The developers also incorporate new features based on user feedback and popularity, enhancing the experience and versatility of ElementsKit. By improving and adding features, they aim to meet user needs, provide seamless integration with Elementor, and address potential conflicts.
Get Started with ElementsKit Widgets
In conclusion, displaying post lists on your WordPress site improves content presentation and navigation. ElementsKit Widgets offer flexible post-list creation and customization options. The Post List Widget enables curated and personalized post lists, while the Blog Post Widget offers layout choices and customization features. These widgets offer easy customization, time savings, and versatile list display.
You can create engaging and appealing WordPress post list templates and customize it to your specific needs and preferences by leveraging these widgets. What are you waiting for? Install your ElementsKit now and follow the steps above to get a post list in WordPress that looks amazing. You can make your WordPress list posts by category and many available filters and enjoy the convenience of using our ElementsKit Widgets.

Leave a Reply