Customizing your WooCommerce pages can truly improve your online store’s performance and shopping experience for your customers.
And for a wholesome e-commerce shopping experience, every page matters, whether it’s the shop, product, cart, or checkout. Each one plays a key role in keeping your customers happy and driving those all-important conversions.
In this blog, we’ll break down the process of customizing WooCommerce pages in Elementor. Highlighting the pages you should focus on, and showing you how ShopEngine makes the process effortless.
Quick Overview
This tutorial demonstrates the easiest way to customize WooCommerce pages.
Tools Used: Elementor and ShopEngine
Here is the basic procedure:
✅ Create a page template from ShopEngine → Builder template.
✅ Select the page type (e.g. Shop, Checkout, Single, etc.)
✅ Activate the template.
✅ Choose a pre-designed ShopEngine layout.
✅ Enter the Elementor editor to start customizing.
Key WooCommerce Pages to Consider for Customization
An e-commerce website may have a lot of pages. But to be focused, we will stick to customizing the core WooCommerce pages that significantly impact your e-commerce site’s performance and sales.
| Shop page | Product Page |
| Cart page | Checkout page |
| Thank You page | Quick Checkout page |
Focusing on these pages ensures your store delivers a tailored experience that drives engagement and sales.
Why do you need to customize WooCommerce pages for your online store
Let’s talk about why customizing your WooCommerce pages isn’t just a nice-to-have, but an essential part of your store’s journey and growth. Here is an overview of how customizing WooCommerce pages can help you.
✅ Create brand identity
✅ Improve conversion rate
✅ Enhance mobile experience
✅ Increase customer retention
According to statistics, 50% of consumers prefer the brands they recognize. So with customized WooCommerce pages, you can create a recognizable brand identity for your online shop.
In 2023, the cart abandonment rate climbed up to 70% globally. But with a customized layout you can simplify the checkout process. This can significantly cut down the cart abandonment rate for your site. Ultimately improving the conversion rate.
And for mobile responsiveness, mobile commerce now dominates eCommerce sales in 2024, making a responsive design non-negotiable. So, customizing your WooCommerce pages ensures they look great and work flawlessly across all devices.
Put all of this together, and you’ve got the formula for higher customer retention. When your store offers a personalized, mobile-friendly shopping experience backed by a strong brand identity, your customers are more likely to return and keep buying.
⭐️ Read top SEO plugins for your WooCommerce site.
How to Customize WooCommerce Pages with ShopEngine
The easiest way to customize the WooCommerce pages is to use a WordPress plugin. In this regard, you can choose ShopEngine—a complete WooCommerce solution compatible with Elementor.
This gives you the ability to build a fully customizable WooCommerce website with blazing-fast loading speed and advanced features including product comparison, variation swatches, quick checkout, pre-order, and more.
Let’s dive into how you can customize WooCommerce pages to deliver a smooth shopping experience for your customers.
👉 Edit WooCommerce Shop Page
The WooCommerce shop page is often the first point of contact between customers and your store, making it essential to customize it for maximum impact. A well-designed shop page improves navigation, highlights your best products, and encourages purchases. Proceed with the following steps to create and customize WooCommerce shop page.
Step 1: Create a shop page template
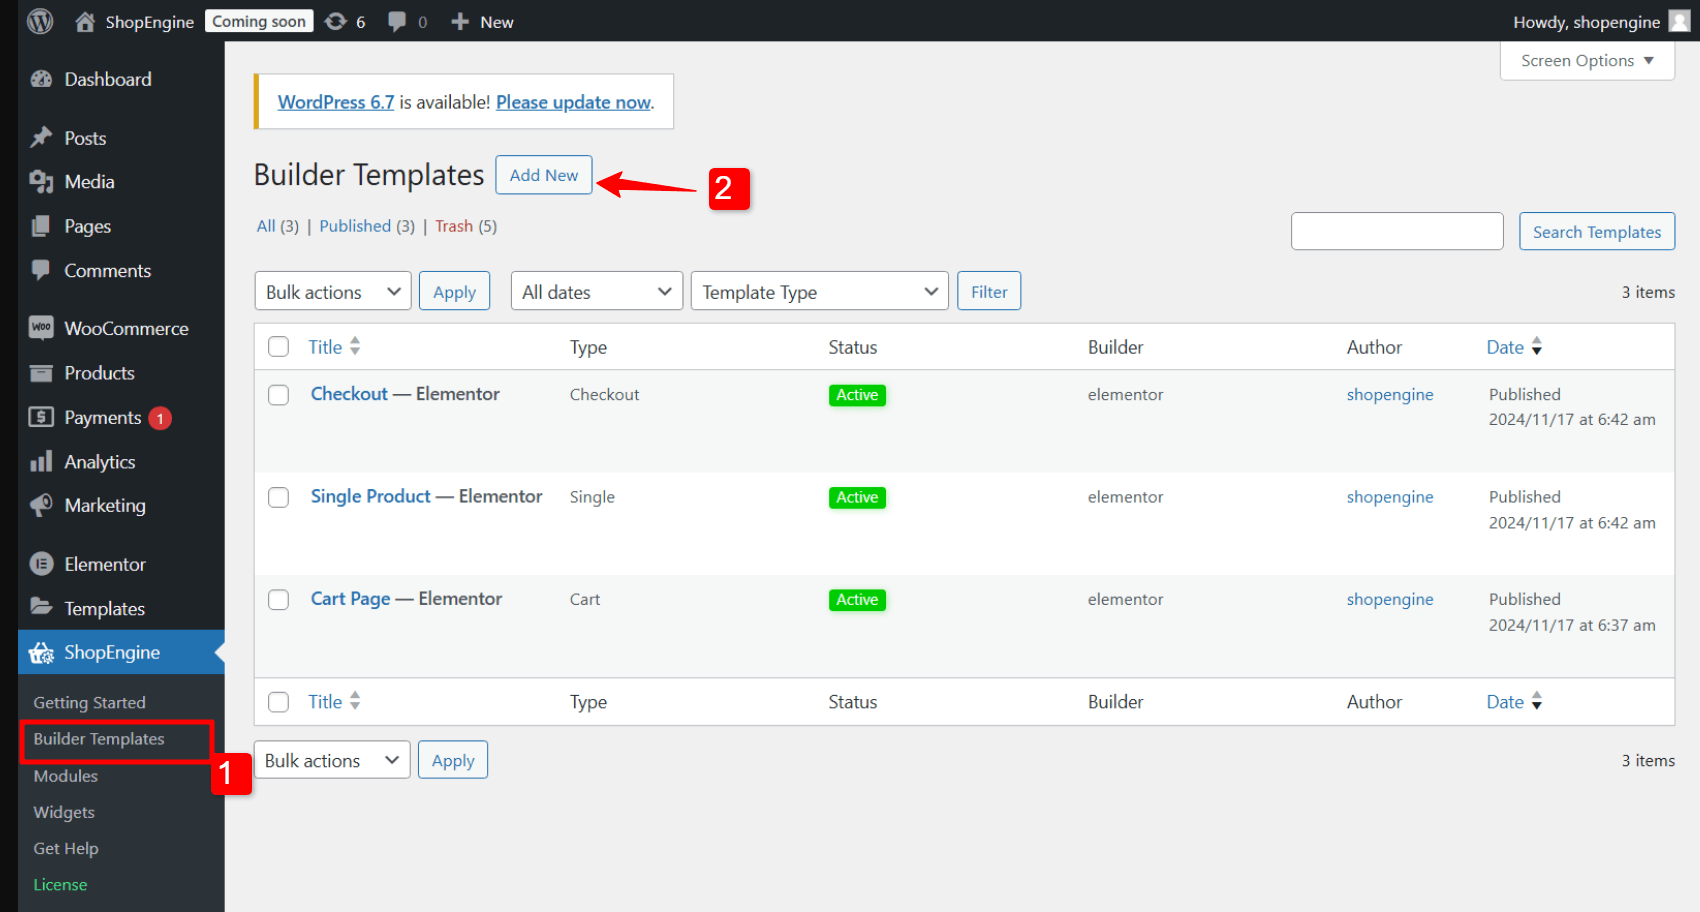
You can design a Shop page with the ShopEngine’s Builder Templates. Go to ShopEngine > Builder Templates and click on the Add New button.

After that, in the Template Settings:
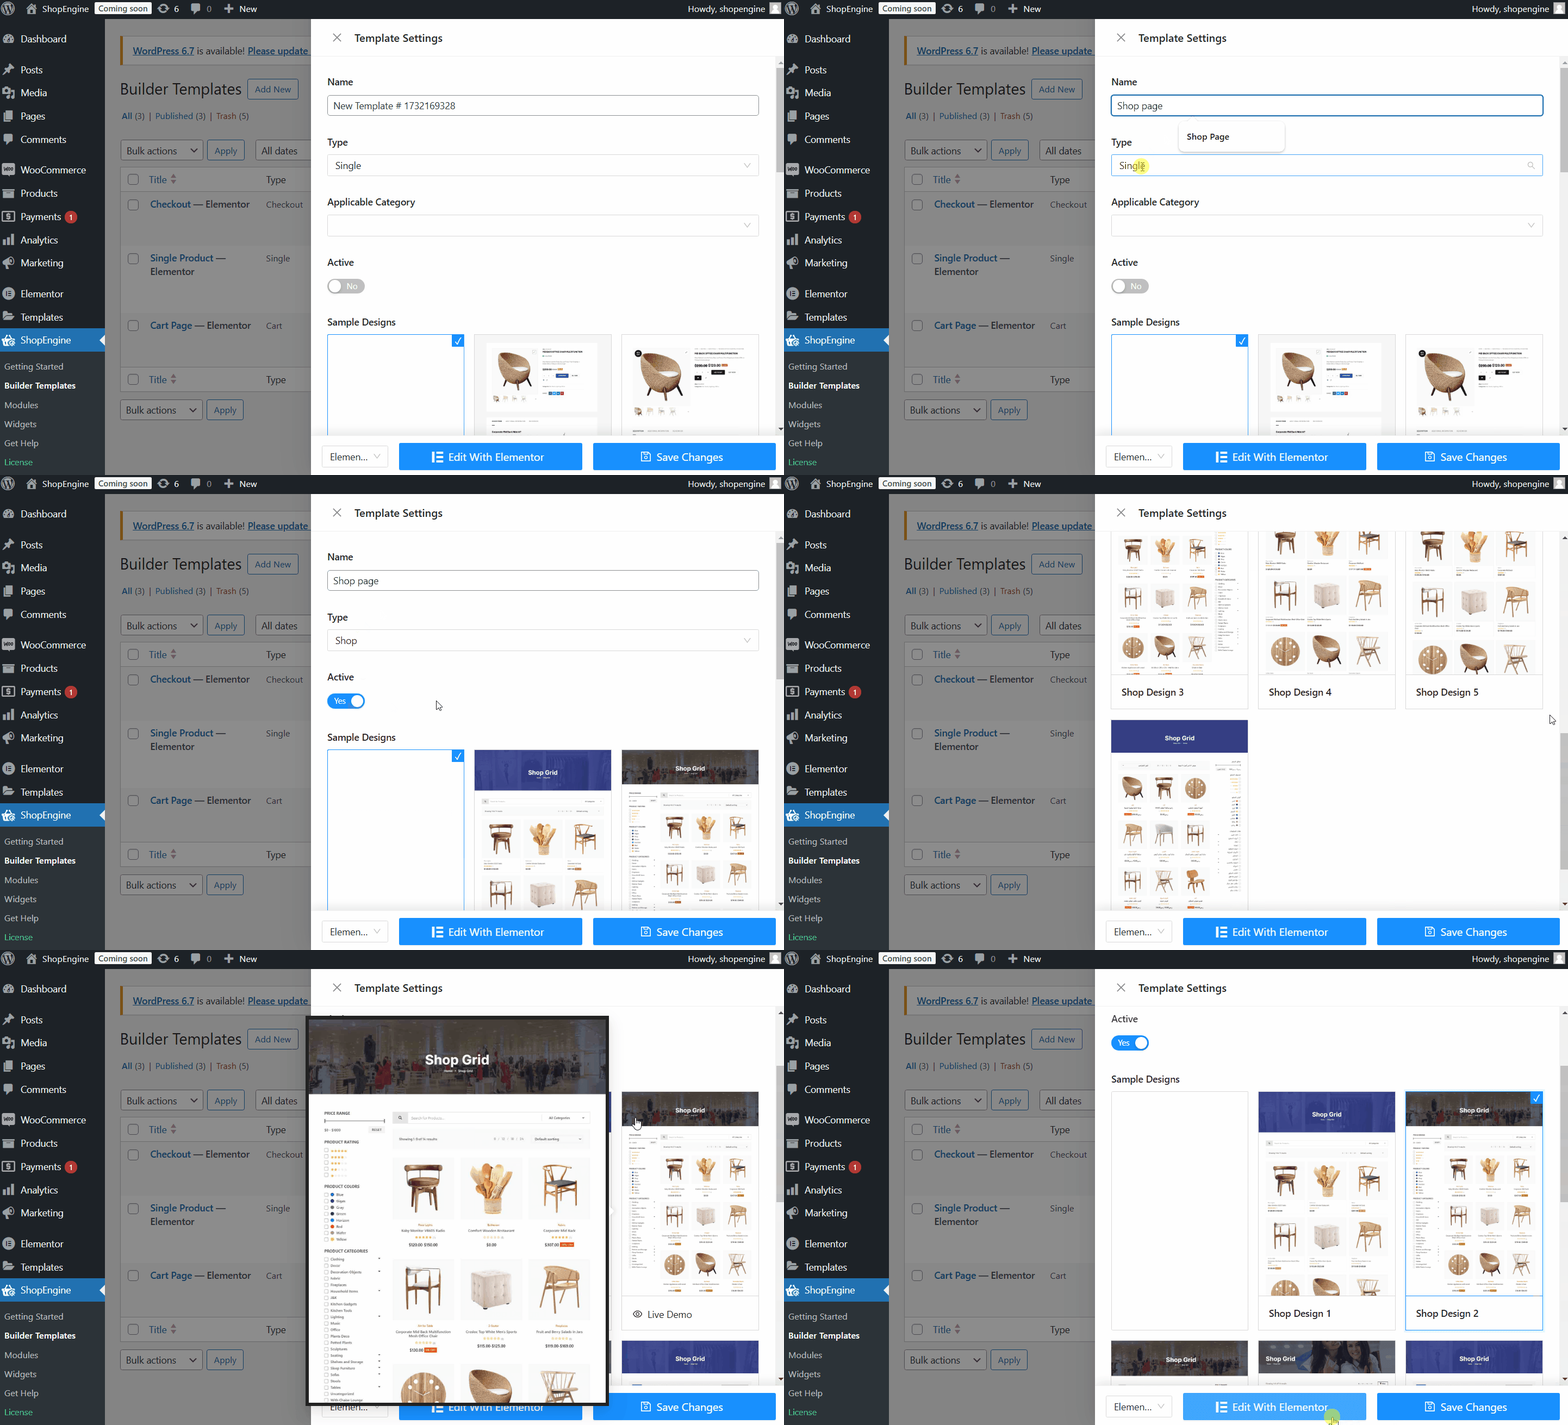
- Name: Set the name of the template (e.g. Shop page).
- Type: Set the template type to “Shop”.
- Active: Toggle the button to “Yes” to activate the template.
- Sample designs: You can either choose pre-designed templates from ShopEngine or start blank.
- Now click on Edit with Elementor to customize the shop page.

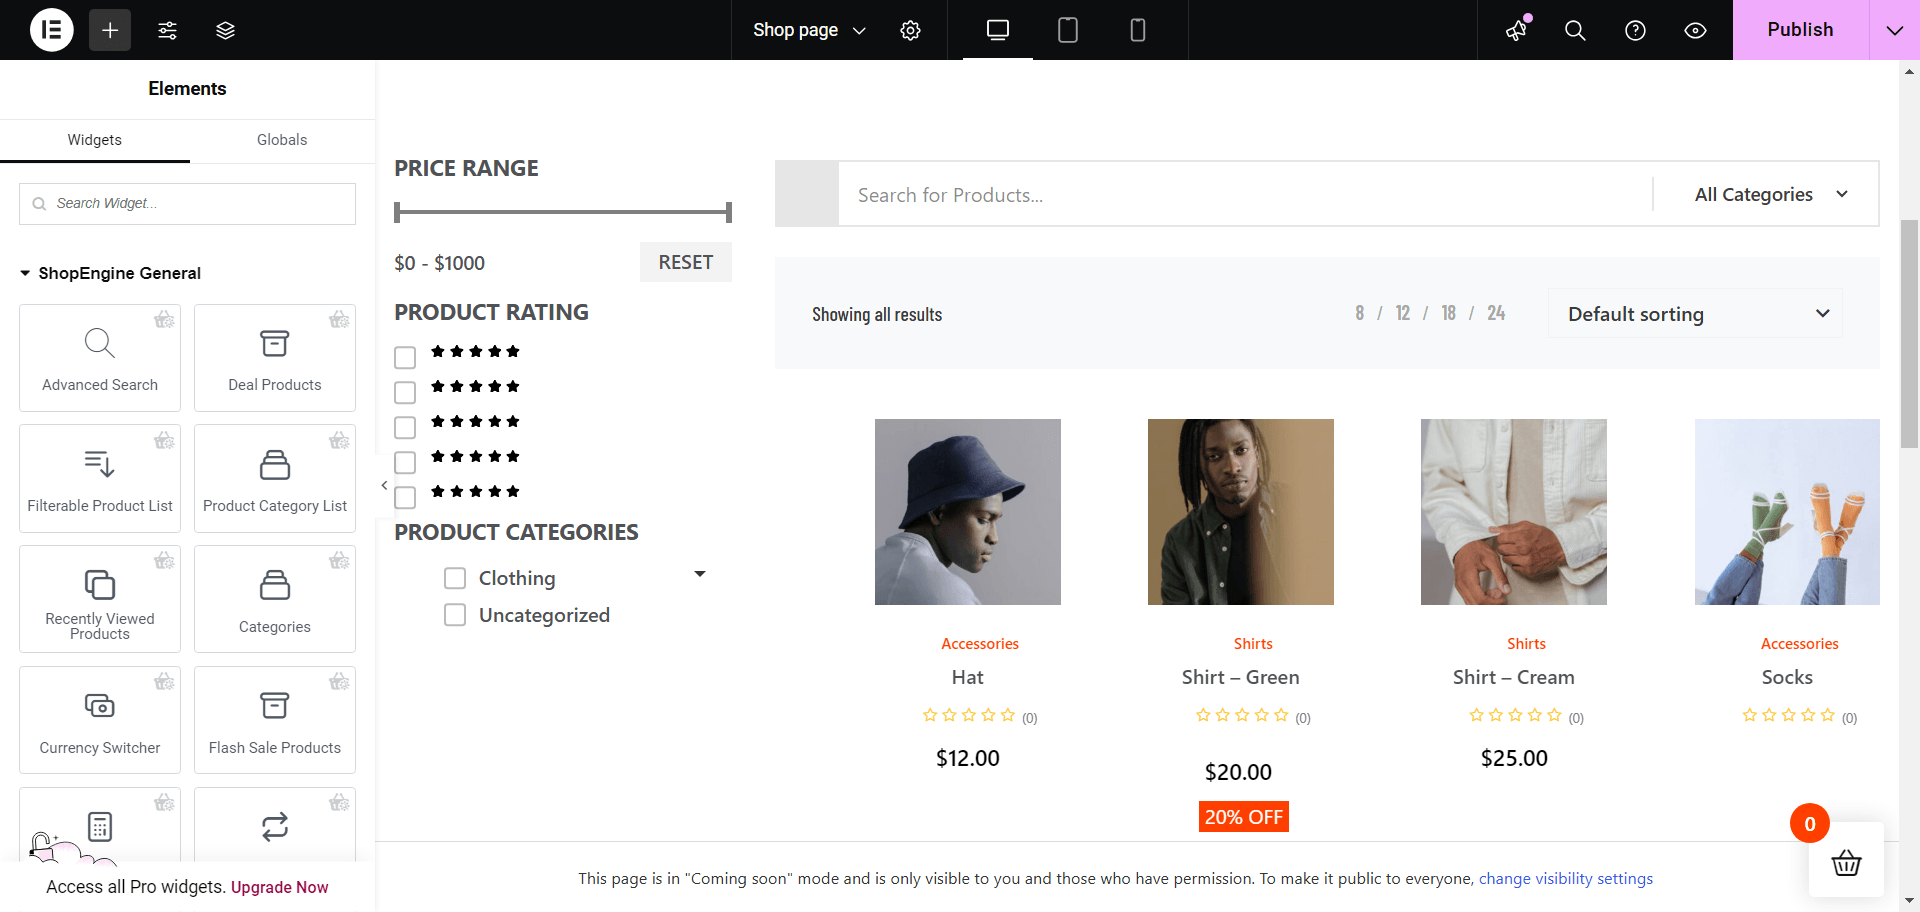
After that, you will find yourself in the Elementor editor where you can customize the WooCommerce shop page for your online shop.
Step 2: Customize WooCommerce shop page template
In the Elementor, you can customize the following sections of your website’s Shop page.
- Title: Edit the HTML tag, alignment, color, and typography.
- Page Filter: You can customize lists, typography, spacing, alignment, color, and active color.
- Product Archive: Edit layout with layout settings, products per row, and rows per page.
You can also customize the product image, categories, title, price, description, rating, flash sale badges, and so on.

Want to learn more about the customization of the shop page?
👉 Customize WooCommerce Product Page
The product page is the heart of your WooCommerce store, where customers make their purchasing decisions. Customizing this page enhances its ability to showcase your products effectively and increase conversions.
Follow these steps to build and edit your WooCommerce shop page.
Step 1: Create a single product page template
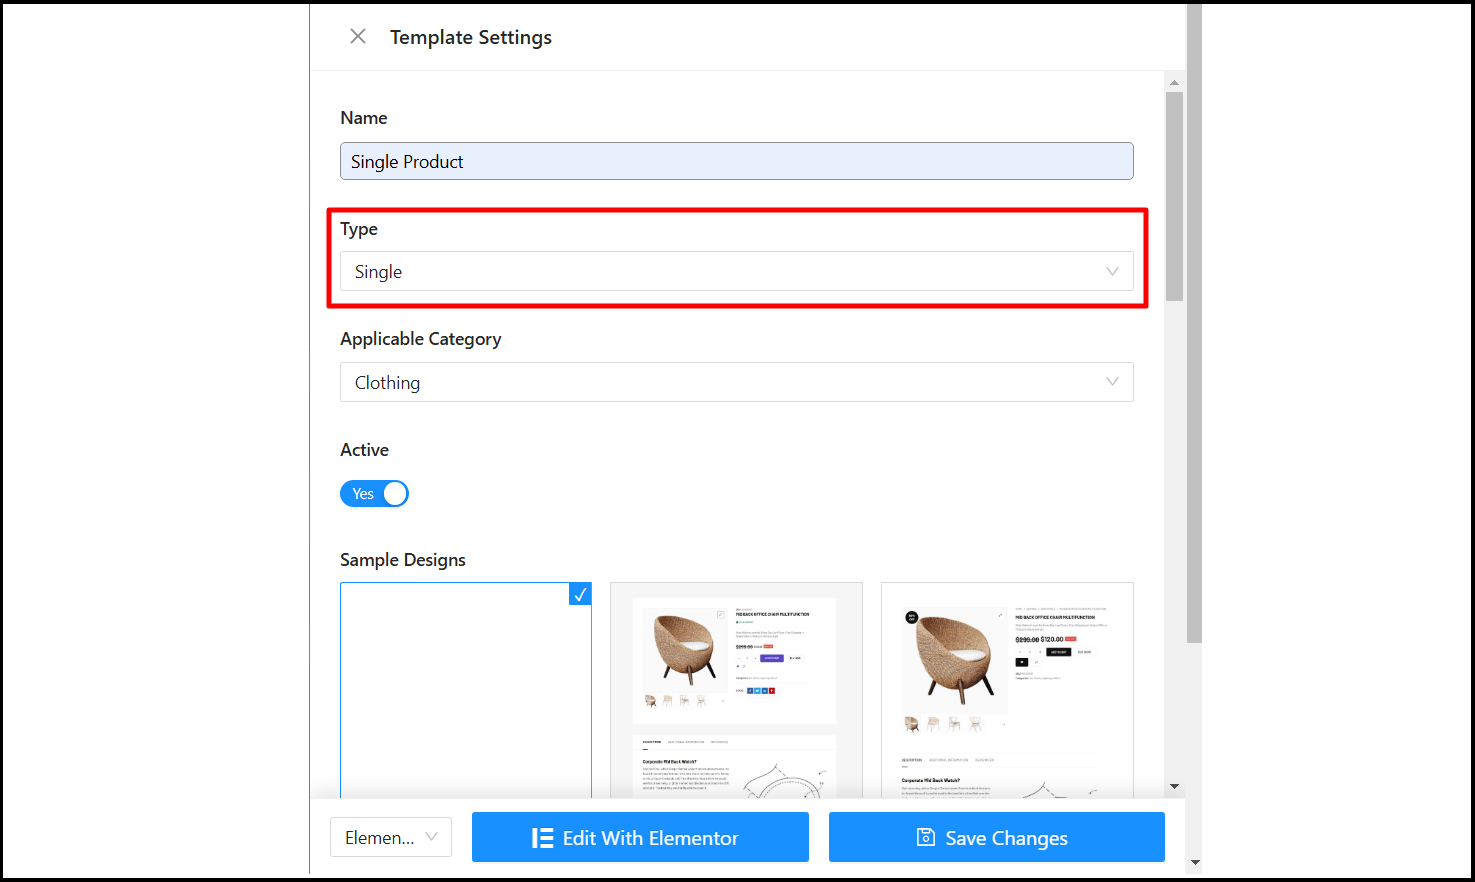
Like the shop page, you can similarly create a product page template. Just in this case, you have to choose the Type as Single.
Go to ShopEngine > Builder Templates and click on the Add New button.
After that, in the Template Settings:
- Name: Set the name of the template (e.g. Single Product).
- Type: Set the template type to “Single”.
- Active: Toggle the button to “Yes” to activate the template.
- Sample Designs: You can either choose pre-designed templates from ShopEngine or start blank.
- Now click on Edit with Elementor to customize the shop page.

Next, you’ll land in the Elementor editor, where you can start customizing the WooCommerce shop page to perfectly match your online store’s style.
Step 2: Modify WooCommerce product page template
With Elementor, you’ve got the power to customize different sections of the product page. Let me walk you through what you can tweak and make your own.
- Product Price: Customize the alignment, colors, product tag, and typography.
- Product Title: Set the HTML tag, and change the title color, typography, and alignment.
- Product Description: Add a description of the product to add detailed information.
- Breadcrumbs: Use breadcrumbs for easy navigation and customize the color, typography, and icon styles.
- Add to Cart Button: Show the order quantity, stock information, variations, and customize button styles.
- Product Rating: Show product ratings and reviews to build trust among the visitors.
- Product Meta: You can also show product meta info like SKU, categories, and tags.
- Product Additional Information: Add additional information about the product to make the product more appealing to the customer.
- Product Upsells: Suggest more products to inspire your customers to buy more products from your shop.
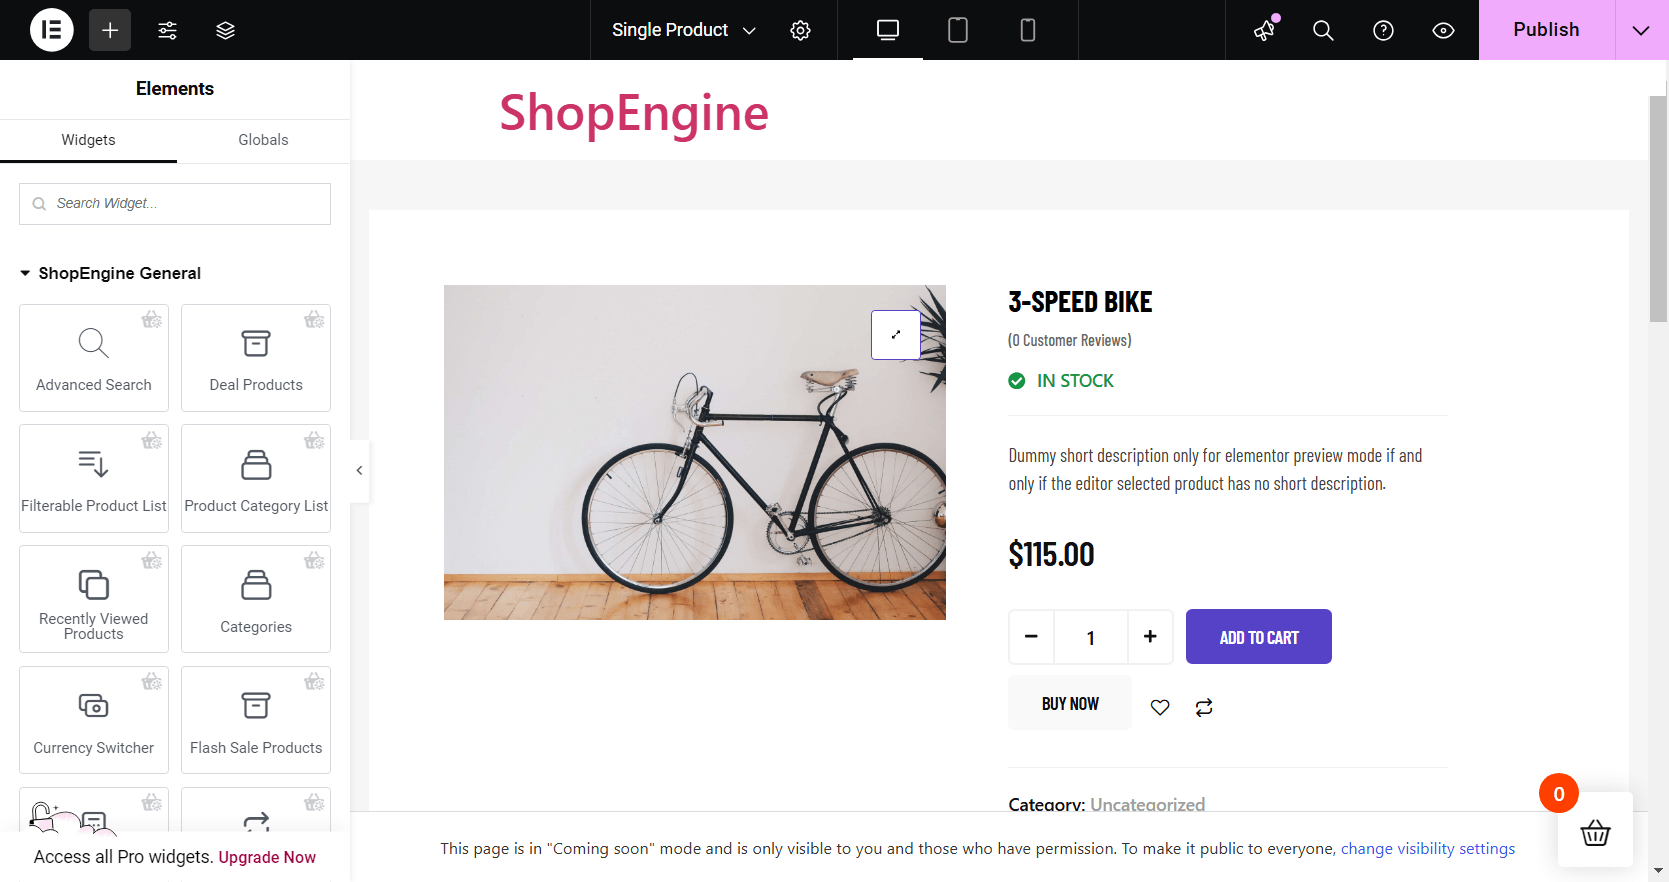

With details on How to Customize Single WooCommerce Product Page Without Coding you can design a customized WooCommerce product page that attracts customers to purchase the products from your website.
👉 Edit WooCommerce Cart Page
The WooCommerce cart page is where customers review their selected items before proceeding to checkout. A customized cart page is essential for improving user experience, reducing cart abandonment, and boosting conversions.
Step 1: Create a cart page template
The steps for creating a WooCommerce cart page template are similar to the previous ones. This time you have to select the template type to Cart.
Go to ShopEngine > Builder Templates and click on the Add New button.
After that, in the Template Settings:
- Name: Set the name of the template (e.g. Single Product).
- Type: Set the template type to “Cart”.
- Active: Toggle the button to “Yes” to activate the template.
- Sample Designs: You can either choose pre-designed templates from ShopEngine or start blank.
- Now click on Edit with Elementor to customize the shop page.
Now, you’re in the Elementor editor, ready to personalize the WooCommerce cart page for your online store.
Step 2: Edit WooCommerce cart page template
Elementor makes it simple to customize your cart page just the way you want. Here are the areas you can modify.
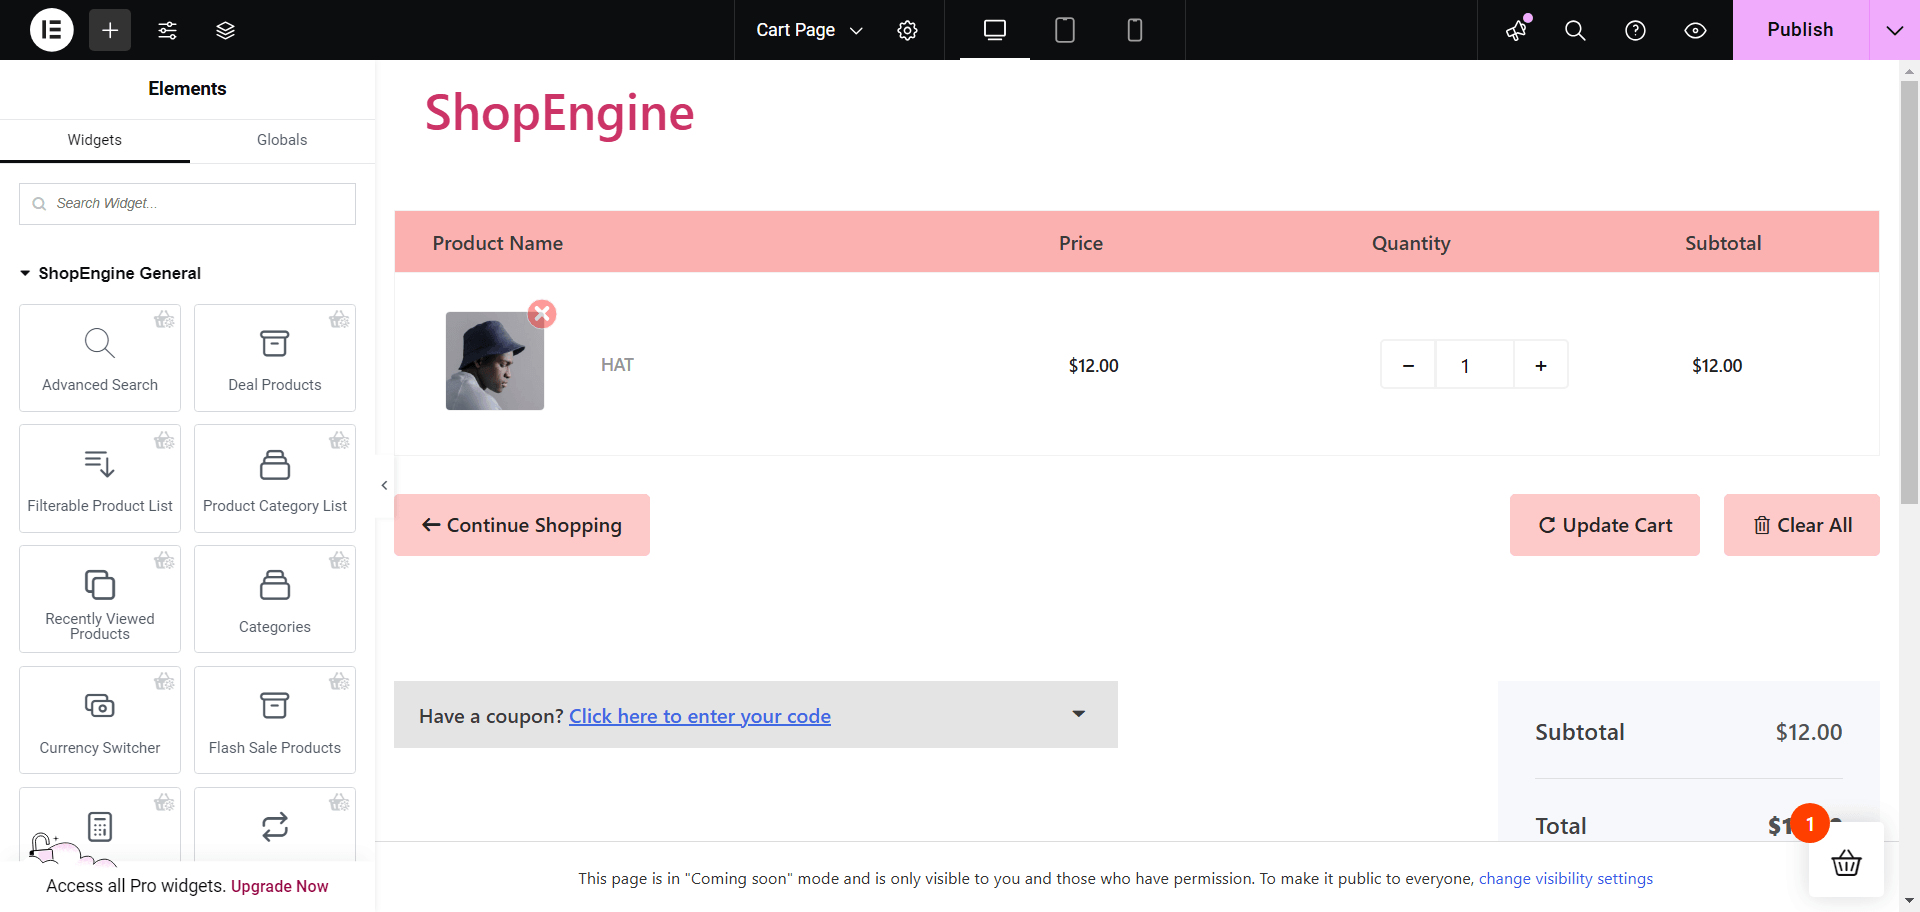

- Cart Table: Display the price, quantity, and subtotal of the products in a table format.
- Cart Total: Show the total amount and the available shipping methods.
- Coupon form: Add a field where customers can add their discount coupons.
- Return to Shop: Add a button that takes the customer back to the shop page for more shopping.
- Cross-Sell: Showcase related products on the cart page to motivate customers to buy more.
- Deal Products: Promote the products on sale with a countdown timer to increase sales.
Including all these, our blog on How to Customize WooCommerce Cart Page Without Coding (Free) has in-depth details on cart page customization.
👉 Customize WooCommerce Checkout page
The checkout page is a critical stage in the customer journey, where potential sales can be lost if the experience is not smooth and efficient. So by customizing the checkout page, you can simplify the checkout process significantly reduce friction, and improve conversions.
Step 1: Create a checkout page template
This time select the “Checkout” as the template type in the template settings.
Go to ShopEngine > Builder Templates and click on the Add New button.
After that, in the Template Settings:
- Name: Set the name of the template (e.g. Single Product).
- Type: Set the template type to “Checkout”.
- Active: Toggle the button to “Yes” to activate the template.
- Sample Designs: You can either choose pre-designed templates from ShopEngine or start blank.
- Now click on Edit with Elementor to customize the shop page.
From there, you’ll be taken to the Elementor editor, where you can fully customize the WooCommerce checkout page.
Step 2: Customize WooCommerce Checkout page
Using Elementor, you can easily tailor various sections of your website’s checkout page. Let’s explore what’s possible.
- Order Review: Let the customers review their orders one last time before confirming their orders.
- Checkout Payment: Show the payment methods and billing details.
- Login Form: Give customers an option to log in during order time.
- Billing Form: Add a form to collect customer’s billing information.
- Shipping Form: This is where the customer adds their shipping address and details.
- Shipping Method: Provide shipping options like home delivery and pick-up.
- Coupon Form: Let the customers add the coupon code for a special discount.
- Additional Form: In case you need some additional information you can add this form.
You will find more details in this step-by-step guide on How To Customize WooCommerce Checkout Page With Elementor and ShopEngine.
👉 Modify WooCommerce Quick Checkout Page
Alternatively, you can simplify the purchasing process with the Quick Checkout Page by reducing the number of steps and making transactions as fast as possible.
Customizing this page is key to improving user experience, increasing conversion rates, and reducing cart abandonment.
Step 1: Enable the quick checkout module in ShopEngine
To use the WooCommerce quick checkout feature, you need to enable the module from your WordPress dashboard.
- Navigate to ShopEngine > Modules.
- Find the “Quick Checkout” module from the list.
- Click on the module to open the settings.
- Turn the toggle button to ON to Enable the module.
- Now a Button Label field will appear. Enter the button label there.
- Click on the Save Changes button.
Step 2: Create a quick checkout page template
Set the template type to quick checkout in the template settings.
Go to ShopEngine > Builder Templates and click on the Add New button. Then in the template settings, enter the template name, make it active, and choose a sample design for the quick checkout.
And, don’t forget to set the template type to quick checkout in the template settings.
Now click on Edit with Elementor to customize the shop page.
This brings you to the Elementor editor, where you can set up and begin customizing the WooCommerce quick checkout page with the ShopEngine widgets and modules to suit your store’s unique style.
👉 Customize WooCommerce ‘Thank You’ Page
The ‘Thank You’ page is the final touchpoint after a purchase and an opportunity to leave a lasting impression while opening the possibility for customer retention.
With this page, you can enhance customer satisfaction, build trust, and even boost post-purchase engagement. Here’s how to optimize it:
Step 1: Create a ‘Thank You’ page template
To create the ‘Thank You’ page template, go to the ShopEngine > Builder template and click on the Add New button.
Now on the template settings select the template type “Order/ Thank You”. Then enter the name, choose a sample design, activate the template, and click on the Edit with Elementor button.
Step 2: Customize WooCommerce ‘Thank You’ page
On the ‘Thank You’ page you can leave a message for your customer with order confirmation and order details.
- Order Confirm: Show the order confirmation message to ensure the customer that their shopping process is now complete.
- Order Thank You: Display a thank you message to build a good impression in the post-purchase phase.
With these widgets and more from the ShopEngine you can create a custom ‘Thank You’ page for WooCommerce in Elementor.
Wrapping up
Alright, that wraps up everything you need to know about customizing your WooCommerce pages using Elementor and ShopEngine. By taking these steps, you’re not just personalizing your store but creating a better shopping experience that keeps customers coming back.
Whether it’s a seamless checkout process or a well-organized product page, these customizations can significantly boost your sales and engagement.
So, dive into your store, apply these tips, and watch the transformation unfold. Thanks for tuning in, and happy customizing!


Leave a Reply