Have you seen those sliding bars on the TV channels? They highlight breaking news, trends, and significant events. These are known as “news tickers” that can also enhance WordPress websites.
Discover how to create and use news ticker in WordPress with our step-by-step guide. Learn how to implement a dynamic news ticker using ElementsKit plugin and enhance your website’s news delivery.
Understanding News Ticker in WordPress
News Tickers, also referred to as content tickers, create a scrolling text effect on a website/any other media with brief announcements. The ticker helps broadcast time-sensitive information, calls for submissions, and other text-based messages. These tickers attract attention by moving text on your page.
Content tickers can exhibit a wide range of content. These include news headlines, announcements, promotions, or other scrolling details. A news ticker delivers news updates, making it a specialized content ticker.
News tickers or news feeds are more than beneficial for news channels. They are valuable for changing topics like news, sports, stocks, and more. A news ticker on your website allows visitors to stay updated. It motivates them to discover more of your content.
How to Add News Ticker in WordPress?
This guide will walk you through utilizing the ElementsKit as a news ticker plugin in WordPress website. Before diving into the step-by-step instructions on how to add news ticker in WordPress, let’s first describe the Elementor and ElementsKit.
Elementor and ElementsKit are both popular WordPress plugins ideal for website building and customization. Elementor is a visual drag-and-drop page builder plugin for WordPress. It is a tool that allows you to customize the appearance of your WordPress site without having to learn code.
On the other hand, ElementsKit is an Elementor addon that is the perfect solution for designing any kind of website from scratch without coding. It extends the functionality of Elementor through its additional elements, widgets, templates, and features to enhance the capabilities of the Elementor page builder. Regardless of the purpose of the website, you can design it just by dragging and dropping the pre-built templates and widgets.
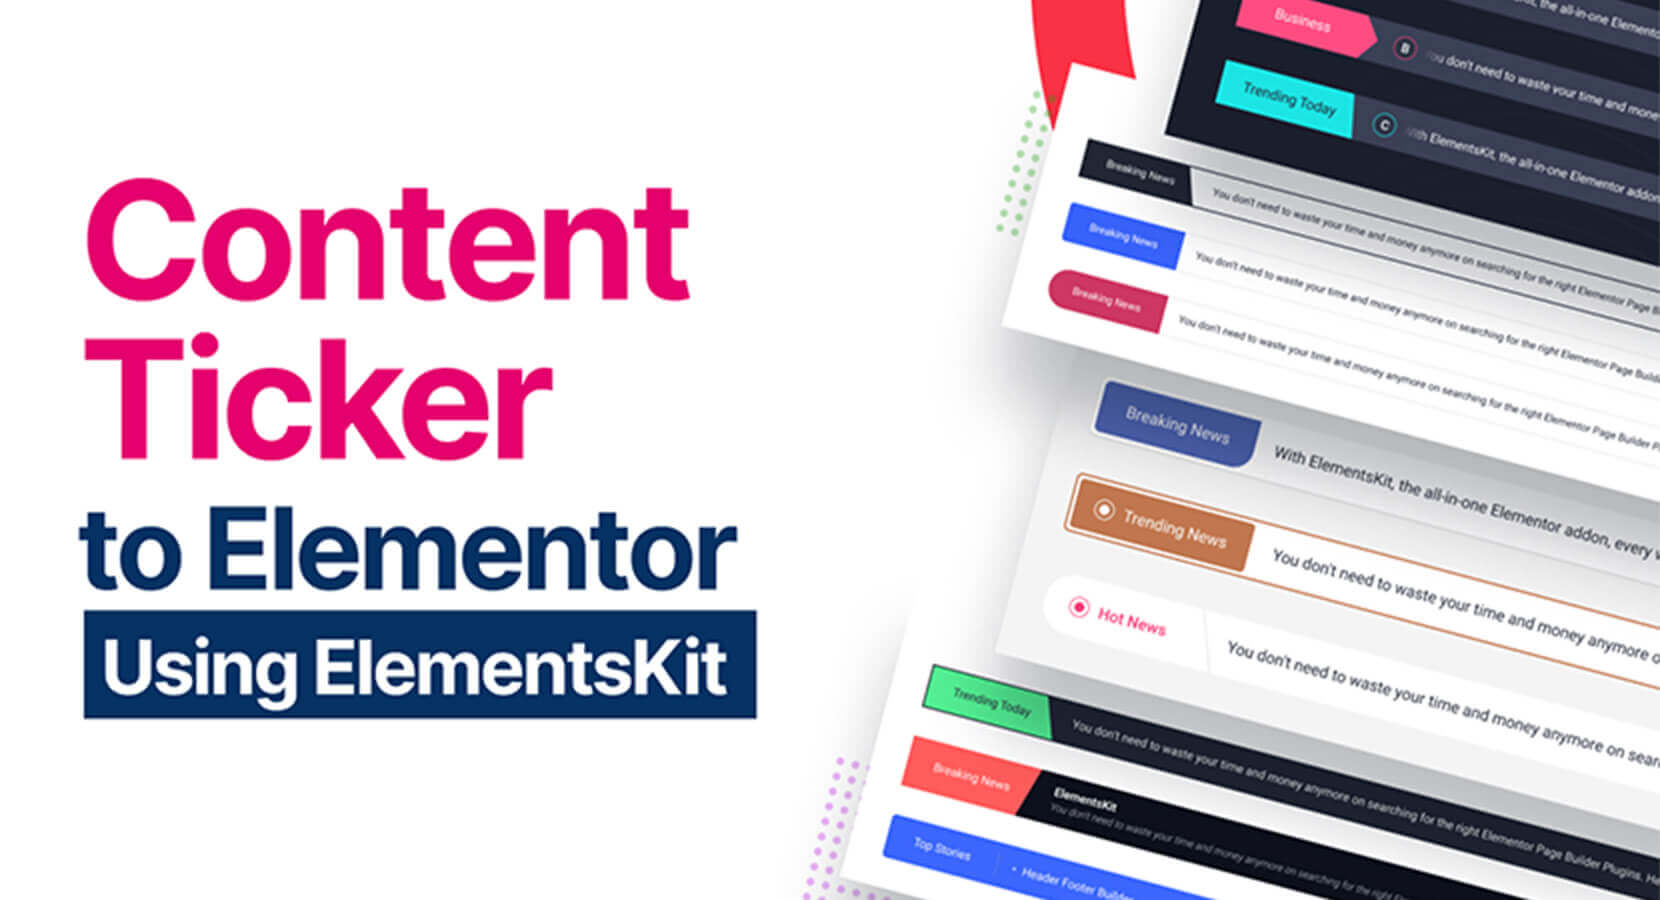
ElementsKit has many powerful features. One of them is them Content Ticker Widget, which helps you create and display important or trending news. It is part of the ElementsKit Pro version, which offers premium features. You can customize the ticker with different layouts, borders, animations, and designs.
Key Features:
- Content Ticker widget for Elementor.
- Drag-and-drop functionality for easy customization.
- User-friendly interface.
- Showcase important or trendy news with style.
- Multiple layout options for a customized look.
- Borders, animations, and design options for enhanced visual appeal.
- Quick creation of content tickers.
- Integrate with your Elementor-powered website.
Now, let’s proceed with the detailed step-by-step guide on effectively using the ElementsKit plugin as a news ticker in WordPress.
Step 1. Turn On the Content Ticker Widget
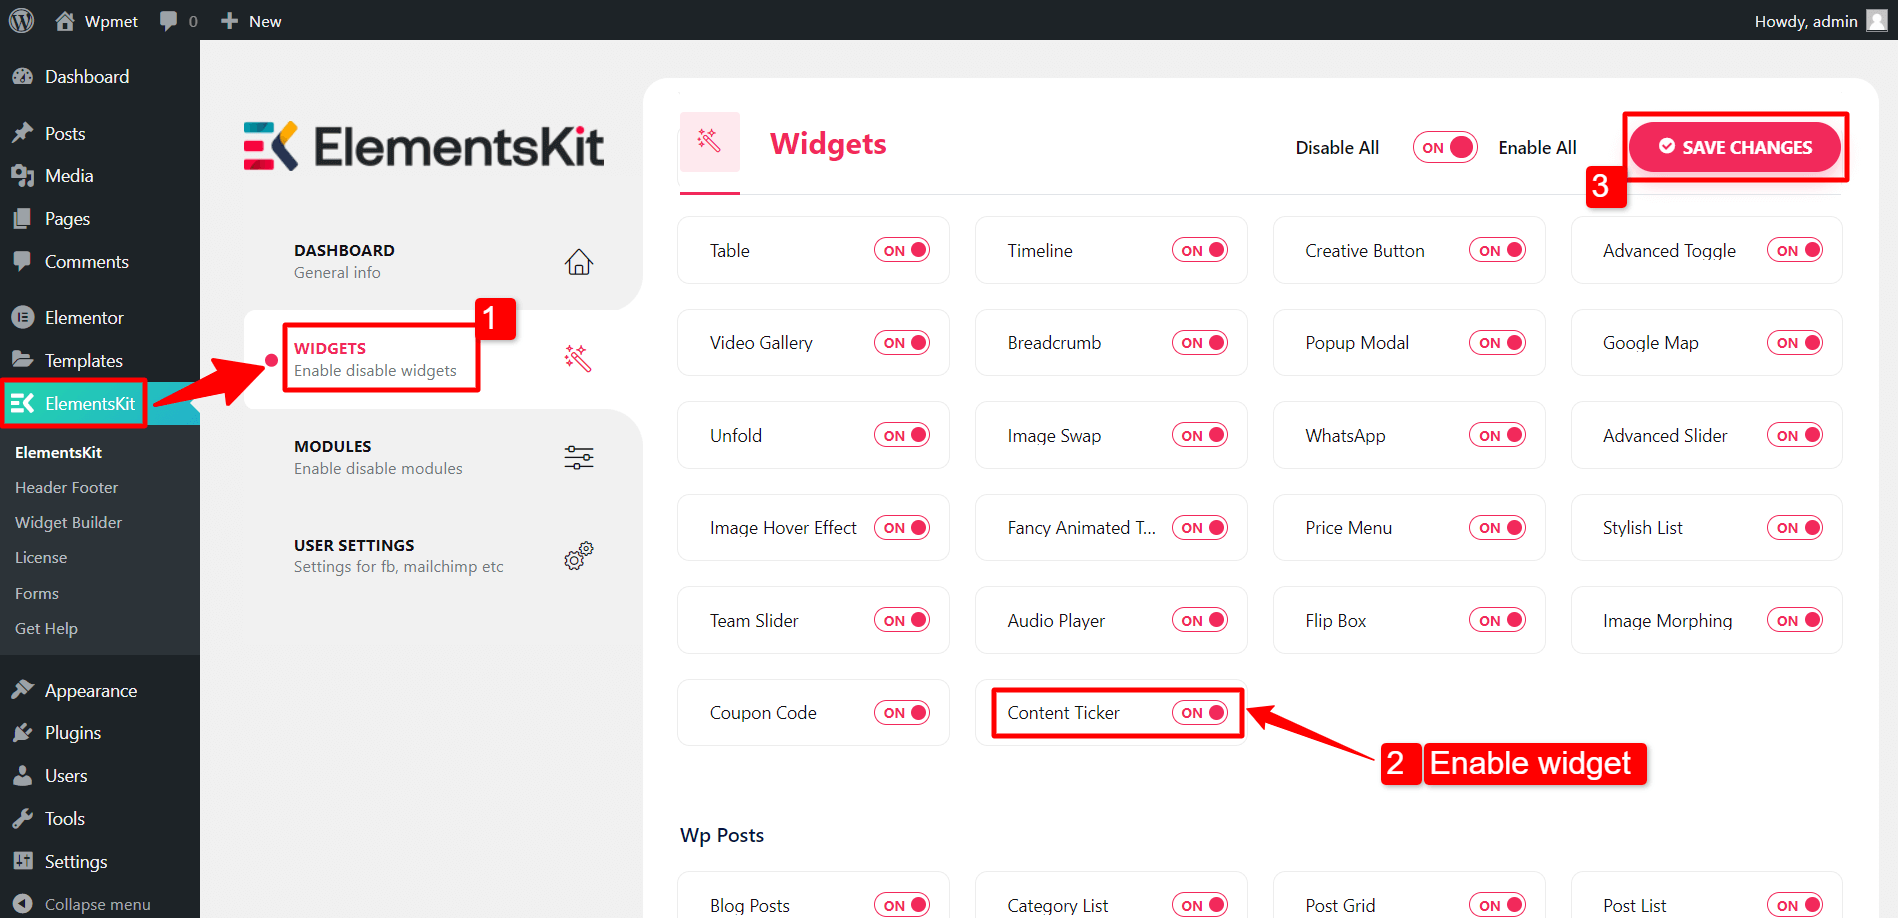
To add a content ticker to your WordPress website, enable the ElementsKit Content Ticker Widget. Afterward, open the Elementor editor and drag and drop the widget onto the design area.
To activate the Content Ticker widget:
- Go to ElementsKit > Widgets
- Locate the Content Ticker in the widget list and enable it.
- Click the “Save Changes” button.
Step 2. Customize the Content Ticker Settings in Elementor
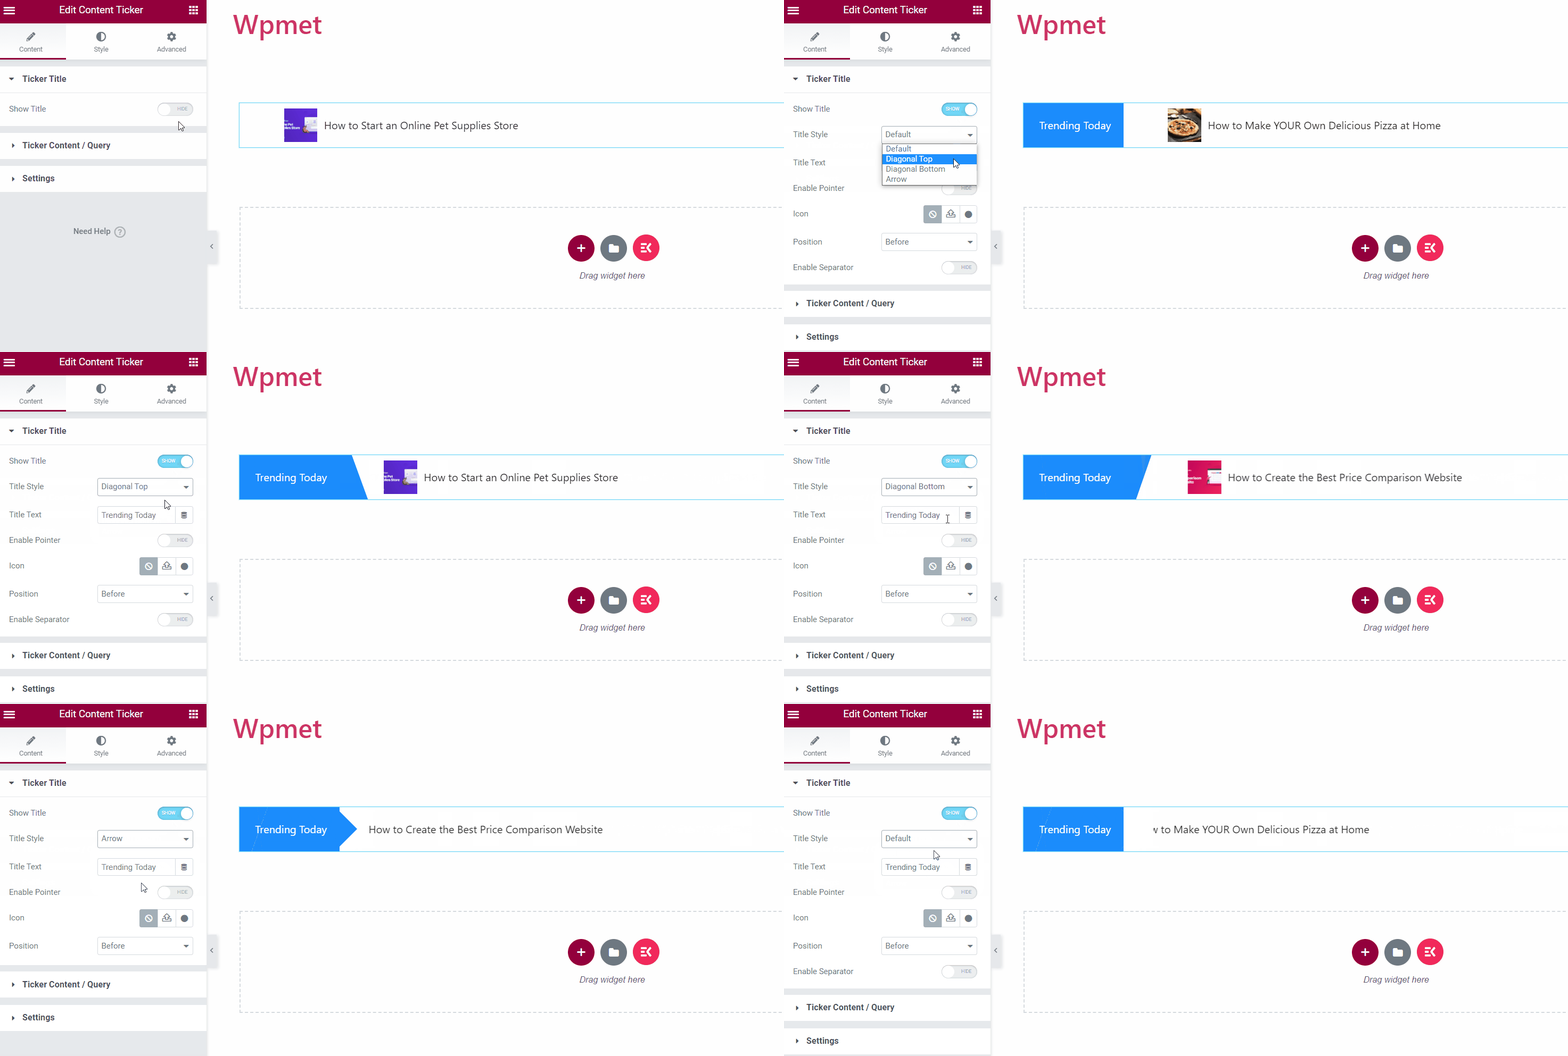
Ticker Title
- Show Title. Activate the ticker title feature to unlock additional customization options.
- Title Style. Select a style for the ticker title among the available options.
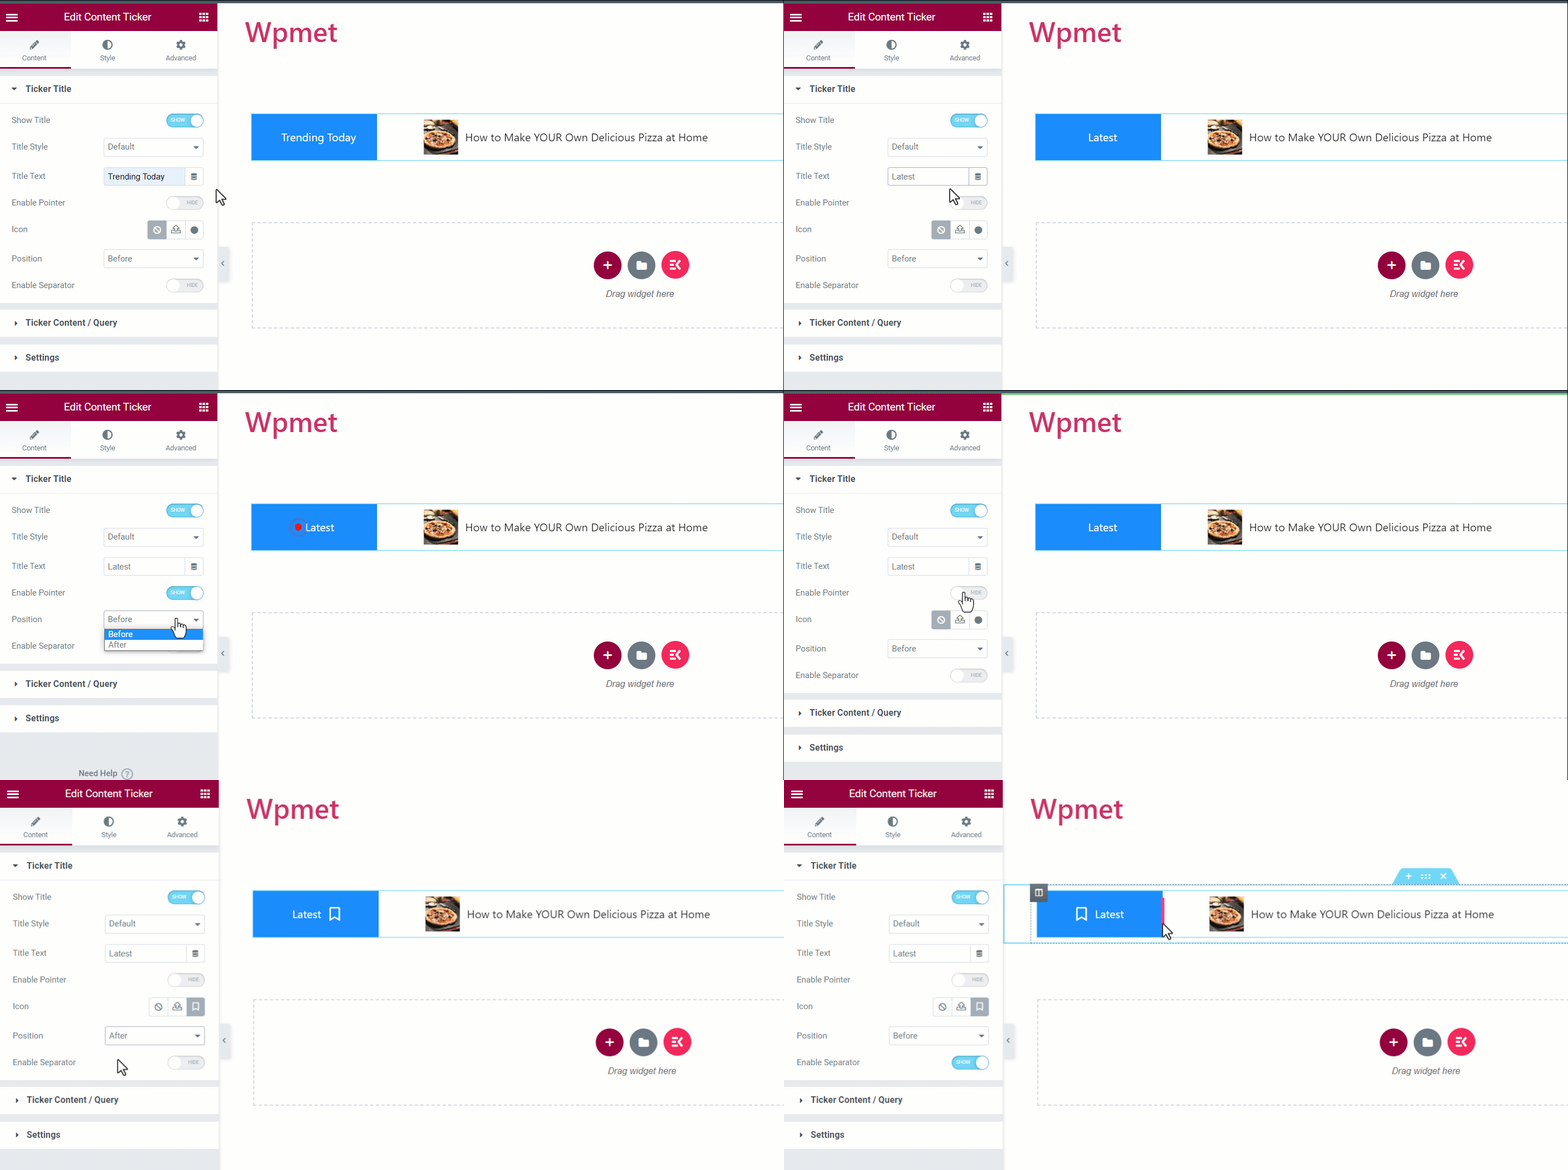
- Title Text. Input the desired text for the title.
- Enable Pointer. You can display a pointer alongside the ticker title.
- Icon. Alternatively, you can display an icon alongside the title.
- Position. Choose either “Before” or “After” as the desired placement.
- Enable Separator. You have the option to display a separator along with the ticker title.
Ticker Content / Query
Within this section, you can select the content type and adjust its settings according to your preferences.
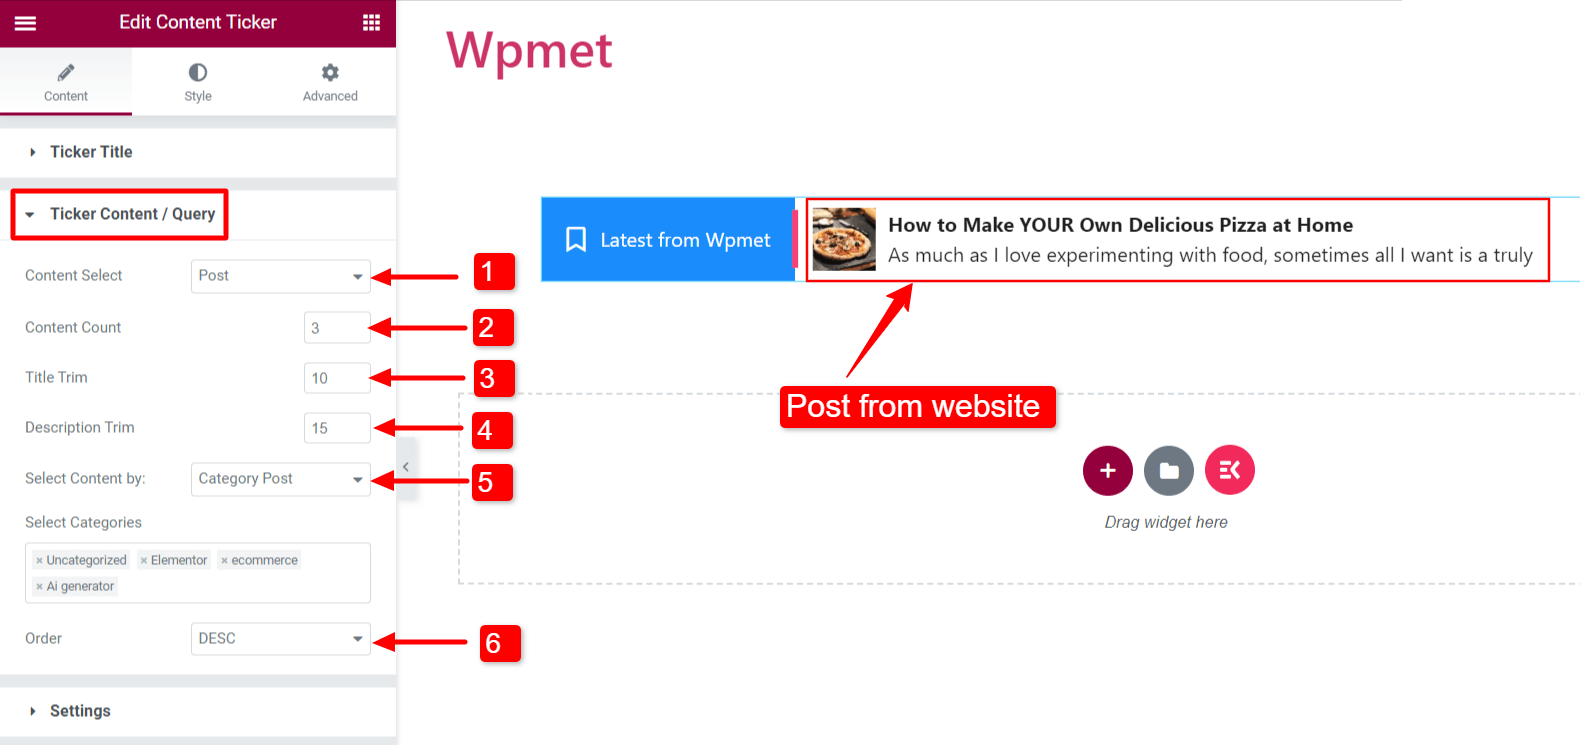
Content-Type: Post
This selection allows you to display your website posts on the ticker.
- Content Select: Set it to “Post“.
- Content Count: Specify the number of posts.
- Title Trim: Limit the character count for the post title in the ticker.
- Description Trim: Limit the character count displayed in the ticker for the post title.
- Select content: You can choose how to display the posts in the following ways:
- Recent Post: Display the most recent posts from your website.
- Selected Post: Show specific posts by selecting them in the “Search & Select” field.
- Category Post: Display posts based on categories. Add the desired categories in the “Select Categories” field.
- Order: Determine the content order as descending (DESC) or ascending (ASC).
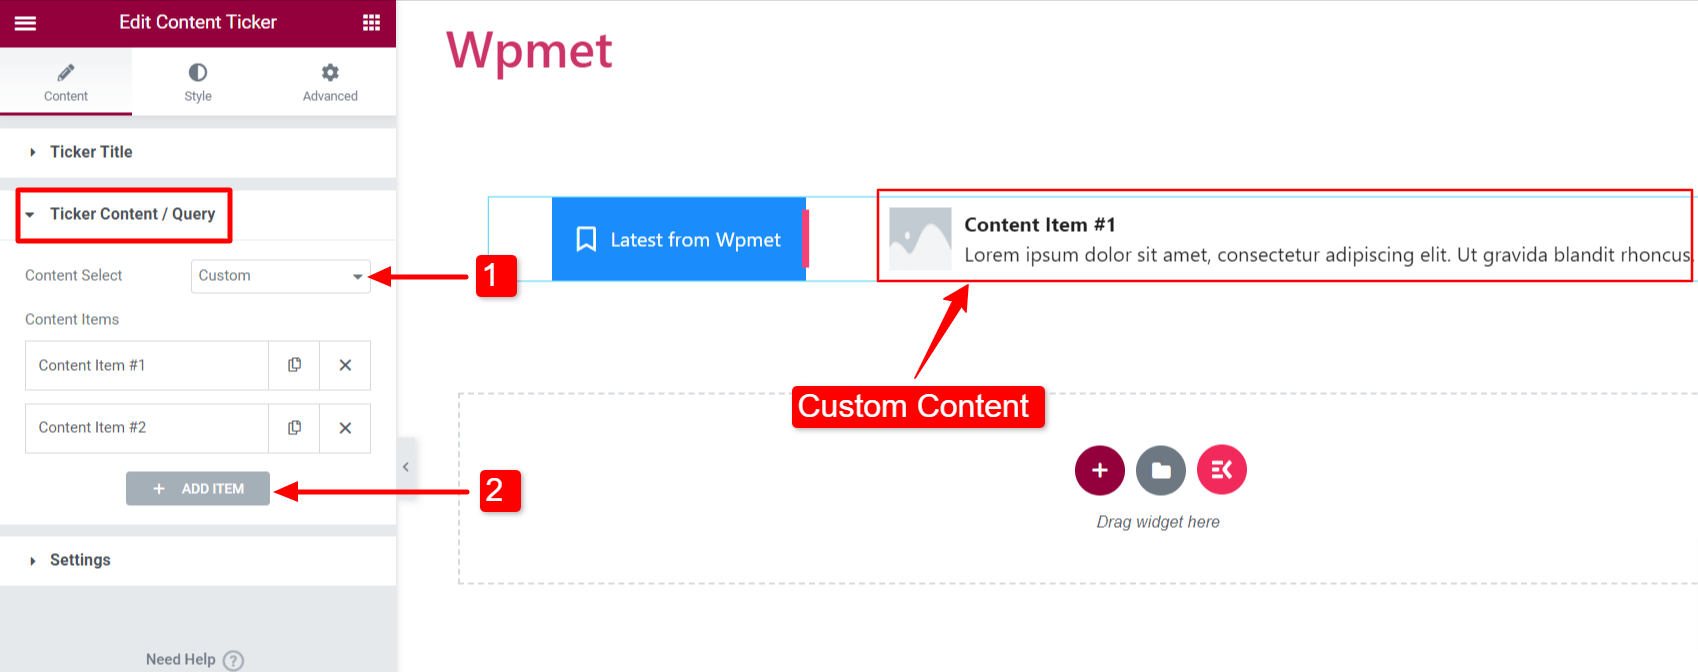
Content-Type: Custom
To display custom content on the ticker, follow these steps:
- Content Select: Set it to “Custom“.
- Add Item: You can add content items.
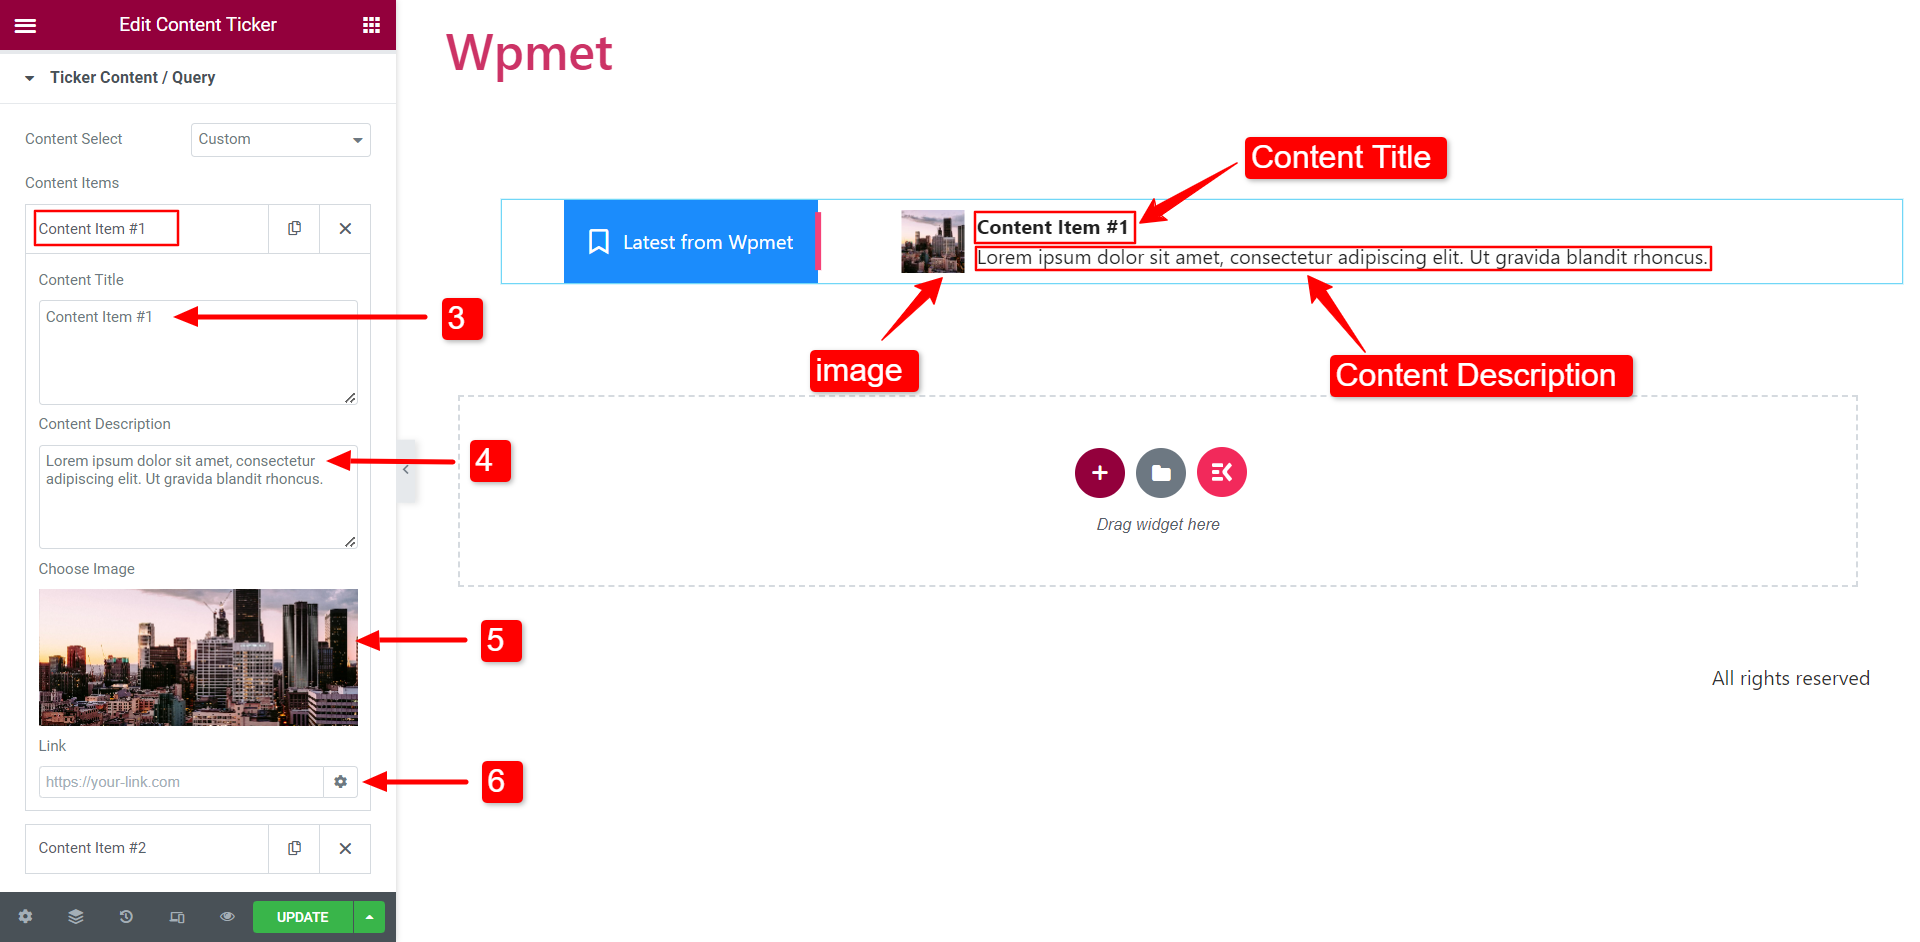
- Content Title: Enter the title for the ticker content.
- Content Description: Enter a description for the ticker content.
- Choose Image: Include an image that the ticker content will display.
- Link: Enter a URL to link the content to a web page.
Settings
In this section, you can customize the ticker settings.
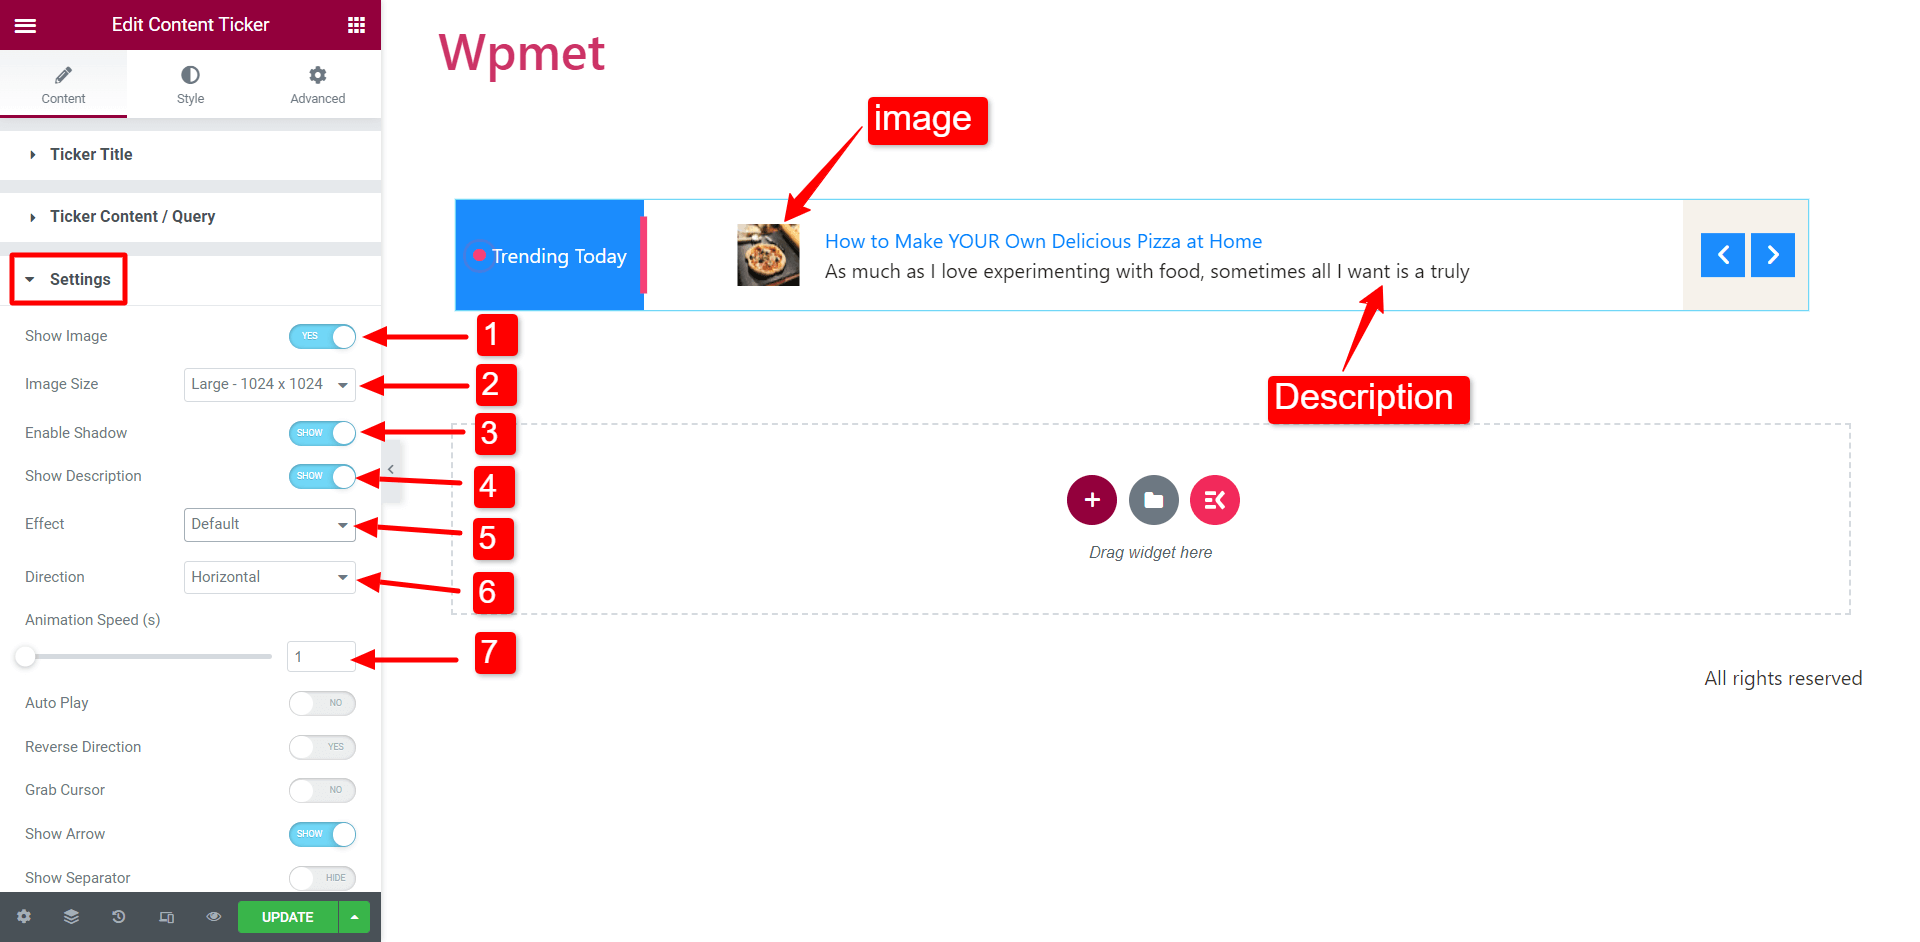
- Show Image: Choose whether to display the featured image of the content on the ticker.
- Image Size: Modify the size of the image within the ticker content.
- Enable Shadow: Activate the shadow on the left and right ends of the ticker content.
- Show Description: Decide whether to include the content description in the ticker.
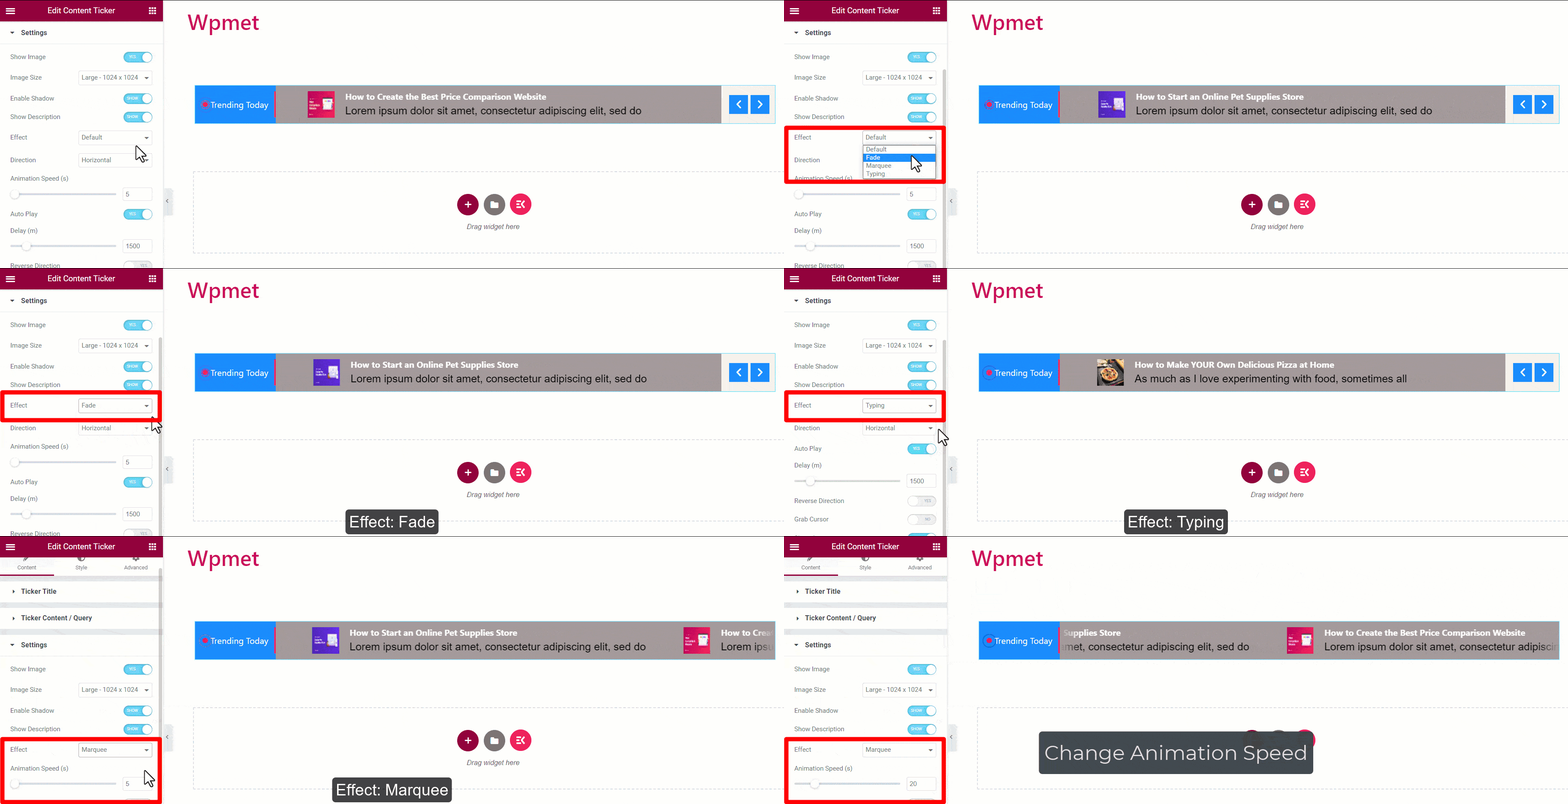
- Effect: Select the desired animation effect style from the options: Default, Fade, Marquee, and Typing. Tip: If you opt for the Marquee effect, increase the Animation Speed for better visibility.
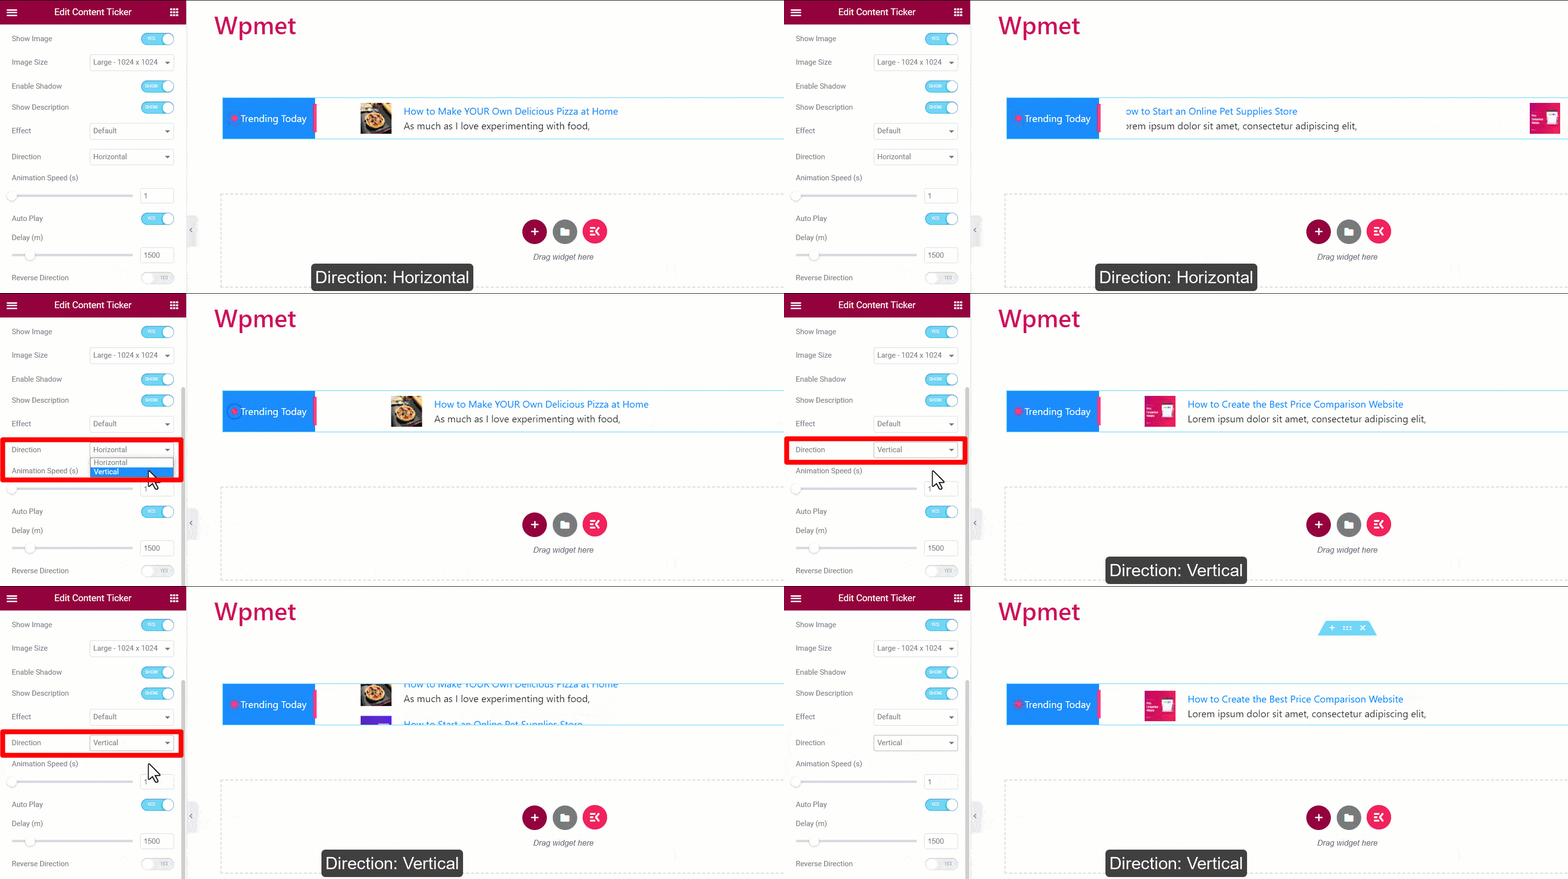
- Direction: Specify the scrolling order as either i. Horizontal scrolling or ii. Vertical scrolling. Note: Direction setting is not applicable for the Marquee effect.
- Animation Speed: You can modify and fine-tune the speed of the animation effect. Note: Direction setting is not applicable for the Marquee effect.
- Autoplay: You have the option to enable autoplay for the content ticker. If enabled, you can set the delay time between content changes. Note: The autoplay setting is not applicable for the Marquee effect.
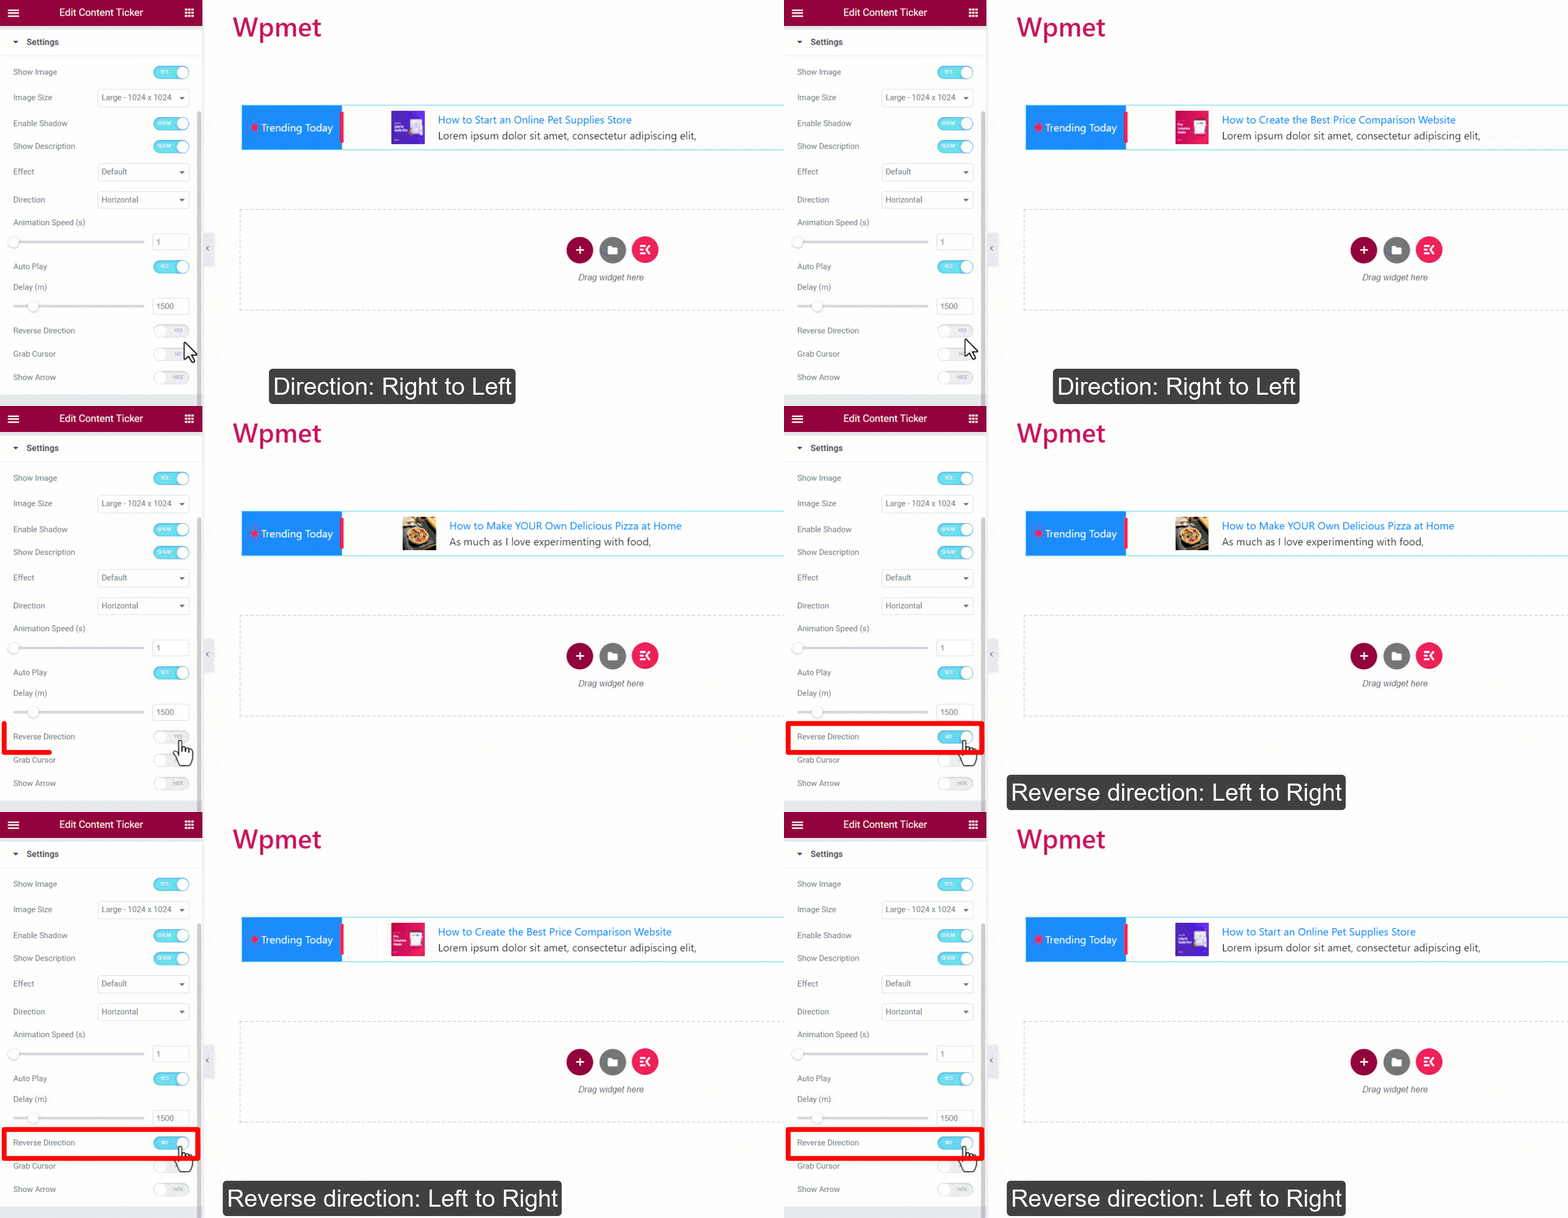
- Reverse Direction: By default, the ticker will scroll from right to left. But you can also choose the left to right direction for the ticker scrolling.
- Grab Cursor: Users can slide the ticker content by simply grabbing them with their mouse cursor. Note: Grab Cursor setting is not applicable for the Marquee effect.

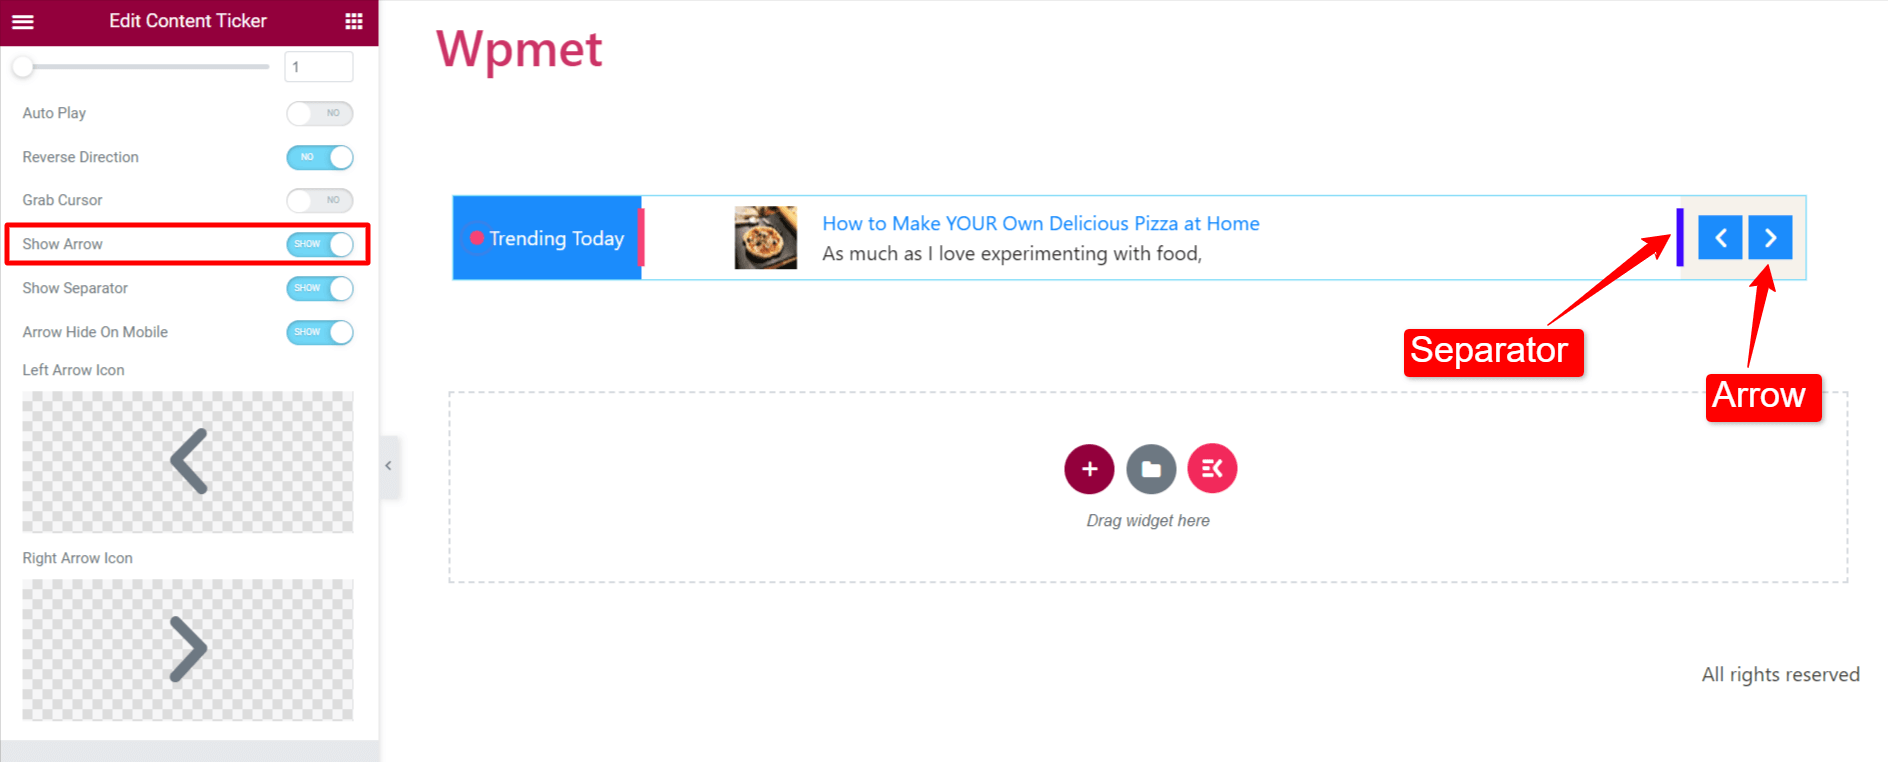
- Show Arrow: Enable the arrow feature to navigate the ticker content manually. If you choose to display the arrows, select a Left Arrow Icon and a Right Arrow Icon.
Step 3: Customize the Content Ticker Style
Under the style tab in Elementor, you can customize the content ticker to your preference.
Wrapper
1. Direction: Select the positioning of the ticker title and arrows.
- Normal: The ticker title is on the left, and the arrow is on the right.

- Reverse: The ticker title is on the right, and the arrow is on the left.

2. Wrapper Padding: Customize the top and bottom padding for the entire content ticker section as per your preference.

Ticker Title
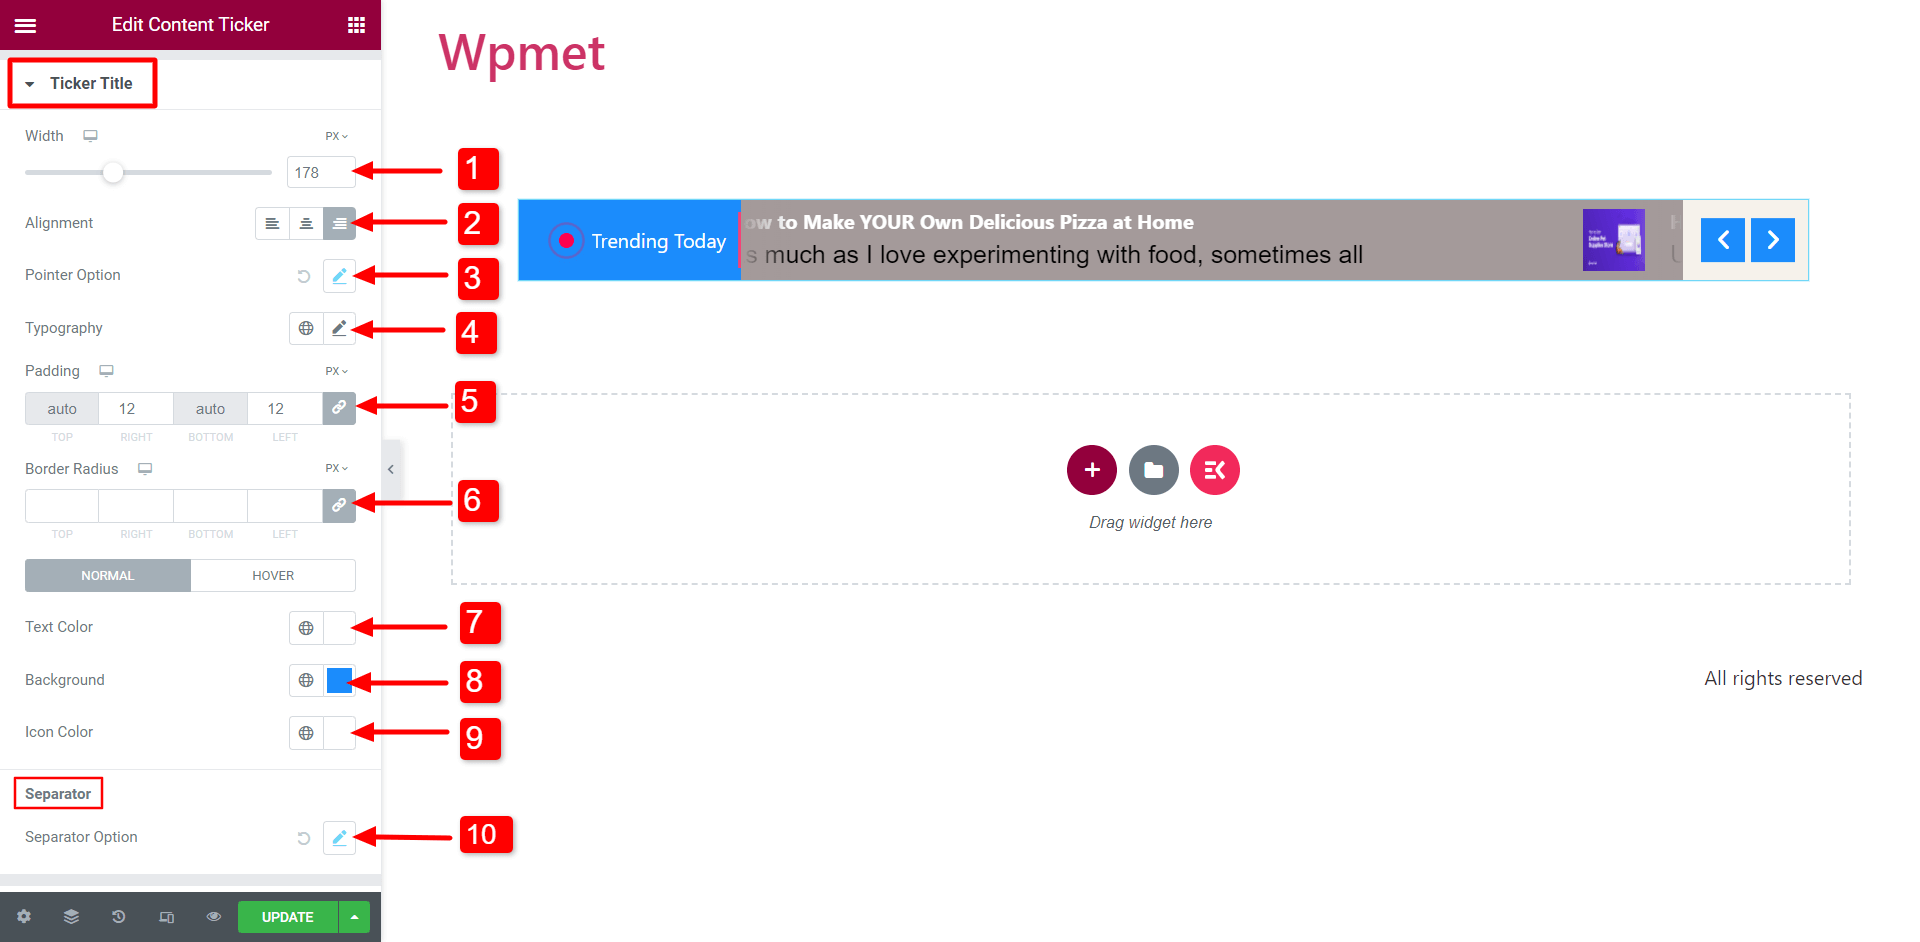
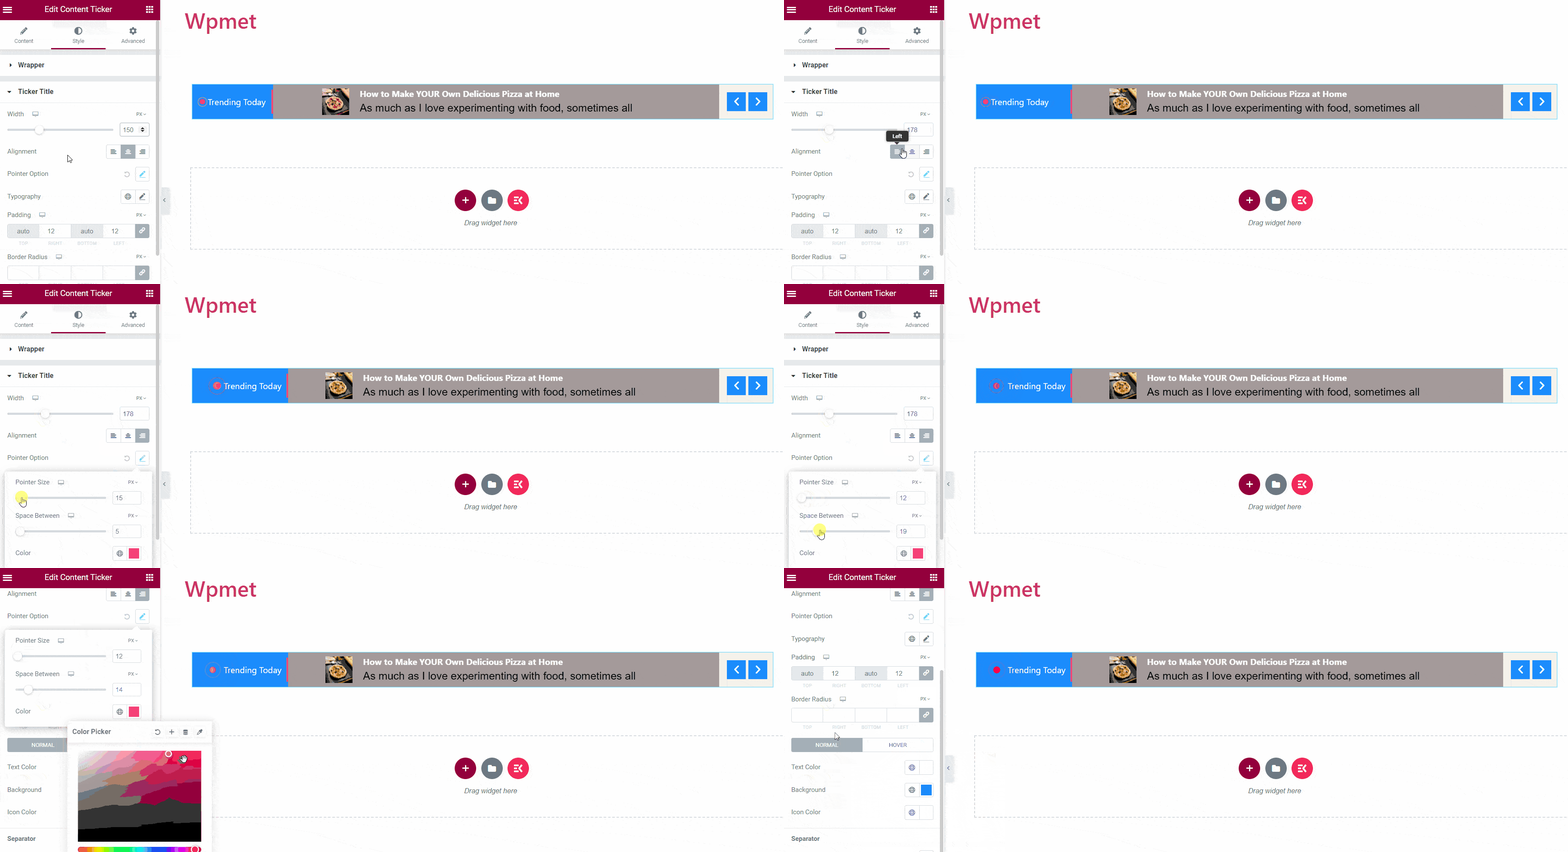
- Width: Modify the width of the ticker title section to achieve the desired appearance.
- Alignment: Choose the alignment for the icon and text within the ticker title.
- Pointer Options/Icon Option: Customize the size, spacing between the title and pointer/icon, and the color of the pointer/icon.
- Typography: Select the desired typography for the title text.
- Padding: Customize ticker title padding.
- Border Radius: Edit the border radius of the ticker title.
- Text Color: Pick the color for the text.
- Background: Choose the background for the ticker title.
- Icon: Choose an icon that will appear within the ticker title.
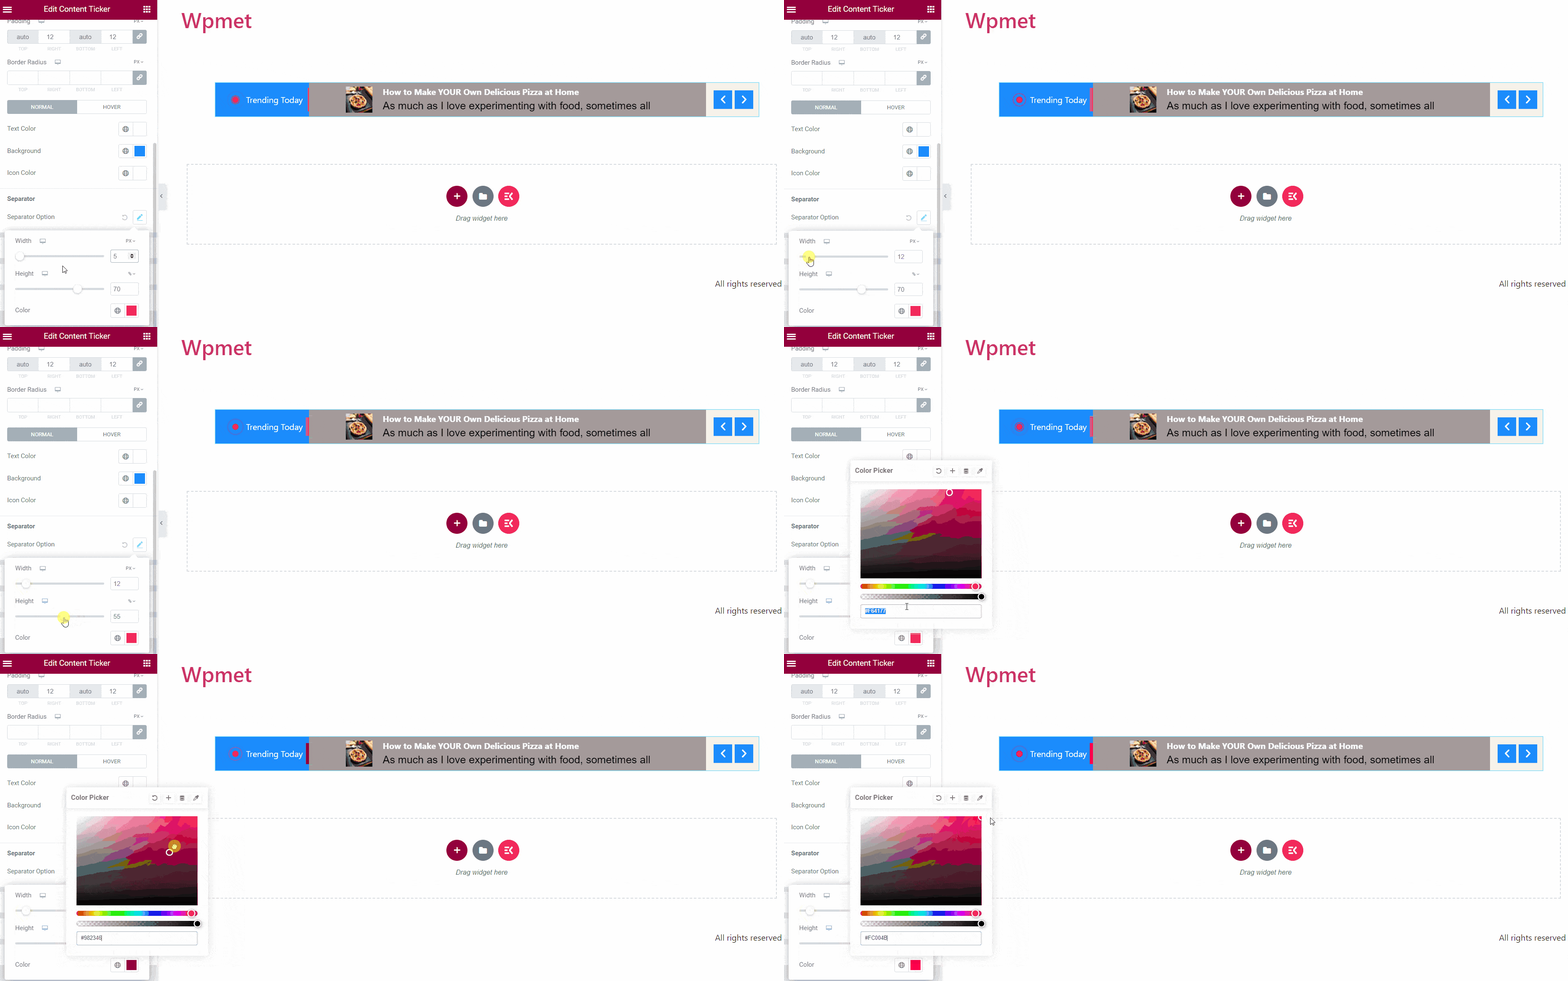
- Separator Option: When enabled, you can customize its style by adjusting properties such as width, height, and color.
Ticker Content
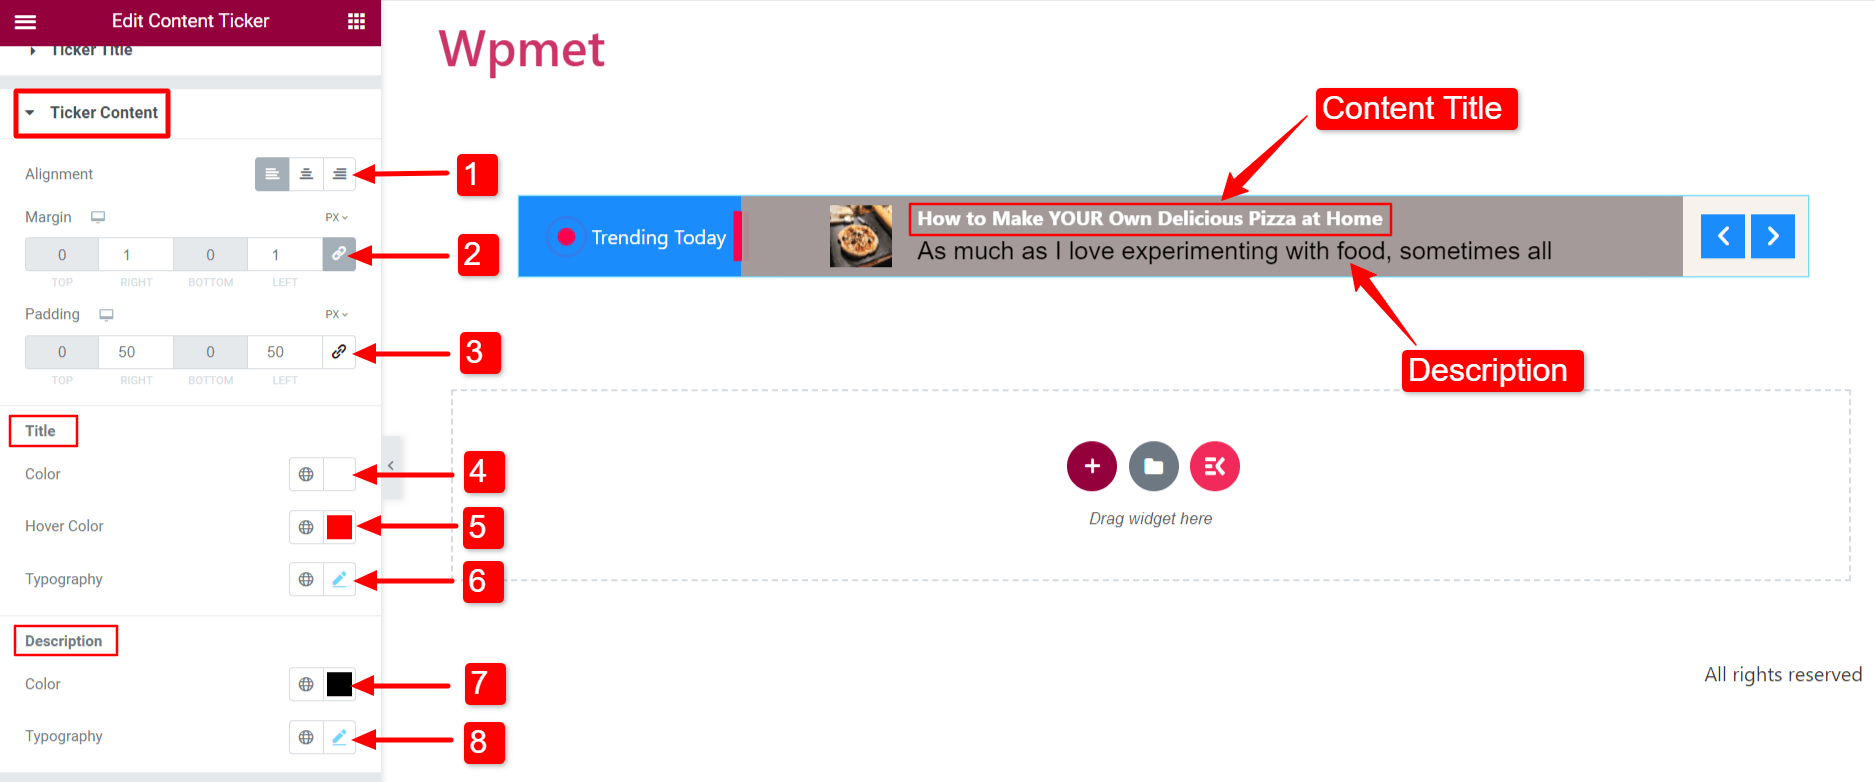
- Alignment: Choose the alignment of the ticker content.
- Margin: Set the right and left margins of the ticker content.
- Padding: Customize the padding of the content.
- Title Color: Select a color for the ticker content title.
- Title Hover Color: Choose a color to be displayed when hovering over the content title.
- Title Typography: Set the typography for the content title text.
- Description Color: Modify the color of the content description.
- Description Typography: Define the typography for the description text.
Image
By enabling the “Show Image” option in the Settings section, the content will include the display of an image.
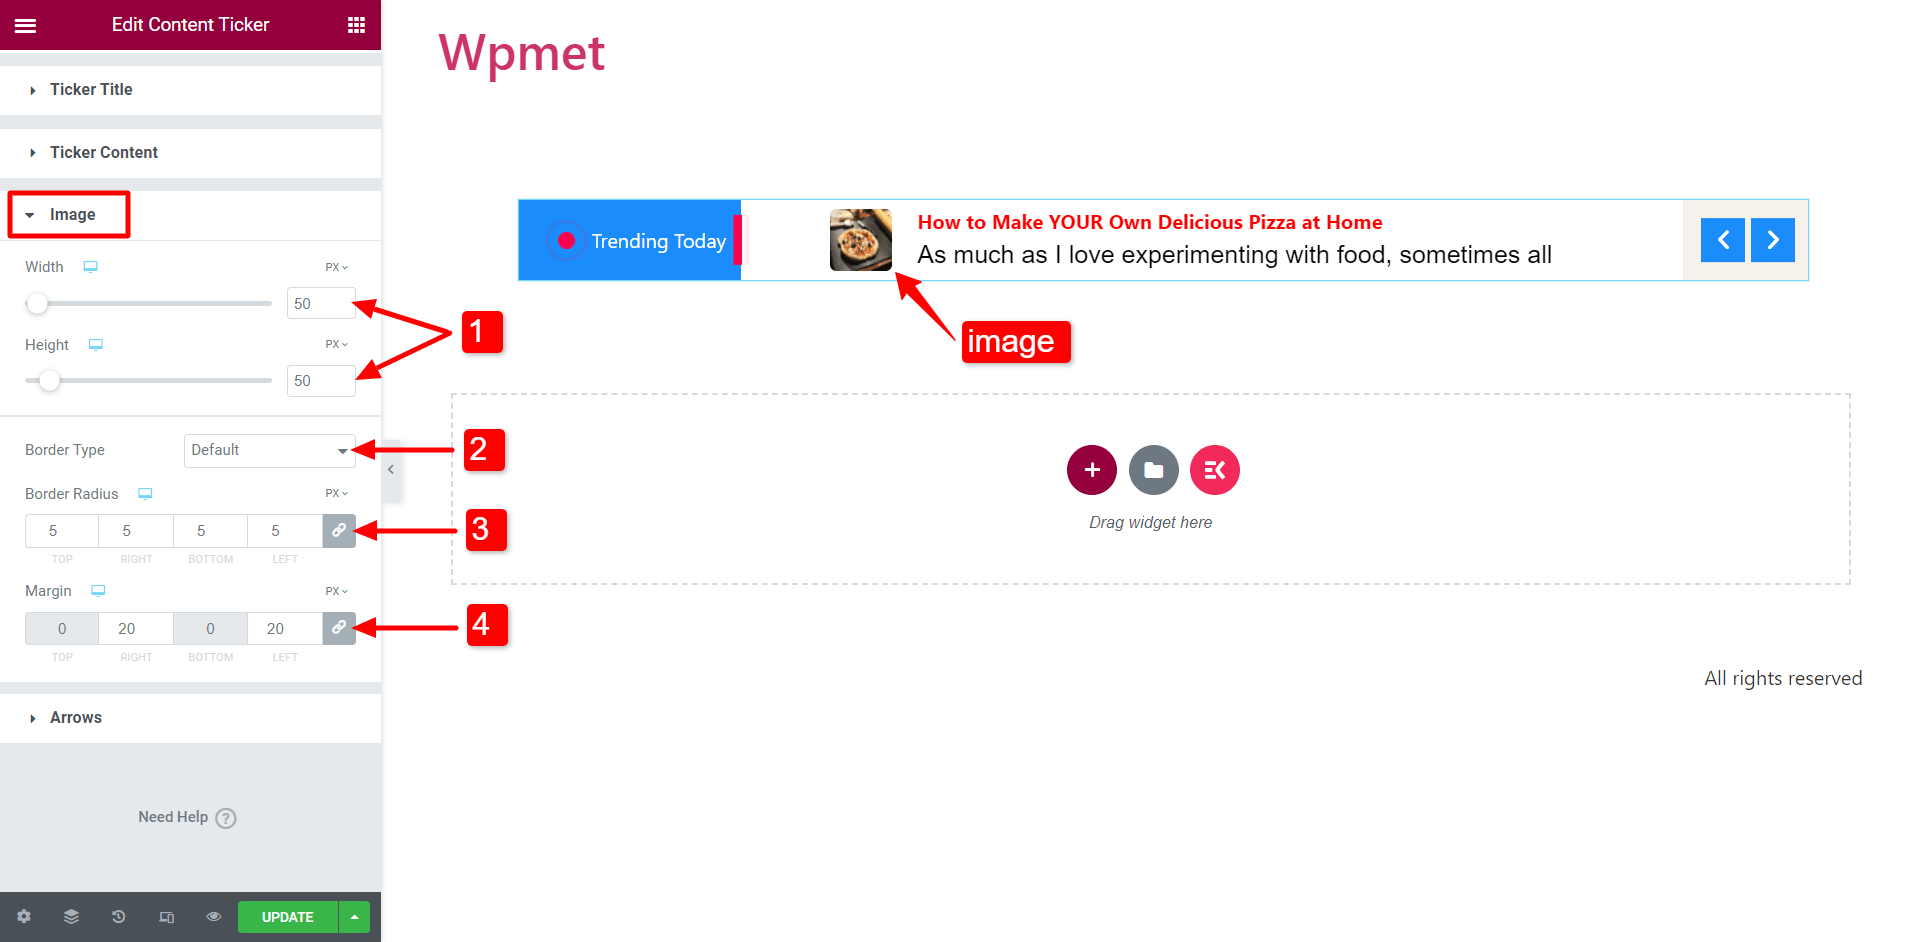
- Customize the image’s width and height to suit your preferences.
- Choose its border type.
- Adjust the border-radius.
- Set the margin for the content image.
Arrow
Once you activate the “Show Arrows” feature, arrows will be visible on the ticker.
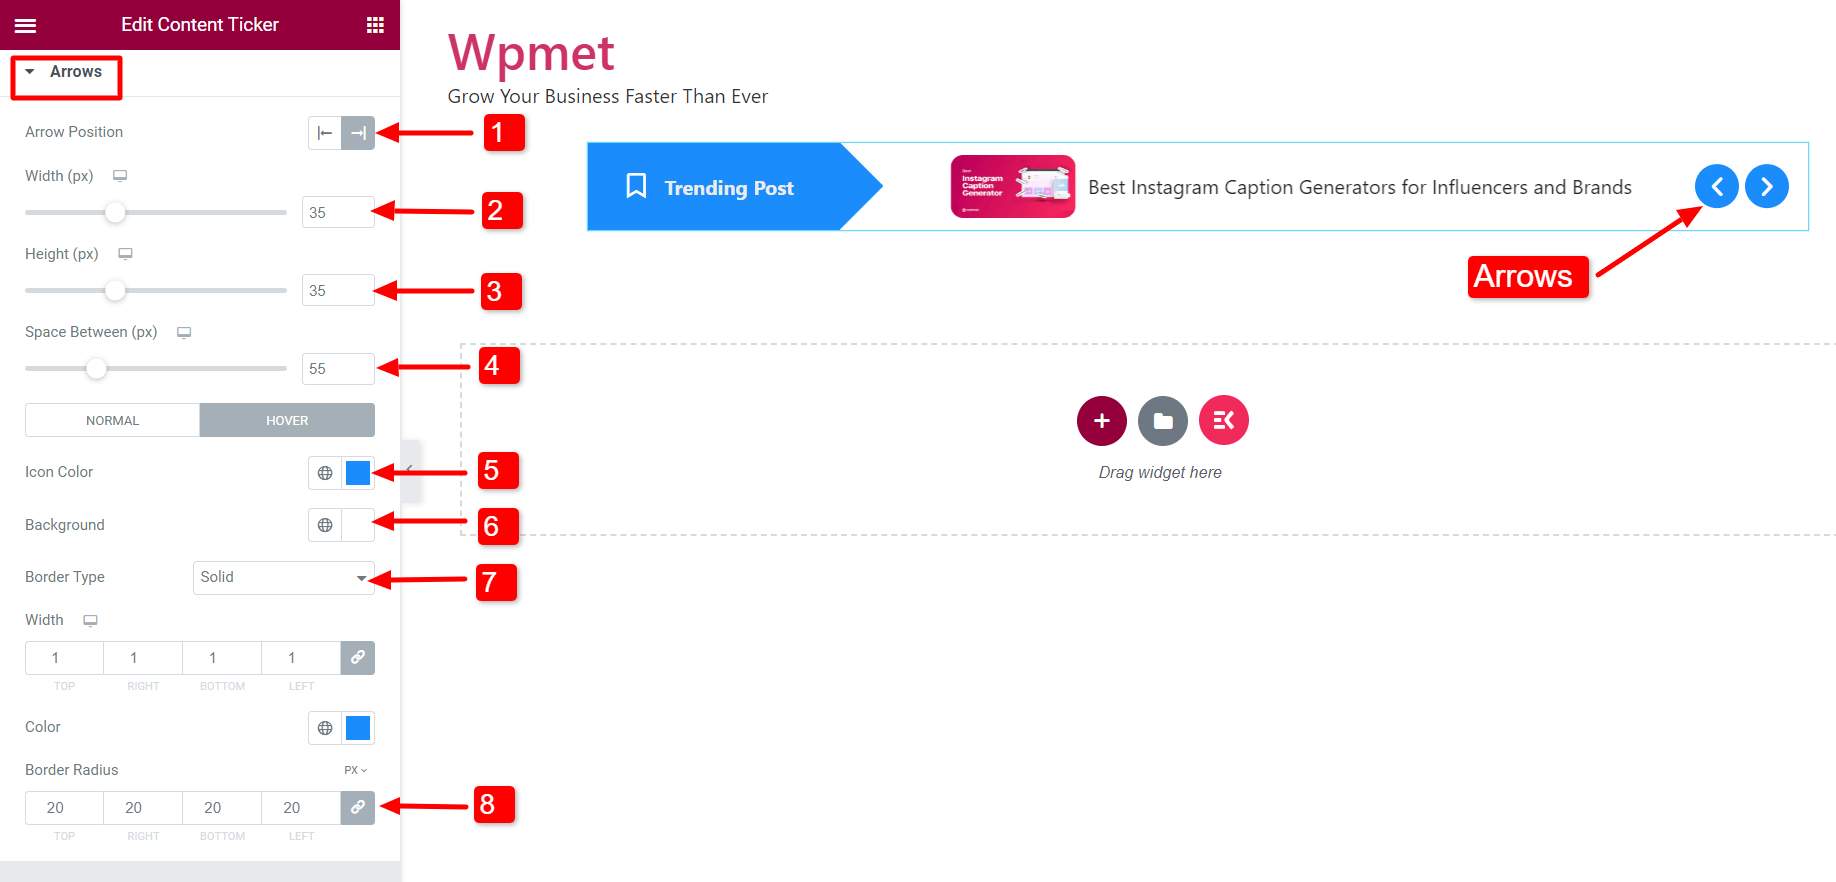
- Arrow Position: Set the arrow position to either the left or right of the ticker.
- Width: Adjust the width of the arrows.
- Height: Adjust the size of the arrows.
- Space Between: Modify the spacing between the two arrows.
- Icon Color: Choose the color for the arrow icons.
- Background Color: Choose a background color for the arrows.
- Border Type: Choose a border type and customize the border width and color.
- Border Radius: Adjust the border-radius.
Best Practices for News Ticker Content in WordPress
To make the most of your news ticker in WordPress, it’s crucial to follow best practices for content. By selecting and presenting information carefully, you can engage your audience effectively.
- Stay Relevant
Ensure the news ticker’s content is current and pertinent to the audience. Keep the content regularly updated to maintain its freshness and appeal.
- Prioritize Readability
Select font styles, sizes, and colors that are visually pleasing to read. Avoid using complex animations or designs that could hinder the legibility of your content.
- Optimize Speed and Duration
Fine-tune the ticker’s speed to give users time to read and comprehend the content. Avoid setting it too fast or slow, which can harm the user experience.
- Limit Item Count
Maintaining a reasonable number of items is advisable to ensure a seamless user experience.
- Use Concise and Clear Text
Keep the text in your news ticker brief and focused. Allow users to grasp the main idea of each item quickly.
- Include Relevant Links
Attach hyperlinks to the text in your news ticker. It connects users to relevant pages on your website. The ticker transforms into a valuable navigation tool that guides users to the content.
- Check Responsiveness Across Devices
Test the news ticker on different devices, screen sizes, and resolutions. Ensure it provides a consistent user experience on all platforms.
- Monitor and Optimize Performance
Continuously assess the performance of your news ticker. Make necessary changes to enhance user experience and engagement metrics.
Wrap Up
You can enhance your website with a news ticker in WordPress. It can showcase breaking news, trends, and essential updates. Ensure your news ticker content is relevant, readable, and optimized for speed. Use concise text, relevant links, and testing responsiveness across devices to improve user experience.
Choose a plugin that not only plays as an automatically scrolling news ticker in WordPress but also plays versatility. A good choice news ticker plugin can display news headlines, announcements, promotions, or any other type of scrolling information. That is the convenience that our ElementsKit Content Ticker Widget can bring to your website.
Let your plugin do the job for you. Install and activate our ElementsKit plugin to create a news ticker with customizable settings. Easily integrate it by following the instructions and leveraging its potential on your WordPress site.
You might be interested to know the best SEO tools for WordPress you must try, which will enhance your blogging experience and level up your website performance.
Check out all premium solutions for your Elementor website ✨


Leave a Reply