
When it comes to designing an attractive and engaging WordPress site, adding interactive elements can remarkably enhance user experience. The Flipbox is one such element that allows you to show content in a dynamic and interactive manner.
In this blog post, we will explore what Flipbox is, the role of Flipbox overlays and hovers in WordPress sites, and provide you with a step-by-step guide on how to add Flipbox overlays and hovers in WordPress.
What is Flipbox?
A Flipbox is a design feature that allows you to provide material as a box that flips or rotates as the user hovers over it. It usually includes two sides, the front, and the back, with different content on each side.
Role of Flipbox Overlays And Hovers in WordPress Site
Flipbox overlays and hovers can help improving the user experience and visual appeal of your WordPress site. They enable you to draw attention to important details, highlight features, or exhibit your photos and videos in a dynamic way.
- Improves User Engagement: Flipbox overlays encourage interaction by displaying additional content on hover or click.
- Enhances Visual Appeal: Adds smooth animations and transitions to make content more dynamic.
- Optimizes Space: Displays extra information without cluttering the layout.
- Boosts Call-to-Action: Highlights key messages, products, or offers effectively.
- Improves UX Without Slowing Performance: Provides interactivity using lightweight animations for faster load times.
You can make your site more attractive, stimulate user engagement, and improve the overall design aesthetics by including Flipbox overlays and hovers.
A Step-By-Step Guide To Adding Flipbox To The WordPress Site
To add Flipbox overlays and hovers to your WordPress site, you’ll need a suitable plugin that offers this functionality. Several Flipbox plugins are available, but two popular choices are Elementor and ElementsKit Flipbox plugins. These plugins provide easy-to-use options and a variety of customization settings to create stunning Flipbox effects. Installing and activating a plugin is not rocket science. You can do it easily by following a few steps.
Now, let’s get back to adding Flipbox to your site. Here are 4 easy and simple ways to do it-
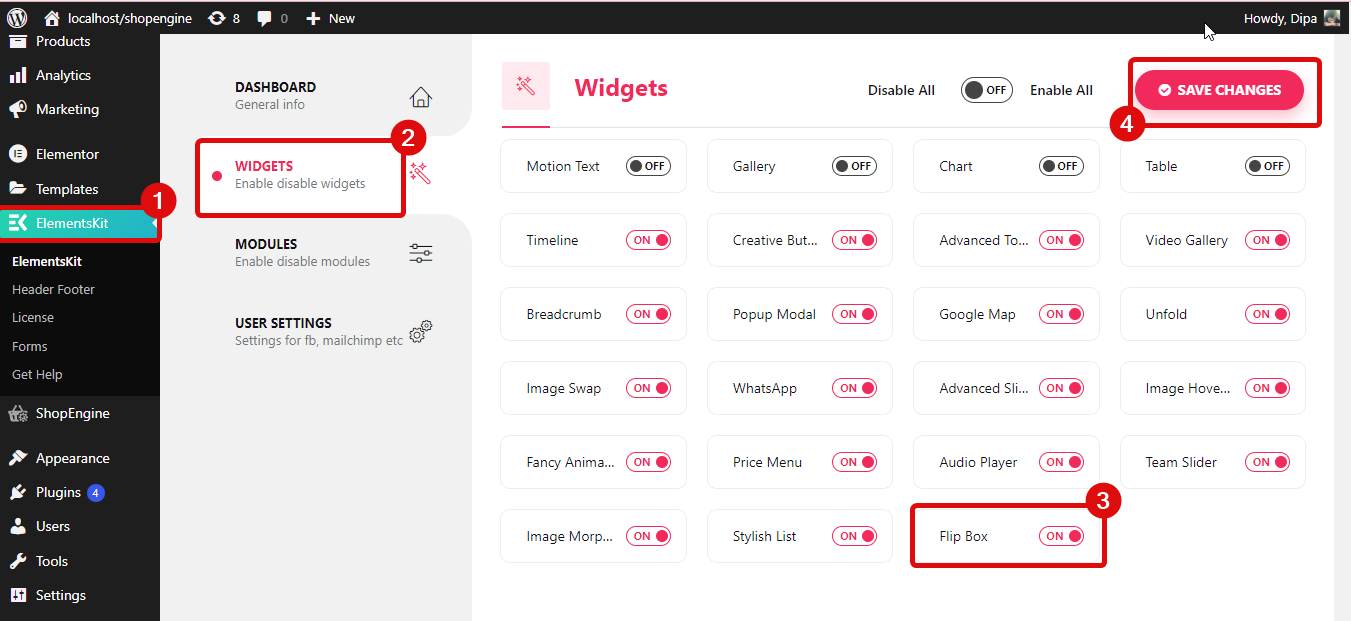
Step 1: Enabling The Flip Box Widget
To do this, log in to your WordPress admin dashboard and Navigate to ElementsKit ⇒ widgets ⇒ flip box widget, turn on the widget, and click on Save Changes.
Step 2: Drag and drop the widget
Edit the page by selecting Edit with Elementor option. Then, search for the flip box widget with an Ekit icon and simply drag and drop the widget onto the page.

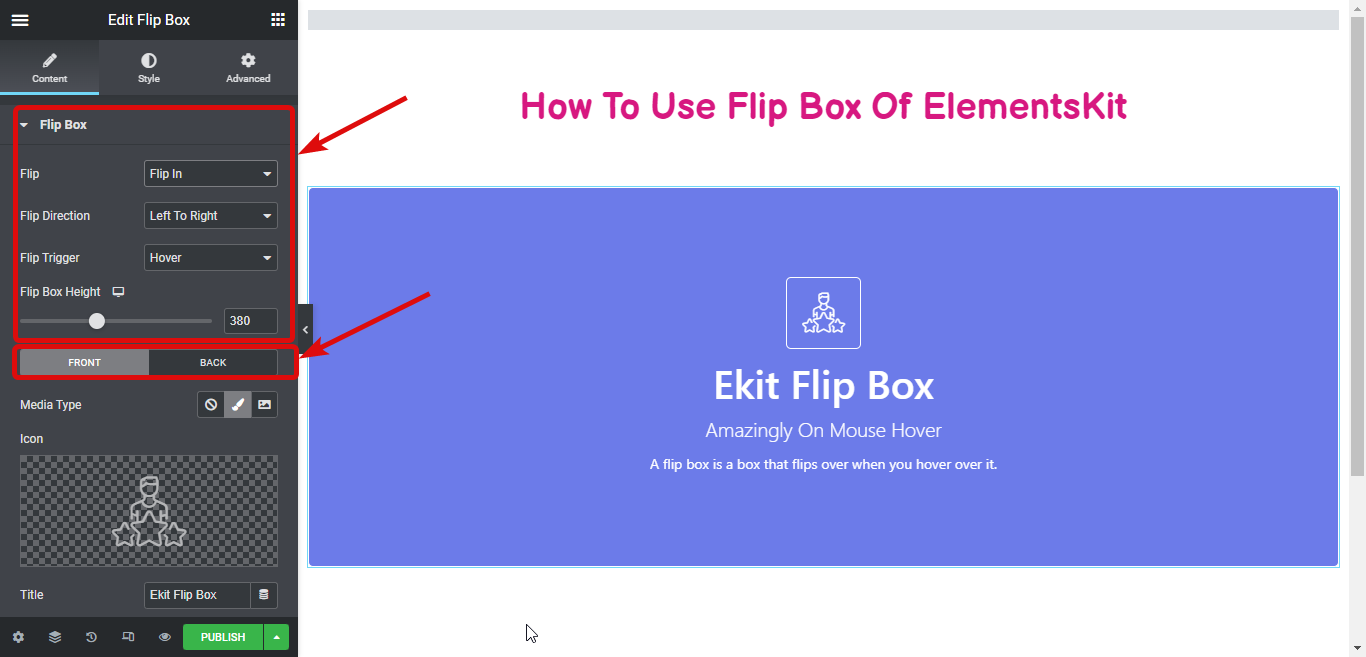
Step 3: Customize the settings
Expand the Flip box menu to alter the settings :
- Flip Options: You can choose how the flip animation looks. There are four options: Flip in, Zoom in, Slide in, and 3D. Each one has a different style.
- Flip Direction: This determines which way the flip animation will go. Depending on the type of flip you chose, you’ll see different options for the direction it can flip.
- Flip Trigger: This is how you make the flip happen. You can choose between three options: Hover (when you move your mouse over it), Box Click (when you click on the box), or Button Click (when you click on a specific button).
- Flip Box Height: You can change the height of the flip box. Inside this setting, there are two tabs: FRONT and BACK. You can customize the content on each side separately.
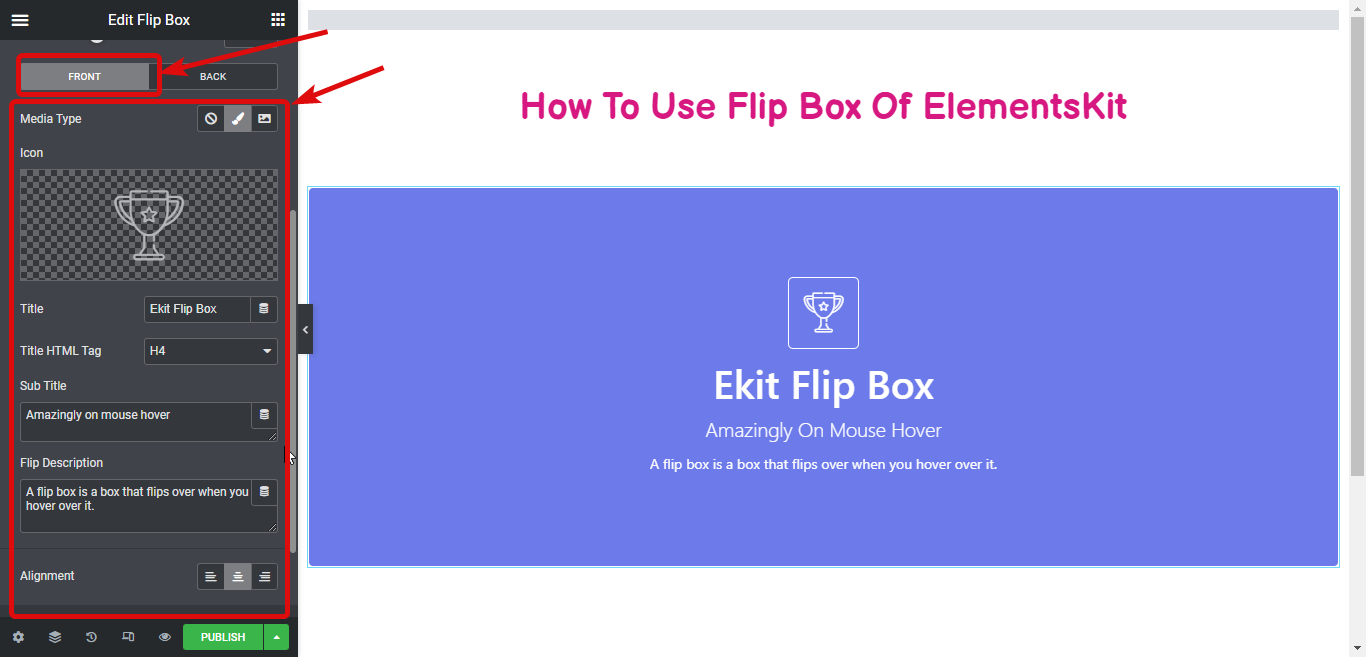
For each side of the flip box, you can customize the following things:
- Media Type: Choose whether you want to use an icon, an image, or none (if you don’t want to add any pictures).
- Icon/Choose file: If you picked an icon or image, you can select which one you want to use from a list or choose a file from your computer.
- Title: Give a title or name to that side of the flip box.
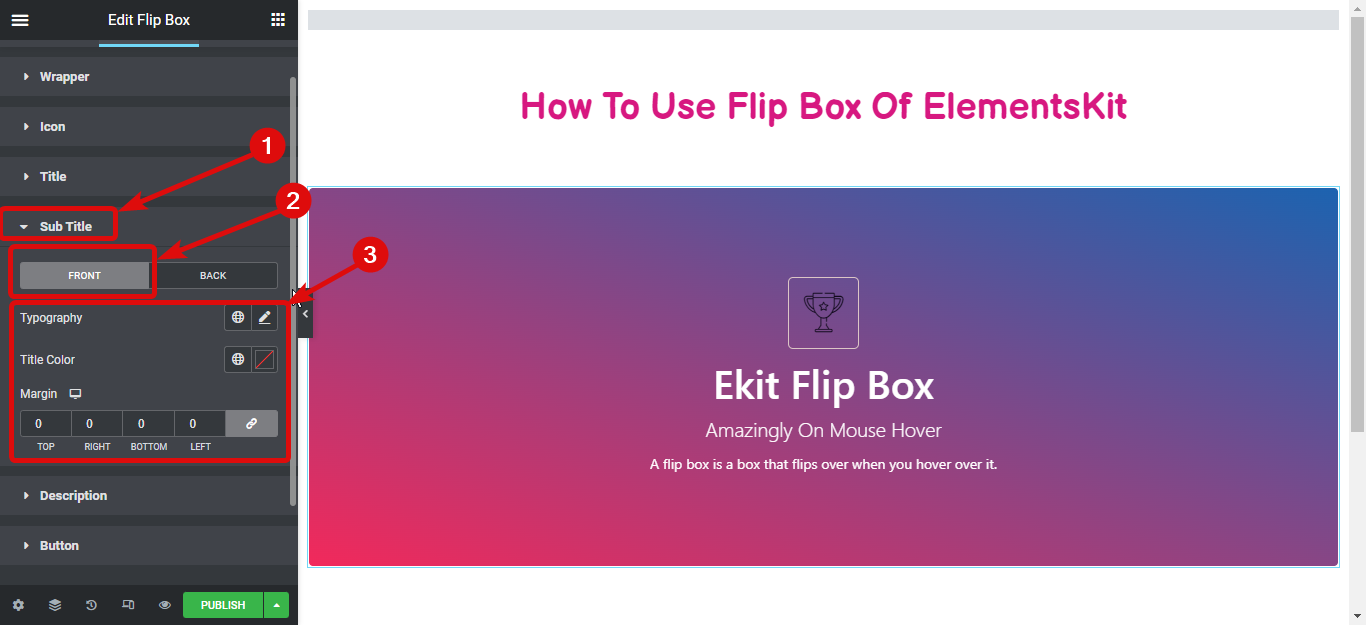
- Subtitle: Add a smaller text below the title to give more information.
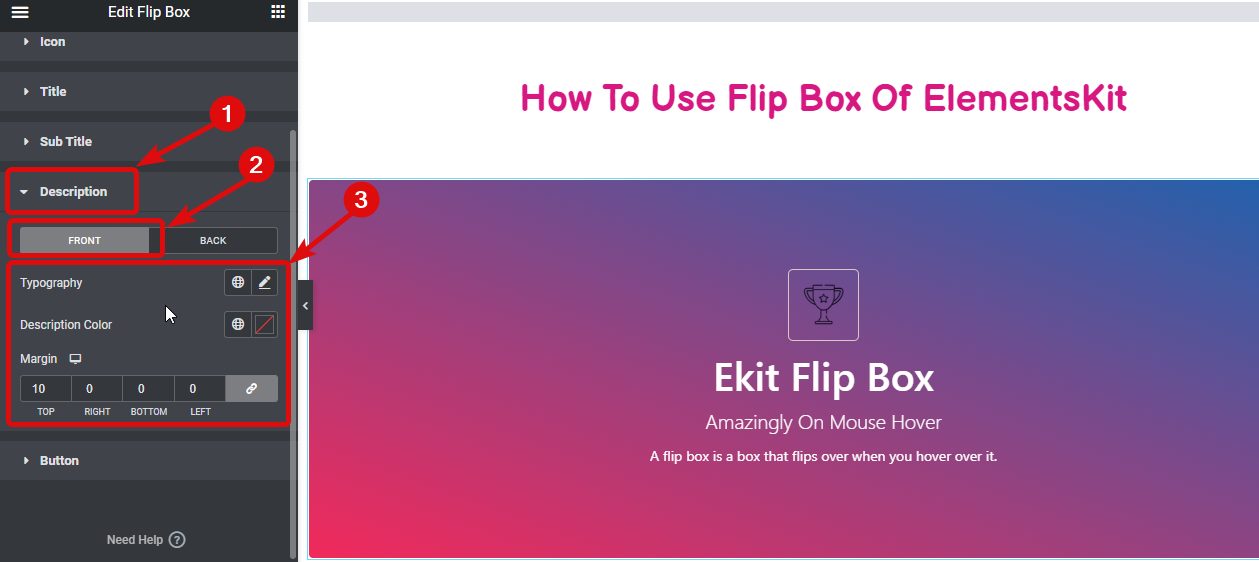
- Flip Description: Write a description or explanation for that side of the flip box.
- Alignment: Decide if you want the content to be on the left side, in the center, or on the right side.
Once you’re finished customizing the content for both sides of the flip box, you can change the style to make it look the way you want.
Step 4: Formalize your flip box
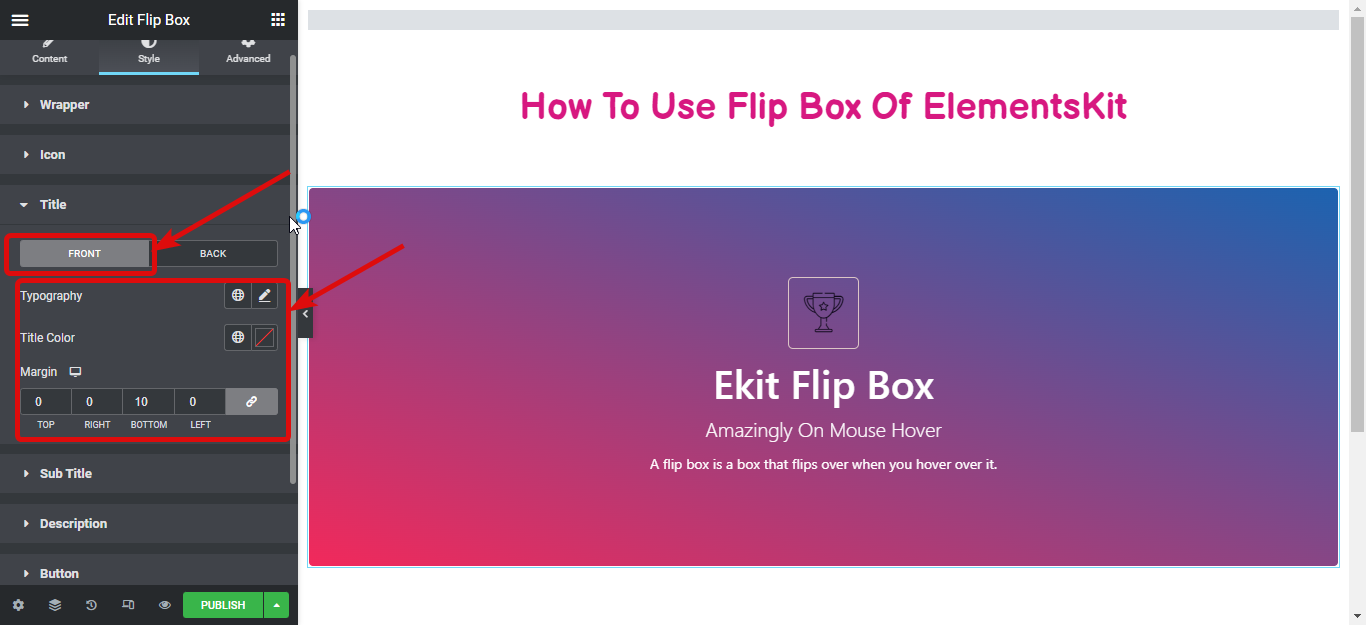
Now, go to the Style tab and expand each section to the corresponding style options:
Wrapper: Here you can change the Background Type, Color, Location, Second Color, Location, Type, Angle, and so on under the wrapper. The options for both the front and rear sides of the flip box can be customized.

Icon: By expanding this option. You may change the Color, Background Type, Box Shadow, Border Type, and other settings for both the regular and hover views. Both the front and rear ends of the flip box can have icon styles customized.
Title: From here you can change the Typography, Title Color, and Title Margin for both sides of the flip box.
Subtitle: Modify this option to customize the Typography, Title Color, and Title Margin of the subtitle for both sides of the flip box.
Description: Here you can customize the Typography, Description Color, and Margin of the description for both sides of the flip box.
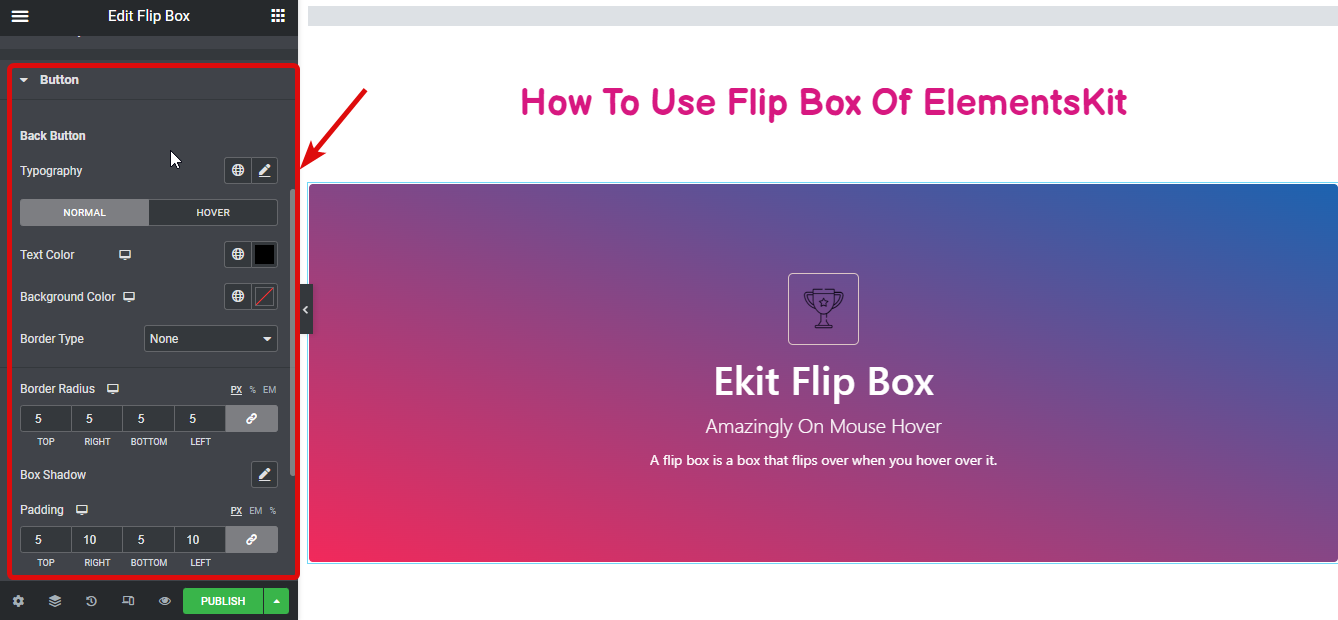
Button: Expand the button section to change the Text Color, Background Color, Border Type, Border Radius, Border Box, and other settings. The button can be styled for both regular and hover views.
Finally, click on publish/ update to save the changes and preview your Elementor flip box:


Easy-to-go Chart
| Steps | How to do it |
| Step 1: Enabling the Flipbox widget | ElementsKit ⇒ widgets ⇒ flip box widget, turn on the widget ⇒ Save Changes. |
| Step 2: Drag and drop the widget | Use the Ekit icon ⇒ search for the flip box widget ⇒ drag and drop the widget |
| Step 3: Customize the settings | Customize Flip Direction, Trigger, Box Height, Media Type, Icon/ Choose file, Title, Subtitle, Flip Description, Alignment, etc. |
| Step 4: Formalize your flip box | Style tab ⇒ expand each section ⇒ change accordingly |
Best Flipbox Overlays and Hovers Plugin for WordPress
Here’s my overview of two popular Flipbox overlays and hovers plugins for WordPress side by side. These are Elementor and ElementsKit Flipbox plugins. Have a look
Elementor Flipbox Plugin
Elementor is a widely used and highly regarded page builder plugin for WordPress. It offers a Flipbox widget that allows you to create stunning flip animations on your website. With Elementor, you can easily add interactive flip effects to your images, icons, titles, and descriptions. The plugin provides a user-friendly interface where you can customize the flip direction, animation style, trigger event (hover, click), and various design elements. Elementor is known for its flexibility, extensive styling options, and compatibility with different themes.
ElementsKit Flipbox Plugin
ElementsKit is a comprehensive add-on package for Elementor that enhances its functionality. There is a dedicated Flipbox module within ElementsKit. It adds more advanced Flipbox features and effects to your Elementor-powered website. This plugin offers an extensive library of pre-designed Flipbox templates. This allows you to create visually appealing flip animations quickly. ElementsKit Flipbox plugin also provides additional customization options. You can have different Flipbox styles, overlay effects, hover effects, and various trigger events. It seamlessly integrates with Elementor and provides a seamless user experience for designing captivating Flipbox elements.
Both the Elementor Flipbox Plugin and ElementsKit Flipbox Plugin can be the best choices for you. These bring interactive and engaging flip animations to websites. These plugins have user-friendly interfaces and extensive customization options. Plus, these are compatible with the Elementor page builder. There is no need to write codes. So, these plugins make creating visually appealing and interactive Flipbox elements easier for you.
Frequently Asked Questions(FAQs)
How do you add a hover effect in WordPress?
To add a hover effect in WordPress, you can utilize CSS or plugins that offer hover effect features. Many page builders and customizer plugins provide options to add hover effects to various elements, including Flipboxes.
How do you create a flip box in WordPress?
You can create a flip box in WordPress using dedicated Flipbox plugins like ElementsKit. These plugins allow you to create and customize Flipbox elements easily without requiring coding knowledge.
How do you add a hover image in WordPress?
To add a hover image in WordPress, you can use CSS or plugins that provide image hover effects. These plugins usually have options to specify a different image or change the appearance when hovering over an image element.
How do you show content on hover in WordPress?
You can show content on hover in WordPress using various methods. One way is to use CSS to display hidden content when hovering over a specific element. Alternatively, Flipbox plugins often offer options to display different content on the front and back sides of the Flipbox, visible upon hover.
Wrap up
Adding Flipbox overlays and hovers to your WordPress site can significantly enhance the user experience and make your content more engaging. By following the step-by-step guide outlined in this blog post and utilizing popular Flipbox plugins like ElementsKit, you can easily create stunning Flipbox effects without any coding knowledge. So go ahead to spice up your website with Flipbox overlays and hovers, and captivate your site visitors with interactive and visually appealing content.
Leave a Reply