For the convenience of development and testing, developers prefer to work on their WordPress site in a local environment (e.g. Xampp or Local WP). However, to make the website accessible to the public, you need to move a local WordPress site to a live server.
So, moving a WordPress site from a local environment to a live server is a crucial step in web development. This process, though seemingly technical, can be streamlined if approached systematically.
To make things easy for you, we’ll show you how to move a local WordPress site to a live server with the proper step-by-step breakdown.
We will cover two of the most popular localhost services for WordPress to make the migration hassle-free for the majority of the users.
What is a local host for WordPress?
Think of a localhost as your personal server that runs on your local machine or computer. It’s where developers can build and test WordPress websites privately without an internet connection.
If you setup WordPress on a localhost, it lets you simulates a live server in a local environment, letting you install WordPress, add plugins, customize your theme, and do all the development work as needed—without public access.
Difference between localhost and live server
The key difference lies in the accessibility and purpose of each environment. Localhost is for private development, while a live server is for public availability.
| Area | Localhost | Live server |
|---|---|---|
| Platform | Uses a personal computer or machine to host the website. | Uses a public server or hosting service. |
| Accessibility | Private, accessible for selected persons only with access to the host computer or machine | Public, accessible to anyone with an internet connection. |
| Usage | Used for development and testing. | For online presence and communicating with audiences. |
How to make a WordPress site live from a localhost
Before moving your WordPress site from a localhost to a live server, there are a few important steps to consider.
Prerequisite: Get a domain name and hosting plan
Before you move your WordPress site from localhost to a live server, you’ll need to secure two essential components: a domain name and a hosting plan.
✅ Hosting Service
Web hosting is basically the live server where you will be shifting your website. A hosting server stores all the resources (including files, databases, and all components) of your website and makes them accessible to the internet.
Different types of hosting such as cloud hosting, shared hosting, VPS, and managed hosting services are available. Before choosing a hosting service, analyze the best web hosting providers for WordPress and pick one that matches your requirements.
When choosing a hosting plan, consider the following factors:
- At least a 99.9% uptime guarantee
- Enough storage space and bandwidth to handle traffic.
- Security features like SSL certificates, backups, and firewalls.
✅ Domain Name
A domain name is the address where people will find your website, such as www.wpmet.com. When choosing a domain name, aim for something that’s short, memorable, and relevant to your brand or site’s purpose. There are many domain registrars like GoDaddy, Namecheap, and Google Domains where you can search for and purchase available domain names.
Method 1: How to move a local WordPress site to a live server from XAMPP
XAMPP is one of the most popular localhost environments for WordPress development. Here are the steps to move your WordPress site from XAMPP to a live server.
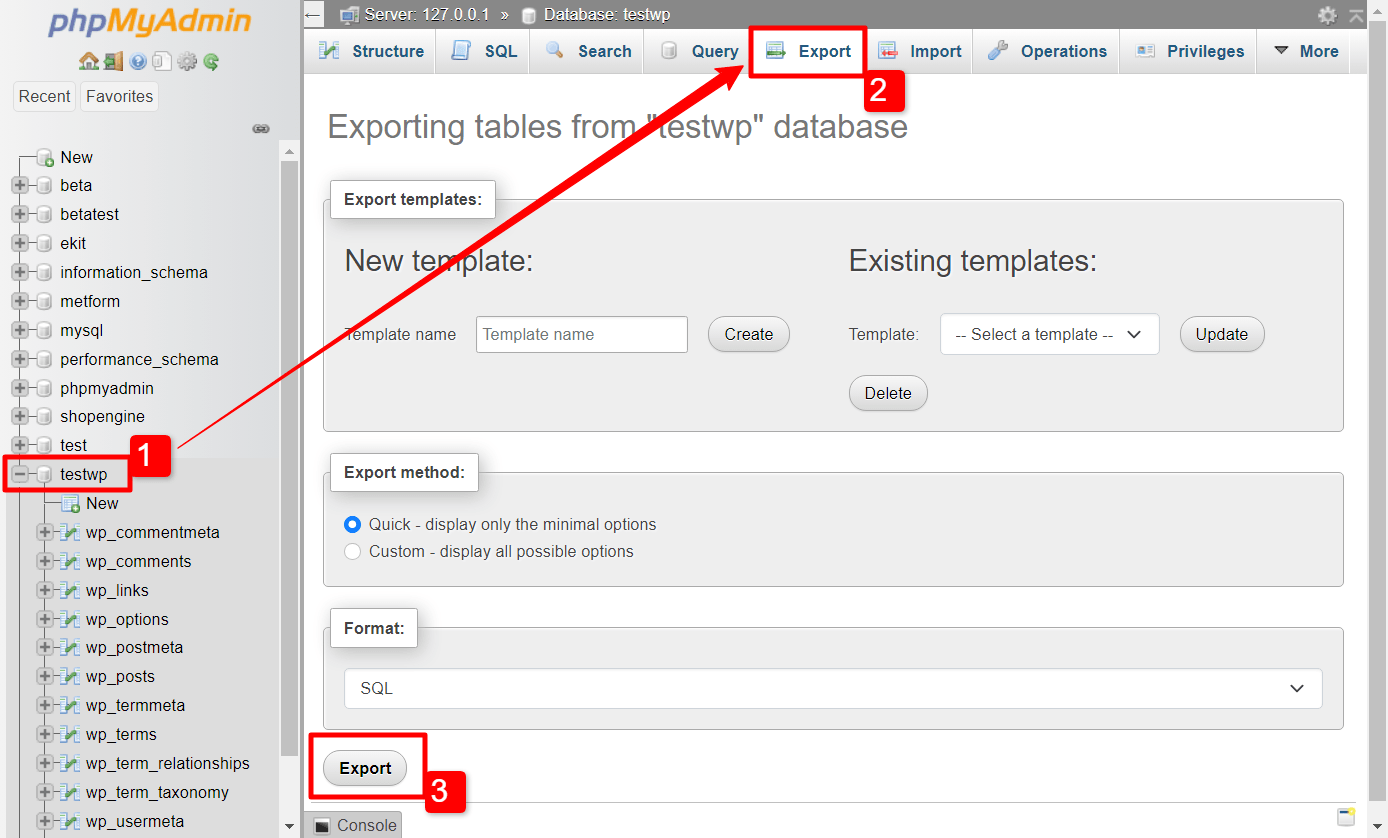
Step 1: Export Your Local WordPress Database
Firstly you need to export the database of your local WordPress site.
- Launch Xampp on your local machine (computer).
- Go to localhost/phpmyadmin.
- Select your WordPress database.
- Click on “Export” and select SQL format.
- Save the SQL file on your computer.
Step 2: Make changes to the SQL file
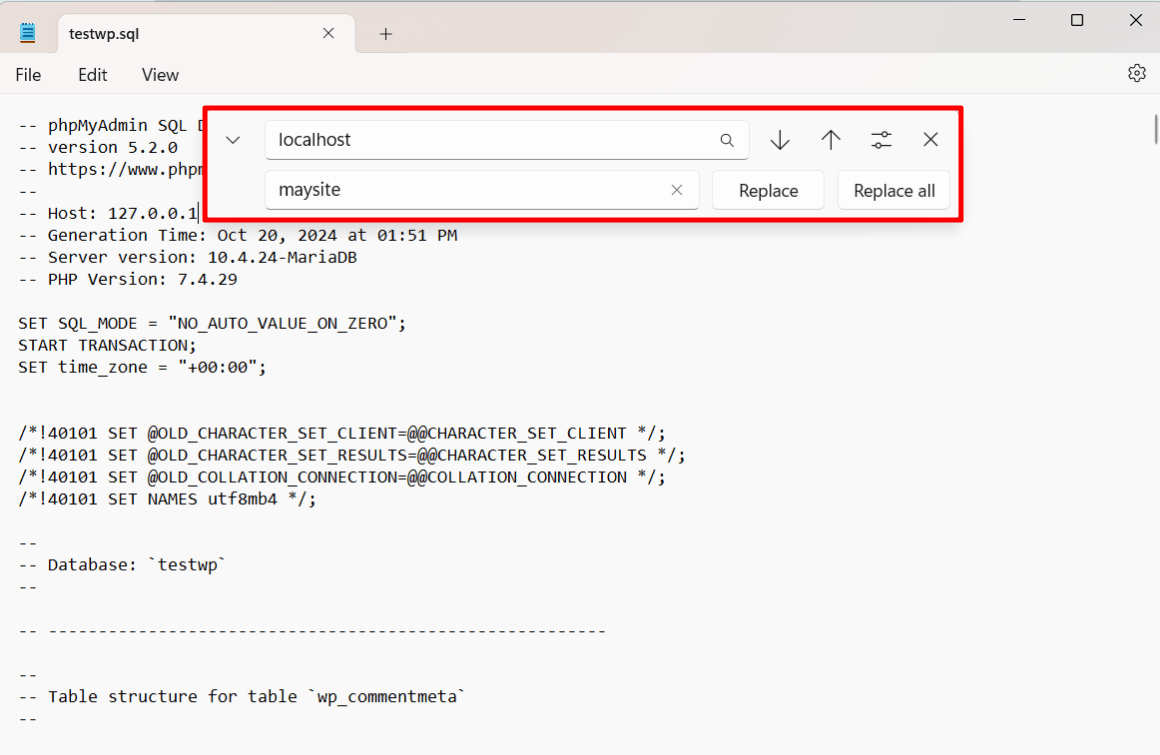
After that, you need to replace the local URLs with the domain name that you have selected for your site.
- Open the SQL file on a Notepad.
- Find and replace the term “localhost” with the domain name.
- Save the changes and close the file.
Step 3: Create a new database on your live server
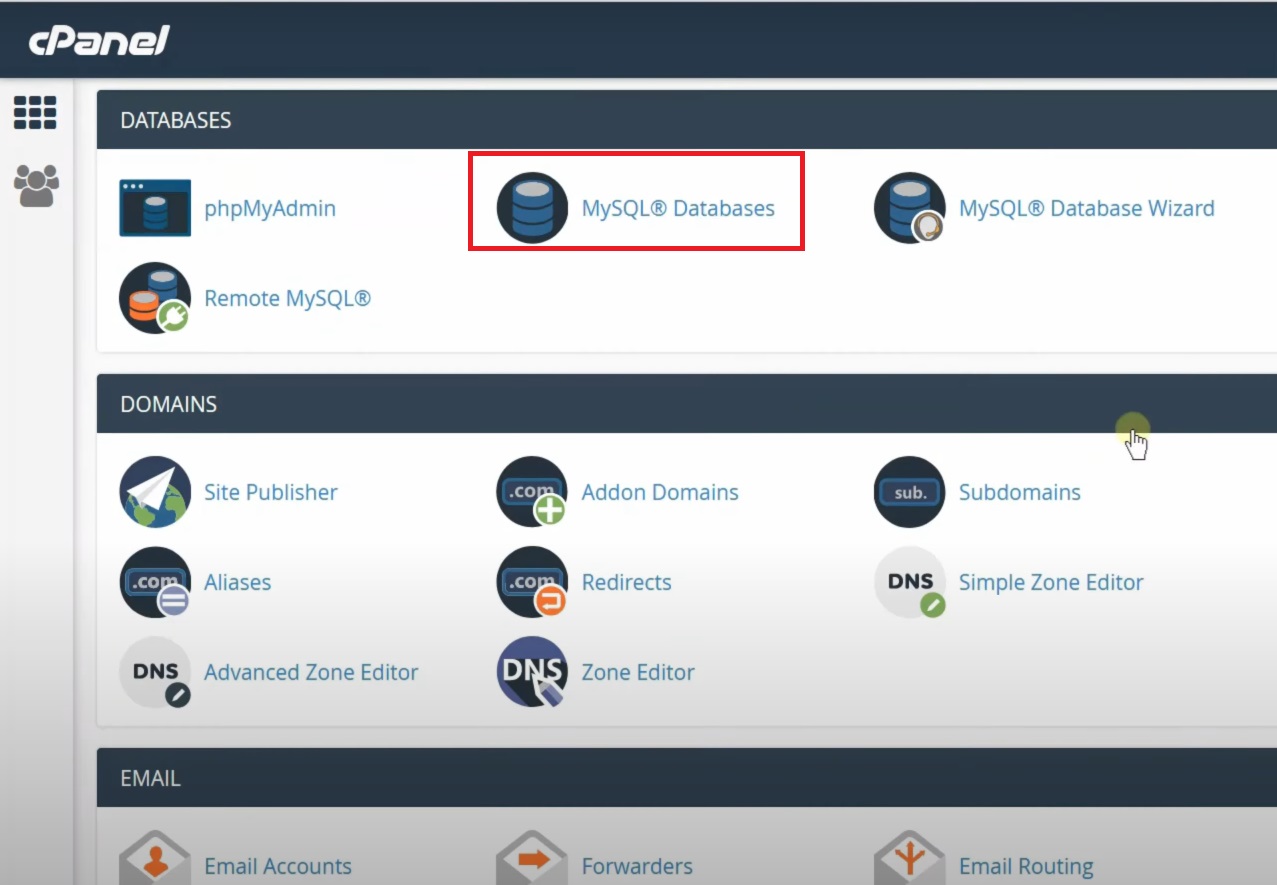
When you get a hosting service, you will get access to a dashboard named “cPanel” for your website.
- Login to the cPanel of your hosting provider.
- Create a new database (make sure the database name is within 60 characters).
- Add a new database user (MySQL user).
- Assign the user to the database with all privileges.
Step 4: Import your local database to the live server
Now you need to import the database of your local WordPress site to the live hosting server. This is the core part of transferring your website.
- Open phpMyAdmin in your hosting cPanel.
- Select the new database you created and click on “Import.”
- Upload the .sql file you exported from XAMPP.
Step 5: Update the wp-config.php file
In this step, you will be configuring your live WordPress site from the wp-config.php file.
- In the FTP client, find the wp-config.php file.
- Update the database name, user, and password to match the new database on your live server.
That’s it. You have now successfully transferred your website from Xampp localhost to WordPress live server.
Method 2: How to move a WordPress site from Local WP to a live host
Local WP is a comparatively new but user-friendly localhost solution tailored specifically for WordPress. Here’s how to move a site from Local WP to a live server.
Step 1: Export the files from Local WP
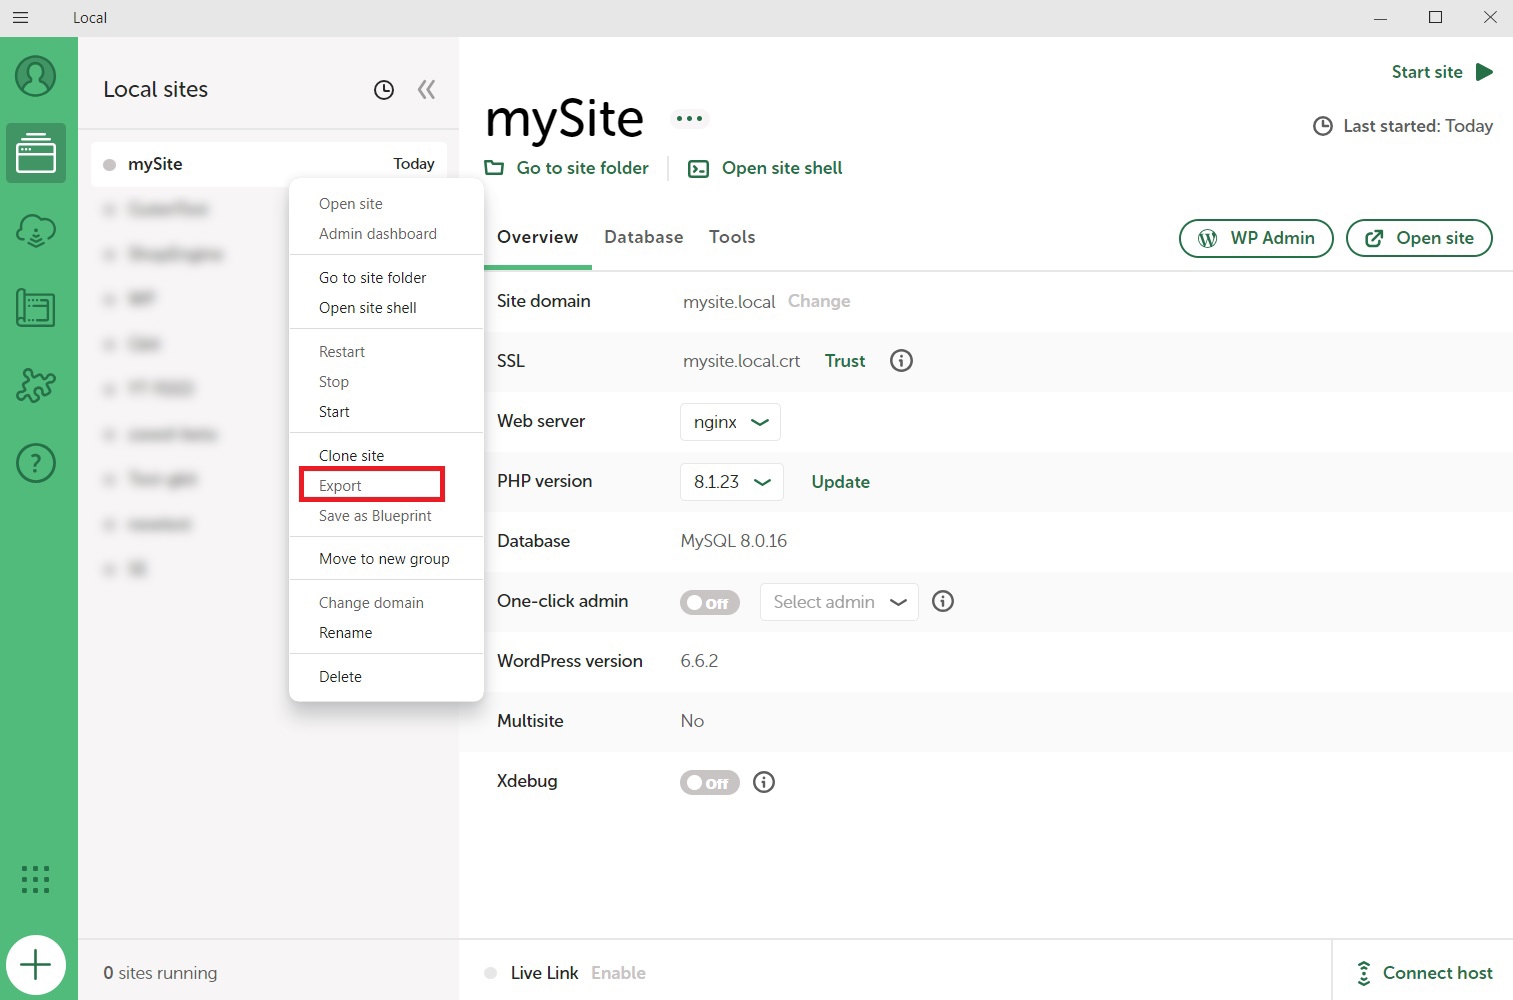
In the Local WP, firstly you need to export your site’s files.
- Open Local WP and go to the site you want to move.
- Click on the “Export” option and select the format for exporting the site.
- Download the site files and database as a .zip file.
Step 2: Create a new database on your live server
When you get a hosting service, you will get access to a dashboard named “cPanel” for your website.
- In the cPanel of your hosting provider, create a new database.
- Add a new database MySQL user.
- Assign the user to the database and grant all privileges.
Step 3: Upload the files and import the database to the live server
Now it’s time to move the files from a local wordpress site to a live server.
- Extract the .zip file that you have downloaded.
- In your hosting cPanel, open phpMyAdmin.
- Import the local database file from the .zip folder.
Step 4: Change the website URLs for the live site domain
The URLs on your local host are not the same as the live site. So you need to replace the local URLs according to your site domain name.
You can replace the URLs by running SQL queries or using a WordPress plugin.
Test your live site for errors
After moving your site to a live server, it’s important to give it a thorough check to ensure everything is running smoothly.
Start by testing for any broken links or missing images, as these can easily be overlooked during migration.
Also, check that all URLs are correct, especially if you’ve had to replace localhost addresses.
Don’t forget to check that your plugins and themes are working properly and that there are no database connection issues. Taking the time to test your site ensures that it’s fully functional and ready for your audience.
Wrapping up
Migrating a WordPress site from a local setup to a live server might feel a bit long and daunting at first, but with the right steps, it’s a lot easier than it seems.
Whether you’re using XAMPP or Local WP, the most important things to remember are backing up your site, setting up the database correctly, and thoroughly testing for any issues once it’s live. By following this process, you’ll have your WordPress site up and running smoothly in no time!


Leave a Reply