

Live sales notification for WooCommerce is a powerful way to convince the visitors to buy from you. When used properly in the right position of the landing page, you can get a boost in the conversion rate.
Live sales notification is one of the most effective social proofs to build trust among your visitors. But integrating the feature for a WooCommerce store could be challenging.
This blog post will let you learn how to integrate it with the best live sales notification plugin for WooCommerce.
What is a live sales notification?
Live sales notification is a pop-up message for a store that shows real time sales notification to the visitors. It could be a simple text based message or with visuals. When the popup appears on the landing page, visitors feel urgency to buy from you.
Wondering why?
Well, the human mind is developed in such a way where people tend to buy something when others are buying. A real time sales notification even creates an urgency to the visitor that helps to get more conversions.
How do live sales notifications work?
Live sales notifications operate by showing real-time updates of recent customer purchases on websites or apps.
When a customer buys a product, the system captures the transaction details and triggers a customizable notification, such as a pop-up or banner, displaying the purchase information.
These notifications create social proof and urgency, fostering trust and encouraging quick action from potential buyers. By providing dynamic content and monitoring analytics, website owners can gauge the impact on conversions and sales.
Responsibly implemented, live sales notifications enhance the shopping experience and boost customer engagement. Remember to handle customer data securely and comply with privacy regulations.
Benefits of Live Sales Notifications:
- Social proof and credibility
- Urgency and fear of missing out
- Increased conversions and sales
- Dynamic and engaging user experience
The impact of live sales notifications on customer behavior
- Increased sense of urgency and fear of missing out (FOMO)
- Boosts trust and credibility through social proof
- Encourages spontaneous purchases
- Creates a more engaging and dynamic shopping experience
- Improves conversion rates and sales
- Provides valuable feedback on popular products
- Builds customer confidence in the website or app
- Can lead to higher customer satisfaction and repeat purchases
Steps to create a live sales notification for WooCommerce
Don’t be worried if you have never customized a WooCommerce store before. Here I am going to show the whole process in the easiest process.
Step 1: Choose the best live sales notification WordPress plugin
Here, our goal is adding the live sales notification for WooCommerce stores without any codes. So, we will use the best live sales notification WordPress plugin. Here we will use two essential plugins —
The Elementor page builder will help you to add a variety of pages to the WooCommerce store without writing any code.
And the ShopEngine addon helps to customize the WooCommerce store without coding. Whether you are a new to WooCommerce or an expert, you will find it easy to customize the store.
Go to your WordPress dashboard > Plugins > Add new. On the search option, type Elementor and you will get the Elementor addon. Install the plugin and activate it.
Next, go to the ShopEngine WooCommerce landing page and choose the package you want. Get the plugin, install and activate it.
You are all set with the plugins.
Step 2: Prepare your store for live sales notification
Before you start adding a sales notification, you need to prepare the store.
First, keep a backup of your WooCommerce store so that if you change something mistakenly, you can revert to the old version.
Next, update the versions of WooCommerce plugins to enjoy the advanced features and keep the store future-proof.
Step 3: Choose the settings from the sales notification plugin dashboard
From ShopEngine’s dashboard, go to modules and find out the sales notification feature. Enable the feature so that you can use it for the WooCommerce store.
In the next step, you will find different fields and settings for the sales notification from where you can choose the settings for your store.
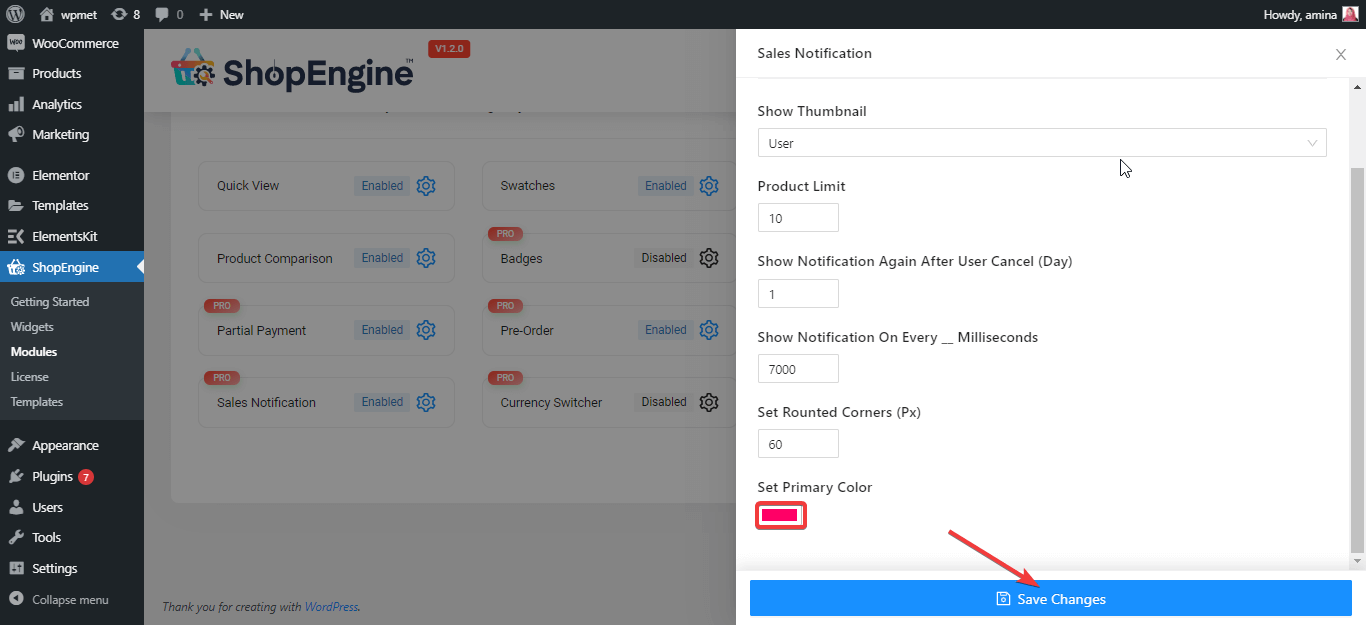
Step 4: Customize the sales notification
For any customization to the sales notification, you can do it from the plugin’s dashboard.
To customize the settings, go to plugins > modules > settings. Now choose the settings you want.
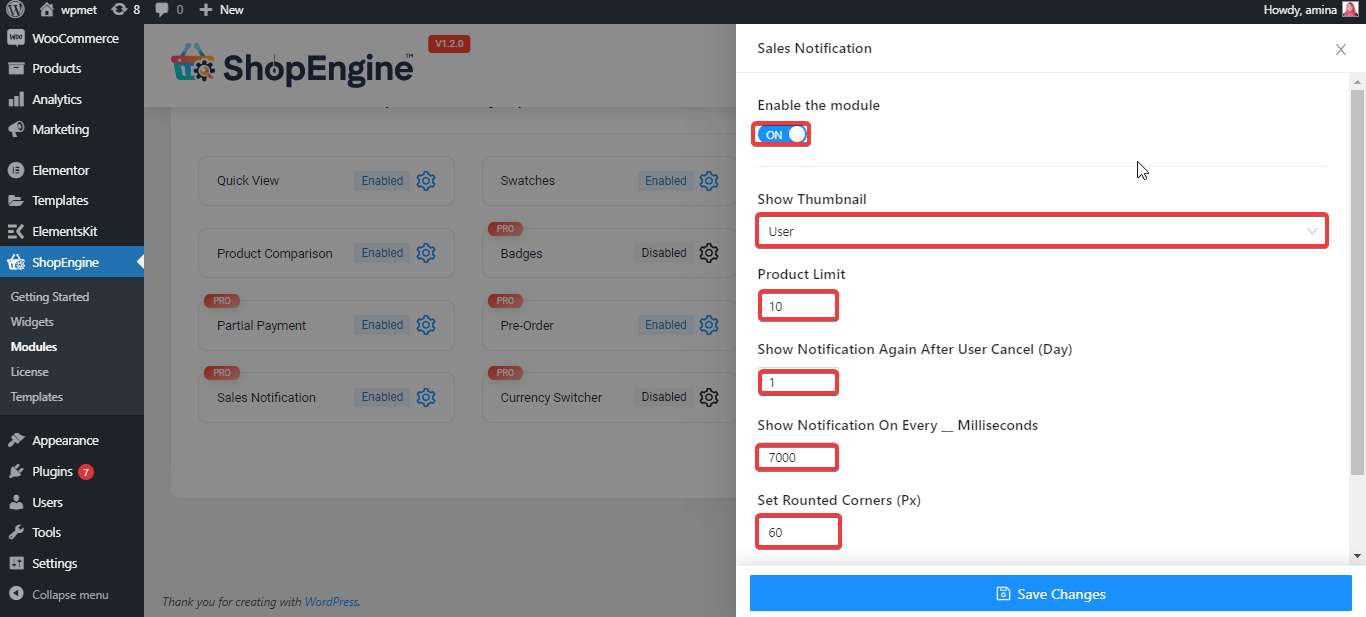
For instance, you can choose the interval for showing the sales notification, background color, product image customization, and more.
Step 5: Check the site’s preview and update the store
Finally, if you are done with the sales notification customization and other settings, save the changes. Now visit your store and go to any product page.
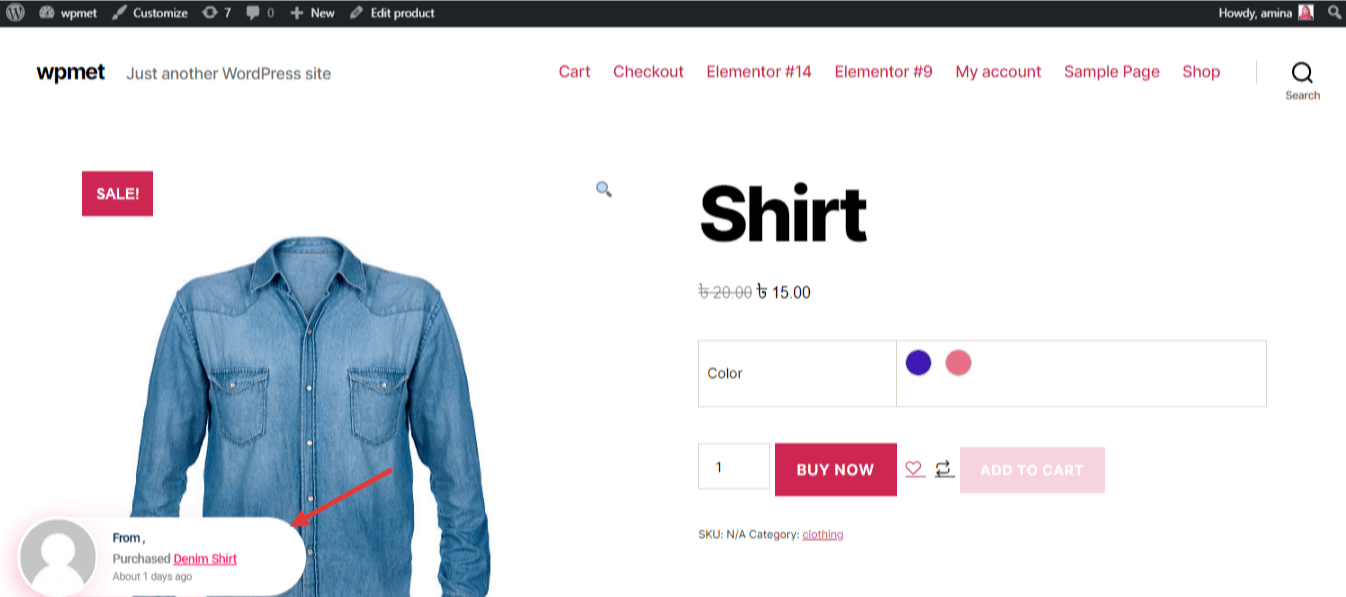
You will see the sales notification with the name of the customer. If you find any error, choose the settings properly and visit the product page again.
How to monitor live sales notification’s impact on the store
If you have successfully created a live sales notification for your WooCommerce store, it will surely give a boost to your sales. However, the performance might vary based on the type of store.
Therefore, you should always conduct A/B testing with different settings and monitor the impact of live sales notifications. You can install sales tracking tools such as HubSpot. Endeavor to compare the sales volume before integrating the live sales notifications and after implementing the sales notifications.
Conclusion
Improving the conversion rate for any WooCommerce store involves combining various selling techniques to determine the most effective approach. It is advisable to experiment with diverse conversion rate optimization methods for the store to achieve optimal results.
Leave a Reply