

 Korean
  English
  German
  Spanish
  Italian
  French
  Danish
  Portuguese
  Swedish
  Polish
  Japanese
 부분 결제 모듈을 사용하면 WooCommerce 매장에 대한 할부 결제를 받을 수 있습니다. 제품에 대해 부분 결제를 받고 다른 방법을 선택하여 나머지 금액을 받을 수 있습니다.
ShopEngine에 내장된 부분 결제 모듈을 사용하면 호텔 예약, 레스토랑 예약 등에 대한 대금을 받을 수도 있습니다.
WooCommerce에 부분 결제를 통합하는 방법 #
1단계: 부분 결제 활성화 #
- WordPress 대시보드 => ShopEngine => 모듈로 이동.
부분 결제 활성화 모듈화하고 필요에 따라 변경을 수행하십시오.
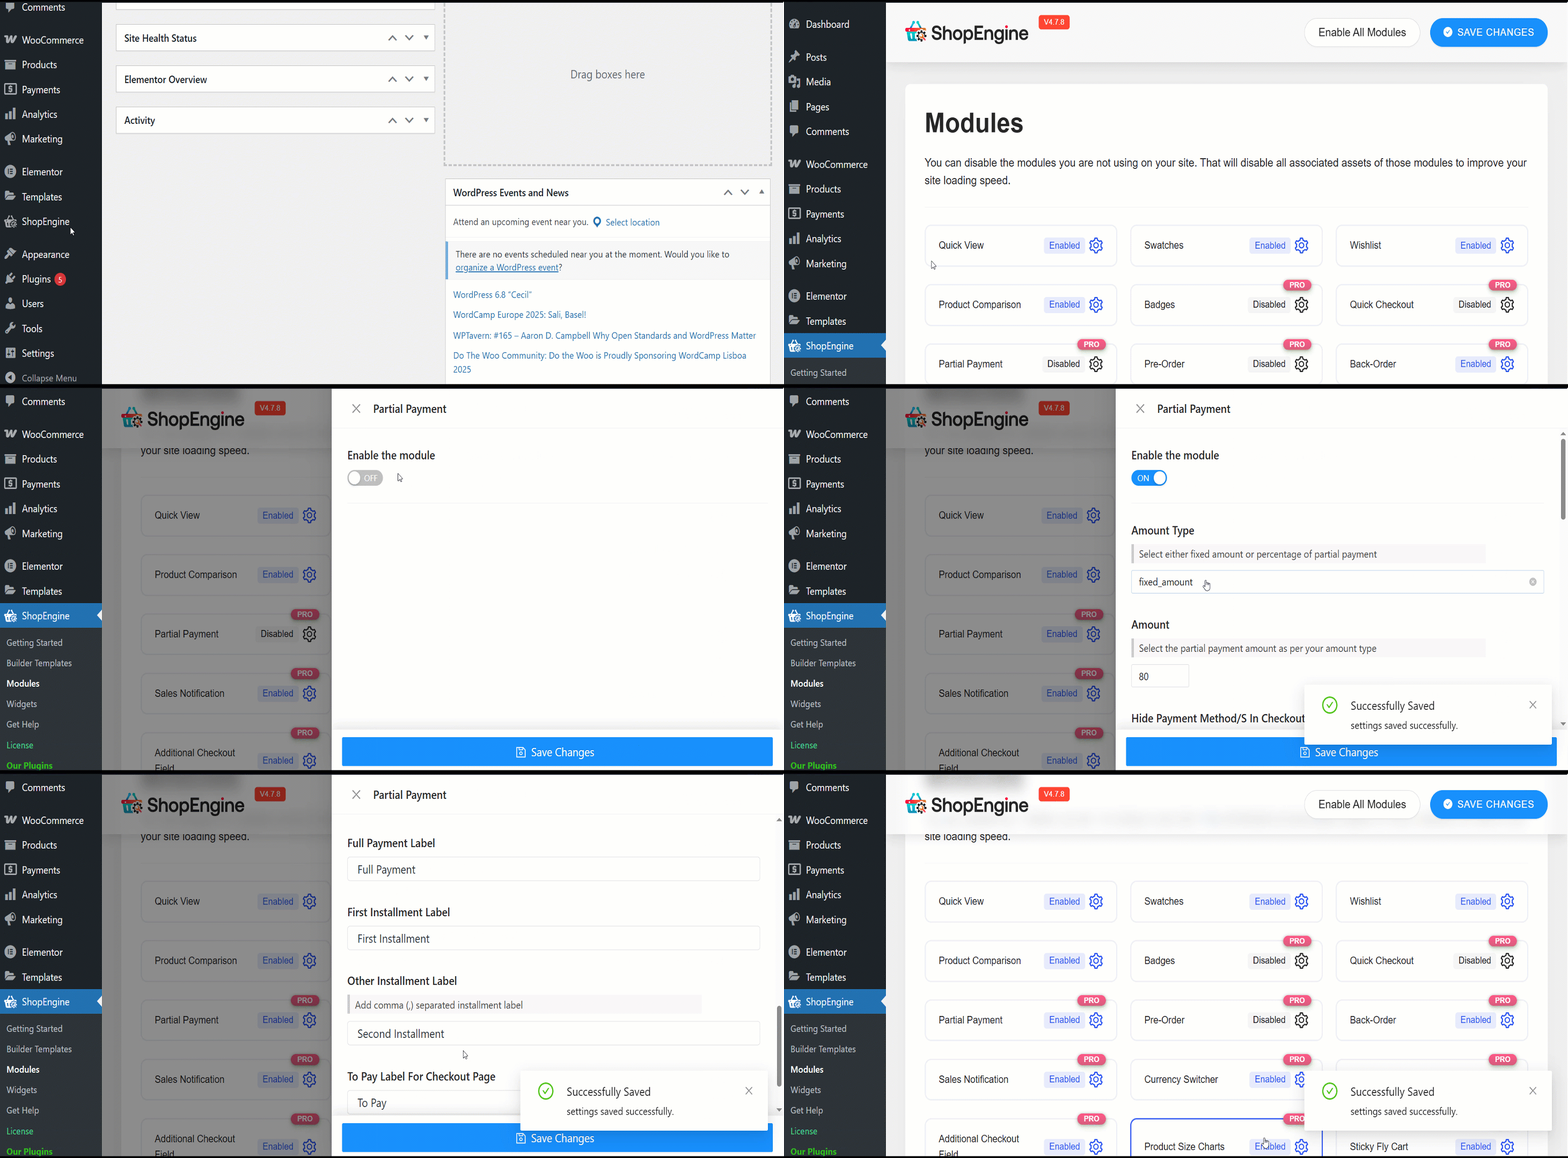
- 금액 유형: 부분 지불 유형(백분율 또는 고정 금액)을 선택할 수 있습니다.
- 양: 부분 지불 금액이나 비율을 입력하세요.
- 결제 방법 숨기기/ 체크아웃에서 S: 이 옵션을 사용하면 체크아웃에서 결제 방법 선택을 숨길 수 있습니다.
- 주문일 이후 메일 보내기 일/일: 구매 후 고객에게 결제 알림 이메일을 보낼 일수를 설정합니다.
다음으로, 다음 5가지 기능에 대한 사용자 지정 라벨을 입력할 수 있습니다.
- Partial Payment Loop Product Label: Display a custom label on product listings showing partial payment availability.
- Partial Payment Single Product Label: Show partial payment info directly on the individual product page.
- 전체 지불 라벨: Clearly indicate the option for paying the full amount upfront.
- 첫 번째 할부 라벨: Label the first payment amount in an installment plan.
- Other Installment Label: Define the text for upcoming or recurring installment payments.
- 결제 페이지의 라벨을 지불하려면: Highlight the amount due now at checkout for partial payments.
2단계: 제품 페이지를 편집하여 제품에 대한 부분 결제를 활성화합니다. #
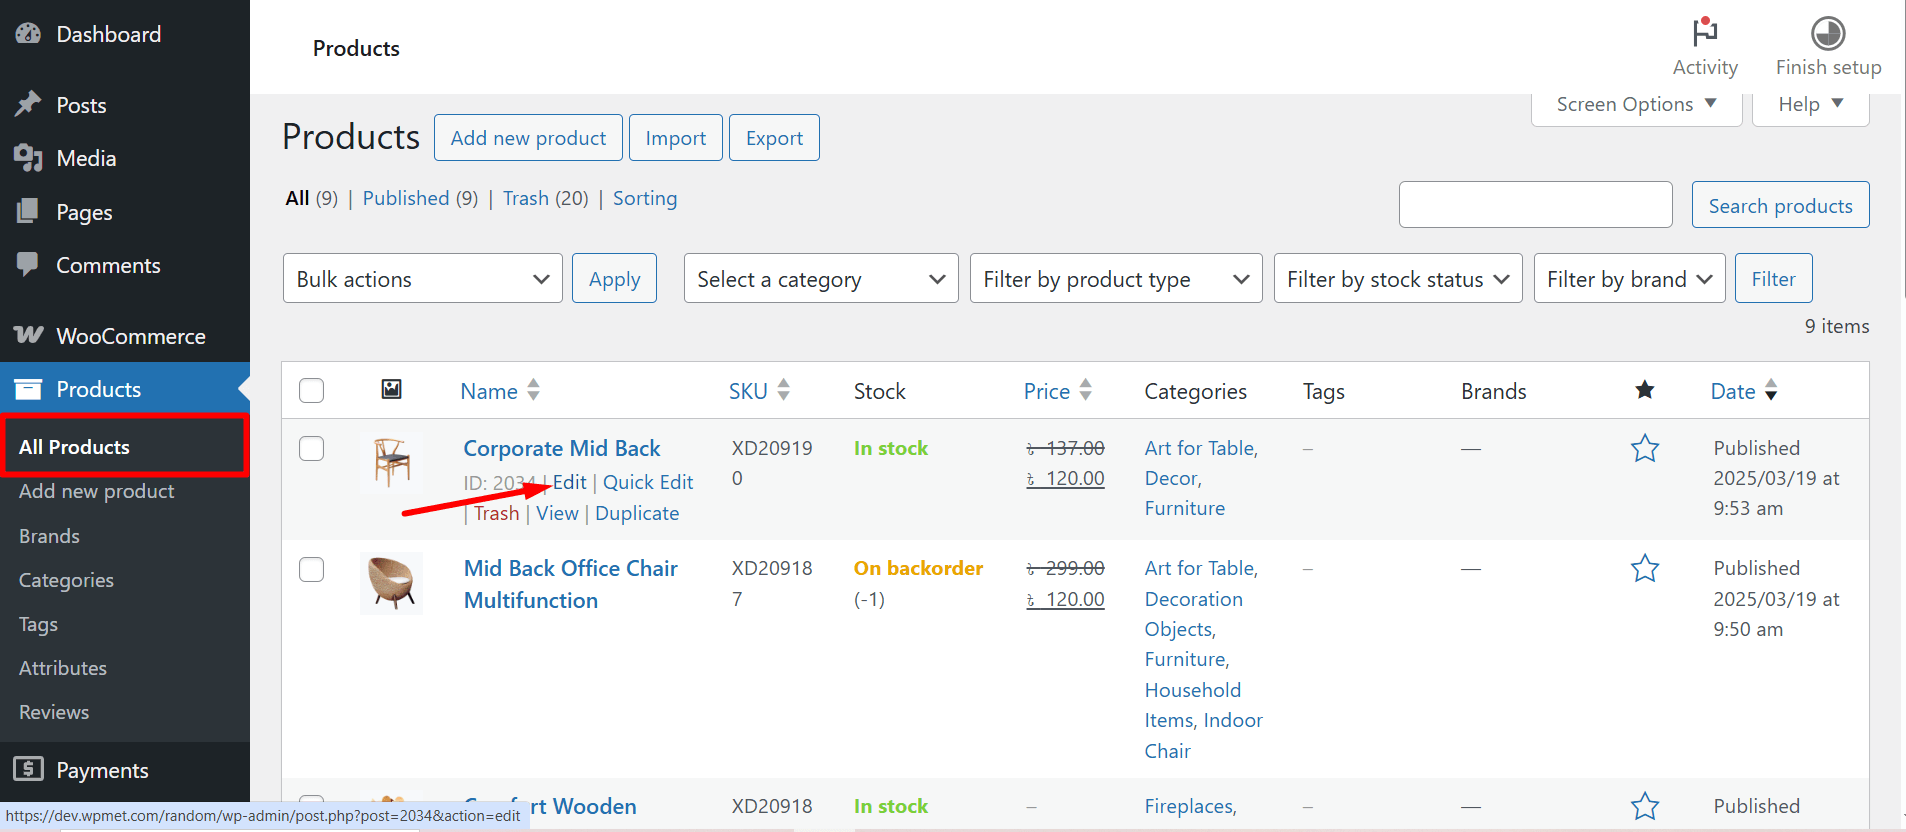
이제 부분 결제를 활성화하려는 상품으로 이동하세요.
WooCommerce >> Products >> All Products >> Select the Product >> Edit
그 후, 상품페이지에서 부분 결제 활성화 이 특정 제품에 대해. 부분지불 유형을 선택하세요.
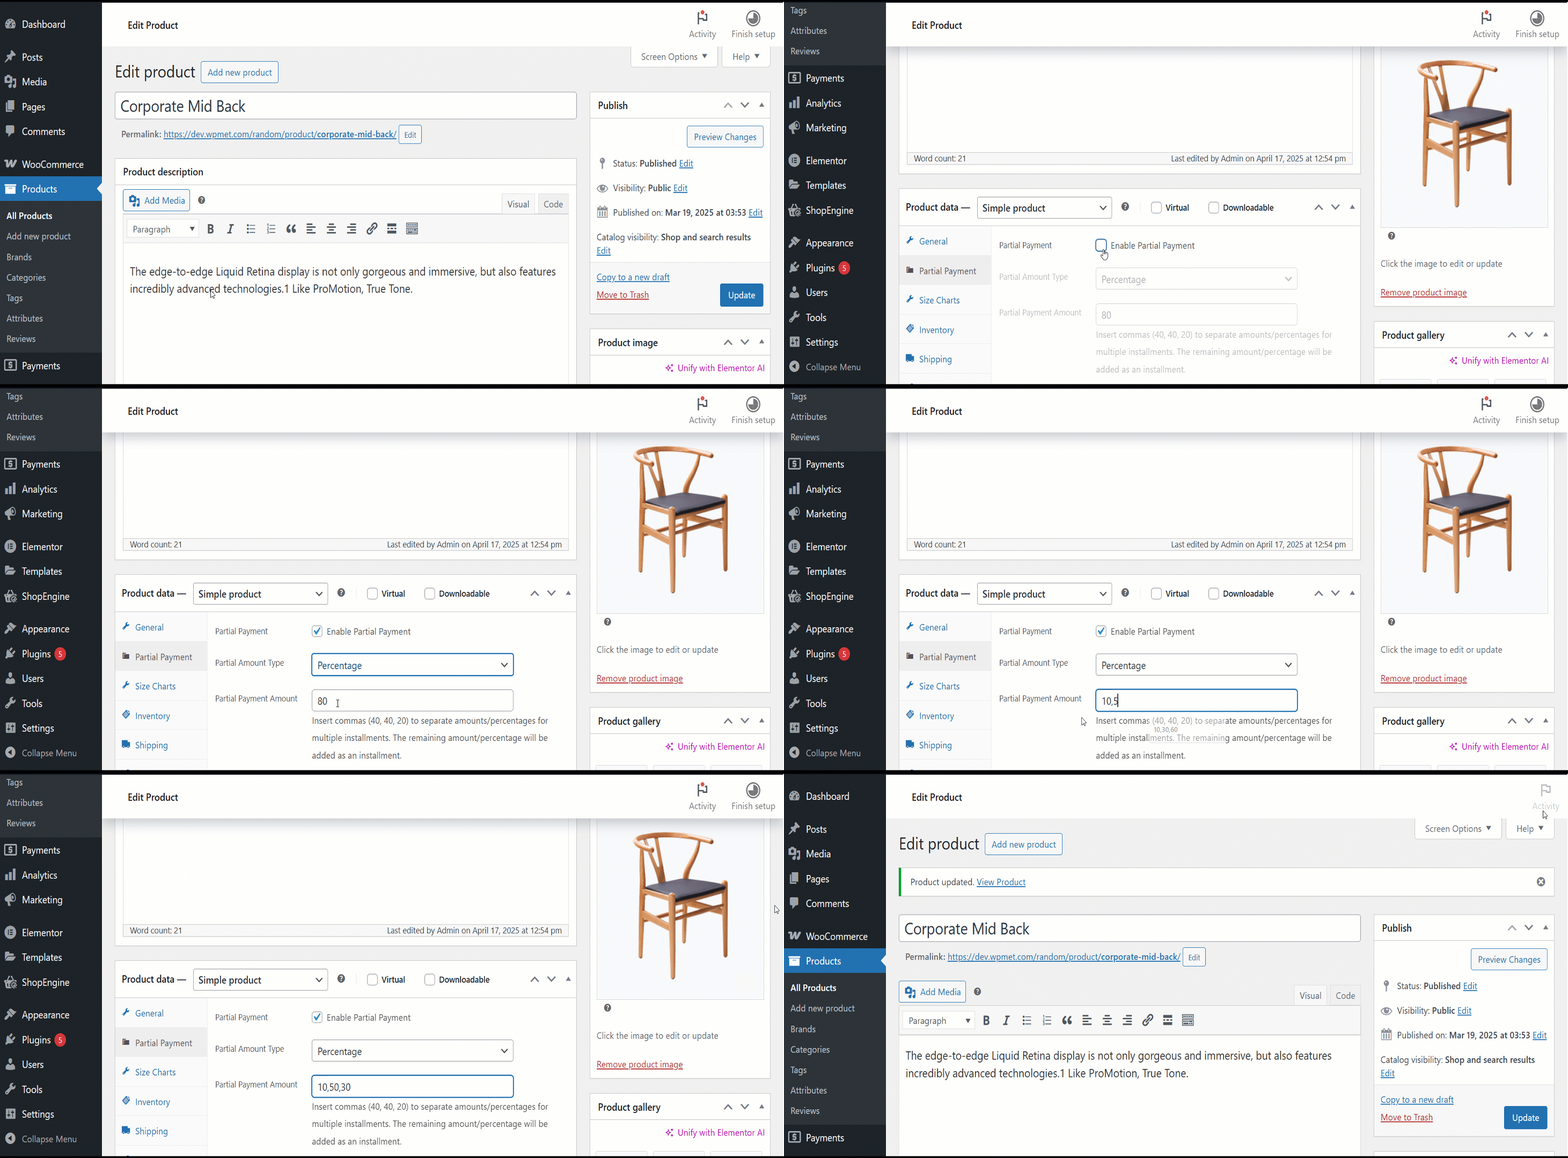
백분율을 사용하는 경우 백분율을 선택합니다. 제품을 업데이트하세요. 또는 고정 금액을 선택할 수도 있습니다.
3단계: 지불 기한을 위한 템플릿 만들기 #
지불 기한을 위한 템플릿을 생성하려면,
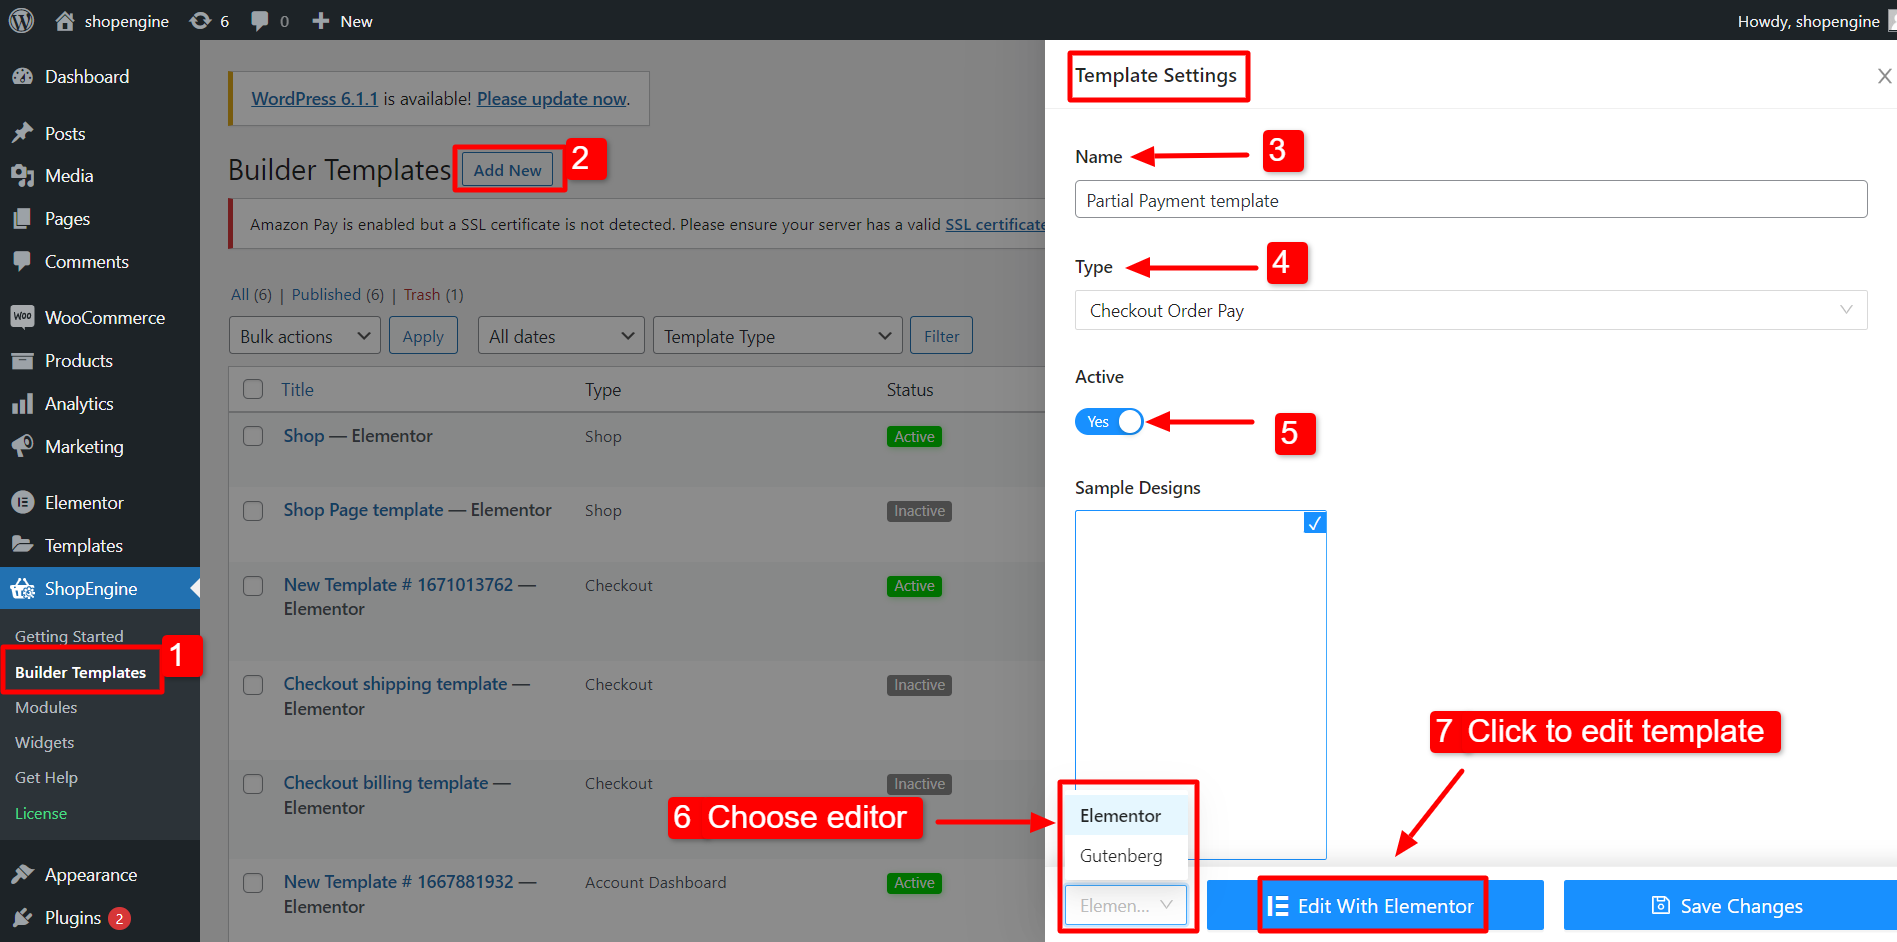
- 로 이동 ShopEngine >> 빌더 템플릿 WordPress 대시보드에서.
- “를 클릭하세요.새로운 걸 더하다” 버튼을 왼쪽 상단에 표시하세요.
- 템플릿 설정 창에서 템플릿을 입력하세요. 이름.
- 템플릿 설정 유형 대상: 결제 주문 결제.
- 활성화 템플릿.
- 편집기(이 경우 Elementor)를 선택합니다.
- 다음을 클릭하세요. Elementor로 편집.
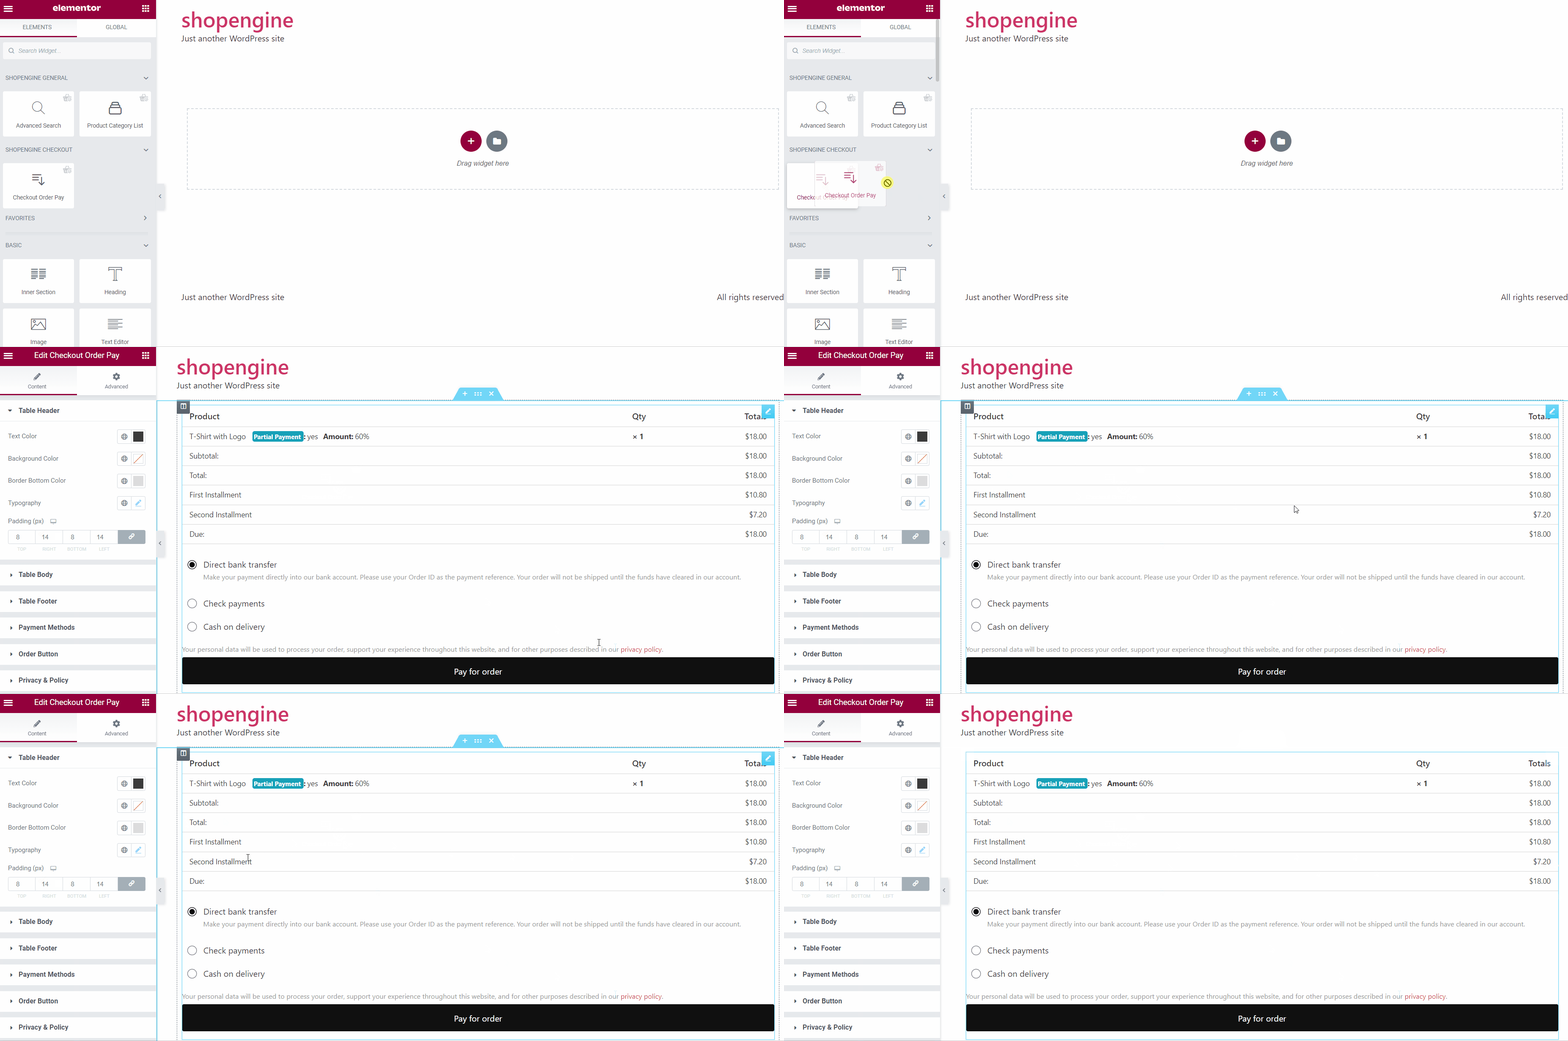
Elementor 편집기에서 Checkout Order Pay 위젯을 드래그 앤 드롭하세요. 디자인 영역으로 이동하면 이제 주문의 지불 기한 세부 정보를 볼 수 있습니다.
Step 4: Check how it work #
- 이제 제품 페이지로 이동합니다. 부분 결제와 전체 결제 옵션이 모두 표시됩니다.
- 선택하다 부분결제 그리고 장바구니에 추가 단추.
- 이제 상단에서 "장바구니 보기"를 클릭하고 부분 결제가 작동하는지 확인하세요.
- 자세한 내용은 결제 페이지에서도 확인하실 수 있습니다.
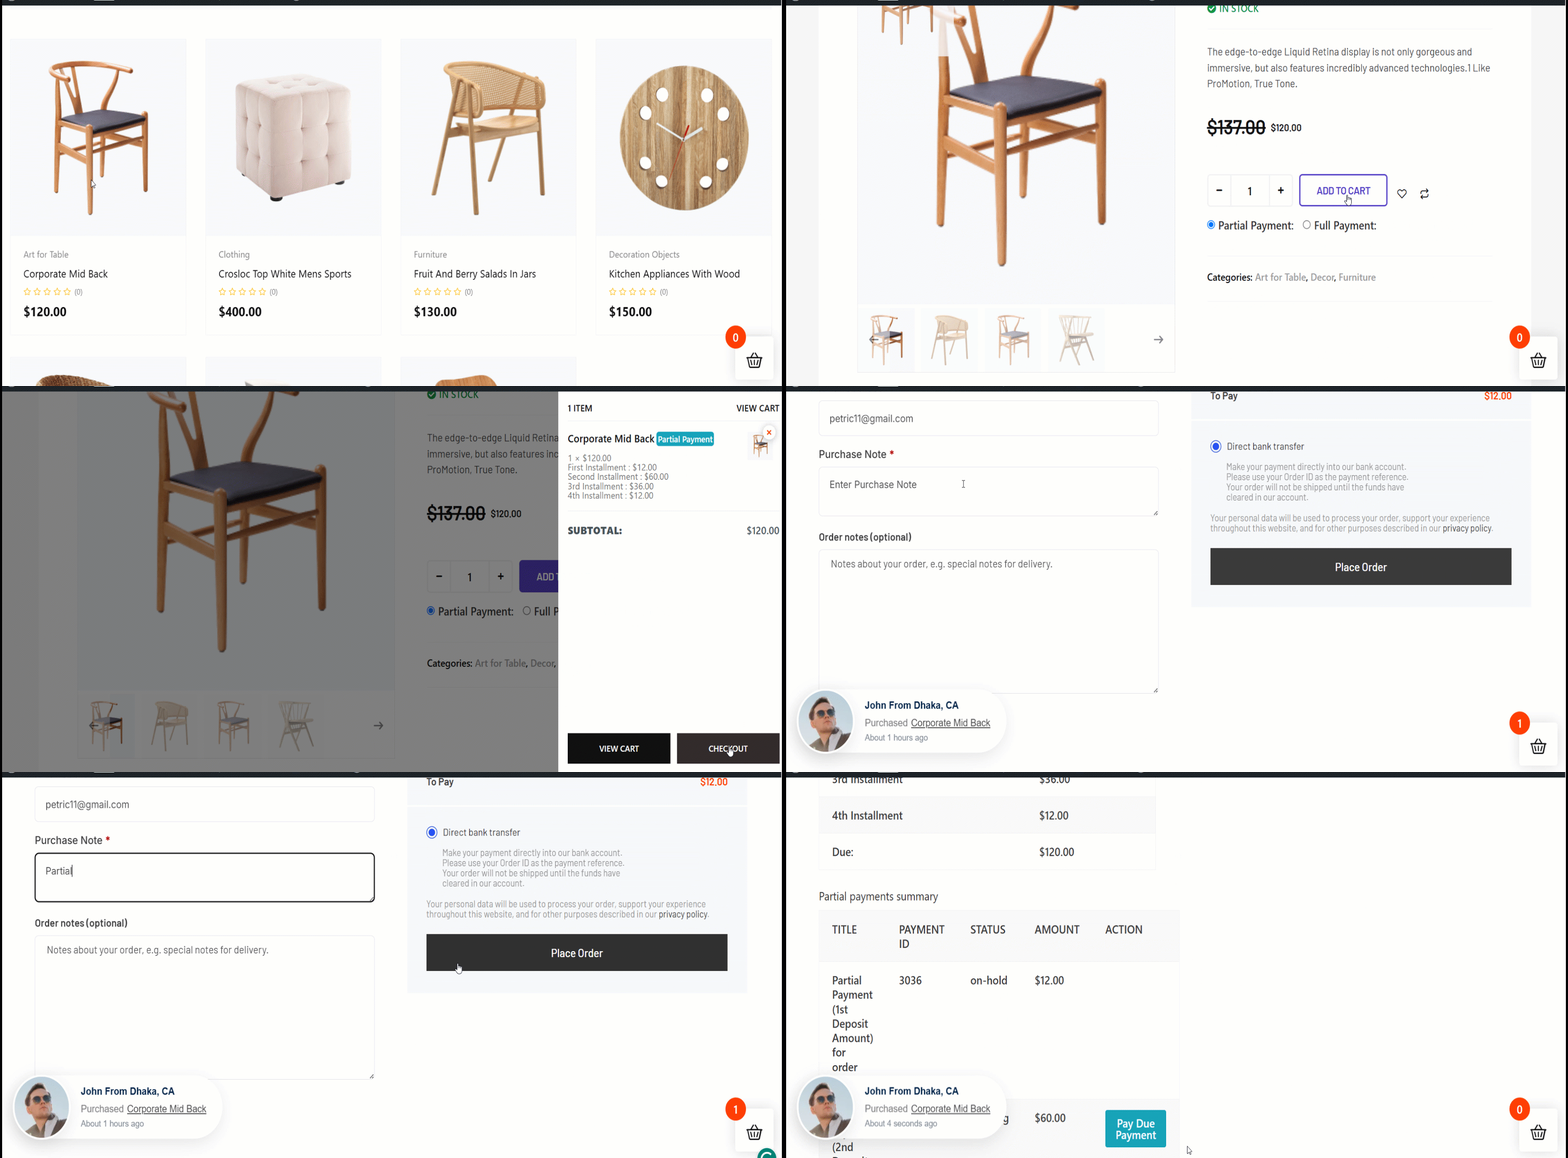
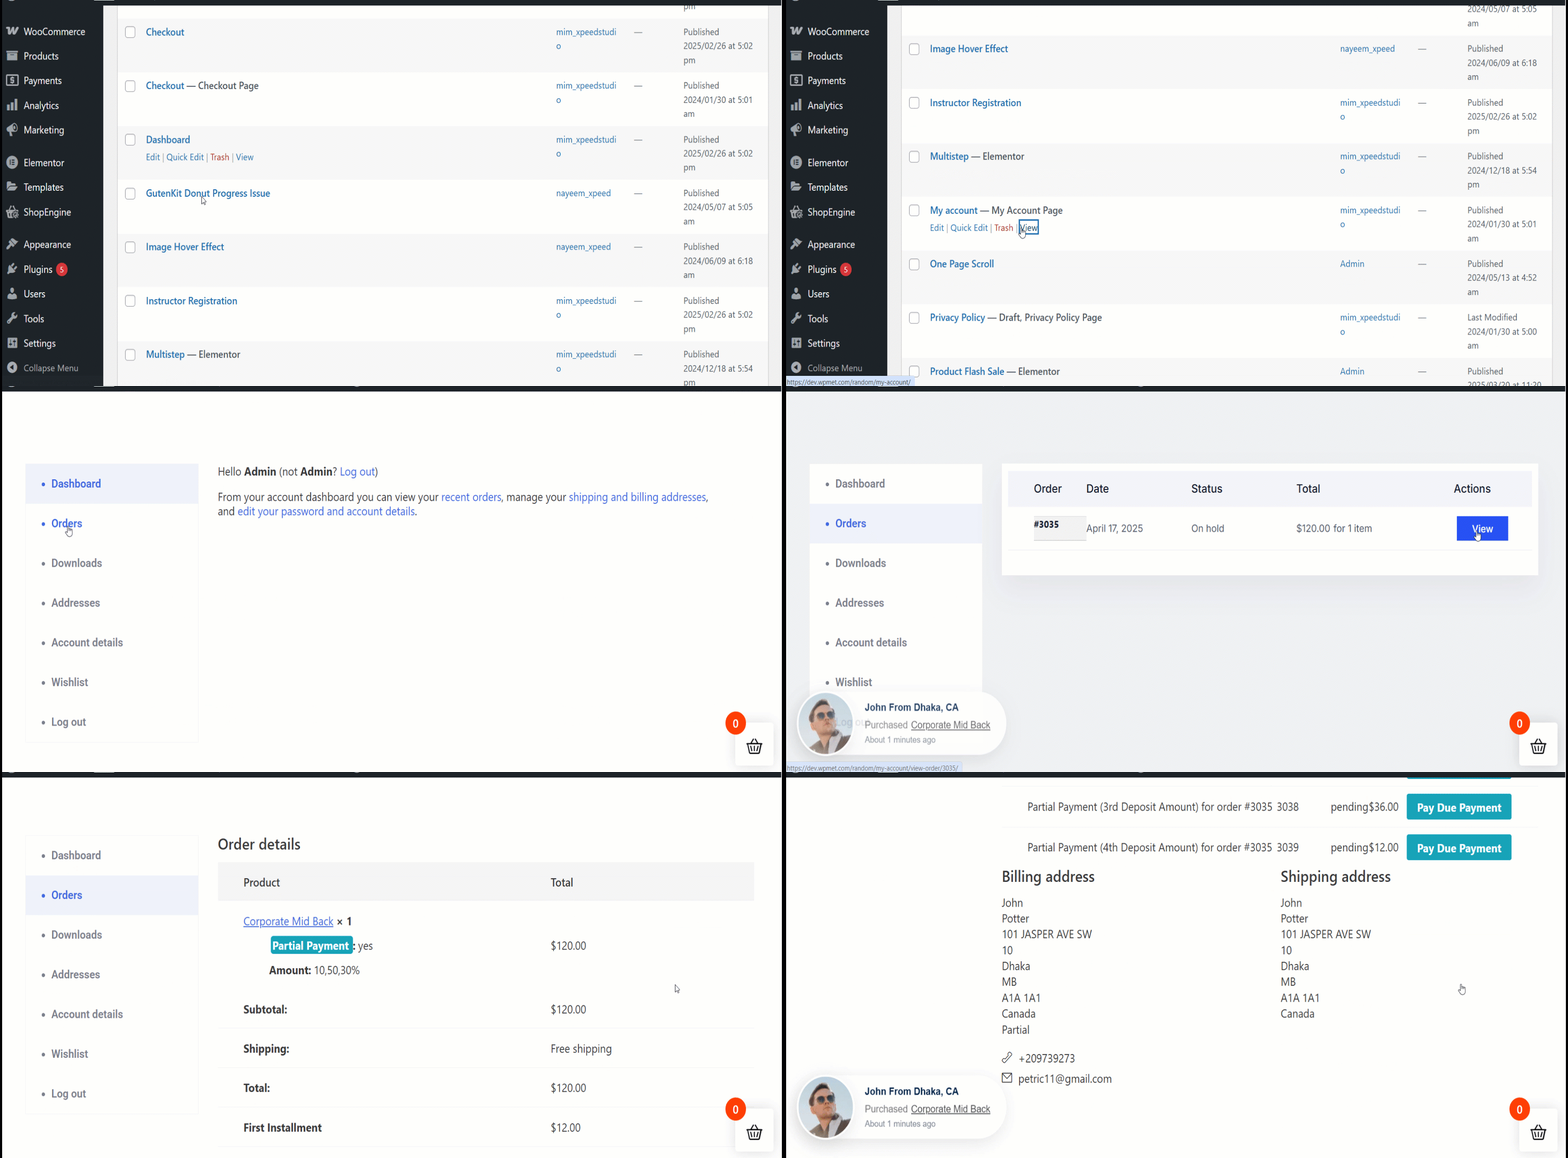
Once the user completes the first payment, he will see the due amount on the my account order details page.
사용자가 다음으로 이동할 때 내 계정 > 주문 > 보다 주문 세부정보를 확인하면 다음 옵션이 표시됩니다. 지불 기한 지불. 지불 기한을 지불하기로 선택한 경우 다음과 같은 두 번째 할부 옵션이 표시됩니다.
그러면 사용자는 이 페이지에서 미결제 금액을 지불할 수 있습니다.