




 Japanese
  English
  German
  Spanish
  Italian
  French
  Danish
  Portuguese
  Swedish
  Polish
  Korean
WooCommerce のカート ページのカスタマイズには、カート ページの放棄など、いくつかの利点がありますが、これをスムーズに行うのは簡単ではありません。
カート ページでは、チェックアウトするかカートを放棄するかを最終決定します。購入者にカートを放棄してほしくないですよね?ここで、WooCommerce カート ページをカスタマイズする必要があります。
このブログでは、コーディングをせずに WooCommerce カート ページをカスタマイズする方法についてのステップバイステップ ガイドを紹介します。
始めましょう…
Quick Overview:
This tutorial explains the process and importance of customizing WooCommerce Cart Page design.
Tools Used: WooCommerce, Elementor, and ShopEngine.
In this standard Cart Page, we have included:
✅ Product Cart Table.
✅ Total order amount.
✅ Shipping Method.
✅ Coupon Code filed.
✅ “Return To Shop” button.
✅ Upgrade Cart option.
✅ Cross-sell products.
✅ Deal Product promotion.
✅ “Proceed To Checkout” button
In this process, first step is to install the plugins, then create the cart page, and final step is to customize page design.
デフォルトの WooCommerce カート ページはどのように見えるか
WooCommerce provides a very basic layout of a Cart page. Although different themes add styles to the WooCommerce cart page, it still kinda looks the same.
WooCommerce カート ページのデザインの一般的な要素は次のとおりです (含まれますが、これらに限定されません)。
| 🔹商品のサムネイルまたは画像 🔹商品名 🔹商品価格 🔹数量セレクターまたは入力フィールド 🔹アイテムを削除ボタン 🔹各項目の小計 🔹注文合計小計 🔹クーポンコードフィールド(該当する場合) 🔹カート合計の概要 (税金、配送料、割引など) | 🔹送料の見積もりとオプション 🔹クロスセルまたはアップセル製品の提案 🔹カートアイテムの小計 🔹カート商品の合計金額(税・送料込み) 🔹数量更新ボタンまたはリンク 🔹商品の属性 (サイズ、色など、該当する場合) 🔹配送先住所と配送方法の選択 🔹購入手続きへ進むボタン |
WooCommerce カート ページを編集し、必要に応じて要素をカスタマイズできます。その前に、デフォルトの WooCommerce カート ページがさまざまなテーマでどのように表示されるかを見てみましょう。
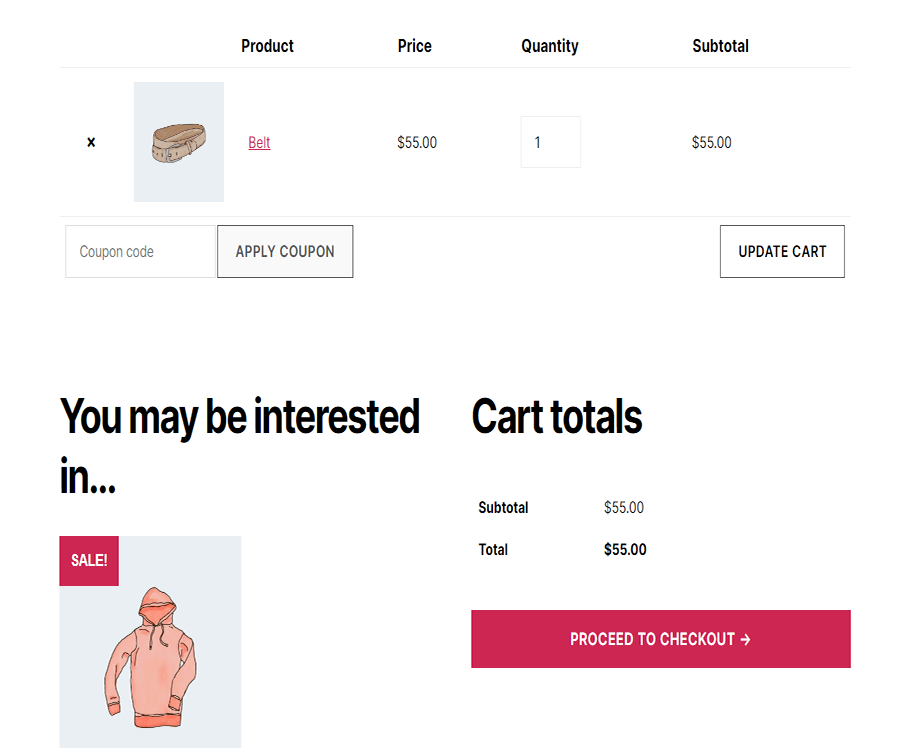
Here is how the WooCommerce cart page design looks on the WordPress Twenty Twenty theme:
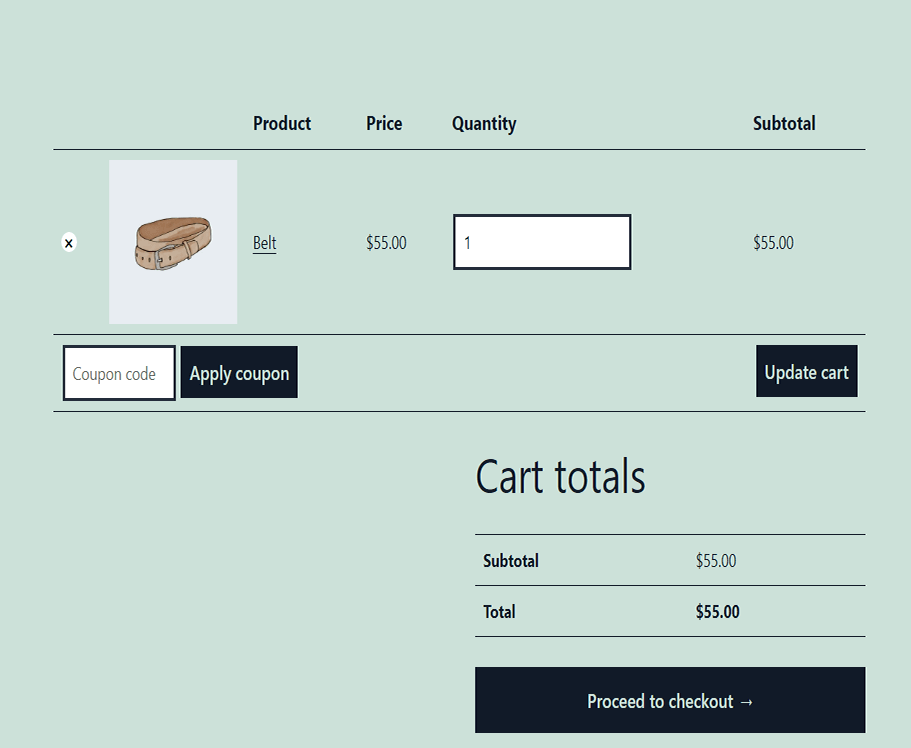
Here is how the cart page design looks on the Twenty Twenty One theme of WordPress:
のような人気のあるElementorテーマでも、 こんにちはエレメンター 非常に基本的な WooCommerce カート ページのデザインが、同じ古いレイアウトで提供されます。
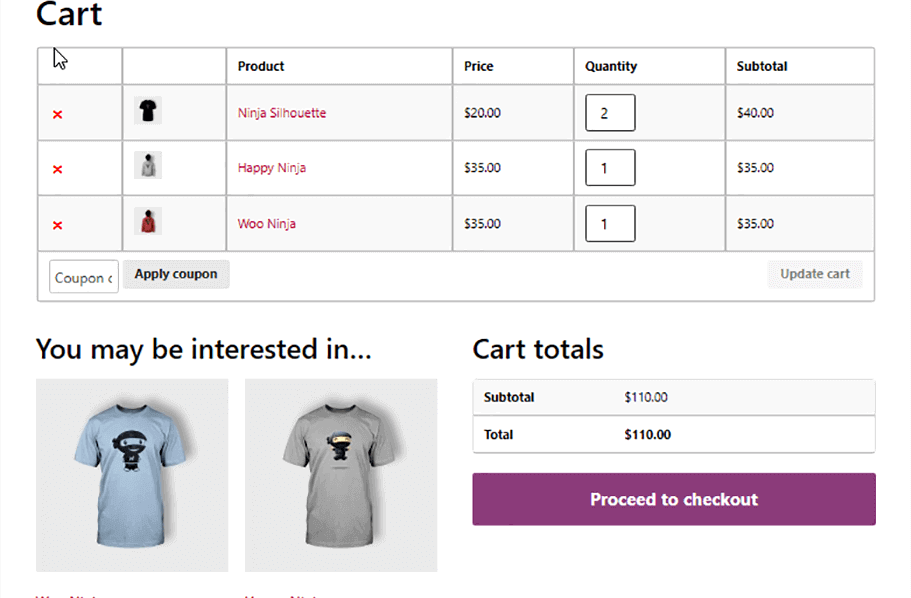
上記のカート ページはすべて同じレイアウトであり、派手なものや特別なものは何も提供していないことに同意していただけると思います。
WooCommerce カート ページをカスタマイズする理由
BuiltWith の 2023 年 11 月のレポートによると、660 万以上のライブ Web サイトが WoCommerce を使用しています。
WooCommerce を使用すると、カート ページなどのテンプレートを使用して、すぐに使用できる完全に機能する e コマース Web サイトを構築できます。これらの Web サイトの多くは、カートやその他のページに WooCommerce のデフォルトのテンプレートを使用しています。
ただし、Web サイトのカート ページが他の Web サイトと似ていると、購入者が離れてしまう可能性があるため、望ましくありません。群衆の中で目立つためには、WooCommerce カート ページの編集または WooCommerce カートのカスタマイズが役に立ちます。
周囲にあるのも事実です 70%の人々が放棄する ショッピングカートに入れてチェックアウトを続行しないでください。これは、WooCommerce カート ページをカスタマイズすることがいかに重要であるかを示しています。
Use WooCommerce abandoned cart plugins to recover lost sales by automatically reminding customers to complete their purchases.
そして、人は他の人とは異なり、群衆の中で目立つものに惹かれることは周知の事実です。
したがって、カート ページが群衆の中で埋もれないように、むしろ目立つようにカスタマイズして、より多くの注文を獲得できるようにしてください。
さて、問題は、目立つカート ページをどのように作成するかということです。Woocommerce カート ページ デザインを作成するには 2 つの方法があります。
- Editing the WooCommerce files (requires you to know to code)
- Use a drag-and-drop plugin
カスタム WooCommerce カート ページを取得するためにコードを編集することが得策ではない理由
コードを編集して目的のカート ページを取得することもできますが、コードを作成しない人にはお勧めできません。 Web サイトを構築するために WooCommerce のようなすぐに使用できるプラットフォームを選択したということは、何も手作業でコーディングするつもりはないと思います。
初心者プログラマーや非コーダーが WooCommerce カート ページのデザイン目的でデフォルト コードの編集を避けるべき理由をいくつか紹介します。
- 専門のプログラマーであり、HTML、CSS、JavaScript、PHP をプロのように知っている必要があります。
- コードが効率的に編集および最適化されていない場合、Web サイトの速度が低下する可能性があります。
- WooCommerce テーマを変更するたびにコードを変更する必要があります
- WooCommerce が新しいアップデートを行った場合、コードを新しいバージョンの WooCommerce と互換性を持たせるために新たな変更を加える必要があります。
- 子テーマを作成しないと、WooCommerce が更新されるときにすべてのコードが失われる可能性もあります。
さらに、WordPress や WooCommerce などのプラットフォームを使用している場合は、 そもそもコーディングを避けるのであれば、カート ページを編集するためだけにコーディングを学ぶ必要はありません。
心配ない。コードを書かずにカート ページをスムーズにカスタム デザインするために使用できる別のプロセスがあります。一行もいない。約束!
コーディングの知識がなくても WooCommerce カート ページを編集する方法を見てみましょう。
ドラッグ アンド ドロップ プラグインを使用して WooCommerce カート ページをカスタマイズする方法
Now you can design a cart page with easy drag-and-drop technology. Thanks to the WooCommerce PageBuilder plugin ShopEngine.
沢山あります top WordPress shopping cart plugins for WooCommerce, ShopEngine is the ultimate WooCommerce builder with premade templates, and widgets to custom build your WooCommerce pages and modules with useful eCommerce functionalities. With this plugin, you get complete control over the design of your WooCommerce pages including the Cart page.
ShopEngine では既製のものが提供されますが、 カートテンプレートでは、カート ページを最初から作成することも、WooCommerce カートのカスタマイズを行うこともできます。このブログでは、WooCommerce カート ページを編集して新しいカート ページを最初から作成する方法を説明します。
We recommend to create a custom shop page to showcase your products in the best style.
ステップ #1: Elementor と ShopEngine をインストールする
WooCommerce でカート ページをカスタマイズするプロセスを開始するには、2 つのプラグインが必要です
ShopEngine は Elementor の WooCommerce ページビルダーであるため、 エレメンターが必要です、 必ずインストールしてください エレメンター 初め。
ステップ #2: カート ページ テンプレートを作成する
両方のプラグインをインストールしたら、カート テンプレートを作成します。カート ページ テンプレートを作成するには:
- に行く: ダッシュボード => ShopEngine => ビルダーテンプレート
- クリック の上 新しく追加する テンプレート設定ウィンドウを開く
- 与える テンプレート名 あなたの好みの
- 選ぶ カートとして入力 ドロップダウンから
- オンにする 既存のカート ページをオーバーライドするデフォルト設定オプション
- の下の空白のオプションを選択します サンプルデザイン
- クリック 変更内容を保存 更新する
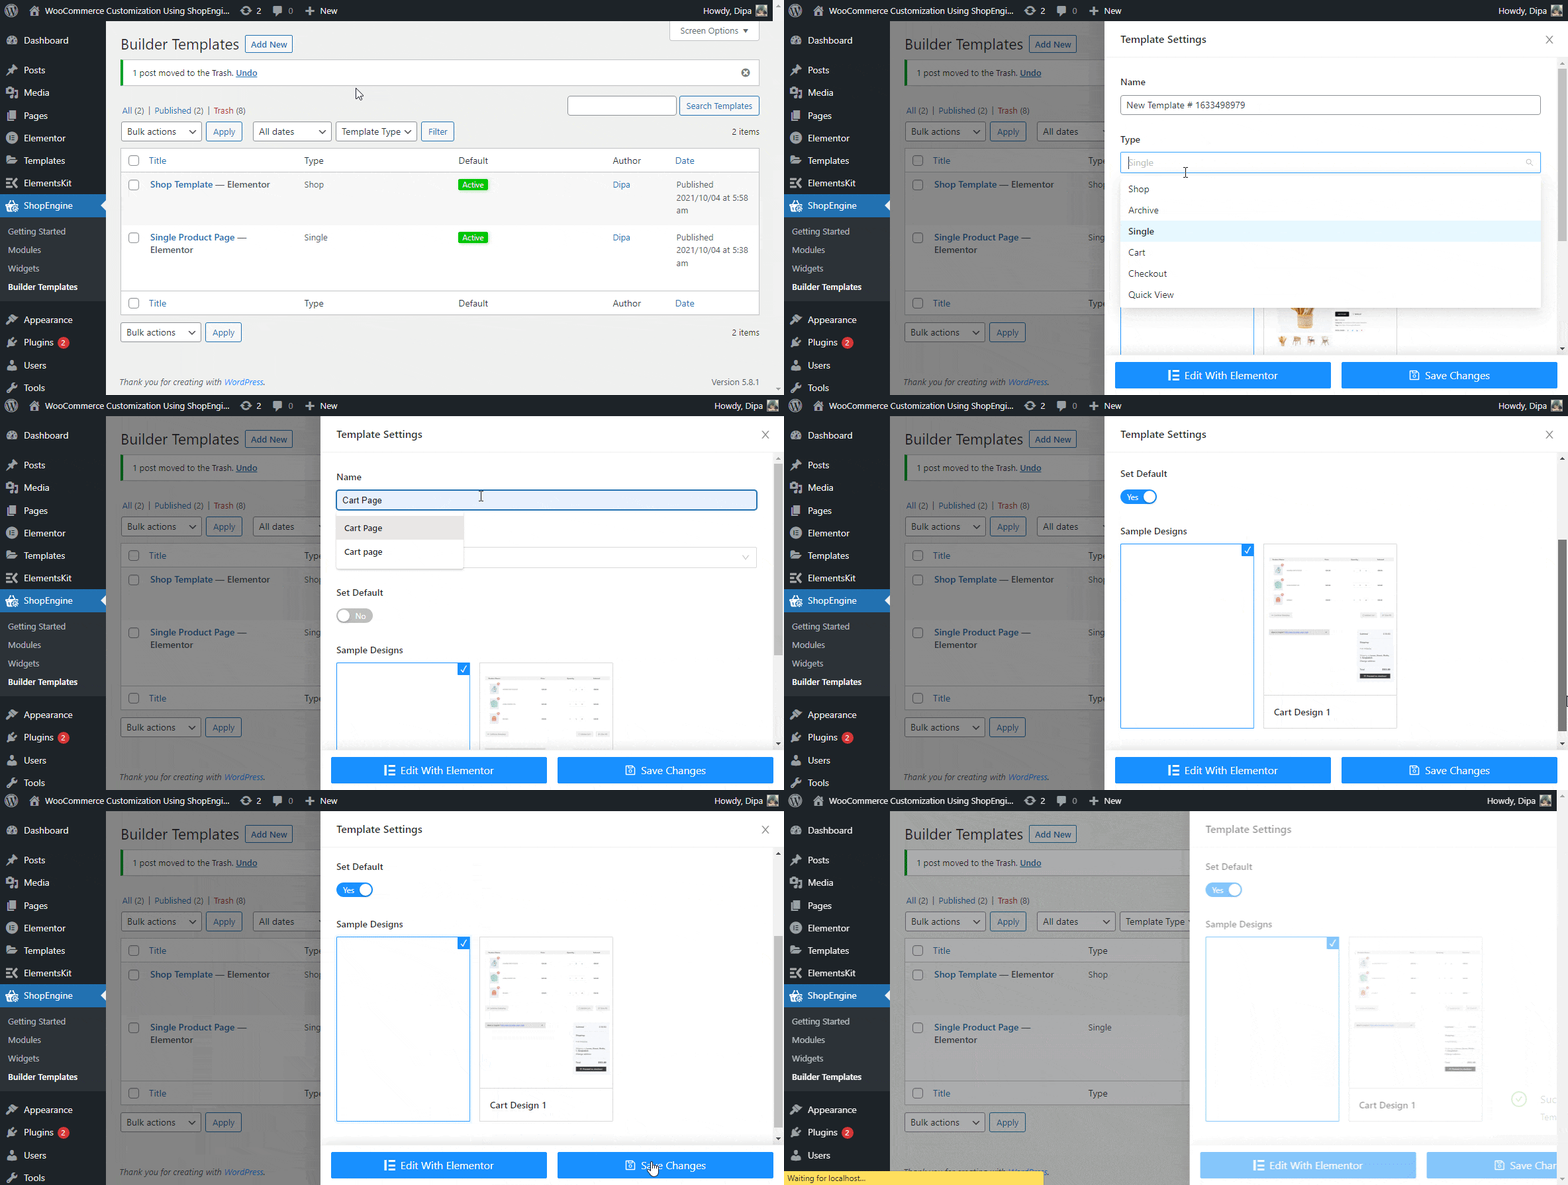
注記: を取得するには すぐに使えるカートテンプレート、テンプレートの作成中に「サンプル デザイン 1」オプションを選択します。事前に作成されたテンプレートのすべての要素を編集することもできます。最初から作成するので空白を選択しました
ステップ #3: レイアウト/構造の選択
今度はレイアウトを選択します。始めるには
- に行く ShopEngine => ビルダーモジュール
- カートテンプレートにカーソルを合わせます リストから
- クリック Elementorで編集する
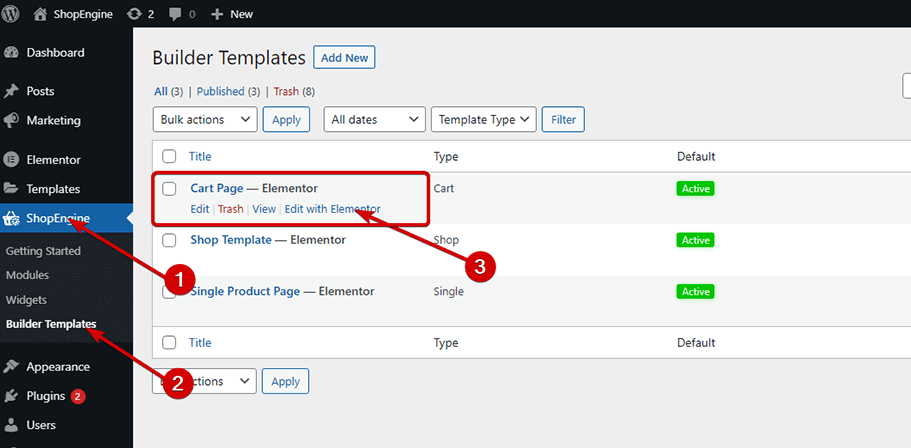
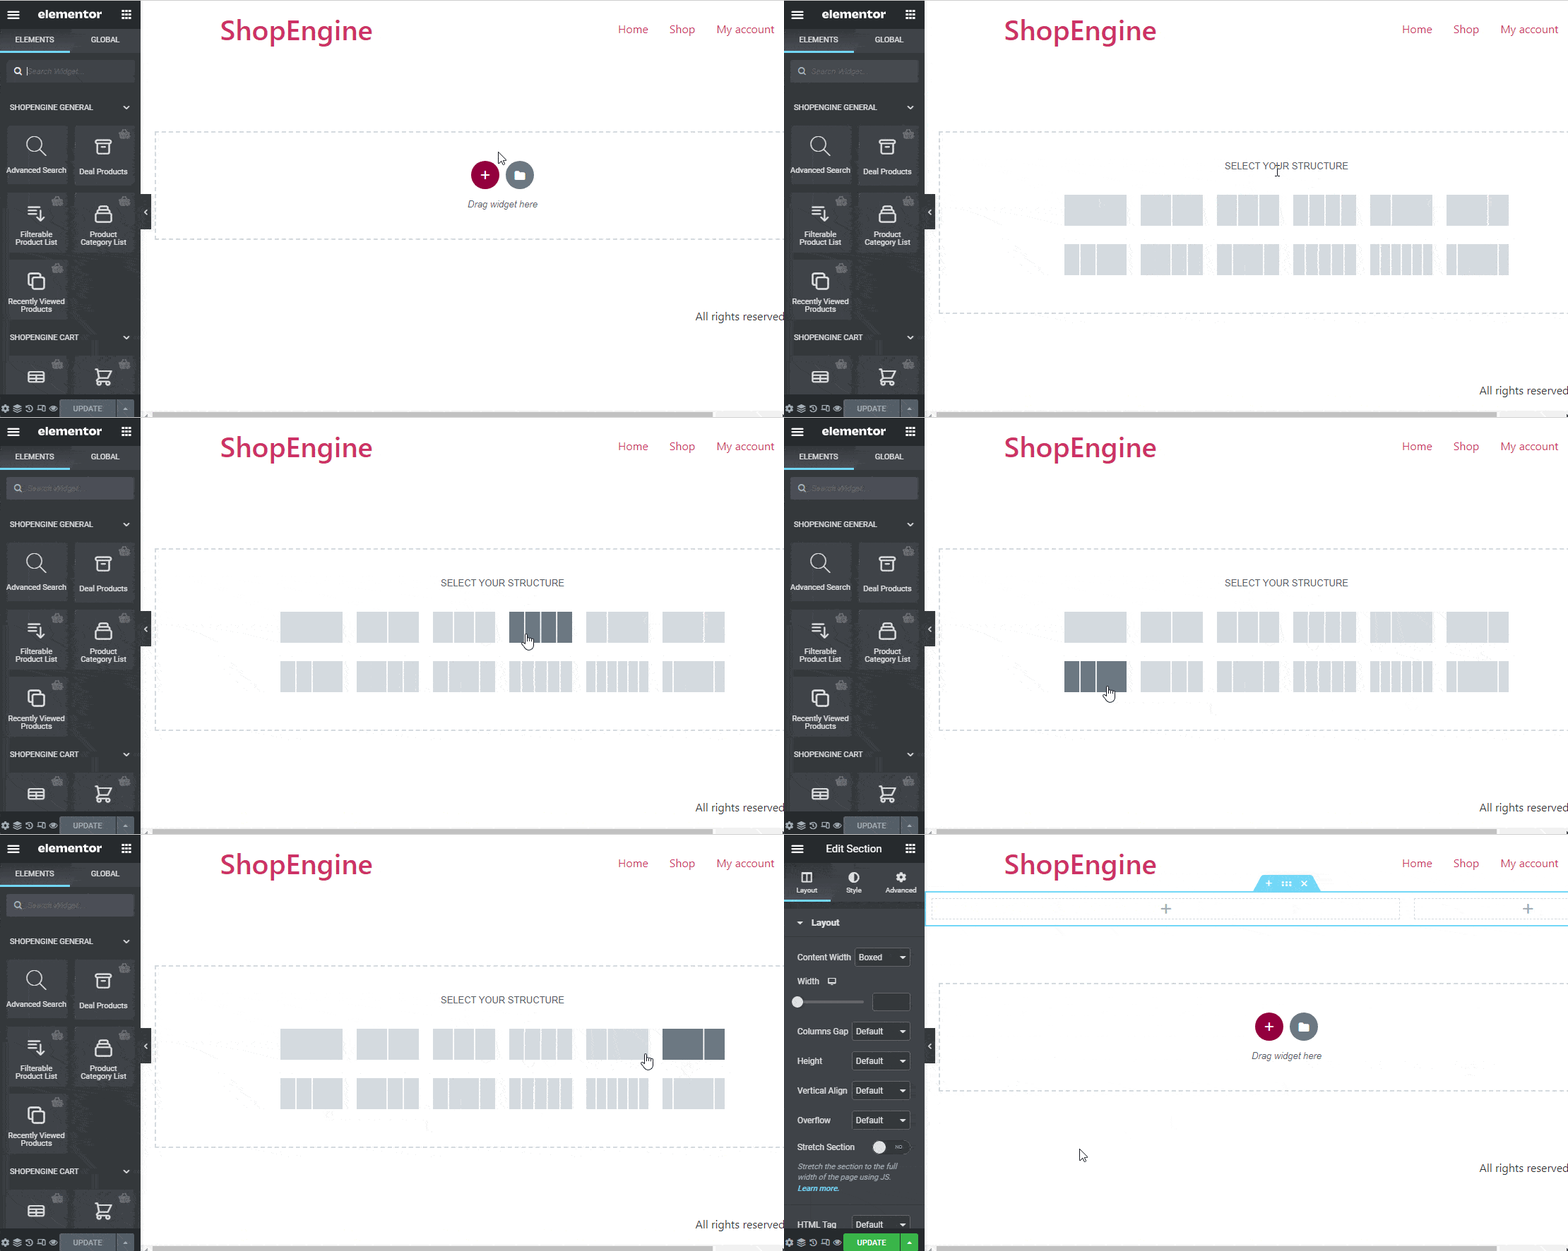
- Elementor Editor が開いたら クリック 新しいセクションの追加 (+) アイコン
- 次に、 構造・レイアウト あなたが好きです
ステップ #4: ShopEngine ウィジェットを使用してカート ページをデザインする
ShopEngine provides five widgets exclusively to design a WooCommerce Cart Template. Along with Cart Template widgets, you can also use the クーポンフォーム カート ページを構築するためのウィジェットと 5 つ以上の一般的なウィジェット。
このブログでは次のウィジェットを使用します。
- カートテーブル: カート ウィジェットには、カート内のすべての製品が価格、数量、小計を含む表形式で表示されます。顧客はワンクリックで製品数量を更新したり、カートをクリアしたりできます.
- カート合計: このウィジェットには、利用可能なすべての配送方法と注文合計が表示されます。
- ショップに戻る: このウィジェットには、ショップ ページに戻るリンクを含むボタンが表示されます。
- チェックアウトクーポンフォーム: お客様はこのウィジェットを使用して割引クーポンを使用できます.
- 取引商品: このウィジェットを使用すると、セール スケジュール期間を表示するカウントダウン タイマーを使用して、カート ページでセール商品を紹介できます。 ShopEngineの汎用ウィジェットです。
- 抱き合わせ販売: クロスセルでは、すべてのクロスセル製品をカート ページに魅力的に表示します。
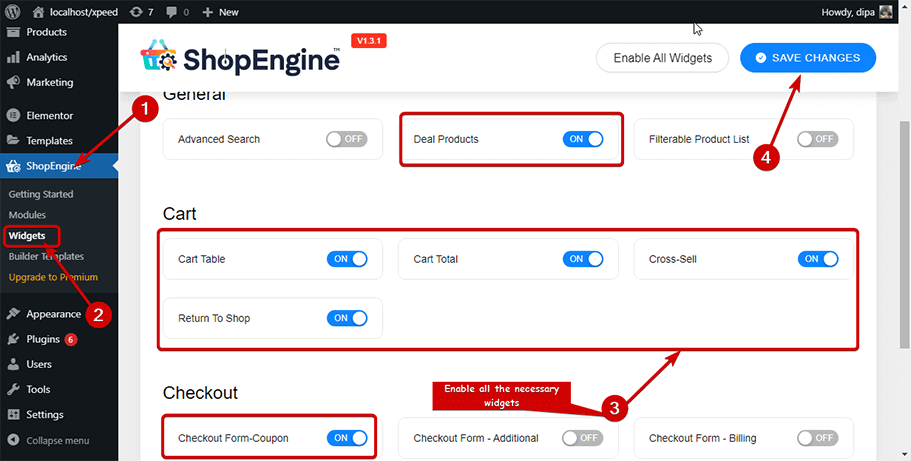
まず、次のことを行う必要があります。 ウィジェットをオンにする カートページで使用したい。スイッチをつける
- に行く 管理者ダッシュボード => ショップエンジン => ウィジェット。
- スクロールして使用したいウィジェットを検索します
- 有効にする 使用したいウィジェット
- クリック 変更内容を保存 ページの上部にある
Now it’s time to drag and drop the WooCommerce cart widgets into your layout. Go back to the Cart page editor mode:
- 検索 ウィジェット用
- ドラッグアンドドロップ the WooCommerce cart widgets (one by one)
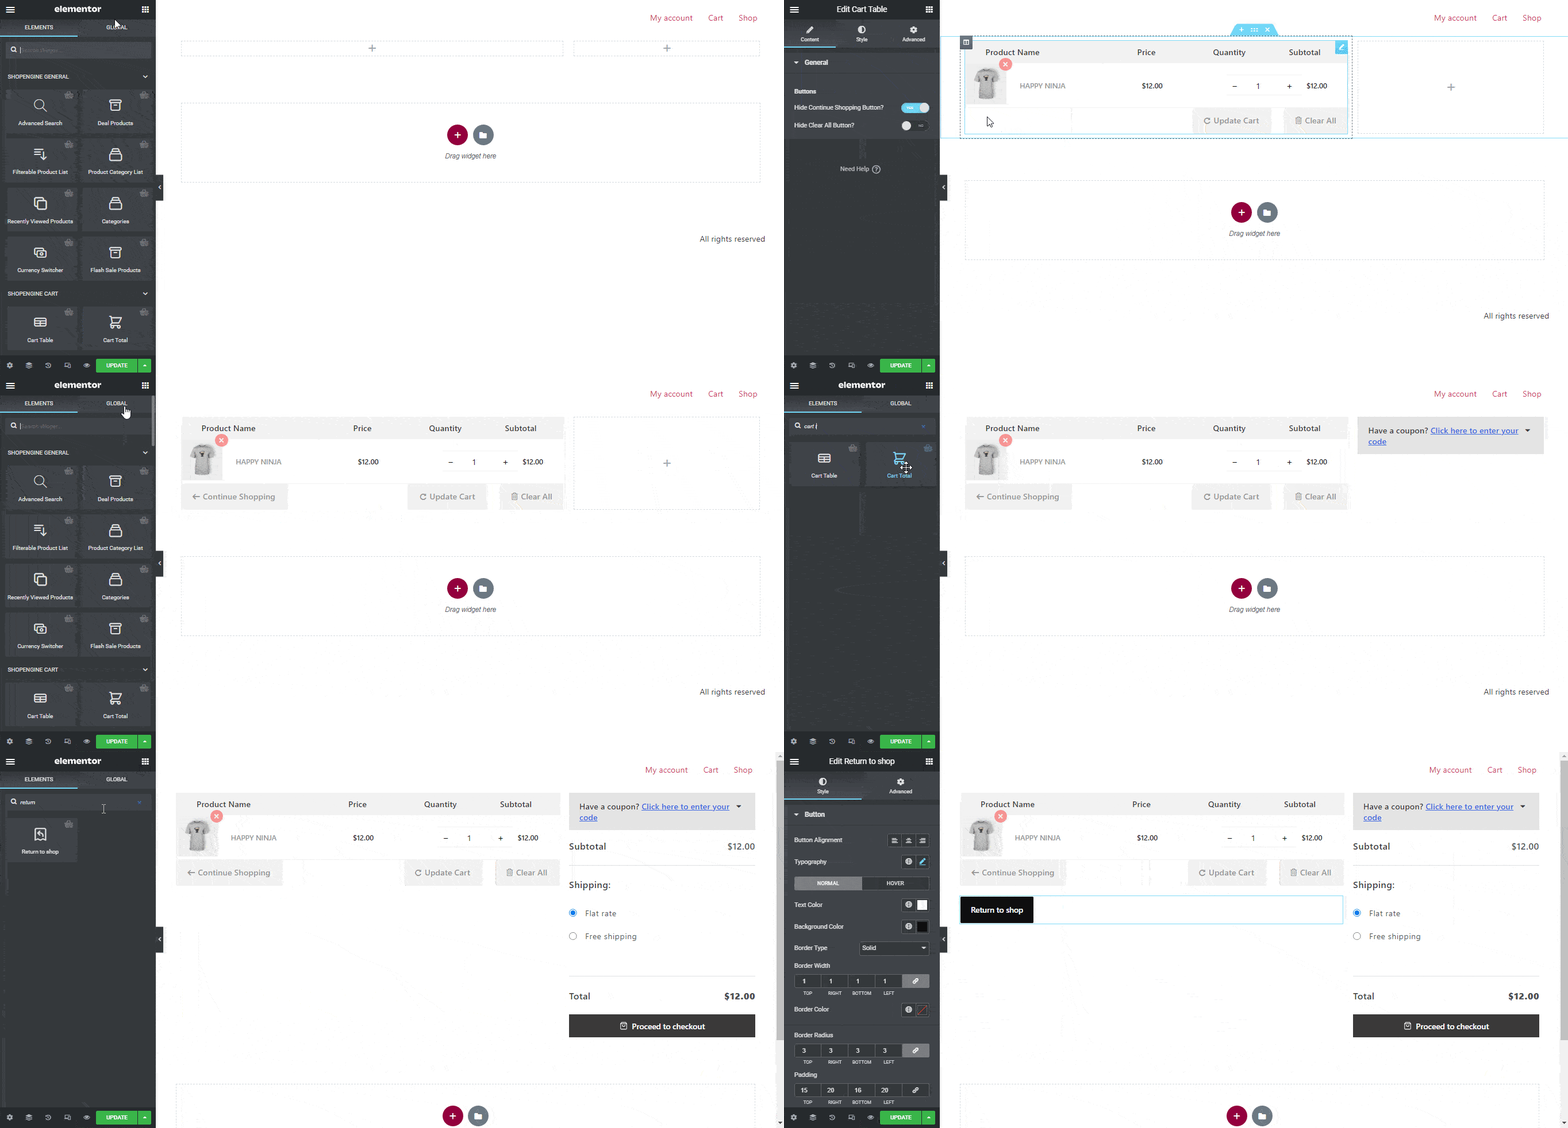
注記: 「買い物を続ける」ボタンと「すべて隠す」ボタンを非表示にすることができます。
As ShopEngine is totally compatible with Elementor, you can use multiple layouts on the same page. For the next part, let’s use a different layout. To do so, I am going to add a new section with a different structure and drag and drop Cross-sell and Deal products widgets.
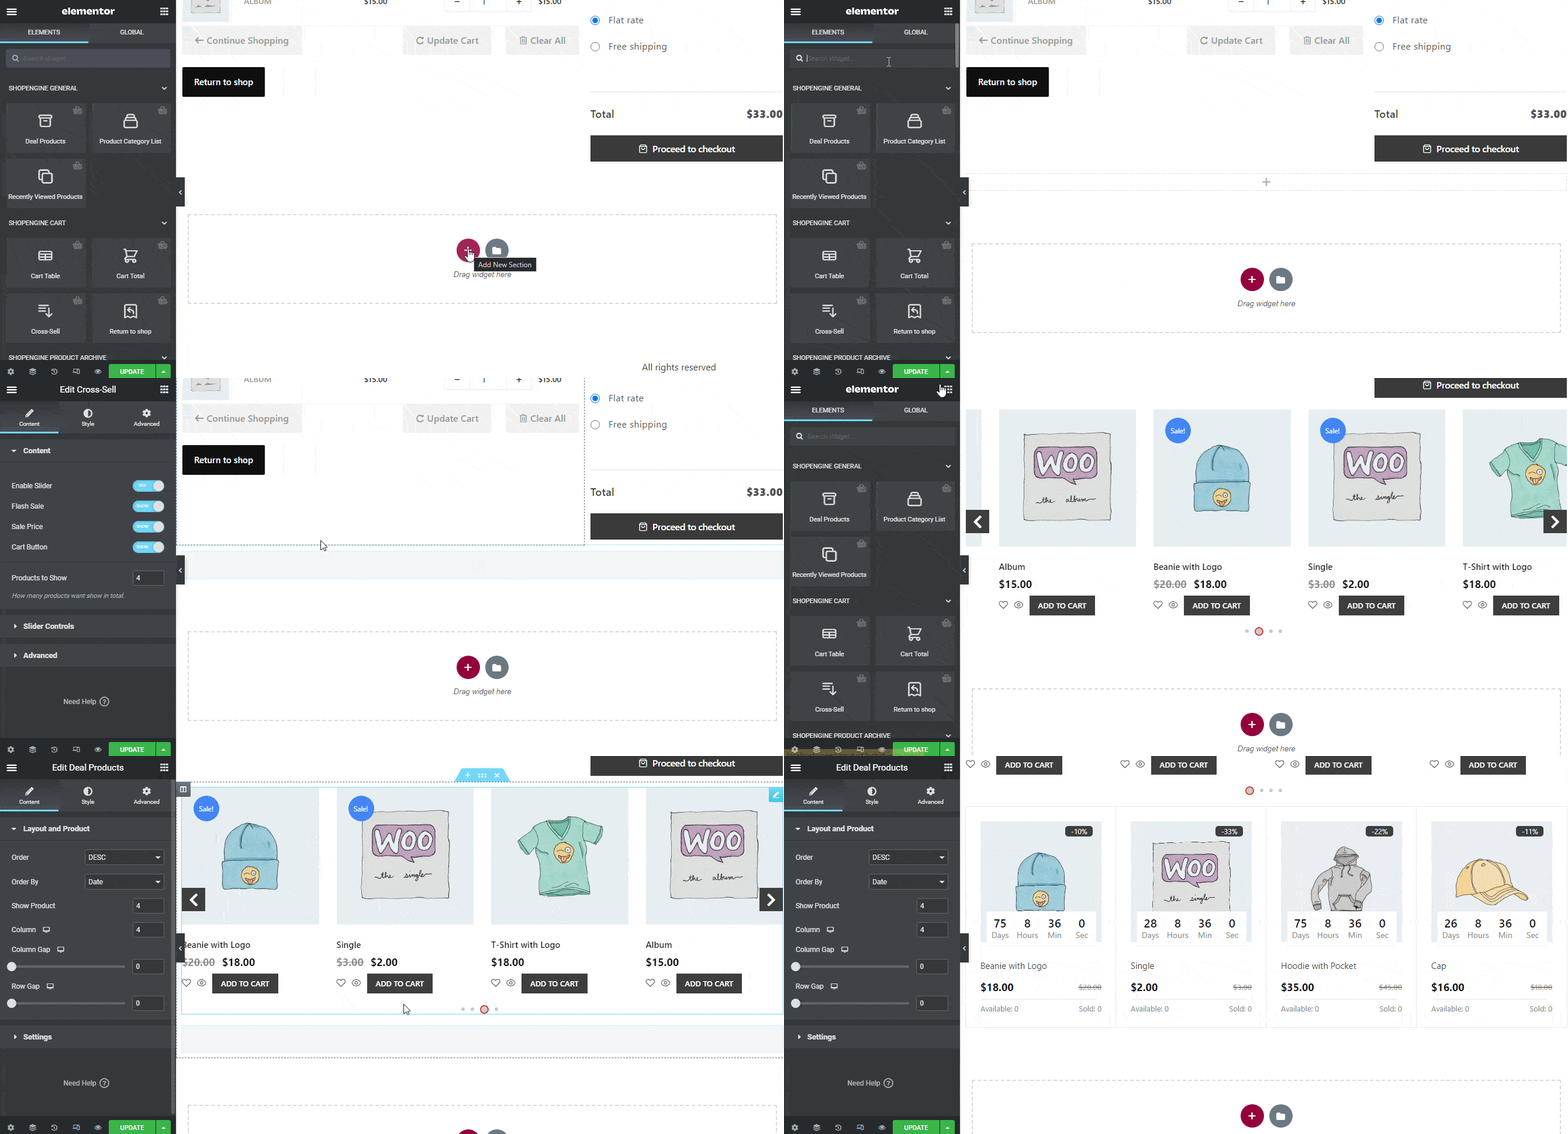
注記: 必要がある クロスセル商品を追加する and set products on sale with schedules from the admin dashboard under product settings for Cross-sell and Deal products to show up on the front end.
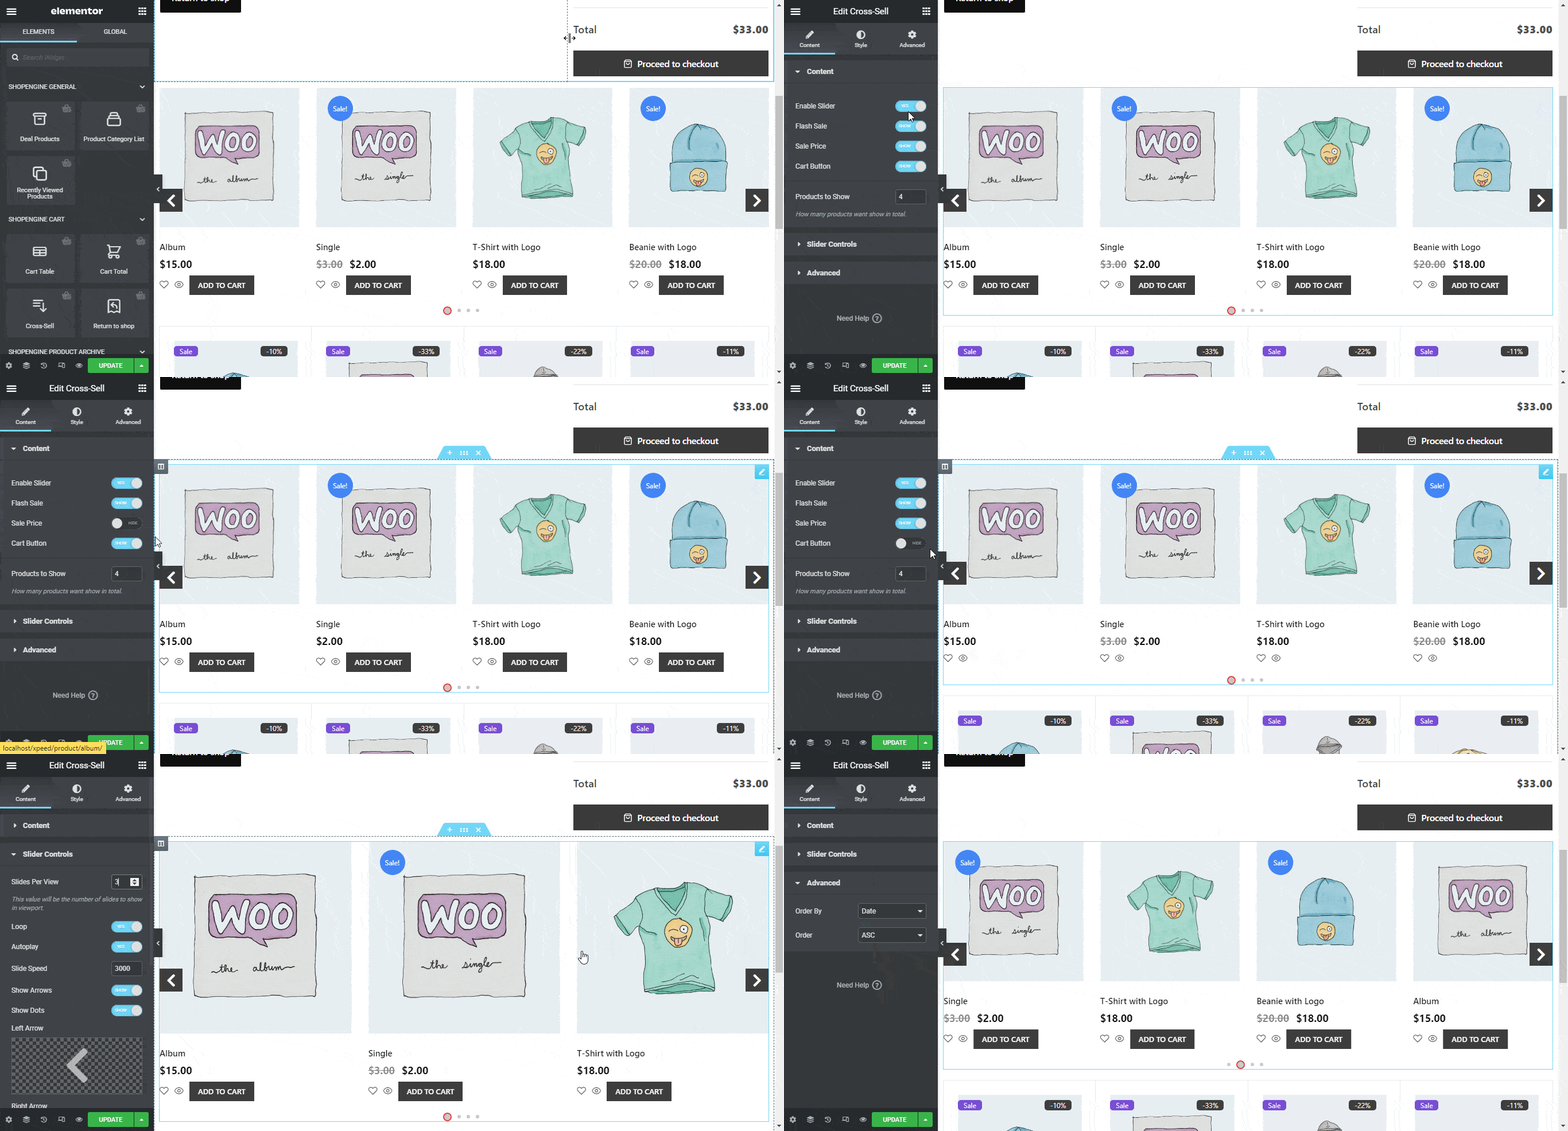
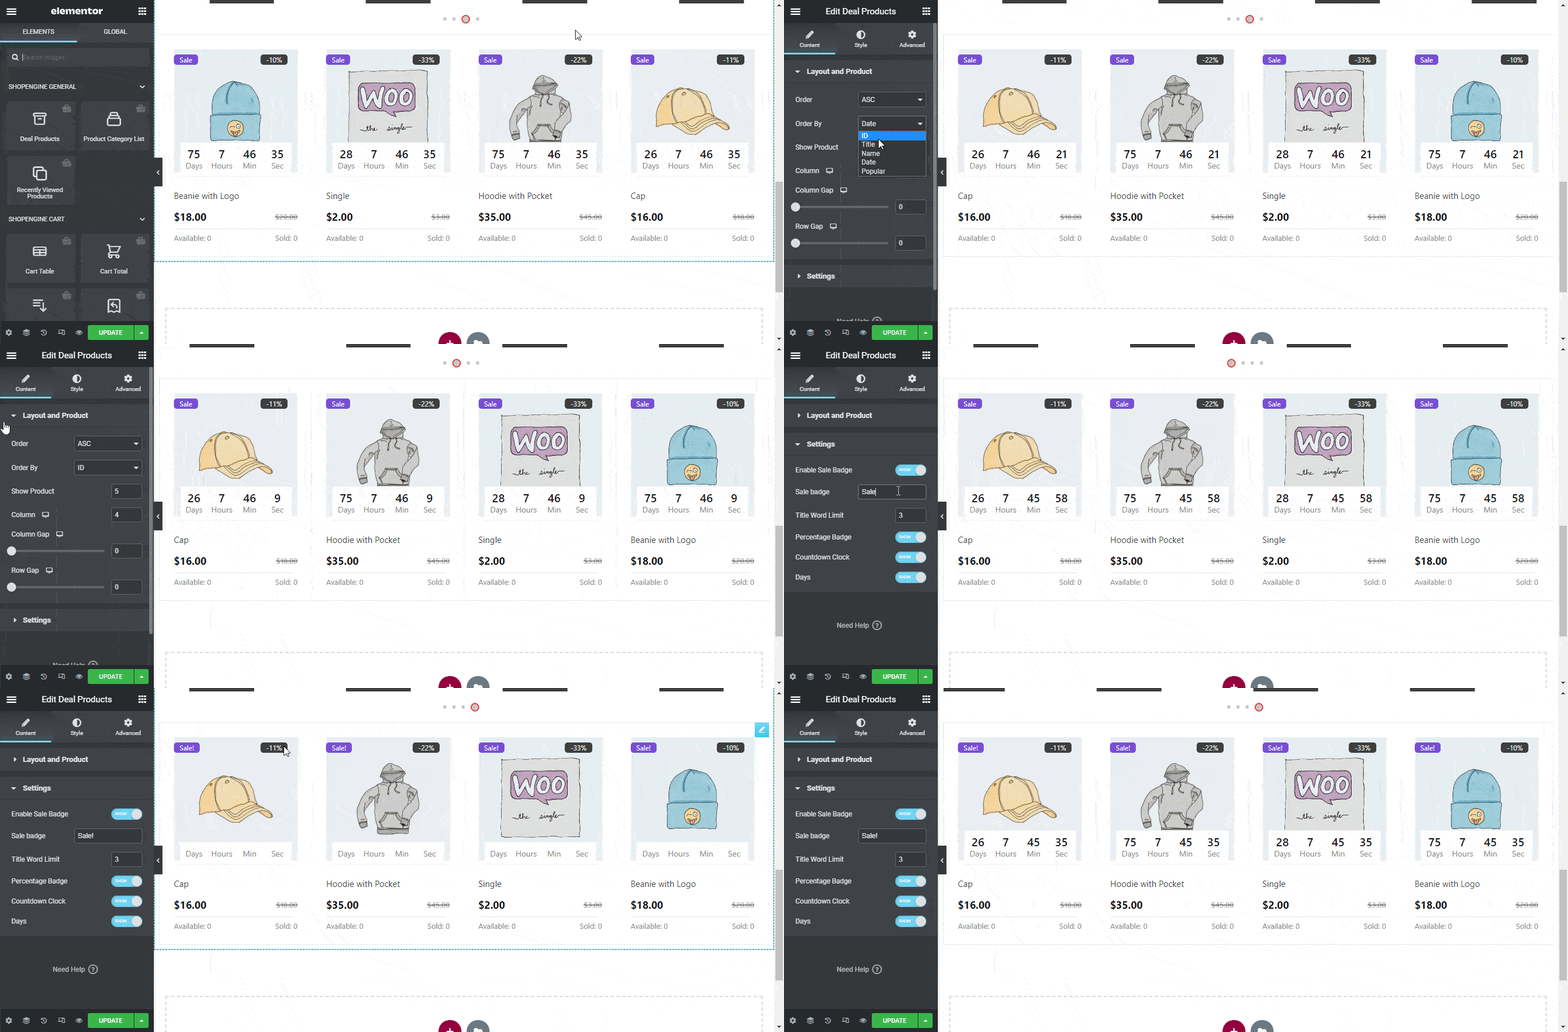
クロスセル製品とディール製品の両方で異なるメリットが得られます カスタマイズできる設定。したがって、ウィジェットをドラッグ アンド ドロップした後、好みに応じて設定をカスタマイズします。
クロスセルウィジェットを使用する、スライダーの有効化のオン/オフ、フラッシュセールの表示/非表示、セール価格、カートボタン、コンテンツ設定で表示する製品数などのオプションがあります。スライダーの場合、ビューごとのスライド数、ループ、自動再生、スライド速度などのオプションがあります。さらに、[詳細設定] タブで [並べ替え] と [順序] オプションも利用できます。
ディール製品が提供するもの コンテンツ設定 注文、注文方法、日付、製品の表示、列、列ギャップ、行ギャップなど。また、セールを有効にする、バッジ、セールバッジ、セール、タイトルの文字数制限、パーセンテージバッジ、カウントダウンクロック、日数などの他の設定も取得できます。
ステップ #5: Woocommerce カート ページのスタイル パラメーターをカスタマイズする
ShopEngine を使用すると、構造だけでなく、カート ページのスタイルも完全に制御できます。
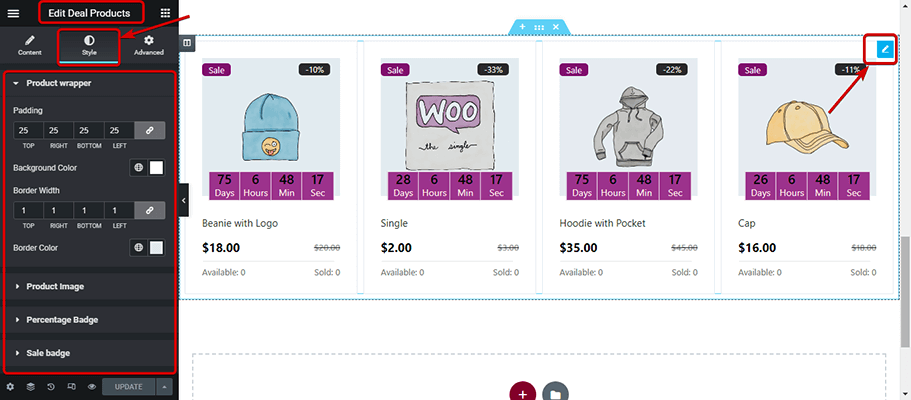
ShopEngine ウィジェットのスタイル パラメータを変更するには、編集するウィジェットの上にマウスを置き、右上隅に [編集] オプションを見つけます。そのオプションをクリックすると、コンテンツに関するすべての Woocommerce カート設定が表示されます。 スタイル 左側にあるElementorパネルにあります。
このブログで使用されている各ウィジェットでカスタマイズできるスタイル設定を見てみましょう。
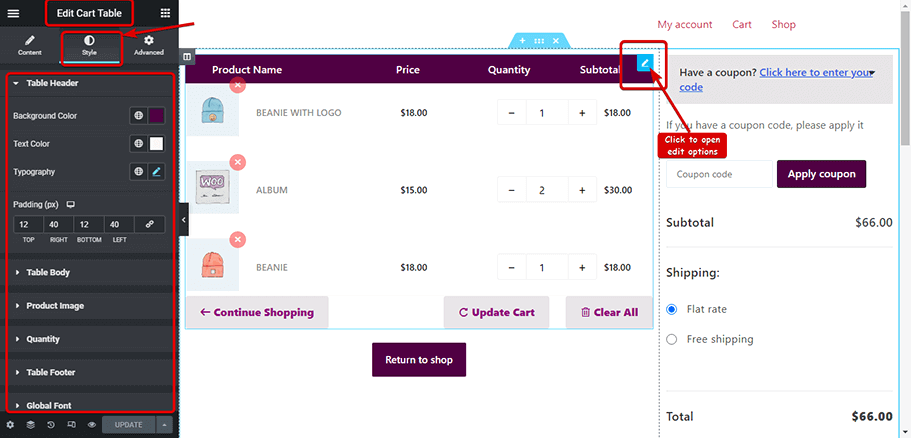
カートテーブル:
テーブルヘッダー、テーブル本文、製品画像、数量のスタイル設定を変更できます。テーブルフッターとグローバルフォント。詳細については、こちらをご覧ください。 カートテーブル上のドキュメント。
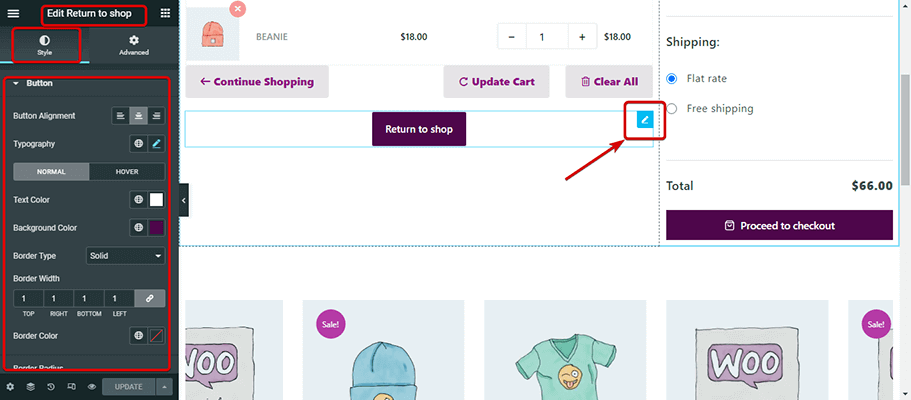
ショップに戻る:
You change Button Alignment, Typography, Border Color, Border Radius, and Box Shadow. For that, you can check out Return To Shop Widget.
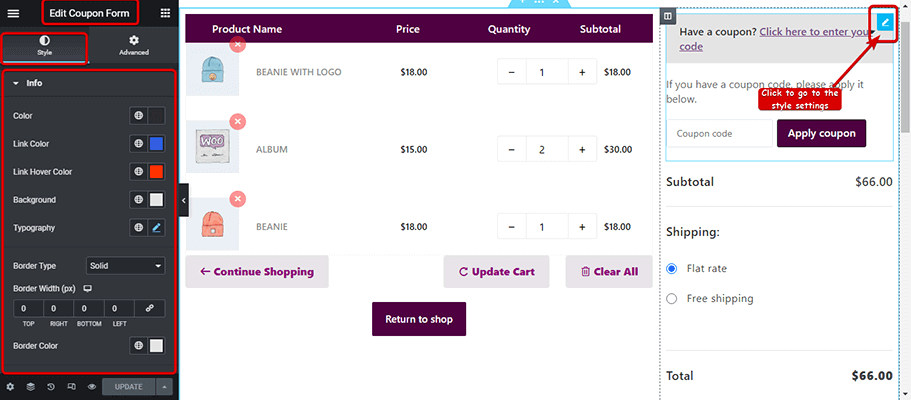
クーポンフォーム:
For the coupon form, you will get a style setting for info, description, coupon form, apply button, and global font. You can easily do that with the Coupon form.
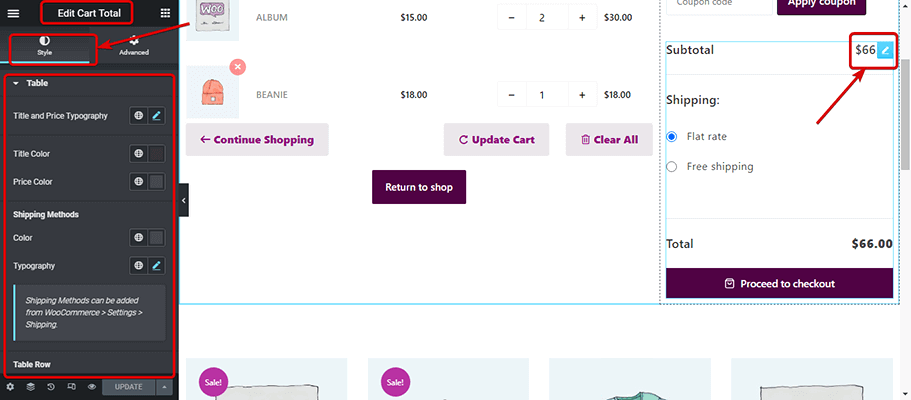
カート合計:
カート合計ウィジェットには、テーブル、入力、チェックアウト更新ボタン、およびグローバル フォントのスタイルを変更するための多くのスタイル オプションがあります。 WooCommerce カート スタイルの詳細設定については、こちらをご覧ください。 カート合計に関するドキュメント.
抱き合わせ販売:
For the Cross-sell widget, you get various style options which include styles for items, flash sales, image, Title racing, price, Add to cart, Slider style, and global font. For more details about Cross, Sale style check out the documentation.
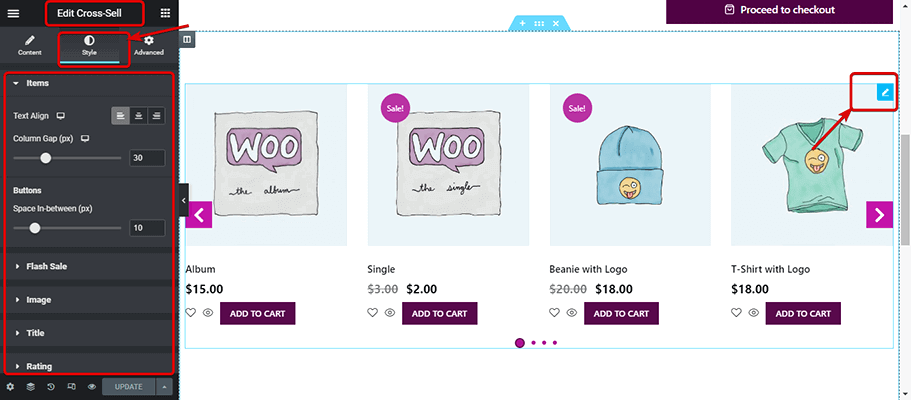
取引製品:
製品ラッパー、製品画像、製品バッジ、カウントダウン クロック、コンテンツ スタイル、ストックバーとプログレス バー、およびグローバル フォントには、さまざまなスタイル オプションがあります。スタイルオプションの詳細を確認するには Deal Product ウィジェットに関するドキュメントを確認してください。.
Step #6: Update and Preview custom WooCommerce cart page design
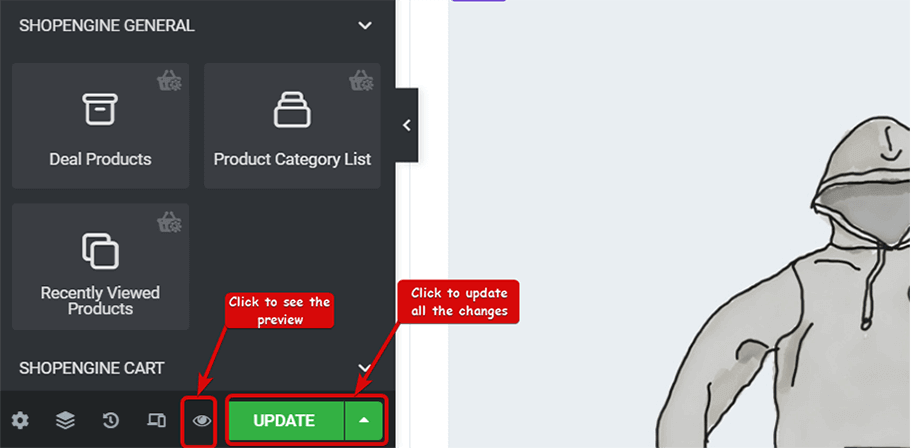
スタイルを変更した後、 アップデート 変更を保存してクリックします プレビュー 変化を確認します。
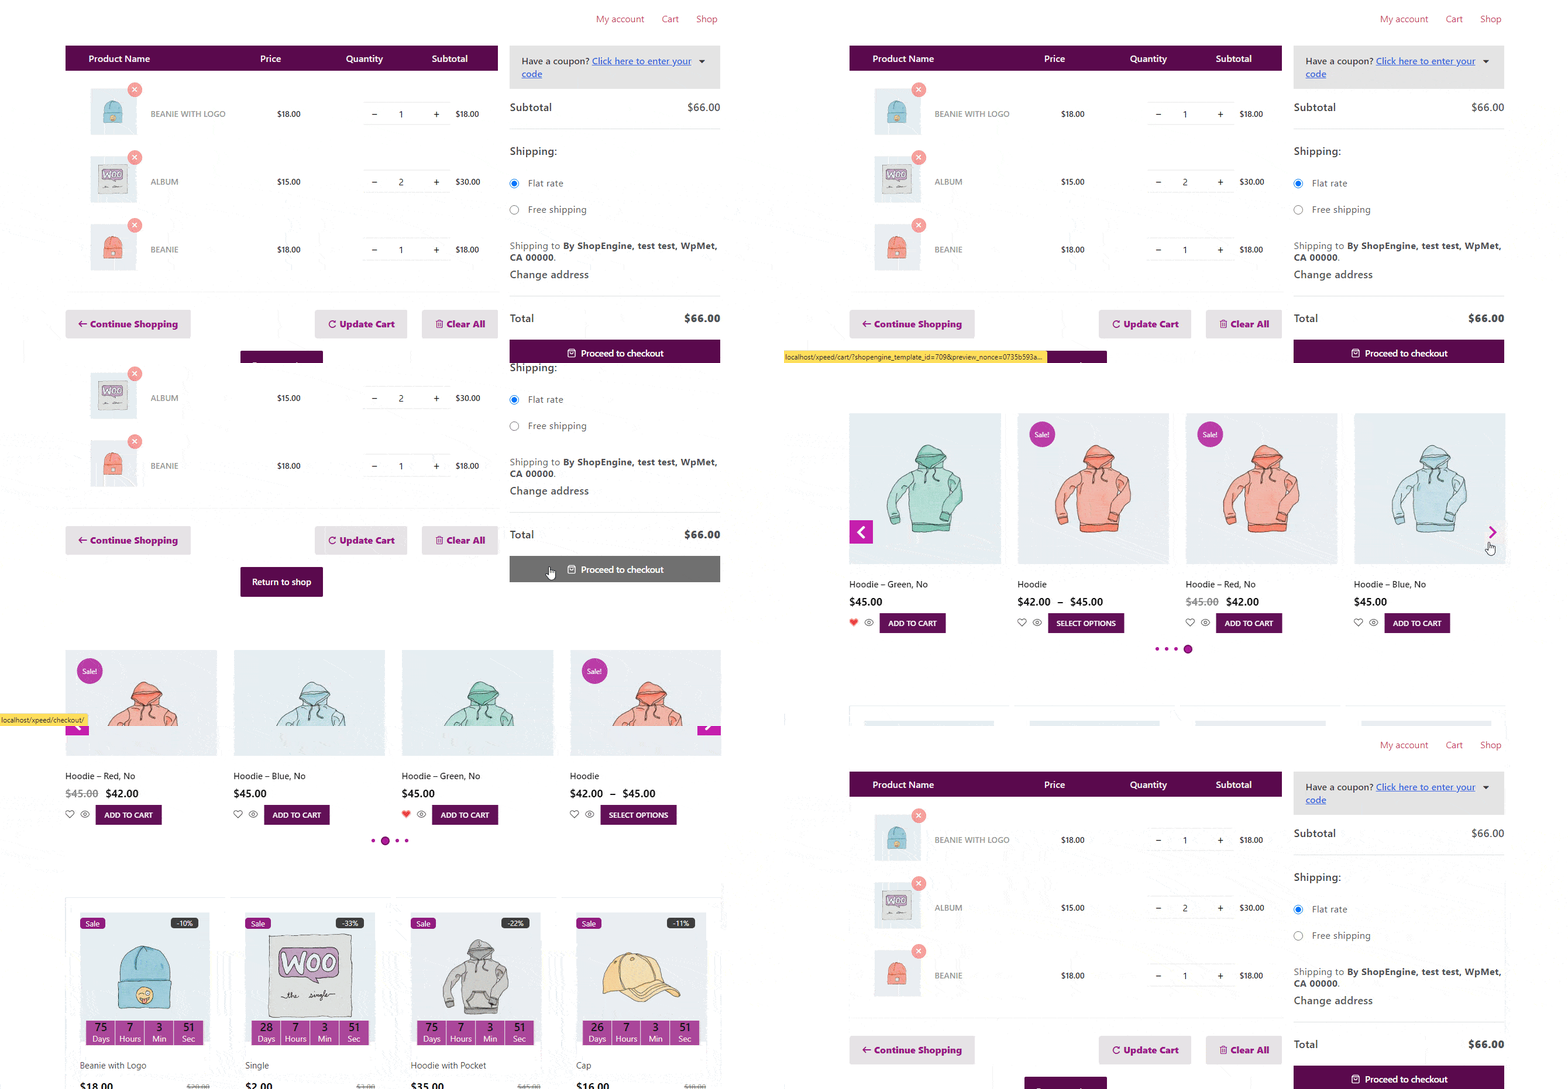
このブログで説明されているレイアウトと設定に従っている場合は、以下のような ShopEngine を使用して WooCommerce でカスタム カート ページをデザインする必要があります。
After optimizing the cart page and customizing it, make sure to customize the WooCommerce checkout page to get more conversions. Also, you can offer WooCommerce floating cart to increase the number of add to carts.
ボーナス: ShopEngine モジュールを使用して e コマース ストアの売上を伸ばすためのヒント
これで、woocommerce でカート ページを作成してカスタマイズする方法がわかりました。 ShopEngine は、WooCommerce カート ページ テンプレート ビルダーに加えて、オンライン ショップの売上を向上させる重要な e コマース機能を備えた便利なモジュールを提供します。 ShopEngine モジュールには次のものが含まれます。
WooCommerce ストアのオーナーであれば、オンラインでの購入体験を良いものにするためにこれらの機能がいかに重要であるかをご存知だと思います。カート テンプレートについて言えば、 クイックビュー ボタンと ウィッシュリスト クロスセルのボタンを使用すると、顧客により良いショッピング体験が提供されます。これにより、顧客がより多くの製品を購入する可能性が高まります。
Quick View を使用すると、顧客はワンクリックで製品の完全な情報を簡単に確認できます。同様に、ユーザーはウィッシュリスト モジュール ボタンを使用して、ワンクリックで製品をウィッシュリストに追加し、後でチェックアウトできます。これらの機能は両方とも、製品の売上を増加させる上で重要な役割を果たします。
If the cart page is not showing properly, there could be an empty cart error. Here is how to solve empty cart error issue.
したがって、カート ページをカスタマイズするだけでなく、ShopEngine モジュールを使用して顧客に優れた購入体験を提供し、ショップの売上を増やしてください。
ShopEngine Pro にアップグレードする理由?
正直なところ、ShopeEngine はオンライン ストアを優れたものにするのに十分な機能を提供します。しかし、最高のものを手に入れることができるのに、なぜ永久に甘んじる必要があるのでしょうか?
ShopEngine Pro は、e コマース ストアでのオンライン ショッピングを顧客にとって最高の購入体験にするための膨大な機能を提供します。 woocommerce カート ページのカスタマイズに加えて、次のことにアクセスできます。 20 個以上のモジュール これは含まれて Flash sale countdown, badges, Sales Notification, Quick checkout, Parietal payment, Currency Switcher、 などなど。
顧客満足度だけでなく、ShopEngine の機能は、次のようなモジュールを使用してオンライン ストア管理を非常に簡単にするように設計されています。 Preorder, Backorder, Additional Checkout Field, などなど。
忘れないように 16+ 既製 完全な WooCommerce カスタマイズ コントロールを備えたテンプレートと 70 以上の高度なウィジェット 必要に応じて、すべての WooCommerce テンプレートを最初から作成します。
カート ページに関しては、ShopEngine を使用すると、オンライン ストア用の WooCommerce カスタム カート ページを構築することもできます。
非常に多くの機能、既製のテンプレート、モジュールを備えたプラグインで、価格も非常に手頃なので、ぜひ試してみてください。
今すぐ ShopEngine のバージョンを入手して、WooCommerce のカスタマイズ方法について心配する必要はもうありません。
最後の言葉
おめでとう! WooCommerce カスタム カート ページが正常に再設計されました。それは簡単ではありませんでしたか?
これが ShopEngine の機能です。コーディングなしで WooCommerce カート ページをカスタマイズする方法がわかりました。
したがって、オンライン ストアをデフォルトのスタイルに限定するだけでなく、WooCommerce Web サイト全体を再設計し、モジュールを使用してオンライン ビジネスをこれまで以上に成功させてください。
さて、次はどの WooCommerce ページをカスタマイズしますか? ShopEngine の使用体験を忘れずに共有してください。

コメントを残す