

 Japanese
  English
  German
  Spanish
  Italian
  French
  Danish
  Portuguese
  Swedish
  Polish
  Korean
 とともに Product Size Charts module by ShopEngine, you can add a product size chart of any information you want in an image format on the product page. You can add as many charts as you want and a single one from the product settings of each product.
ShopEngine を使用して製品サイズ チャートを WooCommerce サイトに追加する方法 #
You can add Product Size Charts to your WooCommerce Elementor website by following 7 simple steps.
Before that, get ShopEngine Pro now 👇
ステップ 1: ShopEngine の製品サイズ チャート モジュールを有効にする #
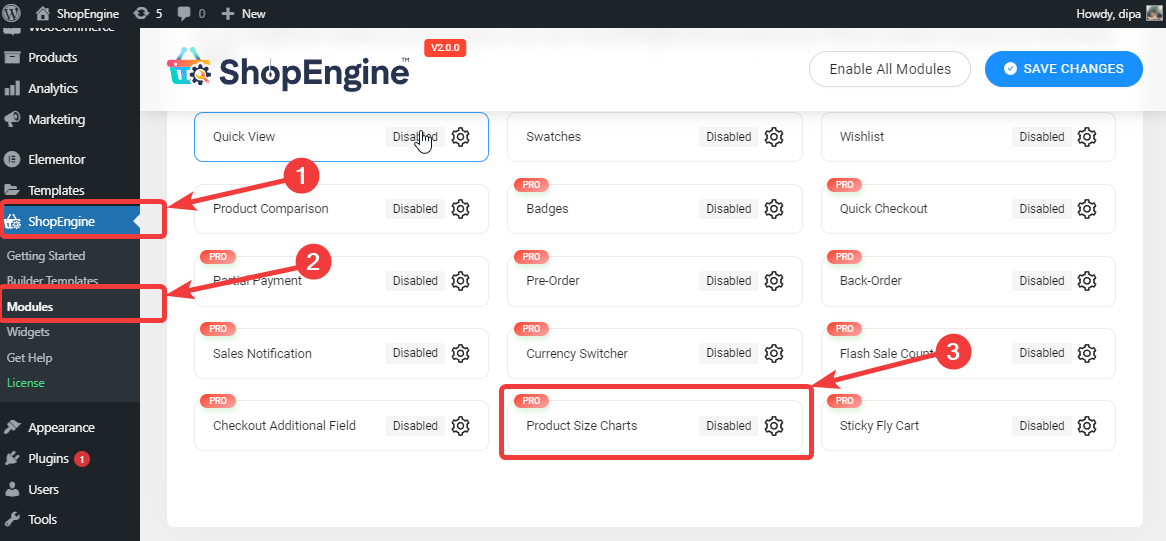
WordPressのダッシュボードから、 ShopEngine ⇒ モジュール ⇒ 製品サイズ表に移動します 設定アイコンをクリックします。
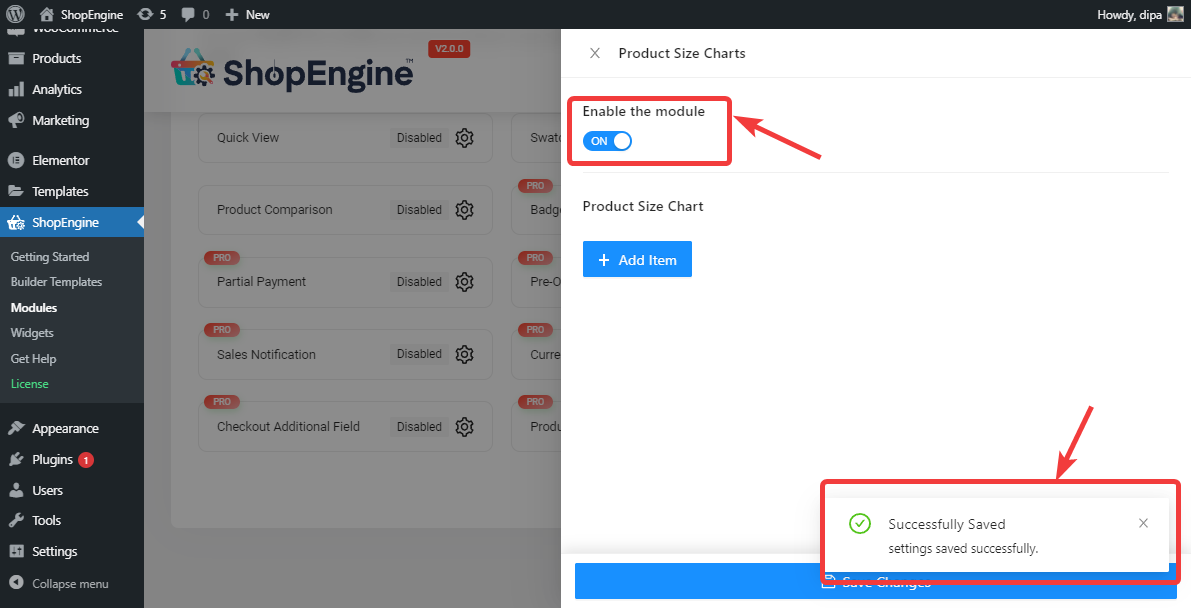
設定を確認したら、 モジュールを有効にするをオンにします オプション。その後、正常に保存されたメッセージが表示されるはずです。
注: すべてのモジュールを同時に有効にすることもできます。どうすればできるかをチェックしてください すべてのモジュールを一度にオンにします。
ステップ 2. 新しい製品サイズ表を追加する #
新しいサイズ チャートを追加するには、 +新規追加 ボタン
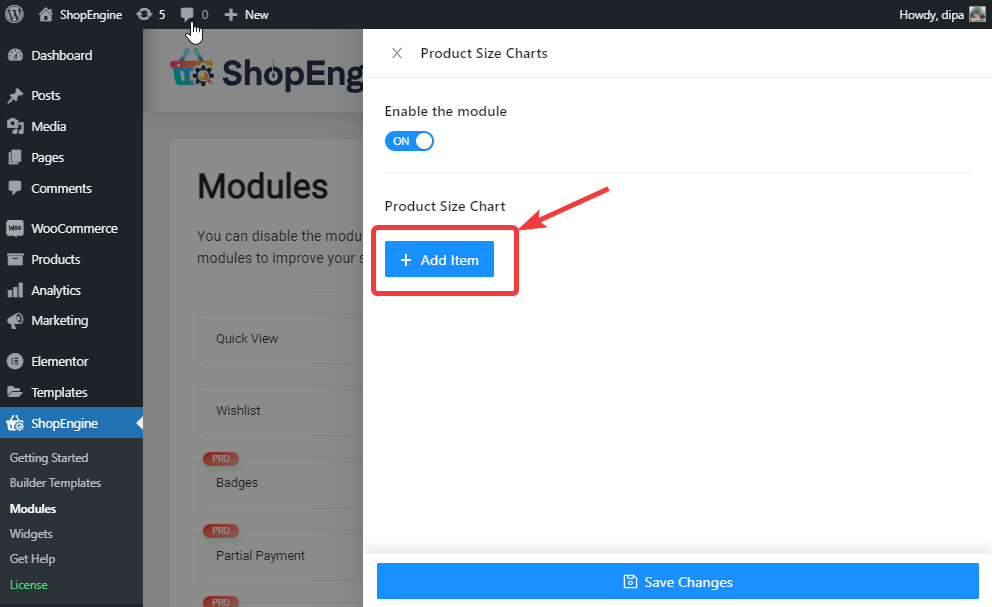
矢印記号を展開し、 グラフタイルの名前、選択アイコンをクリックして、 画像を選択してください この製品のサイズ表の場合は、サイズ表を割り当てるカテゴリを選択してください。カテゴリ名の入力を開始すると、ドロップダウンが表示されるので、そこから選択できます。最後に、「変更を保存」をクリックします。
注記: 割り当てられたサイズ表は、そのカテゴリのすべての製品に適用されます。
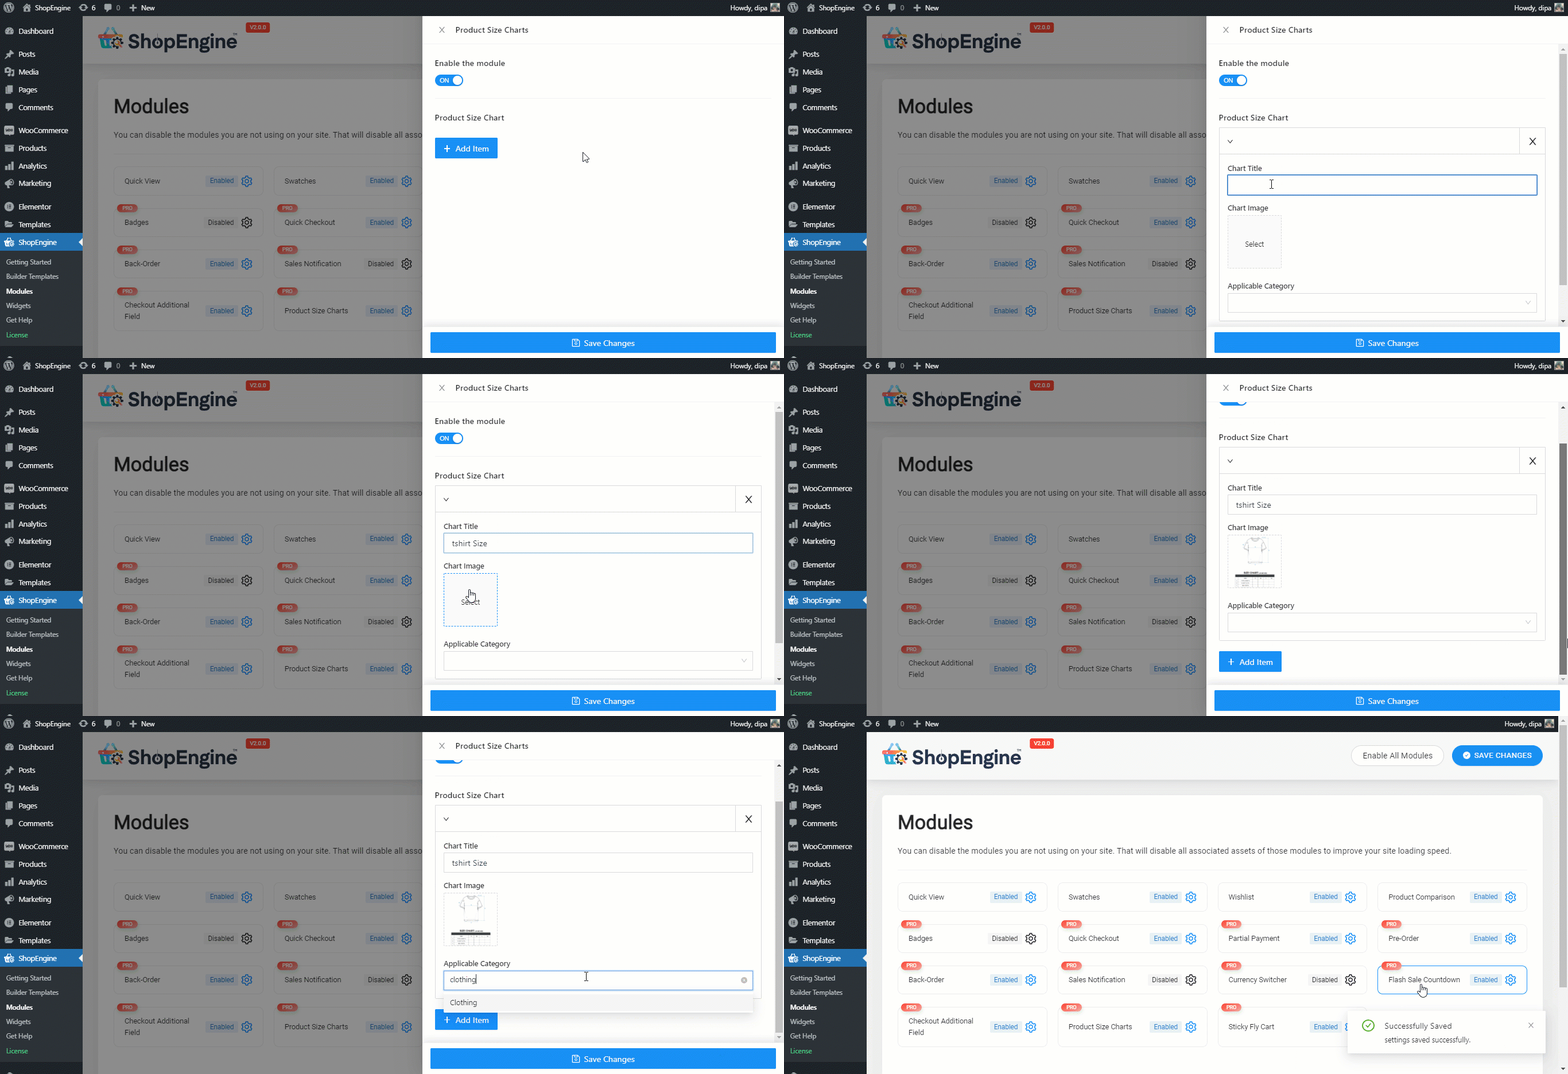
注記: チャートは必要なだけ追加できます。追加して保存した後は、いつでも戻って見ることができます グラフのタイトルと画像を編集する すでに追加されているチャートの数。そしてまた 消去 既存のチャートのいずれか。
ステップ 3. 製品サイズ チャート ウィジェットを単一製品テンプレートに追加する #
サイズ チャートの作成が完了したら、ShopEngine によって製品サイズ チャート ウィジェットを単一の商品ページ テンプレートに追加して、フロントエンドに表示されるようにする必要があります。
注記: 方法についてサポートが必要な場合は、 shopEngine の単一の製品テンプレートを作成および編集する ドキュメントをチェックしてください。
単一製品テンプレートの「Elementor で編集」モードになったら、次のように検索します。 製品サイズチャートウィジェット そしてただ単に ドラッグアンドドロップ ご希望の場所に。
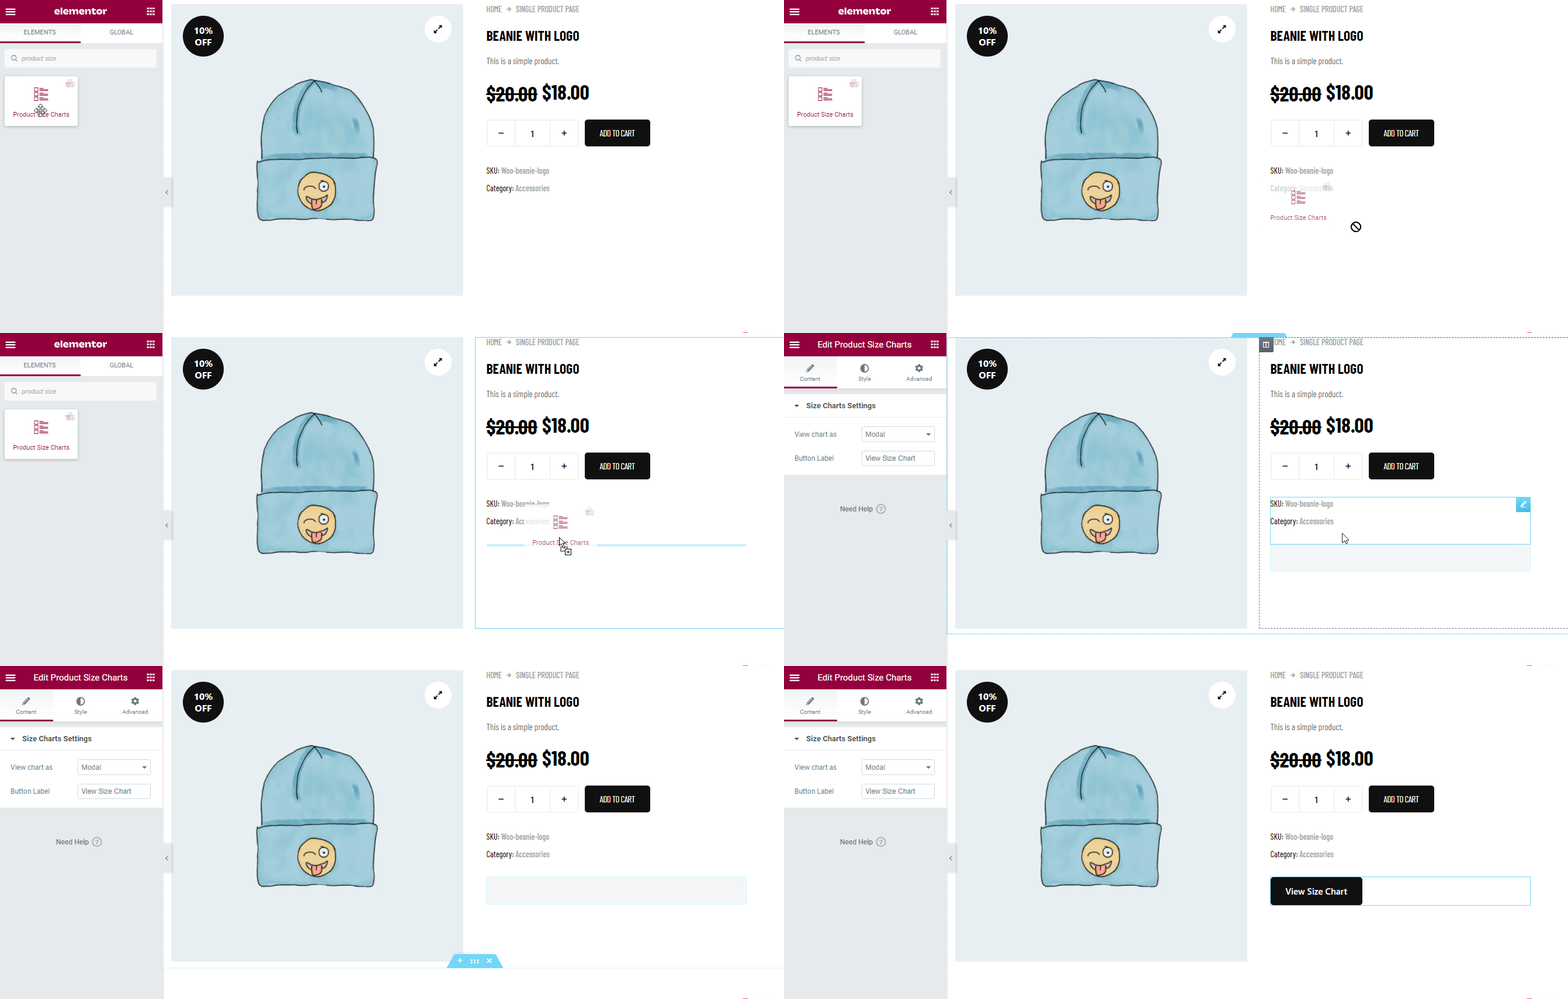
ステップ 4. 通常サイズ チャート/モーダル サイズ チャート タイプを選択し、カスタマイズします #
次のようなサイズ チャートの 2 つの設定が表示されます。
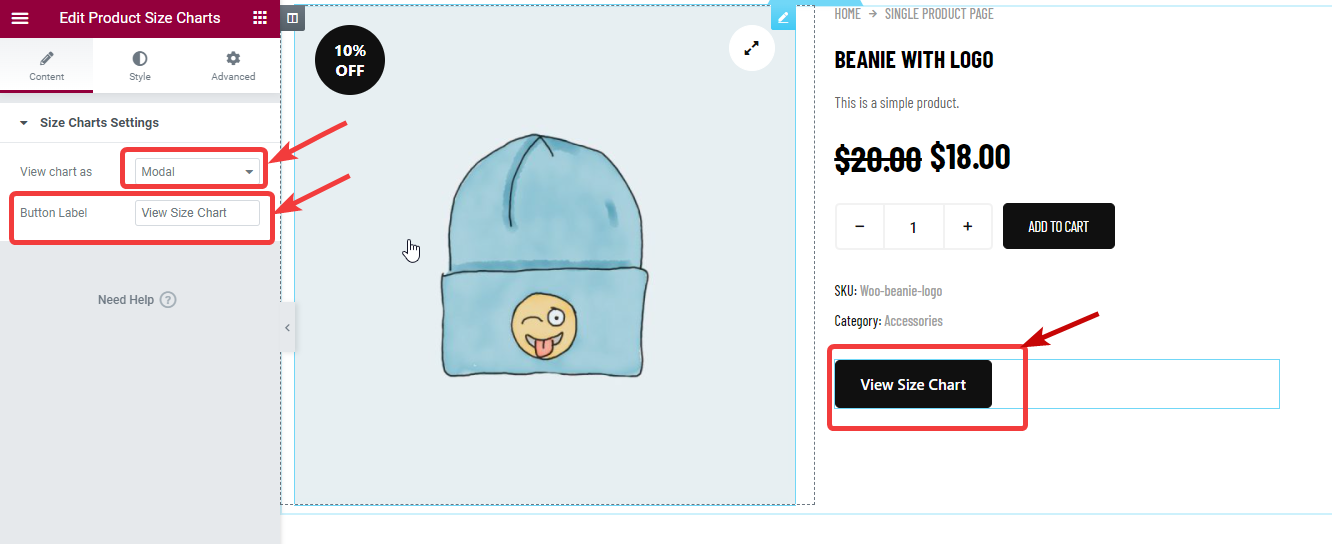
サイズチャートは 2 つの方法で表示できます。 モーダルとノーマル。
モーダルサイズチャート: #
モーダルがデフォルトのオプションです モーダルを使用すると、次のオプションも得られます カスタムボタンのラベルを設定します。
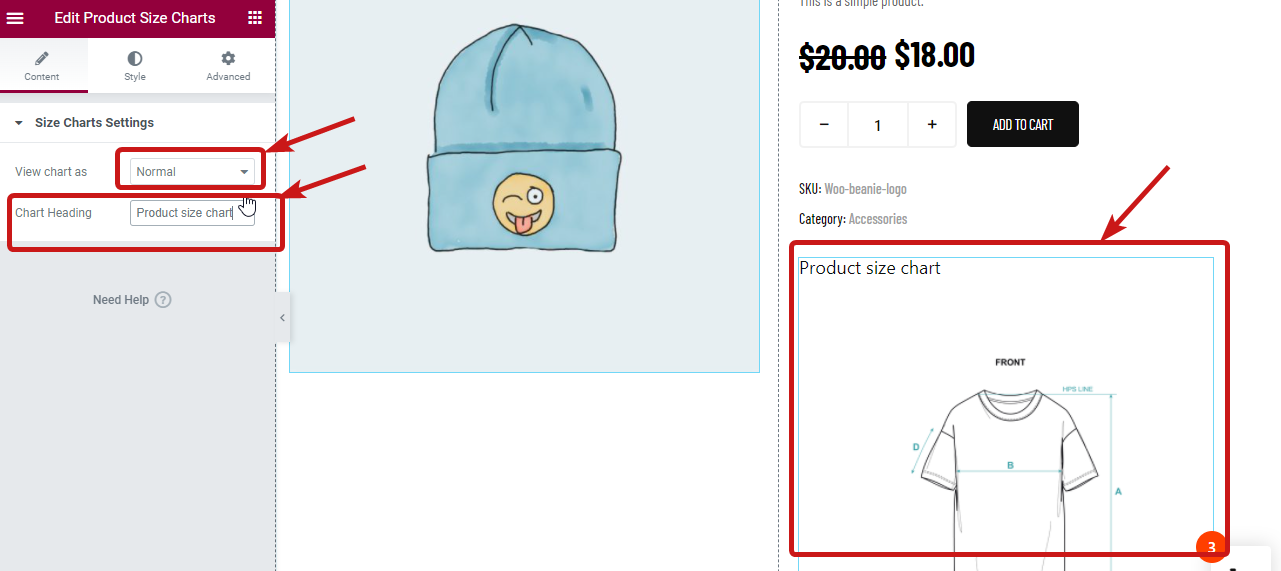
通常のサイズ表: #
通常モードを選択する場合は、「グラフを表示」ドロップダウンから「通常」を選択します。標準を選択すると、画像のカスタム見出しを設定できる新しいオプションのチャート見出しが表示されます。
ステップ 5. モーダル/通常の製品サイズ表のスタイル設定 #
選択したビュー サイズ チャート オプションの種類に応じて、関連するスタイル設定が得られます。スタイル設定にアクセスするには、Elementor エディターのスタイル タブに移動します。
モーダル サイズ チャートのスタイル設定: #
サイズチャートのモーダルビューオプションでは、選択に応じてカスタマイズできる次のスタイル設定が表示されます。
サイズチャートボタン: サイズチャートメニューを展開すると、次のオプションが表示されます。
- タイポグラフィ:フォント サイズ、フォント ファミリー、フォントの太さを選択します。
- 色と背景色: ホバー表示と通常表示の両方の色と背景色を選択します。
- 枠線の種類: 境界線のタイプは、なし、実線、二重、破線などから選択できます。
- 幅: 左右上下の幅を選択します。
- 色: 境界線の色を選択します。
- 境界線の半径 (ピクセル): 境界線の半径を指定します。
- パディング(ピクセル): 上、右、下、左のパディングを調整します。
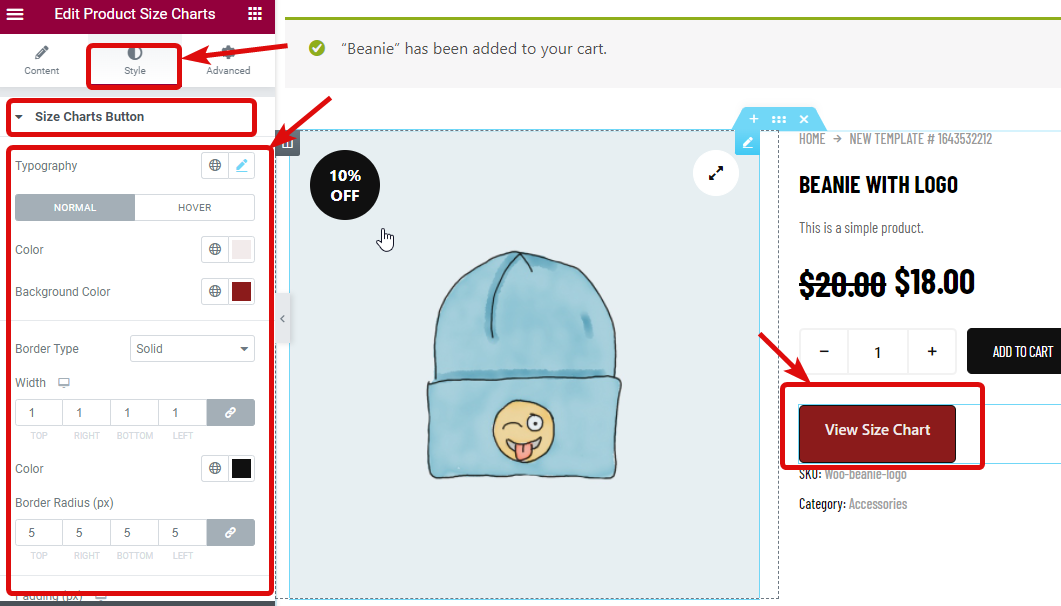
サイズチャートのポップアップ: サイズチャートのポップアップを展開して、次のオプションをカスタマイズします。
- 境界線の半径 (ピクセル): 境界線の半径の値を選択します。
- パディング(ピクセル): 上、右、下、左のパディングを調整します
- 背景色: ここで画像の背景色を選択できます。
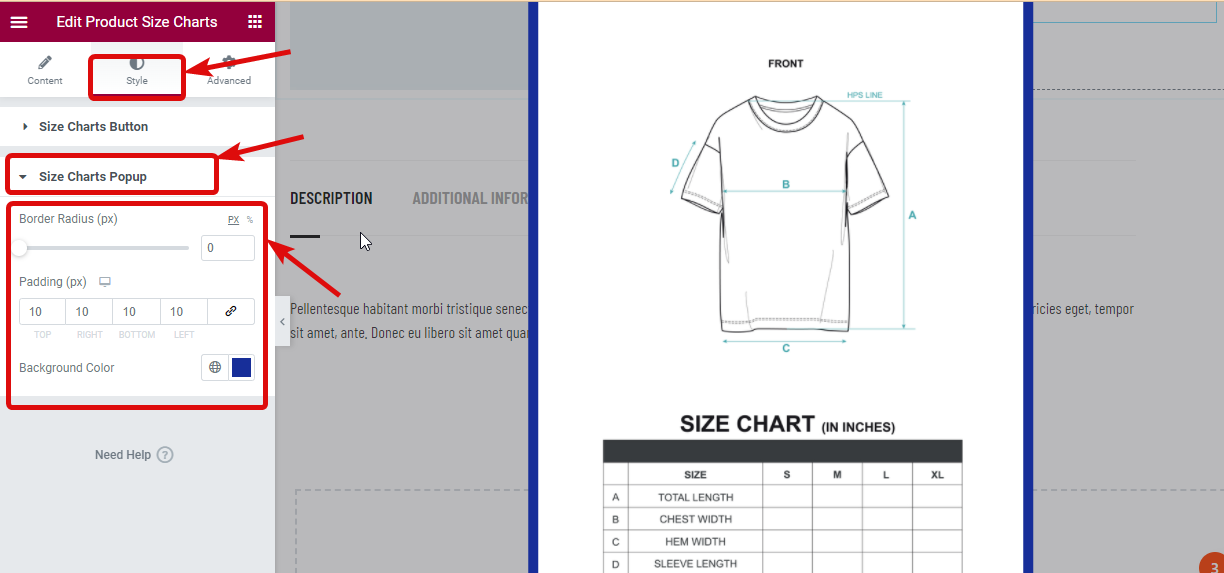
モーダルビューを使用したい場合 すべての変更を加えた後 「更新」をクリックして保存し、次のステップに進みます。
通常のサイズ表のサイズ設定: #
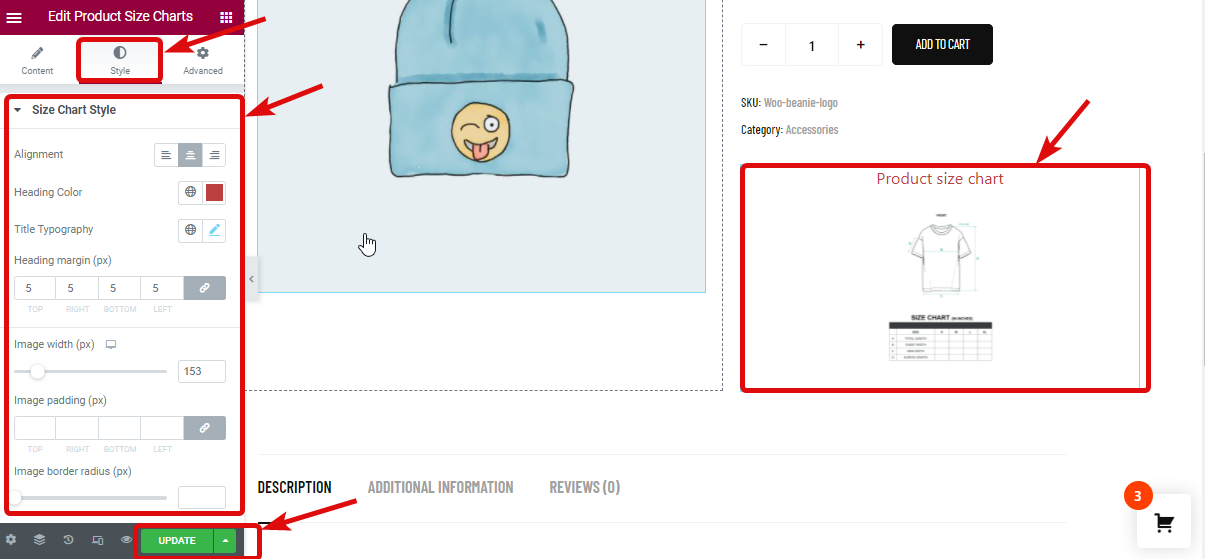
一方、通常のビューを選択すると、[サイズ チャート スタイル] オプションの下にカスタマイズできる多くのオプションが表示されます。
- 配置: ここで、サイズチャートの見出しの位置を調整できます。
- 見出しの色: 見出しの色を選択します。
- タイトルのタイポグラフィ: ここでは、フォントファミリー、サイズ、フォントの太さ、行の高さをカスタマイズできます。
- 見出しの余白 (px): ここで見出しの周囲の余白を調整します。
- 画像の幅 (ピクセル): ここで画像の高さを調整できます。
- 画像のパディング (ピクセル): 画像のパディング値を指定します
- 画像の境界線の半径 (ピクセル): 境界線の半径の値を選択します。
最後に「更新」をクリックして保存します。
ステップ 6. 製品にサイズ表を追加する (オプション) #
注記: あなたがしたい場合は 新しい異なるサイズ表を特定の製品に割り当てます。 その後、この手順に従うことができます。新しい製品に割り当てる新しいサイズ表には、 カテゴリ サイズ チャートよりも優先されます。
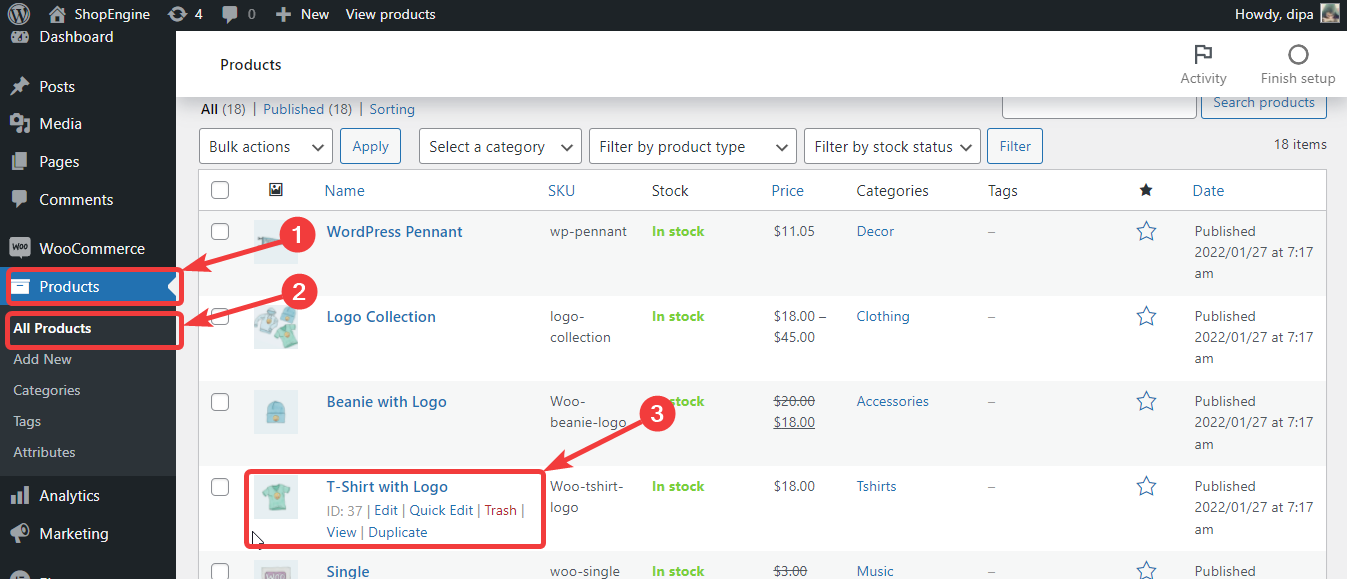
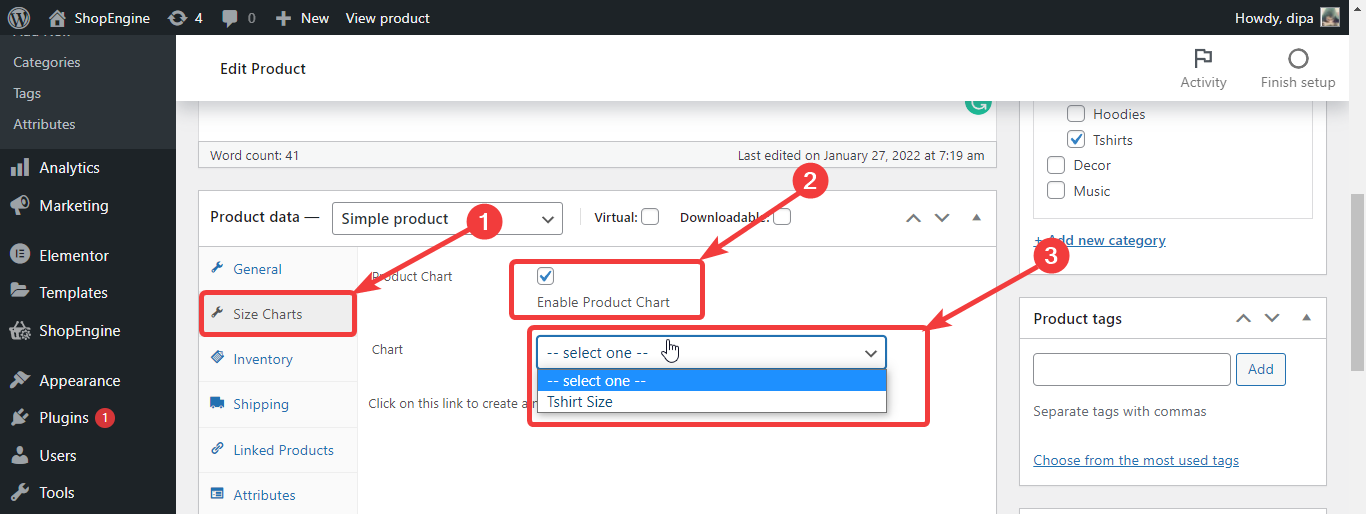
製品サイズ表を製品に追加するには、WordPress ダッシュボードから次のリンクに移動します。 商品 ⇒ 全商品 そして 編集をクリックします 編集する製品のオプション。
製品の設定から、 サイズチャートに移動し、製品チャートオプションを確認してください。 グラフのオプションをチェックすると、グラフのドロップダウンにアクセスできるようになります。ドロップダウンから必要なオプションを選択してください
ステップ 7. 最後に、製品を更新してプレビューを表示します #
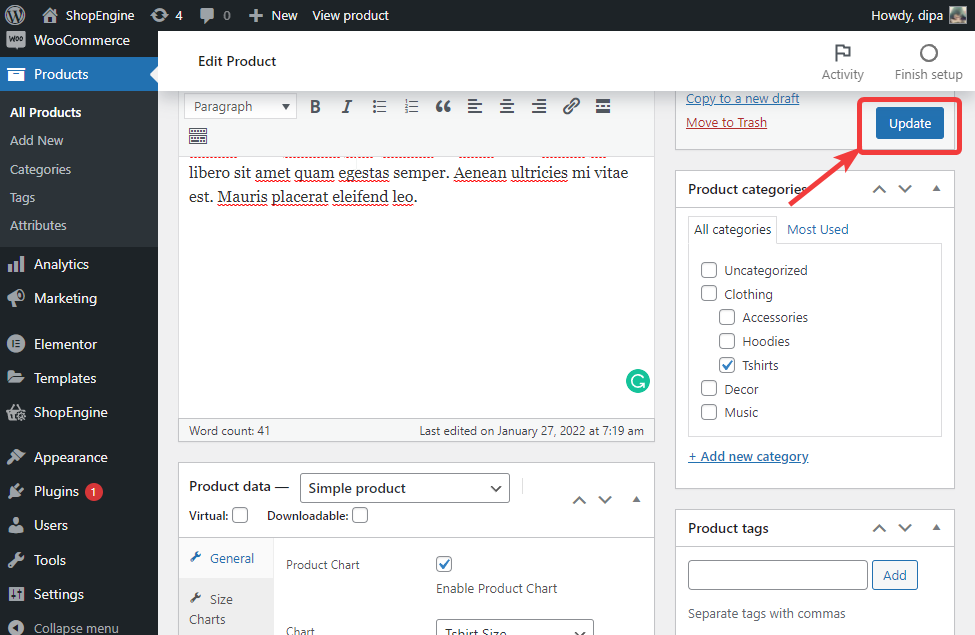
製品チャートを選択したら、「更新」をクリックして保存します。
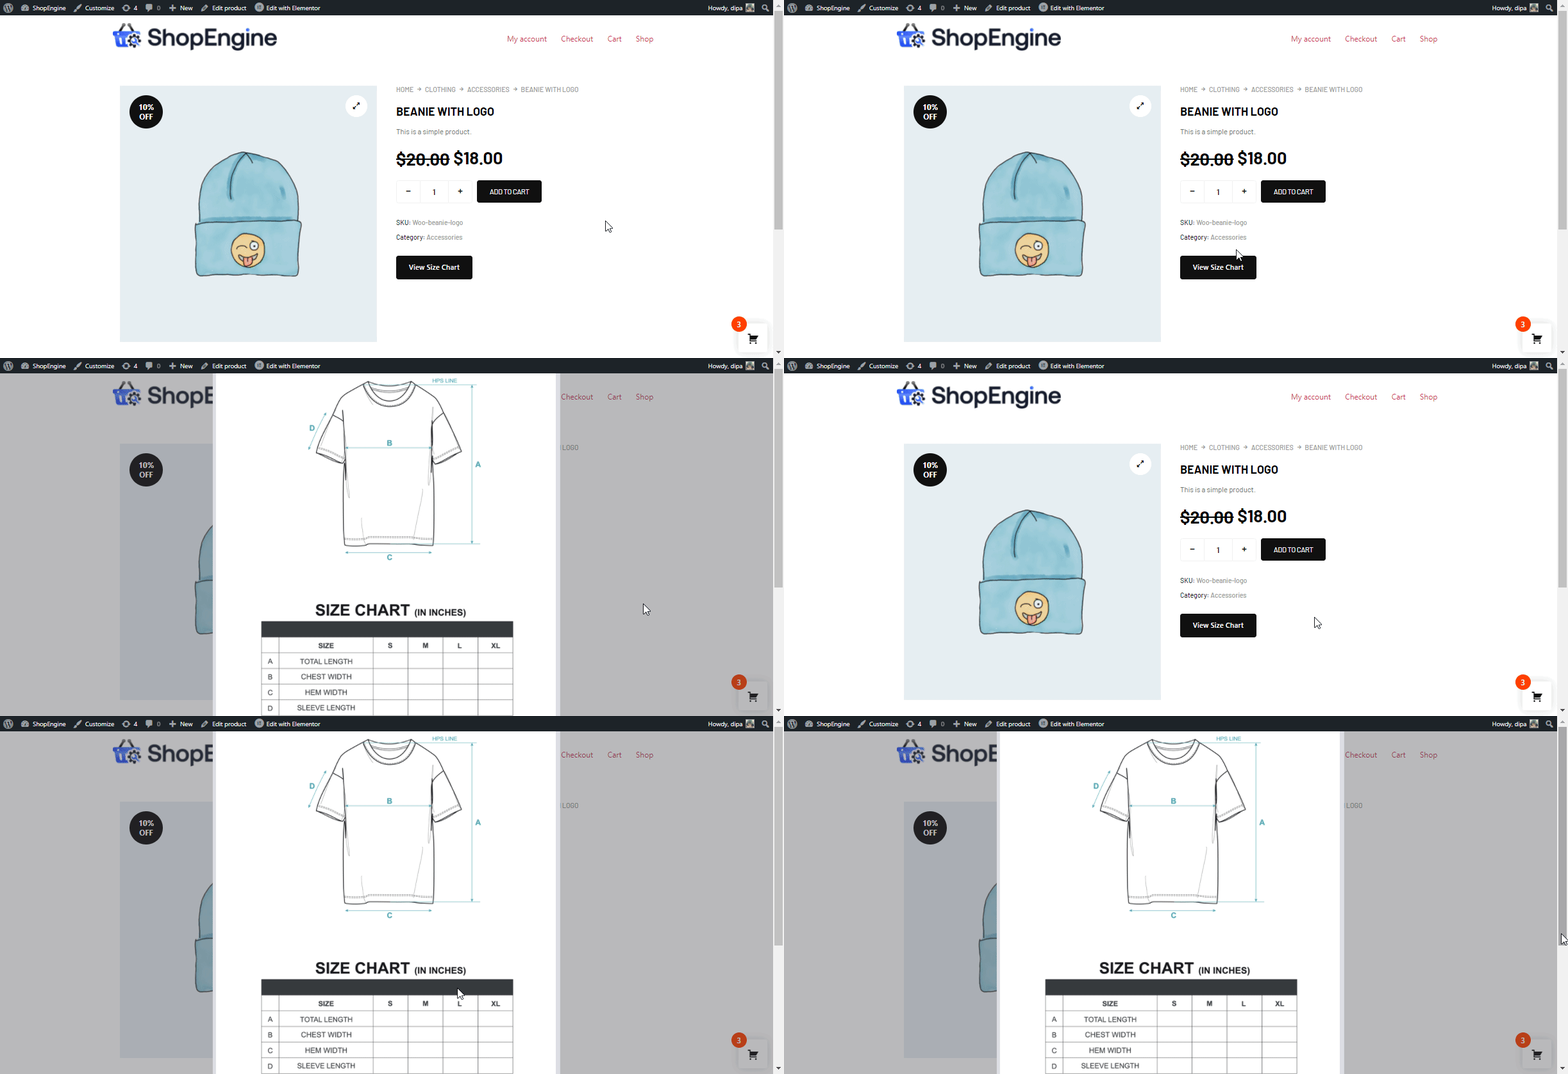
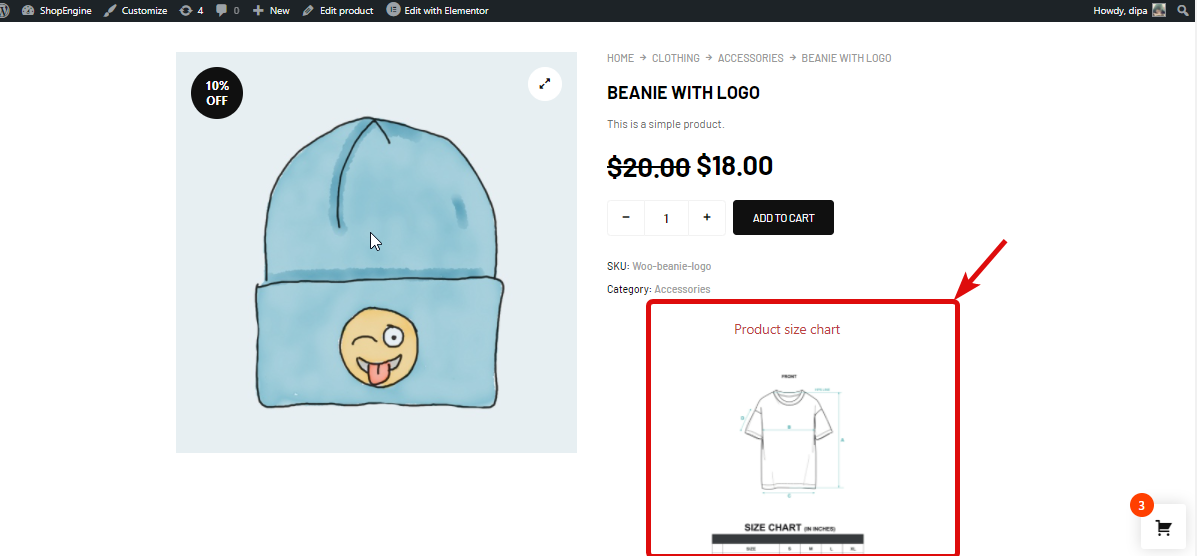
最終結果を確認するには、編集したばかりの製品ページに移動すると、以下のプレビューのような製品グラフが表示されるはずです。
注記: サイズ表を表示したいすべての商品に手動でサイズ表を追加する必要があります。
通常のビューでの製品サイズ カートのプレビューは次のとおりです
ここは ポップアップビューによる製品サイズチャートのプレビュー