


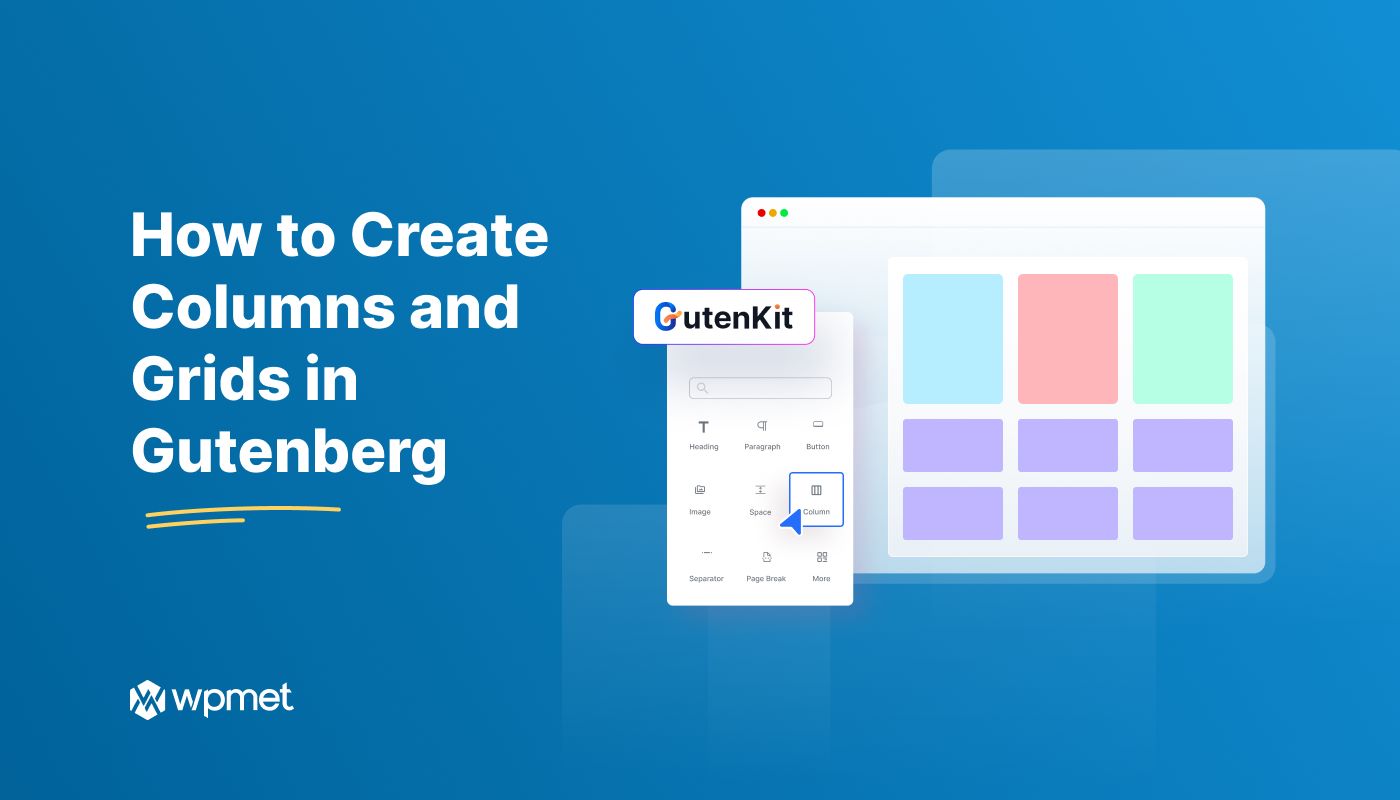
Creating visually appealing and organized layouts is essential for any website. WordPress’s Gutenberg editor offers a flexible platform for building custom designs, and columns and grids are fundamental building blocks.
In this tutorial, we’ll guide you through the process on how to create columns and grids in Gutenberg using GutenKit’s container block and post grid block.
Let’s dive in!
Quick Overview: How to Create Columns and Grids in Gutenberg
Creating columns and grids in the Gutenberg editor involves using the Container and Column blocks to organize content into structured sections. Tools like the GutenKit have Container Block and Post Grid Block, which allow users to design multi-column layouts and dynamic grid displays without coding.
A blog homepage can use a three-column grid to display recent posts, where each column shows a featured image, title, and excerpt.
Steps to Create Columns:
✅ Add the Container Block – Choose a layout depending on your purpose.
✅ Configure the Container Settings – Customize the layout using the block settings panel.
✅ Add Content and Customize – Add blocks such as paragraphs, images, icons, or buttons.
Steps to create Grids:
✅ Add the Post Grid Block – Select the GutenKit Post Grid block and insert it into the editor.
✅ Configure Grid Content Settings – Select categories, adjust post count, etc.
✅ Customize the Grid Style – Use styling options to control the design, such as height, spacing, typography, etc.
Gutenberg columns and grids help WordPress users design structured and responsive layouts by organizing content into flexible column and grid blocks.
Overview: Gutenberg Columns and Grids
Gutenberg, the intuitive block editor for WordPress, has revolutionized the way users create and manage content. One of its standout features is the ability to craft intricate layouts using columns and grids. These elements allow for a more structured and visually appealing presentation of content, enhancing readability and user engagement.
Whether you are designing a simple blog website or creating a complex landing page, understanding how to effectively use columns and grids is essential.
However, the default WordPress Gutenberg Grid and WordPress Gutenberg Column blocks have limited design and customization. And that is where a Gutenberg plugin like GutenKit comes in.
When to Use Columns vs Grids in Gutenberg
Both columns and grids help organize content into structured layouts. However, they serve slightly different purposes.
When to Use Columns
Columns are used for simple side-by-side content. They are best suited for placing a small number of elements side by side in a single row. They work well for straightforward layouts where each section contains different types of content.
Here are the common use cases for columns:
- Feature sections – Three columns showing product features with icons and descriptions.
- Image and text layouts – An image on the left and descriptive text on the right.
- Pricing tables – Multiple pricing plans displayed side by side.
- Service highlights – Three or four columns explaining services offered by a business.
Columns work best for these use cases because they are easy to set up, ideal for small groups of content, and they keep related information aligned in a single row.
When to Use Grid
Grids are better suited for repeated content layouts and displaying larger collections of similar items. Instead of a single row, grids automatically organize content into multiple rows and columns.
Here are the common use cases for grids:
- Blog post listings – Showing multiple articles in a structured layout.
- Portfolio galleries – Displaying projects or creative work.
- Product listings – Showing items in an online store.
- Team member sections – Presenting employee profiles with images and descriptions.
How to Create Columns and Grids in Gutenberg
Creating columns and grids in Gutenberg is a straightforward process, thanks to the powerful tools provided by GutenKit’s container block.
So, here are the steps to get started:
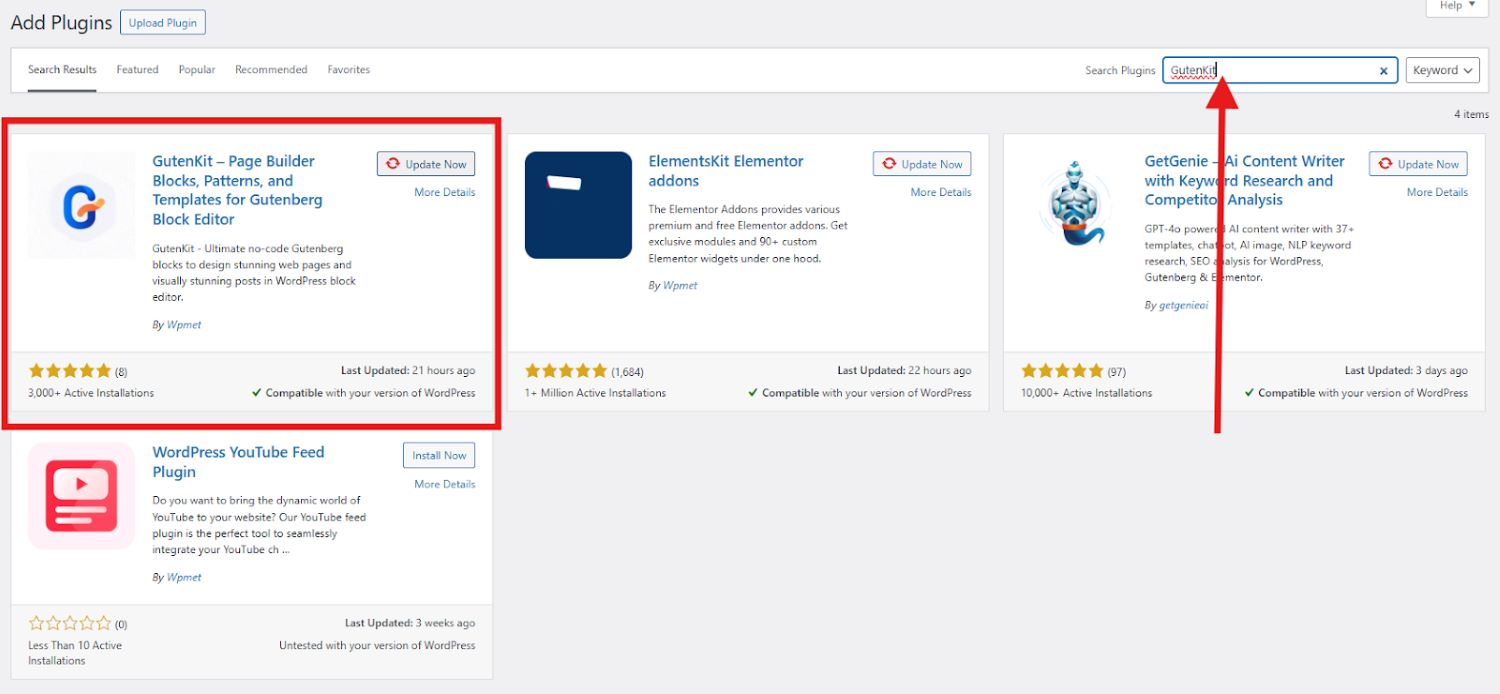
Install and Activate GutenKit:
Log in to your WordPress dashboard and go to “Plugins”. Select “Add New Plugin” and enter GutenKit in the search bar. Click “Install Now” and “Activate” the plugin.
After you successfully activate GutenKit, it will now appear in your WordPress dashboard. You can open the plugin and have a quick view on the demo of the “Container” block to see how it works.
How to Create Columns in Gutenberg
Here are the actual steps on how to use columns in Gutenberg:
Step 1: Adding Columns in WordPress Gutenberg
Begin by opening the page or post where you want to add columns and grids.
Click on the “+” icon at the top of the editor to open the block library.

Search for the “Container” block and add it to your page. Make sure that the block has the GutenKit badge. This block acts as the foundation for your columns and grids.

Drag the block and drop it to your editor screen or simply click the block to pull it to your editor screen.

GutenKit offers you 6 different layouts. Select the layout you plan for your post or page. For this tutorial, we’ll select the 50/50 layout.
Another way of adding the container block into your editor screen is to click on the plus (+) icon in your editor screen.

Step 2: Configure the Container Block
Once the container block is in place, you can configure its settings to suit your design needs. Adjust the width, padding, and margins to create the desired layout space.

In the layout section, you can customize the following:
- Container width
- Direction
- Alignment
- Column and row gap between columns
- Overflow style
- HTML tag
Style section allows you to set the following:
- Background
- Background overlay
- Border
For some personality you can design the sections with a background . Creating a background image in Gutenberg is easy with GutenKit. Just add a container block, go to the Style tab, choose “Image” as the background type, upload your image, and adjust as needed. It’s a quick way to reflect your brand’s style and make your content stand out to visitors.
Now, if you want to level up the design of your columns and grids, go to advanced settings which allows you to set the following:
- Layout
- Position
- Visibility
- Motion effects
- Glass morphism
- CSS transform
- Advanced tooltip
- Sticky
- Parallax
- Additional CSS class
Step 3: Customize Column Content
Now, here comes the exciting part! Adding images, icons, texts, and etc to your columns.
Each column can now be populated with various blocks, such as text, images, or buttons. Simply click within a column and add the desired content block from the library. Arrange and style each block to create a cohesive design.
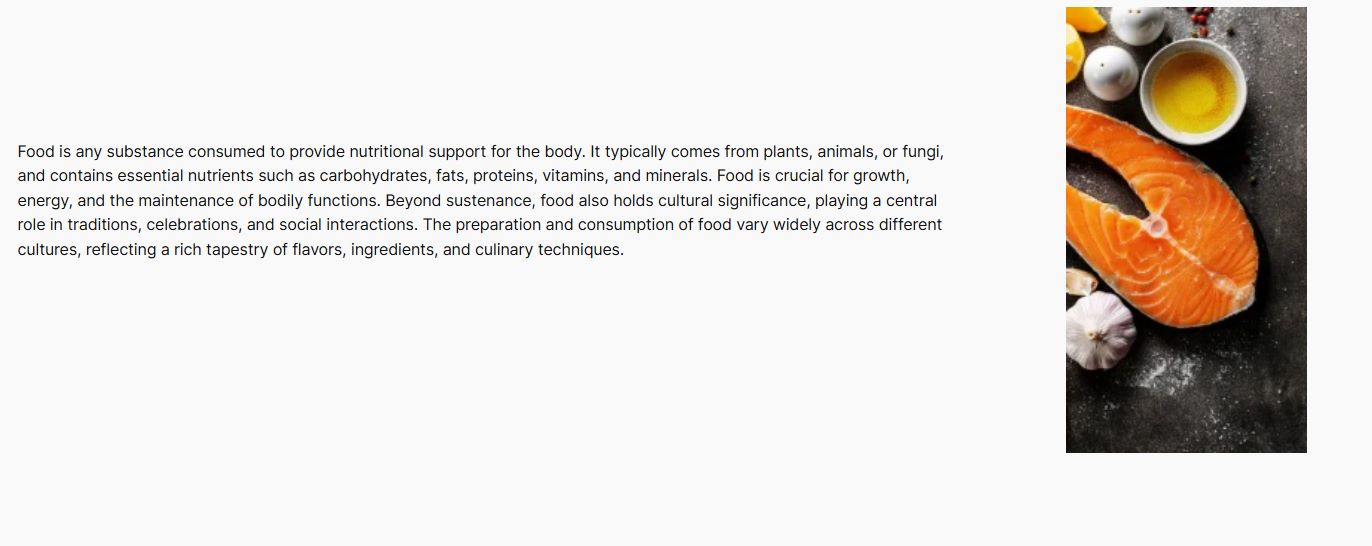
Inside each container, there’s a plus icon. Click on that icon to add a new block. Let’s say you want to display an image of food and its description.
Choose which container you want to add the description and add the paragraph block.

Now, in the next container, add the image block to display an image.

Here’s how your columns look like:
Looks boring, right? No worries! You can polish its appearance by adjusting the text style, font size and the background color. Simply click on the first container and proceed to the sidebar tool. Play with the settings until you are satisfied with the result. You may also go back to the container block settings to add background etc.

To create more columns, just repeat the process from adding the container block up to customizing the column content.

You can turn the static column content into dynamic content in Gutenberg block editor. Instead of manually updating content every time something changes, you can automate it by connecting your column blocks to real-time data.
The Dynamic Content module in GutenKit lets you pull content directly inside the Gutenberg editor from custom fields, post metadata, user info, and more.

How to Create Grids in Gutenberg
The GutenKit Post Grid block enables you to showcase your posts in an eye-catching grid layout. It offers extensive customization options, allowing you to adjust the number of columns, image sizes, and spacing between posts to suit your design preferences.
Here’s the simple way to do that:
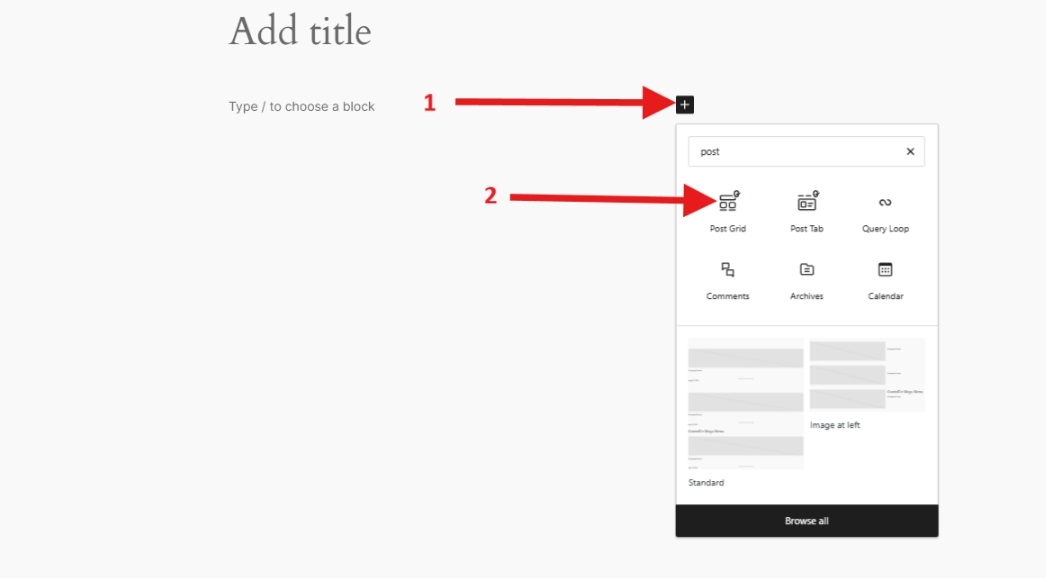
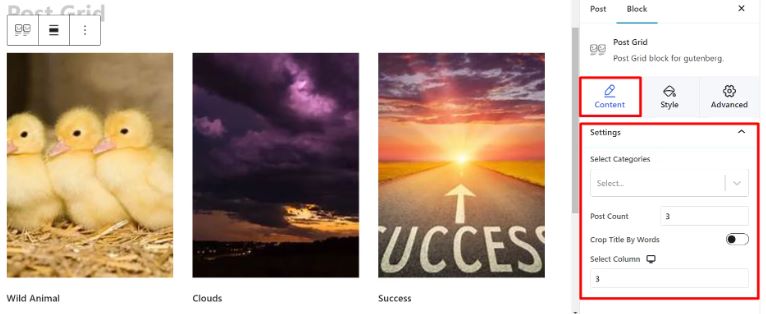
Go to Pages and choose Add New Page or you can open an existing post or page and edit with the block editor. Locate the “+” icon on the right side or top of the editor screen and click on it. In the block menu that appears, search for “Post Grid”. Once you find the one with GutenKit badge, either click on it or drag and drop it onto the block editor screen.
At the side toolbar, you will see the following:
Select Categories: Choose the post categories you’d like to display from this option.
Post Count: Specify the number of posts you want to showcase here.
Crop Title By Words: If you’d like to shorten post titles, enable this option to adjust the word count for cropping.
Select Column: Use this setting to determine the number of columns to display.
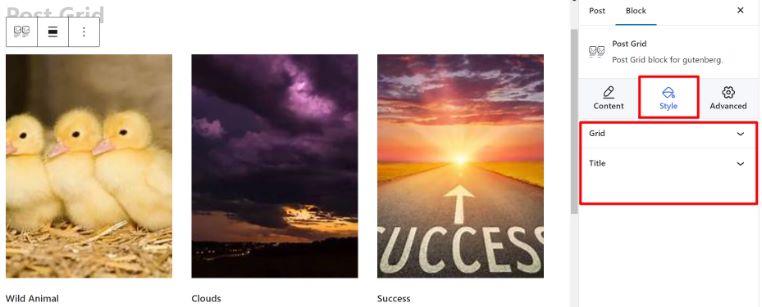
When you go to the Style section, you will see these parameters:
Grid: Adjust the height and gap using the available sliders.
Title: Customize the Typography, Color, Hover Color, and Margin with the styling options provided.
If you want to level up the appearance of your grid, just play the advanced settings which allows you to adjust the following:
- Layout
- Position
- Background
- Border
- Visibility
- Motion Effects
and so on……
And voila! Your grid is ready!

Another easy way to design grids in the block editor is by using the pre-designed patterns. To use the Gutenberg templates, just click on the GutenKit Template Library button in the block editor.
Once the library opens, head over to the Patterns tab. There, you’ll find a collection of ready-made post grid patterns. Pick the one that fits your layout, then simply change the content and customize the styling to match your brand.
It’s a quick and efficient way to build visually appealing sections without starting from scratch. Plus, it helps maintain consistency across your site with just a few clicks.
Common Problems and Fixes When Creating Columns and Grids in Gutenberg
Creating columns and grids is generally straightforward, but you may occasionally encounter layout issues. These problems often happen due to theme styles, spacing settings, or responsive design adjustments.
Below are some common problems and practical solutions to help you fix them quickly.
1. Columns Stack Incorrectly on Mobile
Columns look perfect on desktop but appear misaligned on mobile devices. If this happens, simply adjust the responsive settings so columns stack vertically on smaller screens.
So, when adding columns, make sure you:
- Reduce the number of columns for mobile devices.
- Enable stacking options if available.
- Use the tablet and mobile preview modes in the editor to test layouts.
This ensures your layout remains readable and user-friendly across all devices.
2. Too Much Space Between Columns
Large gaps appear between columns, making the layout look unbalanced. Simply, modify the column spacing or gap settings by:
- Reducing the column gap value.
- Adjusting padding inside the columns.
- Checking if the theme is adding extra margins.
3. Grid Items Are Not Aligned Properly
If grid items appear uneven, with different heights or misaligned elements, make sure each grid item follows the same structure. Here are some things you can do to have a properly aligned grid:
- Use images with the same dimensions.
- Keep text lengths similar.
- Apply equal padding to all grid items.
Some blocks also include an equal height option, which can help maintain consistent alignment.
4. Content Overflows Outside Columns
If images or long text extend beyond the column boundaries, it requires optimization within columns by:
- Resizing large images before uploading.
- Using responsive image settings.
- Adjusting column width or container padding.
- Breaking long text into smaller paragraphs.
5. Columns Look Different After Changing Themes
After switching themes, column layouts may shift, spacing may change, or alignment may break. Check the container width settings, column alignment, and theme-specific spacing styles. Then adjust the layout settings within the editor.
6. Columns Don’t Stay Equal Width
If columns appear uneven, you only need to manually set column widths or reset the column structure. You can do this by:
- Select the Columns block.
- Adjust width percentages for each column.
Ensure all columns have equal width settings if needed.
FAQs
Are Gutenberg columns and grids responsive?
Can You add different background colors to each column?
How do You align content within columns?
Is it possible to create complex grid layouts without coding?
Use these columns and grids to build high-converting popups that drive results. Learn how to create WordPress popups in Gutenberg with custom designs and smart display conditions.
Wrapping Up
Mastering the use of columns and grids in Gutenberg can significantly enhance the visual appeal and functionality of your WordPress site. By following these simple steps and utilizing GutenKit’s container block, you can create professional and engaging layouts with ease.
Why GutenKit?
- A Gutenberg page builder column.
- Fully customizable grids and columns in WordPress Gutenberg.
- Drag and drop interface.
- User-friendly interface ideal for beginners.
Experiment with different configurations and styles to find the perfect design for your content. With practice, you’ll be able to craft stunning pages that captivate your audience and elevate your site to new heights.
Leave a Reply