Guiding customers to their desired products is a top priority for eCommerce website owners. One of the most effective ways to streamline this process is by adding WooCommerce product categories to your WordPress menu.
When visitors hover over a menu item linked to a product category, they can instantly see subcategories, allowing for better product category showcasing within a compact space. This practice not only improves site navigation but also enhances the overall shopping experience.
In this guide, we’ll show you how to add WooCommerce product category in WordPress menu, helping you create a user-friendly and efficient shopping environment.
Why Should You Add WooCommerce Product Category in WordPress Menu
Adding WooCommerce product categories to the website menu is important because it boosts your sales.
This feature clearly indicates where shoppers can find their desired products in the menu, no matter where they are on the website. Due to easy navigation, customers will experience no friction when selecting their desired products.
Once you’ve added a WooCommerce category to a menu item, you can also include multiple submenus for subcategories underneath it. For example, a clothing brand’s website navigation might have a WooCommerce category for men, and within that, other subcategories such as top wear or bottom wear.
In this way, search engines can prioritize important pages for indexing, which can benefit your overall website’s SEO. A major benefit of adding a WooCommerce product category to the navigation menu is for mobile users. Instead of scrolling extensively, they can quickly access products directly from the header area.
Method 1: Adding WooCommerce Product Category in Menu Using Classic WordPress Theme
In the first part, we’re going to show how to add product categories to classic WordPress themes. However, if you’re a Gutenberg block-based theme user, you can skip this part and move to method two.
Generally, traditional theme users incorporate a page builder to add additional functionalities and customization to their websites.
In our tutorial, we’re using the following themes and plugins. So, install and activate them by following this guide.
Add Product Category & Product Tag to WP Menu
To get started, navigate to Appearance > Menus from your WordPress dashboard. If your website doesn’t have a menu, create one first. Then, look at the top-right of the menu editor page and click “Screen Options”.
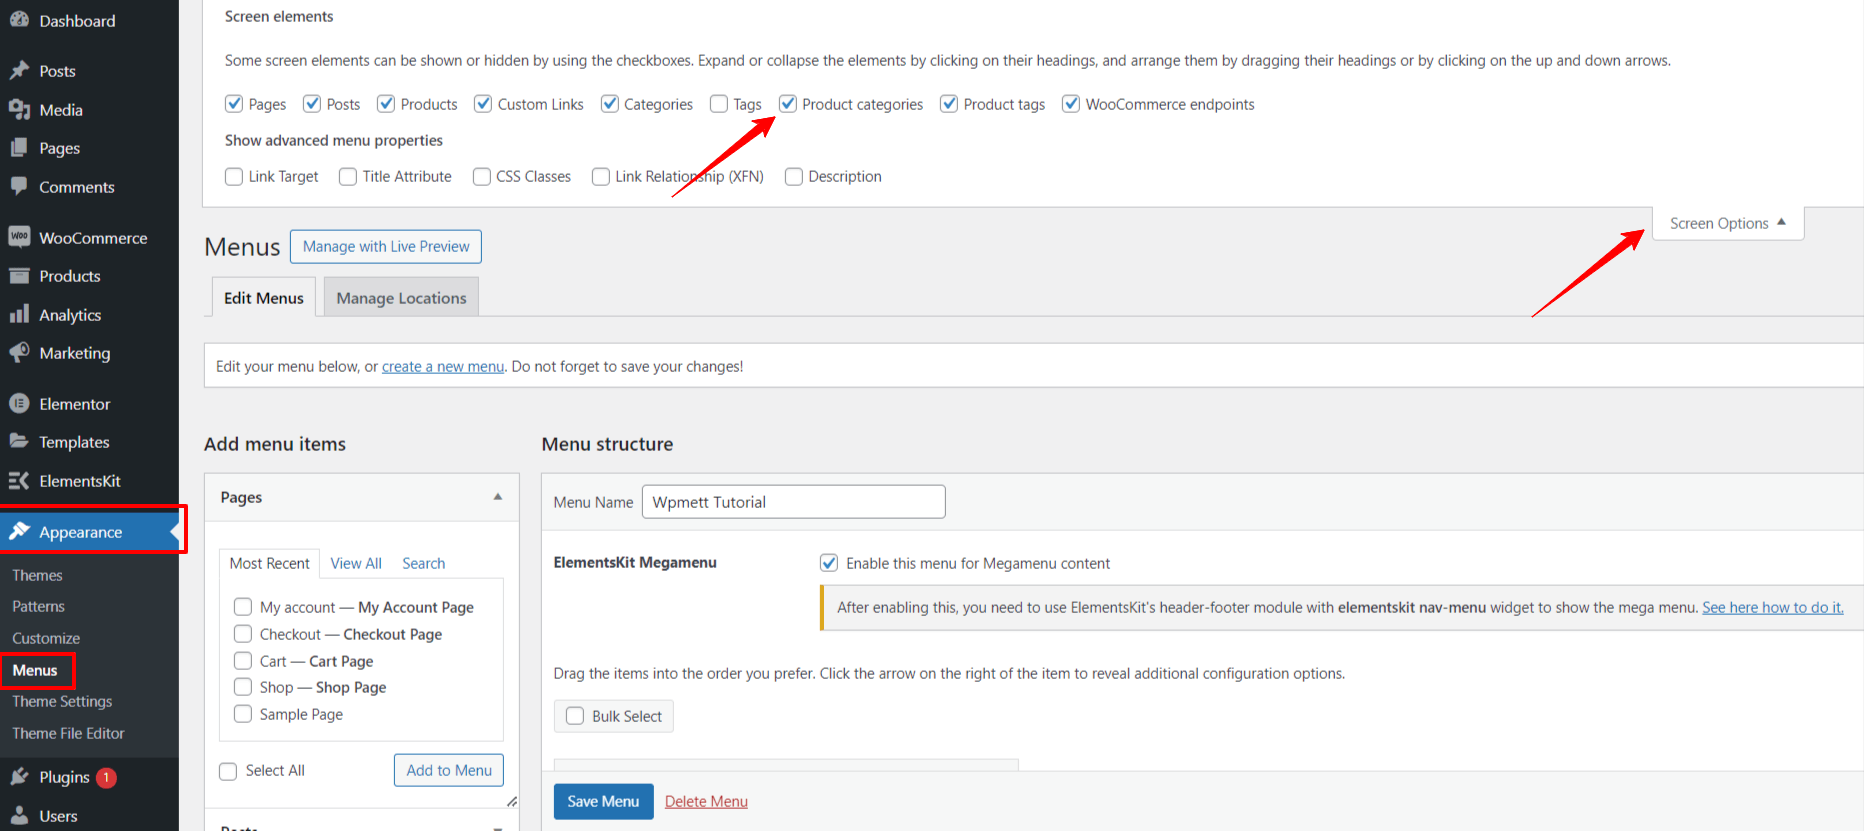
It will expand an area with various elements to add your menu. Check the boxes next to “Product Categories”. Doing this will enable you to add all the product categories and tags to your menu options.
Here, you’re only left with some click works only. In the left-hand column of the screen, you’ll find new options such as Products, Product Tags, and Product Categories. Expand their dropdown and select the checkboxes for the items you want to include in your website’s navigation menu.
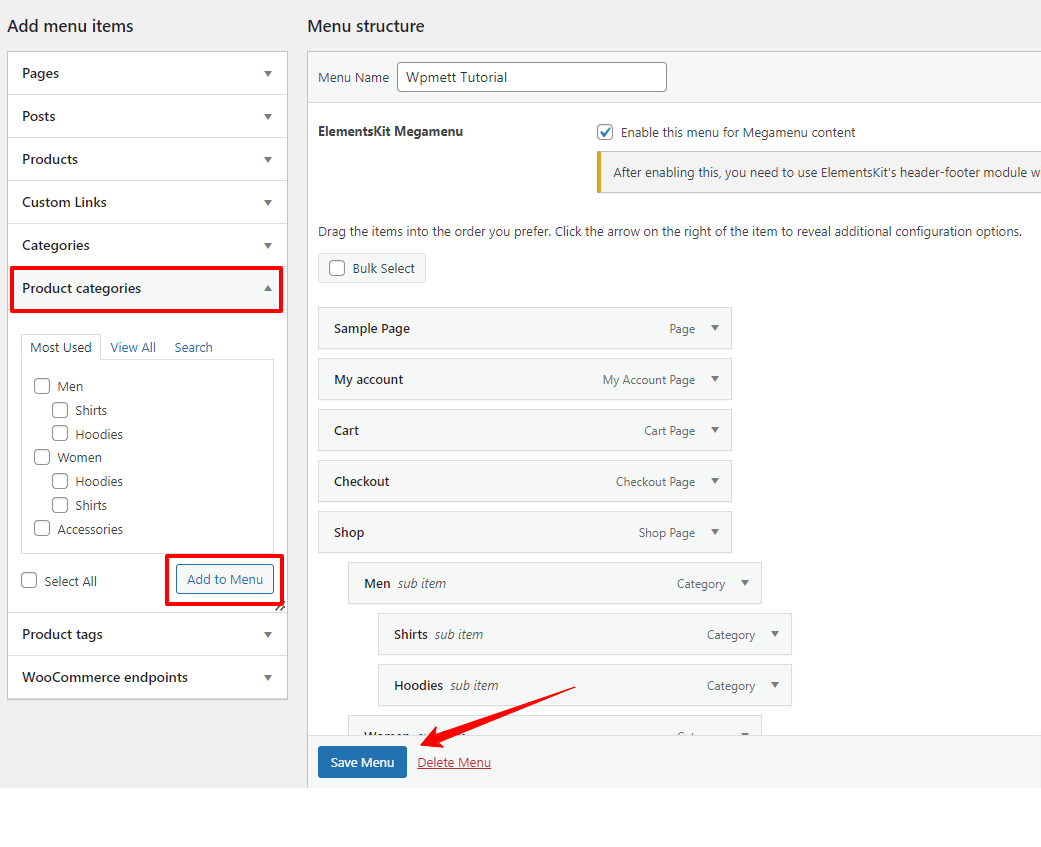
Next, hit the “Add to Menu” button. Adjust the menu hierarchy as per your preference. And, once you’re done, click on the “Save Menu” button.
Now, if you preview or see the navigation menu of your WordPress website, you won’t find it well-organized and responsive. Visitors can’t navigate to their desired product category.
So, what’s the solution here?
The best way to showcase a range of menu elements in a simplified and interactive way is by using a mega menu plugin. And, we recommend the ElementsKit Mega Menu builder for a classic theme user.
This full-featured Elementor addon lets you add stunning horizontal and vertical mega menus to displays without coding hassles.
Gamify Product Category in WP Menu With ElementsKit Mega Menu Widget
To proceed with the ElementsKit mega menu feature, you need to Check the box “Enable the menu for Megamenu Content”. Then, hover over any item in the menu editor area, and it will show the mega menu settings icon. Click on it.
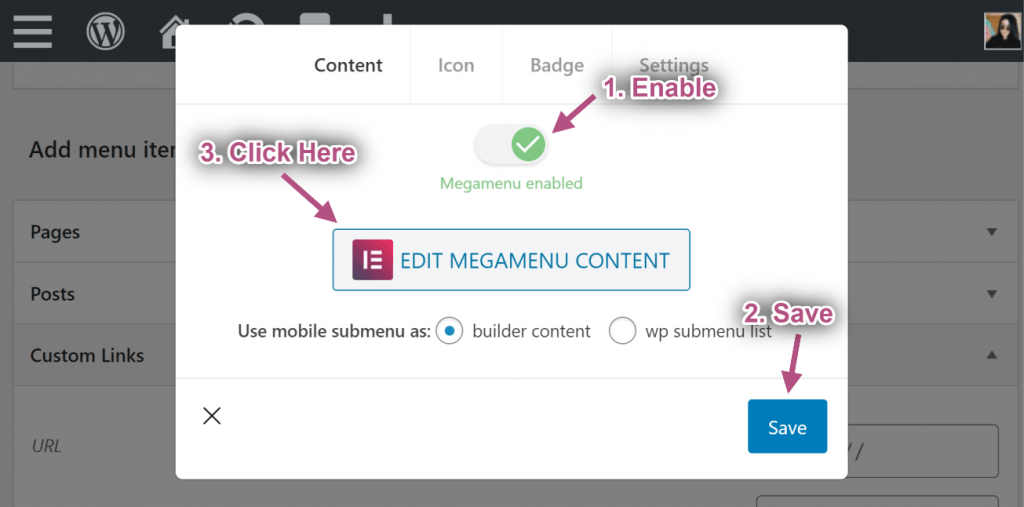
At this moment, your screen will display a popup. Here, toggle the Megamenu button. Doing this will enable the “: EDIT MEGAMENU CONTENT” option. Just click on it.
Next, the ElementsKit mega menu builder dashboard will launch before you, Now, you have the entire Elementor and ElementsKit control to create and customize your mage menu.
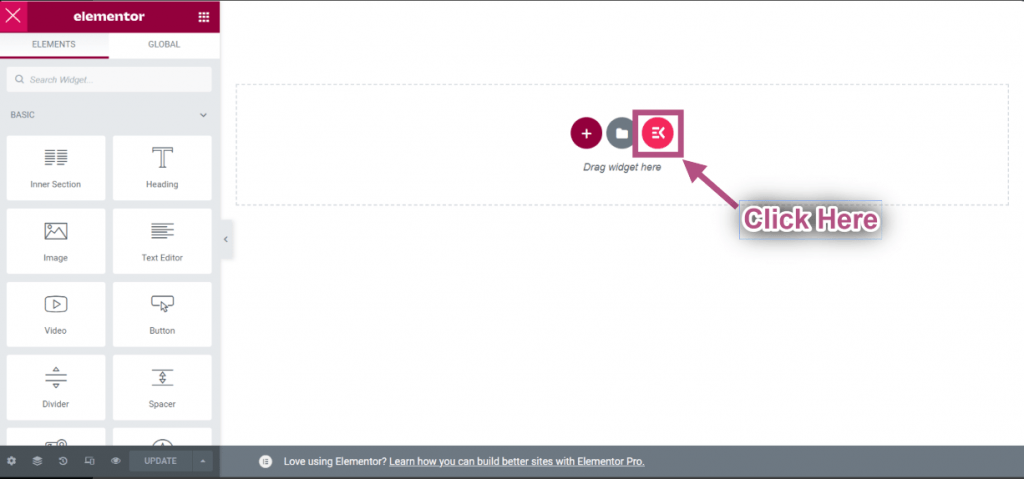
For our tutorial, we’re showing the easiest way. Click the ElementsKit template icon. It will pop up a screen with loads of templates.

First, click on the “Section” option from the top right. Then, go to the “Category” dropdown and choose the Megamenu” option.
Once you choose the suitable template for the mega menu to showcase the product category of your WooCommerce website, click the Insert and wait for some moment.
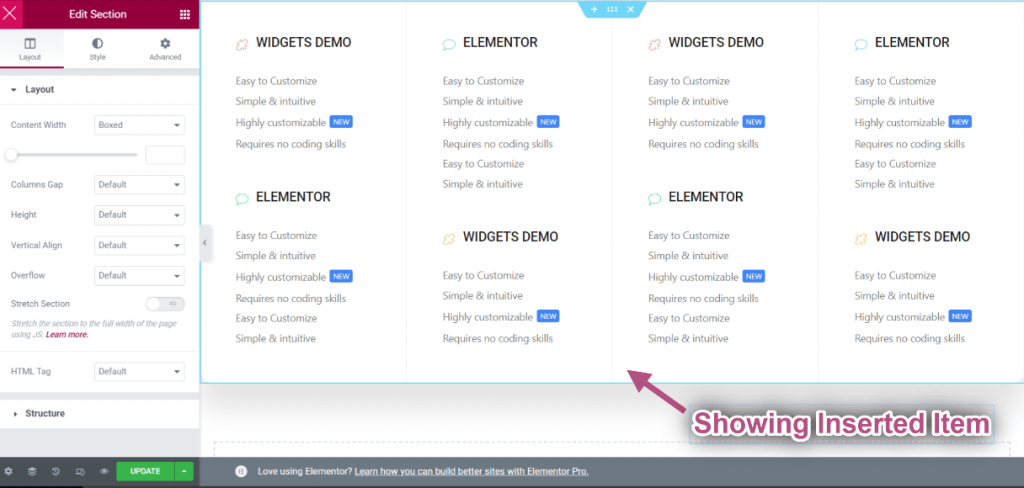
When your inserted item loads successfully go to the column or widget settings.
Here, you will adjust the content and design of the premade layout to match your brand style. Once done, click the update button and close the window.
Next, we’ll focus on customizing the icon and badge, as well as adjusting the header settings. Move to the Icon tab, and set your icon and its color. Also, do the same for badge text customization.
The last tab of this tab is “Settings” to set the position and width of your mega menu and enable the Ajax load. And, when you are done with everything, hit the “Save” button. To exit this popup, click on the “X” icon. And, we’ll end our “adding WooCommerce Product category in the menu of your classic theme” journey by clicking the “Save Menu” option.
Method 2: Add WooCommerce Product Category in Block-Based Theme Menu
The second method of this tutorial showcases how to add WooCommerce product categories to the Gutenberg block-based theme. And, in this part, we’re using the GutenKit plugin. It simplifies the creation and customization of mega menus within your block editor area.
GutenKit supports a powerful mega menu block that eliminates the need for tedious technical efforts of Gutenberg users. They will just drag-and-drop design elements as like any flexible page builder plugin.
Let’s see a real scenario:
Add Product Category & Product Tag to Block Editor Menu
it’s important to understand that in GutenKit or Gutenberg, menu items are added by linking to either internal or external web pages. Therefore, you’ll need the URLs for those specific product categories and tags to add a WooCommerce product category or tag to your website’s navigation menu.
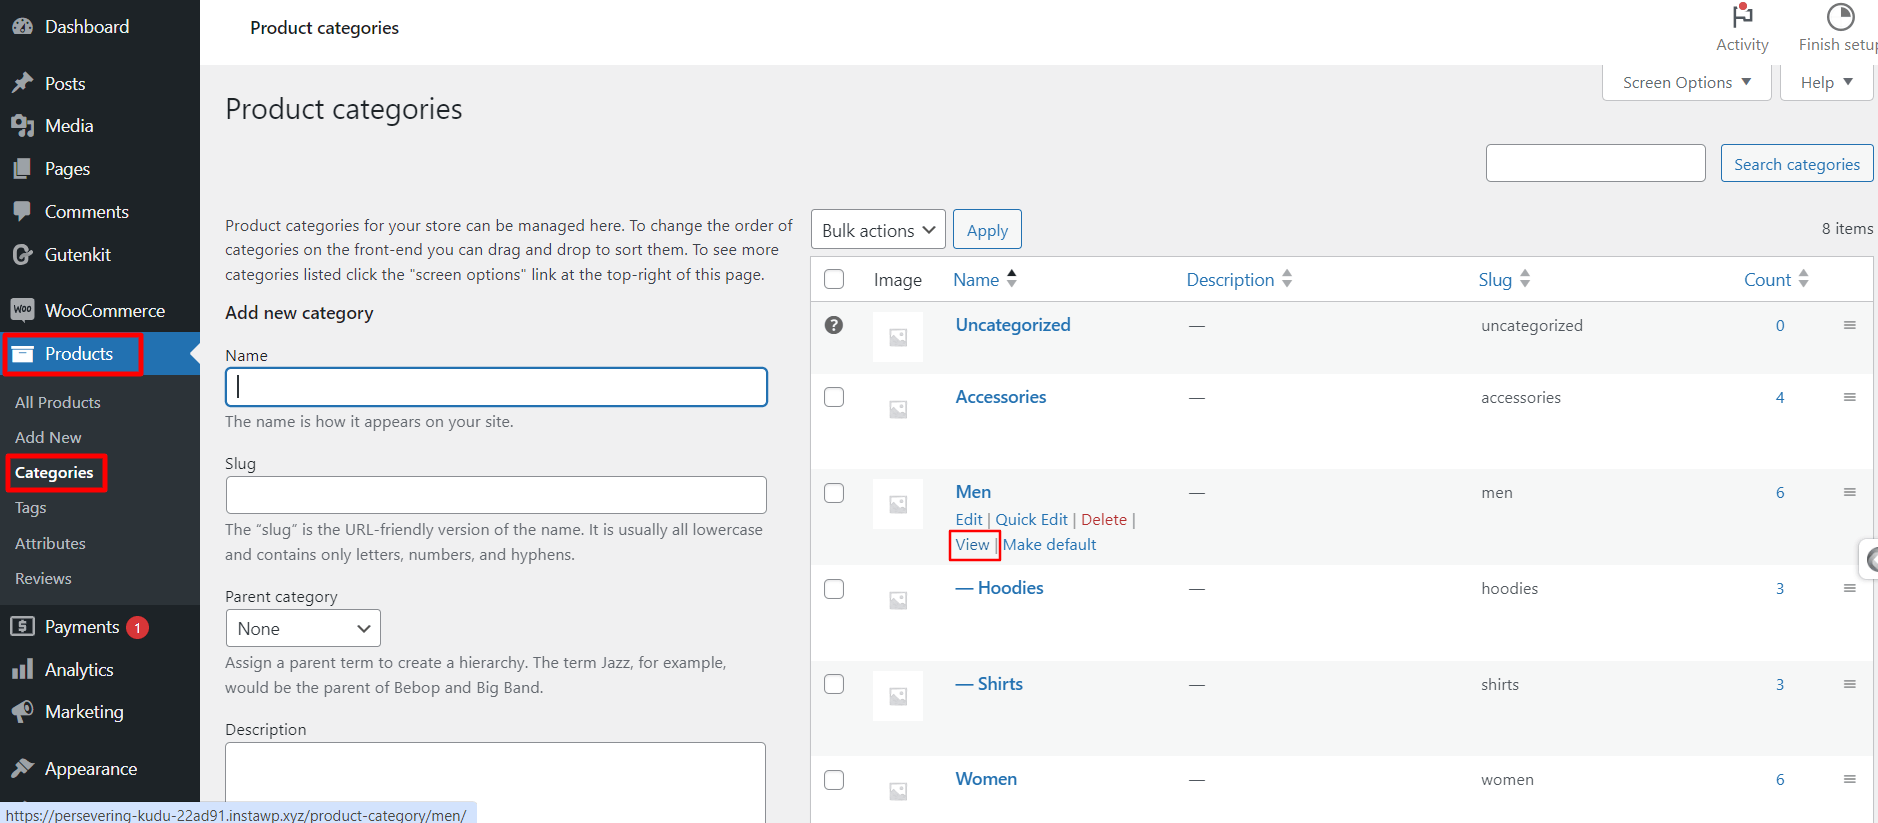
For this, from your Gutenberg website’s dashboard, follow Products > Categories. You will see all the product categories of your WooCommerce website. From this page, click the “View” option of any category, which will load a page in a new tab of your browser.
Then, from the browser’s search bar of the browser, copy the URLs and later you will add them to the GutenKit nav menu block settings as shown below.
Now, we’ll show you how to insert the WooCommerce product category in the WordPress website menu.
Go to your WordPress dashboard, insert a new page or visit an existing page. Click the ”+” icon to add a block and search for the GutenKit Nav Menu block.
Once you see it, click it or drag it to the editor area. The GutenKit Nav Menu block loads with two options. You can choose a premade pattern or build your Gutenberg website menu from scratch.
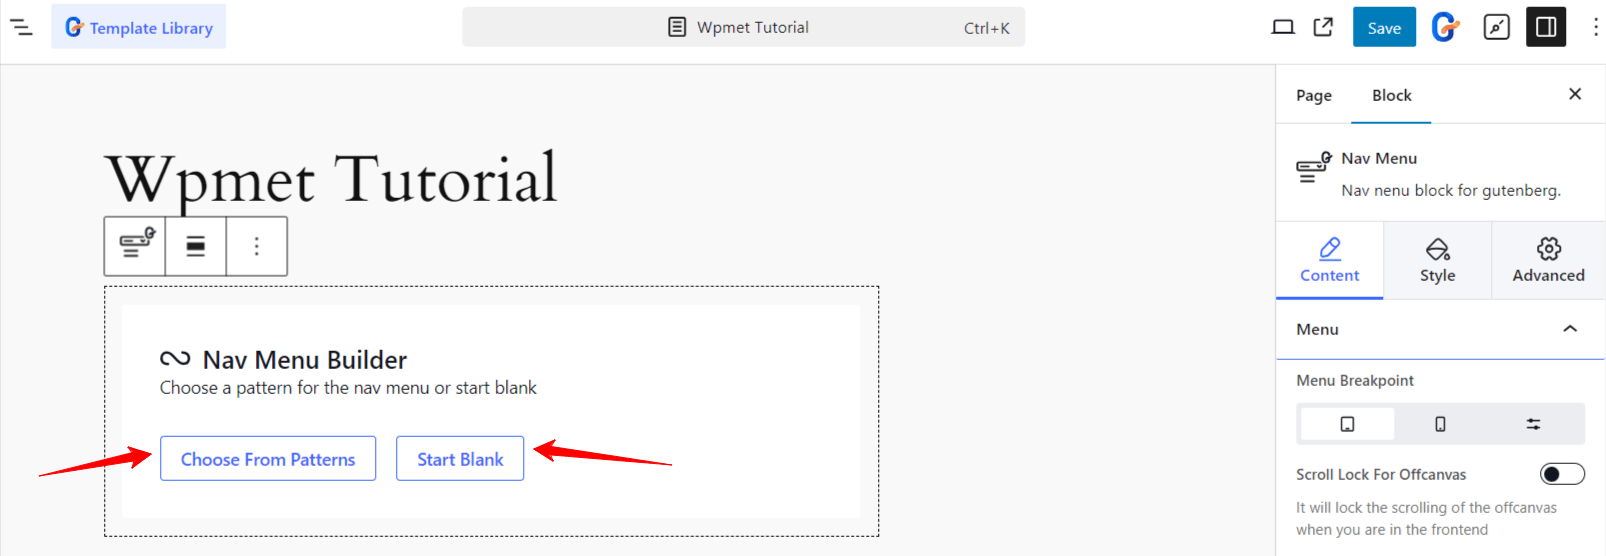
The easiest way is to work with the premade header template. Hit the “Choose From Patterns” button and all the available GutenKit header patterns will appear in a popup.
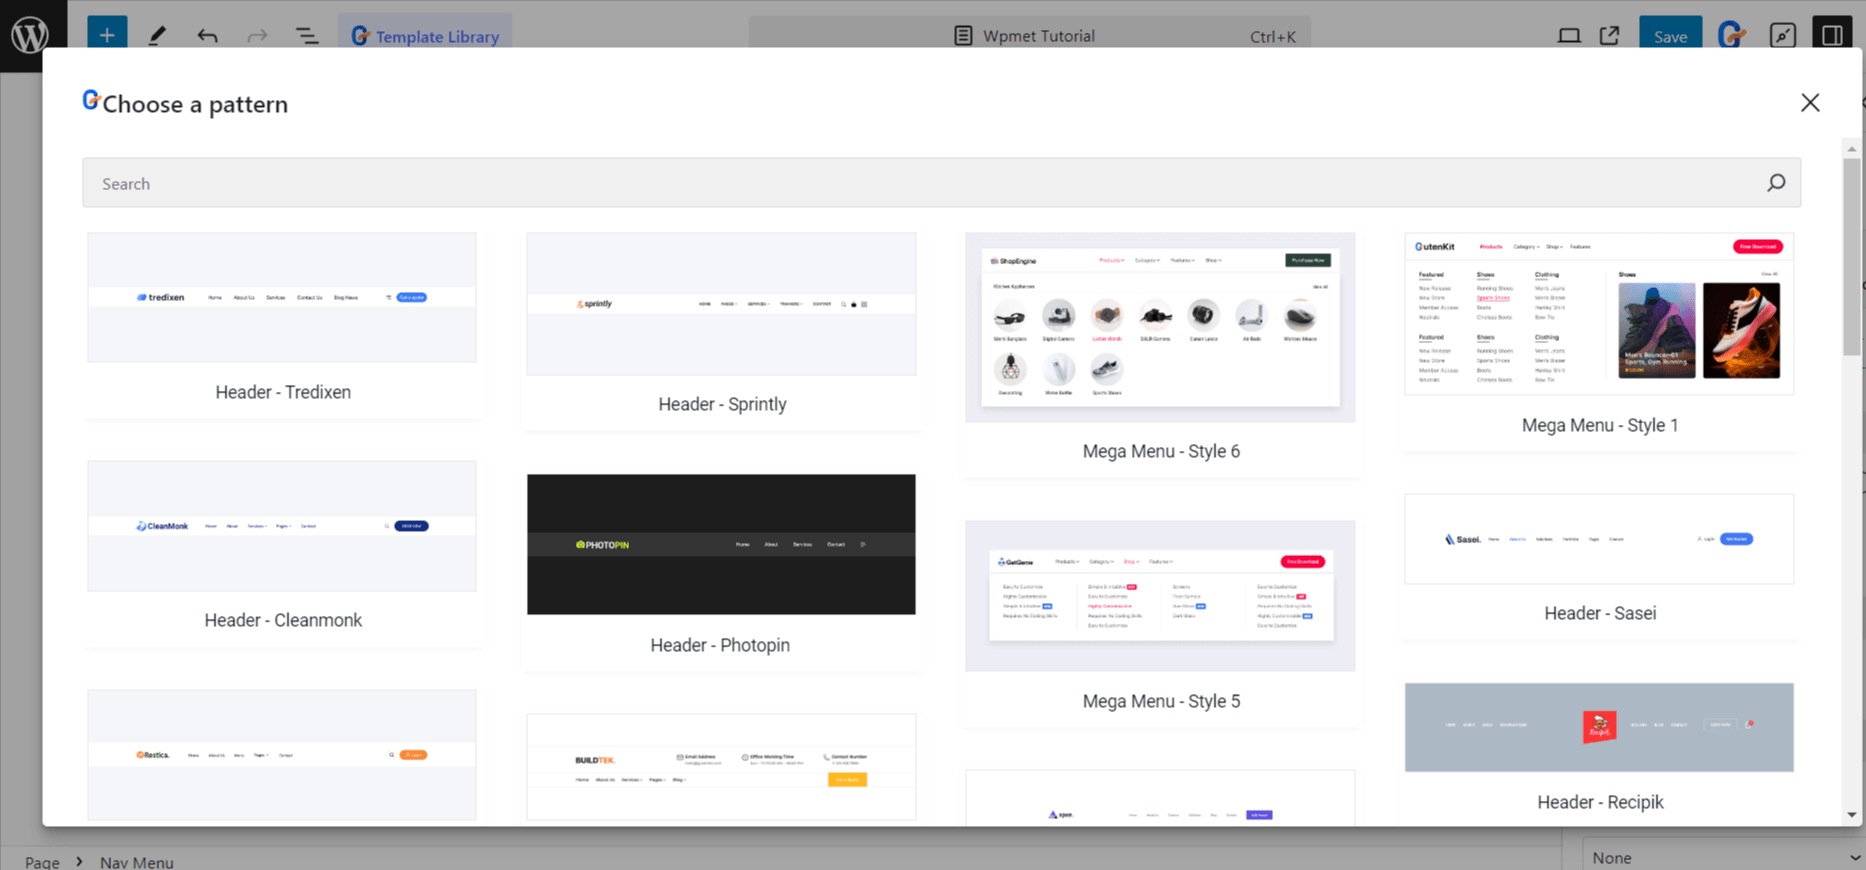
Next, import your preferred menu patterns. Then, you can insert the WooCommerce product category link in the navigation bar. Plus, you will adjust other menu items based on your website navigation.
On the other hand, if you want to start from scratch, click the “Start Blank” button. Then, the GutenKit Nav Menu block will load with some menu items based on the website’s published pages. You can keep them or delete them.

To add a new menu item, click the “blue-circled +” icon. This will let you add an existing published page or URL to your website. You just need to insert the product category URL and define the menu label. This is how we can add a WooCommerce product category to Gutenberg’s navigation menu.
The GutenKit Nav Menu block is a robust solution to customize your website’s menu. Even, you can show your product category with a mega menu as well.
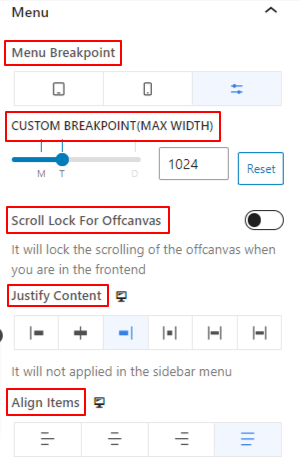
From the GutenKit Nav Menu block settings, click the “Go to Parent” option. You will see various customizing settings to style the WordPress navigation menu. From the “Content” tab you can set custom breakpoints, define submenu revealing animations, and show off-canvas menu on scroll.
Plus, you can customize the menu wrapper and menu items to create a more visually appealing navigation menu for your product categories.
For the mobile menu, the GutenKit Nav Menu block lets you select a different logo. And, most importantly, you can insert a hamburger icon from a big icon library supported by “Font Awesome” and built-in GutenKit icons or upload an SVG file for it. Then, style the hamburger icon in your own way.
Bonus Tips for Displaying WooCommerce Product Categories in Your WordPress Menu
Adding product categories to your website menu is one thing, but making them visually appealing to visitors can be a challenge. Although we have already talked about the customization and styling of the product category display in our tutorial, there are some additional practices that you should keep in mind, as listed below:
👉 First thing first, decide which product category you want to add to the navigation menu. You should highlight popular and best-selling categories in your top menu to attract customers.
👉 Also, make menu items more interactive with colors, icons, and badges. Display your customized icon that represents your brand. The plugins we used in our tutorial support uploading SVG files for your plugin.
👉 To showcase offers or discounted products, add quick links so that customers can jump into those pages directly.
👉 Customize the wrapper area of the mega menu card or nav bar to bring an aesthetic look.
👉 Configure the responsive settings of the menu to showcase product categories accurately on mobile and small devices.
👉 Use a no-code plugin to effortlessly configure and customize the product category showing in your navigation menu.
Wrap UP!
Since the navigation menu appears at the top of the web page, visitors can easily access the most important pages and links. eCommerce owners want to insert their main pages like blog, shop, my account, and product categories into the website navigational menu.
In this guide, we’ve outlined two methods for adding WooCommerce product categories to the menu. Additionally, we’ve highlighted useful plugins like GutenKit and ElementsKit, which allow you to implement this functionality and customize your menu with ease—no coding required.
Take some time to explore these options and create an engaging, user-friendly appearance for your WooCommerce product categories.


Leave a Reply