While Elementor facilitates with a drag-and-drop interface, WooCommerce introduces eCommerce capabilities to your virtual store. These two plugins give you default controls to add and customize WooCommerce products.
However, you can’t get ahead of the eCommerce race with these basic controls and settings. You need to look for another addon to reinforce advanced WooCommerce customization.
Here ShopEngine plays a significant role in making WooCommerce store creation a breeze. It allows you to go beyond the basics and smoothly adds WooCommerce products in Elementor with built-in templates, widgets, and modules.
So, this blog will highlight how to add WooCommerce product in Elementor to create archive, single product, and shop page from scratch or with pre-built templates. Bear with us till the end to unravel the ultimate store creation with ShopEngine.
Effortless store creation in Elementor with ShopEngine
Created WooCommerce pages with default features offer a general and basic look for all. It is impossible for your store to outperform with this default appearance.
However, you can excel in website customization with ShopEngine’s 74+ widgets and 20+ modules that let you customize pages in an intuitive Elementor interface. For example, you can customize WooCommerce pages by dragging and dropping required widgets on the Elementor editor. Here is a sample of how seamlessly a store can be created with ShopEngine’s provided widgets in the Elementor editor:
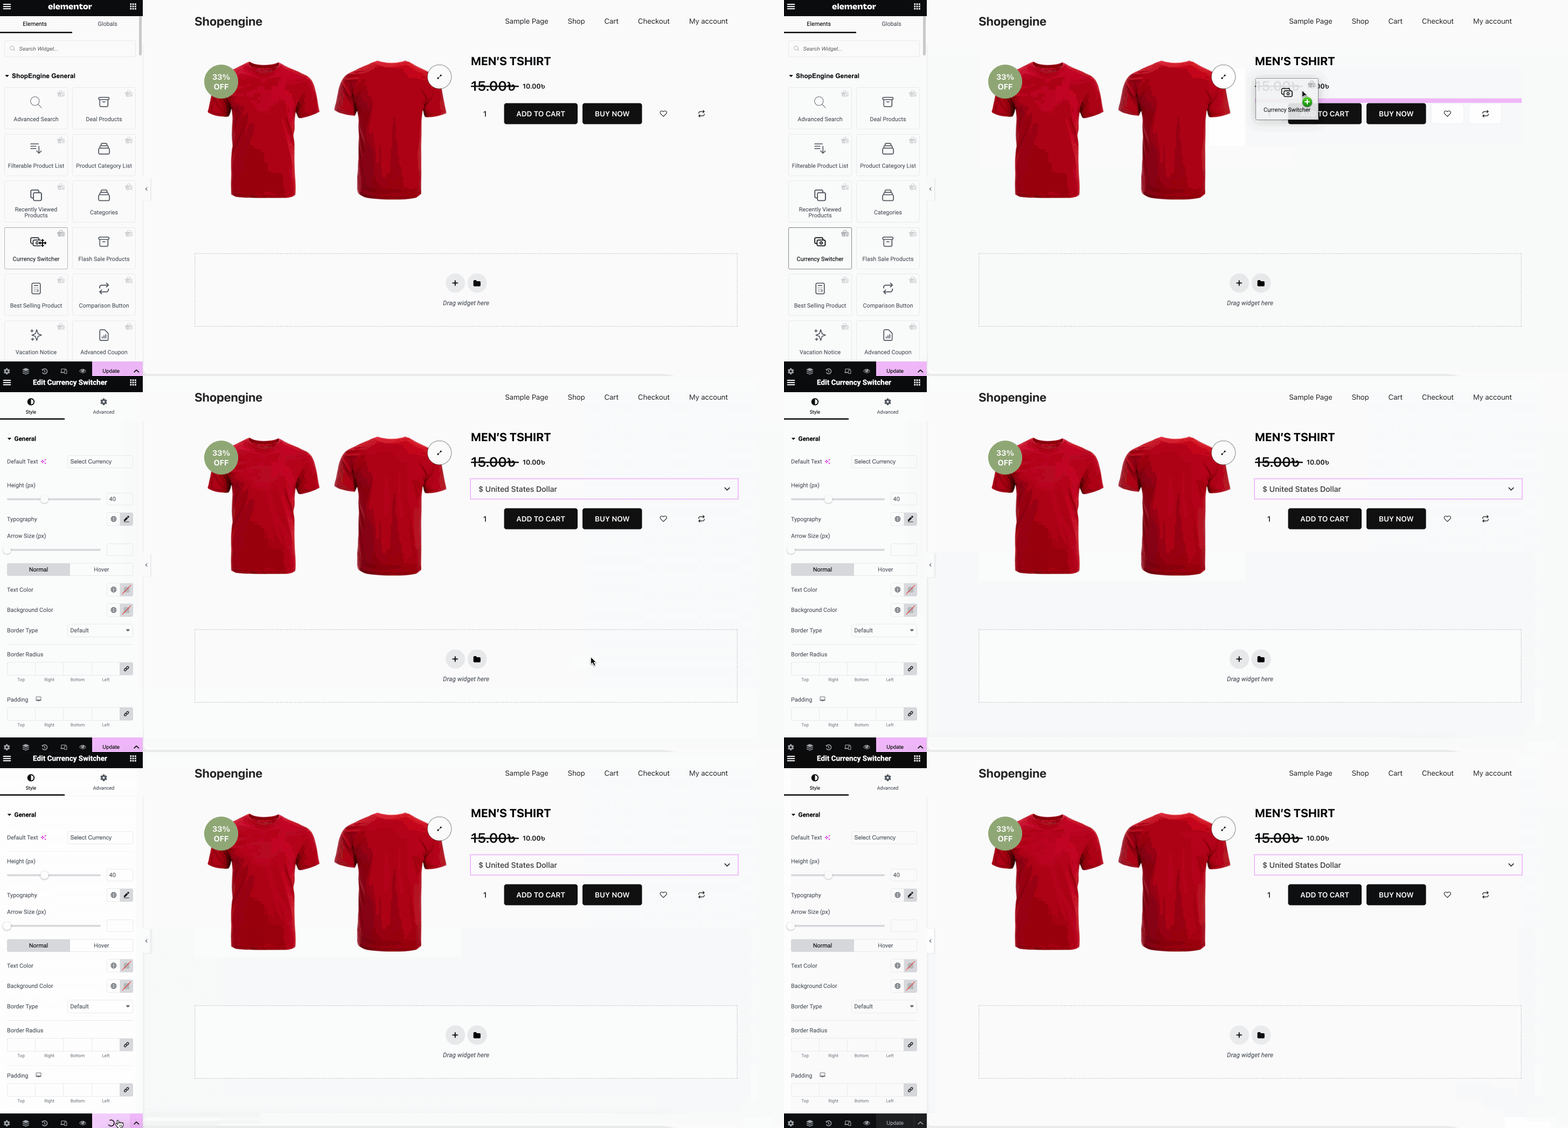

And, this is a final demo of created single product page for your store:
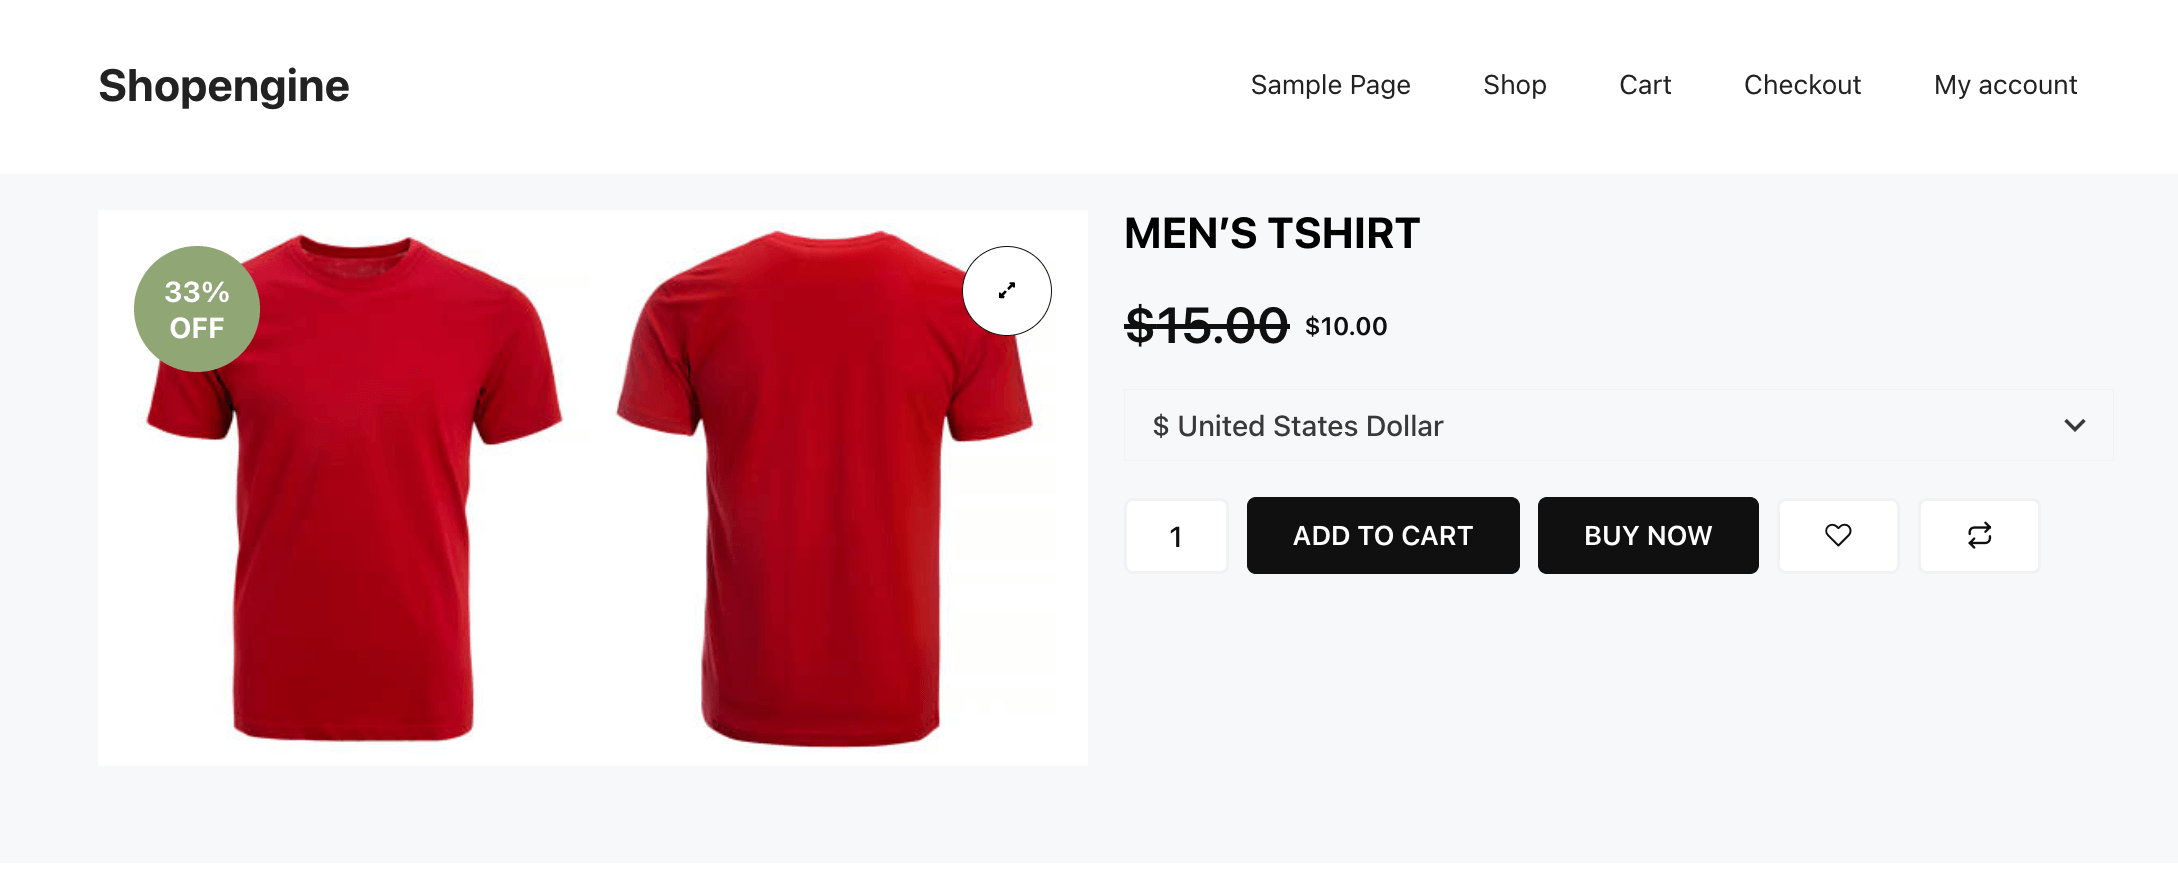

➡️ Check best WooCommerce page builders in WordPress.
How to add WooCommerce products in Elementor
ShopEngine offers an easy way to add and customize WooCommerce products in Elementor. Now, to add WooCommerce products in Elementor using ShopEngine, you need to follow some simple and quick steps.
Here we’ll show how to add an archive, single product, and shop page to your WooCommerce store using ShopEngine. Let’s jump into the complete guide:
Create and customize an archive page in Elementor
Creating a custom archive page using ShopEngine requires three steps. Go through the below steps to add an archive page without a hitch:
Step 1: Add an archive page template.
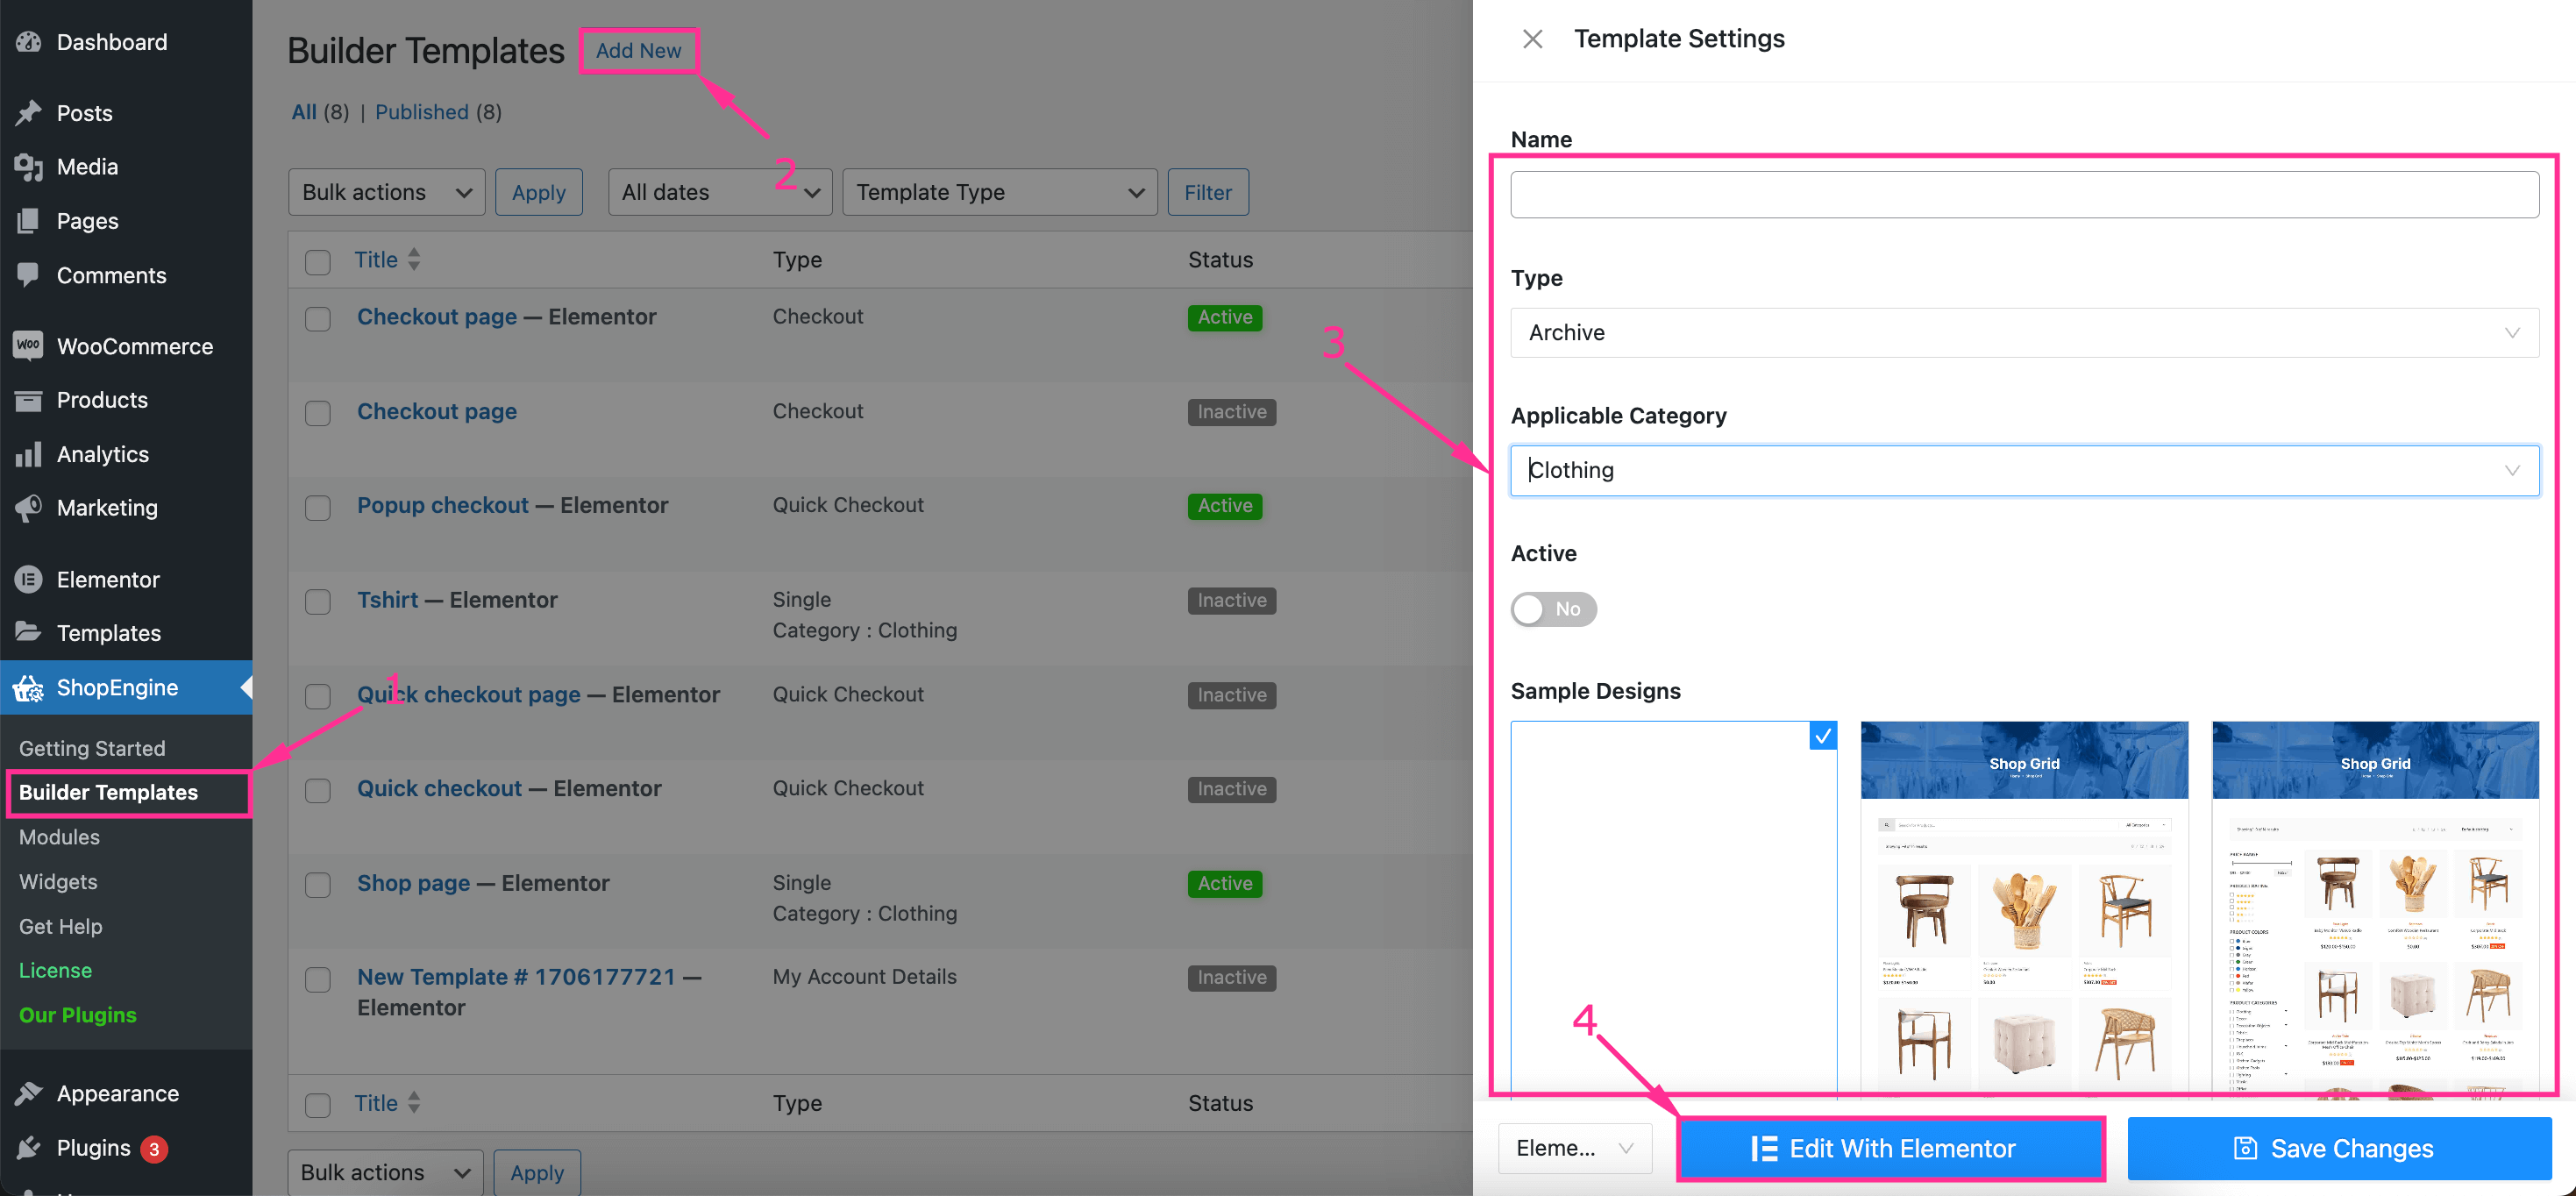
To add an archive page, you need to first create an archive page template. Navigate to ShopEngine >> Builder Templates and hit the “Add New” button.
This will open up a new tab from the right side. Now, add an archive template by filling out the following fields:
- Name: Give a name to your template like an archive page.
- Type: Select Archive from the drop and down menu.
- Applicable Category: Choose a category.
- Active: Turn on the toggle button to activate it.
- Sample Design: Pick the blank template. You can also select a pre-built template if you don’t want to do everything from scratch.
After filling out all the above fields, press the “Edit with Elementor” button. Now, you will be taken to the Elementor editor from where you have created an archive page by using different archive page widgets.

Step 2: Design and customize an archive page.
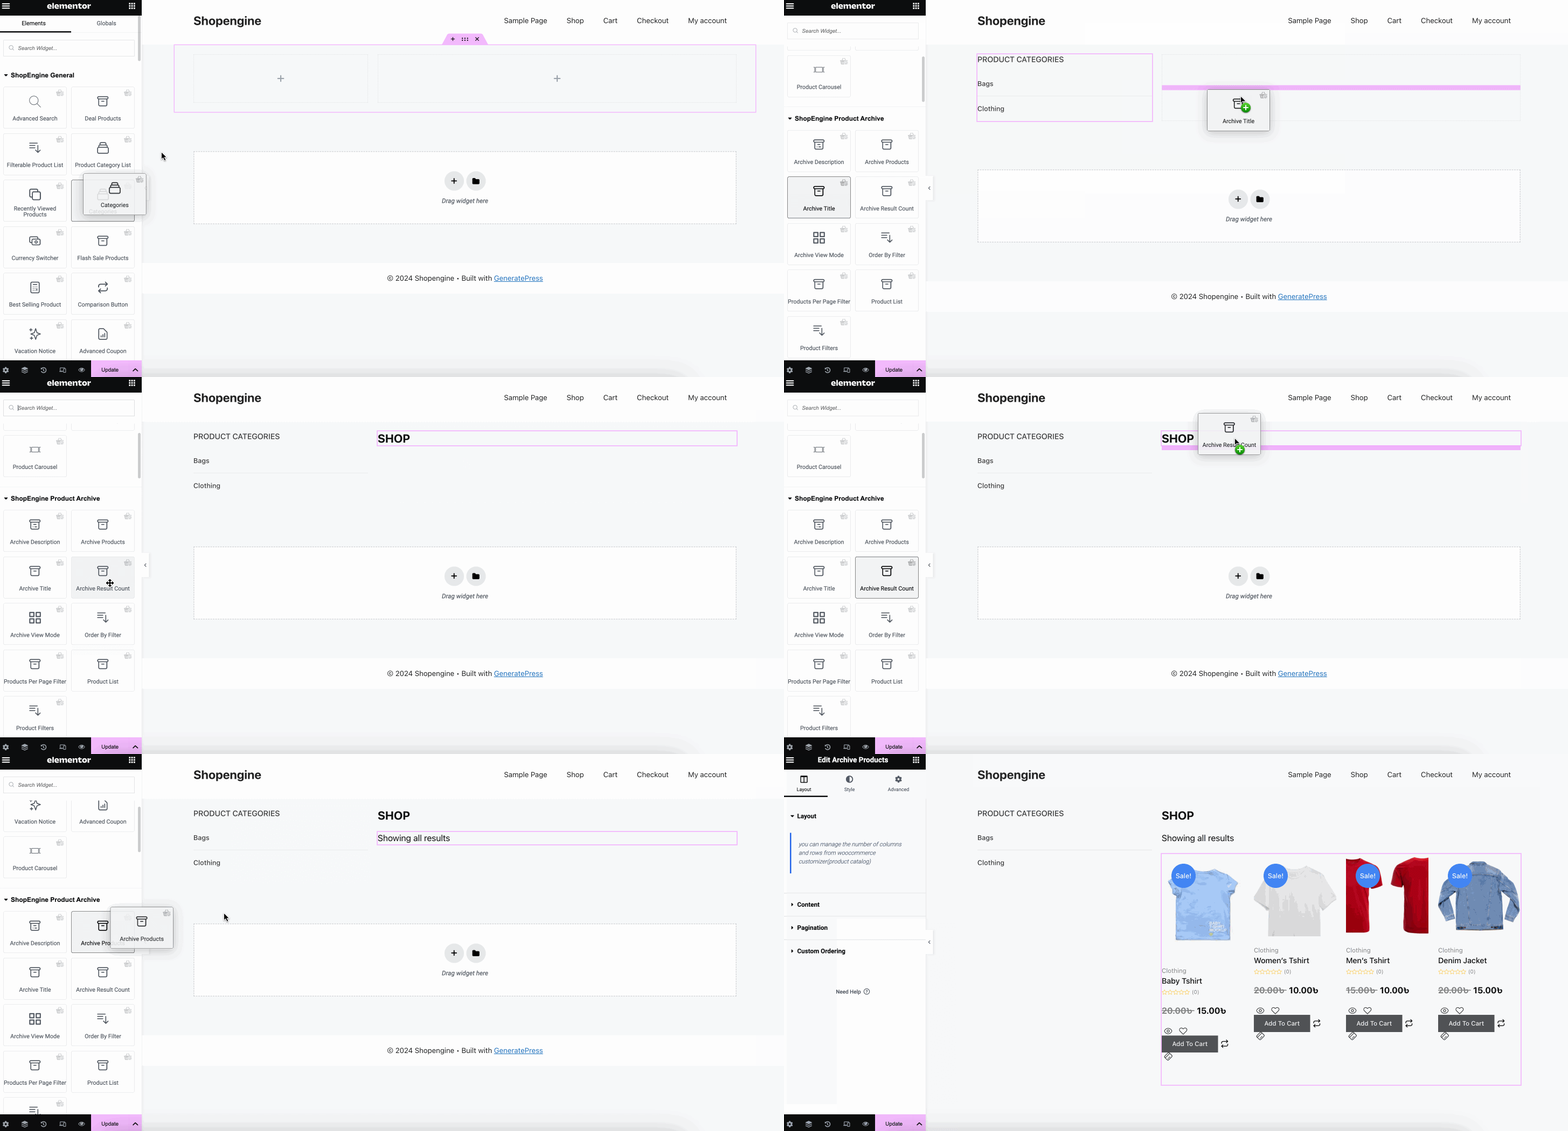
In the second step, you have to select a structure for your WooCommerce Elementor product layout.
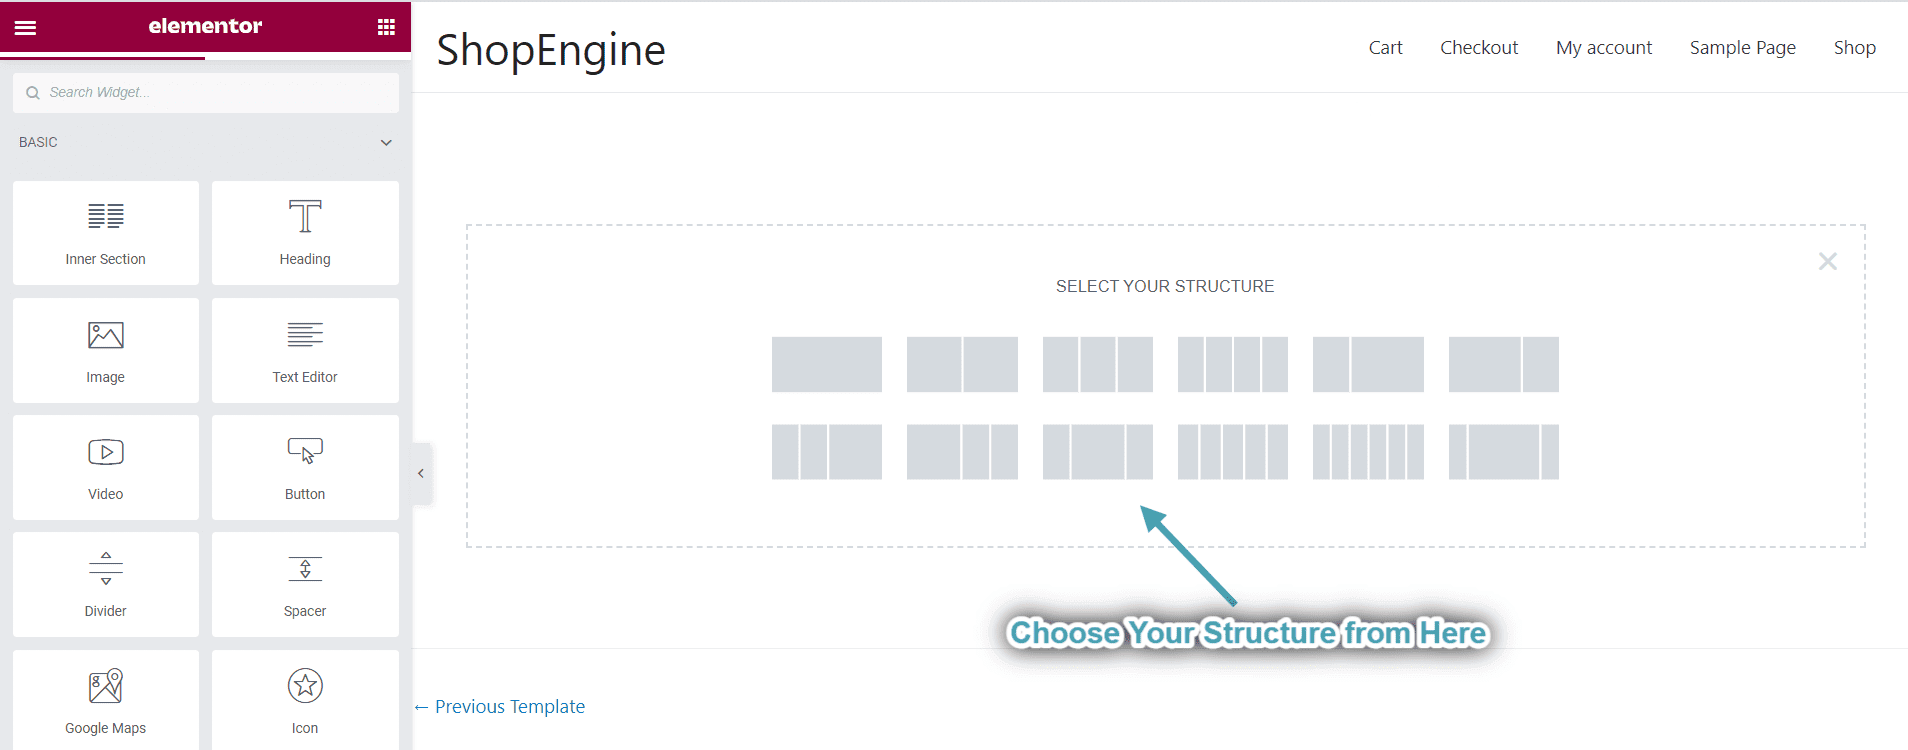

Now, build an archive page by dragging and dropping Categories, Archive Title, Archive Result Count, Archive Products, etc. Next to creating an archive page, you have to customize every section of your archive page by clicking on those sections.

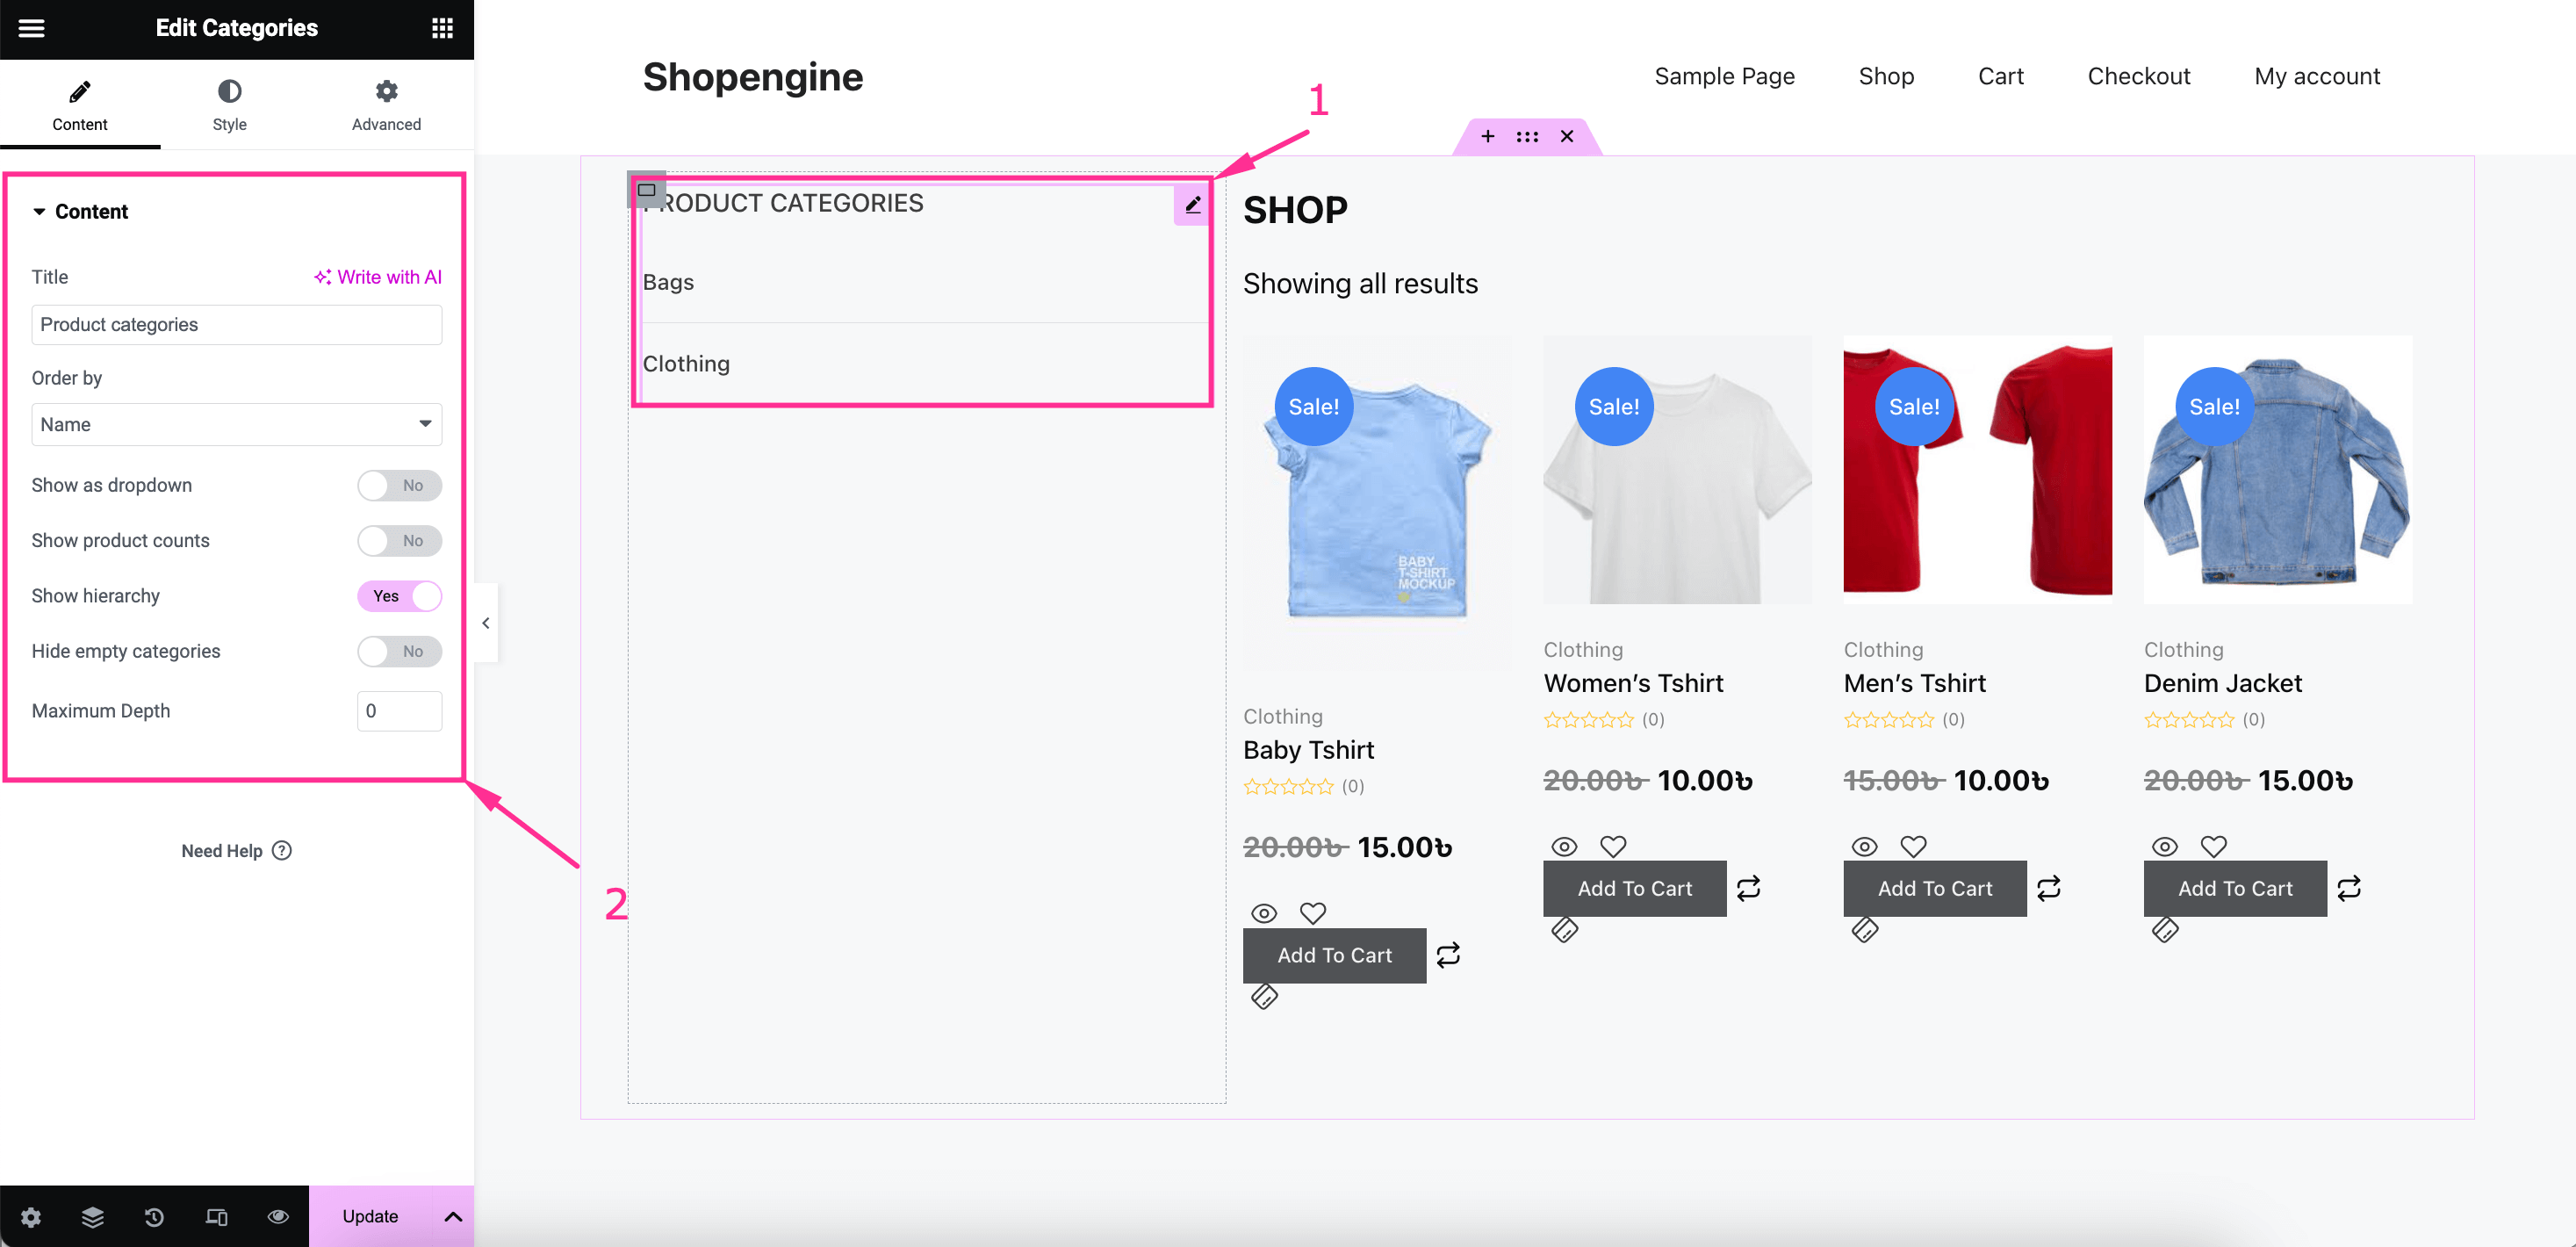
For example, if you want to customize the Categories section, press it, and on the left side you will see all the options for content editing. As for Categories, you will get all the options to adjust the following fields under the Content tab:
- Title: Insert title for categories.
- Order by: Select the orde in which you want to show your category items.
- Show as dropdown: Enable this option to show category items in dropdown format.
- Show product counts: Turn on this toggle button to show product counts along with items.
- Show hierarchy: Display hierarchy by enabling it.
- Hide empty categories: Activate this option to hide empty categories.
- Maximum Depth: You can also select maximum depth to showcase your Elementor WooCommerce product category.

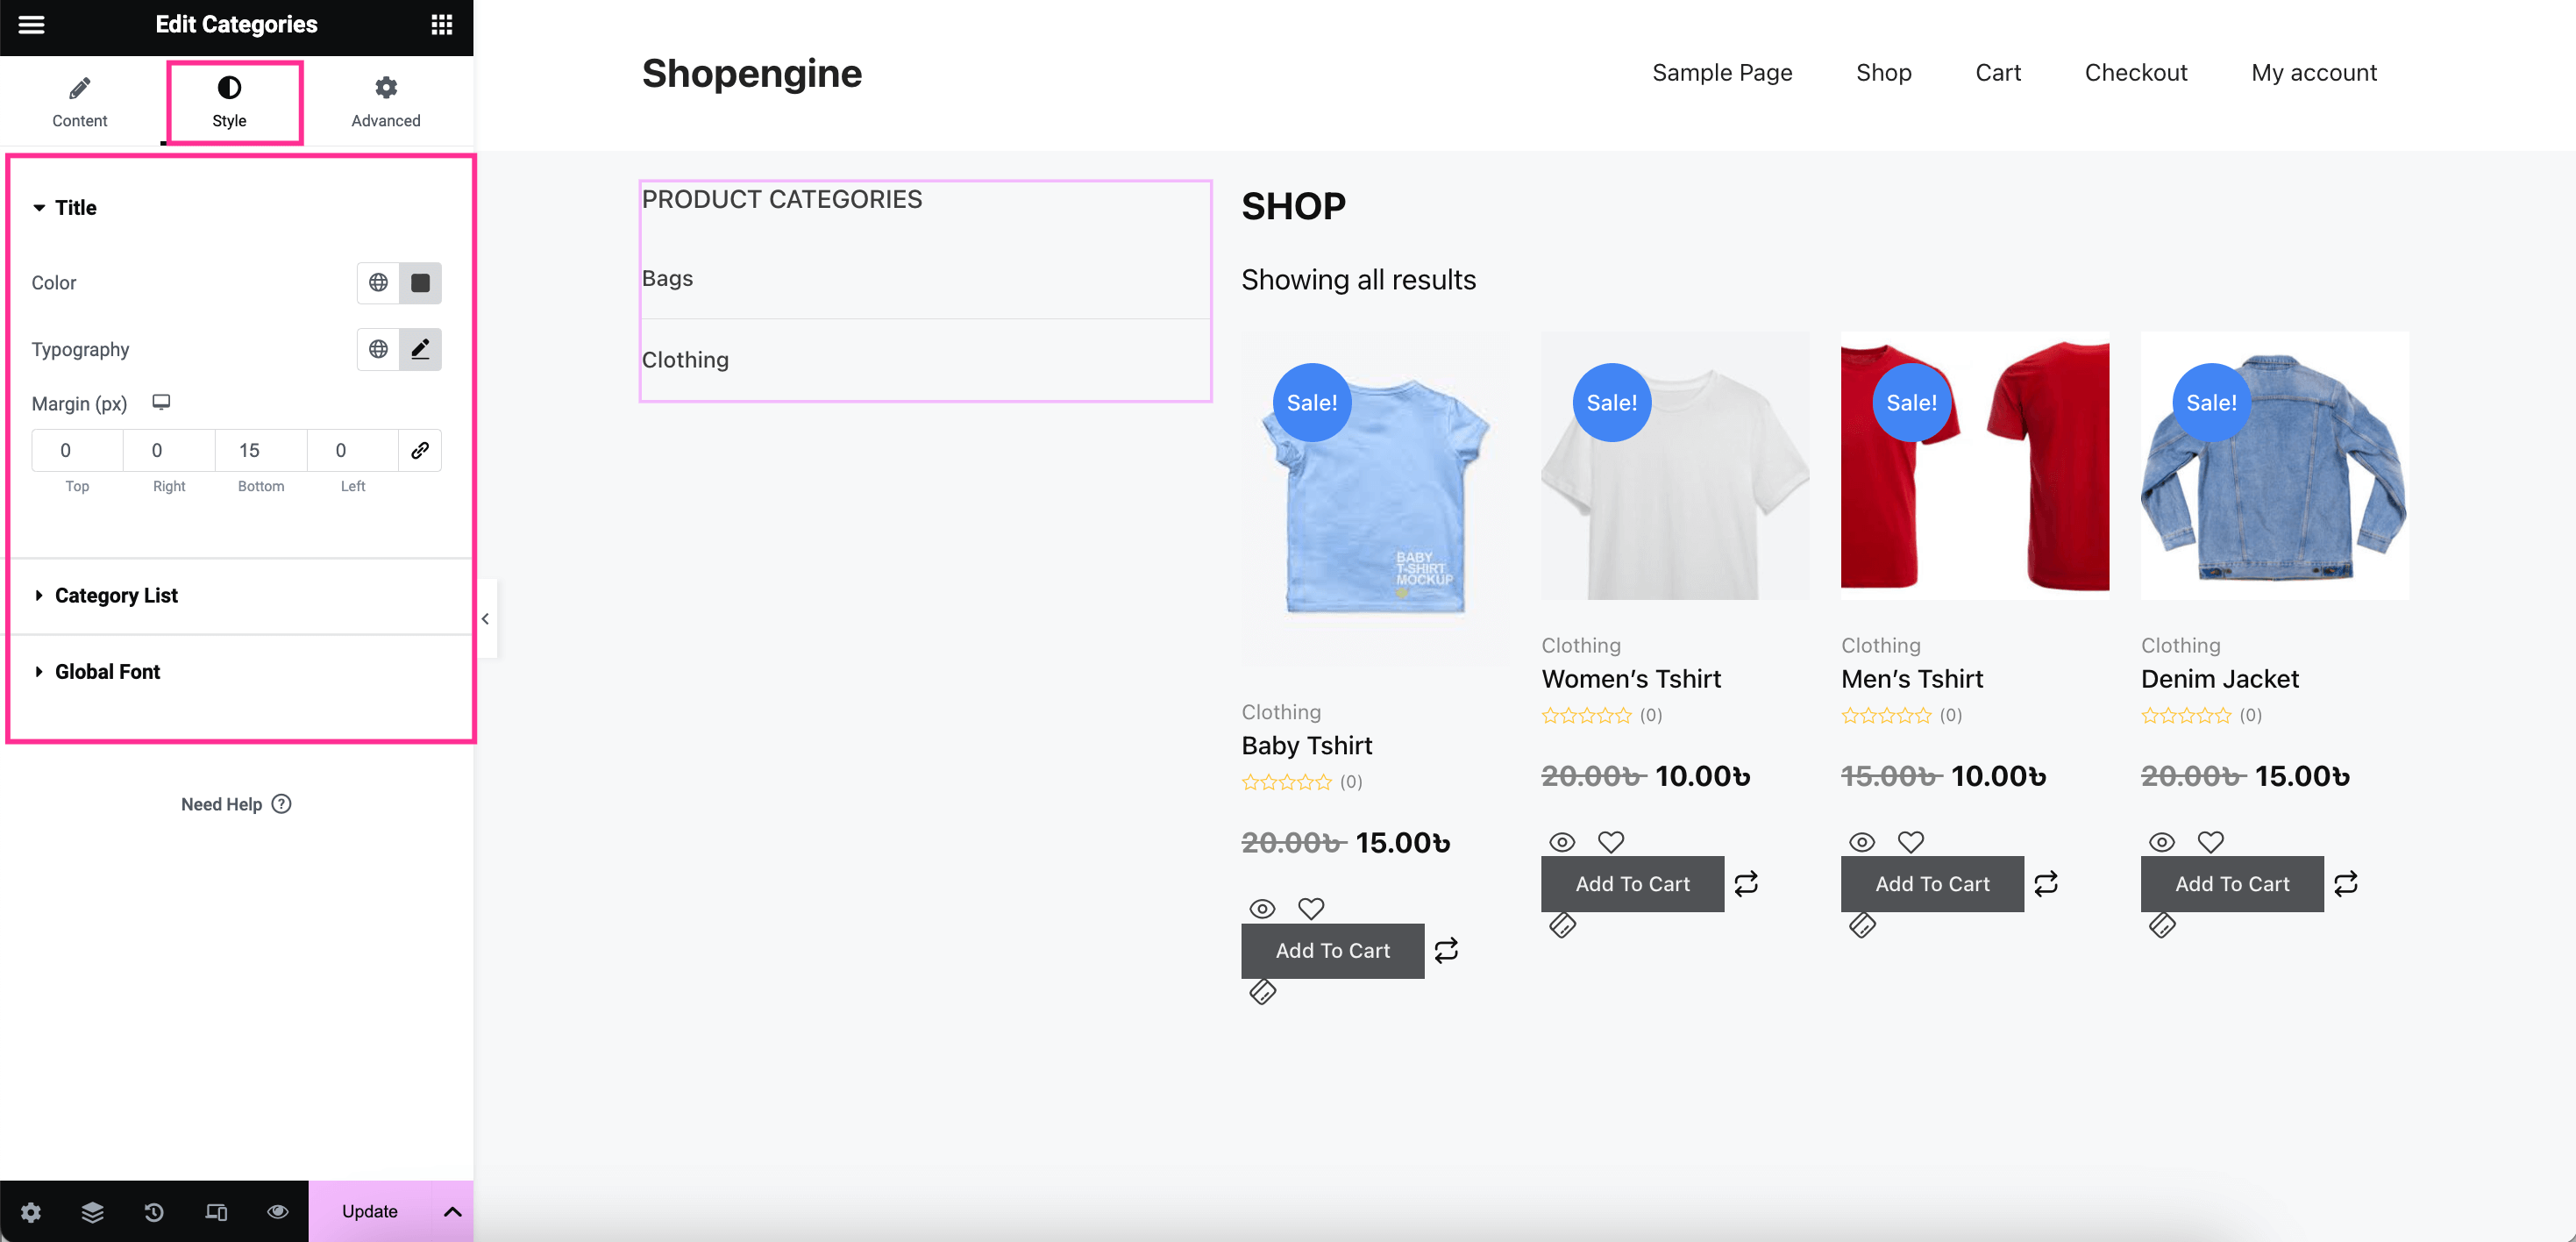
Then, switch to the style tab and adjust color, typography, margin, padding, border type, border width, border color, etc. for your Title, Category List, and Global Font. Thus, you can change your WooCommerce product display in Elementor with styling and content editing.

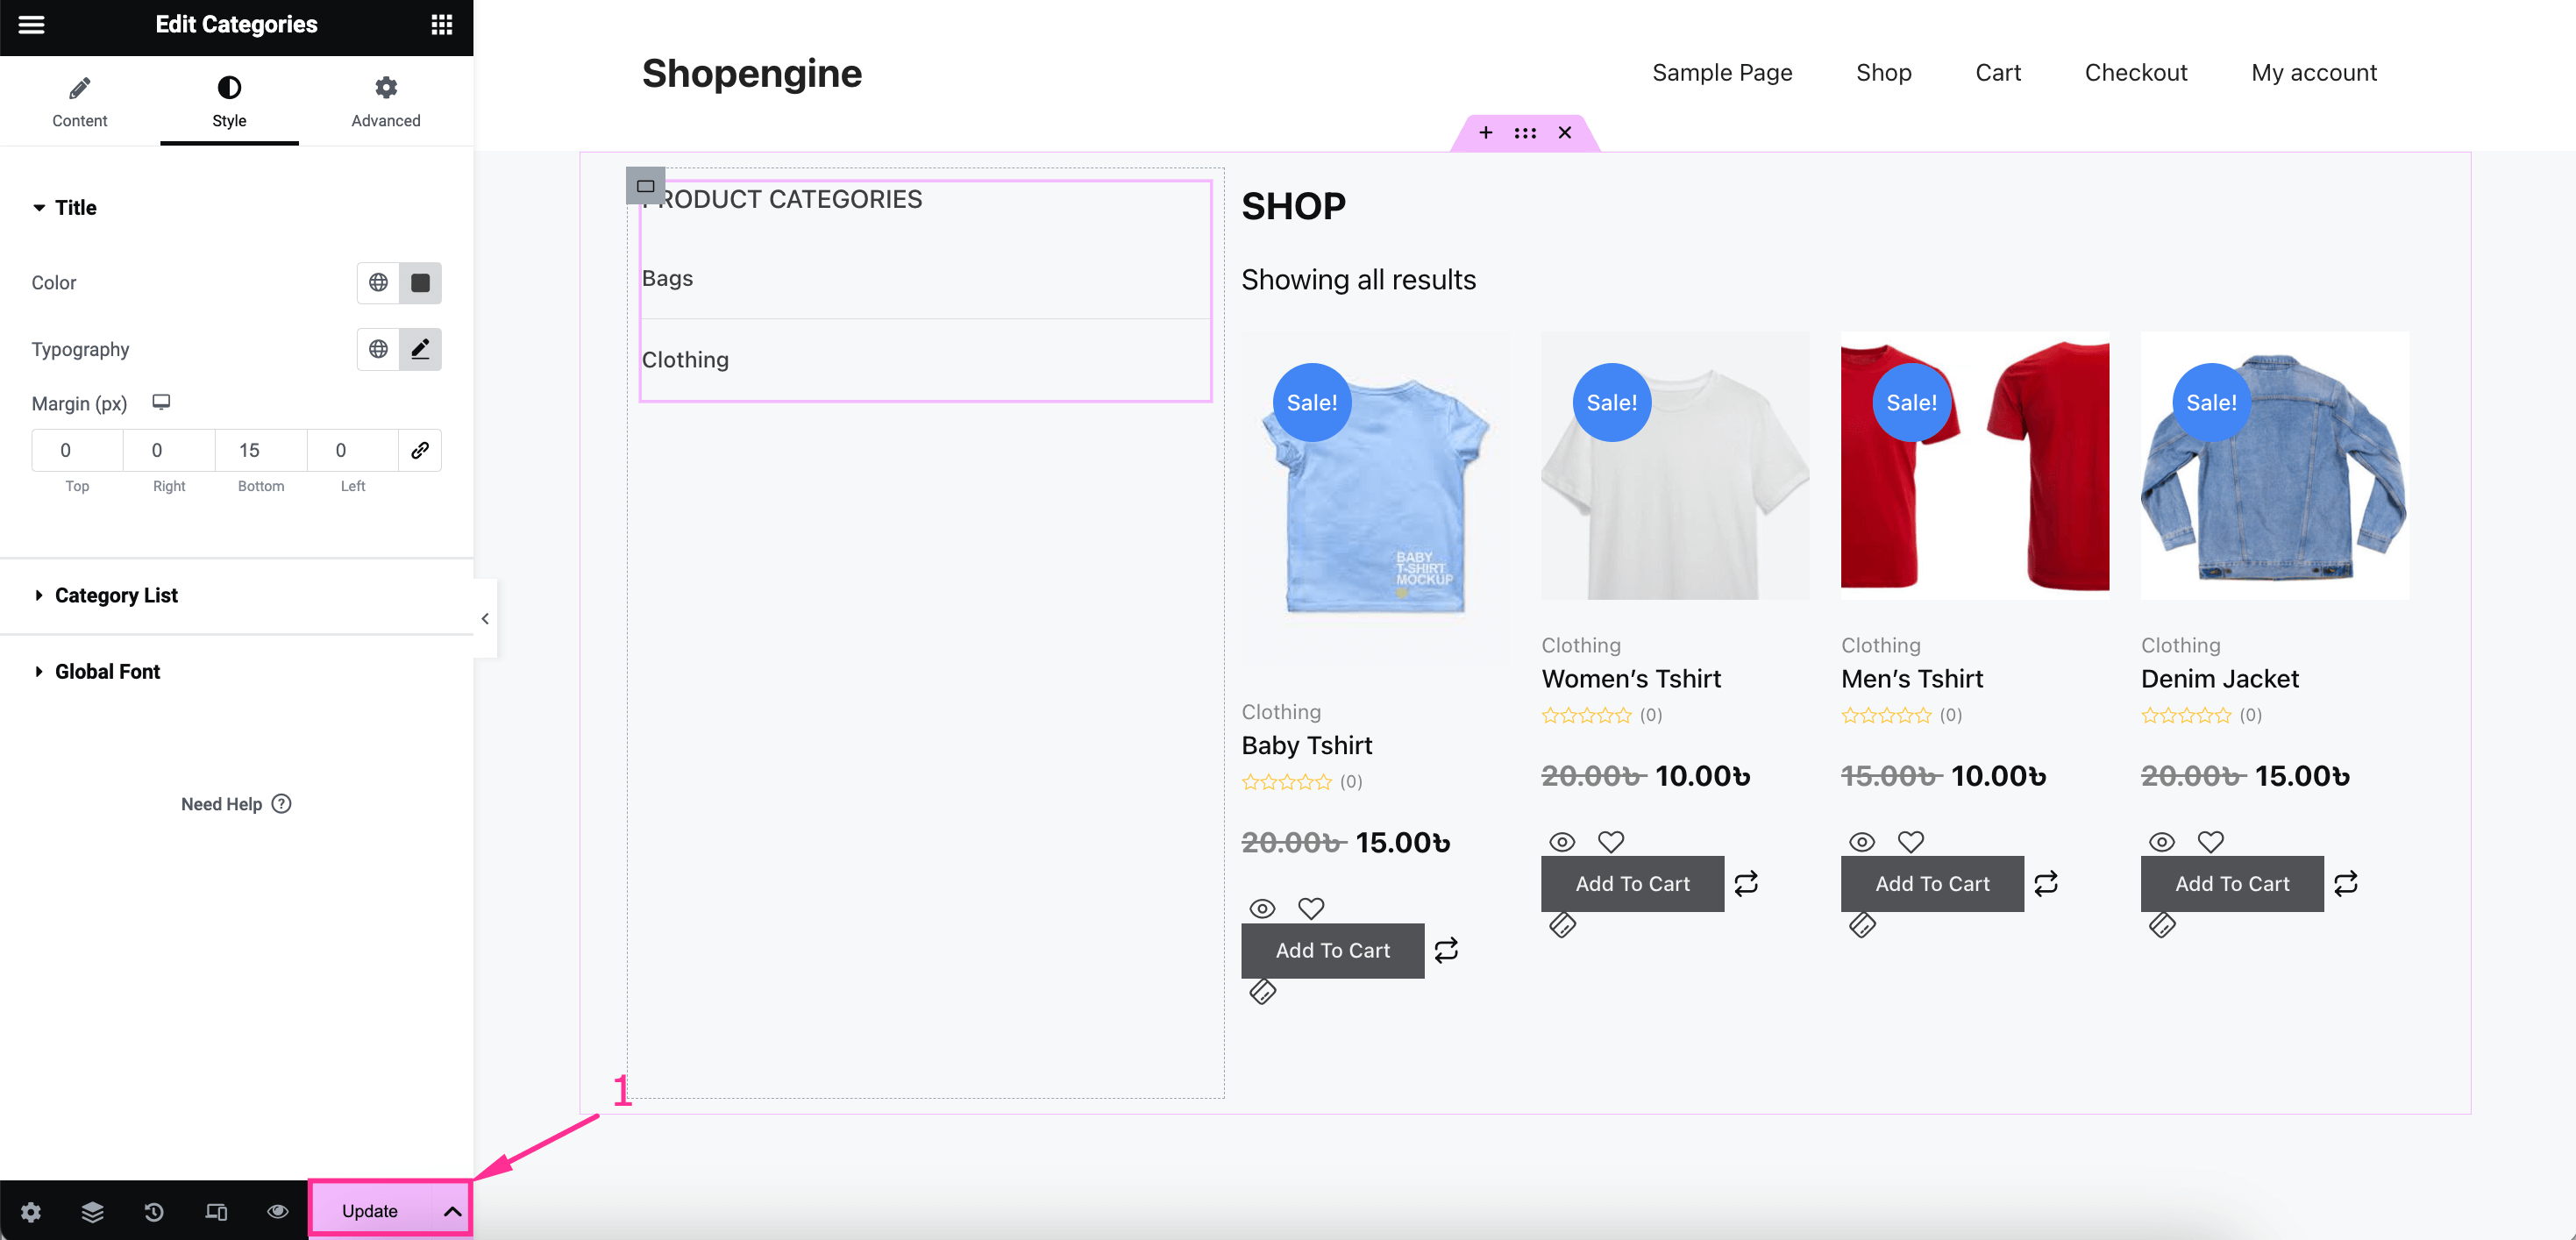
Step 3: Publish the archive page.
In the last step, hit the “Update” button to make your archive page live on your site.

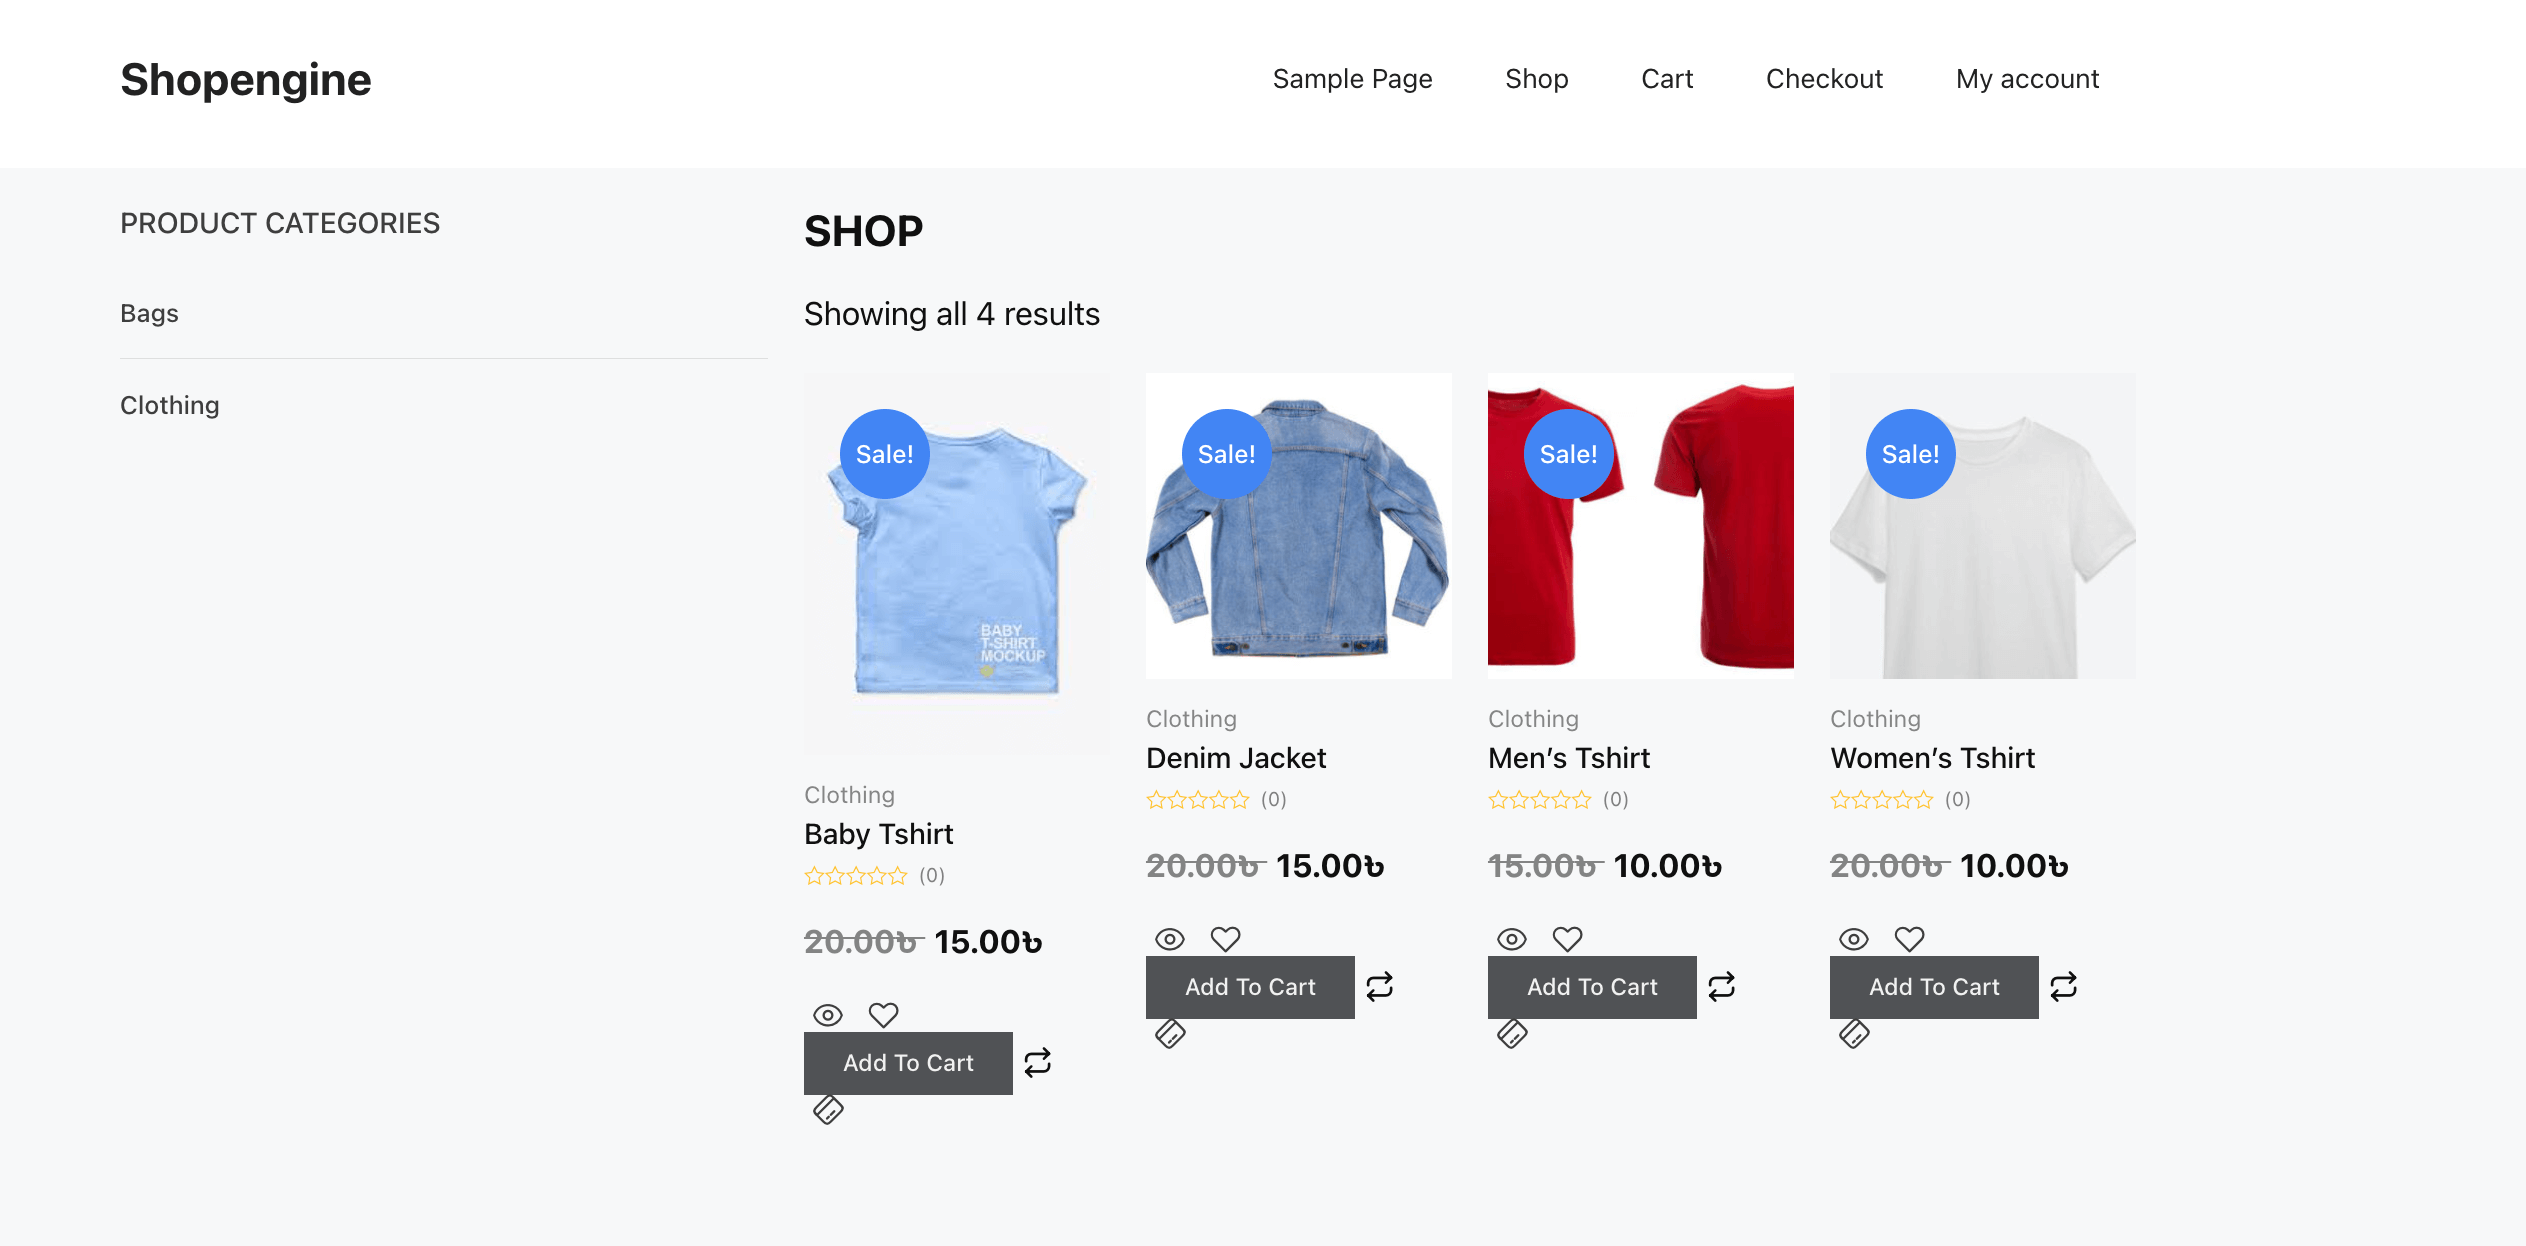
Here is the final look at how your archive page appears at the front end:

Create and customize a single product page in Elementor
After adding an archive page, you need to create a single product page adopting similar steps to the archive page. Still, let’s learn in detail how to add a single product page using ShopEngine:
Step 1: Create a single product page template.
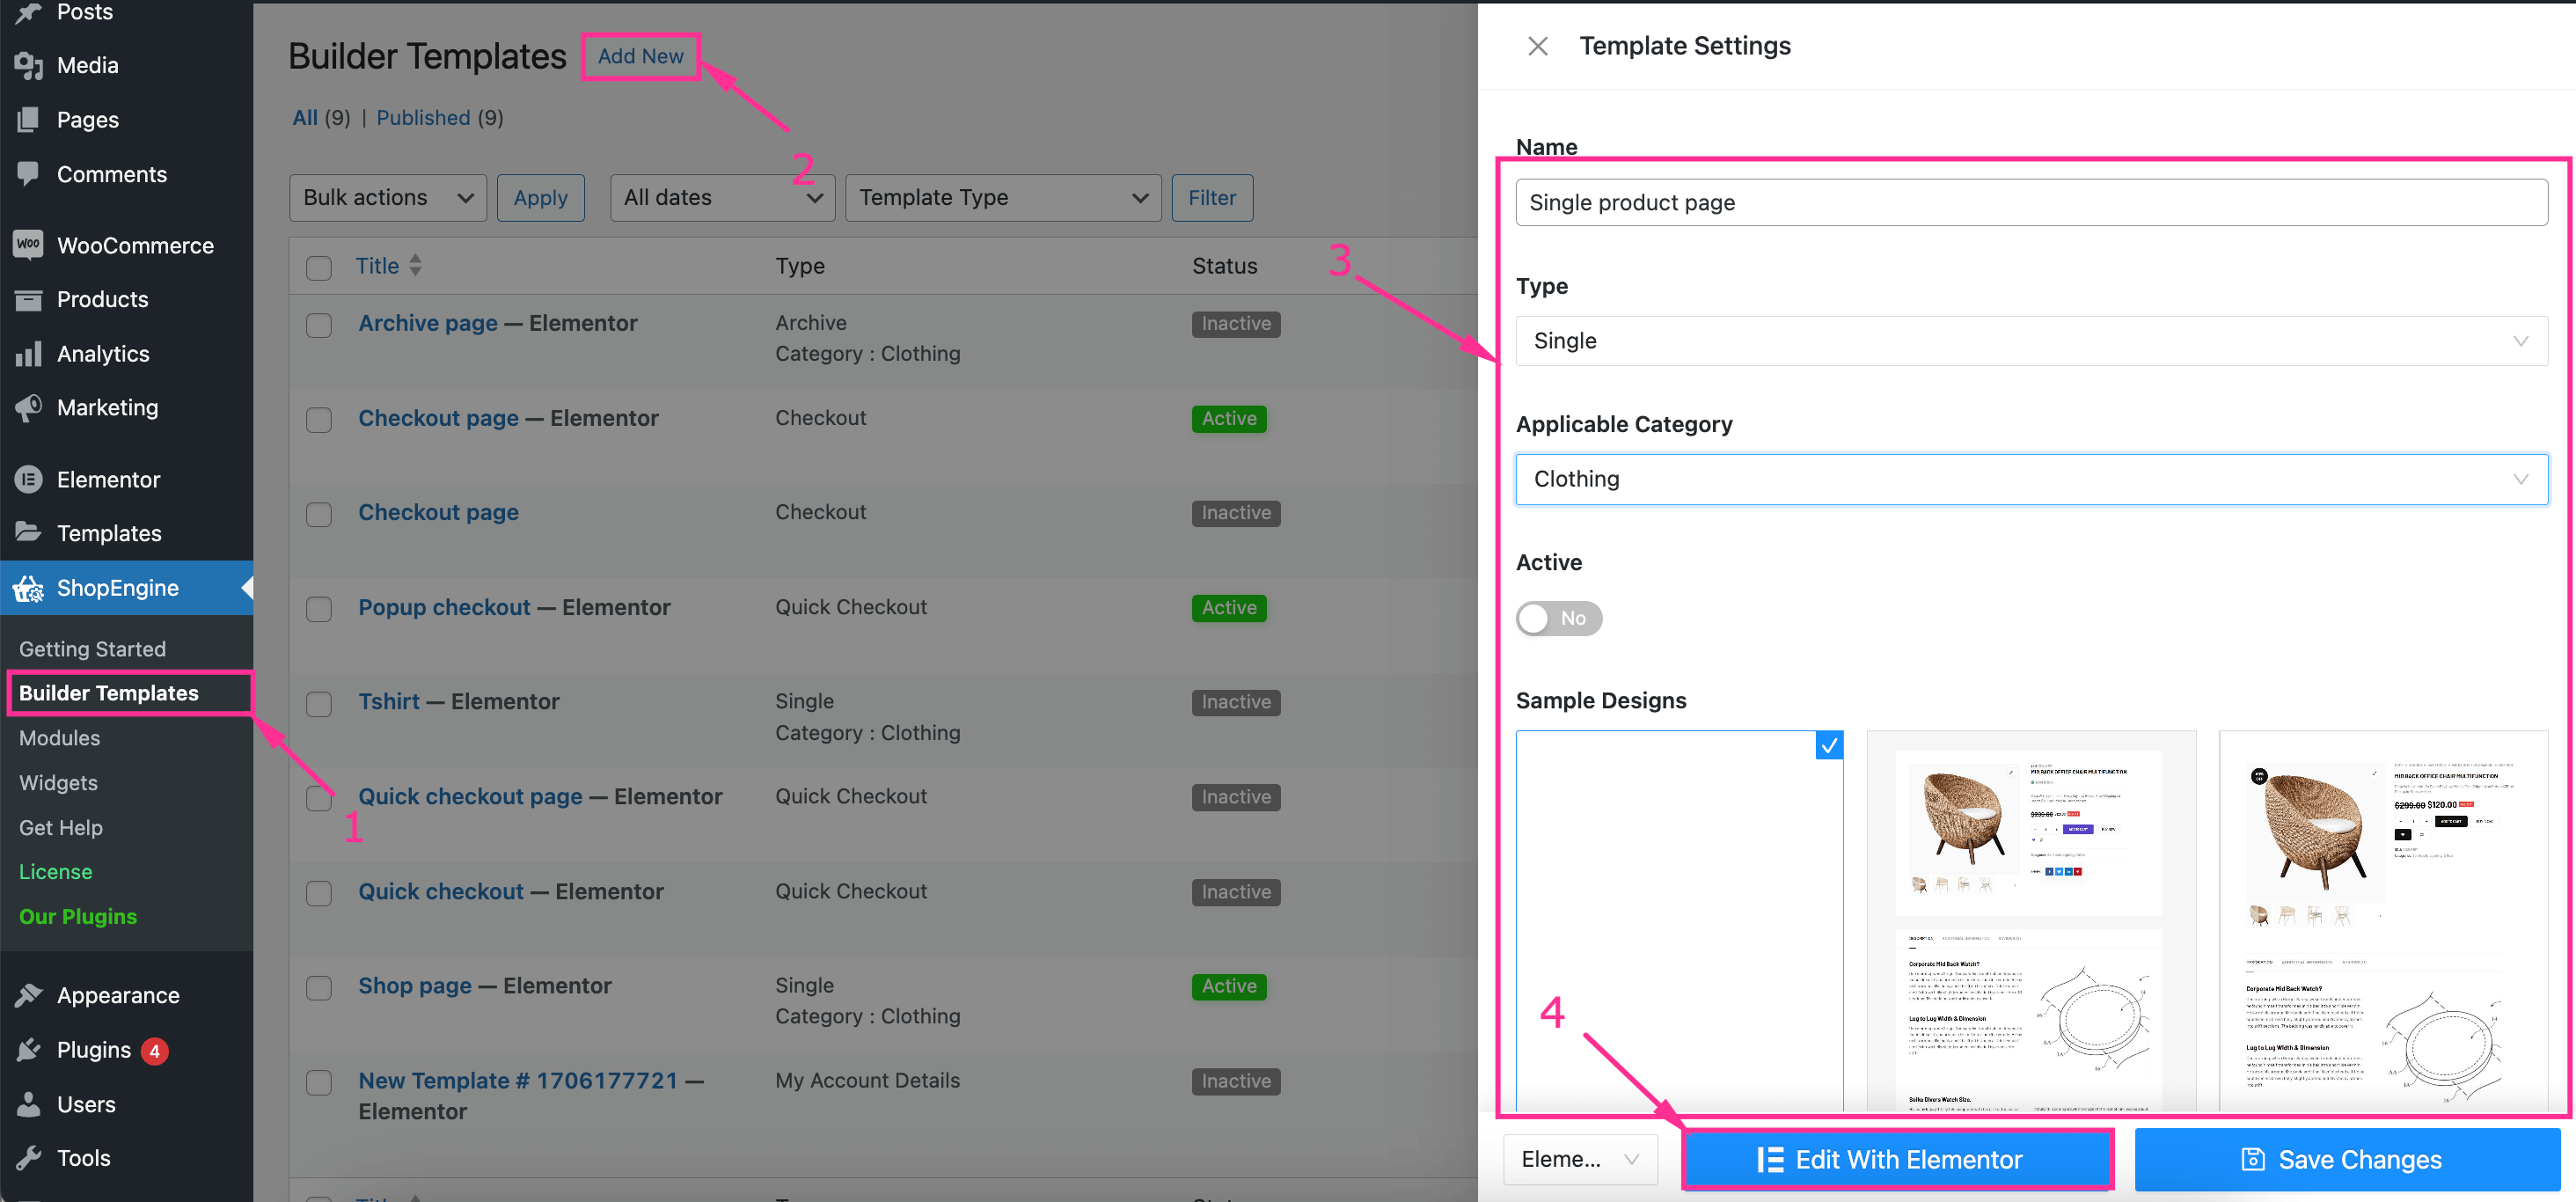
Alike to the archive page, add a single product page template by visiting Builder Templates >> Add New and fill in all the following fields of Template Settings:
- Name: Type “Single product page” in the Name field.
- Type: Select Single from the drop-down option.
- Applicable Category: Enter a category for your single product page.
- Active: Enable the toggle button.
- Sample Designs: Select a blank template to start everything from scratch.
After that, press the “Edit with Elementor” button to get redirected to the Elementor editor.

Step 2: Set up a single product page with built-in templates.
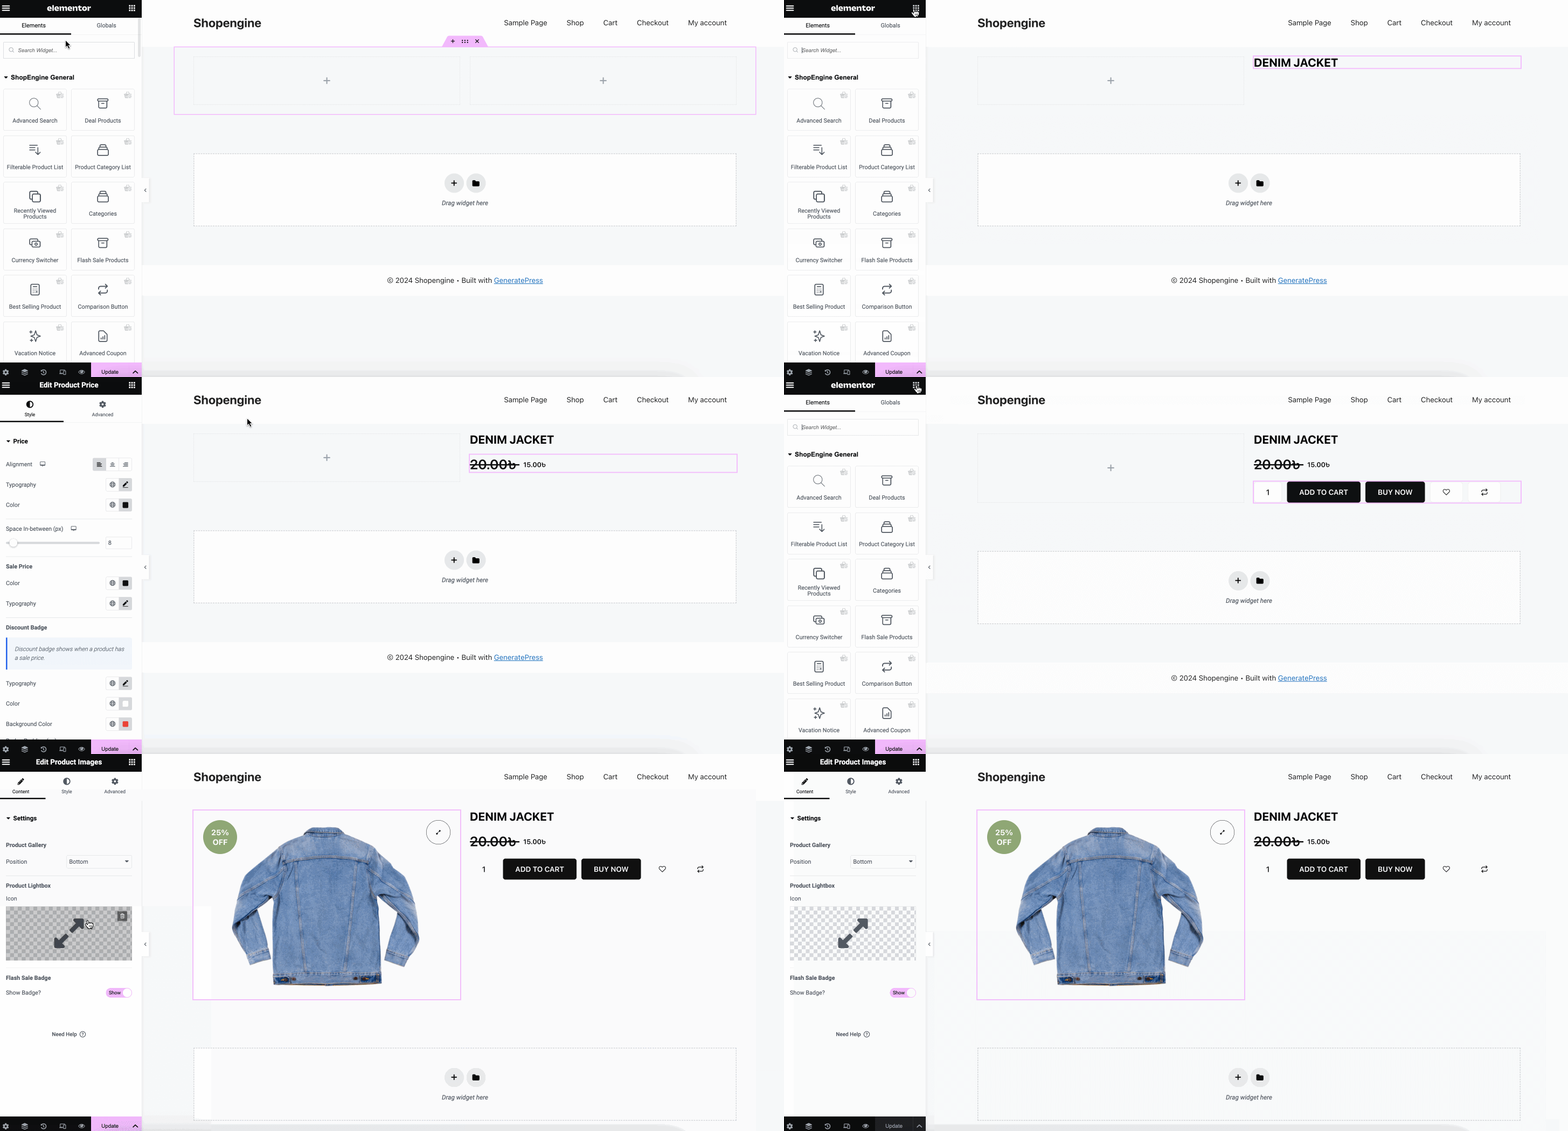
In this step, you need to build your WooCommerce single product page in Elementor from scratch by dragging and dropping Product Title, Product Price, Add To Cart, Product Images, etc.
After adding all the widgets, customize your WooCommerce product display in Elementor by editing the content and style from the left side.

Step 3: Publish a custom single product page.
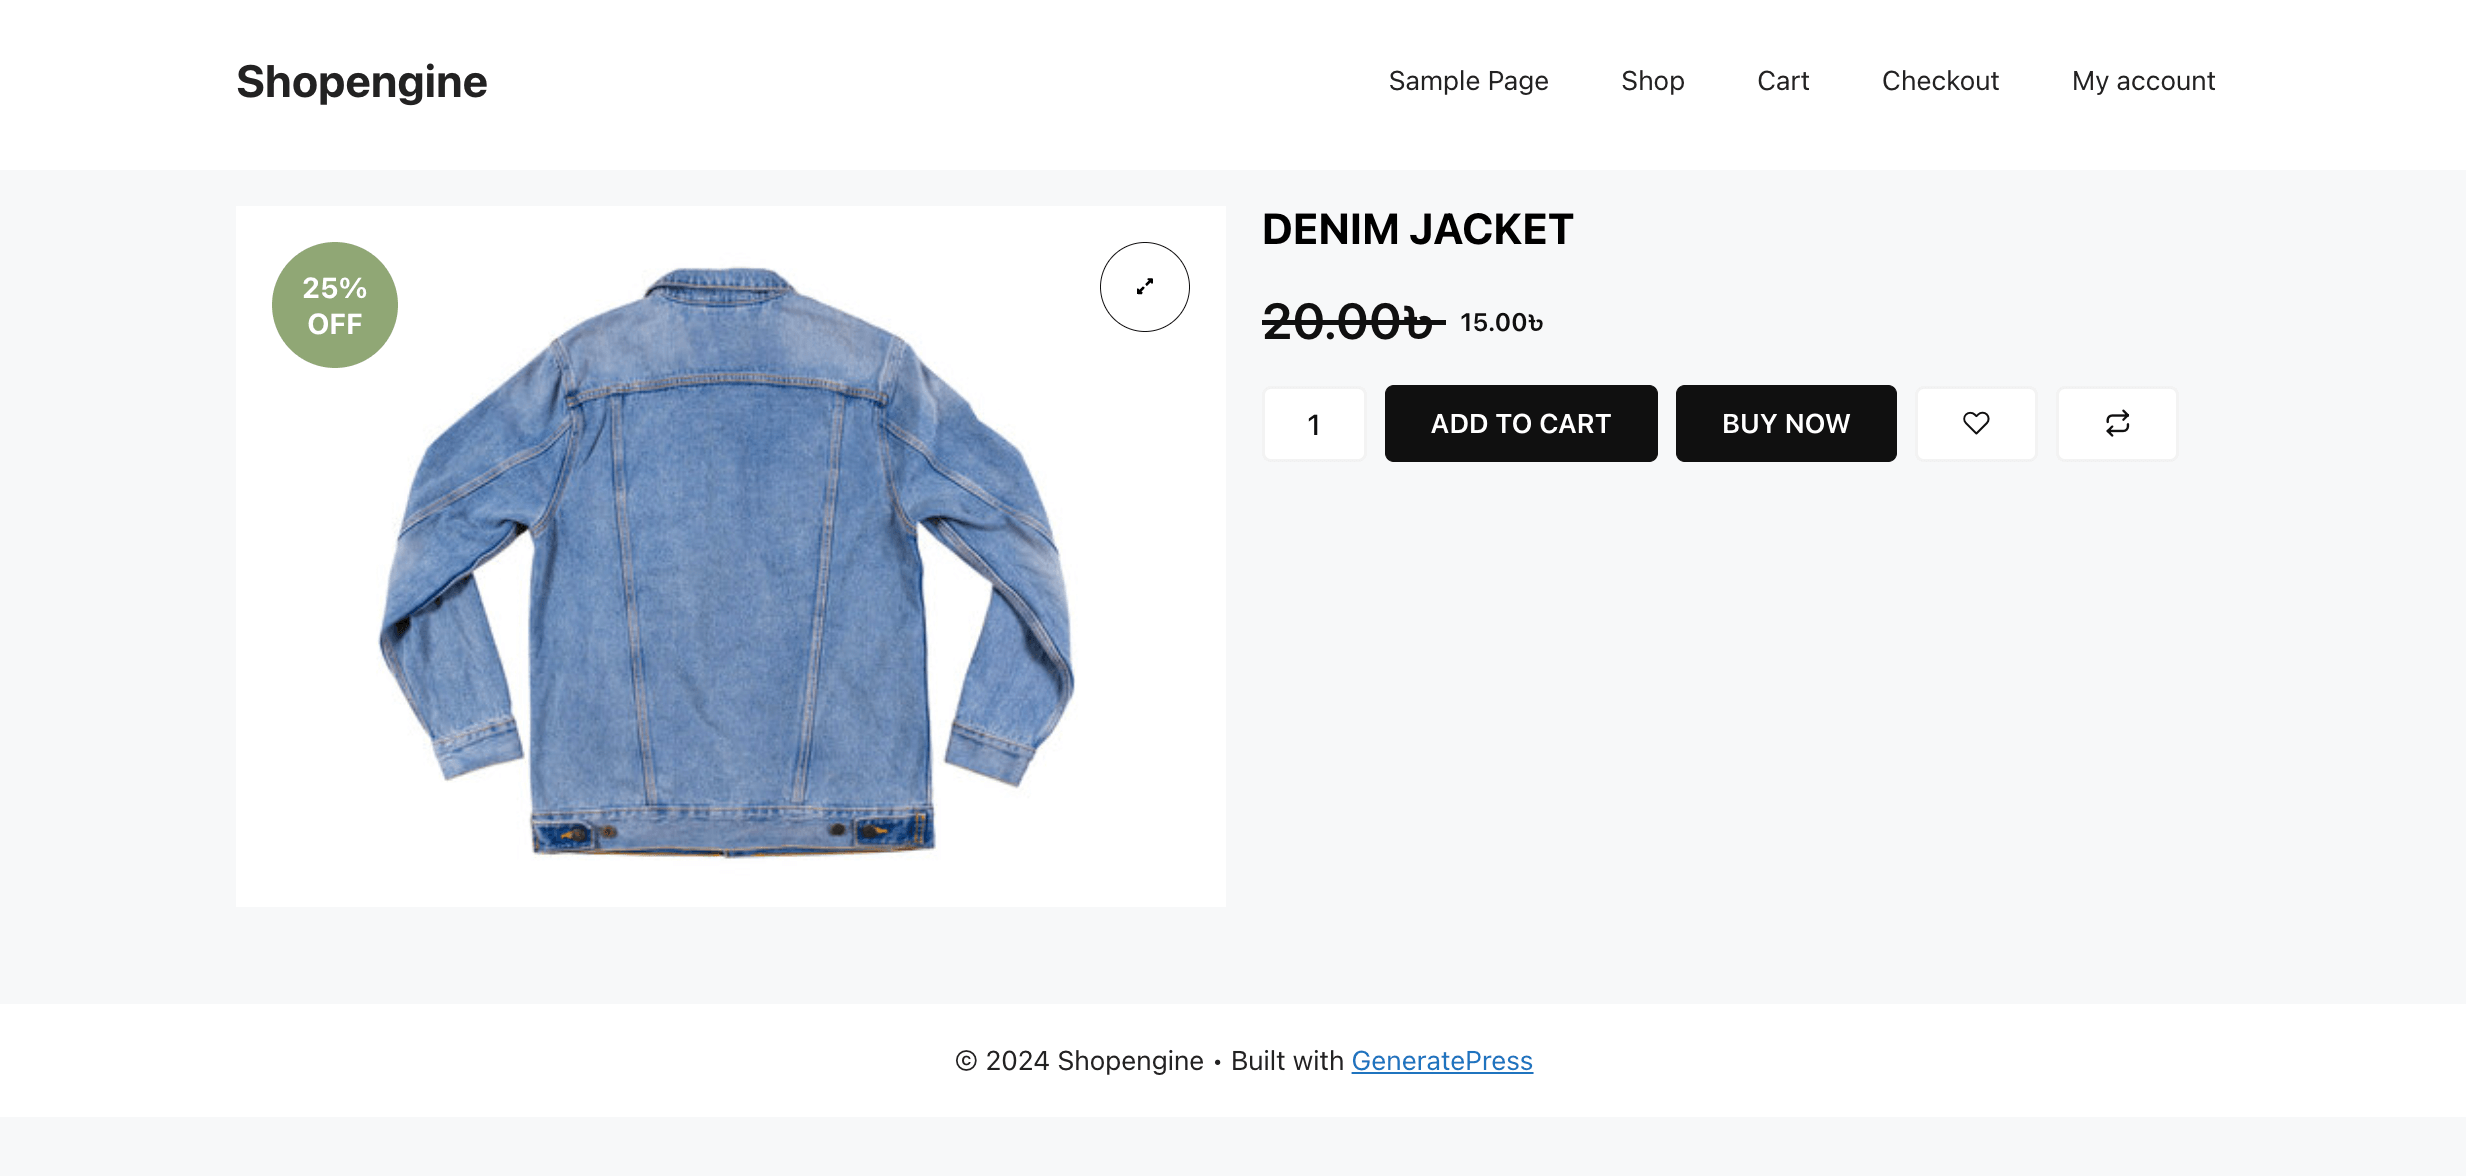
In the third step, you need to “Update” or “Publish” your custom WooCommerce single product page in Elementor. After updating, your single WooCommerce product page will appear something like this:

➡️ Check to create popup checkout page in WooCommerce.
Add a custom shop page in Elementor
Lastly, you need to add a custom WooCommerce shop page with ShopEngine widgets by following the guide described below:
Step 1: Add a shop page template.
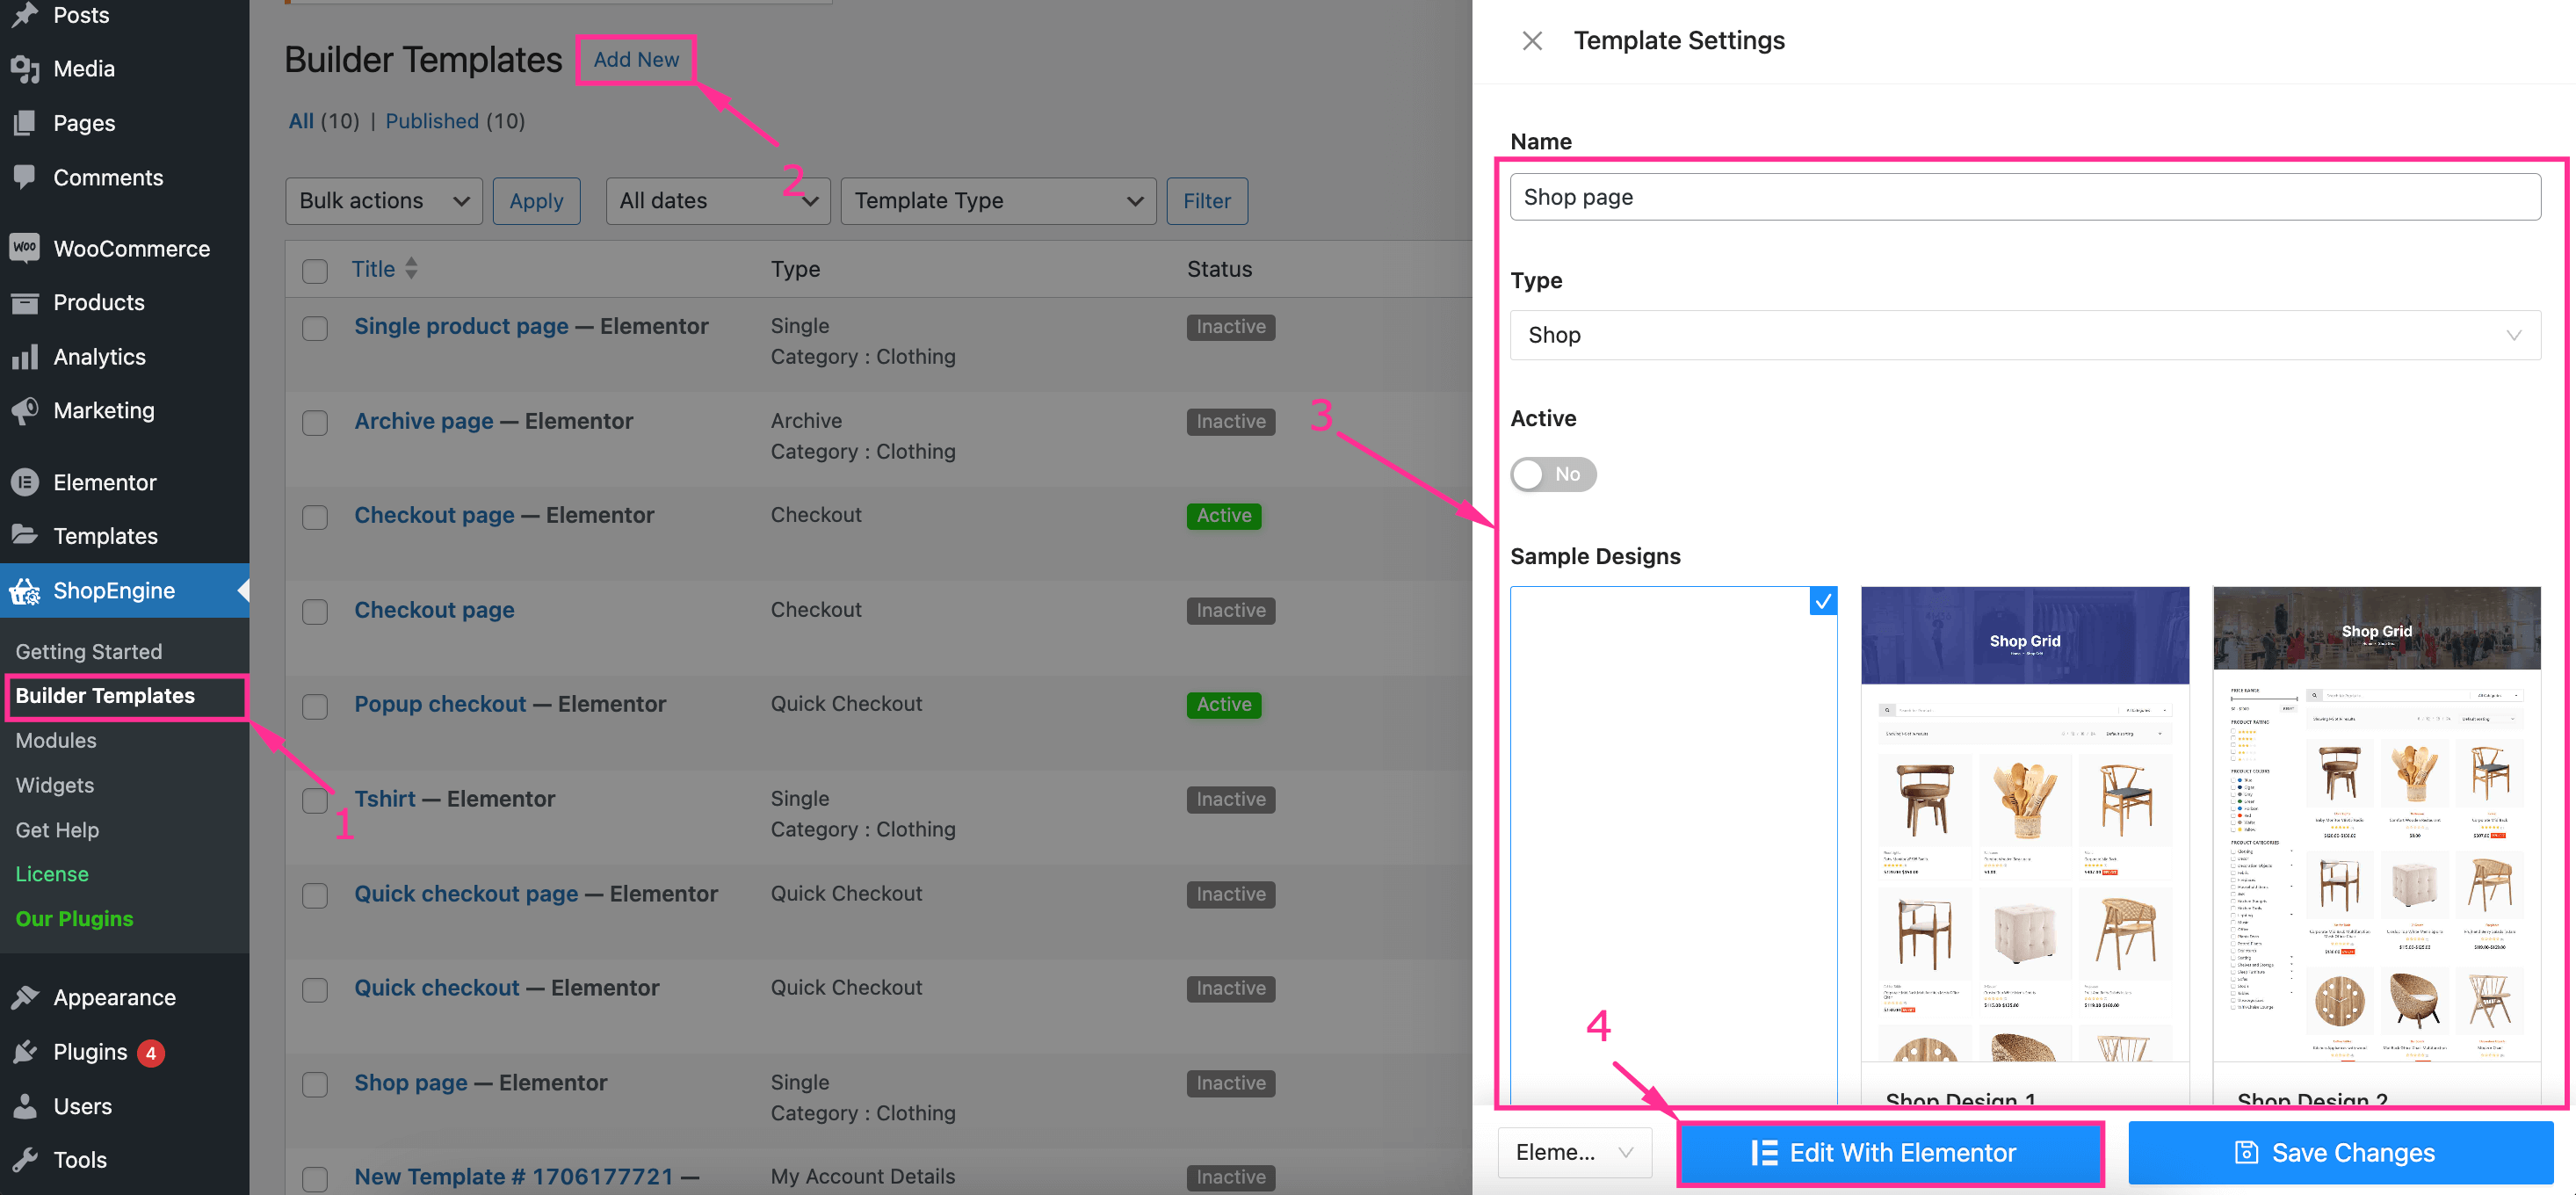
You can add a shop page to your store like creating archive and single product pages. To add a template follow the previous steps like navigating to ShopEngine >> Builder Templates and hitting the “Add New” button.
Then, enter the fields mentioned below:
- Name: Fill this name field with “Shop page”.
- Type: Select shop as a template type.
- Active: Enable the toggle button.
- Sample Designs: Choose a blank design for your shop page.
After completing all the fields, hit the “Edit with Elementor” button.

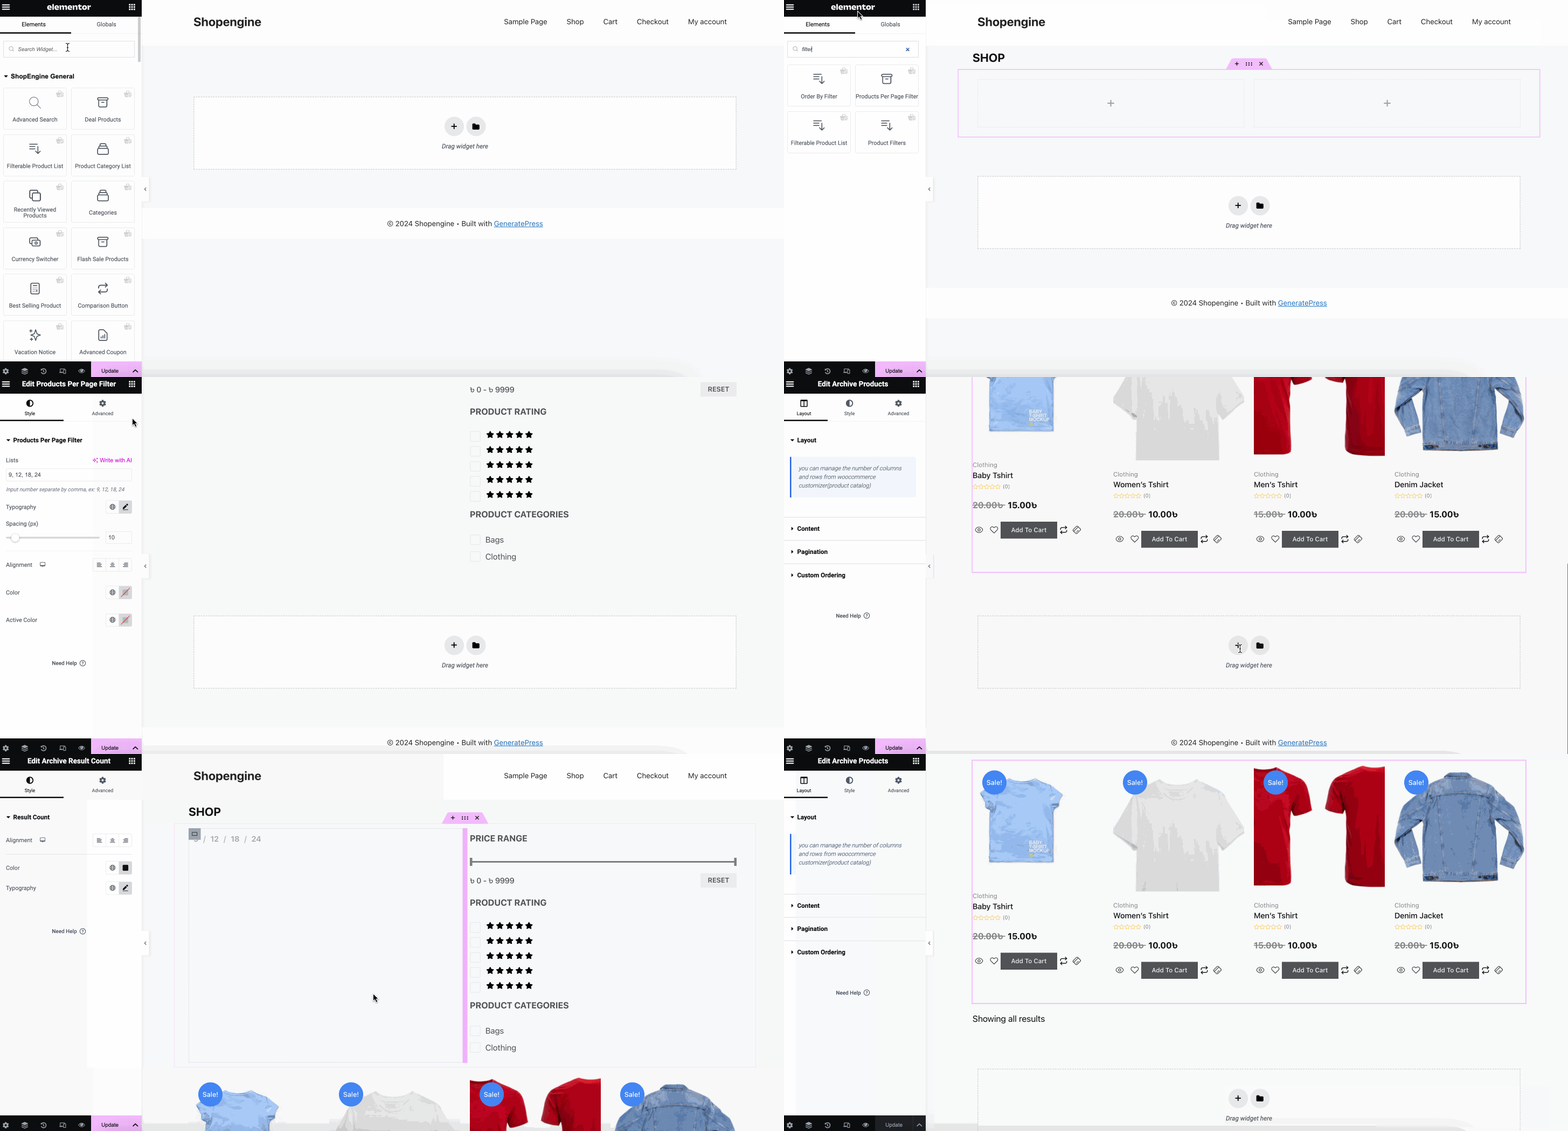
Step 2: Design a shop page with widgets and a template.
Next to adding a template, you need to add different WooCommerce product widgets in Elementor by dragging and dropping. Now add Archive Title, Product Filter, Archive Product Per Page Filter, Archive Products, Archive Result Count, etc. widget one by one.
After adding all the necessary widgets, perform Elementor WooCommerce shop page customization from the content, style, and advanced tab.

Step 3: Publish the customized shop page.
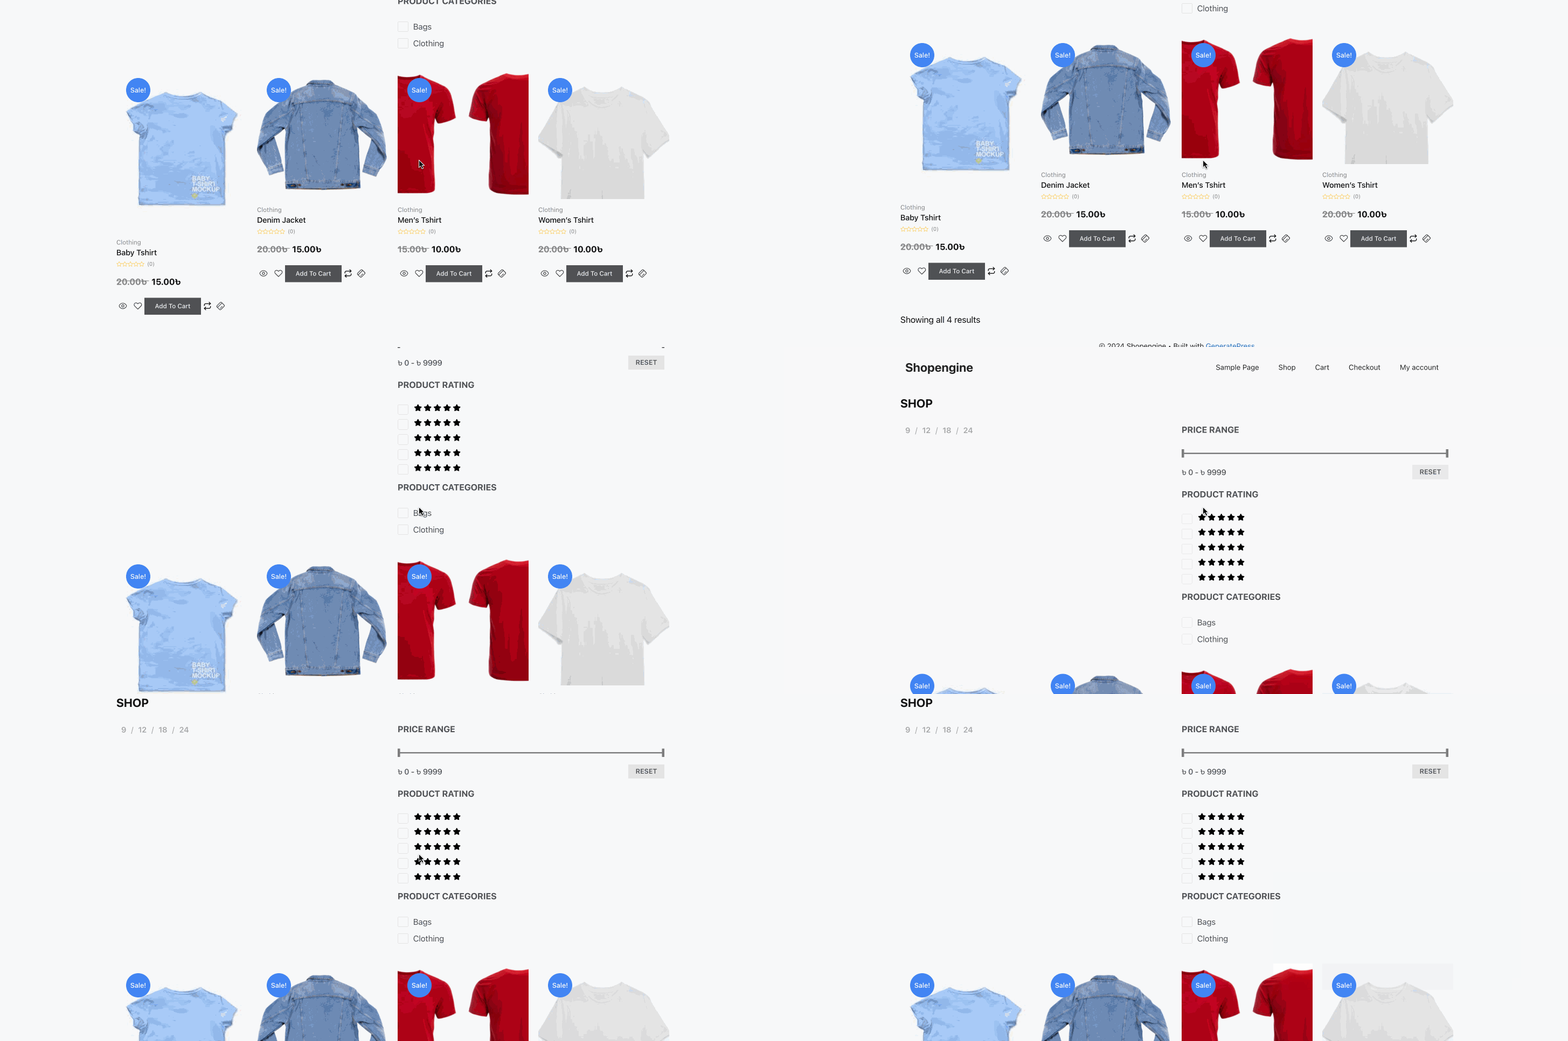
In the last step, hit the “Update” button to make the customized shop page live. This shop page will show dynamic WooCommerce products in your Elementor store and here is how it appears:

How to add WooCommerce product pages in Elementor with built-in templates
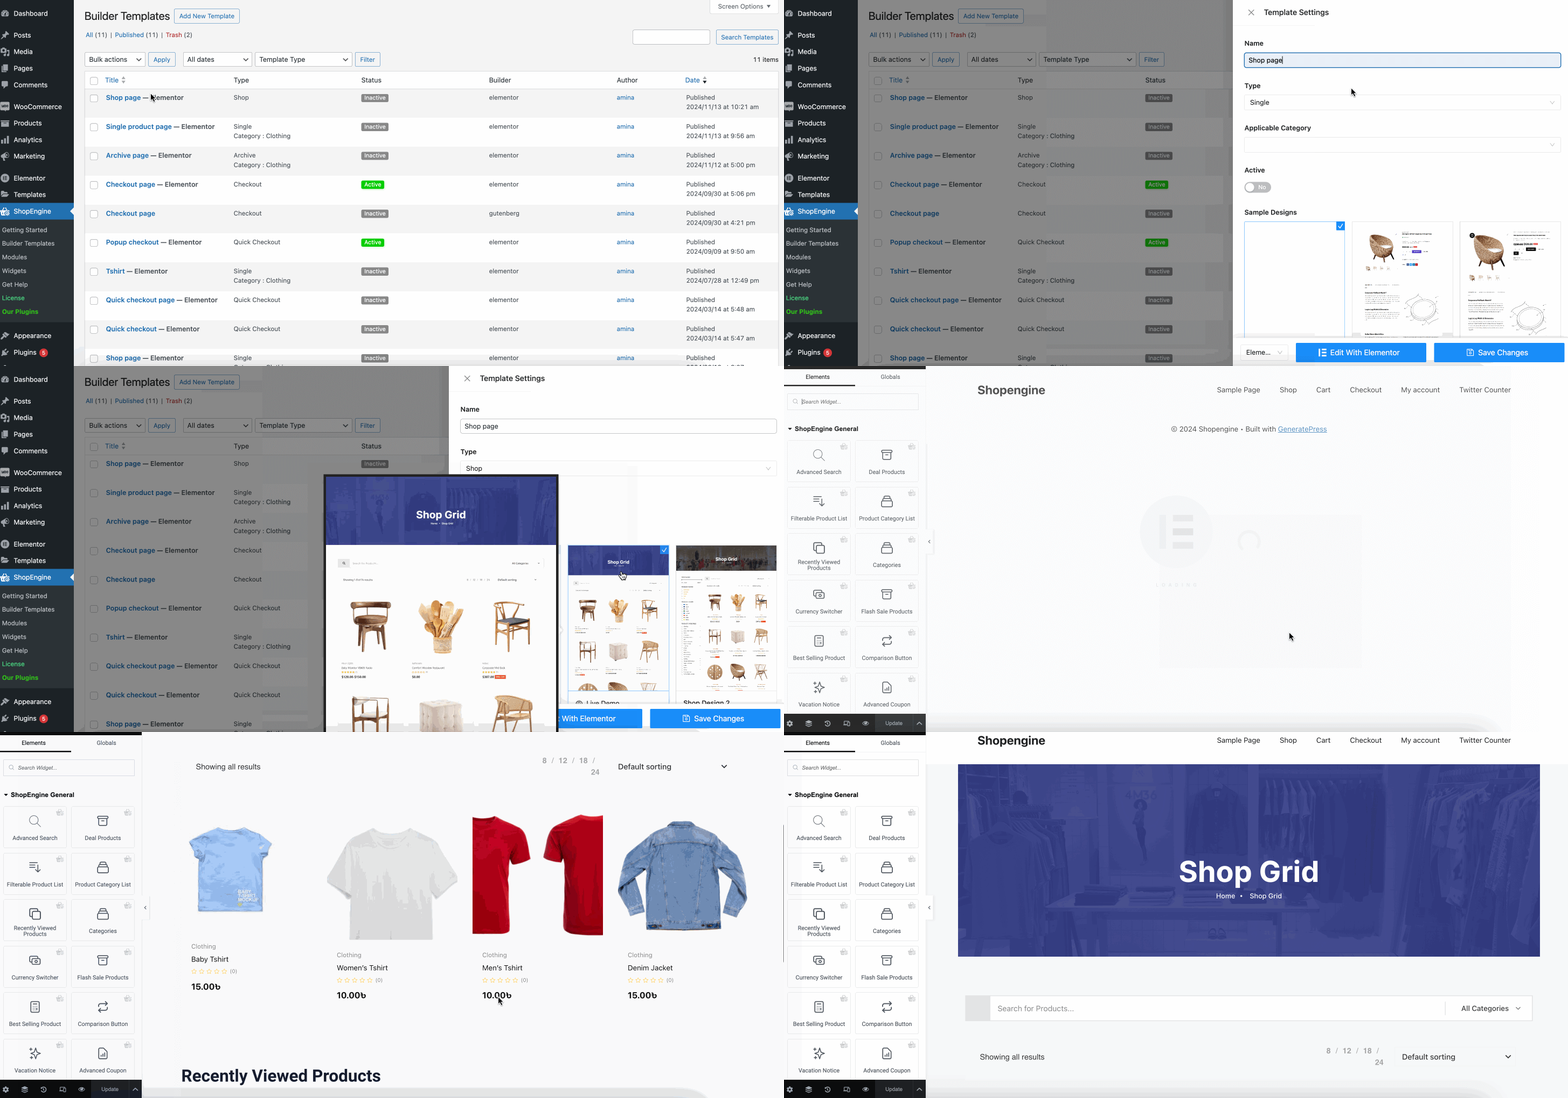
ShopEngine will also allow you to display WooCommerce products in Elementor with built-in templates. The process is similar to creating pages from scratch. Here, without selecting a blank template, you have to choose a pre-built template after navigating to ShopEngine >> Builder Templates and pressing the “Add New Template” button.
Finally, press the “Edit with Elementor” button after completing the template selection. Thus, you will be taken to a completed shop page built with the template.

✅ Bonus guide: How to add a custom thank you page to WooCommerce.
Tips to optimize WooCommerce pages in Elementor
An unoptimized WooCommerce page can drastically hamper website performance with slow loading speed, checkout process, and unreliability. In one research, it has been found that if your site takes 1 to 3s to load then the possibility of bouncing your visitors on your site will increase by 32%.
This bounce rate can notably rise with the increasing loading time. Also, a lengthy checkout system and unreliable WooCommerce pages can increase the cart abandonment rate. So, you must optimize your WooCommerce pages to avoid these crises.
Here are some tips to optimize your WooCommerce pages in Elementor:
- Always compress your images and files before uploading them to your site. Uncompressed or unoptimized images or files increase the site’s loading speed.
- Build your WooCommerce website’s credibility by integrating social proofs such as reviews, feedback, ratings, etc.
- Remove unnecessary widgets and columns that decrease your website performance with low loading speed.
- Minimize cart abandonment rate by keeping your checkout page short and to the point.
- Optimize your WooCommerce pages for mobile devices as over 60% of traffic is mobile visitors.
- Wisely use images, videos, and CTAs throughout your WooCommerce pages.
- Offer exit intent discounts and coupons to create a sense of urgency.
- Keep your WooCommerce website navigation-friendly by integrating breadcrumbs.
⭐️ Learn tips to boost WooCommerce product page conversion rate.
Summing up
So, now you’re just one step behind your next online venture. Whether you prefer to add WooCommerce products in Elementor from scratch or use a built-in template, this guide covers all. Using ShopEngine’s professional templates or flexible design controls, you can overcome the limitations of default WooCommerce features and create fully customizable WooCommerce product pages in no time.


Leave a Reply