
 Swedish
  English
  German
  Spanish
  Italian
  French
  Danish
  Portuguese
  Polish
  Korean
  Japanese
Letar efter sätt att lägga till anpassad CSS i Elementor?
Att utöka de redan fantastiska Elementor-designerna genom att lägga till anpassad CSS kan ge dig en oslagbar fördel gentemot dina konkurrenter.
Så varför inte använda lite Elementor anpassad CSS och sticka ut i mängden i denna mycket konkurrensutsatta digitala värld, eller hur?
Det finns ingen anledning till varför du inte skulle göra det.
Men hur lägger man till anpassad CSS till dra och släpp Elementors sidbyggare?
Tja, du kan lägga till anpassad CSS i Elementor på många sätt. För att veta mer detaljer om hur man lägger till anpassad CSS i Elementor Keep på att läsa...
Vad är CSS?
CSS (Cascading Style Sheets) är ett regelbaserat formatmallsspråk som man använder för att ändra layouten och utseendet på webbsidor byggda med ett märkningsspråk som HTML eller XML. Att använda CSS är ett effektivt sätt för webbdesign eftersom det behåller både innehåll och stil i en separat fil, vilket ger dig mest flexibilitet och användarvänlighet.
Varför ska du lägga till anpassad CSS på Elementor-webbplatsen?
Tja, det är inte obligatoriskt eftersom Elementor själv tillhandahåller alla anpassningsalternativ du behöver för att skapa vackra webbplatser. Men om du är någon som vet hur man kodar och vill använda din kreativitet för att förbättra utseendet på sajten, då kan du lägga till Custom CSS i Elementor.
- Genom att använda anpassad CSS i Elementor kan du åsidosätta temats stil för att implementera en ny stil. Anta att du älskar hela utseendet på en sida som ditt tema ger men du vill ändra layouten lite i ett avsnitt, då kan du ta hjälp av Elementor anpassad CSS för att göra det.
- På samma sätt kan du även åsidosätta Elementor premade malls design med hjälp av de anpassade CSS-kodavsnitten.
- Du kan också anpassa din webbplats så att den ser annorlunda ut på olika enheter genom att lägga till anpassade CSS-kodavsnitt till Elementor.
👉👉 Kolla hur du använder Elementor flexbox-behållare för att skapa enhetsvänliga webbplatser.
Where to put your CSS in Elementor
Elementor provides multiple ways to include custom CSS, each with its unique advantages depending on the scope of your styling needs. Here are the primary locations where you can put CSS in Elementor:
- Elementor Widgets: Add CSS using the Elementor HTML widget.
- Sections or Columns: Apply CSS to entire sections or columns in the Avancerad → Anpassad CSS flik.
- Site-Wide CSS: Add global CSS in Elementor → Site Settings → Custom CSS (Pro only).
- WordPress Customizer: Använda sig av Appearance → Customize → Additional CSS for basic site-wide styles.
- Theme Files or External CSS: Add code to
style.cssor use an external.cssfile for advanced needs.
Hur man lägger till anpassad CSS i Elementor: 3 olika metoder
Att lägga till anpassad CSS är inte alls ett svårt jobb. Faktum är att du kan lägga till anpassad CSS i Elementor med olika metoder. Här delar jag med dig av de fyra säkraste sätten att lägga till Custom CSS från Elementor.
1️⃣ Lägg till CSS med hjälp av Elementors anpassade CSS-kodavsnitt
Elementor ger dig ett avancerat alternativ för att lägga till anpassad CSS till dina sektioner, kolumner och widgets. Dock, detta alternativ är endast tillgängligt med Elementor Pro.
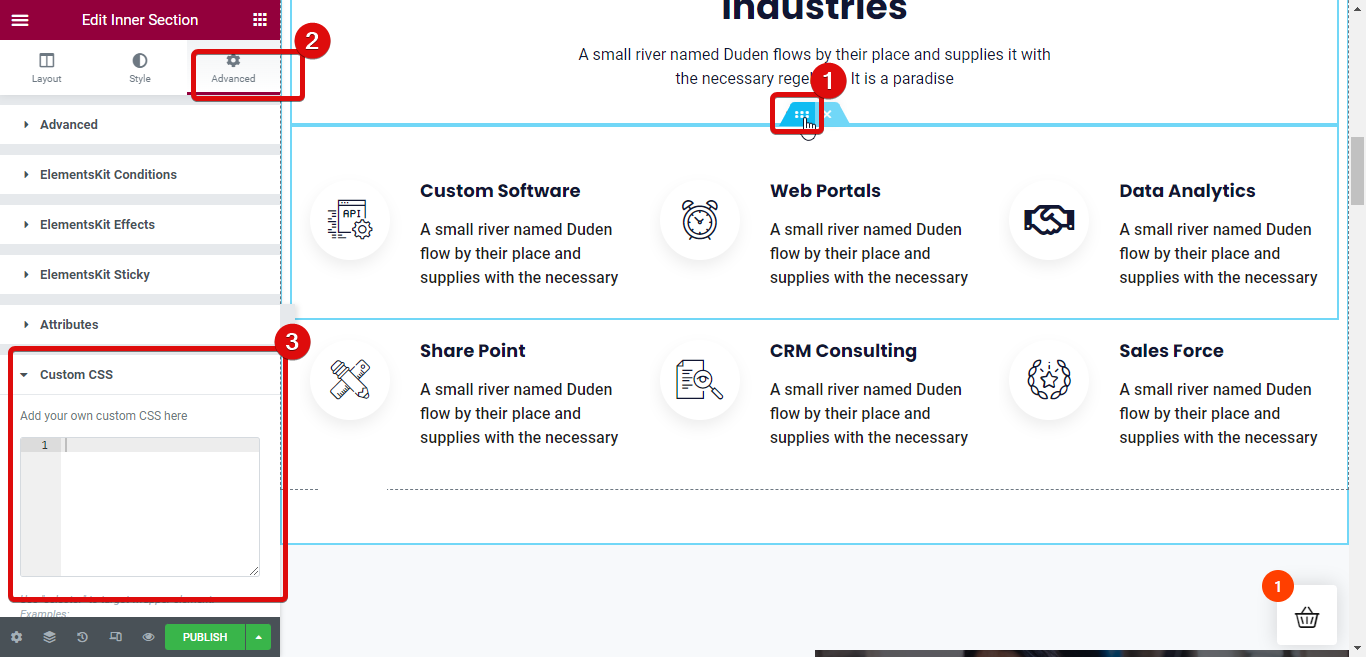
För att lägga till anpassad CSS till valfri sektion/inre del av din Elementor-webbplats, klicka på sex punkter för att gå till redigeringsläge, flytta sedan till Fliken Avancerat ⇒ Anpassad CSS. Expandera nu fliken Anpassad CSS och lägg till din anpassade kod.
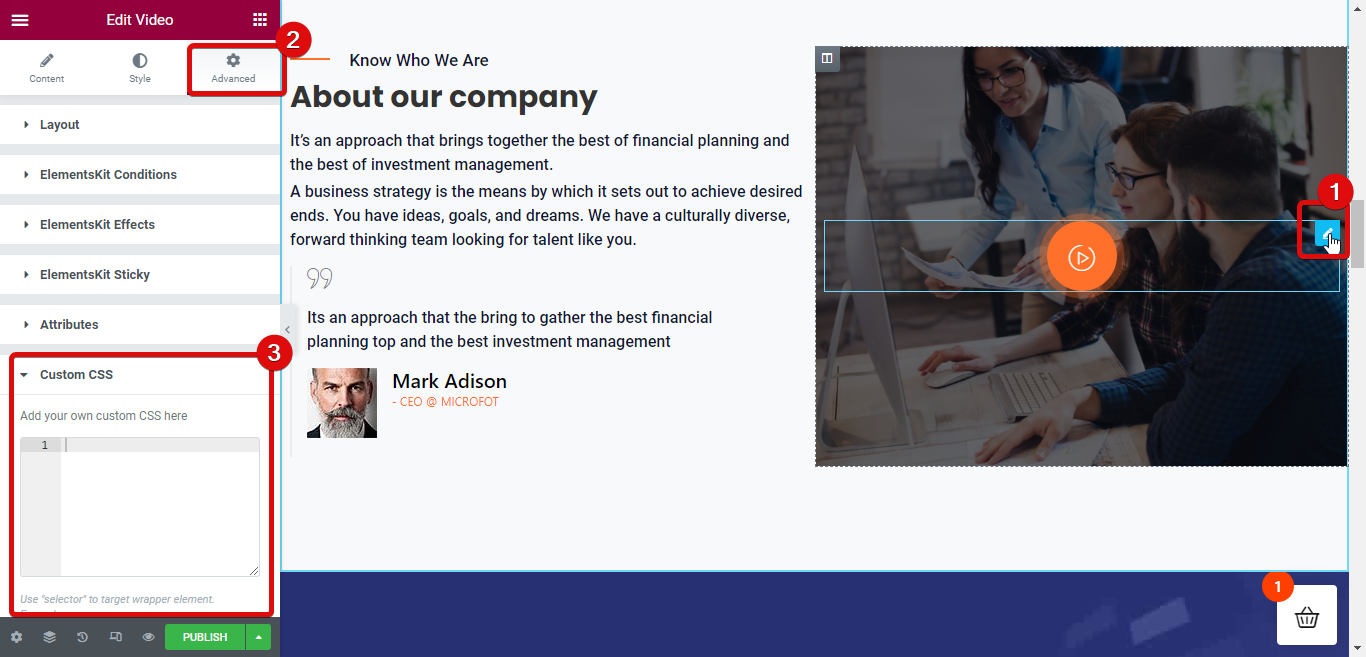
På samma sätt kan du lägga till anpassad CSS i Elementor-widgets också. För det, klicka på widgeten för att gå till redigeringsläge, flytta sedan till fliken Avancerat ⇒ Anpassad CSS. Expandera nu fliken Anpassad CSS och lägg till din anpassade kod.
2️⃣ Använd HTML-widget för att lägga till Elementor anpassad CSS
Det andra alternativet som du kan använda för att lägga till Elementor anpassad CSS till din WordPress-webbplats är att använda HTML-widgeten. För detta alternativ, helt enkelt dra och släpp HTML-widgeten och lägg sedan till din CSS-kod i en Style-tagg.
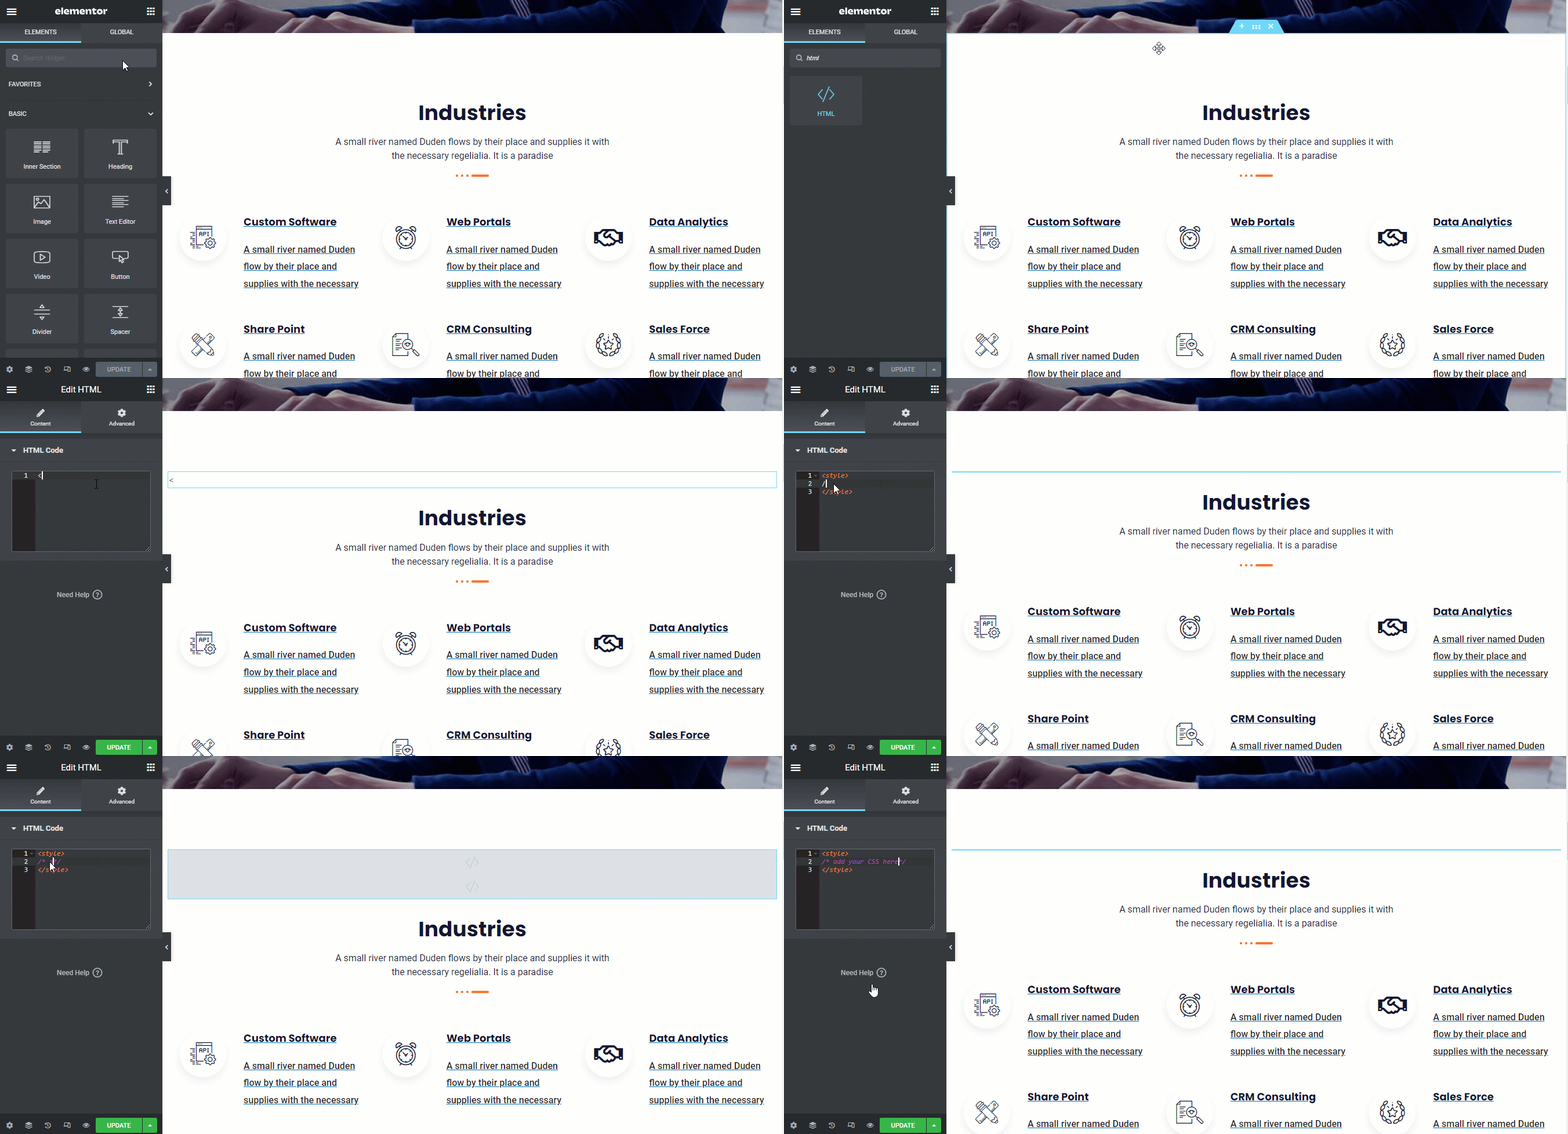
Notera: Du kan lägga till både inline och fristående CSS med HTML-taggen. Och oroa dig inte, bara stilarna kommer att reflekteras på webbplatsen, råkoden kommer inte att synas.

3️⃣ Lägg till anpassad CSS i Elementors webbplatsinställningar
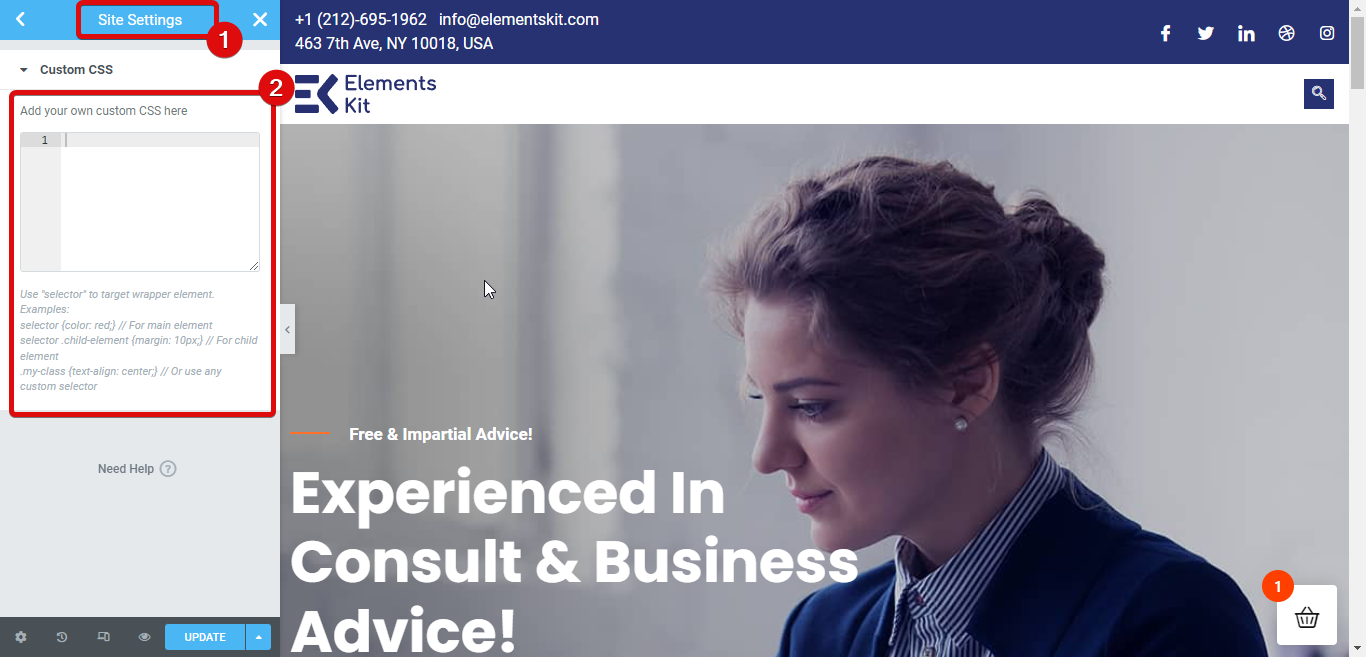
Du kan också lägga till anpassad CSS i Elementor med hjälp av alternativet för webbplatsinställningar. Klicka på hamburgermenyn i det övre vänstra hörnet och sedan under inställningar, klicka på alternativet Webbplatsinställningar för att få tillgång till de globala webbplatsinställningarna.
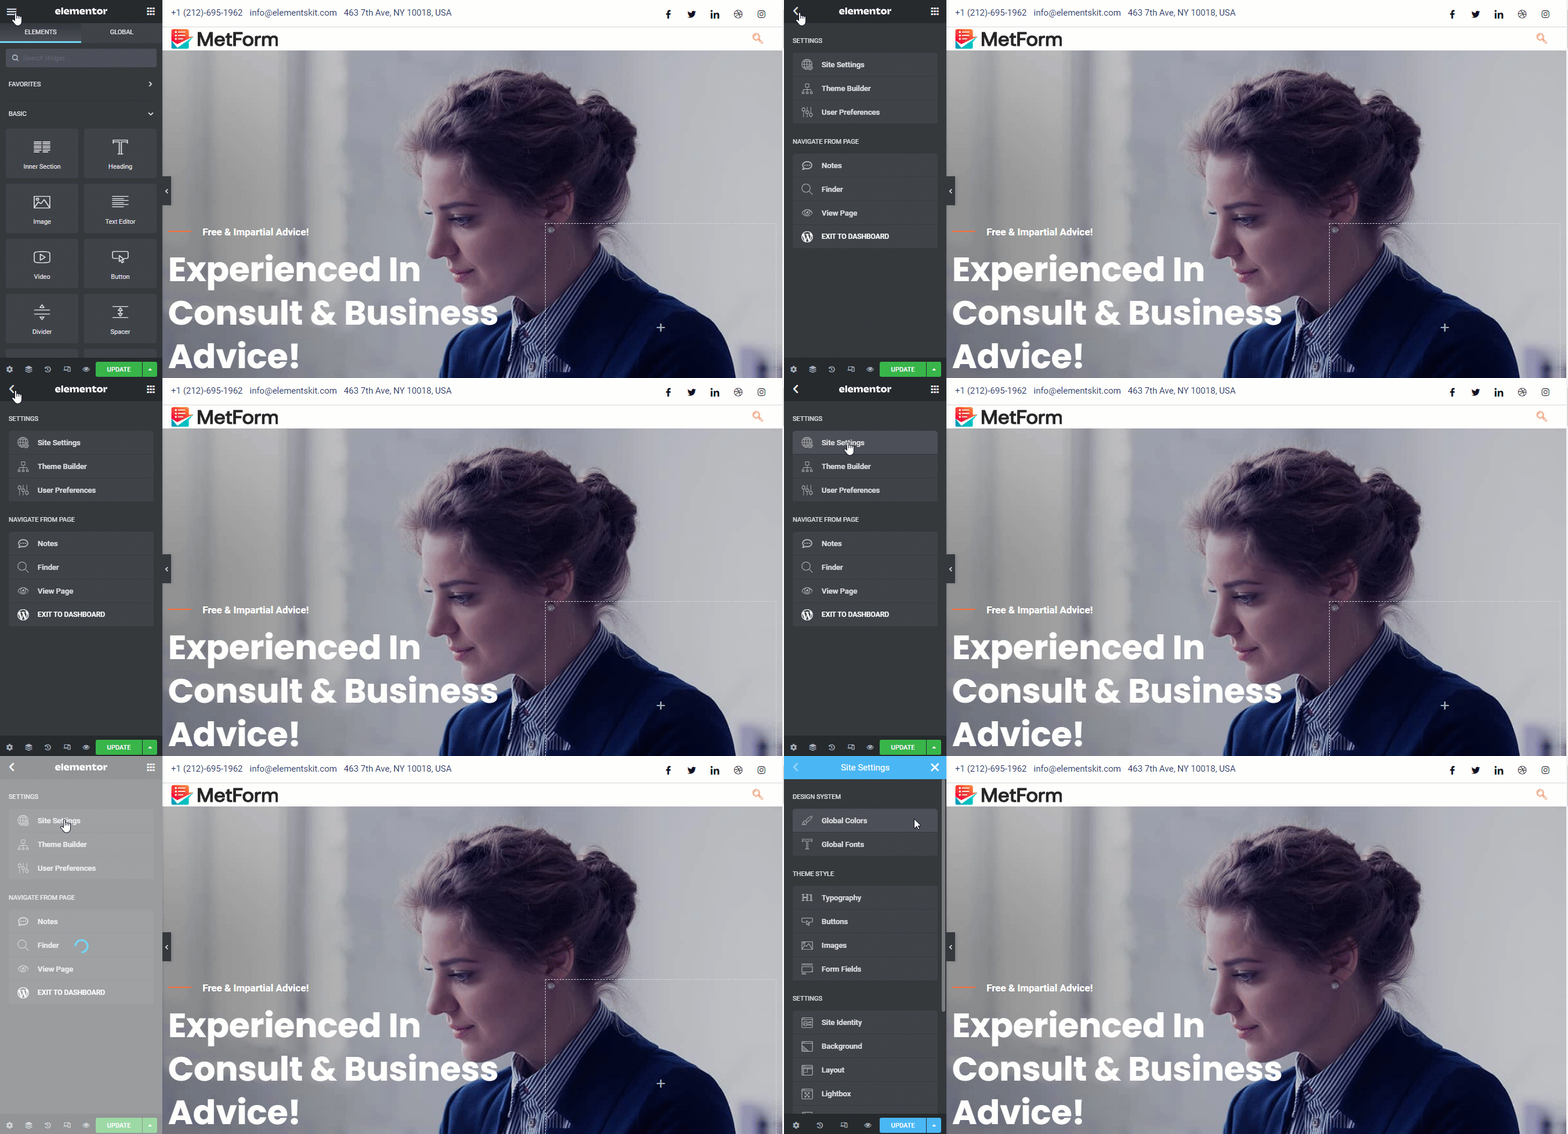
Nu scrolla ner till alternativet Anpassad CSS, öppna fliken och lägg till dina anpassade stilar här.
4️⃣ Lägg till anpassad CSS i Elementor från WordPress anpassningsinställningar
Du behöver inte nödvändigtvis använda alternativen som ges av Elementor för att lägga till anpassad CSS. Du kan också använda WordPress-anpassningsalternativen för att lägga till anpassad CSS.
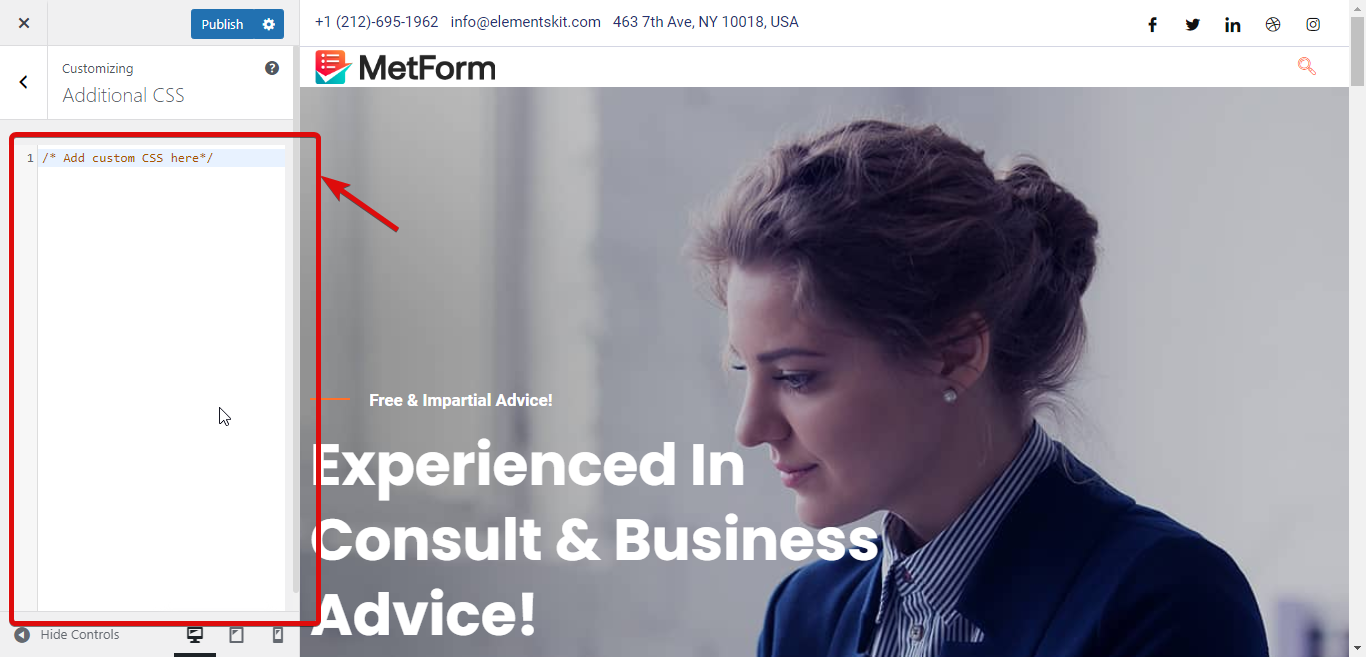
För detta, gå till WordPress Dashboard ⇒ Utseende ⇒ Anpassa.
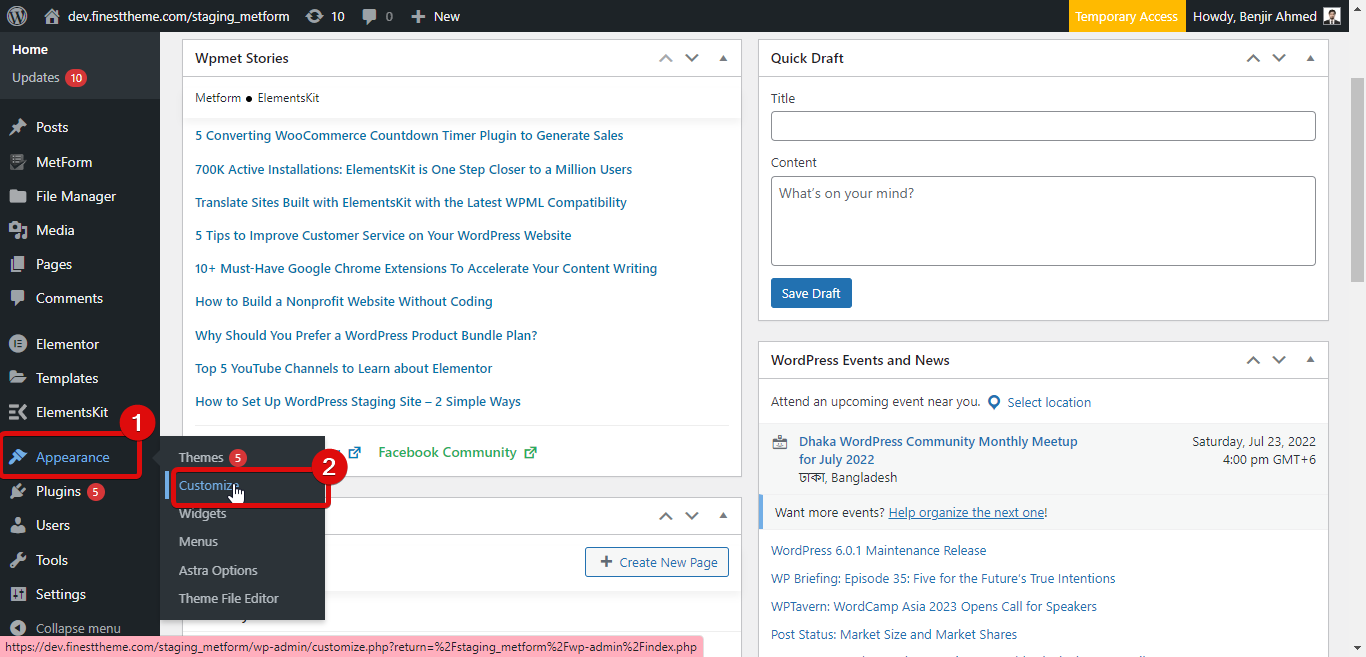
Nu hittar du många inställningar som du kan använda för att anpassa din WordPress webbplats. Scrolla ner och öppna Ytterligare CSS-fliken för att lägga till anpassad CSS på din webbplats.

Hur man fixar Elementor anpassad CSS som inte fungerar Problem
Ibland lägger man till anpassad CSS i Elementor kanske inte reflekteras på webbplatsen omedelbart på grund av vissa tekniska problem. Här är stegen du kan använda för att lösa det här problemet:
✅Regenerera CSS
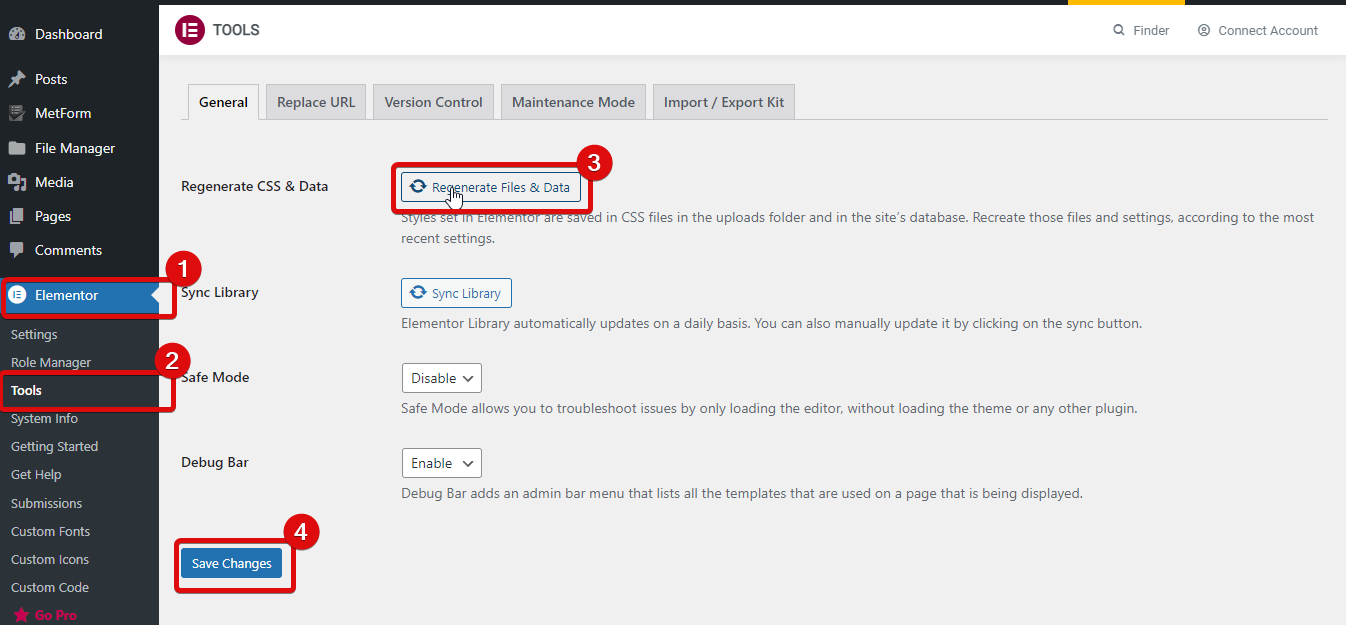
Regenerering av CSS kan lösa detta problem. För att återskapa CSS, navigera till Elementor ⇒ Verktyg och klicka på Regenerera CSS & Data och klicka sedan på Spara ändringar.
✅ Rensa webbplatscache och webbläsarcache
Rensa webbplatsens cache med valfri WordPress cache-plugins. Du kan också rensa valfri cache på servernivå om du har en. När du har rensat webbplatsens cache, rensa webbläsarens cache och uppdatera webbplatsen för att kontrollera om CSS fungerar eller inte.
✅ Temainkompatibilitet
Ibland Elementor-tema inkompatibilitet kan vara orsaken till att anpassad CSS inte visas i användargränssnittet. Du kan prova att byta till vilket standardtema som helst för att kontrollera om CSS fungerar, om css dyker upp på fronten med en standardtema prata sedan med din temautvecklare om kompatibilitetsproblemet.
✅ Använda en annan sidbyggare tillsammans med Elementor
Att använda flera sidbyggare samtidigt kan göra att din anpassade CSS inte fungerar. Den enkla anledningen är att CSS från olika sidbyggare kan komma i konflikt med varandra och den andra sidbyggaren kan åsidosätta Elementors anpassade CSS. I sådana fall bör du endast använda Elementors sidbyggare.
🔔🔔 Notera: Om du vill utöka funktionaliteten för Elementor-sidbyggaren utan att använda en annan sidbyggare, kan du välja Elementor-tillägg.
🔥 Prova ElementsKit– det ultimata tillägget för Elementor som följer med 85+ widgets och 500+ färdiga sektioner så du kan bygga en modern Elementor-webbplats.
✨Mer än 700k+ människor använder för närvarande detta underbara tillägg för att skapa fantastiska webbplatser tillsammans med avancerade sidhuvuden och sidfötter.
Och nu kan du få Pro-versionen av ElementsKit till en rabatt på 20% använda gemenskap20 koda. För att köpa ElementsKit pro klick här.
Vanliga frågor
Ta en titt på några av de mest populära frågorna relaterade till Elementors anpassade CSS med svar:
Hur använder jag anpassad CSS i Elementor?
Du kan lägga till anpassad CSS i Elementor på fyra sätt. Dessa sätt är att använda HTML-block, Elementor Custom CSS-kodavsnitt, WordPress-anpassningsalternativ och Elementor Site Building-inställningar.
Hur kan jag lägga till anpassad CSS till Elementor gratis?
Från WordPress-anpassningsalternativen kan du lägga till anpassad CSS på Elementors webbplats gratis.
🤷 Vill lägga till avancerade formulär på din Elementor-webbplats? Kolla in våra resurser för att skapa formulär:
👉 Hur man lägger till flerstegsformulär i WordPress
👉 Hur man bygger Elementor Conditional Logic Form
👉 Hur man skapar WordPress-undersökningsformulär i Elementor
Avslutar med Elementor anpassad CSS
Nu vet du 4 sätt du kan använda för att lägga till anpassad CSS i Elementor. Även om du kan använda dem alla, bör du tänka på CSS-hierarkin av prioritet. Till exempel kommer en inline-stil alltid att få mer prioritet framför CSS skriven på en sidnivå eller en webbplatsnivå.
Så jag skulle rekommendera att endast använda anpassad CSS när du kan CSS mycket väl. Annars kan du göra mer skada än nytta och i slutändan förstöra din webbplats utseende och layout.
Med det sagt, om du är ett CSS-proffs, har du inget att oroa dig för, använd gärna sätten som beskrivs i den här bloggen för att lägga till din anpassade CSS för att framgångsrikt ändra utseendet på din webbplats.
Lämna ett svar