


 Danish
  English
  German
  Spanish
  Italian
  French
  Portuguese
  Swedish
  Polish
  Korean
  Japanese
Leder efter måder at tilføje Custom CSS i Elementor?
Udvidelse af de allerede fantastiske Elementor-designs ved at tilføje tilpasset CSS kan give dig en uovertruffen fordel i forhold til dine konkurrenter.
Så hvorfor ikke bruge noget tilpasset Elementor CSS og skille sig ud i mængden af denne meget konkurrenceprægede digitale verden, ikke?
Der er ingen grund til, hvorfor du ikke skulle.
Men hvordan tilføjer man tilpasset CSS til træk og slip Elementor-sidebyggeren?
Nå, du kan tilføje tilpasset CSS i Elementor på mange måder. At vide flere detaljer om hvordan man tilføjer tilpasset CSS i Elementor Keep på at læse...
Hvad er CSS?
CSS (Cascading Style Sheets) er et regelbaseret typografiark-sprog, som man bruger til at ændre layout og udseende på websider bygget med et markup-sprog som HTML eller XML. Brug af CSS er en effektiv måde at designe web på, fordi det holder både indhold og stil på en separat fil, hvilket giver dig mest fleksibilitet og brugervenlighed.
Hvorfor skal du tilføje tilpasset CSS på Elementor-webstedet?
Nå, det er ikke obligatorisk pga Elementor selv giver alle de tilpasningsmuligheder, du har brug for for at skabe smukke websteder. Men hvis du er en person, der forstår at kode og vil bruge din kreativitet til at forbedre udseendet af webstedet, så kan du tilføje Custom CSS i Elementor.
- Ved at bruge tilpasset CSS i Elementor kan du tilsidesætte temaets stil for at implementere en ny stil. Antag, at du elsker hele udseendet af en side, som dit tema giver, men du vil ændre layoutet en lille smule i én sektion, så kan du tage hjælp fra Elementor tilpasset CSS til at gøre det.
- På samme måde kan du også tilsidesætte Elementor premade skabelons design ved hjælp af de brugerdefinerede CSS-kodestykker.
- Du kan også tilpasse dit websted til at se anderledes ud på forskellige enheder ved at tilføje tilpassede CSS-kodestykker til Elementor.
👉👉 Tjek hvordan du bruger Elementor flexbox-beholder til at skabe enhedsvenlige websteder.
Where to put your CSS in Elementor
Elementor provides multiple ways to include custom CSS, each with its unique advantages depending on the scope of your styling needs. Here are the primary locations where you can put CSS in Elementor:
- Elementor Widgets: Add CSS using the Elementor HTML widget.
- Sections or Columns: Apply CSS to entire sections or columns in the Fremskreden → Brugerdefineret CSS fanen.
- Site-Wide CSS: Add global CSS in Elementor → Site Settings → Custom CSS (Pro only).
- WordPress Customizer: Brug Appearance → Customize → Additional CSS for basic site-wide styles.
- Theme Files or External CSS: Add code to
style.cssor use an external.cssfile for advanced needs.
Sådan tilføjes brugerdefineret CSS i Elementor: 3 forskellige metoder
Tilføjelse af tilpasset CSS er slet ikke et hårdt arbejde. Faktisk kan du tilføje tilpasset CSS i Elementor ved hjælp af forskellige metoder. Her deler jeg de sikreste 4 måder at tilføje Elementor tilpasset CSS med dig.
1️⃣ Tilføj CSS ved hjælp af Elementors brugerdefinerede CSS-kodestykker
Elementor giver dig en avanceret mulighed for at tilføje tilpasset CSS til dine sektioner, kolonner samt widgets. Imidlertid, denne mulighed er kun tilgængelig med Elementor Pro.
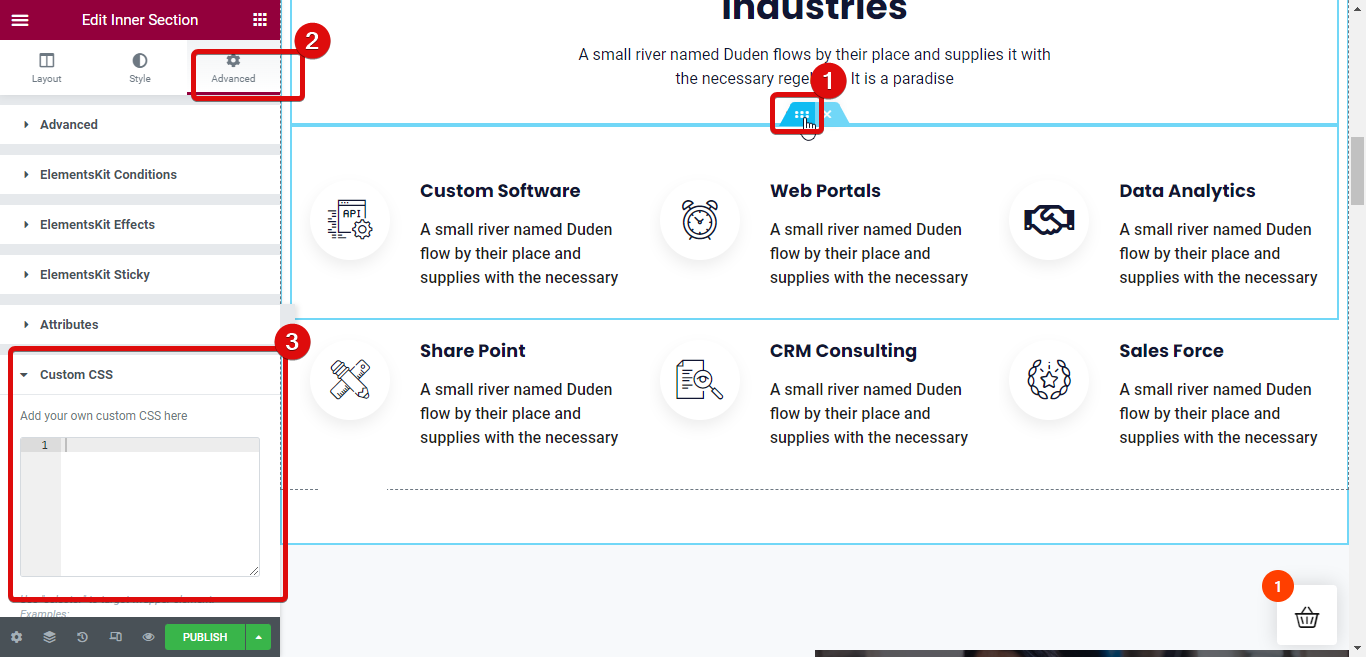
For at tilføje tilpasset CSS til enhver sektion/indre sektion af dit Elementor-websted, klik på de seks prikker for at gå til redigeringstilstand, og flyt derefter til Fanen Avanceret ⇒ Brugerdefineret CSS. Udvid nu fanen Custom CSS og tilføj din brugerdefinerede kode.
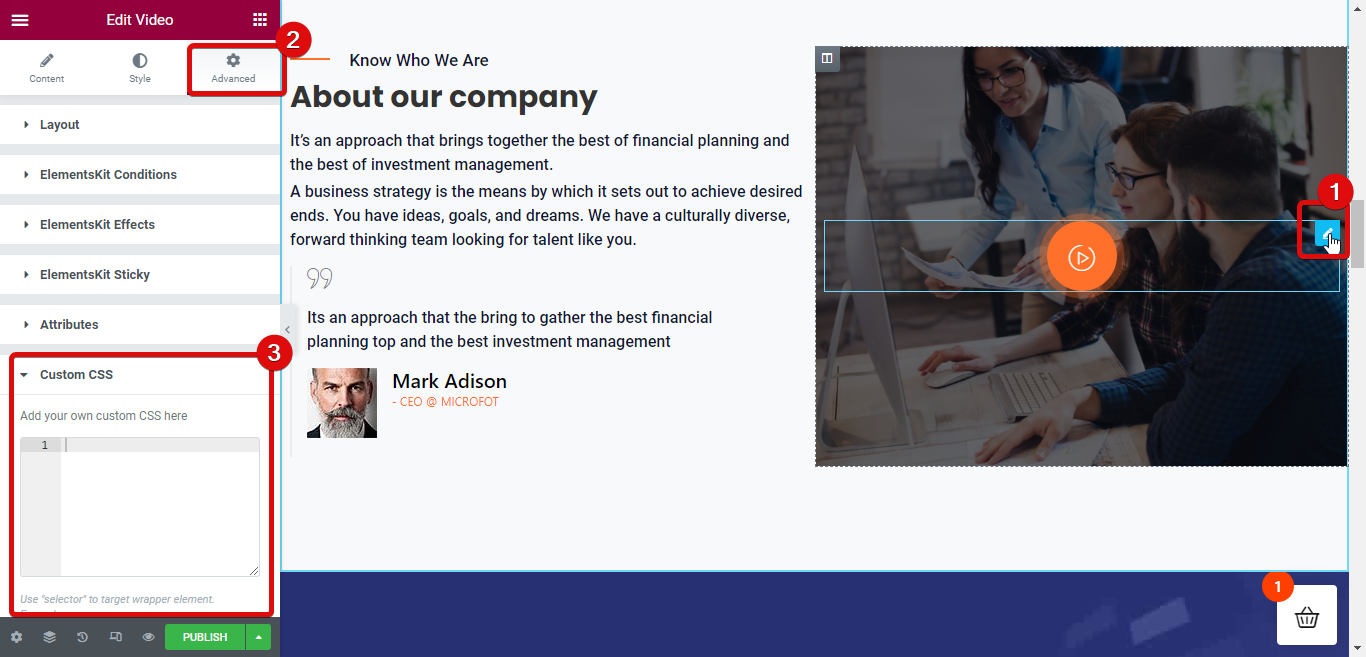
På samme måde kan du tilføje tilpasset CSS i Elementor-widgets. For det skal du klikke på widgetten for at gå til redigeringstilstand, og derefter flytte til fanen Avanceret ⇒ Brugerdefineret CSS. Udvid nu fanen Custom CSS og tilføj din brugerdefinerede kode.
2️⃣ Brug HTML-widget til at tilføje Elementor tilpasset CSS
Den anden mulighed, som du kan bruge til at tilføje Elementor tilpasset CSS til dit WordPress-websted, er ved at bruge HTML-widgetten. For denne mulighed, bare simpelthen træk og slip HTML-widgetten og tilføj derefter din CSS-kode i et Style tag.
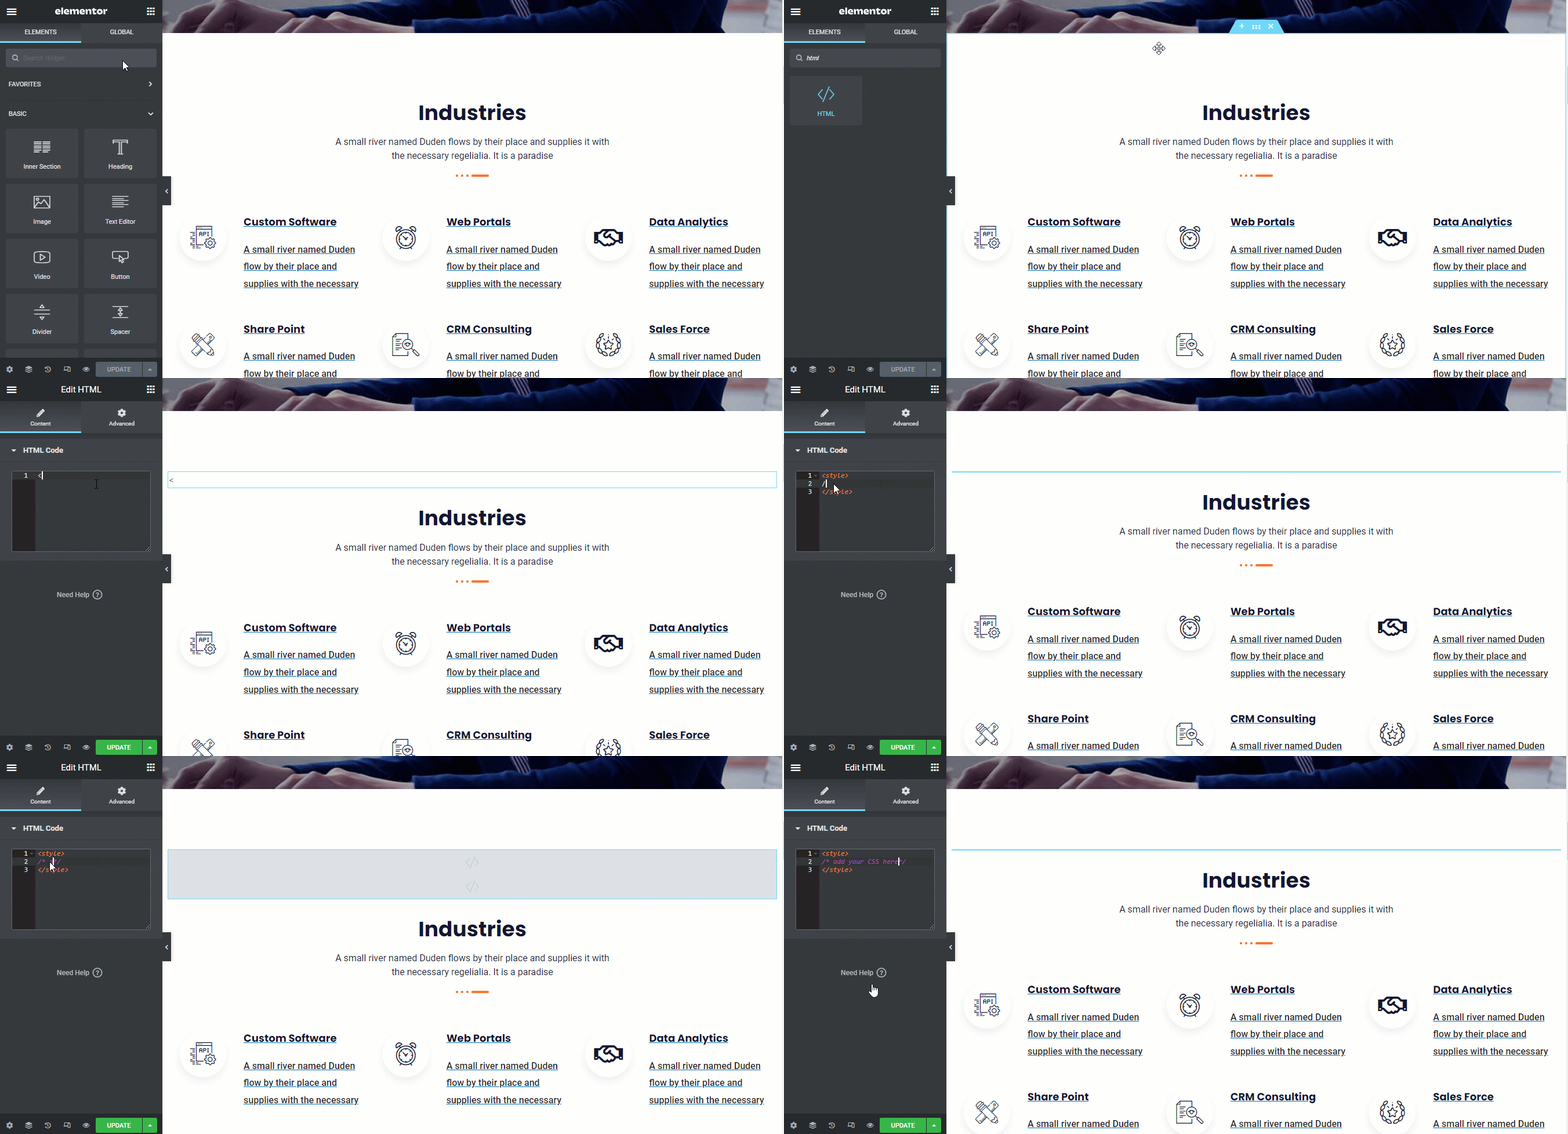
Bemærk: Du kan tilføje både inline og selvstændig CSS ved hjælp af HTML-tagget. Og bare rolig, kun stilene vil blive afspejlet på webstedet, råkoden vil ikke være synlig.

3️⃣ Tilføj tilpasset CSS i Elementors webstedsindstillinger
Du kan også tilføje tilpasset CSS i Elementor ved at bruge indstillingen for webstedsindstillinger. Klik på hamburgermenuen i øverste venstre hjørne og derefter under indstillinger, klik på indstillingen for webstedsindstillinger for at få adgang til de globale indstillinger for webstedsindstillinger.
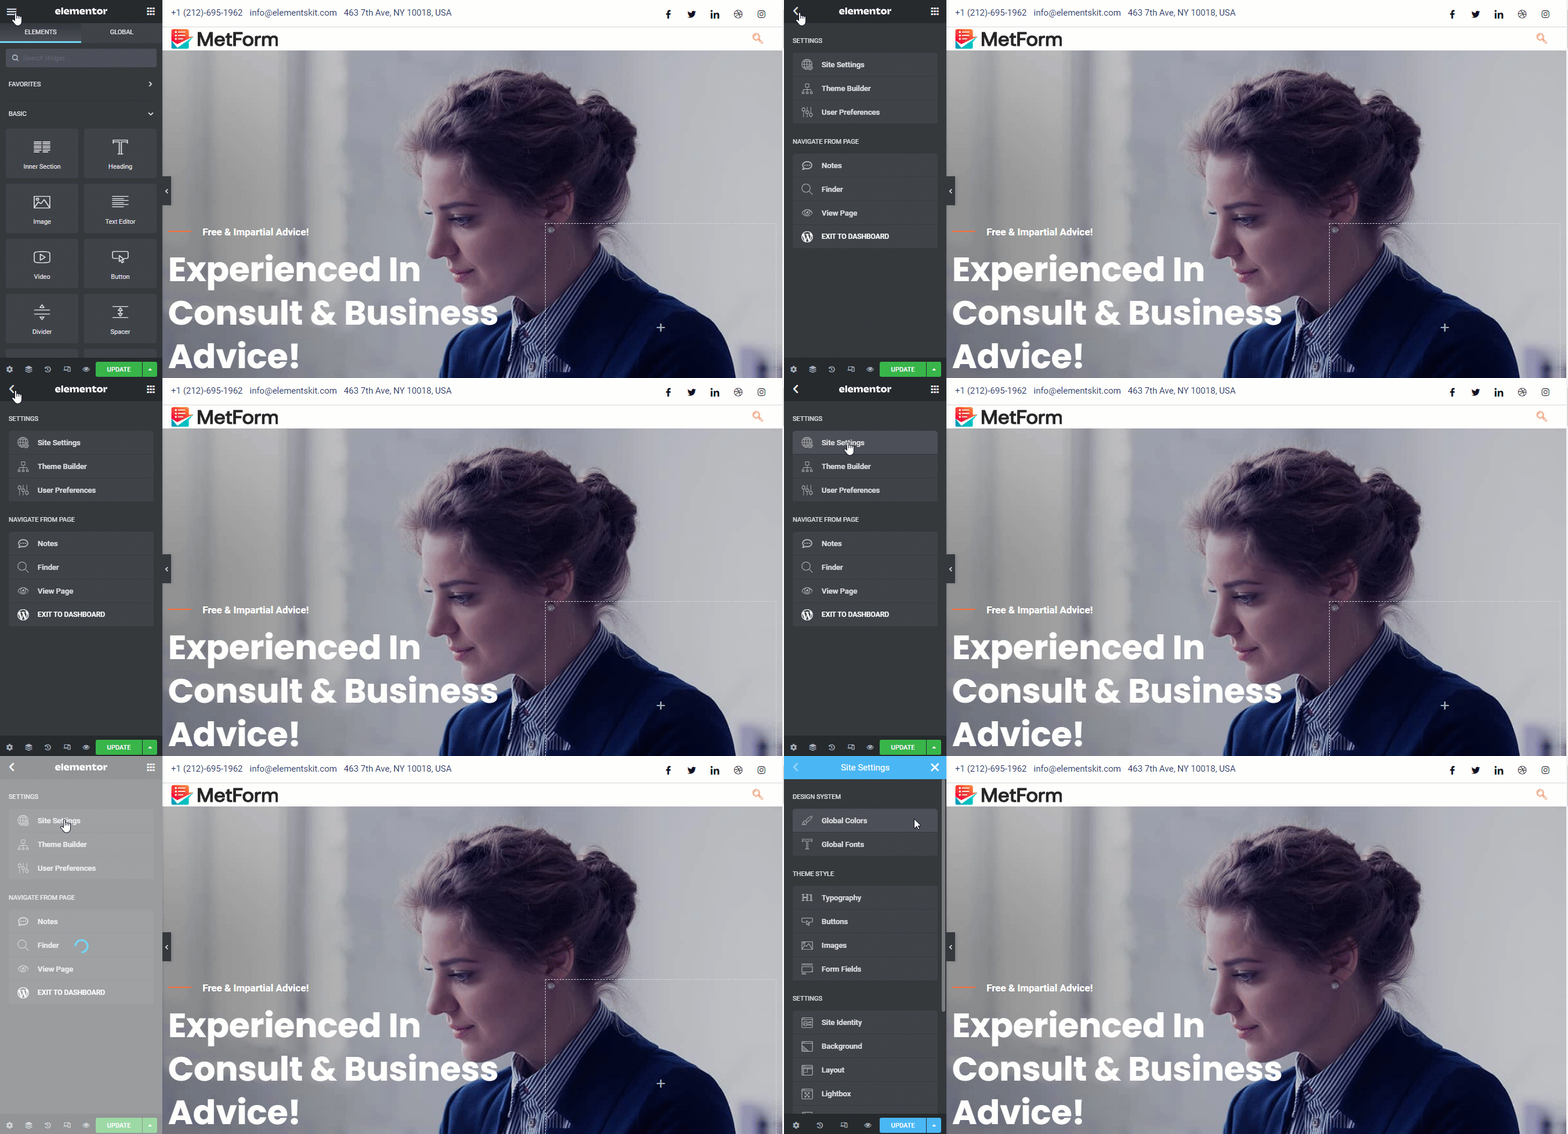
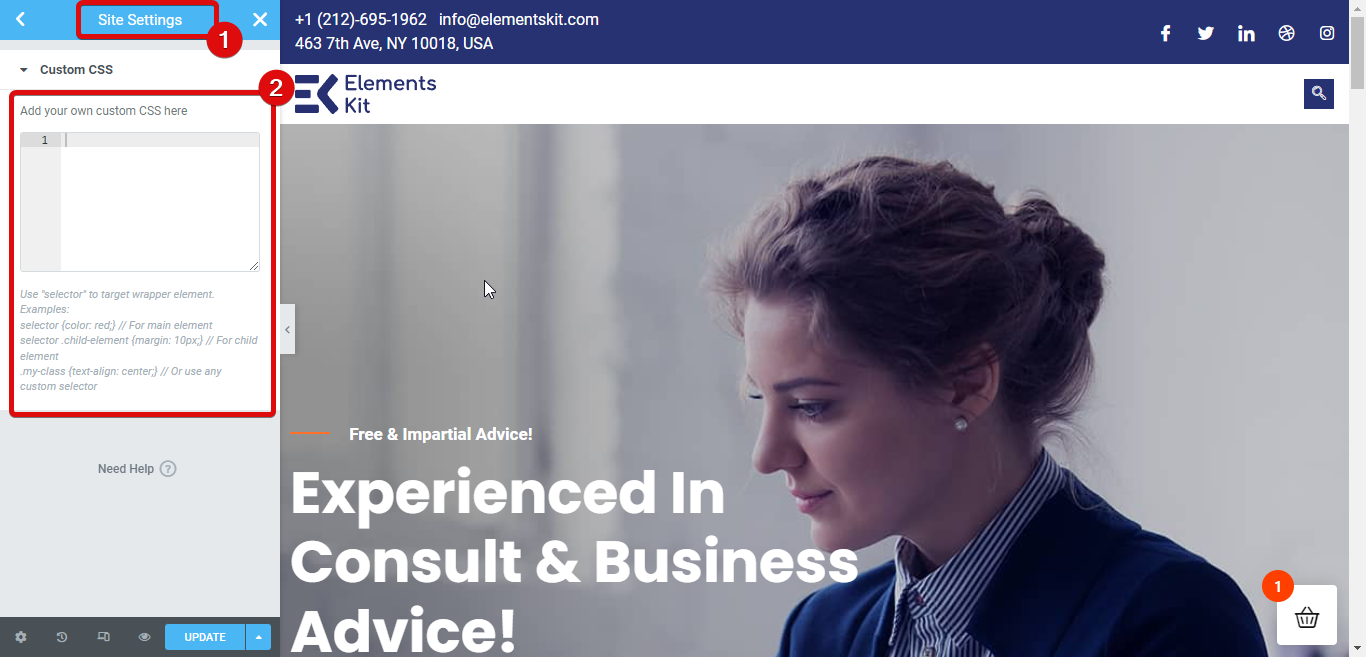
Nu rul ned til indstillingen Custom CSS, åbn fanen og tilføj dine brugerdefinerede stilarter her.
4️⃣ Tilføj tilpasset CSS i Elementor fra WordPress tilpasningsindstillinger
Du behøver ikke nødvendigvis at bruge de muligheder, som Elementor giver for at tilføje tilpasset CSS. Du kan også bruge WordPress-tilpasningsmulighederne til at tilføje tilpasset CSS.
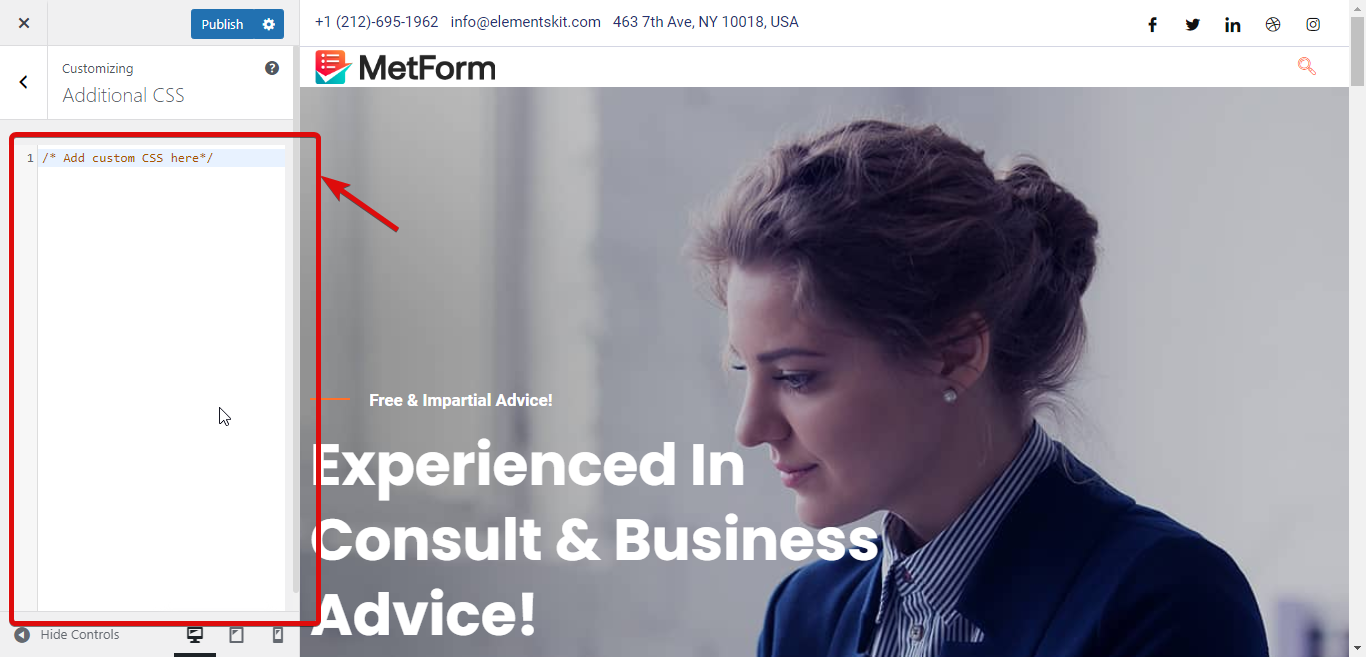
For dette, gå til WordPress Dashboard ⇒ Udseende ⇒ Tilpas.
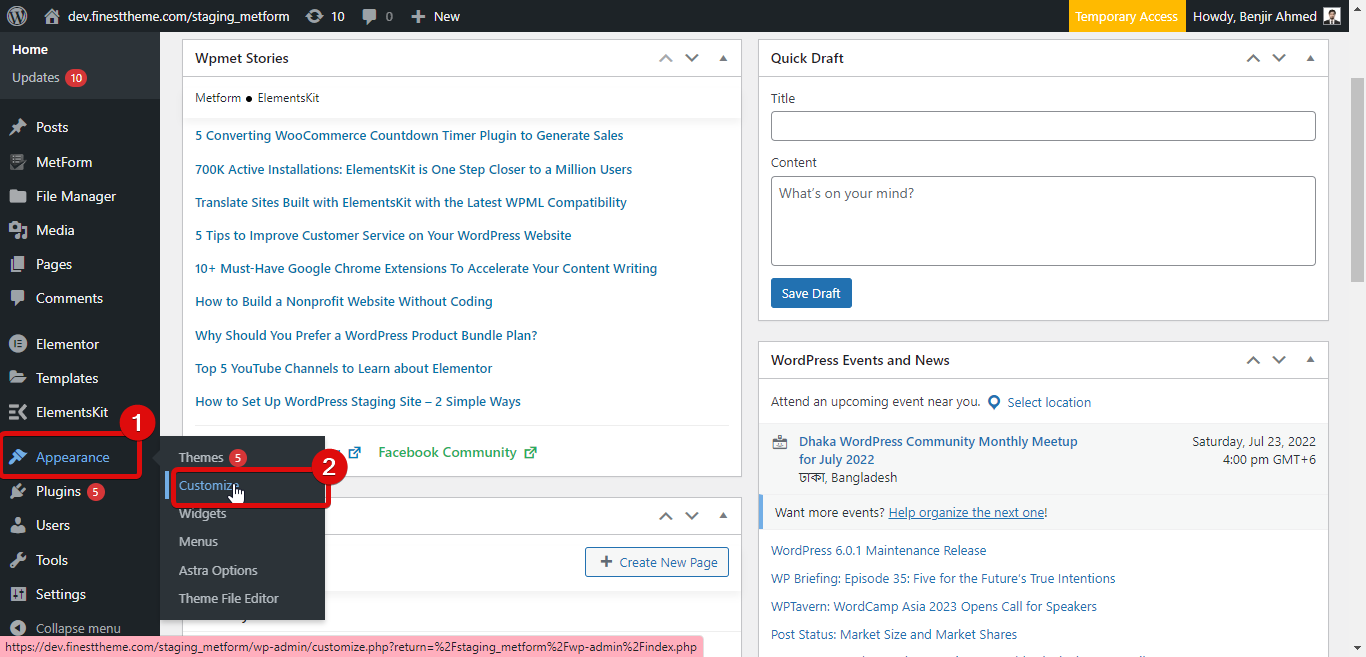
Nu vil du finde mange indstillinger, som du kan bruge til at tilpasse din WordPress websted. Rul ned og åbn Yderligere CSS-fane for at tilføje tilpasset CSS til dit websted.

Sådan repareres Elementor tilpasset CSS, der ikke virker Problem
Nogle gange afspejler tilføjelse af tilpasset CSS i Elementor muligvis ikke webstedet med det samme på grund af nogle tekniske problemer. Her er de trin, du kan bruge for at løse dette problem:
✅Regenerer CSS
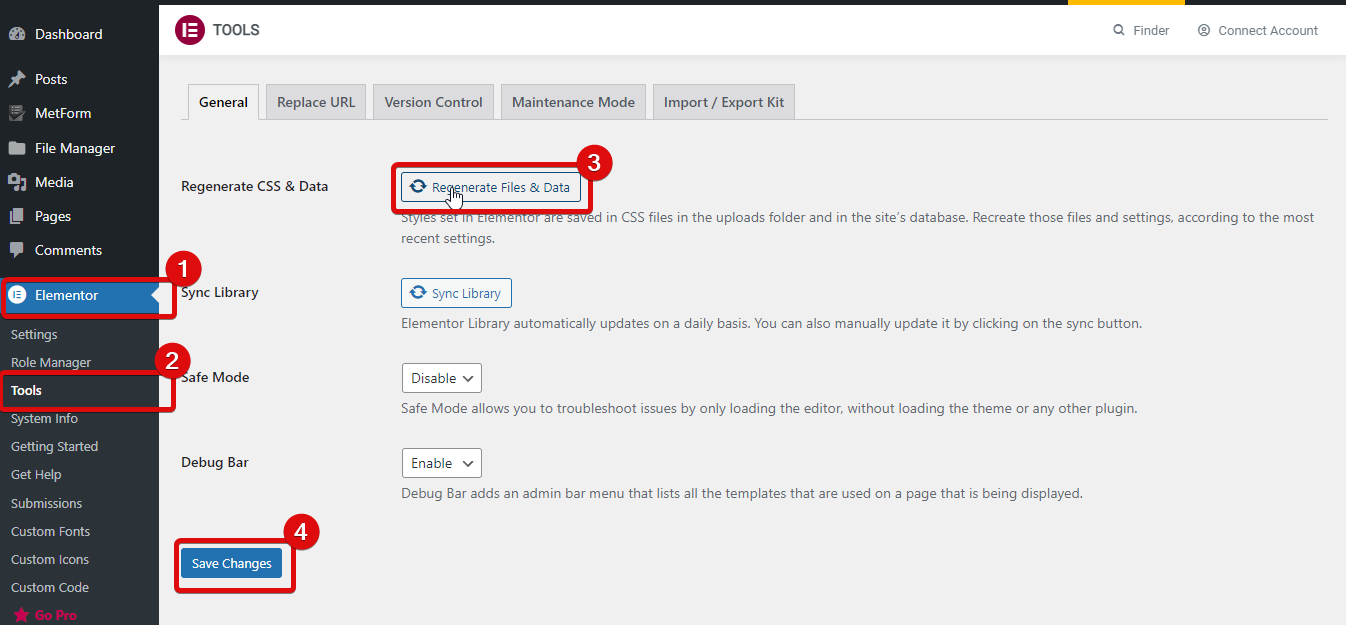
Regenerering af CSS kan løse dette problem. For at genskabe CSS skal du navigere til Elementor ⇒ Værktøjer og klik på Regenerer CSS & Data og klik derefter på Gem ændringer.
✅ Ryd webstedscache og browsercache
Ryd webstedets cache med enhver WordPress cache plugins. Du kan også rydde enhver cache på serverniveau, hvis du har en. Når du har ryddet webstedets cache, skal du rydde din browsers cache og opdatere webstedet for at kontrollere, om CSS'en fungerer eller ej.
✅ Temainkompatibilitet
Sommetider Elementor tema inkompatibilitet kan være årsagen til, at tilpasset CSS ikke vises på frontend. Du kan prøve at skifte til et hvilket som helst standardtema for at kontrollere, om CSS'en virker, hvis CSS'en vises på frontenden med en standard tema så tal med din temaudvikler om kompatibilitetsproblemet.
✅ Brug af en anden sidebygger sammen med Elementor
Brug af flere sidebyggere på samme tid kan forårsage, at din tilpassede CSS ikke virker. Den simple grund er, at CSS fra forskellige sidebyggere kan komme i konflikt med hinanden, og den anden sidebygger kan tilsidesætte Elementor brugerdefinerede CSS. I sådanne tilfælde bør du kun bruge Elementor-sidebyggeren.
🔔🔔 Bemærk: Hvis du vil udvide Elementor-sidebyggerens funktionalitet uden at bruge en anden sidebygger, så kan du vælge Elementor-tilføjelser.
🔥 Prøv ElementsKit– den ultimative tilføjelse til Elementor der følger med 85+ widgets og 500+ klar sektioner så du kan bygge et moderne Elementor-websted.
✨Mere end 700k+ folk bruger i øjeblikket denne dejlige tilføjelse til at skabe fantastiske websteder sammen med avancerede sidehoveder og sidefødder.
Og nu kan du få Pro-versionen af ElementsKit til en rabat på 20% bruger fællesskab 20 kode. For at købe ElementsKit pro klik her.
Ofte stillede spørgsmål
Tag et kig på nogle af de mest populære spørgsmål relateret til Elementor tilpasset CSS med svar:
Hvordan bruger jeg tilpasset CSS i Elementor?
Du kan tilføje tilpasset CSS i Elementor på 4 måder. Disse måder er at bruge HTML-blok, Elementor Custom CSS-snippet, WordPress-tilpasningsmuligheder og Elementor Site-bygningsindstillinger.
Hvordan kan jeg tilføje tilpasset CSS til Elementor gratis?
Fra WordPress-tilpasningsmulighederne kan du tilføje tilpasset CSS på Elementor-webstedet gratis.
🤷 Vil gerne tilføje avancerede formularer til dit Elementor-websted? Tjek vores formularopbygningsressourcer:
👉 Sådan tilføjer du flertrinsformular i WordPress
👉 Sådan bygger du Elementor Conditional Logic Form
👉 Sådan opretter du WordPress-undersøgelsesformular i Elementor
Afslutning med Elementor tilpasset CSS
Nu kender du 4 måder, du kan bruge til at tilføje tilpasset CSS i Elementor. Selvom du kan bruge dem alle, bør du huske CSS-hierarkiet af prioritet. For eksempel vil en inline-stil altid få mere prioritet over CSS skrevet på et sideniveau eller et webstedsniveau.
Så jeg vil anbefale kun at bruge tilpasset CSS, når du kender CSS meget godt. Ellers kan du gøre mere skade end gavn og ende med at ødelægge din hjemmesides udseende og layout.
Når det er sagt, hvis du er en CSS-professionel, så har du ikke noget at bekymre dig om. Brug de måder, der er beskrevet i denne blog, til at tilføje din brugerdefinerede CSS for at ændre udseendet på din hjemmeside.
Skriv et svar