If you run a WordPress site, there might be times when you need to control who sees specific content. To hide such sensitive information or create exclusive protected content on your WordPress site, password protection helps.
In this guide, we’ll talk about how to password protect a page in WordPress. There are two simple methods to password protect any content. To learn the methods, keep reading…
Quick Overview
By default, WordPress supports applying password protection to pages on your website. But using a plugin offers more controls and advanced functionalities.
Tools to Reinforce WordPress Protection: ElementsKit, Elementor (Free version)
Installing these WordPress password-protection plugins empowers you with several security features, like:
✅ User role-based protection system.
✅ Show content in the backend editor for design purposes.
✅ Implement cookies with an expiration time.
✅ Give a customized message when someone enters to password-protected pages.
✅ Change the field–area and submit button text to give a personalized experience.
✅ Give a warning message when visitors enter the wrong password or security key.
✅ Provide styling features for typography, background, border, form field, submit button, etc.
Overall, the ElementsKit Protected Content Widget helps you create an error-free and future-proof password-protection system for WordPress pages or any specific sections. Now, let’s get into the details:
Why should you password protect a page in WordPress?
There are some specific reasons why you may want to protect any content from the public or specific people. Let’s know the reasons first –
- To protect sensitive information: Information, like financial documents, client details, internal company plans, etc. are confidential and sensitive. You can use password protection to add an extra layer of security to prevent unauthorized access to the information.
- Limit content visibility: You can restrict access to content not meant for the public, such as drafts, unfinished work, or content under development. This helps prevent visitors from seeing incomplete information. Yet, you can share in-progress work or drafted content with your specific team members and get feedback.
- Exclusive content for members: If you have a membership site with premium content, password protection can help you control access. You can ensure that only paying members can view it.
- Coming soon page: To build anticipation for a new product or service launch, you can use password protect a “coming soon” page.
- Prevent search engine indexing: Password-protected pages won’t be indexed by search engines so they won’t show up in search results.
Helpful for you 👉👉👉How To Add Clickable Links in WordPress
How to password protect a page in WordPress
You can find a password protection feature in WordPress’s default system and also use a plugin. Let’s learn the methods one by one!
Method 1: The default way in WordPress
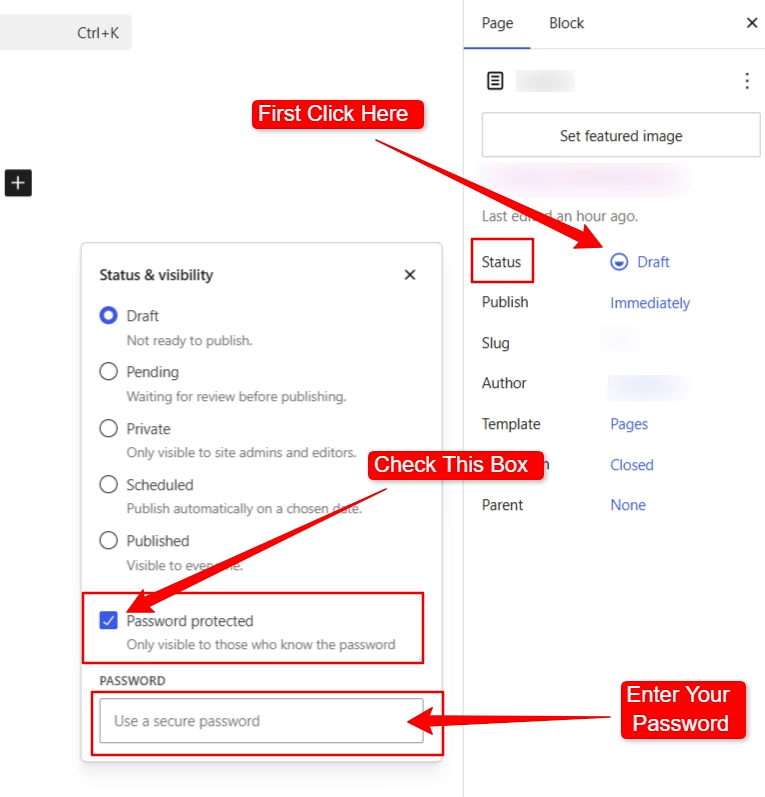
From the WordPress dashboard, go to posts/pages. You can create new content or open any existing content where you want to apply password protection.
In the editor, find Visibility. Here you’ll see three options, Public, Private and Password protected. So you have to select Password protected from the choices.

Write a password in the field and update the page.
That’s it! It may look like this 👇
Method 2: Create password protected Content using a plugin
Here we’ve used the ElementsKit plugin that offers a widget named ‘Protected Content’.
The plugin is a popular add-on for the Elementor. It provides special widgets, modules, various customization and control options, an expansive design library and more. Moreover, ElementsKit is trusted by 1+ million users.
Installing ElementsKit
Start by downloading ElementsKit from here.
Remember, to use the ElementsKit Protected Content widget you need ElementsKit Pro. It’s easy to pick a suitable plan for you from here.
Don’t forget to activate the plugins after installing. 👇
To create an Elementor password protected page, you can start by creating a new content or open any existing content. Afterward, you have to click on Edit with Elementor.
Search the ElementsKit Protected Content widget and drag it to customize.
The widget offers various customization options. You can utilize the options from the Content and Style section to design WordPress password protect page.
You are done! ✌️
Here is the output example we’ve made with the ElementsKit Protected Content widget.
✔️ Check this tutorial to design WordPress toggle content in Elementor.
How to remove the protection on WordPress password protect posts or pages
If you have a password-protected WordPress page or post and want to remove it, no worries! Removing password protection is a breeze. Let’s walk through the quick steps to make your content public again.
Removing the default password protection in WordPress
Go to the page or post where you’ve protected content with a password. Find visibility and unselect ‘Password protected’. Now you can select from Public and Private options, according to your preferences. Then, press the “Save” button to make it live.
Removing the protection on a page or a post using WordPress password protection plugin
Removing password protection from the WordPress content that you’ve created with a plugin is simple.
- Just head to that page/post
- Click edit with Elementor
- Press the right button on the password protection widget
- Delete the widget
- Update the post/page
This instantly removes the password restrictions. However, double-check this aligns with your security goals.
👉 WordPress Guide: How to Create a Search Result Page in WordPress Websites
FAQs
Why consider a password protection plugin for WordPress?
How can I identify password-protected pages in WordPress?
Conclusion
In conclude the content, while the built-in system is a simple solution, a plugin like ElementsKit gives additional features and finer control for sure. Consider your specific needs and technical comfort level when choosing your method. Ultimately, password protection empowers you to create a secure space within your WordPress site. This way you can easily ensure sensitive information reaches the intended audience.


Leave a Reply