
 English
  German
  Spanish
  Italian
  French
  Danish
  Portuguese
  Swedish
  Polish
  Korean
  Japanese
Imagine updating your WordPress site with fresh content, new designs, or essential plugins, only to find out that visitors are still seeing old versions of your pages. Frustrating, right?
That’s the invisible hand of cache at work – a double-edged sword in the world of web performance. On one side, caching can supercharge your site’s speed; on the other, it can stubbornly cling to outdated data, making you look like you haven’t updated your site in ages.
This guide will walk you through the process of how to clear cache in WordPress with a brief background of website caching, the importance of clearing cache on your WordPress site and provide step-by-step instructions on how to do it with and without plugins, as well as how users can clear their browser cache.
What is website cache?
Before diving into the steps, it’s essential to understand what cache is. In short, the cache is a collection of temporary data stored to speed up the loading time of a web page.
When a user visits your website, certain elements like images, CSS files, and JavaScript files are saved locally on their browser. This allows the browser to load these elements from the local cache rather than fetching them from the server each time they visit. So, next time they visit, these files are loaded from the cache, making the site load faster.
Caching improves website performance and reduces server load by serving previously saved files quickly. However, if these cached files become outdated or corrupted, it can lead to problems such as displaying outdated content or causing errors. That’s why periodically clearing the cache is important to ensure that users see your site’s most current version and avoid potential issues.
And you can clear the cache from all types of devices, including your Macbook to speed up the device and this post throws light on it.
Why do you need caches in WordPress sites?
Caching is essential for WordPress sites because it significantly enhances page loading speed. And in regards to WordPress sites, loading time is a critical factor.
When a cache is in place, it stores static versions of your web pages, images, and other resources, allowing these elements to be quickly served to visitors without repeatedly generating them from scratch.
This reduces the load on your server, minimizes the time it takes for pages to load, and decreases the likelihood of server overload during traffic spikes. By improving load times, caching not only boosts user satisfaction but also positively impacts your site’s SEO, as search engines favor fast-loading websites.
Overall, caching is a crucial component in optimizing the performance and reliability of your WordPress site.
When and why to clear cache in WordPress?
Clearing the cache in WordPress is crucial when you make changes to your site that aren’t appearing as expected, such as updates to content, design modifications, or plugin installations. Cached data can sometimes prevent these changes from being visible immediately because it’s serving outdated information.
Therefore, clearing the cache is essential to ensure your site functions correctly and reflects recent changes. Here’s when and why you should consider clearing your cache:
👉 After Making Changes to Content or Design:
- Updates Not Visible: When you update text, images, or design elements on your site, cached versions may still be displayed. Clearing the cache ensures that visitors see the most recent updates.
- New Features: If you’ve added or modified features and they’re not showing up, clearing the cache can help make these changes visible.
👉 When Installing or Updating Plugins:
- Plugin Conflicts: New or updated plugins can sometimes conflict with old cached files. Clearing the cache can help resolve these issues and ensure new plugins work as intended.
- Functionality Issues: If a plugin isn’t behaving as expected after an update, clearing the cache might resolve issues caused by outdated cached data.
👉 Performance Problems:
- Slow Loading Times: If your site starts loading slowly, it could be due to overloaded or corrupted cache files. Clearing the cache can help improve loading speeds.
- Site Errors: Sometimes, errors on your site can be traced back to corrupted cache files. Clearing the cache can help eliminate these issues.
👉 Troubleshooting and Debugging:
- Testing Changes: When troubleshooting or debugging, clearing the cache ensures that you’re working with the most up-to-date data and not affected by outdated cached files.
- Debugging Errors: If you encounter unexpected behavior or errors, clearing the cache is a crucial step in diagnosing and resolving the issue.
👉 Regular Maintenance:
- Routine Clearing: Regularly clearing the cache can prevent the buildup of old, potentially conflicting files and maintain optimal site performance.
- Performance Optimization: Periodic cache clearing helps ensure that your site runs efficiently and that visitors always see the latest content.
By clearing the cache at these times, you ensure that your WordPress site operates smoothly and provides visitors with the most accurate and up-to-date experience.
How to clear cache in WordPress without plugins?
Clearing cache in WordPress doesn’t always require a plugin. You can perform cache clearing manually through various methods, depending on what type of cache you need to clear. Here’s a step-by-step guide on how to clear cache in WordPress without using plugins:
Method 1: Clear your web hosting cache
Many hosting providers offer built-in caching solutions. You can usually clear the cache from your hosting control panel. Look for options like “Clear Cache” or “Purge Cache” in the performance or caching section.
➡️ Access cPanel:
- Log into your hosting account and navigate to cPanel.
- Look for options related to caching, such as Cache Manager or similar.
- Follow the prompts to clear the cache.
➡️ Managed WordPress Hosting:
- Log into your managed WordPress hosting account.
- Look for caching options or tools in the hosting dashboard.
- Clear the cache from the available tools or settings.
Method 2: Clear Content Delivery Network (CDN) Cache
If you use a CDN like Cloudflare, clearing its cache ensures that it serves the most recent version of your site.
- Log into your Cloudflare account.
- Select your website and go to the Caching tab.
- Click Purge Everything to clear all cached files.
Method 3: Manually clear cache files
For advanced users, you can manually clear cache files from your server. You can either clear cache via FTP/SFTP or use the File Manager.
➡️ Via FTP/SFTP
- Connect to your site via FTP/SFTP.
- Navigate to your WordPress installation directory and locate the wp-content folder.
- Look for cache-related directories, such as cache or cache-plugins, and delete their contents.
➡️ Via File Manager:
- Access your hosting control panel and open the File Manager.
- Navigate to the wp-content directory and locate cache directories.
- Delete the files within these directories.
By following these steps, you can effectively clear caches without relying on plugins, ensuring your WordPress site runs smoothly and reflects the latest changes.
Use plugin to clear cache in WordPress
However, using a caching plugin is one of the easiest and most effective ways to manage and clear cache in WordPress. These plugins offer user-friendly interfaces to clear cache, automate caching processes, and provide additional performance optimizations.
Here are a couple of popular WordPress cache management plugins that help you clear cache in WordPress websites.
- WP Rocket
- W3 Total Cache
- WP Super Cache
If you’re using any of those caching plugins, each of the plugins has its own settings and controls to clear your website caches.
Here’s how to use plugins to clear cache in WordPress:
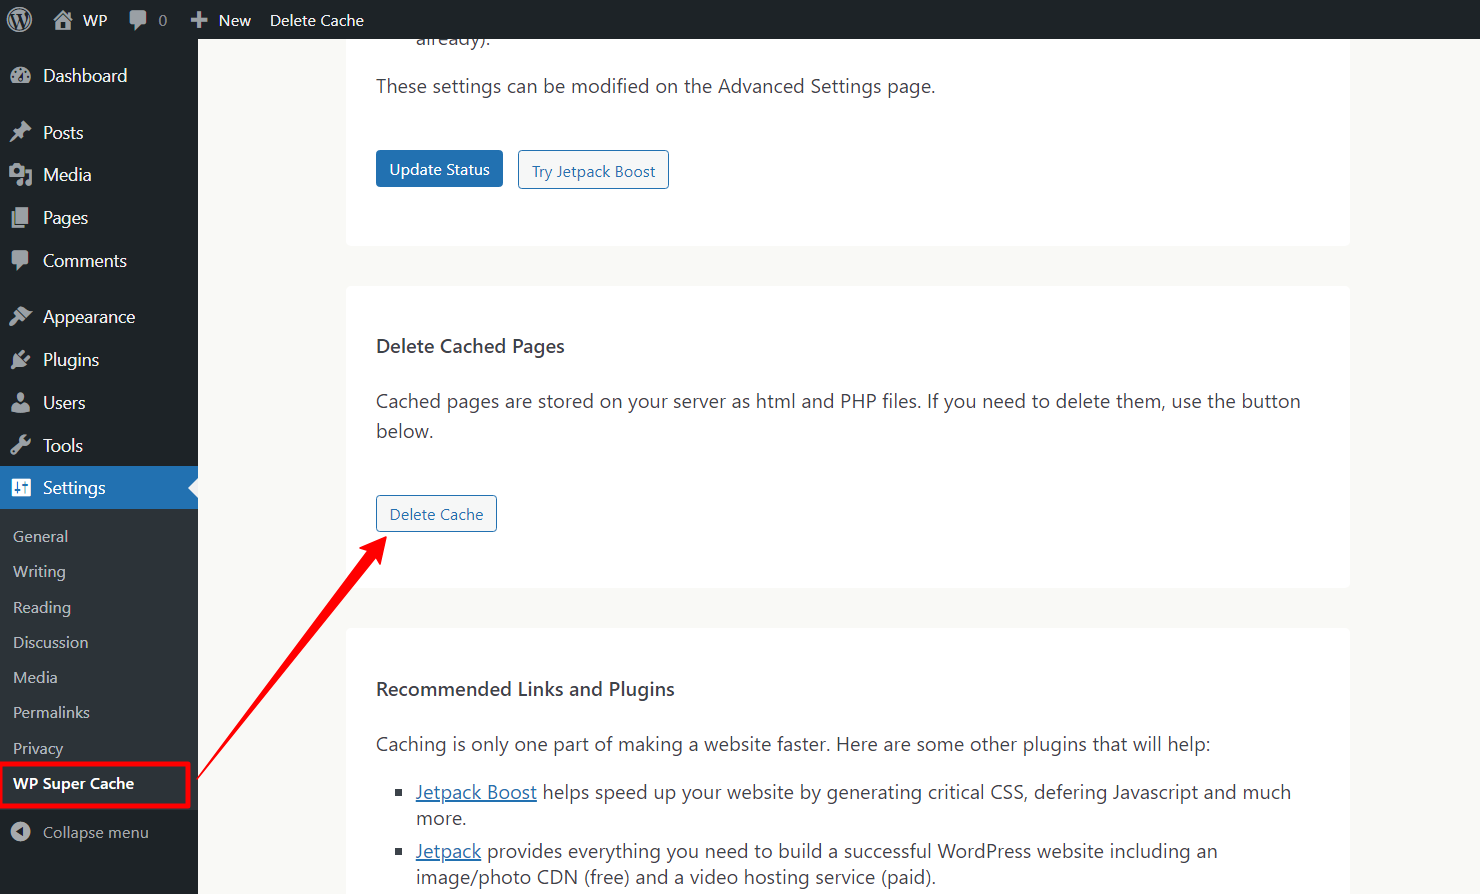
▶️ WP Super Cache:
- Go to Settings > WP Super Cache in your WordPress dashboard.
- Click the Delete Cache button to clear the cached files.
▶️ WP Rocket:
- Go to Settings > WP Rocket.
- Click on the Clear Cache button found in the dashboard section.
▶️ W3 Total Cache:
- Navigate to Performance > Dashboard.
- Click the Empty All Caches button to clear the entire cache.
Using a caching plugin not only simplifies the process of clearing the cache but also provides additional features to enhance your site’s performance. With just a few clicks, you can ensure that your visitors are seeing the latest version of your website and that your site runs smoothly.
Clear website cache from the web browser
This is a step from the user’s end. Clearing the cache from the user’s browser can simplify the process to a great extent. Clearing the cache in your web browser ensures that you’re viewing the most recent version of your website.
However different web browsers have different settings to clear the website cache. Here are three of the most popular browsers and the process of clearing the cache.
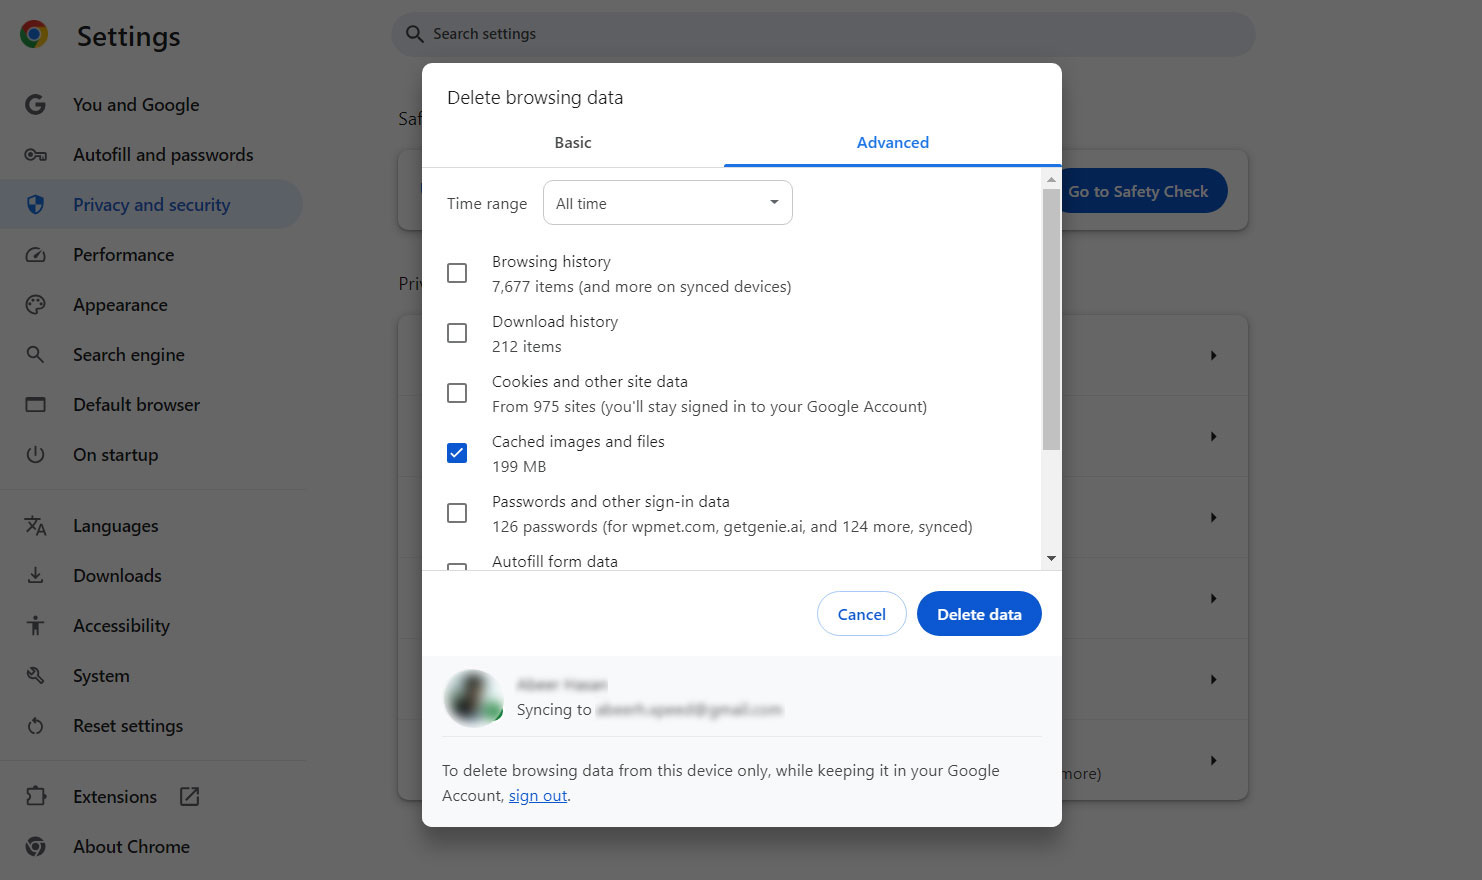
▶️ Google Chrome:
- Open Chrome and click on the three vertical dots in the top-right corner.
- Go to History> Delete browsing data.
- Choose a time range, such as All time to clear everything.
- Check Cached images and files and optionally Cookies and other site data.
- Click Delete data.
▶️ Mozilla Firefox:
- Click the three horizontal lines in the top-right corner and select Settings.
- Navigate to Privacy & Security.
- In the Cookies and Site Data section, click Clear Data.
- Check Cached Web Content and click Clear.
▶️ Safari:
- Open Safari and go to Preferences from the Safari menu.
- Go to the Privacy tab and click Manage Website Data.
- Click Remove All to clear all cached data and confirm.
Clearing your browser cache can resolve many issues related to viewing outdated or incorrect versions of your site. It’s a simple yet effective way to ensure you’re seeing the most current content and to troubleshoot problems related to site updates.
Wrapping Up
By regularly clearing the cache, whether manually, through plugins, or by guiding your users on clearing their browser cache; you ensure that your visitors always see the most up-to-date version of your site, free from outdated data and potential errors.
As you make updates and enhancements to your site, remember that a clean cache is key to reflecting these changes promptly and maintaining a responsive, efficient website. Keep these steps handy to manage your cache effectively and keep your WordPress site performing at its best.
Although cache helps your website load faster, you can use plugins that help to improve your site’s performance such as GutenKit.
GutenKit is a page builder plugin for Gutenberg that is well-optimized and clean-coded coded, also helps you build your entire website with unlimited creative freedom in customization.

Leave a Reply