Ensuring your WooCommerce emails land in your customers’ inboxes and display correctly is crucial. This is why sending WooCommerce test email notifications is crucial. They help you to preview the content and functionality of your email notifications before they reach your actual customers.
But, how to test WooCommerce emails and how do you conduct WooCommerce email delivery tests?
This guide will walk you through the process of sending WooCommerce test emails using EmailKit, a popular email marketing plugin. We’ll also cover some additional tips for effective testing.
Why Test Email Matters
When managing a WooCommerce store, it’s essential to ensure your receipts and order update emails look professional, contain accurate information, and are delivered promptly and reliably.
Customizing the wording and appearance of these emails to align with your brand enhances the user experience for your customers.
Here are some benefits of testing emails in WooCommerce:
- Identify formatting issues: Catch any display problems with images, text layout, or responsiveness before customers see them.
- Verify content accuracy: Ensure order details, product information, and other crucial content are displayed correctly.
- Test functionality: Confirm links, buttons, and other interactive elements function as intended.
- Test email deliverability: See if your emails reach your inbox or get flagged as spam.
By addressing these aspects beforehand, you can guarantee a smooth customer experience with your WooCommerce emails.
How to Perform WooCommerce Test Email with EmailKit
This section will guide you through using EmailKit’s handy test email feature to ensure your WooCommerce emails are polished and ready to impress. EmailKit is a WooCommerce email test plugin. It was designed to customize transactional emails sent through WooCommerce stores.
EmailKit allows users to design and build email templates that match brand identity for various WooCommerce events, such as order confirmation, abandoned cart reminders, and shipping notifications.
Let’s take a look at some prominent features of EmailKit:
💥 Simple drag-and-drop interface to create professionally designed custom email templates in minutes.
💥 Fully customizable pre-made WooCommerce test email templates.
💥 WooCommerce email templates are available on different devices (tablet, desktop, mobile).
💥 Provides a wide range of template-centered shortcodes to automate and customize your email messaging.
This blog covers everything from setting up the test to reviewing the final output, guaranteeing a smooth email experience for you and your customers.
Prerequisites
To send you WooCommerce test emails, you will need 2 plugins: WooCommerce and EmailKit.
Navigate to your WordPress dashboard and look for WooCommerce. If not yet installed, go to Plugins and select Add New Plugin. Then search for WooCommerce and install it.
Follow the same steps to install EmailKit, your WooCommerce test email tool.
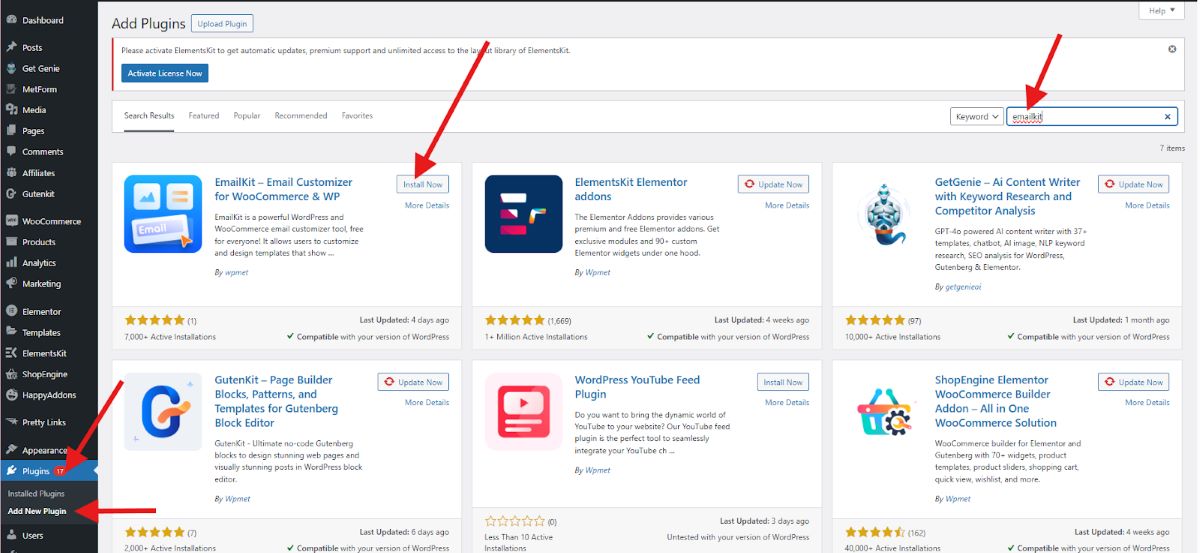
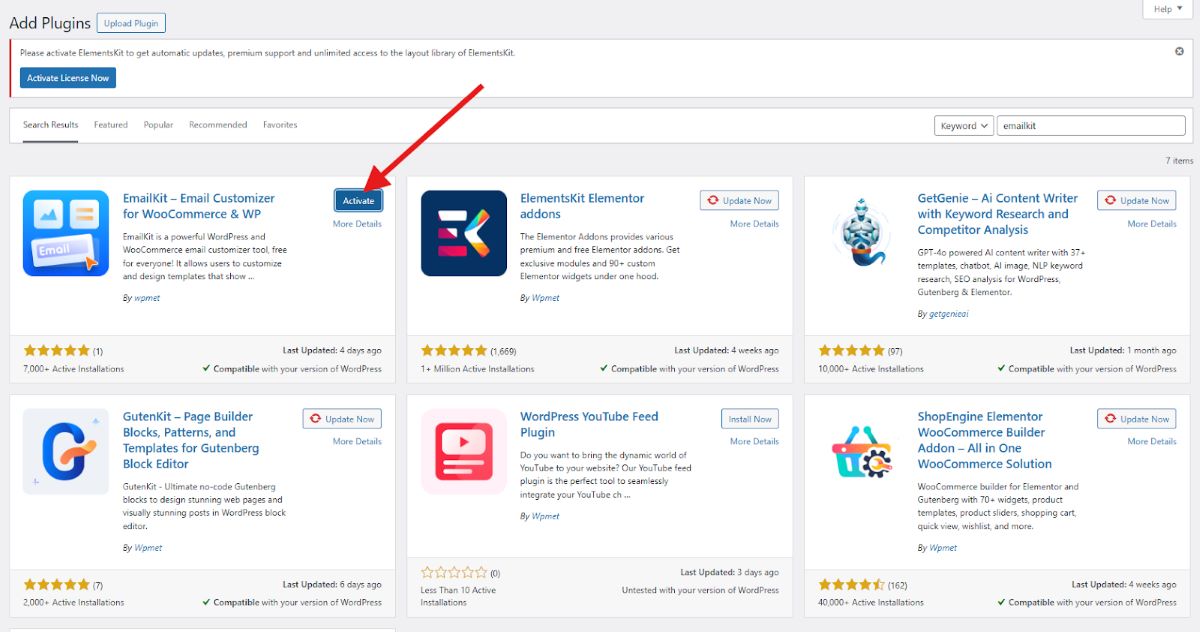
Make sure that you not only install WooCommerce and EmailKit but also activate them.
After you install and activate the two plugins, they will become visible in your WordPress dashboard.
Using EmailKit’s Test Email Feature
EmailKit’s Test Email feature allows you to send a test version of your email campaign to a specific recipient’s inbox before sending it out to a large list. This helps to ensure that your email looks and functions as intended before it reaches your entire audience.
So, let’s get started on how EmailKit test email works!
Navigate to your WordPress dashboard and look for EmailKit. You will notice that at the top left corner, there’s a button “Add New Email”.
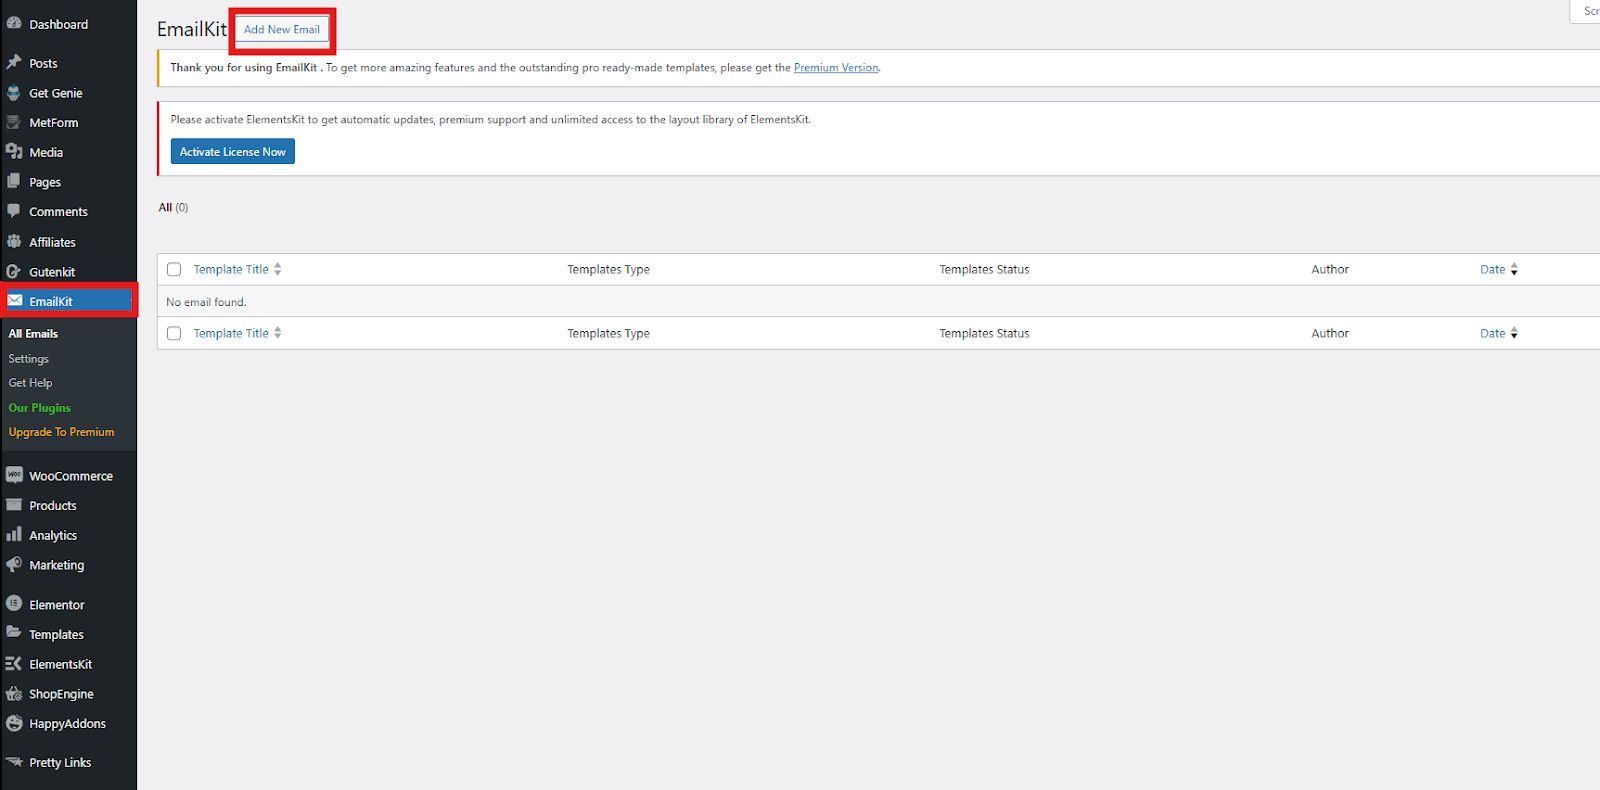
Click on that button to create a new email. A small window will pop up for you to complete. If you have an existing template, you can make use of that.
➡️ Enter template name
➡️ Select email type
Under the email type, you can choose from WordPress Email, WooCommerce Email, or Saved Templates.
➡️ Select template
Depending on the selected email type, you will have the option to choose your template:
- WordPress Email – New Register and Rest Account
- WooCommerce Email – New Order, Cancelled Order, Failed Order, Order On Hold, etc.
- Saved Templates – These are your personalized templates.
For the sake of this tutorial, we’ll select WordPress email type and a new register template. To build your email template from scratch, select the blank template and click on Edit with EmailKit.
To get an idea of how you can present your email template, visit the demo template.
Then, you will be directed to your editor screen where you can customize your own template.
➡️ Drag and drop the Heading block.
➡️ Customize it by playing with the typography, spacing, appearance, and border style.
➡️ Drag and drop the Text block to enter the text of your email.
➡️ Customize it by playing with the typography, spacing, appearance, border style, and dimensions.
➡️ Preview your email template to see its final appearance. You can also select from Mobile or Desktop viewing. If you want to activate your customized template, toggle the Active button.
➡️ Once you are satisfied with your email template, Save it.
Now, it’s time to test WooCommerce test email sending. To do that, kindly follow these steps:
➡️ In your editor screen, look for the arrow icon located at the top left corner and click it.
➡️ A popup will appear where you need to enter the email ID for the test email. Input the email ID and click the Send Email button.
➡️ A notification will appear in the top right corner of the page if the email is successfully sent to the recipient.
Within a few minutes, you should receive the test email at the address you provided. Review the content, formatting, and functionality to ensure everything looks and works as intended. You can always go back to your saved template for any WooCommerce email troubleshooting and adjustment.
And that’s it! You have a simple and straightforward process how to send test email from WordPress.

Additional Tips for Effective Testing
Here are some additional tips you should consider for effective testing WooCommerce transactional emails:
- Test across different devices: Send test emails to your inbox on a desktop, phone, and tablet to ensure responsiveness.
- Use a clean email address: Avoid using an address associated with your website to prevent potential conflicts.
- Consider spam filters: Check if your test email lands in your spam folder. This might indicate deliverability issues.
- Test multiple email templates: Don’t just limit yourself to one type of email. Test all the crucial WooCommerce email notifications you use.
Wrapping Up
Sending test emails with EmailKit is a straightforward process that safeguards the quality of your WooCommerce customer communication. By following these quick steps and additional tips, you can ensure your email notifications are delivered flawlessly and provide a positive experience for your customers.
Why use EmailKit for WooCommerce email configuration test? Though WooCommerce has built-in features to preview emails, its WooCommerce email preview only shows a static version of the email. While EmailKit’s test email feature actually:
- Send a complete email to your chosen recipient’s inbox, allowing you to see how it renders in a real email client.
- You can test if links work properly, buttons are clickable, and any personalized elements in the sent email.
- You can make changes to your email design and resend the test email immediately to see the updated version.
- You can send the test email to a specific address, like your own or a colleague’s, for targeted feedback.
We hope that this WooCommerce email testing guide is helpful to your WooCommerce business!

Leave a Reply